1
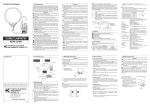
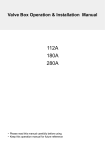
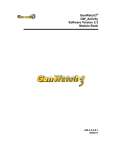
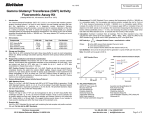
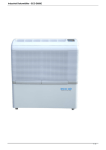
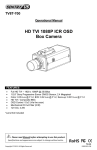
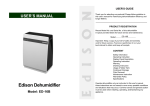
Model No. SensoAirDry User Manual Thank you for selecting our high-quality dehumidifier. Please read this manual carefully before using the appliance. If you have any questions, please contact the customer service for help. Keep this manual in a safe place for future reference. 12 List of contents Important Safety Instructions……………………………………………………………………………………….3 Parts and Features ………….…………………………………………………………………………………………...5 Control Panel ..…………………………………………………………………………………………………………….6 Operation …………………………………………………………………………………………………………………….7 Water drainage ……………………………………………………………………………………………………………10 Maintenance .………………………………………………………………………………………………………………12 Trouble shooting ……..………………………………………………………………………………………………….14 IMPORTANT SAFETY INSTRUCTIONS Read all instructions carefully before using the appliance. 1. Put the dehumidifier on a sturdy, level floor to reduce vibrations and noise. 2. Never immerse the device in water or other liquids. Do not pour water or other liquids onto the appliance or into the air intake/outlet. 3. To avoid accidents, the device shall not be operated if the power cord or other parts are damaged as this may lead to malfunctions. In these cases the appliance must be sent back to the retailer or place of purchase. 4. This appliance is not intended for use by persons (including children) with reduced physical, sensory or mental capabilities, or lack of experience and knowledge, unless they have been given supervision or instruction concerning the use of the appliance by a person responsible for their safety. Children should be supervised to prevent harmful manipulations to the device. 5. Always unplug the appliance when it is not in use, or before relocating or cleaning it. Do not 6. Operate the appliance only at the specified voltage. 7. This dehumidifier is only intended for indoor use. Do not use it for other purposes. 8. Do not put heavy objects on the appliance. 9. Always empty the water tank before relocating, transporting or storing the appliance. 10. Do not tip the appliance to any side as spilt water might damage the device. 11. Never insert fingers or other objects into the openings of the appliance to avoid any danger of electric shock, overheating or fire. 13 WARNING Do not attempt to repair, dismantle or modify this appliance as it may lead to damage to the device. Even replacing the power cord should be done by qualified technical staff. PARTS AND TECHNICAL FEATURES Features When initializing the appliance for first use, the device will automatically start dehumidifying in low fan speed and default humidity set at 70% RH. The control panel display indicates the ambient humidity and the appliance determines the operating mode according to the humidity in the room. Key Parts and Components 1. 2. 3. 4. 5. Control Panel LED Display Air outlet Front Panel Swivel Castors 6. Handle 7. Air Filter 8. Water drainage nozzle 9. Power Cord 10. Water Tank 14 CONTROL PANEL 1. TIMER 2. FAN SPEED 3. NEGATIVE INONISING 4. SETTINGS Button 5. OPERATING MODE 6. POWER 7. LOW FAN Indicator (LOWER) 11. POWER Indicator 8. HIGH FAN Indicator (HIGH) 12. Dehumidification Indicator (D. H.) 9. TIMER Indicator 13. Negative IONIZATION Indicator (ION.) 10. WATER FULL Control Indicator (W. F.) 15 OPERATING At first start-up: After turning on the appliance you will hear a short acoustic BEEP sound. The appliance is not yet running and the POWER indicator will flash. Operating the appliance: Press the POWER button to enter automatic dehumidification mode. When the appliance is running for the first time the standard mode is low fan speed and default humidity set at RH70%. Next you can select the desired ambient humidity level. Press SETTINGS button to select humidity as follows (inital humidity set at RH70%): From 70% decreasing → 65% → 60% → 55% ...→ 40% → “- -”” (forced dehumidification) → RH80% → RH75% → RH70% (RH=relative humidity). After having set the humidity level, the LED display will flash for five seconds, then it will indicate the actual ambient humidity. The appliance will start running when the selected ambient humidity is 5% lower than the actual humidity in the room. As long as the selected ambient humidity stays 5% or more above the actual humidity in the room, the appliance will be idle. FAN SPEED Press the FAN SPEED button to choose between high fan speed (noisy) or lower fan speed while the appliance is running in dehumidification mode. When lower fan speed is selected, the LOW FAN Indicator (LOWER) will flash in green colour, when high fan speed is selected, the HIGH FAN Indicator (HIGH) will flash in orange colour. 16 OPERATING MODE Button Press the MODE button to select the operating mode and choose the fan speed and the dehumidification level. The fan speed indicator LOW FAN will flash green and the indicator for dehumidification will flash while setting the humidity level. During the setting process the appliance will run in low fan speed only and the fan speed can not be adjusted. NEGATIVE ION MODE The process of inonisation of the ambient air is started by pressing the IONISATION button and stops when the button is pressed again. When the button is pushed the ION indicator light will flash and the indicator light goes off when the button is pushed again to stop the ionisation process. TIMER MODE When the appliance is running, press the TIMER button to set a switch-off time. Press the SETTINGS button to set a running time until automatic switch-off in hourly steps from 24h – 23h –22h … – 1h. The time indication flickers for five seconds while setting the timer and stops when no further settings are entered. Then the display will show the ambient humidity in the room. When the appliance runs in TIMER mode and you want to check the remaining running time press the TIMER button and the display will show the remaining time before automatic switch-off. The time will be indicated by flashing for five seconds, then the display will revert to ambient humidity. While the remaining time is flashing on the display you can press the TIMER button to cancel or deactivate automatic switch-off mode. When the appliance is powered off, you can press the TIMER button to set a wake-up time for the appliance to be automatically switched-on. The procedure is the same as for setting a switch-off time. The „Time-to-start“ is shown on the display flashing for five seconds and if no further input occurs, the display will resume showing the ambient humidity in the room. While the remaining time is flashing on the display you can press the TIMER button to cancel or deactivate automatic switch-on mode. 17 Control Indicator „Water full“ (W. F.) When the maximum filling level of the water tank is reached, the appliance is automatically shut off, the WATER FULL (W. F.) control indicator is flashing and an acoustic alarm is sounded for five seconds. Empty the water tank following instructions below. When the water tank is reinserted, the appliance resumes its interrupted operation. Memory function in the case of power outage When the SETTINGS button is pressed, the operating parameters are automatically stored. When the power is restored after a sudden power outage, the operation of the appliance is automatically resumed with the settings last stored. The compressor will be reactivated with a delay of three minutes. Switching off the appliance: By pressing the POWER button the appliance is immediately switched off, independent of any selected operating mode. Operating parameters are stored in memory. 18 CAUTION! 1. When the power is restored after a power outage, please wait with resuming dehumidification operation for at least three minutes to avoid any damage to the compressor unit. 2. Always put the appliance on a sturdy and level floor and ensure adequate ventilation. Leave at least 30cm of free space around the appliance (if no drainage hose is connected). 3. During defrosting the dehumidification indicator will flash and the compressor will be idle. WATER DRAINAGE Water tank The control indicator W. F. (WATER FULL) starts flashing, when the water tank has reached its maximum filling level. An audible alarm signal sounds simultaneously. 1. Remove the water tank from the appliance and empty the tank. 2. Reinsert the empty water tank by sliding it back into place. BEWARE: Always empty the water tank before you move the appliance to another place or before it is put away for storage! How to remove the water tank from the appliance 1. With one hand take hold of the grip recess at the side of the tank and pull it forward, with the other hand press down the retaining tab in the center top of the water tank until the tank pulls free from the appliance. Then carefully slide the water tank straight out and empty it. 2. Slide the water tank back into its place until the retaining tab snaps into locking position. 19 Continuous Drainage 1. Remove the water tank from the appliance. 2. Attach a PVC hose (Ø 12mm, 300mm recommended length) unto the water drainage nozzle and guide the other end of the hose to a discharge on the floor or to a water collection tank. Remark: The PVC hose is not included in the scope of delivery. CAUTION! 1. Never block the drainage nozzle or the PVC hose, otherwise damage to the product may result. 2. Never bend the PVC hose and ensure it is placed below the drainage nozzle (danger of water back-up and possible overflow). (Alternatively the pre-punched drainage hose cover on the water tank can be pried out using a suitable tool such as flat pliers and the water tank can then be reattached to the appliance.) 20 MAINTENANCE WARNING: TO AVOID ELECTRIC SHOCKS TURN OFF THE APPLIANCE AND UNPLUG THE POWER CORD BEFORE ANY REPAIR OR MAINTENANCE. Cleaning Unplug the power cord before each cleaning. Clean the appliance with soft damp cloth. Do not use chemical solvents (such as benzene, alcohol or cleaning petrol) as they may damage the surface or deform the casing as a whole. Do not spray water on the appliance. Air filter The appliance is equipped with a washable air filter. Slide out the air filter sideways from the back of the appliance. Clean the air filter every two weeks if the dehumidifier is used regularly. If the air filter is clogged with dust the performance will be reduced. Wash the air filter with a neutral detergent by emerging it in warm water (max. 40°C), rinse it and then let it dry properly. Do not expose the filter to direct sunlight or other heat sources (i.e.radiator). Reinsert the air filter after cleaning. Storing the appliance If the dehumidifier is not in use for a longer period of time: 1. Empty the water tank and ensure that no more water is being collected. 2. Disconnect the power plug from the socket and wind up the power cord. 3. Remove and clean the air filter, let it dry properly and reinsert it. 4. Store the dehumidifier in a cool dry location away from direct sunlight, high temperatures and high dust formation. 21 TROUBLE SHOOTING Before you contact the dealer for claim Please go through the following checklist before calling after-sales service. You might save time and money. The table below adresses the most frequently encountered problems not caused by defects in material or production. Problem Possible Cause Not connected to power supply The appliance does not run Solution Plug into working power outlet and press POWER button Indicator WATER FULL (W. F.) flashes Empty water tank and reset settings TIMER activated Deactivate TIMER Is the air filter clogged? Clean air filter as instructed Foreign object snagged in air filter inlet or outlet? Remove foreign object from air filter inlet or outlet Dehumidification performance Is the room too big or not closed? too low Adjust performance settings or close the room Water leaking from the appliance The appliance is noisy Is the appliance standing on an even Place the appliance on a firm and surface? even surface Is the water outlet nozzle clogged? Remove object from nozzle Is the appliance unsteady or wobbly? Place appliance on even and firm surface (less vibrations) Is the air filter clogged? 22 Clean air filter as instructed