1
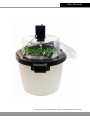
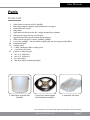
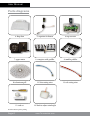
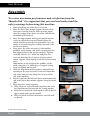
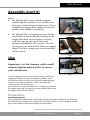
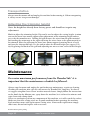
User Manual
Version 1.0 09/2012
©2012. All rights reserved. ThunderVak™ Registered Trademark of 105766 Canada Inc.
User Manual
©2012. All rights reserved. ThunderVak™ Registered Trademark of 105766 Canada Inc.
www.ThunderVak.com
page 3
User Manual
Table of contents
Parts.......................................................................................................................... Page 5-6
Parts list.....................................................................................................
Page 5
Parts diagrams..........................................................................................
Page 6
Page 7
Safety warnings.................................................................................................
Page 7
Electrical requirements...............................................................................
Assembly............................................................................................................... Page 8-9
Use............................................................................................................................. Page 9-10
Page 9
Preparation...............................................................................................
Transportation.......................................................................................... Page 10
Adjusting the trimming height............................................................... Page 10
Maintenance........................................................................................................ Page 10
Warranty................................................................................................................ Page 11
US and Canadian patents pending.
Page 4
www.ThunderVak.com
User Manual
Parts
Parts List
1. white lower reservoir with 2 handles
2. lower base motor support with aluminum crosspiece
3. removable side chute
4. drop door
5. capacitor and rheostat for the cutting motor (base motor)
6. transparent top reservoir with feeder
7. upper motor with speed control (head motor)
8. white metal crosspiece with 4 tumbler paddles
9. 2 sets of 4 paddles - one in rubber (rigid) and one in neoprene (flexible)
10. aluminium grill
11. cutting wires;
▶▶ 8 blue (80 mm) nylon cutting wires
▶▶ 8 red ones (65 mm)
12. a tool set consisting of;
▶▶ one 1/8” Allen key
▶▶ one 3/8” Allen key
▶▶ hex nut driver
▶▶ block to adjust trimming height
1. white lower reservoir with
2 handles
2. lower base motor support
with aluminum crosspiece
3. removable side chute
©2012. All rights reserved. ThunderVak™ Registered Trademark of 105766 Canada Inc.
www.ThunderVak.com
page 5
User Manual
Parts diagrams
4. drop door
5. capacitor & rheostat
6. top reservoir
7. upper motor
8. crosspiece with paddles
9. tumbler paddles
10. aluminum grill
11. blue cutting wires
11. red cutting wires
12. tool set
12. block to adjust trim height
US and Canadian patents pending.
Page 6
www.ThunderVak.com
User Manual
Safety warnings
Warning
This is a high-speed power tool and should be taken
seriously. Careless or improper use may cause
serious or even fatal injury.
IMPORTANT
• • • • • • • • • Make sure to inspect the machine before each use.
Always wear safety glasses, gloves, ear plugs and proper protective clothing.
Do not apply pressure to the grill.
Do not use any instruments or tools above the machine.
Keep work area clean and clear of debris.
Always disconnect the power before servicing the machine.
Never move, tilt or rotate machine while in use.
Never allow the machine to run unattended.
Minors should never be allowed to operate this machine.
This machine is to be used with all existing laws and regulations. The manufacturer and
distributor does not accept any liability or responsibility for misuse of the product or for
damages caused to or by the ThunderVak™, resulting from improper use or assembly. Read
the entire user’s manual prior to operating the ThunderVak™. Read all warnings before
operating.
Electrical Requirements
Wiring requirements: 110V 15amps
The ThunderVak™is equipped with a power supply cord
having a grounded 3 prong plug. To minimize possible
shock hazard, the cord must be plugged into a mating,
grounded 3 prong outlet, grounded in accordance with all
local codes and ordinances.
Electrical
Shock
Hazard
©2012. All rights reserved. ThunderVak™ Registered Trademark of 105766 Canada Inc.
www.ThunderVak.com
page 7
User Manual
Assembly
To receive maximum performance and satisfaction from the
ThunderVak™ it is important that you read and understand the
safety warnings before using this machine.
1. Take everything out of the lower reservoir.
2. Place the lower base motor support into the white
reservoir, ensuring that the chute opening aligns
with the cutouts in the lower reservoir and that the
aluminum grill sits level.
3. Place the upper motor with speed control into the
cavity on top of the reservoir. Hand tighten the
motor into place with the nuts provided. Once the
motor in secured into place, tighten the bolts with
the hex nut driver.
4. Next, place the white crosspiece (with tumbler
paddles) on the motor cam shaft, ensuring that the
bolt aligns with the slot on the camshaft. Tighten
carefully with the 1/8” Allen key and place the
reservoir back into the 5 slots on the lower base
motor support. Turn slightly to the left to lock it into
place.
Adjustments to the height of the paddles can be
made using the 1/8” Allen key, we suggest letting
them rest lightly on the grill.
5. Slide the drop door into the grooves alongside the
opening on the top reservoir. Secure the removable
side chute into place by using the rivets on either
side of the opening.
6. Put the capacitor and rheostat (base motor) onto the
side of the lower base motor support using the metal
slide.
7. Plug the power cords together;
▶▶ Plug the green stickered cords together (this is for
the capacitor and rheostat for the cutting motor).
▶▶ Plug the red stickered cords together (this is for the
upper motor with speed control).
▶▶ Plug the black electrical cord into a 120 Volt wall
receptacle.
step 1
step 2
step 3
step 4
US and Canadian patents pending.
Page 8
www.ThunderVak.com
User Manual
Assembly (cont’d)
Notes:
▶▶ The ThunderVak™ comes with the neoprene
tumbler paddles installed. A set of rubber ones
have been included for your convenience. If you
would like to change them, simply unscrew the
paddles with a Phillips screwdriver.
▶▶ The ThunderVak™ red cutting wires are already
installed but if you would like to change them,
simply slide them out and replace, inserting
each blue wire into the spool, the metal
grommet will hold the wires in place. The red
cutting wires are 65 mm thick and are octogonal
shaped. The blue cutting wires are 80 mm thick
and are round.
step 5
step 6
Use
Important : test the trimmer with a small
amount of plant material first to ensure
your satisfaction.
Start the upper motor by putting the button to “RUN”to
engage the rubber or neoprene tumbler paddles. Turn
the rheostat to the desired speed, between 0 and 60 rpms.
Now, start the lower motor on “VAR” and adjust the
cutting speed with the rheostat.
You can also use your ThunderVak™ as a table-top trimmer
by simply removing the upper reservoir and disconnecting
the upper motor electrical cord.
step 7
Preparation
We recommend removing the stems before placing the plant material in the machine.
You do not have to remove the larger leaves for this machine, as the trimming is more
precise and efficient than other models on the market.
©2012. All rights reserved. ThunderVak™ Registered Trademark of 105766 Canada Inc.
www.ThunderVak.com
page 9
User Manual
Transportation
Always turn the motors off and unplug the machine before moving it. When transporting
it, always secure it to prevent damages.
Adjusting the trimming height
Note: the height has already been factory preset and should not require any
adjustment.
Block to adjust the trimming height. This tool is used to adjust the cutting height. 4 union
nuts on the lower base motor support allow adjustment of the trimming height and are
pre set by the manufacturer. Turning left will distance the wires from the plant material
and turning the union nuts to the right will bring the wires closer to the plant material to
be trimmed. Place the grill onto the lower base motor support (ensuring that it is level)
and start the rheostat on high. Use the tool to adjust the desired height (we suggest 5/32
in). By placing the block on the grill and adjusting one nut at a time, to the desired height.
4 union nuts
union nut
block to adjust trim height
Maintenance
To receive maximum performance from the ThunderVak™ it is
important that the maintenance schedule be followed.
Always stop the motor and unplug the unit before any maintenance, repairs or cleaning.
Cleaning the machine after each use will ensure the ThunderVak™ longevity. To clean it
we suggest using Bio Green Clean® or other natural cleaner. Simply follow the instructions
on the bottle for the dilution rate, spray down the machine, let it sit for a few minutes and
wipe clean with a damp cloth.
Never use an abrasive pad on any component of this machine, as it will scratch the surface.
Make sure that all 8 cutting wires are in good condition before operating the machine.
Each machine comes with replacement cutting wires. If one needs replacement simply
slide it out, discard and replace with a new one.
US and Canadian patents pending.
Page 10
www.ThunderVak.com
User Manual
Warranty
ThunderVak™ warranty obligations are limited to the terms set forth below: ThunderVak™
(“105766 Canada Inc.”) warrants this hardware product against defects in materials and
workmanship for a period of ONE (1) YEAR from the date of original retail purchase,
excluding all replacement rubber parts and cutting wires. If a defect exists, at its
option ThunderVak™ will (1) repair the product at no charge, using new or refurbished
replacement parts, or (2) exchange the product with a product that is new or which
has been manufactured from new or serviceable used parts and is at least functionally
equivalent to the original product. If usage of this ThunderVak™ product violates the
guidelines of this limited warranty, ThunderVak™ will repair the product and charge the
purchaser for the cost of company time, materials and shipping costs.
ThunderVak™ shall not be liable for any loss, injury or damages to persons or property
resulting from the use of this product or any failure of or defect in this product, nor shall
ThunderVak™ be liable to the initial user of this product or to any other person or entity
for any general, special, direct, indirect, incidental, consequential, exemplary, punitive, or
OTHER DAMAGES of any kind or nature whatsoever.
©2012. All rights reserved. ThunderVak™ Registered Trademark of 105766 Canada Inc.
www.ThunderVak.com
page 11
Distributed by:
105766 Canada Inc.
MegaWatt HydroCulture
636 Route 364 Morin-Heights, PQ J0R 1H0
Canada
1-800-575-2515
www.MegaWattHydro.com
US and Canadian patents pending.
©2012. All rights reserved. ThunderVak™ Registered Trademark of 105766 Canada Inc.