1
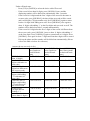
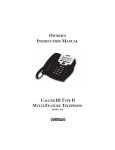
Facile Sos User Manual HT-5968SOS USER’S MANUAL AND OPERATING INSTRUCTION FEATURES: Emergency Features: 1. Activate a loud local alarm for 15 seconds to get immediate help within the house. 2. If no help arrives, the phone dials in sequential mode the emergency numbers from the phone book (Up to 30 records) 3. Play a pre-recorded or user recorded emergency message 4. If the other party receives the call and presses 0 key, a 3 minute speakerphone conversation will be activated. 5. After 3 minutes the phone will dial the next emergency number from the phone book unless the receiving party presses digits 1 and 2 to continue the conversation and deactivate the emergency feature. 6. Remote Control Function: Receive Caller ID and set up emergency call Caller ID Feature: - FSK/DTMF Emergency Talking Caller ID Speakerphone Caller ID:11 Languages Selectable: English / French / Italian / German / Spanish / Portuguese / Dutch / Polish / Swedish / Danish / Finnish Selectable Voice Reporting: English / French / Italian Selectable Up to 60 Message Memories 14 Digits of Telephone Number and 16 Digits of Name Display Built-in Phonebook Up to 30 Memories New Incoming Call Indicator Real Time Clock Display 2 One-Touch Dialing Memories 5 Levels of LCD Contrast Adjustment Flash Time 100/300/600MS Selectable Tone / Pulse Switchable Low Battery Indicator Ringer Volume Control Handset Volume Control Speakerphone Volume Control INSTALLATION - Plug one end of coiled cord to the jack of handset and the other end to the jack of the base set. - Plug one end of flat cord to line jack of the phone and the other end to the wall jack - Open the battery compartment cover, install 4pcs AA batteries or - Connect the 9V adapter to the DC jack of the unit Note: 1. Adapter and batteries are not included for the unit 2. When inserting or replacing batteries, pick up the handset first, then replace the batteries, otherwise, all settings and memory will be lost. HANGING THE PHONE ON THE WALL Drill two holes vertically one above the other, 83mm apart, and leave the screws protruding from the wall by 5mm. 1. Press and lift out the handset holder. Rotate 180o and snap it into place so it will hold the handset in place when the phone is mounted on the wall. 2. Insert the mounting bracket‟s two tabs into the matching slots opposite the keyhole slot on the underside phone‟s base. Then press down and slide the bracket upward until the tab snap into place. 3. Plug one end of the telephone line cord into the TEL LINE jack at the back of the base. 4. Plug the cord‟s other end into the wall plate jack, then align the base‟s keyhole slots with the screws and slide the phone downward to secure it. DESCRIPTION OF DISPLAY A. 3 line LCD displaying, upper line displays the basic information, middle line displays the number of in-coming call and bottom line displays the name of caller “NEW” appears when there are new incoming calls “CALL #” means the total amount of incoming calls “REPEAT” means the repeat of the incoming call “VOICE” means voice reporting indicator “SOS” means emergency calls indicator “XX:XX AM/PM XX/XX” means Hour:Minute Morning/Afternoon Month/Date respectively B. If the time and date of incoming call is different from the Telephone Company, the telephone will adjust the time and date automatically according to Telecom Provider when receiving calls. C. If there is no operation or no incoming calls more than 20 seconds, LCD only displays time and date, total amount of received calls and amount of new incoming calls D. This telephone can store up to 60 incoming calls. If there is a new call after the 60th call, the oldest one will be erased automatically and the new call will be stored. SETTING UP Under on-hook state, press [MENU] to enter the setting menu, use [UP] or [DOWN] to select from the menu including LCD Contrast, Time/Date Setting, LCD Language, Voice Setting, Set Flash Time, Set Dial Mode, Phonebook setting and Pair new Pendant. Press [DEL] or [CID/ESC] to exit setting manual. A. LCD CONTRAST - When the LCD displays “LCD CONTRAST”, press [OK/DIAL] to enter - Press [UP] or [DOWN] to select the desired contrast level from 1 to 5 - Press [OK/DIAL] to confirm B. SET TIME/DATE - When the LCD displays “ENTER TIME/DATE”, press [OK/DIAL] to enter - When the LCD displays “ENTER TIME”, then press [UP] or [DOWN] to set the present hour - Press [OK/DIAL] to confirm the hour - Use the same method to set minute. - When the LCD displays “ENTER DATE”, then press [UP] or [DOWN] to set the month - Use the same method to set date C. LCD LANGUAGE - When the LCD displays “LCD LANGUAGE”, press [OK/DIAL] to enter - Use [UP] or [DOWN] to select the desired LCD language (ENGLISH, FRANCAIS (French), ITALIAN (Italian), DEUTSCH (Germany), ESPANOL (Spanish), PORLUGUES (Portuguese), NEDERLANDS (Dutch), POLSKI (Polish), SVENSKA (Swedish), DANISH (Danish) and FINNISH (Finnish) - Press [OK/DIAL] to confirm D. SET VOICE - When the LCD displays “VOICE”, press [OK/DIAL] to enter - Use [UP] or [DOWN] to select the desired Language of Voice (VOICE ENGLISH, VOICE FRENCH, VOICE GERMAN, VOICE ITALY) - If you want to disable the voice reporting, then select “VOICE NO” - Press [OK/DIAL] to confirm E. SET FLASH TIME - When the LCD displays “SET FLASH TIME”, press [OK/DIAL] to enter - Press [UP] or [DOWN] to select flash time among 100MS, 300MS or 600MS - Press [OK/DIAL] to confirm F. SET DIAL MODE - When the LCD displays “SET DIAL MODE”, press [OK/DIAL] to enter - Press [UP] or [DOWN] to select “TONE” for tone dialing or “Pulse” for pulse dialing. - Press [OK/DIAL] to confirm G. SET LOCAL AREA CODE - When the LCD displays “LOCAL AREA CODE”, press [OK/DIAL] to enter - Press [UP] or [DOWN] to select the first digit - Press [OK/DIAL] to confirm the first digit. - Use the same method to select the rest of digits. H. PHONE BOOK ENTRY WITHOUT EMERGENCY NUMBER SETTING - When the LCD displays “STORE NUMBER”, press [OK/DIAL] to enter and flashing prompt will show in the middle display - Press keypad to input the numbers - Press [OK/DIAL] to confirm, a flashing prompt will show in the bottom display line - Press keypads to enter the name (at most 16 letters) (For example: enter [C], just continuously press [2] key three times) - Press [DEL] for the wrong input - Press [OK/DIAL] to confirm the input name, “EMERGENCY OFF” will then be shown - Press [OK/DIAL] to confirm, “SAVE!” will then be shown and the phone will announce “Name recording for phone book” - Press [DEL] if you don‟t want to record a voice tag, or: - Press [OK/DIAL] firmly till hear a beep tone - Record a “NAME TAG” for the entered number after the beep tone (You should keep your finger press [OK/DIAL] though out the voice tag recording process) - Release the [OK/DIAL] till the name tag recording is done with the phone announced “STROE” and “STORE NUMBER” shown on the display - Press [DEL] to return to clock showing display. Note: You may store up to 30 emergency records, „MEMORY FULL‟ will be shown on LCD if the records are full. I. PHONE BOOK ENTRY WITH EMERGENCY NUMBER SETTING - When “STORE NUMBER” displays on the LCD, press [OK/DIAL] and a flashing prompt will show in the middle display - Press keypad to input the numbers - Press [OK/DIAL] to confirm - Enter the name by using keypad (at most 16 letters) (For example: enter [C], just continuously press [2] key three times) - Use [DEL] to correct during entering the name - Press [OK/DIAL] to confirm the input of the name, “EMERGENCY OFF” then will be shown - Press [UP] and the display will show “EMERGENCY ON” - Press [OK] and the phone will display “XX LOCATION” - Press [UP] and [DOWN] to edit the position of the entered number in the emergency list and press [OK/DIAL] to confirm (If a number is already set for the decided location, “XX overwrite” will display), “SAVED!” will - - then be shown and the phone will announce “name recording for phone book” Press [DEL] if you don‟t want to record a voice tag; or Press [OK/DIAL] firmly till hear a beep tone Record a “Name tag” for the entered number after the beep tone (You should keep your finger pressing [OK/DIAL] during the voice tag recording process) Release the [OK/DIAL] till the name tag recording is done with the phone announced “STORED” and “STORE NUMBER” will be shown on display. Press [DEL] to exit the setting. J. COPY FROM THE CALLER ID TO THE PHONE BOOK You can copy Caller ID information to the phone book while you are reviewing the Caller ID information. - Select the required Caller ID memory location by scrolling [UP] or [DOWN] buttons - Press and hold [MENU] button for 2 seconds, the LCD will show “COPY TO MEMORY?” - Press [OK/DIAL] button, the LCD will show “SAVE” K. REMOTE SETTING - When “PAIR NEW PENDANT” is shown on the LCD, press [OK/DAIL] till “PAIRING…..” flashing shown on display - Press the remote‟s Red button and “DONE” shown on display - Press [DEL] to exit the setting L. TONE/PULSE SELECTABLE Select the dialing mode that your telephone requires by sliding the [T-P] switch to „T‟ position for tone dialing and to „P‟ position for pulse dial. Note: Under the pulse dial state, press „*‟ to change to tone dial. M. RINGER HI/MI/LO SELECTABLE - Slide the [RINGER] switch to „Hi‟ position for high ringer volume, „MI‟ position for medium ringer volume and „Lo‟ for low ringer volume. N. HANDSET VOLUME ADJUSTMENT - Slide the [RECEIVER] switch from the handset to adjust the handset volume. „NOR‟ position for normal handset volume, „HI‟ position for high handset volume and „VHI‟ for very high handset volume. O. SPEARKERPHONE VOLUME CONTROL (MAX TO MIN) - Slide the “SPEAKER” switch from the right side of the base unit to adjust the speakerphone volume from maximum (Max) to minimum (Min). RECEIVING CALLER ID INFORMATION Note: You must make sure your Telephone Company offer caller ID service so that the caller ID function can be activated. A. Incoming Call Display When there is an incoming call, the LCD will display the number, area code, name, time and date of the call. B. Please note the following indicator: “UNAVAILABLE” The call is made through a telephone company, which does not offer Caller ID service or does not transfer calls by long distance net “BLOCKED CALL” Some areas allow the option for callers to prevent the telephone data from being displayed on others‟ telephone. If you received such a call, “BLOCKED CALL” will be shown on LCD “Message Icon” If you apply message service to your telephone company, LCD will display Message icon of post box when there is a message left. When you read this message, the message icon will disappear. EMERGENCY CALL FUNCTION EMERGENCY MESSAGE It is important you record the personalized message with all the important information as in B. Below. A. Your unit includes a back-up pre-recorded message. “THIS IS AN EMERGENCY CALL, TO ACCEPT THIS CALL PRESS ZERO” B. Your own message that must be recorded to properly use the Emergency Help System (max. recording time is 20 seconds). The message must always end with “please immediately hang up if you cannot get me help now. To accept this call press zero”. Example: There is a medical emergency at the home of John Smith at 123 Main Street, Apt. 4D, please come @ once. Please immediately hang up if you can‟t get me help now. To accept this call press zero. TO RECORD YOUR OWN EMERGENCY MESSAGE - Press and release the [MENU] button until the “RECORD MESSAGE” is shown in the LCD display. - Press and hold the [OK/DIAL] button. Start your message directly after the “BEEP” tone and “VOICE” icon is flashing. While recording, keep at a distance of 15cm from the telephone so that you speak easily into the microphone on the upper side. - Release [OK/DIAL] button after you have finished your emergency message. The message will now be played back automatically. TO CHECK THE EMERGENCY MESSAGE You can check the emergency message at any time. - Press and release the [MENU] button until the “CHECK MESSAGE” is shown. - The press [OK/DIAL] button to play back the message. TO DELETE YOUR OWN EMERGENCY MESSAGE AND REVERT TO THE PRE-RECORDED MESSAGE If you have recorded your own message, you can delete this and by doing so revert to the pre-recording message. Note: As stated above, it is important to record a personalized message. - Press and release the MENU button until the “CHECK MESSAGE” is shown. - Then press the [OK/DIAL] button to play back the message. - During the playback, press [DEL] button. Your own message will be deleted and you will be using the pre-recorded greeting. TO ACTIVATE THE EMERGENCY HELP SYSTEM - Press and hold the [SOS] button on the telephone for 3 seconds, then the telephone local alarm will sound for 15 seconds. The telephone will then dial out the entered emergency help system numbers automatically in speakerphone mode. OR - Using the wireless pendant also can activate the Emergency Help System. Press and hold down the red button on the pendant fro more than 1 second. The pendant will flash for approximately 15 seconds, the telephone local alarm sounds for 15 seconds as well. - Within this 15 seconds, press [SOS] button or press red button on the pendant once more to turn off the Emergency Help System. - The telephone dials out the fist of the entered emergency numbers (stored in the phone book emergency location 1) in speakerphone mode, and then begins playing the emergency message. - The emergency message will be played repetitively for 1 minute until the called party can acknowledge the call by pressing 0, the telephone will be put in speakerphone operation for 3 minutes. (Note: If 0 is not pressed during the period the message is played, the next emergency number in the sequence will be dialed out automatically in speakerphone mode.) - During 3 minutes speakerphone operation, press [SPEAKER] button or red button of the pendant to terminate the conversation and the Emergency Help System will be turned off as well in the meantime - During 3 minutes speakerphone operation, if the called party press „1‟ and then press „2‟, the Emergency Help System will be turned off and the conversation will be terminated after 3 minutes automatically. (Note: When the time reaches to 2 minutes 50 seconds, you will hear a signal to indicate that 10 seconds left to 3 minutes) RECEIVING A CALL BY USING PENDANT - - When there is an incoming call, pick the handset or press [SPEAKER] to receive the call You may also use pendant to pick the call. When there is an incoming call, just press red button of the pendant and the telephone will be put in speakerphone operation. After finishing the conversation, press and hold the red button of the pendant for a few seconds to terminate the call and the telephone will be returned to onhook state. REVIEWING THE CALLER ID LIST Press [UP] or [DOWN] to review the incoming calls (at most 60 calls) ERASING DATA FROM THE CALLER ID LIST - Press [UP] or [DOWN] to select the wanted number, press [DEL] and the LCD will display “DELETE?”, then press [DEL] for 2 seconds to confirm If press [DEL] firmly until the LCD will display “DELETE ALL?”, press [DEL] again for 2 seconds and the entire Caller ID list will be erased. CALLING BACK A NUMBER FROM THE CALLER ID LIST Under on-hook state: - Press [UP] or [DOWN] to select the desired caller id record. - If the record is less than 10 digits, press [OK/DIAL] once, pick up the handset and the displaying number will be dialed out automatically - If the record is 10 digits and the first 3 digits of the record is the same as set area code, press [OK/DIAL], the three digits area code will be erased and it will display 7 digits number only. The LCD will display “PICK UP OR ADJ”. Press [OK/DIAL] again to return back to 10 digits with adding area code. Press [OK/DIAL] once again to show 11 digits with adding „1‟ as the first digits and area code as well. Pick up the phone and the number will be dialed out automatically. - If the record is 10 digits but the first 3 digits of the record is different from the set area code, press [OK/DIAL] once to show 11 digits with adding „1‟ as the first digits. Press [OK/DIAL] again to return back to 10 digits. Press [OK/DIAL] once again to show 7 digits and first three digits will be erased. Pick up the phone and the number will be dialed out automatically. Under off-hook state: - Press [UP] or [DOWN] to select the desire caller ID record. - If the record is less than 10 digits, press [OK/DIAL] once and the displaying number will be dialed out automatically after 2 seconds. - If the record is 10 digits and the first 3 digits of the record is the same as set area code, press [OK/DIAL], the three digits area code will be erased and it will display 7 digits number only. Press [OK/DIAL] again to return back to 10 digits with adding area code. Press [OK/DIAL] once again to show 11 digits with adding „1‟ as the first digits and area code as well. The number will be dialed out after 2 seconds automatically. - If the record is 10 digits but the first 3 digits of the record is different from the set area code, press [OK/DIAL] once to show 11 digits with adding „1‟ as the first digits. Press [OK/DIAL] again to return back to 10 digits. Press [OK/DIAL] once again to show 7 digits and first three digits will be erased. Pick up the phone and the number will be dialed out automatically. (Please refer to the table as below for reference) Assume the set area code is 416: Original Number Press [OK/DIAL] once (under onhook/off-hook state) 752712345 (less 75-271-2345 than 10 digits) 4165462345 (10 456-2345 digits with same set area code) 6625561234 (10 1-662-556-1234 digits but different to the set area code) 14165561234 (11 1-416-556-1234 digits with leading „1‟ with same set area code) 16625561234 (11 1-662-556-1234 digits with leading „1‟ but different to the set area code 23456789012 2-345-678-9012 (11digits but not leading „1‟) 123456789012 123456789012 (more than 11 digits) Press [OK/DIAL] twice (under onhook/off-hook state) 75-271-2345 Press [OK/DIAL] three times (under on-hook/off-hook state) 75-271-2345 416-456-2345 1-416-456-2345 662-556-1234 556-1234 1-416-556-1234 1-416-556-1234 1-662-556-1234 1-662-556-1234 2-345-678-9012 2-345-678-9012 123456789012 123456789012 PHONEBOOK SEARCH, DELETE AND DIAL BACK - Under on-hook state, press [UP] and [DOWN] to check incoming call records, press [CID/ESC] to enter phone book record. Use [UP] or [DOWN] to search the desire record or press the first letter of record name to search the desired record directly. Press [OK/DIAL] to dial back the displaying record Press [DEL] once, the LCD will display “DELETE?”. Then press [DEL] for 2 seconds to delete the showing record. If you want to delete all phonebook records, press and hold [DEL] key until the LCD display “DELETE ALL?”, then press [DEL] for 2 seconds to delete all records ONE-TOUCH MEMORY - Under on-hook or off-hook state, press [MENU] until the LCD displays “STORE NUMBER” Press [OK/DIAL] button, then enter the wanted number by using keypad Press [OK/DIAL] to confirm Press the desire location M1 or M2 Press [OK/DIAL] to confirm and the LCD will display “SAVE”. When you want to dial out a number from one-touch memory key, just press the key (M1/M2) and the record will be dialed out automatically. PRE DIALING FUNCTION - Under on-hook state, enter the wanted telephone number Lift the handset or press [SPEAKER] and the number will be dialed out automatically. Note: You may use [DEL] key to modify or erase the number during entering the wanted telephone number. LAST NUMBER REDIAL The last outgoing number can be redialed automatically just by pressing the [REDIAL/P] key under off-hook state. This is useful especially if the line is busy. FLASH FUNCTION - When in an office equipped with PABX, this telephone makes it easy to transfer calls - Ask caller to wait and press [FLASH] key once - Dial the extension number which caller intended - When the party answers, just hang up the handset - When the line is busy or nobody answers, press [FLASH] key again to re-connect with the caller IMPORTANT NOTE: To operation this unit, you must have “CALLER ID SERVICE” setup with your local telephone company. Some functions such as CALLER NAME INDICATION will only operate if such service are included in the user‟s Caller I.D. program with the local telephone company. IMPORTANT SAFETY INSTRUCTIONS When you use this telephone, follow these safety precautions to reduce the risk of fire, electric shock and injury. - Read and understand all instructions - Unplug the phone from the wall jack before cleaning with a damp cloth - Do not use liquid or aerosol cleanser. Do not use this phone near water for example, near a bath tub, sink, or pool - To reduce the risk of electric shock, do not push objects through the phone‟s slot or disassemble the phone. Pushing objects in the phone or opening or removing covers might expose you to dangerous voltages or other risk. Take it to a serviceperson when service or repair is required. Incorrect reassemble can cause electric shock when you use the telephone - Do not place the phone on a bed, rug, and any similar surface or near a heater. The phone has slots and openings for ventilation that must not be blocked or covered. - Do not place this phone on an unstable cart, stand or table. The phone might fall and be seriously damaged - Unplug the phone from the phone line jack and refer service to serviceperson under the following conditions: a) If the phone is exposed to rain or water b) If the phone fails to operate normally c) If the phone is dropped or the cabinet is damaged d) If the phone exhibits a distinct change in performance - Avoid using the phone during electrical storms. There is a risk of electric shock from lightning - Do not use the phone to report a gas leak in the vicinity of the leak - Follow all safety rules and use with caution when installing or modifying telephone lines. For example: a) Do not install telephone wire during a lightning storm b) Only install telephone jacks in dry locations unless the jack is specifically designed for wet locations c) Avoid touching uninsulated telephone wires or terminals unless the telephone line is disconnected at the network interface.