1
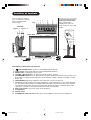
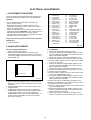
Location of controls
You can adjust the angle of
the TV-screen for 2˚ forward
or for 6˚ backward from
vertical angle.
1
2
3
4
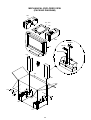
Anti-Tumble Measure
5
Securing to a wall or pillar
Using a commercially
available cord, chain, and
clamp, secure the set to a wall
or pillar.
Top
Left Side
Approx. 6˚ Approx. 2˚
screw
hook
Front Side
cord or
chain
Wall or Pillar
cord or
chain
AV3 IN
6
7
clamp
8
10
11
9
Description of Indicators and Controls
1.
2.
3.
4.
5.
6.
7.
8.
9.
10.
11.
(SUB-POWER) button: To turn the unit standby mode on and off.
INPUT-button: Select input mode for TV/AV/COMPONENT/HDMI/PC.
MENU-button: To display the menu-screen.
▲/▼ buttons : To adjust the volume. In Menu : Setting.
VOLUME
PROGRAM ▲/▼ buttons: Press ▲ to change to a higher numbered channel set into memory. Press
▼ to change to a lower numbered channel set into memory. In Menu : Setting. In Standby : Turning
on the unit.
HEADPHONES jack: Plug headphones with a mini plug (3.5 mm) into this jack.
AV3-Input: Input for analogue A/V-Signal (Composite). If your equipment has an S-video connector,
use an S-video cable instead of a standard yellow video cable (You still must connect the standard
red and white audio cables for full system connection, but do not connect a standard yellow video
cable at the same time or the picture performance will be unacceptable.)
Main Power Switch: To turn the unit on or off completely.
Loudspeakers
Remote sensor
STANDBY/ON mode indicator: It lights up in red at STANDBY, and in green at POWER ON.
3
3V90441A [E] P09-12
9
05.11.24, 0:17 PM