1
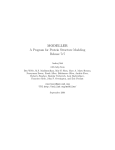
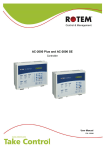
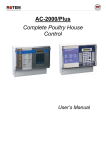
RSC-2 Poultry Scale System
User Manual
RSC-2
Poultry Scale System
This manual is published by Rotem Computerized Controllers Ltd. All
rights to this publication are reserved. No part of this document may be
reproduced, transmitted, transcribed, stored in a retrieval system, or
translated into any language, in any form or by any means.
Rotem Computerized Controllers Ltd. reserves the right to make
changes or improvements to the equipment, software, and documentation
herein described at any time without notice.
© Copyright 2004 by Rotem Computerized Controllers Ltd.
Warning: Rotem products are designed and manufactured to
provide reliable operation. Strict tests and quality control procedures are
applied to every product.
However, there is the possibility that something may fail beyond our
control. Since these products are designed to operate climate control and
other systems in confined livestock environments, where failure may cause
severe damage, the user should provide adequate back up and alarm
systems. These are to operate critical systems even in case of a Rotem
system failure. Neglecting to provide such back up will be regarded as the
user’s willingness to accept the risk of loss, injury and financial damage.
Date: March 27, 2004
Software Version: 3.5
Table of Contents
Warning ................................................................................................................2
Table of Contents..................................................................................................3
Introduction ...........................................................................................................4
Key Features.........................................................................................................4
Operating Principles..............................................................................................4
Control Panel ........................................................................................................5
Main Menu ............................................................................................................6
Average Weight:................................................................................................6
Number of Weights:...........................................................................................6
Daily Gain/Standard Deviation: .........................................................................6
Coefficient of Variation (C.V.)/Uniformity:..........................................................6
Growth Day: ......................................................................................................6
Advanced Functions .............................................................................................7
Weighing: ..........................................................................................................7
Weighing Questions:......................................................................................7
Print:..................................................................................................................7
Printing Questions: ........................................................................................8
History: ..............................................................................................................8
History Questions: .........................................................................................9
Scale Calibration: ............................................................................................10
Scale Calibration Questions:........................................................................10
Time Update....................................................................................................11
Parameters:.....................................................................................................11
Parameter Questions: ..................................................................................11
Parameter Table ..........................................................................................12
Parameter Definitions: .................................................................................13
Weight Correction Factor.................................................................................14
Technical Reference ...........................................................................................15
Standard Deviation..........................................................................................15
Coefficient of Variation. ...................................................................................16
Uniformity (Homogeneity or Evenness)...........................................................16
Wiring Diagram................................................................................................17
3
RSC-2
Poultry Scale System
Introduction
Rotem’s RSC-2 Poultry Scale weighs chickens and turkeys
automatically using one or two platforms. The RSC-2 weighs the birds
automatically as they mount the platform within their living area.
Key Features
¾
¾
¾
¾
¾
¾
¾
¾
¾
¾
¾
¾
Weighing Range According to the Installed Platform
Precision per Weighing — ± 0.2%
Up to Two Platforms
Up to one year Data Collection
Up to 100 Meter (300 feet) Cable
Minimum Weighing Time — 2 to3 Seconds
Battery Backup
Automatic Update of Average
Standard Deviation, Daily Gain, CV, Uniformity
Remote Communications is Standard.
Weight Histograms are available with Communications
Direct Printout to a Serial Printer.
Operating Principles
¾ A simple menu and three user friendly keys provide user access.
¾ Two indicator lights identify the active platform.
¾ The RSC-2 senses the change in weight when birds mount and
dismount the platform. Changes within the acceptable range register as
valid bird weights.
¾ Accumulations of debris tare out automatically since they are not in the
range of acceptable bird weights.
¾ Multiple birds automatically register correctly as long as there is small
interval between them as they mount.
¾ The RSC-2 automatically follows the birds as they grow, and updates
its reference data regularly.
Control Panel
Scale Selection
Indicators
Five Digit Display
with Lb and Kg
Indicators
Five Line menu
with Indicator
Lights
Three Keypads
to Select Menu
Items and Make
Changes
1. Scale Indicator Lights: Identify the current platform. Values in the
display pertain to this platform.
2. Display: shows the current value. In some cases it shows an
abbreviation describing the current value alternately with the value. To
the right of the display are Lb (pound) and Kg (kilogram) indicators.
3. Menu: The first menu item is Average Weight. When the indicator by
this item is lit, the display shows the average weight for the indicated
scale platform.
4. Keypads: The ‘Select’ keypad moves from item to item in the Menu.
After you reach Growth Day it moves back to Average Weight.
a) Warning: You can edit the Growth Day with the Arrow keys. If you
set to growth day zero, the display flashes CLEAr; if you press the
Select key at this point, the RSC-2 resets to growth day 1 and erases
data it has collected. If you change growth days, new data mixes with
previously saved data.
5. Advanced Functions: The keypads also have advanced functions,
which this manual explains later.
5
RSC-2
Poultry Scale System
Main Menu
Average Weight:
The average weight shown is the average of birds weighed since
midnight, then the last 50 birds until 200 birds have been weighed, finally the
last 100 birds if 201 or more birds have been weighed. The average weight in
the display pertains to the indicated weighing platform.
Whenever the RSC-2 acquires a new bird weight, it flashes this weight
several times before continuing to show the average weight. A flashing display
indicates the latest bird’s weight; a steady display indicates an average
weight.
Number of Weights:
This shows the number of birds weighed on the indicated weighing
platform.
Daily Gain/Standard Deviation:
By default, this shows the weight gained since yesterday in percent.
Press the Up Arrow for the standard deviation (SD) of the average weight,
Down Arrow to show daily gain.
Standard Deviation is a scientific measure of how even the bird weights are.
Coefficient of Variation (C.V.)/Uniformity:
Coefficient of Variation (CV) is another scientific measure of how even
the bird weights are. It is related to Standard Deviation.
Uniformity is the usual way evenness of bird weights is measured.
Press the Up Arrow for Uniformity and the Down Arrow for Coefficient of
Variation.
Growth Day:
The Growth Day is the age of the birds for the indicated platform. You
can have different growth days for each weighing platform.
You can adjust the growth day with the arrow keys to a maximum of
500. If you set it to zero, the display flashes CLEAr and 0. If you press the
Select key at this point, the RSC-2 asks for confirmation by flashing SurE and
no. Press the up arrow key to display the YES choice and clear out all history
data. This resets the growth day to 1 for starting a new flock.
If you change the growth day without clearing previous history, old
history mixes with new data. To prevent corrupting your data while reviewing
history you should use the History function, not simply move the growth day
back.
If you immediately change the growth day after clearing history, the
RSC-2 automatically adjusts the reference weight to a typical broiler weight of
that age. If your birds weigh differently, adjust the reference weight manually
to approximately the weight of your birds in order to start collecting bird
weights.
Advanced Functions
Weighing:
When weighing birds, the RSC-2 takes into consideration factors to
prevent weighing things that are not birds. This can make it difficult to test the
scale, since a ‘correct’ bird may not be readily available.
If you Press and Hold the Select key for 2 or 3 seconds, the RSC-2
switches into weighing mode, and indicates this by showing SCALE in the
display for several seconds. To correctly use this feature, be sure to keep the
scale empty during this time, since the RSC-2 will automatically be calculating
tare and calibrating to zero.
After the zero weight appears in the display, you can weigh objects just
as you would on a typical bathroom or grocery scale. To return to bird
weighing mode, press the Select key briefly. Here are the steps in order:
1. Keep the scale empty and steady. Start with the usual average weight
in the display.
2. If you have more than one weighing platform, wait until the Scale
Indicator lights for the scale platform you wish to use.
3. Press and Hold the Select Key until SCALE appears in the display.
Then release the key.
4. Wait until the display returns to zero, all the while keeping the scale
weighing platform empty and steady.
5. Weigh objects as desired by placing them on the platform. Their weight
appears in the display.
6. To return to normal operation, briefly press the Select key. ESC will
appear momentarily in the display.
Weighing Questions:
1. Will the other weighing platform continue to weigh birds while this
platform is in special weighing mode?
a. No.
2. How heavy an object can I weigh?
a. This depends on the particular weighing platform. The small
stainless steel chicken platform can weigh up to 50 lb (25 kg);
the larger stainless steel turkey platform can weigh up to 100 lb
(50 kg). Review the specifications for the hanging platforms.
3. How accurate are the scales?
a. All scale platforms have 0.2% basic accuracy.
4. Can I calibrate the scales?
a. Yes. Each platform must be individually calibrated prior to use
using the calibration procedure described later in this manual.
Print:
The RSC-2 can print its data directly to a serial printer. The printer must
be suitably connected directly to the RSC-2, or indirectly through a Rotem
Multiplexer or Communicator. This connection is best performed by a qualified
technician.
1. To connect directly, move the DIR/MUX jumpers to the DIR position.
7
RSC-2
Poultry Scale System
2.
3.
4.
5.
6.
a. The Jumpers are located directly above the green
communication connector inside the RSC-2.
b. Connect a serial printer to the COM, RX and TX terminals. Turn
it on and set it to 9600 baud, N, 8, 1.
To print indirectly through a Multiplexer or Communicator, place the
jumpers in the MUX position. Connect the printer to the Multiplexer or
Communicator.
To start printing, Press and Hold the Down Arrow key. –Prn- displays
momentarily followed by F-dAy alternating with 1. This indicates First
Day to Print is day 1.
If you wish, adjust the first printing day (indicated by F-dAy) with the
arrow keys. Printing will start with data from this day continuing until the
current growth day.
a. You can not adjust the first printing day past the current growth
day.
Press the Select key to start printing. While printing, -Prn- flashes in
the display.
When finished, the flashing -Prn- disappears.
Printing Questions:
1. I started a long printout, but have changed my mind. How do I stop it?
a. Turn power off to the RSC-2.
2. Why does the display show F-dAy instead of F-DAY for first day?
a. The display is a bright red five digit seven segment display
suited to showing numbers, such as average weight. This is as
close as it can come to showing letters. An uppercase D would
look like a zero. However, the word displays are remarkably
clear and easy to understand.
3. What is 9600, N, 8, 1?
a. These have to do with RS-232 communication settings as
defined by international standards. A qualified technician will
understand them, as well as further questions, such as: What is
RS-232?
History:
Use the History function to review data from previous growth days. You
can review all data (Average Weight, Uniformity, etc.) for each growth day in
the past without affecting scale operation.
1. Press and Hold the Up Arrow Key until –HIS- appears in the display
briefly. Be sure to observe the momentary –HIS- indication, since the
display will return to the average weight for today without any other
indication.
2. Use the Select, Up and Down arrow keys as you would during normal
operation to review data. For example,
a. To review data on day 10, move to the Growth Day main menu
using the Select key. Then adjust the growth day using the
arrow keys.
b. Press Select to choose a particular item, such as Uniformity.
c. To review historical data for a different growth day, move to the
growth day item again with the Select key and repeat steps a’
and b’.
3. To exit history mode, press and hold the Select key until –Esc- appears
briefly in the display.
History Questions:
1. Does the RSC-2 continue to weigh birds while in History Mode?
a. Yes, it continues to operate normally in the background.
2. How can I tell that the RSC-2 is in History mode?
a. The RSC-2 briefly displays –HIS- when it switches into history
mode.
b. The display stops flashing new weights as they are acquired.
You can see whether new weights are being acquired by
watching the Number of Weights for the current growth day.
i. Note: In normal operation, the RSC-2 briefly flashes each
new bird weight before continuing to display the average
weight.
c. You can not go to Growth Day zero.
d. You can not go past the current Growth Day.
e. When you press and hold Select again, it will show –ESCinstead of SCALE. However:
i. If you were in history mode, you will exit it.
ii. If you were not in history mode, you will enter SCALE
mode. Press Select again in this case to return to normal
operation.
3. What is the best way to tell the RSC-2 is in History mode?
a. Carefully watch for the brief –HIS- display when the RSC-2
switches into history mode.
4. How can I view Histograms?
a. You can view Histograms only at a personal computer using
Rotem’s NetVision software. The software provides other
important features as well.
9
RSC-2
Poultry Scale System
Scale Calibration:
Upon installation, each weighing platform should be calibrated. Allow a
minimum 10 minute warm up time after turning on power, prior to calibrating
the platform.
1. Obtain a precision weight of about 5 to 10 pounds (2 to 5 kilograms).
The minimum calibration weight is 1 pound (500 grams).
a. A low cost precision weight may be easily obtained at most
grocery stores. Purchase a suitable beverage (such as a 2 liter
soft drink, gallon of milk), and weigh it on the government
certified scales at the checkout.
Most cashiers will gladly sell and weigh a precision weight for
you.
2. Keep the platform empty of birds and steady during the calibration
process.
3. Press and Hold Simultaneously the Select and Down Arrow keys
when the scale indicator for the appropriate platform is lit.
a. If you are adding a second platform, or the desired scale
indicator light never lights, refer to the Parameters section
below. You will need to enter a calibration number initially to
make the RSC-2 recognize the platform and start switching
between the two. This number need not be accurate.
4. CAL-1 or CAL-2 appears in the display, depending on which platform
you are calibrating. Release the Select and Down Arrow keys.
5. Press the Select key. The display starts flashing CAL-1 or CAL-2.
During this period the RSC-2 is calculating the tare, so it is particularly
important not to disturb the platform in any way during this period.
6. The display shows 1.00 and the appropriate scale indicator light
flashes. Place the precision weight on the platform, and adjust the
value in the display using the arrow keys until it registers the correct
weight.
7. Press the Select key. The display will start flashing the weight you
entered. During this period it is calibrating to your precision weight, so it
is particularly important not to disturb the platform in any way.
8. After several seconds, the display shows Good.
9. Press the Select key to return to normal operation.
Scale Calibration Questions:
1. Do I need to clean the weighing platform prior to calibration?
a. No. The calibration procedure uses the same ‘change in weight’
principle that is used during normal bird weighing. As long as
you do not change the amount of debris on the platform, its
presence will not affect calibration.
2. Will the other platform continue to operate normally while I calibrate this
one?
a. No. During calibration all normal weighing operations stop.
3. I want to calibrate Scale 2, but only the Scale 1 indicator light is on.
a. This is normal. By factory default, the RSC-2 uses scale platform
1 only. To start using scale platform 2, you need to signal the
RSC-2 that it has another platform by entering a ‘calibration
number’ other than 0 in the Calibration Parameter. See the
Parameters section below.
4. How often should I calibrate the scales?
a. Rotem recommends calibration once a year.
5. I see a calibration factor number on my scale platform. What is this?
a. This is a factory calibration number for the platform. You can
enter it manually into the calibration number as described in the
Parameters section below for a quick approximate calibration.
Time Update
The RSC-2 has an internal battery backed clock. You can use this to
schedule bird weighing for particular hours of the day in the Parameters
section. To set the clock:
1. Press and Hold Simultaneously the Select and Up Arrow keys until
the time appears in the display in hr.mm format.
2. The hour will be flashing. To adjust it, use the Up and Down Arrow
keys.
a. Note that the hour is in 24 hour military format. For example,
5:00 PM will show as 17.00.
3. When finished adjusting the hour, press the Select key. The minutes
will start flashing.
4. Adjust the minutes using the arrow keys. You can press and hold an
arrow key to move more quickly.
5. Press the Select key. The display briefly shows –ESC- and returns to
normal operation.
Parameters:
The RSC-2 has many parameters with which you can customize it for
your needs. While viewing the parameters, each parameter will display its
value alternately with a brief acronym to identify the parameter. You can
adjust the parameter with the arrow keys. This is the procedure:
1. Press and Hold Simultaneously both arrow keys until the first
parameter, rEF-1, flashes in the display alternately with its value.
2. To adjust the parameter, use the up and down arrow keys.
3. When finished adjusting the parameter, press the Select key to move to
the next parameter.
4. If you are finished adjusting all parameters of interest, continue
pressing the Select key until you get past the last one. The RSC-2 will
display –ESC- briefly after the last parameter and return to normal
operation.
Parameter Questions:
1. I accidentally went past the parameter I wanted. How do I back up?
a. You can not back up. If you missed the parameter, you need to
go through all the parameters until the –ESC- and start again.
2. I accidentally forgot to exit from Parameter mode after adjusting a
parameter. I left the farm and am now at home. Must I go back to the
RSC-2 and exit parameter mode?
11
RSC-2
Poultry Scale System
a. Actually the RSC-2 will wait patiently for a little while and then
exit by itself. There is no need to go back to the RSC-2 to exit in
this case.
Parameter Table
Param
rEF-1
rEF-2
CAL-1
CAL-2
UnIt
PrC.Lo
PrC.HI
A.d
Parameter Meaning
Scale 1 Reference Weight
Scale 2 Reference Weight
Calibration Number, Scale 1
Calibration Number, Scale 2
Weight Unit, 0→ Kg, 1 → Lb
Low Acceptance Range, %
High Acceptance Range, %
Stability factor for registering
tare value
bAud
Communication Baud Rate
Pc.1
Bird Scale 1 Identification
Number for Communication
Pc.2
Bird Scale 2 Identification
Number for Communication
PASS
Password
StArt
Weighing Start Hour
End
Weighing End Hour
tArg1
Platform 1 Target Curve
Selector
tArg2
Platform 2 Target Curve
Selector
PrC.Sn Maximum Weight Sample
Deviation (per cent)
Accur
Minimum Number of Stable
Weight Samples
unF.Pr Uniformity
Minimum
0
0
0
0
0
10
10
8
Default
0.048
0.048
1367
0
0
30
30
15
Maximum Custom
30 Kg
30 Kg
10000
10000
1
45
45
100
1200
0
9600
0
9600
255
0
0
255
0
0
0
0
0
0
24
0
9999
24
24
255
0
0
255
1
3
10
5
5
20
5
10
20
Parameter Definitions:
1. rEF-1: Scale 1 Reference Weight. The RSC-2 accepts bird weights that
are within a limited range of the reference weight, typically ±30%. For
example, if the current reference weight is 1.00 pounds, then by default
weights greater than 0.70 and less than 1.30 pounds are accepted as
valid :
a. After CLEAR, start with reference weight of 0.100 pounds (0.048
kilograms). You can manually edit the reference weight if
needed.
b. If the reference weight was manually entered, retain it until
midnight.
c. After a new day, the reference tracks the current average weight
after weighing:
i. More birds than yesterday, or
ii. 50 birds which ever occurs first.
2. rEF-2: Scale 2 Reference Weight. Same as rEF-1, except it applies to
weighing platform 2.
3. CAL-1: Scale platform 1 calibration factor.
4. CAL-2: Scale platform 2 calibration factor.
5. UnIt: Pounds or Kilograms
6. PrC.Lo: Low acceptance limit. Birds more than this percent below the
reference weight are rejected.
7. PrC.Hi: High acceptance limit. Birds more than this percent above the
reference weight are rejected.
8. A.d: Stability value for establishing a new tare value. This is the
minimum change in weight (in machine analog to digital converter
counts) that occurs to establish a new base reading before accepting
another bird weight.
9. bAud: Communication connection speed, typically 9600.
10. Pc.1: Scale number of Scale 1 for personal computer communications.
Each scale platform in a network of RSC2 scale systems must have its
own number.
11. Pc.2: Scale number of Scale 2 for personal computer communications.
12. PASS: Password for access via communications.
13. StArt: Start time for weighing. You can limit weighing to a start hour.
14. End: End time for weighing. You can force the RSC-2 to stop weighing
at a particular hour.
15. tArg1: Reference growth curve identifier for scale weighing platform 1.
The remote communications shows the particular reference curve
chosen with the actual weight data when graphed on the personal
computer.
16. tArg2: Reference growth curve identifier for scale weighing platform 2.
17. PrC.Sn: Each bird weight is the average of several samples (see
parameter 20, Accur). Maximum sample to sample variation as a
percent, for the samples to be acceptable.
18. Accur: Sets the minimum number of acceptable samples to establish a
birds weight.
19. unF.Pr: Uniformity limit in percent. Default uniformity limit is plus or
minus 10% of the average.
13
RSC-2
Poultry Scale System
Weight Correction Factor
The RSC-2 incorporates a weight correction factor curve. In certain
cases, bird behavior may cause a bias in the bird weights accumulated. For
example, it is possible that birds will establish a pecking order, with larger
birds dominating smaller ones. In this case it may be that some smaller birds
discover mounting the weighing platform gives them additional apparent size,
and they move up the pecking order when on a platform. For this reason, they
tend to mount the platform more frequently than the larger birds, which affects
the statistical average.
In most cases, these biases become consistent from flock to flock. You
can add a correction curve based on bird age to account for this variation. To
enter the correction curve menu, simultaneously press and hold all three
keys until ‘1’ alternates with the correction factor for day 1, by default 1.00.
Edit the value for day 1, if desired using the arrow keys. Press the Select key
briefly to move to the next day and back to day 1 again if desired. To exit the
correction factor menu, press and hold the Select key until –ESC- appears in
the display. You can not the programmed growth days, only the factor for
these days. Factory default correction curve:
Day 1
10
20
30
40
50
60
Factor 1.00 1.00 1.00 1.00 1.00 1.00 1.00
Technical Reference
Standard Deviation
The standard deviation is kind of the "mean of the mean," and often can help
you find the story behind the data. A normal distribution of data means that
most of the weights in a set of data are close to the "average," while relatively
few examples tend to one extreme or the other.
If you looked at normally distributed data on a graph, it would look something
like this:
The x-axis is the weight. And the y-axis (the vertical one) is the number of
weights for each value on the x-axis.
Standard Deviation
n – Number of weights.
A smaller number in standard deviation indicates a more uniform flock.
15
RSC-2
Poultry Scale System
Coefficient of Variation.
The CV (Percentage) is calculated by the following formula:
CV = (standard deviation / Average) x 100
The CV is expresses the standard deviation as a percentage of the
average weight. This term describes the variation among the recorded body
weights accounting for the relative size of the birds. A 0.1 pound variation, for
example, is more important for one week birds than for much larger 8 week
birds.
Uniformity (Homogeneity or Evenness)
Counting birds with body weight within a range of either ±10% or ±15%
of the average body weight gives the uniformity. The number of birds in this
range is expressed as a percentage of the total number weighed. In Europe
most managers use the ±10% range but the fact that different ranges are
used does sometimes cause confusion. This method of describing variation is
easy to practice but it does not accurately account for all variation in the way
that CV does.
The formula for Uniformity is:
Uniformity = (number of birds within ±10% of Average / Number of weights) x
100
Environmental Protection
Recycle raw materials instead of disposing as waste. The controller,
accessories and packaging should be sorted for environmentalfriendly recycling. The plastic components are labeled for categorized
recycling.
Wiring Diagram
RX
TX
COM
Protected Side
RPLP-1
Unprotected
GND
Neutral
Phase
ROTEM Computerized Controllers Ltd. 972-3-920-6200 FAX: 972-3-924-9834 ISRAEL
Web site- www.rotem.com Email- [email protected]
17