1
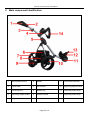
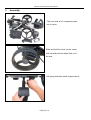
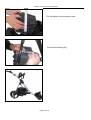
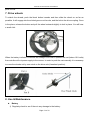
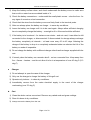
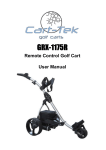
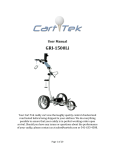
GRX-1155R
Remote Control Golf Cart
User Manual
Remote Control Golf Cart User Manual
Index
1
Introduction
2
Identification – main components
3
Assembly
4
Operating your cart.
5
Remote control Operation
6
Charging the battery
7
Drive wheels
8
Use and maintenance
9
Troubleshooting
10
Safety
11
Contact details
Page 1 of 16
Remote Control Golf Cart User Manual
1 Introduction
Thank you for purchasing this golf cart. Please read this manual carefully before use.
After unpacking please keep the carton and all internal sections in safe storage. In the unlikely
possibility that you need to return the whole unit due to a defective component, you will need to
repack the unit in the original manner to ensure safe and secure transit.
Check all components are included in the package –
•
Main cart frame.
•
Transmitter
•
Drive wheels
•
Back support wheel
•
Battery complete with battery bag
•
Battery charger
•
User Manual
•
Tool kit
After unpacking the cart place the battery on charge whilst you assemble the unit. The battery will
be delivered with a charge but should always be placed on charge overnight before using.
Contents of this manual cover assembly from the delivery carton – operating instructions and
conditions – maintenance – and troubleshooting. Please note that our design and manufacturing
policy is aimed at continuous improvement – this can result in changes without notice to the
specifications contained in our websites and in this manual.
Page 2 of 16
Remote Control Golf Cart User Manual
2
Main component identification
1
Manual speed control
6
Battery
11
Front wheel assembly
2
Handle LED
7
Drive wheel
12
Upper bag support holder
3
Cart lock device
8
Battery tray
13
Lower Bag holder strap
4
Upper bag support holder
9
Stabilizer wheel
14
Upper Bag holder strap
5
Hinge
10
Motor/Gearbox
Page 3 of 16
Remote Control Golf Cart User Manual
3
Assembly
Take cart and all of component parts
out of carton
Slide and hold the knob on the center
hub cap and push the wheel fully on to
the axle
Pull spring bolt then install support wheel
.
Page 4 of 16
Remote Control Golf Cart User Manual
Pull the lock device and then raise the
frame support(wishbone) into the upright
position
Lift the main frame upwards to meet the
frame support.
Engage the slots in the hinge with the
metal bar on the frame support.
Page 5 of 16
Remote Control Golf Cart User Manual
Lift the upper handle frame up and over
the central locking hinge. Depress the
metal catch and ensure that the hinge is
locked in position around the frame
support bar.
Ensure that the locking catch is fully
engaged by pulling the upper part of the
catch outwards if necessary. Pull down
the upper bag support.
The cart is now ready to receive the
battery and golf bag.
Page 6 of 16
Remote Control Golf Cart User Manual
Put the battery into the battery case.
Connect the battery plug
Page 7 of 16
Remote Control Golf Cart User Manual
4. Operating your cart.
To switch the cart on, turn the manual speed control knob away from you until a small click is
heard. The LED on the handle will flash briefly to indicate that the cart has power.
Turn the speed control progressively forward to increase speed. Turn the knob back to reduce
speed. Turning the knob back until a click is heard will turn the cart off.
LED Light Indications
When the manual combined on/off speed control switch in the handle is turned ON, the blue LED
light on the handle will illuminate for a approximately 2 seconds to indicate that all parts of the cart
are functioning properly. It will then turn off.
If this does not happen, check the following:
1. Blown fuse: the fuse is located is located in the red (positive) battery cable. A blown fuse may
occur after a period of sustained load- e.g. negotiating a very steep hill with a heavy bag and
need replacing.
2. Battery not connected properly or a loose connection at the battery terminals. Tighten the
connections.
3. A loose connection in either the handle wiring or in the main controller.
When the cart is operated in manual mode the LED will flash approximately once per second. If
the LED flashes for a longer duration (2 seconds) this indicates that the cart battery voltage is low
and the battery should be recharged as soon as possible.
Page 8 of 16
Remote Control Golf Cart User Manual
5. Remote control Operation.
Once the cart has been turned on manually (see above) you can control the speed and direction
by using the Remote Control. To initiate remote control, switch on the transmitter, turn the cart on
manually and then press a button on the remote control within 3 seconds. Once the cart begins to
move, the system is initiated and will remain so until the cart is switched off.
Replacing the transmitter.
If the original transmitter is lost or broken, it is a very simple process to key the cart controller to
the transmitter. First, switch on the new hand remote and then press and hold the “UP” arrow.
Switch on the cart by rotating the speed control. Hold the transmitter button for about 4 seconds.
The green light should flash once, indicating that the new remote and the cart are keyed together.
Remote Control Buttons
Press the “UP” button to start the cart forwards. Click again to
accelerate- maximum speed is achieved after 5 clicks.
Press the “DOWN” button to decelerate the cart. When the cart
is stationary, pressing the “DOWN” button will send the cart in
reverse.
Page 9 of 16
Remote Control Golf Cart User Manual
Press the “RIGHT” button to turn the cart to the right.
Press the “LEFT” button to turn the cart to the left.
Press the “STOP” button to stop the cart .You must stop the
cart before switching from forward to reverse direction or vice
versa.
Adjustment Buttons (just for minor adjustment)
The two top buttons marked with ADJUST and SAVE are
only to be used if necessary for
calibration of the alignment of the cart. See below
ALIGNMENT ADJUSTMENT
The two buttons at the top of the transmitter are only for use after adjustments to the cant of the
front wheel have not produced the desired results – when the alignment of the cart is
permanently pulling to one particular side on flat ground. Before making any adjustments with
these buttons it should be understood that a golf cart with a very narrow wheelbase and with an
uneven – and sometimes shifting – load will probably never be able to maintain a forward
direction and a straight line – mainly because even a small directional bias at the start quickly
magnifies to a much larger directional deviation. Indeed the whole point of having a remote
operation cart is to be able to ignore the exact position of the cart – as long as it is on the fairway
and clear of other golfers and water hazards. The user has the ability to bring his cart and clubs
over to him when he gets up to his ball.
To initiate this process start with a forward motion of the golf cart, and then press the ADJUST
button once.
Pressing the left arrow button once will cause the left-hand drive wheel to reduce in speed by
1%
Pressing the same button twice will produce a speed reduction of 2%
This process can be repeated up to a differential reduction of 20%
All of the above applies equally to the right arrow button
Page 10 of 16
Remote Control Golf Cart User Manual
Having completed this process pressing the save button will save the chosen settings
Pressing the ADJUST button and then pressing the SAVE button, without altering either
direction button will program the same power to both wheels.
Using the Hand-held Remote Control Transmitter
Never store the transmitter in a pocket with metal or sharp objects, or loose change.
Because of the need for a removable battery cover, the transmitter is NOT waterproof. Take care
when playing in rain (you may wish to place the transmitter in a polythene bag to prevent water
ingress) or use the remote in a pocket or under a jacket. NEVER immerse the transmitter in water.
The LED on the transmitter will appear as a solid red light when a function key is pressed. If the
light is dimmed, it indicates that the battery in the transmitter is running low, Replace the battery as
soon as possible. If the battery power is running low, the control distance of the remote will be
reduced. If in doubt check the battery for 12 volts.
The transmitter uses a replaceable battery. Slide open the battery compartment to replace the
battery.
Don’t use rechargeable batteries as these batteries do not give sufficient voltage for optimum
operation.
Avoid using excessive force when pressing the function keys on the transmitter
If you don’t press a command button within 20 seconds, the cart will stop. However try to keep the
cart typically within a safe 50 yard distance from you.
6. Charging the battery.
You must give your battery an initial ‘commissioning’ charge before using it for the first
time. Charge your battery for a minimum of 24 hours, even if the green light appears
soon after commencing charging.
Page 11 of 16
Remote Control Golf Cart User Manual
Always start every round with a fully charged battery.
Charge your battery as soon as possible after every round (certainly within 24 hours) even if you
have played only a few holes. This will maximize the life of your battery.
To charge your battery, ensure your charger is not connected to the mains and connect it to the
battery. Connect the charger to the mains. If the green light on your charger flashes, switch off
immediately and check the polarity of the charger leads. The charger light will turn red indicating that
charging is taking place. When your battery is charged, the light will turn from red to green. With a
new or fully charged battery, the red light may show only for a short time before turning green.
Ideally, you should charge your battery for a minimum of 8 hours, even if the red light turns green
before this. This will ensure that the maximum charge is put into the battery and will increase battery
life.
The charger supplied with your cart is a modern 3 stage charger. If not being used, we recommend
that you leave the battery connected to the charger with the mains until the next time you play golf,
up to a maximum of one month. The electronic circuits in the charger will protect your battery from
over-charging and will ensure your battery is kept topped-up.
Switch the charger off at the mains before disconnecting the battery. If you do not intend to use your
cart for several months, fully charge the battery and then disconnect from the charger. Recharge
your battery every 30 to 45 days. Leaving the battery on charge for an extended period may cause
the battery to dry out and shorten the life of both the battery and charger.
DO NOT leave the charger connected to the mains if the battery is not attached. This will shorten the
life of the charger.
DO NOT leave the charger connected to the battery if it is not connected to the mains. This will
discharge your battery.
DO NOT charge your battery on a concrete floor - always charge on a shelf/bench or place the battery on a
Page 12 of 16
Remote Control Golf Cart User Manual
plank of wood.
7. Drive wheels
To attach the wheels, push the black button inwards and then slide the wheel on as far as
possible. It will engage into the slotted groove on the axle, and the hub to the drive-coupling. Once
in the place, release the button and pull the wheel outwards slightly to lock in place. You will hear
a small click.
When the battery indicator is red and the voltage is too low to operate the cart (below 10.8 volts)
the controller will cut power supply to the motors. In order to push the cart manually it is necessary
to move the wheels out by one notch on the drive axle (freewheel position).
8. Use & Maintenance
Battery
1) Regularly check to see if there is any damage to the battery.
Page 13 of 16
Remote Control Golf Cart User Manual
2) Keep the battery surface clean, and check underneath the battery cover to make sure
that no dirt or water has accumulated inside of it.
3) Check the battery connections – underneath the small plastic covers – also the fuse - for
any signs of corrosion or bad connection.
4) Check that the wires from the battery cover are firmly fixed to the terminal posts.
5) After use always place the battery on charge – in warm dry conditions.
6) Leave the battery on charge until it is to be used again. Always allow sufficient charging
time to completely charge the battery – overnight or 6 to 8-hours should be sufficient.
7) If the battery is to be stored – for instance over winter – and not used, it can either be left
connected to the charger, or disconnected. If disconnected for storage always recharge
the battery completely at intervals – at least once every 30 to 45 days. Allowing the
charge of the battery to drop to a completely exhausted state can shorten the life of the
battery or render it inoperable.
8) Do not charge the battery with a different charger other than the charger supplied with the
cart.
9) If stored, place the battery on a wooden shelf – not on a concrete floor. Keep away from
fire – flames – heaters – and do not allow it to be in a temperature of over 45 deg C (113
deg F)
Charger
1) Do not attempt to open the case of the charger
2) Only use the charger to charge the battery of this golf cart
3) Operate only indoors – in clean dry conditions
4) Immediately remove from the mains electrical supply in the event of the charger
overheating (over 70 deg C)
Cart
1) Clean the whole cart as convenient. Remove any caked mud and grass cuttings.
2) Store it indoors in dry conditions
3) Always remove the battery from the cart
Page 14 of 16
Remote Control Golf Cart User Manual
9. Trouble shooting
The following is general information for the customer. If you have a persistent problem always
call the service department. It will always help if you can tell them the sequence and condition of
the LED light.
Indication
Possible cause
With the ON/OFF switch turned ON –
Bad wire connection. Either to the switch in the
the speed control knob is turned for
handle – or at the connection jacks to the
speed. The LED on the handle does not
controller.
illuminate. There is no forward
Blown fuse on the battery
movement of the cart.
Loose battery terminals
Same conditions as above – but the LED Bad wire connection to the motor. Either at the
is illuminated
connection jacks to the controller – or even internal
to the controller.
The battery is not accepting a charge.
Faulty charger. (The battery can easily be checked
at any auto-repair center). Always check for correct
connection of the plugs into and out of the charger.
Transmitter not operational
The main ON/OFF switch is not turned ON.
Faulty transmitter.
Reduced operational distance of the
Low battery condition in the transmitter
transmitter
LED on transmitter does not light
Low battery condition in the transmitter - replace
10 Safety
•
Read this manual carefully so that you understand and are able to follow all safety instruction and
methods of use before you use the golf cart.
•
Do not let children use the cart.
•
If you feel ill, tired or have been drinking alcohol or taken medication you should not use the cart.
•
All repairs not described in this manual should only be carried out by trained personal.
Page 15 of 16
Remote Control Golf Cart User Manual
•
Only use original spare parts. This also applies to the battery.
•
Only lend the cart to people who are familiar with the use.
•
Waste electrical products must not be disposed of with the household waste. These should be
taken to your local recycling centre for safe treatment
11.
.Contact details:
http://www.carttek.com
Cart-Tek Golf Carts
Bend, Oregon
866-356-2278
email: [email protected]
Page 16 of 16