1
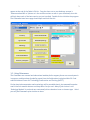
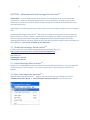
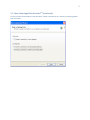
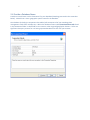
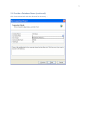
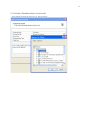
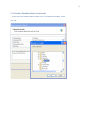
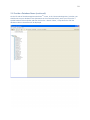
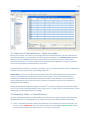
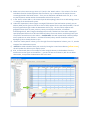
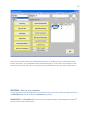
1 Installation Instructions for Osteoware Beta April 2011 CONTENTS SECTION 1: Basic Osteoware Install 1-‐0 Osteoware Beta Requirements 1-‐1 Download the Software 1-‐2 Download the ‘Osteoware240-‐xx.zip’ file 1-‐3 Unzip the download 1-‐4 Install Osteoware 1-‐5 Using Osteoware SECTION 2: Advanced Install of Advantage Data ArchitectTM 2-‐1 Download Advantage Data ArchitectTM 2-‐2 Install Advantage Data ArchitectTM 2-‐3 Open Advantage Data ArchitectTM 2-‐4 Provide a Database Name SECTION 3: Advanced Data Table Editing; Adding Burial or Feature Numbers 3-‐1 The CaseListProtInvt Table 3-‐2 Data entry in ‘CaseListProtInvt’ – Things to Consider… 3-‐3 Populate ‘Catkey’ in ‘CaseListProtInvt’ 3-‐4 Open or Reopen Osteoware SECTION 4: Back up your database SECTION 5: Installing the latest beta release 5-‐1 Back up your database folder 5-‐2 Delete your old beta install 5-‐3 Replace your old beta install 5-‐4 Replace your Protdata database folder SECTION 6: Working with Osteoware on the network Questions? Contact: Chris Dudar, PhD Director Repatriation Osteology Lab Department of Anthropology, National Museum of Natural History, Smithsonian Institution, Washington D.C. email: [email protected] http://anthropology.si.edu/repatriation/index.htm 2 SECTION 1: Basic Osteoware Install 1-‐0 Osteoware Beta Requirements: Windows XPTM through Windows7TM operating systems, no MacOSTM. At this time the installation of Osteoware beta is hands-‐on, but should be relatively simple to accomplish. We are working on a one-‐step installation program, as is used by most Windows software you personally install. 1-‐1 Download the Software: Please navigate to the following URL that will take you to the File Transfer Protocol (FTP) site of the Osteoware creator and programmer, Dr. Steve Ousley, former Director of the Repatriation Osteology Lab now at Merceyhurst College. Without Steve’s vision and efforts Osteoware would not exist. You can download the Osteoware beta version here: http://math.mercyhurst.edu/~sousley/Software/Osteoware/?C=N;O=D 1-‐2 Download the ‘Osteoware240-‐xx.zip’ file (where xx is the beta version number): PLEASE NOTE: As an aside at this time, there are other files on the FTP site, Advantage91–odbc.exe and Advantage91-‐arc32.exe . These are installation files for the Advantage Data ArchitectTM , the Relational Database Management System (BDMS) and Structured Query Language (SQL) interface where Osteoware data can be queried for extraction and subsequent analyses and reports. TM The Advantage91 files and Advantage Data Architect are not necessary to install or test Osteoware beta since once installed the Osteoware folder itself contains all the necessary database tables in the Protdata folder within the Osteoware software folder. Should you decide to enter your own real data into Osteoware beta (rather than simply using the provided test data for trial entries), then the Advantage91 files are required and instructions for their advanced installation follow in Section 2 and Section 3 further into this document. Please, at this time simply get Osteoware beta installed and running and let us know how that goes first. 1-‐3 Unzip the download: Unzip or unpack the compressed file to your desktop (must be Windows OS, no MacOS). 7zip is a free file unpacking utility if you need one, and is available here: http://www.7-‐zip.org/download.html 1-‐4 Install Osteoware: Take the resulting unpacked ‘Osteoware’ folder and simply drag it onto your C-‐drive, making sure to NOT inadvertently put it into one of the other C-‐drive folders (!). Go into the Osteoware folder and scroll down the list to find the ProtMenu2.exe file. This is the executable file to start up the graphic user interface (GUI) of Osteoware. Right click on the ProtMenu2.exe file and choose ‘Create shortcut’. A shortcut to the executable file will now 3 appear at the end of the folder’s file list. Drag the short cut to your desktop, rename it ‘Osteoware beta240-‐xx’ (where xx is the version number as seen in your download) since this will help keep track of the beta version you just installed. Double click to initialize the program. The Osteoware beta home page should open and look like this: 1-‐5 Using Osteoware: The Osteoware user manual and educational website/online support forum are currently works in progress, and have been funded by grants from the Smithsonian Institution Web 2.0 Fund and the National Center for Technology Preservation and Training (NCPTT). Further basic documentation and terminology will be provided shortly, but meanwhile explore and click all the module buttons and drop down lists you see! Many of the choices in the ‘Pathology Module’ in particular are contextually driven based on bone or element type. I think you will find Osteoware quite intuitive to learn. 4 SECTION 2: Advanced Install of Advantage Data ArchitectTM PLEASE NOTE: This is an advanced step in the process of installing Osteoware to its full potential. Please do not conduct the following steps until you are sure Osteoware is running on your system, otherwise we will be unsure how to resolve any beta related issues between the Osteoware GUI and your operating system. ALSO approach the following steps with caution unless you have complete confidence in your computer skills. Installing the Advantage Data ArchitectTM will allow you to begin entering actual site names, burial or feature numbers, et cetera. However, while we do not anticipate any stability issues (Osteoware has been running and successfully storing and managing Smithsonian Institution Repatriation Office osteology data for about 10 years), please be aware that during this beta stage we cannot anticipate any future problems. Use caution, and back up your data often. 2-‐1 Download Advantage Data ArchitectTM: From the same FTP server where you downloaded the Osteoware file, go to: http://math.mercyhurst.edu/~sousley/Software/Osteoware/ Download now: Advantage91-‐arc32.exe Advantage91-‐odbc.exe 2-‐2 Install Advantage Data ArchitectTM : Double click on Advantage91-‐arc32.exe and follow the install prompts/directions. You may need to be an administrator on your computer. If you have any difficulties, consult with your institution’s IT support. 2-‐3 Open Advantage Data ArchitectTM : Open the Advantage Data ArchitectTM program from the shortcut on your desktop and click on ‘File\New Connection Wizard’ or ‘Connection\New Connection Wizard’ from the menu bar. 5 2-‐3 Open Advantage Data ArchitectTM (continued): From the choices listed under the tool bar select ‘Create a Connection to a directory of exisiting tables’ then click ‘Next’. 6 2-‐4 Provide a Database Name: Provide an overall name such as ‘Osteoware’ for your database (Osteology was used in the screenshot below). DO NOT use a site or geographic specific name for the database. One database (including its component data tables) will encompass all of your osteology data management needs from multiple sites. Within the database master table (CaseListProtInvt.adt) found in the Osteoware folder is a data field for site names or other regional/geographic divisions. There are significant data query reasons for not having separate databases for each site you excavate. 7 2-‐4 Provide a Database Name (continued): Click ‘ConnectionPath’ and then ‘Browse for Directory’ … 8 2-‐4 Provide a Database Name (continued): … and navigate by the drop down lists to ‘My Computer’... 9 2-‐4 Provide a Database Name (continued): … and to the set of database tables located in the C:\ Osteoware\ProtData folder. Click ‘OK’ 10 2-‐4 Provide a Database Name (continued): On the left side of the Advantage Data ArchitectTM screen, in the ‘Connection Repository’ window, you should now see your database name (Osteoware in the screenshot below), and if you click on the + symbol beside the blue cylinder and then click on the + beside ‘Tables’, a drop down list of all the database tables in Osteoware will be displayed. 11 SECTION 3: Advanced Data Table Editing; Adding Burial or Feature Numbers PLEASE NOTE: At this time the Osteoware graphic user interface (GUI) does not allow you to enter your own unique burial feature numbers directly via the GUI. This is planned for future versions. However do not despair! There is a method to enter unique burial feature numbers directly into the database through Advantage Data ArchitectTM. Be aware that while Advantage Data ArchitectTM looks and sometimes operates like a spreadsheet program, it is not. For instance, there is no ‘Undo’ feature so if you mistakenly delete a row or more of data you have no recourse to recover it unless you have previously backed up the data elsewhere. PLEASE NOTE: At this time before you edit the database table make sure you back up the Protdata folder as outlined in SECTION 4 below. 3-‐1 The CaseListProtInvt Table: Double click on the database table named ‘CaseListProtInvt’ found in the ‘Connection Repository’ window and you will see a list of the test Catkey numbers as they appear in the Osteoware GUI. ‘CaseListProtInvt’ is the master database table where you will add burial feature numbers. The column/field ‘Catkey’ is short form for ‘Catalog Key’, a unique identifying number for osteology data at the Smithsonian Institution. PLEASE NOTE: Do not change the name of this column ‘Catkey’ (underlined in amber in the screenshot below) to suit your personal nomenclature, as this will have far reaching negative effects in the database and Osteoware GUI. 12 3-‐2 Data entry in ‘CaseListProtInvt’ – Things to Consider… Before you can enter any of your own osteology data into the Osteoware GUI you must add your own burial/catkey numbers to the database. All you have to do is populate the ‘CaseListProtInvt’ database table with a series of unique alphanumeric values relevant to you/your institution ahead of any Osteoware data entry. To reiterate, future versions of the Osteoware graphic user interface will allow you to enter burial feature numbers directly via the GUI. After burial/catkey numbers are entered (see below), you may simply access them within the Osteoware program when you need to enter the osteology data itself. PLEASE NOTE: The current method of burial/catkey number entry was established to provide secure access to the database by a single person such as a lab manager. This person would be the only individual who could add new burial/feature/catkey numbers to the database. This is a powerful security feature that some of you may wish to continue to implement in the future if students are working with your database. Editing the database through Advantage Data ArchitectTM can have unexpected consequences though, such as if you make a mistake and delete many rows there is no ‘undo’ feature. Please keep that in mind and backup your data folder before any editing! 3-‐3 Populating ‘Catkey’ in ‘CaseListProtInvt’: To enter burial/feature/catkey numbers within the ‘CaseListProtInvt’ table, and have them show up in the Osteoware GUI for osteology data entry, refer to the screen shot below and do the following: a) There is a horizontal selection tool bar at the bottom of the window (see screen shot below), click on the + button (red arrow), and it will add an empty row to the database (green arrow), where you add your burial/feature/catkey number in the empty ‘Catkey’ field. 13 b) Make sure in that same row you insert a ‘0’ (zero) in the ‘INDIV’ column. This column is for other individuals found in the burial/feature after excavation, say in subsequent lab analysis that are commingled within that burial feature – Thus you can add other individuals such as A, B, C … N to any burial feature number within the osteoware GUI itself at any time. c) In the ‘Prefix’ column add a P, this means Physical Anthropology rather than an Archaeology record – a vestige of the Smithsonian system. d) Under the ‘RepatSeries’ column (again a vestigial field name of the Smithsonian system) you can add any label you like (you can see this is where TEST1 appears for the test data provided). This will help to organize data right inside the Osteoware GUI for you. Use this field to separate one geographical unit (such as state, province, county et cetera)from another, or between archaeological sites, OR if a large archaeological site itself is divided into some other meaningful spacial/temporal division then all burial features/catkeys from one division could simply have your site-‐specific nomenclature in this column – PLEASE NOTE: do NOT repeat burial numbers/catkeys across quadrants or other divisions-‐-‐ each burial feature/catkey number should be unique!!! Apologies if this is already obvious to you. e) Under the ‘Catkey Active’ column, just to the right from the ‘RepatSeries’ column, put a ‘Y’, another vestige of the Smithsonian system. f) Refresh the table to double check your entries by hitting the curved arrow button (yellow arrow), this will update the table on your display screen. g) Also, as mentioned, there are a number of other vestigial columns in the database from the Smithsonian version (such as Case Officer…), you do not have to fill these in, BUT do not delete them either, it may affect the Osteoware GUI at this time. 14 3-‐4 Open or Reopen Osteoware: Close the ‘CaseListProtInvt’ table, and the Advantage Data ArchitectTM software if you like, then close and open Osteoware (if it was left open during database editing) to refresh your display. On the Data Subset list (upper left of screenshot below), click the down arrow and a drop down list should appear with the ‘RepatSeries’ subset name you created in the ‘CaseListProtInvt’ database table (you can see ‘My Site’ was added in the screen shot below). On the right side the burial feature number(s), or Catkeys that you entered should appear in the display list/table (Alpha 1 and 2 were added as an example only). 15 There are some other features of the database setup such as adding researcher information (name, initials, date active…) to the database table named ‘Osteologists’, so that their initials appear in each data record they enter, but this is not necessary for beta evaluation unless you want to implement it. SECTION 4: Back up your database If you have entered any osteology data you would like to keep, then ensure that you regularly back up the ProtData folder found inside the C:\Osteoware\ directory. PLEASE NOTE: The Protdata folder contains all your database tables in Advantage Data ArchitectTM format (.adt and .adi file extensions). 16 Simply copy and paste the ProtData folder to a new location, preferably another drive, external drive, or network drive. You should do this regularly, perhaps as often as every day or after particularly intense data entry sessions. SECTION 5: Installing the latest beta release As happens with all software beta releases, bugs in the software get resolved on an ongoing basis. As our project programmer, Dr. Steve Ousley, resolves bugs a new beta release of Osteoware will be made available at the Mercyhurst FTP site: http://math.mercyhurst.edu/~sousley/Software/Osteoware/?C=N;O=D 5-‐1 Back up your database folder: Back up your Protdata database folder to another location as outlined in SECTION 4 above. 5-‐2 Delete your old beta install: Simply drag the C:\Osteoware\ folder to the trash can of your computer. You backed up the Protdata database folder first, right? See Section 4 above. 5-‐3 Replace your old beta install: Download the latest Osteoware beta build and repeat Section 1, the Basic Installation. In brief: unzip the download, drag the unpacked Osteoware folder to your C:\ drive, where the old install was. It is that simple. PLEASE NOTE: You DO NOT have to reinstall Advantage Data ArchitectTM ever again, but may be prompted to update the software on occasion. 5-‐4 Replace your Protdata database folder If you have saved data in your backed up Protdata folder, then simply copy the Protdata folder and replace the C:\Osteoware\ ProtData folder you just installed; it simply contains the default test data. SECTION 6: Working with Osteoware on the network The Osteoware database can be placed on a networked drive and accessed by up to five computers at a time (a limit of the Advantage Data ArchitectTM). To network the database open the Protocol.ini file that resides in the Osteoware main folder. As an aside, Protocol is the name of the original SI version that has become the public release Osteoware. The Protocol.ini contains the following stock code when downloaded and unzipped: 17 [File Location] dir=C:\OSTEOWARE\PROTDATA\ dir2=C:\Program Files\Borland\Delphi6\Projects\SMITHSON\REPAT\DATENTRY\ProtMain\protdata\ [Site] AtSI=N Change the following line in the code (this is the stock location of the folder containing the database tables): dir=C:\OSTEOWARE\PROTDATA\ … to a network location of your choice. Make sure to drag/copy the ProtData folder from the Osteoware main folder to this network location, since it contains the database tables. If your institution has IT support they will be able to assist you with the network path. Install Osteoware on up to five computers, making sure to change each Protocol.ini to match the network path. For example, at the Smithsonian the Protocol.ini is networked as seen below. Do not change the AtSI= from N to Y, as this is only for the Smithsonian version of the software. [File Location] dir=\\Si-‐msfscl01r1\Data5\NMNH\MNH-‐REPAT2\VOL1\osteolab\ dir2=C:\Program Files\Borland\Delphi6\Projects\SMITHSON\REPAT\DATENTRY\ProtMain\protdata\ [Site] AtSI=Y Please do not hesitate to email me if you have any problems, find a bug, or need more details: Chris Dudar, email: [email protected]