1
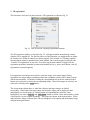
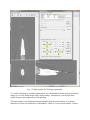
Image registration in DataViewer A brief user guide Starting from version 1.5.0.0, DataViewer provides tools for image registration for both 2D and 3D. In both cases, only rigid transformation is considered. Two sets of images are required as input: a reference image which stays stationary, and a target image which needs to be transformed to match the reference image. 1. In a nutshell The aim of the registration option is to provide a basic tool for volume registration. The emphasis is more on visualization, speed and interactivity, rather than a fully automatic registration which is extremely challenging. We use an intensity-based registration method for registration. There are three important components: transformation method (rigid or non-rigid), similarity/dissimilarity measure (or matching criteria) and the searching algorithm. Currently, only rigid transformation is used to transform the target image. More specifically, the rigid transform contains x/y/z translations and 3D rotation which is expressed internally using Euler angles (z-x-z convention). There are many different similarity/dissimilarity measures for registration. For the time being, we use sum of square difference as criteria, which is suitable for images coming from the same modality (e.g., CT) and when the 2 images are not too different in geometry and image intensity from each other. For the searching engine, we use Powell's method (see “Numerical recipes in C++”) to find the transformation parameters. To speed up registration, we use a pseudo-3D registration method. Instead of searching all 6 parameters simultaneously using the 3D volumes, we break the searching task into smaller and easier steps. The viewing option in DataViewer displays three orthogonal views at any given location: the x-y plane (transaxial view), the x-z plane (coronal view) and the z-y plane (rotated sagittal view). We perform a 2D registration (two shifts and one rotation) on each of the views iteratively to achieve volume registration. The number of loops is default to 3, which works fine in most cases. One can change this number in the options. If the improvement becomes very small, the registration will stop automatically before the number of loops is done. Due to the decomposition of a 3D task to many 2D tasks, the registration can be done almost instantly in a semi-automatic fashion. A complete comparison in speed and accuracy is yet to be done (the truly 3D registration is still to be implemented). In this interactive registration mode, it is important to choose a proper region for comparison. The Volume-Of Interest (VOI) can be defined interactively. The smaller the VOI is, the faster the calculation will be. The VOI is chosen based on intuition: for the automatic registration to succeed, it should contain similar and clear structures in both volumes. The 3D registration module in DataViewer accepts both 16-bit (grey value ranging [0, 65535]) and 8-bit ( [0, 255]) images, although images displayed on the screen are always 8-bit. To maximize flexibility, a 3-layer data structure is used internally: bottom, middle and top layer. The bottom layer is the raw data of both target and reference images, which are loaded into memory either in 16-bit or 8-bit as it is in the original images. Resampling and undersampling may occur, as explained in the paragraph below. At this layer, no image transformation takes place. The middle layer is always 8-bit and is extracted from the bottom layer with image transformation applied to target image. Only the 3 orthogonal views are extracted and kept. User defined dynamic range, with the guidance of a corresponding histogram, is applied to convert 16bit/8-bit raw data to 8-bit display data. This allows a user to choose image contrast properly. Images at middle layer are the basis for image registration and profiling. The top layer is the image displayed on the screen. Artificial colors (color look-up-table and contrast stretching) and zooming are applied to the 8-bit middle-layer-images. For registration, the target image and reference image are not required to have the same matrix size or pixel size. This implies that re-sampling is unavoidable. At loading time, a common matrix is calculated based on one simple rule: just large enough to contain both image sets, with the chosen pixel size (by default, the pixel size in the reference image). In 2D case, no downsampling is applied. In 3D case, both image volumes are loaded into computer memory. Therefore, down-sampling is often necessary. The down-sampling factor is kept as an integer number and is determined by the "max. preview dimension" as defined in options (if N = max. preview dimension, the maximum number of voxels is then N3), and the available physical memory on the PC. Noting that 3D registration is very memory-demanding, it is therefore very important to install a 64-bit DataViewer on a 64-bit computer, as a 32-bit application has the intrinsic limitation of maximum usable memory (2GB). The registered images can be visualized immediately. There are several ways to examine it: - Show the reference and target images alternatively on the screen by selecting with mouse, or with keyboard keys ↑ , ↓, Page Up or Page Down. - Show fusion images. Fusion is done with alpha blending. Simply explained: each grey-value pixel is mapped into a so-called RGB-triplet (R: red; G: green; B: blue) to be displayed on the screen; if we denote a RGB-triplet pixel in target image as (Rt, Gt, Bt) , and the corresponding pixel in reference image as (Rr, Gr, Br), the pixel will be displayed as Rt+(1-)Rr , Gt+(1)Gr, Bt+(1-)Br ), with . The mapping between a grey value and a RGB-triplet is done using a look-up-table (there are a few of them in DataViewer, grey, color 1, color 2, etc., w/o inverting, w/o contrast stretching). The colors are chosen in different ways. In fusion mode a, if the user has selected different color for each image, these colors are used; otherwise a set of pre-defined contrast colors are used instead. In fusion mode i, inverted grey colors are chosen to enhance the differences between the 2 set of images. - Draw a profile on the fusion image. This draws a profile on each of the two images and shows the difference at pixel level: not only in geometry, but also in image intensity. As mentioned above, the profiles are extracted from the "middle layer". 2. 2D registration. This function is activated via menu Actions->2D registration, as shown in fig. 2.1. Fig. 2.1 How to activate 2D image registration function. The 2D registration window, as shown in fig. 2.2, will appear and the normal image control window will be toggled off. For the first time use of this function, you might need to re-adjust the window size so that all controls are shown properly. This window is a "floating window", meaning that it cannot be attached to the main window, but it can be toggled on and off with "Actions->2D registration" at any time. Even if the registration window is toggled off, the registration procedure maintains its status until another task (e.g., open a new dataset, start 3D registration) is started explicitly. For registration, two images are needed: a reference image and a target image. During registration, the target image is transformed into the coordinate system of the reference image which stays stationary. By double-clicking the corresponding line in the list with left mouse button, one can browse to select the corresponding image. Once both images are selected, one can load by clicking on the Load button. The screen image shown above is when the reference and target images are loaded successfully. Once loaded, the target image and reference image can be displayed either individually or as fused image, by clicking on the corresponding line in the list. Once highlighted, you can use Page Up and Page Down button to switch. In the fusion mode, a slider is provided to vary the weights (blending). The images are shown in the main window. When target/reference image is shown alone, one can change the color options and the dynamic range using the histogram shown. To visually examine how good the registration is, one can alternate between target and reference images, or view the fusion images with various settings. Alternatively, you can also check profile along any line (right-mouse click and drag). The target image can be shifted and rotated manually using the arrow buttons, or keyboard shortcuts (see below for detailed key combinations). You can alter the shift/rotation steps using button Options. Fig. 2.2 Main window for 2D image registration. The registration can also be done automatically using buttons Register after selecting VOI carefully. It is generally recommended to shift/rotate manually first so that the 2 images are sufficiently close to each other, before using the automatic function. You can alter the searching range using button Options. Once the images are registered, a saving function with button Save... will allow you to save the transformed image. It saves optionally also the reference image. This makes sense if there is resampling during loading. A difference image can be saved too. The grey values in the difference image are calculated as such: Diff = (256 + target – reference) / 2 The resulting images will be saved in the target folder with "_tar", "_ref" and "_diff" attached to the file name. Keyboard shortcuts: (For the keyboard shortcuts to work, click at an empty place on the main window so that it is on focus to respond to the shortcut signals. ) Shift + ←: shift target image to the left (x-axis) by one step. Shift + →: shift target image to the right (x-axis) by one step. Shift + ↑: shift target image further (y-axis) by one step. Shift + ↓: shift target image closer (y-axis) by one step. Ctrl + Shift + ←: rotate to the left (anti-clock-wise) by one rotation step. Ctrl + Shift + →: rotate to the right (clock-wise) by one rotation step. 3. 3D registration. This function can be activated via menu Actions->3D registration, as shown in fig. 3.1. Fig. 3.1 How to activate 3D image registration function. The 3D registration window, as shown in fig. 3.2, will appear and the normal image control window will be toggled off. For the first time use of this function, you might need to re-adjust the window size so that all controls are shown properly. This window is a "floating window", meaning that it cannot be attached to the main window, but it can be toggled on and off with "Actions->3D registration" at any time. Even if the registration window is toggled off, the registration procedure maintains its status until another task (e.g., open a new dataset, start 2D registration) is started explicitly. For registration, two datasets are needed: a reference image volume and a target image volume. During registration, the target image is transformed into the coordinate system of the reference image which stays stationary. By double-clicking the corresponding line in the list with left mouse button, one can browse to select the corresponding image volume. Once both volumes are selected, one can load by clicking on the Load button. The screen image shown above is when the reference and target image volumes are loaded successfully. Once loaded, the target image and reference image can be displayed either individually or as fused image, by clicking on the corresponding line in the list. Once highlighted, you can use Page Up and Page Down button to switch. In the fusion mode, a slider is provided to vary the weights (blending). The images are shown in the main window as 3 orthogonal views: the x-y view (transaxial view) at bottom-left, the x-z view (coronal view) at top and the z-y view (sagittal view) at right. When target/reference image is shown alone, one can change the color options and the dynamic range using the histogram shown. Fig. 3.2 Main window for 3D image registration. To visually examine how good the registration is, one can alternate between target and reference images, or view the fusion images with various settings. Alternatively, you can also check profile along any line (right-mouse click and drag). The target image can be shifted and rotated manually using the arrow buttons, or keyboard shortcuts (see below for detailed key combinations). There are 3 sets of arrow buttons. Each of them corresponds to a given view: the controls and the views are arranged in the same way topologically. You can alter the shift/rotation steps using button Options. The registration can also be done automatically using buttons R and Register all after selecting VOI carefully. It is generally recommended to shift/rotate manually first so that the 2 sets of images are sufficiently close to each other, before using the automatic function. You can alter the searching range using button Options. On each set of the arrow windows, there is a button R (standing for register). This action would do automatic registration on the corresponding view only. The Register all button does registration on the 3 views alternatively (in a few loops): after registration on one view, all 3 views are retrieved again using the newly obtained transformation parameters. All these actions can be applied repeatedly, and on different location of the volume. A Volume Of Interest (VOI) is defined for automatic match: only the area within the VOI is used for calculating matching criteria (by default, the square difference). This can be crucial for registration: the intuition is to use an area with clear and similar features for registration. The VOI can be hidden if desired, or be shown only so that you can move around to visualize the images at any location, or be enabled for drawing. To keep the transformation parameters, three actions are provided: Reset, Reload and Keep. The parameters can be kept in the original log file (if absent, one log file will be created) in the target dataset. Reload would simply read the parameters back and apply the transformation. Reset is to discard all shifts and rotations in the current session. Once the parameters are saved in the log file, they will be loaded back automatically when you open the same set of data back again for 3D registration. Once the images are registered, a saving function with button Save... will allow you to save the transformed images. It saves optionally also the reference volume. This makes sense if there is resampling during loading. A difference image can be saved too. The grey values in the difference image are calculated as such: Diff = (256 + target – reference) / 2 The resulting images will be saved in the sub-folder /Registration in the target folder (automatically created if absent). Keyboard shortcuts: (For the keyboard shortcuts to work, click at an empty place on the main window so that it is on focus to respond to the shortcut signals. ) Shift + ←: shift target image to the left (x-axis) by one step. Shift + →: shift target image to the right (x-axis) by one step. Shift + ↑: shift target image further (y-axis) by one step. Shift + ↓: shift target image closer (y-axis) by one step. Shift + Page Up: shift target image up (z-axis) by one step. Shift + Page Down: shift target image down (z-axis) by one step. Ctrl + Shift + ←: rotate x-y (tra) view to the left (around the z-axis) by one rotation step. Ctrl + Shift + →: rotate x-y (tra) view to the right (around the z-axis) by one step. Ctrl + Shift + ↑: rotate x-z (cor) view to the left (around the y-axis) by one rotation Ctrl Ctrl + Shift + →: rotate x-z (cor) view to the right (around the y-axis) by one step. + Shift + Page Up: rotate z-y (sag) view to the left (around the x-axis) by one step. rotation step. Ctrl + Shift + Page Down: rotate z-y (sag) view to the right (around the x-axis) by one rotation step. 4. Further development As a beta release of image registration, the available functionalities are quite limited. New functions and features will be gradually added in the next releases. A brief list of these functions is given below. - Truly 3D registration as an alternative. - Alternative similarity/dissimilarity measures: e.g., co-variance, mutual information..., in addition to the sum of square difference. - Alternative views for the pseudo-3D registration, e.g., MIP images in addition to the usual orthogonal views. - Transformation: scaling factor in addition to translation and rotation. - Pre-processing of the image views. - Saving images in a resolution different than the loaded resolution (e.g., the original resolution), within given volume-of-interest. - Alternative visualization method for registered images, e.g., check-board viewing, difference image. Some of these come from the feedback we received on user/sales meeting in 2013. We appreciate a lot these invaluable suggestions and hope for more feedback from our users on the beta release, via [email protected].