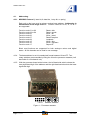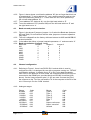
1
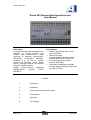
625ManualIss1.doc
Anville Instruments Ltd
Series 625 Data Acquisition System
Hardware User Manual
(QMF 37)
Jan 2008 Issue 1
Anville Instruments Ltd
Unit 19, Pegasus Court
North Lane, Aldershot
Hants, GU12 4QP
Tel. 01252 351030
Fax. 01252 323492
NOTICE
The contents of this manual are liable to change without notice. Whilst every effort has been
made to ensure the accuracy of this manual, Anville Instruments Ltd will not be responsible
for any errors and omissions or their consequence.
Windows is a registered trademark of Microsoft Corporation.
COPYRIGHT
This documentation and the equipment described in it are copyrighted with all rights
reserved. Under copyright laws, neither the documentation nor the software may be
copied, photocopied, reproduced, translated, or reduced to any electronic medium or
machine readable form, in whole or in part, without the written consent of Anville
Instruments Ltd. Failure to comply with this condition may result in prosecution.
Page 1 of 15
07/01/2008
625ManualIss1.doc
Series 625 Remote Data Acquisition Unit
User Manual
Description
A compact modular data acquisition unit,
designed to provide accurate and
reliable data measurement whilst
operating in harshest environments.
Individually
configurable
channels.
Available in 8, 16 and 24 channel
versions as Analogue Inputs, Digital
Inputs, Analogue Outputs (4 channels
per slot) or Digital Outputs.
RS485
communications
employing
MODBUS/RTU,
optional
TCP/IP
MODBUS.
Key Features
• Robust, rugged case with 3.5mm
screw terminals
• DIN rail mounting
• Interchangeable cassette modules
housing all the active electronics
• Full inter-channel and system
isolation (EN60950)
• Individually configurable channels
(scaling, features) through simple setup utility (FDTLite)
Contents
1.
Unpacking
2.
Installation
3.
Connecting the inputs and outputs
4.
Configuration
5.
Operation
6.
Fault finding
Page 2 of 15
07/01/2008
625ManualIss1.doc
1. Unpacking
1.1
1.2
1.3
The unit is available in either 8 or 24 channel form. The base units are
numbered 625/BASE8 and 625/BASE24 respectively.
If you have ordered a base unit complete with I/O cassettes, these will be
installed in the correct slots according to the order. If the base units have
been ordered separately from the cassettes, then these will be packaged
separately.
Carefully remove the unit from the packing and inspect for damage. If
damaged, then please inform the Factory within 3 days of receipt, so that a
replacement can be sent to you.
Page 3 of 15
07/01/2008
625ManualIss1.doc
2. Installation.
140.00mm
Cassette L
Processor & Comms.
Dimensions
Weight
Casing
Fixing
Protection
Connectors
2.1
2.2
2.3
2.4
2.5
2.6
Channel 9-16 (Slot 2)
Cassette R
35.00mm
90.00mm
Channel 1-8 (Slot 1)
75.00mm
Channel 17-24 (Slot 3)
90 x 140 x 75 mm
500 g (average)
Reinforced Polycarbonate
DIN rail symmetrical 35mm (EN50022/BS5584)
IP40
Captive Plus-Minus screws M3.5, tinned strip steel. Capacity 2 x
2.5mm solid or 2 x 1.5mm stranded conductor capacity.
The unit may be installed on 35mm DIN rail or by extending the fixing clips,
the unit can be panel mounted using 4mm screws.
The dimensions of the 24-channel unit are shown above. The 8-channel unit
is half the width i.e. 70mm wide.
Please allow sufficient room to install trunking and make the connections to
the unit. It is recommended that at least 150mm is allowed between horizontal
DIN rail centres.
The cassettes are keyed to prevent insertion in an inappropriate position.
To prevent possible mistakes, it is recommended that the unit be installed
with the cassettes in place to avoid mixing the I/O from several units.
All channels are isolated from each other and the system, thus two
connections are required for each channel.
Page 4 of 15
07/01/2008
625ManualIss1.doc
2.7
Power
2.7.1
Supply Voltage is 24 VDC ±10% @ 70mA – Isolation 500 VDC. The 70mA
load only applies when a 24-channel digital output unit is used and all 24
channels are ‘ON’. The unit is fitted with an internal diode to protect against
reverse polarity and to prevent voltages greater than 27VDC being applied.
As can be seen from the illustration below, two sets of power terminals are
provided so that a series of units can be ‘strung’ together without the need for
two connections per terminal.
2.7.2
-
-
-
-
-
-
-
-
-
+
+
+
+
+
+
+
+
+
+
+
+
+
+
+
+
+
-
-
-
-
24VDC in
-
-
-
-
-
-
+
-
+
-
-
-
+
+
+
-
+
+
+
+
+
+
+
+
+
+
-
-
-
-
-
-
-
-
24VDC to next unit
0V in
0V to next unit
2.7.3
Two ground terminals (WD+ & WD-) are also provided. This is not safety
ground but is used to increase immunity to noisy inputs.
2.8
RS485 communications.
2.8.1. The unit is equipped with an isolated RS485 communications port. The unit is
shipped as standard with 4-wire RS485 selected. Please see below for
changing to 2-wire configuration.
2.8.2. It is recommended that Belden 9502 or similar be used and that the wires be
terminated directly at the terminals in a multi-drop (parallel) loop. The screen
is connected to the ‘SCR’ terminal – NOT the ‘COM’ terminal as this is used
in three wire RS485 connections. Avoid ‘spurs’ longer than 300mm or else
reflections will occur and corrupt the communications.
Page 5 of 15
-
-
-
-
-
-
-
-
-
-
-
-
-
-
-
-
+
+
+
+
+
+
+
+
+
+
+
+
+
+
+
+
+
+
+
+
+
+
+
+
+
+
+
+
+
+
+
+
-
-
-
-
-
-
-
-
-
-
-
-
-
-
-
-
From previous TX+
To next TX+
From previous TX-
To next TX-
From previous RX+
To next RX+
From previous RX-
To next RX-
07/01/2008
625ManualIss1.doc
2.8.3. It is recommended that a 120 Ohm resistor be connected across the RX
terminals of the last unit on the loop, once again to prevent reflections.
2.8.4. Please remember that when the unit is the first in the loop, it will be
connected to a ‘master’ unit. This would normally be a computer with an
RS485 port.
2.8.5. In this case, the TX and RX terminals of the master should be connected to
the RX and TX terminals respectively of the Series 625 unit. Please observe
polarity.
2.8.6. To change the communications configuration to 2-wire RS485, remove the
left hand side cassette, flip up the lid and remove the processor (lower) board.
Move JP6 from position ‘B’ to position ‘A’. Replace the board, close the lid
and replace the cassette
3. Connecting the inputs and outputs
When the units are connected terminals may be live and the removal of parts is likely
to expose live parts. The unit must be disconnected from all voltage sources
(including any potentially hazardous I/O leads) before it is opened for any
replacement, maintenance or repair. Any adjustment, maintenance or repair of the
opened unit whilst powered must be avoided. It should be carried out only by skilled
personnel who are aware of the hazard involved.
3.1. Digital inputs (Low level 10 – 30V).
These are current driven and require about 2mA. They are designed to operate from
external supplies. Although + and - are specified, either AC or DC inputs may be
used. Do not apply voltages in excess of the specified input range.
Page 6 of 15
07/01/2008
625ManualIss1.doc
If volt-free contacts are to be used, since the unit is 24VDC powered, the supply may
be taken from the main supply as all inputs are isolated.
Connect the input to the
appropriate terminals each input is isolated. If
inter-channel isolation is
not important, the (-)
Excitation Source -ve
terminals
can
be
commoned and connected to the negative of the supply. Connect the positive of the
supply to the correct side of the switching device and the other to the (+) input
terminals.
Opto Isolator
Excitation Source +ve
3.2. Digital inputs (High level 80 – 240VAC).
These are current driven and require about 2mA. They are designed to operate from
external supplies. Do not apply voltages in excess of the specified input range.
Connect the input to the
appropriate terminals each input is isolated. If
inter-channel isolation is
not important, the (-)
Excitation Source neutral
terminals
can
be
commoned and connected to the neutral of the supply. Connect the live of the
supply to the correct side of the switching device and the other to the (+) input
terminals.
Opto Isolator
Excitation Source live
Please remember that the source of the inputs may render the terminals
hazardous - as when a thermocouple is connected directly to a heater element.
The user should take steps to affix warning labels as necessary.
3.3
Analogue inputs - thermocouples
In the circuit schematics below, the capacitor is not normally fitted. In the event of
extremely noisy signals, appropriate capacitors and resistors can be fitted at extra
charge.
Solid State
Automatic cold junction compensation
is provided, so that thermocouples or
compensation cable should be
connected directly to the terminals switch
observing the polarity.
It is
recommended that direct connection is made, although wire protecting ferrules may
be used if desired. The CJC sensors are located centrally on all input boards
+
-
Input circuit
The offset facility is provided to enable errors, which might be caused by heat
sources in a cabinet, to be removed completely. Offsets should only be applied
when the unit is installed and running in the normal working environment, and after
sufficient time has elapsed to stabilise any temperature gradients within the cabinet.
Page 7 of 15
07/01/2008
625ManualIss1.doc
When very low level signals such as for type R thermocouples are being used in very
noisy electrical environments, it is possible that readings may vary slightly due to
high series mode signals. See elsewhere for adjustable filter time constants.
3.4.
Analogue inputs - linear signals
Voltage
+
-
Input circuit
Solid State
Connect direct to the channel
terminals, observing polarity. For very
switch
low level signals, it is recommended
that screen cable be used, with the screen terminated at the signal source end.
V
+
-
Current
Current signals are converted to voltage
across a burden resistor, which should
I
be attached directly to the terminals so
Burden Resistor that if the cassette is removed the
switch
mA Inputs measured on 2V range (code 035)
current loop will not be broken. If the
unit has been ordered with current inputs specified, the burden resistors will be
supplied separately. If the burden resistors are to be supplied by the customer, then
they should be at least 0.1% 15ppm type. If 20mA is to be measured then a 100 ohm
resistor should be used with the 2V range selected.
100 ohm +
3.5.
Input circuit
Solid State
Analogue inputs - platinum resistance thermometers (PRT or RTD)
The system is designed for 3-wire PRT100s. These are measured in a bridge
configuration where lead 1 and 2 resistances appear in the lower two arms. Connect
lead 1 to channel (+), lead 2 to channel (–) terminal. Three ‘PRT Rtn’ terminals are
provided, one for each slot. The third wire should be connected to one of these
terminals.
Take care not to confuse the three wires of the PRT or else unpredictable
readings will be obtained.
2-wire sensors can be used by connecting the PRT to the + and - channel terminals,
and linking the - terminal to the 'PRT Rtn' terminal. 4-wire sensors are measured as
3-wire units by ignoring the fourth wire and connecting as 3-wire PRTs.
Page 8 of 15
07/01/2008
625ManualIss1.doc
Solid State
+
-
switch
PRT
Rtn
Internal Current Source
3.6.
Make sure all connections are tight and
that the three wires have the same
resistance and are affected by the same
external influences, such as hot pipes and
electrical interference.
If several PRTs are being used, it is
convenient to common the Lead 3's to a
local bus arrangement and run a single
fairly heavy gauge wire back to one of the
'PRT Rtn' terminals.
Digital outputs - transistor
Excitation Source
Load
Output circuit
Although the output terminals are marked + and -, the
MOSFET output of the opto-isolator is bi-directional
so either AC or DC loads may be driven. In addition
the switching speed is controlled so there is no
EMI/RFI generation and no snubber network is
Excitation Source return
required. The output is rated at ±350V at 320mA
peak, 120mA continuous. The device is rated at 400mW and has an ‘ON’
resistance of 25 Ohms.
3.7.
Analogue outputs
Four fully isolated analogue outputs are provided in each slot, thus a total of
12 outputs can be provided per unit. Since they are isolated, they can be
combined with all the other I/O types. The isolated supply voltages of
between 15 and 30VDC (nominally 24VDC) are connected to the odd
numbered channels and the outputs are taken from the even numbered
channels. If full isolation is required between analogue output channels then
individual supplies will be required.
3.7.1. Current outputs.
For clarity, only one channel will be illustrated, but the same connection
scheme applies to all other analogue output channels.
0V
The scheme illustrated sources 0 – 20mA
and the load it will supply is dependent on
the supply voltage used. Allow 2V for the
20mA current constraining circuit, so a 24VDc
supply will allow up to 1kohm load to be
driven. If isolation is not required then all
the odd numbered (+) terminals and the
odd numbered (-) terminals can be
Channel 1
Channel 2
connected together. Output smoothing
(Odd numbered) (Even numbered)
capacitors are not employed, but it is not
advisable to connect the load ‘live’ as an inrush current can result in damage
to a burden resistor.
24VDC
-
+
Page 9 of 15
Load
-
+
07/01/2008
625ManualIss1.doc
As can be seen, outputs are available at channels 2, 4, 6, 8, 10, 12, 14, 16,
18, 20, 22 and 24.
3.7.2. Voltage outputs.
Four fully isolated analogue outputs are provided in each slot, thus a total of
12 outputs can be provided per unit. Since they are isolated, they can be
combined with all the other I/O types. The isolated supply voltages of
between 15 and 30VDC (nominally 24VDC) are connected to the odd
numbered channels and the outputs are taken from the (-) terminals of the
odd and even numbered channels.
For clarity, only one channel will be illustrated, but the same connection
scheme applies to all other analogue output channels.
0V
The scheme illustrated sources 0 – 10VDC
at up to 5mA. In this case the voltage output
24VDC
appears between the (-) terminals of
adjacent channels, the positive being the
even numbered channel. If isolation is not
required then all the odd numbered (+)
terminals and the odd numbered (-)
terminals can be connected together.
Channel 1
Channel 2
Output smoothing capacitors are not
(Odd numbered) (Even numbered) employed, but it is not advisable to connect
the load ‘live’ as an inrush current can result in damage.
0 -10V into
Load
+
-
+
+
4. Configuration.
4.1
Hardware configuration.
4.1.1. The unit automatically senses the configuration of the I/O on power up. That
is, how many and where the inputs and outputs have been installed.
4.1.2. If it is required to increase the number of channels in an 8-channel unit, a 24channel base must be used, but the existing cassette and the new one can be
installed in the 24-channel base. This feature makes spares holding very
simple.
4.1.3. To change a board, power down the unit, remove the cassette, lever up the
lid with a small screwdriver and change the board. Replace the cassette. The
unit will reconfigure itself on power up.
Page 10 of 15
07/01/2008
625ManualIss1.doc
4.1.
Addressing.
4.2.1. MODBUS Protocol (1 start bit, 8 data bits, 1 stop bit, no parity)
Each unit on the loop must be given a unique base address. Addressing is
hexadecimal in the range 00 to FF. Function codes 01 to 08, 15, 16 & 17
are supported:
Function code 01 or 02
Function code 03 or 04
Function code 05
Function code 06
Function code 07
Function code 08
Function code 15
Function code 16
Function code 17
Read n bits
Read n words
Write 1 bit
Write 1 word
Read Exception
Loopback
Write n bits
Write n registers
Report ID
Block read functions are supported for both analogue values and digital
status. All 24 channels can be read in one message.
4.2.4. The base address is set in hexadecimal format between 00 and FF. Two
rotary switches are accessible by lifting the lid on the processor cassette (Left
hand side of a 24-channel unit)
4.2.5. With the processor board at the bottom, the left hand side switch selects the
most significant digit of the address and the right hand switch selects the least
significant digit.
E 0 2
C
4
1
2 3 4 5
JUMPERS
A
8
6
E 0 2
C
4
A
8
6
Figure 1 – Processor cassette.
Page 11 of 15
07/01/2008
625ManualIss1.doc
4.2.6. Figure 1 above shows a unit has the address ‘00’ (do not forget that this is set
in hexadecimal). To set to address ‘01’, use a small screwdriver and turn the
right hand side rotary switch to ‘1’. Power down the unit, when powered up
the unit will adopt address ‘01’.
4.2.7. To set address ‘0E’ (decimal 14), turn the right hand switch to ‘E’.
4.2.8. To set the address to ‘E4’ (decimal 228) turn the left hand switch to ‘E’ and
the right hand one to ‘4’.
4.3.
Baud rate and protocol selection.
4.3.1. Figure 1 also shows 5 jumpers, jumpers 1 to 3 select the Baud rate (between
600 and 76k8). Do not interfere with the other jumpers or incorrect operation
may result.
4.3.2. The unit is shipped from the factory with baud rate set to 9600 and MODBUS
protocol selected.
4.3.3. In the tables that follow, a jumper inserted represents a ‘1’ and removed a ‘0’.
4.3.4. Baud rate selection (Jumpers 1 to 3).
Baud rate
Jumper 1
Jumper 2
Jumper 3
600
0
0
0
1200
1
0
0
2400
0
1
0
4800
1
1
0
9600
0
0
1
19200
1
0
1
38400
0
1
1
76800
1
1
1
4.4.
Channel configuration.
4.4.1. Referring to Figure 1, there is an RS232 RJ11 socket which is used to
configure the unit. It is designed for use with a computer running our ‘FDT625’
configuration software. A suitable 9 way ‘D’ to RJ11 plug lead is available
from Field. In the absence of such a lead, the computer’s RS232 port may be
connected to the RS485 port, provided that 4-wire RS485 is selected (See
above). On the 9 way connector pins 2, 3 & 5 are used. Connect the RX of
the computer to the TX of the unit and the TX of the computer to the RX of the
unit. Connect pin 5 to the ‘COM’ terminal.
4.4.2. Analogue ranges.
Range
20.000V
10.000V
5.0000V
2.0000V
1.0000V
200.00mV
100.00mV
50.000mV
20.000mV
Page 12 of 15
Code
032
033
034
035
036
037
038
039
040
Range
Type ‘K’
Type ‘J’
Type ‘S’
Type ‘R’
Type ‘T’
PRT
Output continuous
Output ‘one-shot’
Unused
Code
042
043
044
045
046
047
002
003
000
07/01/2008
625ManualIss1.doc
4.4.3. Digital configurations.
Configuration
PWM continuous mode
0.1s units
1.0s units
PWM ‘one-shot’ mode
0.1s units
1.0s units
Timer 0.1s units
1.0s units
Counter
Status (input and output)
Page 13 of 15
Code
004
005
006
007
008
009
016
000
07/01/2008
625ManualIss1.doc
5.
Operation.
There are two LEDs on the processor unit. The yellow one marked ‘Fault’
indicates the health of the unit. Upon power up, the yellow LED will illuminate
for 0.2s in every 2s. The Green LED will be illuminated constantly and will
extinguish as data passes down the RS485 loop. This LED is in the transmit
circuit so the unit is answering an interrogation every time it flashes ‘OFF’.
5.1.
5.2.
5.3.
5.4.
The unit can be configured with FDTLite utility. Refer to 4.4.1. above for
connections. Ensure that MODBUS protocol is selected at 9600 Baud.
First of all ‘Identify’ the unit. The address number, the unit type and its
firmware release number will be displayed. Click the ‘Done’ button.
The unit may now be configured using the ‘Configure’ button. The type of
board fitted to each slot is displayed. Click on the board of interest and the
display will change to a representation of each of the channels. Use the drop
down menus to select the configuration.
Use the ‘Monitor’ button to monitor the channels.
6. Fault Finding.
Check that the unit is wired to the power supply and that it is switched on. The
LEDs should be on.
6.1.
The ‘Fault’ (Yellow) LED.
1.
2.
When the unit is healthy, this will illuminate for 0.2s every 2s.
If illuminated constantly, the unit has not been programmed – please contact
the Factory.
Being illuminated for 1s in 2s indicates a watchdog error, cycle the power.
Being illuminated for 0.1s in 2s indicates a fatal error. If cycling the power
does not cure the problem, the board needs replacing.
Not illuminated at all – check that power is ‘ON’ and that the fuse is intact.
This is accessible by removing the processor cassette and replacing the fuse
located on the base board. It must be replaced with the correct value
(200mA) or else damage may be caused to the unit and the power
supply.
3.
4.
5.
6.
6.2.
No unit in the loop responds.
1.
2.
3.
4.
5.
Ensure that the units and computer protocols match
Check each unit's address and make sure the channels are configured correctly
Ensure that the Baud rate is the same for the computer and all units on the loop
Check that power is applied to the RS232/comms. loop converter if used.
Ensure that all communications LEDs are on, and that they dim or flicker as data
passes
6. Check the connections between the computer RS232 port and the RS232/comms.
loop converter if used.
7. Check the communications loop connections - most faults arise from this cause
8. Check RS232/RS485 converter by 'looping back' and running a terminal emulator
Page 14 of 15
07/01/2008
625ManualIss1.doc
6.3.
Communications errors.
1.
2.
3.
4.
Check the wiring of the Belden cable carefully.
Check routing of the communications loop - try to avoid sources of HF noise.
Check that no unit has a spur connection longer than.
Try terminating the transmit loop of the converter with a 330 Ohm resistor to
eliminate reflections. This is done at the unit furthest from the converter.
5. Check the communications protocol for correct parity setting.
6. Check that the correct tristate control is enabled.
6.4.
Measurement errors.
1. Ensure that the correct input type has been configured in the unit
2. Ensure that the correct input has been specified at the computer
3. Check that no inadvertent offsets or scaling have been added to the channel
Thermocouples
1. A hard full scale reading indicates that the Thermocouple is open circuit check
connection polarity and security
2. An error of about 20° to 30°C implies a cold junction compensation error. Ensure
that the correct compensating cable is used and that any joins maintain the correct
polarity
3. Noisy readings can be caused by excessive common mode voltage on the signal,
by the use of type R or S thermocouples in very noisy environments or loose
thermocouples or other sensors. Anville Instruments instrumentation is designed
for use in industrial environments, and is designed for very high noise rejection. If
noise is a problem, please contact the company for further advice.
4. If inter-channel compliance is not good enough, use the offset facility to correct for
temperature gradients across the unit.
Platinum Resistance Thermometers
1. If consistent errors are present check that all input connections are correct; since
a common return is used, a connection error on one channel can affect all PRT
channels.
Page 15 of 15
07/01/2008