1
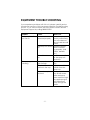
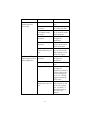
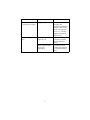
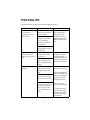
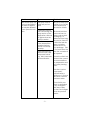
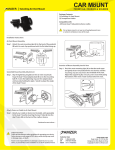
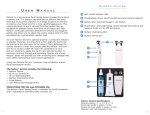
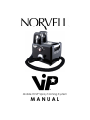
TM Mobile HVLP Spray Tanning System MANUAL WELCOME Thank you for choosing the Norvell® VIPTM Mobile Spray Tanning System. Please carefully review the enclosed information to insure your equipment performs as designed and to enjoy many happy sunless tanning applications. CONTENTS QUICK SET-UP GUIDE ........................... 2 Package Contents Spray Applicator Gun Set-Up QUICK SET-UP GUIDE continued ........ 3 Turbine Spray System Unit WALL MOUNTING GUIDE .................... 3 SAFETY INFORMATION ......................... 3 MAINTENANCE GUIDE ......................... 4 TROUBLE SHOOTING ............................ 5 SPRAYING TIPS ...................................... 8 WARRANTY INFORMATION ................. 10 WARRANTY REGISTRATION .................. 11 QUICK SET-UP GUIDE Carefully unpack your system. Your box contains the following: Turbine Spray System Unit Spay Applicator Gun Spray Hose Solution Cups Solution Cup Lids Power Cord Manual Qty 1 Qty 2 Qty 1 Qty 4 Qty 2 Qty 1 Qty 1 Spray Applicator Gun Set-Up Step 1 Unscrew solution cup from the base of the spray application gun and ll solution cup 3/4 full. Use caution overlling the solution cup may cause leaks. Step 2 Carefully insert the solution cup into the base of the applicator gun and rotate until a snug t is achieved. Step 3 Set the spray patter by turning the spray nozzle at the front of the applicator gun. Align the nozzle in a horizontal position FIG 1.1 for left to right spraying and a vertical position FIG 1.2 for up and down spraying. Step 4 Adjust the Solution Dial on the back of the gun to the desired level. For a lighter application the dial should be set to a lower number. Settings of 2-4 on the dial are the most commonly used and produce the best atomization. (Atomization: the process that occurs when the solution breaks into minute particles when pulverized by the air ow upon exiting the gun nozzle. Commonly referred to as the spritz or spray.) The higher settings will result in more solution spraying from the applicator creating improper atomization. -2- NOTE: It is important to test the spray patter prior to applying to skin. The best way for testing is on a large white easel pad or poster board. Step 5 Attach Hose. Insert the longer hose tting into the bottom of the applicator gun and turn counterclockwise until rmly locked into place, and the tting lines up with the bottom of the applicator. Avoid over tightening as this may result in broken components. Turbine Spray System Unit Step 1 Attach Hose to Spray System Unit. Insert hose tting into unit and turn counterclockwise until rmly locked into place. Avoid over tightening as this may result in broken components. Step 2 Attach power cord and plug into power socket. Step 3 Turn on your unit and you are ready to start spraying. The power is controlled via the Control Dial on the front of the Spray Unit and the most common setting is about 3/4 of full power. Note: if the power is too low, the solution may not atomize properly. WALL MOUNTING GUIDE The Norvell® VIPTM Mobile Spray Tanning System is designed to be conveniently mounted on the wall or positioned on the oor as desired. If you opt for the wall mounting option it is important to consult your local contractor or home improvement expert to determine the best anchor system for your particular mounting surface. Important Note: Any damage sustained to the unit from improper wall mounting, falling, etc. is not covered by the unit warranty. SAFETY INFORMATION The Norvell® VIPTM system is to be sprayed with professional sunless spray tanning solution only, kept away from water and must be connected to the correct power supply at all times. This system is to be operated by trained sunless technicians only and never operated by children. -3- MAINTENANCE GUIDE End of Day Maintenance Step 1 Remove Hose. Empty any excess solution from the solution cup into a solution storage cup. DO NOT pour any excess solution back into the original solution container as it will contaminate the remainder of solution. It is strongly recommend that this be done over a sink or wet area. Step 2 While holding the gun upside down and pulling back the trigger, rinse your gun by running warm water through the solution feed stem. Repeat this step until water runs clear. Rinse out the handle where the hose connects to the gun, until water runs clear. Shake gun over sink to insure all drips are clear. Rinse solution cup with warm water. Step 3 Fill the solution cup 1/8 - 1/4 with HVLP cleaner, reattach hose and spray through the applicator. Set your solution dial to the maximum setting when spraying for cleaning. Once all cleaner is sprayed, run air through the system for a few minutes. Step 4 Remove hose and cup from gun. Wipe any excess solution from the applicator gun or spray tip with a clean cloth and warm water. Step 5 Re-set your solution dial back to your regular spray settings. Allow all parts to air-dry overnight. Reassemble prior to your rst appointment the following morning. Turbine Spray System Unit Maintenance Step 1 Wipe the unit down with a clean soft cloth. Avoid using anything abrasive on the nish. Acrylic cleaner or Windex are useful products for maintaining the exterior gloss nish on your spray unit. Step 2 Clean the lter. Remove the lter from the base of the unit. Rinse with warm water until water runs clear. Wait until lter is completely dry before re-inserting into unit. For best results, position the spray unit behind the spray technician when in use, this will ensure the unit and lter are exposed to less overspray. -4- EQUIPMENT TROUBLE SHOOTING If you experience problems with this unit, please carefully review the relevant sections of this User Manual and the Trouble Shooting section. If you cannot resolve the issue, please contact Norvell Equipment Support by calling 888-829-2831. Problem Cause What to do The Spray Unit will not turn on. Power cord not attached properly. Ensure the power cord is pushed rmly into to the base of the unit and the wall socket. Electricity not turned Ensure the power on. point is functioning properly. (wall socket, breaker, etc.) The unit is not turned Turn the control dial on. on the spray unit clockwise. The spray applicator Spray cup is not is leaking. tight enough Tighten the solution cup. There is too much solution in the cup. Empty some of the solution from the spray cup. The nozzle may be blocked. Remove solution cup, ll with warm water and spray warm water through the applicator gun, until water ows freely through the nozzle. -5- Problem Cause What to do The spray is splattering and sputtering. Solution cup is low. Add solution to the cup. Power control dial is set to low. Increase the power by turning the dial. Angled applicator too sharply while spraying. Keep the applicator on a lesser angle while spraying. Nozzle may be blocked. Spray warm water through the applicator. Filter could be blocked. Ensure the lter under the spray unit is clear and clean. Spray applicator Increase the numcontrol dial is set too ber on the solution low. dial located on the back of the gun. Solution is NOT dispensing from the spray applicator Nozzle may be blocked. Spray warm water through the applicator. Solution cup is low. Add solution to the cup. Trigger is jamming. Spray warm water through the applicator while the solution dial on the back of the gun is set to “8”. Pull the trigger repeatedly until it frees. Solution dial on the applicator is set too low. Increase the solution dial number on the back of the spray gun. Number 1 is the lowest setting and 8 it is the highest. -6- Problem Cause What to do The applicator is continuing to spray. Trigger is jamming. Spray warm water through the applicator while the solution dial on the back of the gun is set to “8”. Pull the trigger repeatedly until it frees. Hose coming out of unit. Hose not correctly tted to unit. Ensure the tting is inserted, turned, and locked into place. Hose tting broken from over tightening. Contact Norvell Equipment Support for a replacement hose. -7- SPRAYING TIPS Application tips and trick to achieve desired results. Problem Cause What to do The solution is sitting on the skin or beading on the clients skin. Too much solution has been sprayed onto the skin. Dab the area gently with a clean dry towel or sunless application mitt. Lightly re-spray the area blending the tan. Client has foreign barrier on the skin. (i.e. moisturizer, cream or perfume on the skin) Client maybe excessively hot and perspiring. The client is tanned in areas they do not wish to tan. The technician has sprayed the area incorrectly. The client appears orange. Too much tanning solution has been sprayed onto the skin. Exfoliate the skin before re-spraying. The clients skin pH may not be optimal for spray tanning or they may have a low tolerance to DHA. Allow 4-5 days before re-spraying. Client has touched part of their body with a spray tanned area. Exfoliate the area using a moisturizing body scrub. If further exfoliation is desired a salt scrub may be necessary. Ensure the reappliThe client may have cation is lighter, and left a rapid tanning apply a pH balancsolution on too long. ing spray prior to spraying solution. -8- If a rapid tanning formula was used reiterate the time before showering information. Problem Cause What to do The clients spray tan has not developed as dark as desired, or may be different from a previous session. The spray solution used may not be fresh. Be sure to keep your solution in a cool dry place and ensure the solution is fresh. A different solution was used during the spray session or the application dial was set lighter than the previous session . The client may have showered or perspired before the tan could fully develop. Other factors may affect the tan’s development including: diet, hormones and medication. All Norvell solutions feature a born-on date code on their packaging. To determine how long the solution formula is effective nd the open container symbol shown on your package. 12M - 12 months from the time the container is rst opened. Ensure the client has followed the correct recommendations for preparation and post spray tanning care. The client can be re-sprayed if required after a minimum of 10 hours and after a shower has been taken. Consult with your client to determine if any changes in their day-to-day routine has changes since the previous session. -9- WARRANTY INFORMATION IMPORTANT NOTICE FOR REPAIRS DO NOT CALL OR RETURN TO YOUR DISTRIBUTOR ALL REPAIR AND WARRANTY CLAIMS MUST BE MADE TO NORVELL BY CALLING 888-829-2831 Please keep your Proof of Purchase and User Manual in a safe place as you will need these items in the event a warranty claim is necessary. Prior to making a claim, you should carefully review the “Trouble Shooting” section of this manual. If you nd a warranty claim is necessary, all claims should be made directly to NORVELL by calling 888-829-2831. If within (1) year from the date of purchase, the product fails to a defect in material or workmanship, we will repair or replace the unit free of charge with a comparable unit. Comparable unit may be new or refurbished. This warranty applies only to the original purchaser and is nontransferable. The goods must be returned to Norvell with a copy of the proof of purchase for assessment. 1. ALL RETURNS MUST BE FACTORY AUTHORIZED BY NORVELL PRIOR TO RETURN. THIS MAY BE DONE BY CALLING 888.829.2831. 2. RETURNS MUST BE SHIPPED TO NORVELL IN THE ORIGINAL SHIPPING CONTAINER. 3. RETURNS MUST HAVE A VALID RETURN GOODS AUTHORIZATION (RGA) CODE MARKED CLEARLY ON THE OUTSIDE OF THE SHIPPING CONTAINER. RGA’S WILL BE SUPPLIED DURING THE INITIAM CLAIM CALL AND MUST APPEAR ON ALL CORRESPONDENCE CONCERNING THE CLAIM. 4. RETURNED CONTAINERS MUST INCLUDE A COMPLETED RGA FORM. RGA FORMS ARE AVAILABLE ONLINE BY VISITING WWW.NORVELLSUNLESS.COM/WARRANTY Warranties shall not apply to any defect failure or damage caused by improper use or improper/inadequate maintenance and care. The manufacturer shall not be obligated under these warranties: a) to repair damage resulting from attempts by personnel other than authorized Norvell representatives to repair or - 10 - service the product. b) to repair damage, malfunction, or degradation of performance resulting from improper solution use. c) to repair damage, malfunction or degradation of performance resulting from failure to perform user maintenance and cleaning as prescribed. d) to repair damage, malfunction, or degradation of performance resulting from use of the unit in an environment not meeting the operating specications. e) to repair damage, malfunction or degradation of performance resulting from improper wall mounting or other methods of installation. TO ACTIVATE YOUR WARRANTY, PLEASE COMPLETE THE ONLINE WARRANTY REGISTRATION BY VISITING: WWW.NORVELLSUNLESS.COM/WARRANTY WARRANTY REGISTRATION MUST BE COMPLETED WITHIN 30 DAYS OF PURCHASE. 115 Edgewood Avenue Alexandria, TN 37012 888.829.2831 www.NorvellSunless.com © 2011 Norvell Skincare Solutions, LLC Item#VIPMAN