1
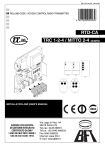
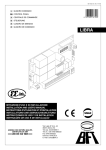
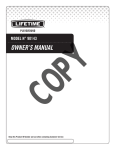
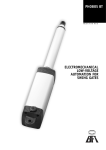
D811319_10
INSTALLATION MANUAL
Example of installation:
I
Type-approved omnipolar circuit breaker, which must be adequately
rated and have at least 3,5 mm contact opening, provided with protection against overloads and short circuits. If not already installed, place
a type-approved differential switch with a 0.03A threshold just before
the automation system.
QR
Control panel and incorporated receiver
S
Key selector
AL
Blinker with tuned antenna
M
Bollard
P
Wall-mounted pushbutton panel
Fte, Fre Pair of photocells
T
1-2-4 channel transmitter
SF
Red and green traffic lights
SM
Magnetic coil
NOTE: The choice of the type and number of safety devices to be installed
depends on the particular use and installation location.
8) TERMINAL BOARD CONNECTIONS
Having passed adequate electric cables through the raceways, and fixed the
various automation components in the chosen points, these must be connected
according to the indications given in the diagrams below.
Carry out connection of the phase, neutral and earth (compulsory) wires. The
protection (earth) wire with yellow/green insulating sheath must be connected
to the appropriate terminals marked by the earthing symbol.
The automation system must only be commissioned after all the safety devices
have been connected and inspected.
Here follows the description of the PERSEO N mod. control unit supplied as
standard (fig. 4).
CN1
1-2 Single-phase mains supply (1=L) (2=N)
3-4-5 Motor connection (3 opening - black wire, 4 common - blue wire, 5 closing - brown wire) up to 4 motors in parallel
N.B. opening means bollard lowered (transit allowed), closing means bollard raised (transit not allowed)
6-7-8 Traffic light output (6 green, 8 red, 7 common) 230V 25+25W max
9-10 Blinker output 230V
CN2
11-12 Electric brake outputs 24V
(up to 4 in parallel) white wires
13-14 Buffer battery board input at 12 Vd.c. to maintain electric brake with mains
power off
15-16 STOPPY signalling LED outputs 24V~ (up to 4 in parallel) 0.8 A max yellow
wires
17-18 AUX NO contact output timed from 2s to 120s
19-20 Supply to accessories 24 V~ 1 A max
CN3
21-22 Photocell input (NC contact) active on closing
23-24 Stop command input (NC contact) - stops the manoeuvre and leaves the
bollard released. A subsequent Start command always activates bollard
opening, unless already opened, in which case it controls closing.
24-25 Opening limit switch input - green wires
26-29 Start command input (NO contact, 2-step logic: open-close) - with the
bollard raised, the Start command initiates the lowering manoeuvre, during which this command is not active; with the bollard lowered, the Start
command initiates the manoeuvre, and during rod raising, a new Start
command interrupts the manoeuvre and controls lowering.
27-29 Open command input (NO contact)
The contact “open” also acts as safety device in that, after the bollard has
beeen lowered, it deactivates the closing and start command, interrupting
also the automatic re-closing until it is released.
28-29 Close command input (NO contact)
30-31 CN4 Heating resistor
Terminal preset for supplying the heating resistor (230V~100W max) on the “R”
series models. Allows the bollard to be used even in particularly cold climates.
However, even with the heating resistor installed, it may be necessary to remove
any layers of ice which have formed on the bollard surface (red wires).
32-33 CN6 Antitheft device
Presetting of reed sensor located on the flange of the “A” series bollard. Allows
the bollard to be connected to an external antitheft device. In the case of an attempt to tamper with the bollard, the sensor activates the alarm system (orange
wires, NC contact).
CN8 Radio Receiver
Connection for single and double-channel radio receiver
The second channel is always connected to the close command (see dip-switch
5 configuration).
The first channel can be configured, by means of the J1 jumper (see fig. 4), as:
ENGLISH
t 4UBSUXJUITUFQMPHJDPQFODMPTF
see Start command description in the paragraph concerning terminal board
connections.
t 0QFO
only accepts the opening command.
To control closing and opening by means of two different keys on a doublechannel transmitter, use a double-channel receiver and move the J1 jumper on
the PERSEO N control panel to the Open position.
34-35 CN9 Antenna
Antenna input (35 signal, 34 braid). RG58 Cable.
The components - Heating resistor (red cables), Electric brake (white cables),
LED lights (yellow cables), Opening limit switches (green cables) and Antitheft contact (orange cables) - are not polarised, therefore the position of
the cables of the same colour is interchangeable.
9) CONNECTION TO SEVERAL MOTORS
Refer to Fig.8. for the connection to several motors.
The motor capacitors must be connected in parallel. To do this, cut the CM connector of the capacitor and use an auxiliary external terminal board.
The limit switches must be connected in series as indicated in Fig.8. The electric
brakes must be connected in parallel as indicated in Fig.8. The connections must
be completed in a workmanlike manner.
DIP-SWITCH CONFIGURATION
1 T LAVORO
LEAVE THE DIP1 OFF!
2 T PAUSA
Enables subsequent automatic closing
OFF= excluded
ON= dwell time to be entered and set by means
of appropriate trimmer (dwell time) from 2s to
120s
3 SET PAUSA
Enables Start and Close commands during dwell time
OFF= disabled
ON= enabled
4 SET AP
Start command only valid when activated after Open command
OFF= independent inputs
ON= restricted inputs
5 SET CH
Closing command
OFF= impulse activated
ON= impulse released
6 PRELAMP
Pre-blinking on blinker and traffic light
OFF= excluded
ON= 2s before each manoeuvre with alter nate
green-red signal on the traffic light before each
closing operation
7 LED OK AP
Operation of LED lights with bollard raised
OFF= fixed lights
ON= blinking at 1s
8 LED OK CH
Operation of LED lights with bollard lowered
OFF= fixed lights
ON= blinking at 0,5s
J2
Device select
OFF= STOPPY (50 cm)
ON= STOPPY H (70 cm)
TRIMMER SETTING
T AUX Sets the Aux contact activation time from 2s to 120 s
V RALL Sets the approaching speed towards the mechanical closing liminting
device (on opening the slow-down is steady).
TPAUSA Sets the dwell time from 2s to 120s.
10) CONCENTRICITY SETTING UP
For correct operation, proceed to setting up the cylinder concentricity in order that,
during the opening and closing manoeuvres, movement occurs smoothly, regularly
and without oscillation. To set up the cylinder, proceed as follows:
Use a no.4 Allen key to unscrew and remove dowels A (fig. 5).
Insert a no.3 flathead screwdriver (DIN 0,8x5) and turn it one way or the other
until obtaining concentricity (fig. 5).
During this phase concentricity can be checked visually, making sure that the
distance between the cylinder and external flange is as uniform as possible.
Then proceed to a practical check, carrying out a few manoeuvres during which
the cylinder movement can be checked.
Screw the 4 dowels in tight.
STOPPY- Ver. 10 -
13