1
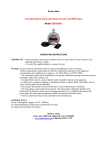
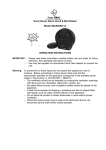
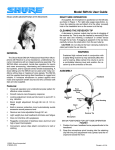
WHIRELESS PORTABLE AMPLIFIER
GLOBETROTTER
OPERATION MANUAL
GLOBETROTTER
GLOBETROTTER
GLOBETROTTER
MANUALS
TO USERS
POWER USING INSTRUCTOIN:
1. ON USING THE AC ELECTRIC.
* Please make sure the power is AC110V or AC220V/
* When put up the button on “ON”, the red indicator will light, it means the AC power is ok. If the
red indicator isn’t light, it means AC power can’t work or the battery is out of power. When put
down the bottom, the charge indicator will light, it means electronic charge works, the middle
button means “OFF”.
OPERATING INSTRUCTIONS:
1. FRONT INSTUCTIONS:
- Tone control
- Echo
- Wireless microphone volume control
- Recharging indicator
- Battery indicator
- RF 1 Indicator
- Jack of wire microphone
- Wire microphone volume control
- Power indicator
- Speaker
YOUR ATTENTION PLEASE:
2. REAR INSTRUCTIONS:
2. WHEN USING DC POWER:
3. Transmitter Instruction
Please put down the power cord plug on below two cases:
1. Long time not using the amplifier.
2. After the electronic
3. Charge finished.
*. When DC power switch is ON, it can works.
* Please make sure the polarity of DC power and the best choice of the OUTPUT DC12V. 2A
* The red indicator lighting means power is works.
* Please pay attention that if indicator (BATT LOW) lighting, it means inserted charged battery or
output AC power voltage is low.
3. PAY ATTENTION TO THE BELOW THINGS WHEN THE DC POWER IS
LOW:
(There is 11.2Ah/ 12V DC charged battery inside this amplifier)
If red indicator (BATT LOW) is lighting or flashing, it means the inserted power is low, so please
connect the AC power to have electronic charged.
4. INSERTED ELECTROINC CHARGE METHOD:
* Inserted AC power cord, and put up the power switch.
* Green charged indicator lights, it means electronic charge is work.
*Please make sure the electronic charge time is not less 10 to 12 hours. (The Green indicator will
die out after electronic charge)
YOUR ATTENTION PLEASE:
If under the above using the green indicator is not light, please check out
-1-
MANUALS
- Power
- DC in jack for 12-18 voltage
- Record output
- Jack of wire microphone
- Microphone jack
- Power switch
- Power indicator
- Battery case (follow the indicator to open)
4. Operation Instructions:
- Pull the full antenna.
- Connect the AC cable to power output. Note: power voltage have to meet amplifier voltage.
- Insert the battery into the transmitter case. Follow the arrow direction to open the case then
insert the 1.5V *2 batteries into the transmitter case. (Your attention on the� polarity of battery
to be correctly)
- Connect the head type microphone or neck type microphone to the jack of the transmitter. (Plug
firmly.)
- Turn on the power switch of transmitter then the red indicator will light.
- Adjust the volume control of transmitter to minimum position.
- Turn on the power switch of amplifier, UP side is power “ON”, down side is “Recharging
function”.
- Adjust the volume control of amplifier and transmitter to get a best situation.
- Please set the transmitter away from the amplifier over 3 meters to avoid any feedback noise
-2-
GLOBETROTTER
5.ON USING WIRELESS MICROPHONE
*. This amplifier can be worked with wireless handhold microphone, wireless
bodypack microphone, wireless conference microphone.
*. This amplifier also can be worked with cord microphone. ③ is wireless microphone
volume control button, the up side green indicator ① is wireless microphone receive
signal indicator.
6.ON USING CORD MICROPHONE
*. Please insert the cord microphone jack (Ф6.35) into ④ pole, and then adjust the ⑧
volume control button till the idea volume.
*. Please don’t put the microphone to the speaker for fear the big noise.
7.RECORDING VOICE
When using the recording output ⑦ to insert (Ф6.35) audio cable, please also bring
with the recording equipment, then it will make voice recording.
.BODYPACK MICROPHONE TRASMITTER USING METHOD
1. PARTS LISTING
-Microphone jack
-Power switch
-Power indicator
-Battery case
2. BATTERY INSERT METHOD
- Please open the battery case cover.
-Pay attention to the + polarity of battery to be correctly.
-Cover the battery case then you can use the transmitter.
PLEASE INSERT THE MICORPHONE JACK TO THE TRANSMITTER
-This transmitter can be worked with Lavalier microphone or headset microphone.
- This transmitter can be used in any direction according to user’s own willing.
-This transmitter also can be put in the pocket or the waistband.
SYSTEM COMPOSITION
1.Wireless amplifier..................................1
2.transmitter..............................................1
3.bodypack microphone...........................1
4.headset microphone..............................1
5.1.5V batteries........................................2
6.user manual...........................................1
GLOBETROTTER
MANUALS
MANUALS
COMMON FAULTS AND SIMPLE APPROACH
FAILURE
Whistle
APPROACHING
Please turn down the volume or put the microphone 3 to 5
meters far away from the amplifier.
RF indicator don’t
①.Transmitter is not open.
light
②.Transmitter’s frequency is not fix for the receiver.
③.No electronic power of the transmitter.
④. The power of amplifier is not open.
NO AUDIO OUTPUT
①.Check out if transmitter is put “ON”.
OR OUTPUT
②.Please be sure if the transmitter is well connected.
VOLUME IS LOW
③.Check if it’s low power of the transmitter battery.
④.Please turn the Volume switch from low to louder.
⑤.Turn on the Amplifier
⑥.Change the lavaliver mic nor the headset mic.
⑦.
CHARGING
①.Put the power switch to “CHARGE ON”.
INDICATOR NOT
②.Change the inserted battery. (Must open the Receiver case)
LIGHT WHEN
③.Check out if the AC power is well connected.
CHARGING
STACCATO AND
①.Please
RF INDICATOR
environment is over 50 meters.
NOT LIGHT
close
to
the
amplifier
when
the complicated
②.Please put the headset microphone at least 50mm away from
the mouth.
③.The battery of transmitter is lack of power, please change the
new battery in time.
④.Once the inserted battery indicator is light or fresh, please
change the inserted battery or make electronic charge on time.
NOISE
① .Please keep away from these high magnetic field when
using vehicle, electric welding, electric motor etc.
②.Please close your mobile phone when using this amplifier.
③.Please change the battery if the transmitter’s indicator is light
or flash.
④.Please be sure that the lavalier mic is well connected.
YOUR ATTENTION PLEASE:
IN ORDER TO MAKE THE INSERTED BATTERY WORKS NORMAL AND EXTEND ITS USING LIFE, PLEASE
CHARGE THE BATTERY AT LEAST 10 HOURS ON THE FIRST TIME USING. IF YOU NEED TO USE THE
INSERTED BATTERY, PLEASE REMEMBER TO CHARGE THE BATTERY FOR 5 HOURS AFTER USING.