1
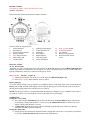
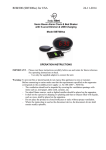
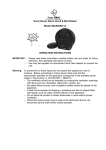
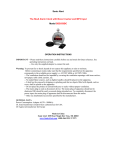
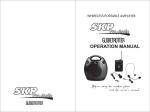
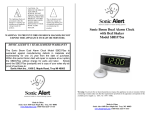
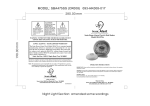
Sonic Alert
The Skull Alarm Clock with Bone Crusher and MP3 Input
Model SBS550BC
OPERATION INSTRUCTIONS
IMPORTANT -- Please read these instructions carefully before use and retain for future reference. See
operating instructions on back.
-- Use only the supplied adaptor to connect the unit.
Warning: To prevent fire or shock hazard do not expose this appliance to rain or moisture.
Before connecting to mains make sure that the requirements specified on the apparatus
corresponds to the available power supply i.e. AC120V 60Hz or AC230V 50Hz.
-- The ventilation should not be impeded by covering the ventilation openings with items such as,
newspaper, table cloth, curtains, etc;
-- No naked flame sources, such as lighted candles should be placed on the apparatus.
-- It shall not be exposed to dripping or splashing and that no objects filled with liquids, such as
vases, shall be placed on the apparatus.
-- Do not place the product in closed bookcases or racks without proper ventilation.
-- The mains plug is used as disconnect device. The mains plug of apparatus should not be
obstructed OR should be easily accessed during intended use. To completely disconnect the
power input, the mains plug of apparatus shall be disconnected from the mains.
-- Only use attachments/accessories specified by the manufacturer.
GENERAL DATA
Power Consumption: Adaptor AC9V~ 900MA)
UL listed transformer (Underwriters Laboratories) for USA
CE Approved transformer for Europe
Made in China
Sonic Alert 1050 East Maple Rd. Troy, MI 48083
www.SonicAlert.com 1-800-566-3210 V/TTY
The Lightening flash and
arrowhead within the
triangle is a warning sign
alerting you of dangerous
voltage inside the product.
CAUTION:
TO REDUCE THE RISK
OF ELECTRICAL
SHOCK, DO NOT
REMOVE THE COVER
(OR BACK) FROM THE
PRODUCT. NO USER
SERVICEABLE PARTS
INSIDE. REFER
SERVICING TO YOUR
SONIC ALERT .
The exclamation mark
within the triangle is a
warning sign alerting you
of important instructions
accompanying the product.
WARNING: TO PREVENT FIRE OR SHOCK HAZARD, DO NOT
EXPOSE THIS APPLIANCE TO RAIN OR MOISTURE.
-
Attention should be drawn to the environmental aspects of battery disposal.
This indicating separate collection for electrical and electroinc equipment.
SONIC ALERT’S 1 YEAR LIMITED WARRANTY
The Skull alarm clock Model SBS550BC is warranted
Against manufacturing defects in materials and workmanship
For (1) year from the date of purchase. Within this period Sonic
Alert will repair or replace at our option the SBS550BC without
Charge for parts and labor. Simply send the SBS550BC (postpaid)
And a copy of your sales slip as proof of purchase to:
Sonic Alert Inc., 1050 E. Maple Road, Troy MI 48083, USA.
Sonic Alert
Made in China
Sonic Alert 1050 East Maple Rd. Troy, MI 48083
www.SonicAlert.com 1-800-566-3210 V/TTY
INSTRUCTIONS
The Skull ALARM CLOCK WITH Bone Crusher
MODEL SBS550BC
Please retain the instruction manual for future reference.
Features show on diagram above:
1. Alarm Indicator
2. PM Indicator
3. Alarm Function Switch
4. Dimmer Switch
5. Skull Snooze button
6. Skull LED Light
7. Volume Knob
8.
9.
10.
11.
12.
13.
14.
Flashing Light Display
Tone Control Knob
Alarm Set
Hour Button
Minute Button
Time Set Button
Alarm Off Button
15.
16.
17.
18.
19.
Bone Crusher Output
AUX Line-in Jack
AC Adaptor
Battery Compartment
Hour Format & Power
Cycle
INSTALLATION
AC 9V Power Input
Attach the AC power supply input to the side of clock at AC9V IN (17) next to the VIBRATOR input (15),
smaller input of the two. Important: do not confuse AC input with vibrator input. The eyes of the skull will
light up continuously when it is connected to the power source.
Bone Crusher / Vibrator – Figure B
1) Attach the bed shaker jack to the back of the clock at VIBRATOR input (15).
2) Place Bone Crusher under mattress (best) or pillow.
Battery Backup
To use the battery backup, you can install a 9-volt alkaline battery in the back of the clock located under the
battery cover (18). Note the LED display will not light up during power failure but the clock will still be
running and keeping proper time until the power is restored.
NOTE: For the best results it is recommended that the battery be changed every 6-8 months. If the clock is
not used for a while, it is recommended to remove the battery to aviod leakage.
OPERATION
Setting the correct time
1) Press and hold the Time Button (13) at the same time press the Hour Button (11) to advance the
clock display rapidly until the hour is correct; press the Minute Button (12) to advance the clock
display rapidly until the hour is correct.
2) A lighted dot (2) in the upper left of the clock display indicated the time is PM. For AM time
indication, the dot (2) does not light up.
Setting the alarm time
1) Simply follow the instructions mentioned under “Setting the correct time“ except that you will have
to press the Alarm Set Button (10) instead of the TIME Button.
2) Make sure the alarm time is correctly set for AM or PM, the lighted dot (2) indicated PM. Be sure
to release the HOUR and MIN set buttons before releasing the ALARM button.
Waking to Alarm
1) After setting the alarm time, set Function Switch (3) to choose „VIB“, „BUZZ“ or „VIB / BUZZ“.
2) Set to VIB for bed shaker; BUZZ for sound, or VIB/BUZZ for both buzzer and vibrator.
3) Set desired Volume (7) for buzzer sound.
4) When the alarm sounds the Flashing light display (7) will flash continously, until the alarm is
stoped. This will work under all three wake up modes.
5) When the alarm sounds the Skull eyes LED (6) will flash continously, until the alarm is stoped.
This will work under all three wake up modes.
Shutting Off Alarm
The alarm can be shut off temporarily for the day or shut off permanently.
1) When the alarm goes off, simply press the AL off button (3) once, the alarm will shut itself off for
the day and come back on the next day at the same time if the alarm setting has remained
unchanged.
2) To shut off the alarm permanently, slide Function Switch (3) to OFF positon.
Snooze Operation
When the alarm sounds, press the Skull SNOOZE button (5) the alarm will be turned off for 9 minutes for
extra sleep. The alarm will come back again after 9 minutes. You may repeat many times up to 119 minutes.
Volume
To adjust the volume rotate the Volume Knob (7) located on the upper right hand side until you have reach
your desired level.
Tone
Adjust the tone by rotating the Tone Knob (9) located on the right hand side just below the Volume Knob
(7) until you have reach your desired level. Tone will only work for alarm sound it will not adjust for MP3
operation.
Dimmer
The brightness of the LED clock display can be adjusted using the Dimmer Switch (4). Two intensity, Hi /
Low can be set.
Hour Format and Power Cycle (19) this setting determines to correct speed that your clock will
operate at.
Please select the appropriate settings for use. For USA please select 12/60Hz; for Europe please select
24/50Hz; for UK please select 12/50Hz. Please note the incorrect selection of power cycle will result in
incorrect time.
To Play Music using a Player (MP3) through AUX-IN, MP3 player not included.
To play music (from CD, MP3 player, Radio etc):
1. Plug the supplied line-in cable to the back of the unit labelled AUX-in (16), the other end plug
into the earphone/ headphone socket of the music player.
2. Set the volume knob (9) on the clock unit to a desired volume level.
3. Play your music player and set the volume to a suitable level on your player.
NOTE:
a) The clock unit will automatically switch to the AUX mode once the line-in cable is plugged into the unit.
b) The Tone Knob does not function in the AUX mode.
Made in China
Sonic Alert 1050 East Maple Rd. Troy, MI 48083
www.SonicAlert.com 1-800-566-3210 V/TTY