1
III.
Resetting the Controller to Original Factory Settings
J-KEM manufactures the most technically advanced temperature controller available and should give consistently flawless control.
If you have difficulty with your controller, a good place to start to correct the problem is by loading the original factory settings.
If problems persist, our Engineering department will help you resolve the problem. The factory settings of a J-KEM controller
are: 0.1o C resolution, PID control with tuning parameters for a heating mantle, high temperature alarm turned on, and a
thermocouple offset entered at the time of original calibration.
Procedure to Reset the Controller to Original Factory Settings
1.
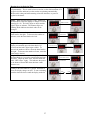
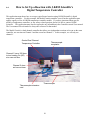
Set the Over Protection circuit (12) to the OFF position.
Press and hold in both the ▼ and ▲ keys on the
front of the temperature meter until the word “tunE” appears in the display, then release both keys.
2.
Press the ▼ key until “LEVL” appears in the display. Next, hold in the ‘*’ key, then while holding in the
‘*’ key press the ▲ key until “3” appears in the display. Let go of all the keys.
3.
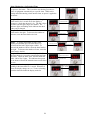
Press the ▲ key until “rSEt” appears in the display. Next, hold in the ‘*’ key, then while holding in the ‘*’
key press the ▲ key until the word “All” appears in the display. Let go of all the keys.
4.
Press and hold in both the ▼ and ▲ keys until the word “inPt” appears in the display, then release both keys.
The value that needs to be entered depends of the type of thermocouple receptacle your controller was shipped
with.
Determine the thermocouple type below.
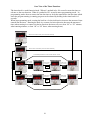
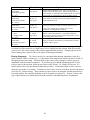
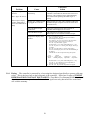
Color of thermocouple receptacle (Fig 1; # 9) Value to enter:
Blue (type T)
“tc ”
Yellow (type K)
“tc ”
Black (type J)
“tc ”
First hold in the ‘*’ key, then while holding in the ‘*’ key press the ▲ key until the value from the table
above appears in the display. Let go of all the keys.
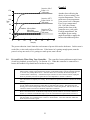
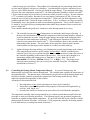
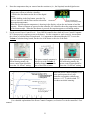
NOTE: Many of the patterns for this parameter look
similar, be careful to select the exact pattern shown above.
5.
Press the ▲ key once and “unit” will appear in the display. Next, hold in the ‘*’ key, then while holding in
the ‘*’ key press the ▲ key until the value “o C” appears in the display,. Let go of all the keys.
6.
Press the ▲ key once and the word “SP1.d” appears in the display. Next, hold in the ‘*’ key, then while
holding in the ‘*’ key press the ▲ key until the value “SSd” appears in the display. Let go of all the keys.
7.
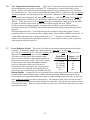
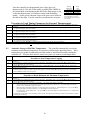
Press in both the ▼ and ▲ keys until the temperature appears in the display (the word “PArk” also appears),
then release both keys.
Hold in the ‘*’ key then press the ▲ key until a value > 100 is entered. Let go of all the keys.
8.
Hold in both the ▼ and ▲ keys on the front of the temperature meter until the word “tunE” appears in the
display, then release both keys.
9.
Press the ▲ key once and the word “bAnd” will appear in the display. Next, hold in the ‘*’ key, then while
holding in the ‘*’ key press the ▲ key until the value “10” appears in the display. Let go of all the keys.
10.
Press the ▲ key once and the word “int.t” will appear in the display. Next, hold in the ‘*’ key, then while
holding in the ‘*’ key press the ▲ key until the value “10” appears in the display. Let go of all the keys.
11.
Press the ▲ key once and the word “dEr.t” will appear in the display.
Next, hold in the ‘*’ key, while holding in the ‘*’ key press the ▲ key until the value “50” appears in the
display. Let go of all the keys.
12.
Press the ▲ key once and the word “dAC” will appear in the display. Next, hold in the ‘*’ key, then while
holding in the ‘*’ key press the ▲ key until the value “3.0” appears in the display. Let go of all the keys.
13.
Press the ▲ key once and the word “CyC.t” will appear in the display. Next, hold in the ‘*’ key, then while
holding in the ‘*’ key press the ▲ key until the value “30” appears in the display. Let go of all the keys.
14.
Press the ▼ key until the word “LEVL” appears in the display.
15.
First hold in the ‘*’ key, then while holding in the ‘*’ key press the ▲ key until “2” appears in the display.
Let go of all the keys.
16.
Press the ▲ key until “SP2.A” appears in the display. Next, hold in the ‘*’ key, then while holding in the
‘*’ key press the ▲ key until the word “dU.hi” appears in the display. Let go of all the keys.
17.
Press the ▲ key until “diSP” appears in the display. Next, hold in the ‘*’ key, then while holding in the ‘*’
key press the ▼ or ▲ key until the value “0.1o” appears in the display. Let go of all the keys.
18.
Press the ▲ key until “Lo.SC” appears in the display. Next, hold in the ‘*’ key, then while holding in the
‘*’ key hold in the ▼ key until the number in the display stops changing (this will be “0” or “-50” or “-199.9”
depending on thermocouple type). Let go of all the keys.
36