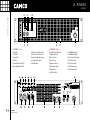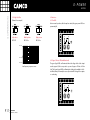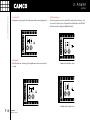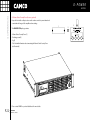
1
D-POWER D-POWER SERIES USER MANUAL SERIES INFORMATION FOR USE FOR MODELS D-POWER 2, D-POWER 3 and D-POWER 4 DUM_GB_2009-R2_06-2009 © Copyright 2009 by CAMCO Produktions- und Vertriebs-GmbH für Beschallungs- und Beleuchtungsanlagen Fischpicke 5, D-57482 Wenden, Germany Telephone +49 (0) 2762 408-0 D-POWER SERIES P. USER MANUAL D - P O W E R SERIES D-POWER IMPORTANT SAFETY INSTRUCTIONS SERIES IMPORTANT SAFETY INSTRUCTIONS 1) Read the information for use (user manual). 2) Please keep this user manual in a safe place during the lifetime of the amplifier. The user manual forms an integral part of the amplifier. Reselling of the amplifier is only possible if the user manual is available. Any changes made to the amplifier have to be documented in writing and passed on to the buyer in the event of resale. 3) Heed all warnings. 4) Follow all instructions. 5) Do not expose this device to rain or moisture. Do not use this amplifier near water (for example, swimming pools and fountains). Do not place any objects containing liquids, such as bottles or glasses, on the top of the unit. Do not splash liquids on the unit. IP-20 equipment. No Protection against splashing water. 11) Do not place this amplifier on an unstable cart, stand, tripod, bracket or table. The device may fall, causing serious injury and serious damage to the device itself. 12) The amplifier can only be disconnected from the power supply by removing the plug which must be freely accessible at all times. Unplug this amplifier during lightning storms or when unused for long periods of time. 6) Clean only with dry cloth. 7) Do not block any ventilation openings. Install in accordance with the user manual. 8) Do not install near any heat sources such as radiators, heat registers, stoves or other apparatus that produce heat. 9) Protect the power cord from being walked on, pinched or damaged in any other way. Pay particular attention to plugs and the point where they exit from the amplifier. P. 10) The amplifier may only be used in accordance with the information provided in the user manual. Before and during the usage of the amplifier please ensure that all recommendations, especially the safety recommendations as detailed in the user manual, are adhered to. The D-POWER Amplifier is designed for the amplification of pulsed audio signals and the amplifier should only be connected to speakers with an average impedance as indicated. USER MANUAL D - P O W E R SERIES 13) Refer all servicing to qualified service personnel. Servicing is required when the power-supply cord or plug has been damaged, liquid has been spilled or objects have fallen into the amplifier, the amplifier has been exposed to rain or moisture, the amplifier has been dropped or suffered damage in any other way, the amplifier exhibits a distinct change from its normal function or performance. D-POWER EXPLANATION OF SYMBOLS / SAFETY SERIES CAUTION RISK OF ELECTRIC SHOCK DO NOT OPEN CAUTION – HIGH VOLTAGE HAZARDS EXIST WITHIN THIS PRODUCT. REFER ALL SERVICING TO AUTHORISED PERSONNEL. THE LIGHTNING FLASH WITH ARROW HEAD SYMBOL IS INTENDED TO ALERT THE USER TO THE PRESENCE OF UNINSULATED DANGEROUS VOLTAGE WITHIN THE PRODUCT’S ENCLOSURE. THE EXCLAMATION MARK IS INTENDED TO ALERT THE USER TO IMPORTANT INSTRUCTIONS ALSO FOR MAINTENANCE IN THE LITERATURE ACCOMPANYING THE AMPLIFIER. THE LIGHTNING FLASH WITH ARROW HEAD SYMBOL ALERTS THE USER TO DANGEROUSLY HIGH VOLTAGE AT THE OUTPUT CONNECTORS THAT COULD POTENTIALLY BE LIFE THREATENING. CAUTION – RISK OF ELECTRIC SHOCK – DO NOT OPEN. WARNING – TO PREVENT FIRE OR SHOCK HAZARD, DO NOT EXPOSE THIS AMPLIFIER TO RAIN OR MOISTURE. THE AMPLIFIER MAY ONLY BE CONNECTED TO A SOCKET WITH A PROTECTIVE EARTH CONDUCTOR. P. USER MANUAL D - P O W E R SERIES 1. Read the information for use (user manual) When shipping the D-POWER amplifier always use the original shipping carton and packing materials. For maximum protection repack the unit as it was originally packed at the factory. 2. Environments Use this amplifier only in E1, E2, E3 or E4 environments according to EN55103-2 “Electromagnetic compatibility – Product family standard for audio, video and audio-visual and entertainment lighting control apparatus for professional use – Part 2: Immunity” 3. Ventilation Slots and openings in the cabinet are provided for ventilation to ensure reliable operation of the amplifier and to protect it from overheating. These openings must not be blocked or covered. This amplifier should not be installed unless proper ventilation is provided or manufacturer’s instructions have been adhered to. 4. Water and Moisture Do not expose this device to rain or moisture. Do not use this amplifier near water (for example, swimming pools and fountains). Do not place any objects containing liquids, such as bottles or glasses, on the top of the unit. Do not splash liquids on the unit. IP-20 equipment. No Protection against splashing water. 5. Cleaning Unplug this amplifier from the wall outlet before cleaning. Do not use liquid or aerosol cleaners. 6. Power-cord Protection Power-supply cords should be routed so that they are not likely to be walked on or pinched by items placed upon them or against them, paying particular attention to cords and plugs and the point where they exit from the amplifier. D-POWER SAFETY SERIES 7. Lightning For added protection of this amplifier during lightning storms or when it is left unattended and unused for long periods of time, unplug it from the wall outlet. This will prevent damage to the amplifier due to lightning and power-line surges. Disconnection from the mains power supply can only be achieved by removing the plug from the mains socket and by external disconnecting all poles from the mains. 8. Interference of external objects and/or liquids with the appliance Never push objects of any kind into this amplifier through openings as they may touch dangerous voltage points or short out parts that could result in a fire or electric shock. Never spill liquid of any kind on the amplifier. 9. Accessories Do not place this amplifier on an unstable cart, stand, tripod, bracket or table. The amplifier may fall, causing serious injury and serious damage to the product. Any mounting of the amplifier should follow the manufacturers instructions and should use a mounting accessory recommended by the manufacturer. 10. Connecting When you connect the amplifier to other equipment turn off the power and unplug all of the equipment from the supply source. Failure to do so may cause an electric shock and serious personal injury. Read the user manual of the other equipment carefully and follow the instructions when making the connections. 11. Sound Volume Reduce the volume to minimum before you turn on the amplifier to prevent sudden high levels of noise which may cause hearing or speaker damage. (See also section 4.2.1 Volume control) P. USER MANUAL D - P O W E R SERIES 12. Damages that require service Unplug this amplifier from the mains supply and refer to your dealer/distributor or other authorised repair workshop if any of the following situations occur: if liquid has been spilled or objects have fallen into the amplifier if the amplifier does not operate normally as described in the user manual, operate the controls only as described in the user manual if the amplifier has been dropped or damaged in any other way when the amplifier exhibits a distinct change from its normal function or performance 13. Servicing Do not attempt to service this amplifier yourself. As opening or removing covers may expose you to dangerous voltage or other hazards, the amplifier may only be opened by qualified personnel. Please refer to your dealer/distributor. 14. Servicing and Replacement Parts All service and repair work must be carried out by a CAMCO authorised dealer. When replacement parts are required, please ensure that the dealer/distributor only uses replacement parts specified by the manufacturer. The use of un authorized replacement parts may result in injury and/or damage through fire or electric shock or other electricity-related hazards. 15. Safety Check Upon completion of any service or repairs to this product, ask the dealer/ distributor to perform safety checks to determine that the amplifier is in proper operating condition. Recommendations on how to carry out the safety test can be found in DIN VDE 0701-1 “Maintenance, Modification and Test of Electronic Appliances“. D-POWER SERIES EC DECLARATION OF CONFORMITY EC Declaration of Conformity in accordance to EC Directives: electro-magnetic compatibility (Council Directive 2004/108/EC); low-voltage electrical equipment (Council Directive 73/23/EEC ) Manufacturers Name: CAMCO Produktions- und Vertriebs-GmbH für Beschallungs- und Beleuchtungsanlagen Manufacturers Address: Fischpicke 5, D-57482 Wenden, Germany Declares that the product with the model name: CAMCO Power amplifier D-POWER 2, D-POWER 3 and D-POWER 4 Conforms to the following standards: EN60065 Safety EN55103-1 Emission EN55103-2 Immunity The operating conditions and application environments presupposed in the information for use (user manual) are to be kept accordingly. Wenden, 17.04.2009 Joachim Stöcker P. USER MANUAL D - P O W E R SERIES D-POWER CONTENTS SERIES P.2 P.3 P.5 P.6 P.7 P.8 P.9 P.10 P.11 P.12 P.13 P.14 P.15 P.16 P.17 P. IMPORTANT SAFETY INSTRUCTIONS EXPLANATION OF SYMBOLS / SAFETY EC DECLARATION OF CONFORMITY CONTENTS 1 WELCOME 1.1 Welcome to CAMCO 1.2 Unpacking 1.3 The Amplifier 2 FACILITIES 2.1 D-POWER – The Front 2.2 D-POWER – The Rear 2.3 Factory Settings 3 INSTALLATION 3.1 Mains Supply 3.2 On/Off Switch 3.3 Mounting 3.4 Cooling 3.5 Ground Lift 3.6 Mode Selector 3.7 Wiring 3.7.1 XLR Connection 3.7.2 Stereo Operation 3.7.3 Parallel-Mono Operation 3.7.4 Mono-Bridge Operation 3.7.5 SPEAKON Connection 4 OPERATION 4.1 Controls 4.1.1 Volume Control 4.1.2 Gain Selector 4.1.3 Gain and Input Sensitivity 4.1.4 Limiter Switch 4.1.5 High Pass Filter USER MANUAL D - P O W E R SERIES P.18 P.19 P.20 P.21 P.22 P.23 P.24 P.26 4.2 Indicators 4.2.1 On LEDs 4.2.2 Signal / Protect LEDs 4.2.3 I-Out LEDs 4.2.4 Clip LEDs 4.2.5 Mode Indicators 4.3 Power Amp Protection Systems 4.3.1 Clip Limiter 4.3.2 SOA Protection 4.3.3 DC Protection 4.3.4 DC Servo 4.3.5 Over Current Protection 4.3.6 Thermal Protection 4.4 Mains Protections 4.4.1 Inrush Current Limitation 4.4.2 Mains Over Voltage Detection 4.4.3 Mains Failure Detection 4.4.4 Fuse Protection 4.5 Main SMPS Protections 4.5.1 Over Current Protection 4.6 Fans 4.7 Filter Cleaning 4.8 Volume Control Security Cover (Accessory optional) 5 TROUBLESHOOTING 5.1 Problem: No Sound 5.2 Problem: No Channel Separation 5.3 Problem: Distorted Sound 5.4 Problem: Hiss 5.5 Problem: Squeals and Feedback 6 SPECIFICATION 7 TYPICAL PERFORMANCE DIAGRAMS P.30 8 WARRANTY INFORMATION 8.1 Summary Of Warranty 8.2 Items Excluded From This Warranty 8.3 What CAMCO Will Do 8.4 How To Obtain Warranty Service 8.5 CAMCO’s Product Improvement P.31 9 SERVICE INFORMATION P.32 10 MAINTENANCE INFORMATION 11 DECOMISSIONING P.32 COMPANY INFORMATION D-POWER 1 WELCOME SERIES 1.1 Welcome to CAMCO Established in 1983, CAMCO has gained worldwide experience with professional sound reinforcement technology. Within the audio market CAMCO specialises in the production and marketing of high quality power amplifiers and sound systems for use both on tour and in fixed installations. The success of the LA, DL, DX, VORTEX and TECTON series of power amps has made the CAMCO name synonymous with professional quality, high performance and utterly reliable power amps. CAMCO’s commitment to research and development, seen not just in the area of materials and technology but also most importantly in its highly skilled and motivated workforce, is one of the keys to its ongoing success. Welcome to the new world of professional power amplifiers – WELCOME TO CAMCO! P. USER MANUAL D - P O W E R SERIES 1.2 Unpacking Please unpack and inspect your new amplifier for any damage that may have occurred during transit. If damage is found, notify the transportation company immediately. Only you the consignee may initiate a claim for shipping damage. CAMCO will be happy to cooperate fully as needed. Please save the shipping carton as evidence of damage for the shipper’s inspection. Even if the amplifier has arrived in perfect condition, save all packing materials so you will have them if you ever need to transport the unit. NEVER SHIP THE AMPLIFIER WITHOUT THE ORIGINAL PACKING MATERIALS. When shipping the D-POWER amplifier, always use the original shipping carton and packing materials. For maximum protection, repack the unit as it was originally packed at the factory. D-POWER 1 WELCOME SERIES 1.3 The Amplifier The D-POWER is a Class-H power amplifier with a power output of: D-POWER 21200 W per channel @ 4 Ω 2400 W in Mono-Bridge @ 8 Ω 2400 W in Parallel-Mono @ 2 Ω D-POWER 3 1600 W per channel @ 4 Ω 3200 W in Mono-Bridge @ 8 Ω 3200 W in Parallel-Mono @ 2 Ω D-POWER 41900 W per channel @ 4 Ω 3800 W in Mono-Bridge @ 8 Ω 3800 W in Parallel-Mono @ 2 Ω D-POWER amplifiers are fitted with Switched Mode Power Supplies (SMPS), which significantly reduces the weight and size (only 2U) of the amplifier. Using SMPS, the 2 symmetrical supply voltages of the power amplifier are more stable than the power supplies used in conventional amplifiers. The D-POWER has been designed as an intelligent and powerful product for performing specialised tasks within a complex audio system. Users can adapt the power amp to meet their specific audio requirements before use. Controls mounted on the front and the rear of the D-POWER allow access to the functionality. Since some of the externally mounted controls have multiple functions, it is important that users should familiarise themselves thoroughly with the entire range of controls. P. USER MANUAL D - P O W E R SERIES D-POWER 2 FACILITIES SERIES 2.1 D-POWER – The Front 1 Clip LEDs 2 I-Out LEDs 3 Signal LEDs 4 On LEDs 5 Parallel-Mono Mode LED 6 Mono-Bridge Mode LED 7 Volume Control Channel A 8 Volume Control Channel B 9 Removable Air Filter System 10 Cooling Air Inlet Vents 11 On/Off Switch 2.2 D-POWER – The Rear 12 Input Ground Lift Switch 13 High Pass Filter B 14 Mode Selector 15 Gain Selector 16 High Pass Filter A 17 Clip Limiter Switch 18 Rating Plate 19 AC Power Cable 20 SPEAKON Output A 21 SPEAKON Output B 22 Cooling Air Outlet Vents 23 XLR - Line Link A 24 XLR - Line Link B 25 XLR - Line Input A 26 XLR - Line Input B D-POWER 4 230 V ~ 50/60 Hz ,3 A 220 W 900 W / 4 Ohm P. USER MANUAL D - P O W E R SERIES xxxxxxx D-POWER 2 FACILITIES SERIES 2.3 Factory Settings D-POWER amplifiers are delivered with the following factory settings Front panel: Rear panel: 7 8 Volume Control Channel A Volume Control Channel B The volume is set to minimum. The volume is set to minimum. 11 On/Off Switch The amplifier is switched off. 12 13 14 15 16 17 Input Ground Lift High Pass Filter B Mode Selector Gain Selector High Pass Filter A Clip Limiter Grounded Off Stereo 32 dB Off Off Make sure that the switches are set to the configuration needed for each particular application. For more detailed information, see sections 3.5, 3.6, 3.7 and 4.1. P. 10 USER MANUAL D - P O W E R SERIES D-POWER 3 INSTALLATION SERIES 3.1 Mains Supply When mounting or connecting the amp always disconnect it from mains. Only connect the D-POWER amplifier to an appropriate AC circuit and outlet, according to the requirements indicated in the second line on the rating plate. 3.2 On/Off Switch The On/Off Switch is a rocker-type switch. It is located on the right side of the front panel. To turn the amplifier on, press on the upper part of the switch. During power up the Clip and Signal LEDs from both channels will light up in red for a few seconds. To turn the amplifier off, press on the lower part of the switch. D-POWER 2 230 V ~ 50/60 Hz 0,5 A 060 W 600 W / 2,7 Ohm xxxxxxx D-POWER 3 230 V ~ 50/60 Hz 9,8 A 00 W 600 W / 4 Ohm xxxxxxx Amplifier is switched on NOTE: This switch does NOT disconnect the amplifier from mains. Make sure the mains power socket or an alternative disconnect device is near by and easily accessible. D-POWER 4 230 V ~ 50/60 Hz ,3 A 220 W 900 W / 4 Ohm xxxxxxx Exemplary rating plates for a mains supply of 230 V ~ 50/60 Hz. Power supply data: D-POWER 2 D-POWER 2 D-POWER 2 D-POWER 3 D-POWER 3 D-POWER 3 D-POWER 4 D-POWER 4 D-POWER 4 P. 11 USER MANUAL D - P O W E R SERIES Amplifier is switched off Voltage 120 V 220 V 230 V 120 V 220 V 230 V 120 V 220 V 230 V Mains Frequency 50/60 Hz 60 Hz 50/60 Hz 50/60 Hz 60 Hz 50/60 Hz 50/60 Hz 60 Hz 50/60 Hz Current 21 A 10,5 A 10,5 A 19,6 A 9,8 A 9,8 A 22,6 A 11,3 A 11,3 A Power Consumption 1060 W 1060 W 1060 W 1010 W 1010 W 1010 W 1220 W 1220W 1220 W The switch initiates start-up by activating the inrush current limiter. As soon as the power amplifier is connected to the mains power supply, a voltage is supplied to both the line-filter and the fused input of the controllable rectifier. Disconnecting the amplifier from the main power supply can only be achieved by physically separating the amplifier from the mains by pulling the mains plug. The mains plug therefore has to be freely accessible. Disconnect the mains plug from the mains during a lightning storm or when the amplifier remains unused or unsupervised for a prolonged period of time. Alternatively, you can disconnect the amplifier via an external all-pole disconnection from the mains. If a power cut occurs while the amplifier is switched on, it will restart automati cally once the power supply has been restored. All amplifier settings rior to the loss of power will be maintained. D-POWER 7,5 mm 3.3 Mounting Use four screws and washers when mounting the amplifier to the front rack rails. For mobile use, the amplifier should also be secured using the 19” mounting elements on the rear panel. 10,5 mm 88,1 mm 76,2 mm 3 INSTALLATION SERIES If this can not be achieved a forced ventilation system has to be used. 3.5 Ground Lift The input signal ground (pin 1 for all 4 XLRs) is connected to the ground of the mains supply. In order to avoid ground loops, this connection can be separated via a resistor. The ground potential of the power amp and the ground of the loudspeaker always remain connected to the ground of the mains supply regardless of the setting of this switch. 465 mm 412 mm 442 mm 396 mm 3.4 Cooling Under normal operation of the power amp, overheating should never be a problem. The air is taken in from the front and out through the back. It is essential that while the amplifier is running the air is able to circulate around it freely. The efficiency of the cooling will depend on the immediate environment (e.g. an enclosed rack, direct sunlight). If the amp is installed in a case, the open area at the back of the case must be at least 140 cm². This area should be in line with the amplifier. Lift Position Ground Position to Pin 1 of the XLRs Removing or taping the mains connector ground is illegal and dangerous. DO NOT REMOVE MAINS CONNECTOR GROUND IT IS ILLEGAL AND DANGEROUS P. 12 USER MANUAL D - P O W E R SERIES D-POWER 3 INSTALLATION SERIES 3.6 Mode Selector The switch on the rear panel changes the operating mode. WARNING! Always turn off the amplifier before making changes on the Mode Selector. 3.7 Wiring 3.7.1 XLR Connection XLR: Pin 1 = Ground (or lifted via 15 Ω resistor) (See 3.5 Ground Lift) Pin 2 = Hot (inphase) Pin 3 = Cold (out of phase) Always use symmetrical (balanced) shielded cable to connect the amplifier. When the amplifier is switched on again, the selected mode will operate. Input Channel B Input Channel A 2 2 1 3 ALWAYS SWITCH OFF THE AMPLIFIER BEFORE CHANGING MODES To Channel B 1 3 USER MANUAL D - P O W E R SERIES 1 LINK A 2 3 To Channel A Input Ground Lift P. 13 LINK B Input Ground Lift in position: grounded 1 2 3 D-POWER 3 INSTALLATION SERIES 3.7.2 Stereo Operation, Two Channel Operation Two fully independent amplifier channels (normal operating mode). D-POWER D-POWER A (L) Z ≥ *Zmin A B (R) Z ≥ 2 *Zmin Z ≥ *Zmin 3.7.3 Parallel-Mono Operation Parallel operation of the two channels together. D-POWER Zres ≥ 0.5 *Zmin A The output terminals of the two channels are configured in parallel using an internal relay. The (single) load is connected either to the output of channel A or to that of channel B (as if in stereo). While the total output of the amplifier remains the same and the output voltage level is also the same as in stereo operation, the minimum impedance that can be connected is reduced by half due to the fact that current capability is doubled. Only channel A-Input is active. The channel B-Input is inactive – turn the volume of channel B down to zero. This mode is useful when, for example, three identical loudspeakers are to be operated with the same power. P. 14 3.7.4 Mono-Bridge Operation One-channel mono bridged operation. USER MANUAL D - P O W E R SERIES The second amplifier channel processes the same input signal, but with reversed phase. The (single) load is connected between the two positive channel outputs using a suitable connected SPEAKON connector. While the total output of the amplifier remains the same, both the available output voltage and the minimum impedance that can be connected are doubled, as compared with stereo ope ration. Only channel A-Input is active. A signal feeding channel B will have no effect on the output. Turn the volume of channel B down to zero. WARNING ! In Mono-Bridge mode RMS output voltages are as high as 230 V. Wiring to the speaker loads must conform to NEC Class 3 safety standards or its equivalent that meets all national and local electric codes. All customer specific cables may only be manufactured by qualified suppliers/personnel. All cabling or rewiring work must be carried out by qualified personnel. * Zmin = 4 Ω for D-POWER 2, 3 and 4 D-POWER 3 INSTALLATION SERIES 3.7.5 SPEAKON Connection Both SPEAKON connectors are connected to channel A and channel B outputs. The pin configuration of the SPEAKON connectors is as follows: WARNING ! SPEAKON connectors marked with the lightning flash indicate high vol tages that are potentially life threatening. SPEAKON right: (View at the back) Pin 1+ Pin 1- Pin 2+ Pin 2- Channel A Channel A Channel B Channel B signal ground signal ground Wiring to these terminals requires installation by an instructed person or the use of ready-made leads or cords. SPEAKON left: Pin 1+ Pin 1- Pin 2+ Pin 2- Channel B Channel B Channel A Channel A signal ground signal ground (View at the back) Input Channel A NOTE: For reasons of safety and performance, use only high-quality fully insu lated speaker cables of stranded copper wire. Use the largest wire size that is economically and physically practical, and make sure the cables are no longer than necessary. IMPORTANT: When connecting speaker cabinets in parallel, always use all the contacts in both SPEAKON connectors. If not, this may cause permanent damage to the connectors and considerably reduce performance. SPEAKON left USER MANUAL D - P O W E R SERIES To prevent electric shock, do not operate the amplifier with any of the con ductor portion of the speaker wire exposed. SPEAKON right Input Channel B P. 15 Custom wiring should only be made by qualified personnel. D-POWER 4 OPERATION SERIES 4.1 Controls 4.1.1 Volume Control A volume control with 41 notched settings controls the audio signal. These settings have been selected to correspond to human hearing characteristics (logarithmically) and therefore guarantee an optimal range of settings for practical applications. Each channel can be set individually except when operating in mono modes whereby only channel A is active. 4.1.3 Gain and Input Sensitivity The table shows input sensitivity per channel for a given gain and load. It also shows the gain for the 1,4 V input sensitivity. Model D-POWER 2 D-POWER 3 D-POWER 4 1200 W @ 4 Ω 700 W @ 8 Ω 1600 W @ 4 Ω 915 W @ 8 Ω 1900 W @ 4 Ω 1100 W @ 8 Ω 26 dB 3,47 V 3,75 V 4,01 V 4,29 V 4,37 V 4,70 V 32 dB 1,74 V 1,88 V 2,01 V 2,15 V 2,19 V 2,36 V 1,4 V 34,56 dB 35,72 dB 36,52 dB 4.1.4 Limiter Switch This switch is located at the rear of D-POWER. It allows you to set the mode of the limiter. There are three modes. (See 4.3.1 Clip Limiter) Set the volume to zero before turning on the amplifier to prevent the occurrence of sudden high volume levels which may cause damage to your hearing and/or the speakers. 4.1.2 Gain Selector A switch on the rear of the D-POWER allows the maximum amplification attainable to be set directly in the input stage. The D-POWER amplifier has a 26 dB and 32 dB voltage gain setting along with a 1,4 V sensitivity setting. P. 16 USER MANUAL D - P O W E R SERIES Right position: Clip Limiter: Fast Fast attack time Middle position: Clip Limiter: Slow Slow attack time Left position: Clip Limiter: Off Limiter disabled D-POWER 4 OPERATION SERIES 4.1.5 High Pass Filter (Channel A as example) Left position: HPF: Off 4.2 Indicators 4.2.1 On LEDs Under normal operation, after the amp has started, the green power LEDs are permanently lit. Middle position: HPF: 30 Hz Right position: HPF: 50 Hz HPF OFF HPF 30 Hz HPF 50 Hz Low frequency response curves P. 17 USER MANUAL D - P O W E R SERIES 4.2.2 Signal / Protect LEDs (multifunctional) The green Signal LEDs are illuminated when the voltage level at the output reaches approx. 4 V; this corresponds to a power of approx. 4 W into a 4 Ohm load. The channel signal LEDs are illuminated red when the amplifier is in Protect Mode (Mute), for example because of persistent DC-voltage at the outputs or overheating. D-POWER 4 OPERATION SERIES 4.2.3 I-Out LEDs The brightness is proportional to the output current in the corresponding channel. 4.2.4 Clip LEDs This LED indicates an overloading of the amplifier when the power output level is to high. 4.2.5 Mode Indicators On the front panel there are two yellow LEDs to indicate the mode that is set. In stereo mode (2-channel) none of them will be lit. In Parallel-Mono the (PM) LED will be lit and in Mono-Bridge, the (MB) LED will be lit. Amplifier in Parallel-Mono mode Amplifier in Mono-Bridge mode P. 18 USER MANUAL D - P O W E R SERIES D-POWER 4 OPERATION SERIES 4.3 Power Amp Protection Systems 4.3.1 Clip Limiter If the power amp is overdriven, the clip detection triggers the Attack-ReleaseCircuit (ARC). The ARC delivers the control voltage for the gain reduction. Two different attack modes (fast and slow) can be selected with the Clip Limiter switch (see 4.1.4 Limiter Switch). 4.3.2 SOA Protection Whenever the power transistors leave their Safe Operation Area (SOA), the SOA-protection in stereo mode switches back the current rail of the respective channel. In mono modes the rails of both channels are switched back. 4.3.3 DC Protection Each output of the power amp is constantly monitored for persistent DC voltage levels. If the 3 V thresholds are exceeded at any of the outputs, the corresponding channel will be muted. If DC was only detected for a short moment, the amplifier will release mute and work as normal. If DC is detected for longer periods or repeatedly if this happens,the amplifier will switch to standby mode. Switch off the amplifier, wait until the power LED stops flashing and switch the amplifier on again. P. 19 USER MANUAL D - P O W E R SERIES 4.3.4 DC Servo To prevent DC Offset at the speaker output the D-POWER is fitted with a DC Servo. 4.3.5 Over Current Protection Over current is permanently controlled in the output stage. There are two limit ing levels of over current depending on output voltage. These limits will be set automatically. This improves reliability without degrading sound quality when driving complex loads. 4.3.6 Thermal Protection There are several sensors inside the amplifier in order to ascertain temperature data. If a temperature of more than 85 °C is detected at the heat sinks, the input signal on that channel is reduced. If the temperature exceeds 100 °C, the main SMPS will be switched off. D-POWER 4 OPERATION SERIES 4.4 Mains Protections 4.4.1 Inrush Current Limitation Within 2 seconds of the amplifier being switched on, the inrush current limiter will increase mains current from nearly zero to nominal value. This value depends on program material, output level and speaker loads. 4.4.2 Mains Over Voltage Detection Mains over voltage detection is always operative. When the mains voltage exceeds approx. 263 V (230 V operation) or 134 V (120 V operation), the amplifier will be switched off. The system will try to restart in intervals and will return with a soft start when the regular mains voltage returns. 4.4.3 Mains Failure Detection Mains failure detection is always operative. When the mains supply is interrupted for about 2 mains cycles, the amplifier will be switched off. When the mains voltage returns to a normal value, a soft start occurs. 4.4.4 Fuse Protection The average mains current can peak temporarily, depending on the load im pedance and type of signal, at values significant higher than the nominal value allowed by the fuse protection. Continuous monitoring of the fuse protection status allows the conditions that would trigger the fuse protection to be predicted. In order to avoid shut-down of the amplifier due to current overload, the amplitude of the input signals will be limited and by hard overloads the amp will be muted for the time. P. 20 USER MANUAL D - P O W E R SERIES 4.5 Main SMPS Protections 4.5.1 Over Current Protection Main SMPS (Switched Mode Power Supply) transformer current is continuously monitored. If over current occurs, the main SMPS immediately stops working. Should there be an internal failure, this feature prevents other parts being damaged. 4.6 Fans The fans mounted in the D-POWER operate permanently, but as long as the temperature remains below 40 °C they run at their slowest speed and can hardly be heard. The highest detected temperature from either channel controls the speed of the fans: above 40 °C the speed is increased until it reaches its maximum value. D-POWER 4 OPERATION SERIES 4.7 Filter Cleaning The air intake on the front of your D-POWER Amplifier is fitted with a removable filter system. If the filter becomes clogged, the unit will not cool as efficiently as it should and may result in reduced output levels. WARNING: Disconnect the amplifier from the mains before removing the front frame. WARNING: Turn off the amplifier before removing the front frame. To clean or replace the filter just slightly unscrew the fixing screw (3) without completely removing it from the front frame (it is held back by a small plastic spacer on the back side of the frame to avoid loosing the screw). Then shift the front frame slightly to the right. Then you should be able to remove the frame from the amplifier completely (pull gently to avoid any bending of the front frame). 1 2 3 D-POWER Filter Assembly 1 Foam Filter 2 Front Frame 3 Screw P. 21 USER MANUAL D - P O W E R SERIES D-POWER 4 OPERATION SERIES 4.8 Volume Control Security Cover (Accessory optional) It is possible to install a solid protection over the volume controls to prevent intentional or unintentional changes of the amplifier volume settings. 1 The GAIN-POT-COV package contains: - Volume Control Security Cover (1) - Two fixing screws (2) - Jig (3) - Tech Note with informations about mounting the Volume Control Security Cover (not illustrated)) Please contact CAMCO or your dealer/distributor for more details. P. 22 USER MANUAL D - P O W E R SERIES 2 3 D-POWER 5 TROUBLESHOOTING SERIES 5.1 Problem: No Sound Indication: Signal LEDs not lit Clip LEDs not lit Check AC plug. Confirm that AC outlet works by plugging in another device. Indication: Output Current LEDs are lit Signal LEDs not lit Make sure the signal source is operating and try another cable. Check position of volume pots. Indication: Output Current LEDs are lit Signal LEDs responding to signal level Check the speaker wiring for breaks. Try another speaker and cable. Indication: Signal LEDs show red (Protect Mode) Overheating will cause protective muting. Check for proper ventilation. If the fans aren’t running the amplifier requires servicing. 5.2 Problem: No Channel Separation Check the mode indicators on the front panel and make sure the mode selector on the rear panel is in the stereo-position. Make sure other equipment in the signal path such as mixers and preamps are set for stereo, not mono. P. 23 USER MANUAL D - P O W E R SERIES 5.3 Problem: Distorted Sound Indication: Output Current LEDs are lit Signal LEDs responding to signal level Clip LEDs not lit A faulty speaker or a loose connection could cause this. Check the wiring and try another speaker. The signal source might be clipping. Keep the D-POWER volume pots at least halfway up so that the source does not have to be overdriven. Keep the D-POWER volume pots at least halfway up and try changing input sensitivity from 1,4 V to 32 dB or 26 dB with the gain selector on the rear. 5.4 Problem: Hiss Unplug the amplifier input to confirm that the hiss is coming from the source or from a device upstream. Erratic or popping noises indicate an electronic fault in the offending unit. To keep the noise floor low, operate the primary signal source at full level, without clipping. Avoid boosting the signal further between the source and the amplifier. 5.5 Problem: Squeals and Feedback Microphone feedback should be eliminated with mixer controls. If noise continues to build up with no microphone gain, there is a serious fault in the signal processors or cables. Working in succession from the signal source towards the amplifier and check each device in the signal path by reducing its gain or by unplugging it. D-POWER 6 SPECIFICATION SERIES Output Power 1 kHz, THD ≤ 1 %, in mono-bridge mode 1 kHz, THD ≤ 1 %, both channels driven Duration limited by fuse / thermal protection for RL < 8 Ω in stereo mode or RL < 16 Ω in mono-bridge mode. 1 kHz, THD < 0,1 %, both channels driven Circuitry D-POWER 2 D-POWER 3 D-POWER 4 1 x 2400 W @ 8 Ω 1 x 1400 W @ 16 Ω 1 x 3200 W @ 8 Ω 1 x 1800 W @ 16 Ω 1 x 3800 W @ 8 Ω 1 x 2200 W @ 16 Ω 2 x 1600 W @ 2,7 Ω 2 x 1200 W @ 4 Ω 2 x 700 W @ 8 Ω 2 x 1600 W @ 4 Ω 2 x 915 W @ 8 Ω 2 x 1900 W @ 4 Ω 2 x 1100 W @ 8 Ω 2 x 1135 W @ 4 Ω 2 x 655 W @ 8 Ω 2 x 1500 W @ 4 Ω 2 x 860 W @ 8 Ω 2 x 1800 W @ 4 Ω 2 x 1070 W @ 8 Ω Bipolar, Class H 2-step high efficiency circuit Bipolar, Class H 2-step high efficiency circuit Bipolar, Class H 2-step high efficiency circuit >110 dB >111 dB >115 dB >112 dB >116 dB Signal to Noise-Ratio 20 Hz - 20 kHz, 8 Ω load, unweighted A-weighted >114 dB Power Consumption @ 230 V Typical1) (both channels driven) P. 24 USER MANUAL D - P O W E R SERIES Idle 1,2 A 50 W 16 Ω 3,9 A 250 W 8Ω Max2) Typical1) Idle 1,3 A 55 W 9,9 A 1000 W 16 Ω 3,9 A 330 W 5,2 A 460 W 16,5 A 1840 W 8Ω 4Ω 7,9 A 790 W 27 A 3230 W 4Ω 2,7 Ω 10,5 A 1060 W 36 A 4600 W Max2) Typical1) Idle 1,4 A 60 W 12,2 A 1280 W 16 Ω 4,8 A 410 W 14,8 A 1600 W 6,2 A 580 W 21 A 2410 W 8Ω 7,3 A 700 W 25 A 3000 W 9,8 A 1010 W 34 A 4300 W 4Ω 11,3 A 1220 W 40 A 5230 W Multiply currents by 2 for 120 V 1/8 of max Output Power with pink noise to represent typical music signal max. rated Output Power (see above) 1) 2) Max2) D-POWER 6 SPECIFICATION SERIES Frequency Response20 Hz - 20 kHz ± 0,15 dB 8 Ω load, 10 dB below rated power Input Impedance 14 kΩ balanced Voltage Gain selectable: 26 dB, 32 dB, or 1,4 V input sensitivity Protection Circuitsinrush-current limitation, temperature monitoring of heat-sinks, output DC protection, power transistor SOA protection, output over current protection, mains fuses protection Limiter switchable clip limiter Fans two temperature dependent speed-controlled axial fans Ground Lift input ground lift switch on back panel IndicatorsLEDs for Power-ON, Mode, Signal, Clip, Output Current and faults (e. g. DC) Input Connectors 3-pin XLR, male and female per channel, pin 2 = inphase (hot) Output Connectorsone 4-pole SPEAKON connector for each output channel (bi-amping possible) Modes of Operation Stereo, Mono-Bridge and Parallel-Mono Options Volume Control Safety Cover THD+N (typical) < 0,01 % 20 Hz - 10 kHz, 8 Ω load, 10 dB below rated power SMPTE (typical) 8 Ω load, 10 dB below rated power Damping Factor 8 Ω load, 1 kHz and below Dimensions (WxHxD) Net Weight Shipping Dimensions (WxHxD) Shipping Weight P. 25 USER MANUAL D - P O W E R SERIES < 0,01 % > 400 483 x 88,1 x 421 mm (19”, 2U) 9,6 kg 615 x 135 x 540 mm (0,045 m3) 11,2 kg Subject to technical alterations without prior notice D-POWER 7 TYPICAL PERFORMANCE DIAGRAMS SERIES +80 +27 +26.5 +35 +26 +90 +25.5 +25 +45 +24.5 deg +0 dBr +24 +23.5 -45 +23 -90 +22.5 +22 -35 +2.5 +2 0 20 50 00 200 500 k Hz 2k 5k 0k 20k 50k 00k -80 0 20 Figure 8.1 Gain vs. frequency (Ch1, Ch2) (Measurements of a typical performance) 50 00 200 500 k Hz 2k 5k 0k 20k 50k 00k Figure 8.3 Phase vs. frequency (Ch1, Ch2) (Measurements of a typical performance) +80 +26 +24 +35 +22 +90 +20 +8 +45 +6 dBr +4 deg +0 +2 -45 +0 +8 -90 +6 +4 -35 +2 -0 0 20 50 00 200 500 Hz k 2k 5k 0k Figure 8.2 Gain vs. frequency / Different positions of HPF-Switch (Ch1, Ch2) (Measurements of a typical performance) P. 26 USER MANUAL D - P O W E R SERIES 20k -80 0 20 50 00 200 500 Hz k 2k 5k 0k Figure 8.4 Phase vs. frequency / Different positions of HPF-Switch (Ch1, Ch2) (Measurements of a typical performance) 20k D-POWER 300m 000 200m 800 00m 50m damping factor 7 TYPICAL PERFORMANCE DIAGRAMS SERIES Ohm 20m 400 0m 200 5m 2m 20 50 00 200 500 Hz k 2k 5k 0k Figure 8.5 Output impedance vs. frequency @ 1 Amp RMS injected current (Ch1, Ch2) equivalent 11 mΩ + 2,1 µH (Measurements of a typical performance of D-POWER 3) dB 0 20 20k -20 -30 -30 -40 -40 -50 -50 -60 -60 -70 50 00 200 500 Hz k 2k 5k 0k 20k Figure 8.7 Damping factor into 8 Ω (Ch1, Ch2) equation: damping factor = loaded impedance / amplifier output impedance (Measurements of a typical performance of D-POWER 3) -20 dB -80 -70 -80 -90 -90 -00 -00 -0 -0 -20 00u 200u 500u m 2m 5m 0 m 20m 50m 00m 200m 500m Vrms Figure 8.6 THD+N @ 1 kHz, 8 Ω load vs. input voltage (Ch1, Ch2) (Measurements of a typical performance of D-POWER 3) P. 27 600 USER MANUAL D - P O W E R SERIES 2 5 -20 20 50 00 200 500 Hz k 2k 5k 0k Figure 8.8 THD+N vs. frequency (BW 22 kHz), 10 dB below clip, 8 Ω (Ch1, Ch2) (Measurements of a typical performance of D-POWER 3) D-POWER 7 TYPICAL PERFORMANCE DIAGRAMS SERIES -20 -20 -30 -30 -40 -40 -50 dB -60 -50 -70 dBr -60 -80 -70 -90 -80 -00 -90 -0 -20 00u 200u 500u m 2m 5m 0m 20m 50m 00m 200m 500m Vrms 2 5 -00 20 Figure 8.9 CCIF difference frequency method (10,5 kHz and 11,5 kHz) vs. input level @ 8 Ω (Ch1, Ch2) (Measurements of a typical performance of D-POWER 3) 50 00 200 500 Hz k 2k 5k 0k 20k 0k 20k Figure 8.11 Common mode rejection ratio (Ch1, Ch2) (Measurements of a typical performance of D-POWER 3) -20 -0 -30 -20 -30 -40 -40 -50 dB -50 dB -60 -60 -70 -70 -80 -80 -90 -90 -00 00u 200u -00 500u m 2m 5m 0m 20m Vrms 50m 00m 200m 500m 2 4 Figure 8.10 SMPTE intermodulation distortion (60 Hz and 7 kHz) @ 8 Ω vs. input level (Ch1, Ch2) (Measurements of a typical performance of D-POWER 3) P. 28 USER MANUAL D - P O W E R SERIES -0 20 50 00 200 500 Hz k 2k 5k Figure 8.12 Channel separation vs. frequency @ 10 W / 8 Ω (Ch1 => Ch2, Ch2 => Ch1) (Measurements of a typical performance of D-POWER 3) D-POWER 7 TYPICAL PERFORMANCE DIAGRAMS SERIES 2275 365 500 2500 22 900 2000 000 225 500 22 Watts 378 630 000 500 370 608 500 Peak power 0 4 Distortion limited output power (1 % THD) 8 Impedance/ Ω 6 Figure 8.13 D-POWER 4 (Measurements of a typical performance) 800 2000 600 500 960 Watts 95 000 500 483 500 Peak power 0 4 8 Impedance/ Ω 6 istortion limited D output power (1 % THD) Figure 8.14 D-POWER 3 (Measurements of a typical performance) P. 29 730 695 Watts USER MANUAL D - P O W E R SERIES Peak power 0 4 8 Impedance/ Ω 6 Distortion limited output power (1 % THD) Figure 8.15 D-POWER 2 (Measurements of a typical performance) D-POWER 8 WARRANTY INFORMATION SERIES 8.1 Summary of Warranty CAMCO guarantees the D-POWER Amplifier to be free from defective material and/or workmanship for a period of six (6) years from the date of sale. When a defect occurs under normal installation and use, CAMCO will repair the product under this warranty. In this event, please return the amplifier to your dealer/distributor together with a copy of your sales reciept as proof of purchase. This warranty provides that examination of the returned product must indicate in our judgment a manufacturing defect. 8.2 Items Excluded from This Warranty CAMCO is not liable for any damage caused by shipping accidents, misuse, abuse, operation with incorrect AC voltage, operation with faulty peripheral equipment, modification or alteration without prior factory approval, service by an unauthorised service center and normal wear and tear. Amplifiers on which the serial number has been removed or defaced are not eligible for warranty service. 8.3 What CAMCO Will Do CAMCO (or its appointed agent) undertakes to rectify any defect regardless of the reason for failure (unless excluded from this warrenty), by repair, replacement or refund as it sees fit. P. 30 8.4 How to Obtain Warranty Service You must notify your dealer/distributor of your need for warranty service. All components must be shipped in the original packaging. USER MANUAL D - P O W E R SERIES 8.5 CAMCO Product Improvement CAMCO reserves the right to improve the technical standard of its products without giving prior notice. If in any doubt, please consult your dealer/distri butor or contact CAMCO directly for clarification. D-POWER 9 SERVICE INFORMATION SERIES PLEASE ENCLOSE THIS COMPLETED FORM WITH THE AMPLIFIER DO NOT SEND SEPARATELY Owner’s Information Company Name: _ _ _ _ _ _ _ _ _ _ _ _ _ _ _ _ _ _ _ _ _ _ _ _ _ _ _ _ _ _ _ _ _ _ _ _ _ _ _ _ _ _ _ Contact: _ _ _ _ _ _ _ _ _ _ _ _ _ _ _ _ _ _ _ _ _ _ _ _ _ _ _ _ _ _ _ _ _ _ _ _ _ _ _ _ _ _ _ _ _ _ _ _ _ Address: _ __ __ __ __ __ __ __ __ __ __ __ __ __ __ __ __ __ __ __ __ __ __ __ _ __ __ __ __ __ __ __ __ __ __ __ __ __ __ __ __ __ __ __ __ __ __ __ __ __ __ _ _ __ __ __ __ __ __ __ __ __ __ __ __ __ __ __ __ __ __ __ __ __ __ __ __ __ __ _ _ __ __ __ __ __ __ __ __ __ __ __ __ __ __ __ __ __ __ __ __ __ __ __ __ __ __ _ Telephone: _ _ _ _ _ _ _ _ _ _ _ _ _ _ _ _ _ _ _ _ _ _ _ _ _ _ _ _ _ _ _ _ _ _ _ _ _ _ _ _ _ _ _ _ _ _ _ Facsimile: _ _ _ _ _ _ _ _ _ _ _ _ _ _ _ _ _ _ _ _ _ _ _ _ _ _ _ _ _ _ _ _ _ _ _ _ _ _ _ _ _ _ _ _ _ _ _ eMail Address: _ __ __ __ __ __ __ __ __ __ __ __ __ __ __ __ __ __ __ __ __ __ Model: _ _ _ _ _ _ _ _ _ _ _ _ _ _ _ _ _ _ _ _ _ _ _ _ _ _ _ _ _ _ _ _ _ _ _ _ _ _ _ _ _ _ _ _ _ _ _ _ _ Serial Number: _ __ __ __ __ __ __ __ __ __ __ __ __ __ __ __ __ __ __ __ __ __ Purchase Date: _ __ __ __ __ __ __ __ __ __ __ __ __ __ __ __ __ __ __ __ __ __ Expired Warranty If the warranty has expired, payment will be: Nature Of Problem Please describe the conditions that existed when the problem occured and what attempts were made to correct it: _ __ __ __ __ __ __ __ __ __ __ __ __ __ __ __ __ _ __ __ __ __ __ __ __ __ __ __ __ __ __ __ __ __ __ __ __ __ __ __ __ __ __ __ _ _ __ __ __ __ __ __ __ __ __ __ __ __ __ __ __ __ __ __ __ __ __ __ __ __ __ __ _ _ __ __ __ __ __ __ __ __ __ __ __ __ __ __ __ __ __ __ __ __ __ __ __ __ __ __ _ _ __ __ __ __ __ __ __ __ __ __ __ __ __ __ __ __ __ __ __ __ __ __ __ __ __ __ _ _ __ __ __ __ __ __ __ __ __ __ __ __ __ __ __ __ __ __ __ __ __ __ __ __ __ __ _ _ __ __ __ __ __ __ __ __ __ __ __ __ __ __ __ __ __ __ __ __ __ __ __ __ __ __ _ _ __ __ __ __ __ __ __ __ __ __ __ __ __ __ __ __ __ __ __ __ __ __ __ __ __ __ _ _ __ __ __ __ __ __ __ __ __ __ __ __ __ __ __ __ __ __ __ __ __ __ __ __ __ __ _ _ __ __ __ __ __ __ __ __ __ __ __ __ __ __ __ __ __ __ __ __ __ __ __ __ __ __ _ _ __ __ __ __ __ __ __ __ __ __ __ __ __ __ __ __ __ __ __ __ __ __ __ __ __ __ _ _ __ __ __ __ __ __ __ __ __ __ __ __ __ __ __ __ __ __ __ __ __ __ __ __ __ __ _ _ __ __ __ __ __ __ __ __ __ __ __ __ __ __ __ __ __ __ __ __ __ __ __ __ __ __ _ _ __ __ __ __ __ __ __ __ __ __ __ __ __ __ __ __ __ __ __ __ __ __ __ __ __ __ _ _ __ __ __ __ __ __ __ __ __ __ __ __ __ __ __ __ __ __ __ __ __ __ __ __ __ __ _ Cash/Cheque VISA MasterCard Shipping Address To transport the amplifier, the original packing materials must be used. Please return the amplifier to the following address or your nearest CAMCO appointed distributor. Other equipment in your system: _ __ __ __ __ __ __ __ __ __ __ __ __ __ __ __ __ _ __ __ __ __ __ __ __ __ __ __ __ __ __ __ __ __ __ __ __ __ __ __ __ __ __ __ __ _ __ __ __ __ __ __ __ __ __ __ __ __ __ __ __ __ __ __ __ __ __ __ __ __ __ __ __ _ __ __ __ __ __ __ __ __ __ __ __ __ __ __ __ __ __ __ __ __ __ __ __ __ __ __ __ _ __ __ __ __ __ __ __ __ __ __ __ __ __ __ __ __ __ __ __ __ __ __ __ __ __ __ __ _ __ __ __ __ __ __ __ __ __ __ __ __ __ __ __ __ __ __ __ __ __ __ __ __ __ __ __ Our web site: www.camcoaudio.com provides a complete list of CAMCO dealers/distributors. CAMCO Produktions- und Vertriebs-GmbH für Beschallungs- und Beleuchtungsanlagen, Fischpicke 5, D-57482 Wenden, Germany P. 31 USER MANUAL D - P O W E R SERIES D-POWER 10 MAINTENANCE INFORMATION / 11 DECOMISIONING SERIES P. 32 10 Maintenance Information Cleaning and servicing the inside of the amplifier must never carry out by unqualified personnel. The amplifier must never be opened by unqualified personnel. Cleaning and servicing work on the inside of the amplifier must only be carried out by qualified personnel. Qualified personnel is defined as a person who has gained specialised relevant knowledge of electronic engineering through education, training and experience and who has sufficient knowledge of all relevant governmental work safety regulations to be in a position to judge the safe functioning of power amplifiers based on technical rules according to IEC 60065. (IEC 60065 (DIN EN 60065) “Safety Requirements for Audio, Video or similar Electronic Appliances”) In order to guarantee the safe functioning of the amplifier, it has to be checked regularly depending on its application but at least once a year by a properly qualified person. Advice on how to carry out these checks can be found in DIN VDE 0702-1 “Safety Checks for Electronic Appliances” . An amplifier that is considered to be unsafe must be labelled accordingly and stored in a safe place to prevent this amplifier being used mistakenly. For details on removal and cleaning of the front filter refer to section 4.7. USER MANUAL D - P O W E R SERIES 11 Decomissioning During the decomissioning process of the amplifier, all legally prescribed rules and procedures must be adhered to. D-POWER COMPANY INFORMATION SERIES Mailing Address: CAMCO Produktions- und Vertriebs-GmbH für Beschallungs- und Beleuchtungsanlagen Fischpicke 5 D-57482 Wenden Germany Telephone: +49 (0) 2762 408-0 Facsimile: +49 (0) 2762 408-10 Internet: www.camcoaudio.com Email: [email protected] P. 33 USER MANUAL D - P O W E R SERIES D-POWER NOTICES SERIES P. 34 USER MANUAL D - P O W E R SERIES www.camcoaudio.com