1
Contents (version 1.7)
Contents (version 1.7)
•
•
•
•
•
•
•
•
•
Quite Revealing
Reveal plates / colours
Reveal profiles / tagged colour
Reveal fonts
Reveal overprinting
Reveal transparency
Reveal image resolution
Reveal transfer functions
Reveal halftone screens
Contents (version 1.7)
Contents (version 1.7)
Credits
Credits
Copyright © 2002, 2003, 2005 A. W. Inston and Quite Software Ltd.
This document is the user manual for Quite Revealing, a software
product. The software is supplied under the terms of a license, and
may only be used or copied in accordance with the terms of the
license.
Quite Software Ltd.
Carraig Thura
Lochawe
Argyll
PA33 1AF
United Kingdom
http://www.quite.com/
Adobe®, Acrobat®, Acrobat® Reader™, Distiller®, Photoshop®,
Illustrator® InDesign® and PostScript® are either registered trademarks
or trademarks of Adobe Systems Incorporated in the United States and/or
other countries. http://www.adobe.com/
Pantone® is a registered trademark of Pantone, Inc.
http://www.pantone.com/
Quark and QuarkXPress are trademarks of Quark, Inc.
http://www.quark.com/
Other trademarks acknowledged.
Crackerjack referred to herein is a product from Lantana, Inc.
http://www.lantanarips.com/
The software includes portions from the Independent JPEG Group, and
the ZLib compression library.
Contents (version 1.7)
Quite Revealing
Quite Revealing
•
•
•
•
•
•
•
How do I run Quite Revealing?
What can I do with Quite Revealing?
What can’t I do with Quite Revealing?
How do I get support?
Can I automate Quite Revealing?
What’s new in Quite Revealing 1.6?
What’s new in Quite Revealing 1.7?
How do I run Quite Revealing?
Quite Revealing is a plug-in for Acrobat 4.0, 5.0, 6.0 or 7.0. This means
that before you can run it, you need to put it into the Acrobat plug-ins
folder. The location of the folder depends on where you installed
Acrobat, but on the Macintosh it is called Plug ins and on Windows it is
called plug_ins (with an underscore).
You need to be running Windows 95 or above (including Windows 98
and Me) or Windows NT 4.0 or above (including Windows 2000 and
XP); or MacOS 9.1 or above on a Power Macintosh (including Mac OS
X). Windows 3.1, 68K Macintosh, and Unix systems are not supported.
Acrobat is required; the free Acrobat Reader will not work. Acrobat 3.0
will not work.
You should check the system requirements for Adobe’s Acrobat
software. For instance, Acrobat 6.0 Professional will not run in Windows
95, 98, or Me.
This PDF file can be used for on-line help in Quite Revealing. When you
click the ? button on a dialog, this manual should open to the appropriate
page. The file must be installed in the same folder as the plug-in itself.
On the Macintosh, there are three plug-in files, which should be called
Quite Revealing, Quite Revealing.acroplugin and Quite Revealing
OSX and this file should be called Quite Revealing Guide. You can
install all three plug-in files on any Macintosh system; Acrobat will load
only the correct one. To run native in Mac OS X, you need Acrobat 5.0.5
or above.
Contents (version 1.7)
Quite Revealing
With Acrobat 6.0 and above on the Macintosh only, the plug-ins folder is
now invisible. Quite Revealing has an installer which can find it. To add
plug-ins manually, locate the Acrobat 6.0/7.0 application icon in the
Finder (not a folder, and not a shortcut.) Use Command+I to get the
information pane. An entry “Plug-ins” appears, and you can use it to add,
remove or disable plug-ins. Add all three of the files above, even though
the guide is not actually a plug-in.
On Windows, the plug-in should be called qrev32.api, and this file
should be called qrev32.pdf.
Once the plug-in is installed, and Acrobat is restarted, you should see a
new menu item appear: Plug-ins > Quite Revealing. That gives access
to all of the features of Quite Revealing in one place.
If you do not have a license, click the Free Trial button. This will give a
30 day free trial starting with the current date.
When you purchase a license you will receive a serial number and private
code. Click the Licensing button, type your details and the two numbers.
The serial number you receive is going to look like this: 1234-5678-12341234, with 16 digits in all. The private code is a 4 digit number like 9876.
If you don’t seem to have both, check to see if they have been written
together like this:
1234-5678-1234-1234 9876.
The Licensing button is on the About screen. This screen is shown when
you first run Quite Revealing, and can be pulled up at any time by
clicking the ?? (two question marks) button on a Quite Revealing screen.
This will show the serial number, but never the private code, so you
should keep both in a safe place.
What can I do with Quite Revealing?
The functions of Quite Revealing can be described quickly:
1. To show you information in various categories about the things used
in a PDF file. “Things” would be things mainly of interest in a prepress context, but also fonts which may be of more general interest.
2. To reveal where these things are used, by showing you a live, side-byside view of the original PDF file and the items you selected. For
Contents (version 1.7)
Quite Revealing
instance, you could show a view using only the Helvetica font, or a
view using only the Cyan colour plate (in effect, a separation
preview).
3. To do a number of actions that relate to these categories. For instance,
you can rename spot colours, or apply transfer functions.
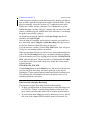
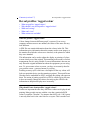
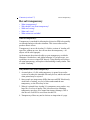
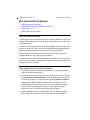
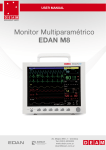
All of these are accessed from the Quite Revealing control panel, which
should be self-explanatory. There is a short format, designed for
compactness, and a long form with more information. Here is the short
form.
Short form
This list
shows what
is in the
current
document.
("What am I
seeing?")
Click on
just one
item in the
list to see
full details
here
Select what
you want to
reveal
(Go to)
Select what
to view, or
view options
("What can
I view?")
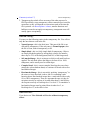
Long form
Help (online
guide)
About
(licensing)
Each of the functions is described in detail later in this guide:
• Reveal plates / colours
• Reveal profiles / tagged colour
• Reveal fonts
• Reveal overprinting
• Reveal transparency
• Reveal image resolution
• Reveal transfer functions
Contents (version 1.7)
Quite Revealing
• Reveal halftone screens
Each of these includes a section “What am I seeing?” which describes
what information will appear in the list. Each section also includes “What
can I view,” which describes what appears in the pull-down list for what
to view. That list also always includes Set viewing options (general) in
every case.
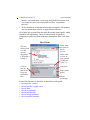
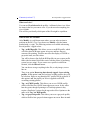
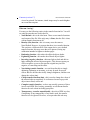
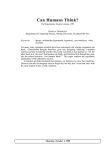
The long form includes all of the same features, and some new ones,
including a place to select actions, and a convenient way to locate
information that appears on only certain pages. Here is the long form.
Long form (click +)
Click
Refresh if
you change
the original
document
and want to
refresh the
list
Select this
box to refresh
every time the
document
Select an action
(modify)
Short form
Go to
previous
page with
any
selected
item
Go to next
page
containing any
selected item
Actions available are described under each function under “What actions
are available”?
What can’t I do with Quite Revealing?
It’s important to understand the limitations of software. Some of the key
things Quite Revealing can’t do:
Contents (version 1.7)
Quite Revealing
• Save or print the views (this means Quite Revealing is only a
previewer of separations, it cannot be used to make separations).
• Select individual items on pages to see their properties. The aim is to
reveal everything on a page. You can zoom in while viewing to see
just a single item.
• Show the location of invisible items (such as items off the page,
behind another item, or a space character in a particular font).
• Convert RGB to CMYK unless you also install the Quite A Box Of
Tricks product.
• Preview the effect of overprinting on more than one colour plate; only
single plates can accurately show overprinting.
• Flatten transparency (preserving appearance).
How do I get support?
We want you to be able to use Quite Revealing to solve your problems.
If you have a question that is not answered in these pages, or you think
you have found any sort of bug, check on our web site
http://www.quite.com/ for the latest information. If that doesn’t help,
please contact your reseller or send an e-mail to [email protected].
All software has bugs, and although we’ve had the help of well over a
thousand beta testers for Quite Revealing, there may still be some
lurking. We need your help to tell us when you find a bug, so that they
can be fixed as quickly as possible. Please don’t assume that someone
else has already found it and told us about it. Thank you!
Can I automate Quite Revealing?
It is not unusual to have a large collection of files, all of which need the
same treatment, such as removing overprint or applying transfer
functions.
If you have Acrobat 5.0 or Acrobat Professional 6.0 or 7.0 (not Acrobat
Standard 6.0 or 7.0), you can use the “batch sequences” feature that is
built in to Acrobat. Quite Revealing provides access to a limited number
of actions to Acrobat for use in batch sequences.
Contents (version 1.7)
Quite Revealing
We would like to caution you that we only consider Acrobat suitable for
light duty automation. By “light duty” we mean perhaps a few dozen files
at a time, with someone checking occasionally to make sure that things
are going correctly.
We do not support “heavy duty” automation, for instance hundreds of
files left to run overnight. There is a high chance that Acrobat will fail
during such a task; it was written as an interactive tool.
This information is an outline, because automation is a standard Acrobat
5.0 feature, and should be covered in the Acrobat Guide in more detail.
Actions from Quite Revealing can be combined with other actions. You
can use them to process single files, all the files in a folder, or all open
files (without saving).
Here is an example, which selects the action “Apply transfer functions”,
and applies this to every file in a folder. Remember that you need Acrobat
5.0 to follow this example.
1. Use File > Batch Processing > Edit Batch Sequences (Acrobat 5.0)
or Advanced > Batch Processing (Acrobat Professional 6.0 or 7.0).
2. Click New Sequence and type a name for the sequence, say My
Apply transfer.
3. The Batch Edit Sequence dialog opens. Click Select commands.
4. Scroll down in the list of available commands in the left hand panel to
find Quite Revealing. Click on Reveal transfer functions then the
Add button. A Reveal transfer functions action should appear in the
right hand panel.
5. Double click on Reveal transfer functions in the right panel.
6. In the pull-down list, select Apply all transfer functions and click
OK.
7. Click OK again to return to the Batch Edit Sequence dialog. Check
that Run commands on says Ask when sequence is run. Also set
Ask when sequence is run for Select output location.
8. Click OK. The sequence is now saved.
Contents (version 1.7)
Quite Revealing
Now you can run the selection at any time, by selecting File > Batch
Processing > Apply transfer. You can select one or more files to
process, then you will be asked for an output directory.
This is just one of many ways to set up batch sequences.
You may find that you want to record the messages displayed on screen
during batch processing. You can do this by asking Acrobat to keep a log
file. This is controlled by choosing Edit > Preferences > General, then
selecting Batch processing. On this dialog, switch on Save warnings
and errors in log file. Click Choose location to select a folder for the log
files. All the messages from Quite Revealing are considered to be
warnings, so everything is logged.
Only the following actions are currently available:
Reveal profiles / tagged colour.
Untag - remove all profiles
Reveal overprinting
Remove all overprint
Set Illustrator Overprint mode OFF
Set Illustrator Overprint mode ON
Overprint all black elements
Reveal transparency
Remove all transparency effects
Reveal transfer functions
Apply all transfer functions
Remove all transfer functions
Reveal halftone screens
Remove all halftone information
What’s new in Quite Revealing 1.6?
There are no new functions in Quite Revealing 1.6. The plug-in has
simply been revised to work with Acrobat 6.0. This new version was
released in July, 2003.
Contents (version 1.7)
Quite Revealing
What’s new in Quite Revealing 1.7?
There are no new functions in Quite Revealing 1.7. The plug-in has
simply been revised to work with Acrobat 7.0. This new version was
released in January, 2005.
Contents (version 1.7)
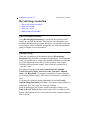
Reveal plates / colours
Reveal plates / colours
•
•
•
•
Why Reveal Plates / Colours?
What am I seeing?
What can I view?
Why do grey bars appear for fonts that should not appear on the
plate?
• What actions are available?
Why Reveal Plates / Colours?
This function is designed to show you critical information about the
colours in your PDF file, especially how colours will be separated. By
using View Selected you can choose to view colour separations. You
have several controls over how separations are viewed, which are
described below - What can I view?; How do I use Viewing Options
(Overprint Control)
What am I seeing?
The reveal plates / colours list will show some of the following types of
entry. Only the ones that actually appear in the file will be shown.
• RGB colour - this information is made using RGB colours. It will be
fine for screen display, but some workflows will not be able to make
colour separations. We do not attempt to preview separations for
RGB colours, as we have no way to know how they will come out.
But you can select RGB colour then view the result, to see all (and
only) RGB colour.
• Lab colour - this is similar to RGB colour, in that it is fine for screen,
but may not separate correctly.
• Transparency - unpredictable - this uses the transparency features
of Acrobat 5.0, in such a way that the result has unpredictable
separation. This includes using the “blend modes” of Hue, Saturation,
Color or Luminosity. It also includes the case where the “mixing
colour” for transparency is not CMYK. We cannot attempt to preview
separations. Note that we can show separations for more simple
Contents (version 1.7)
Reveal plates / colours
blending, so this is not a way to check if a file contains transparency.
For that, see Reveal transparency.
• CMYK with profile - this is CMYK information tagged with an ICC
profile. The importance of this is that tagged CMYK is expected to
have its colours all converted in the printer/imagesetter. So, the
particular values of cyan, magenta, yellow and black can be expected
to change, including the possibility of pure black gaining CMY
colours. Because of this, we cannot attempt to preview separations. If
you do not want this effect, you can use the actions under Reveal
Profiles to remove the tagging, and make the CMYK revert to normal.
• Cyan, Magenta, Yellow, Black - these are the normal process
colours in colour printing. You can preview the individual
separations. Marks made using CMYK will show up, and also any
use of spot plates called Cyan, Magenta, Yellow, Black since the rule
is that plates by these names will mark the process plates.
• Registration (all plates) - a special name which should mark all
plates, typically used for registration colour. Note that when you view
items the registration item is put on all CMYK and process plates by
default, but you can change this behaviour with Set Viewing Options
(Plates/Colours).
• None (separation suppressed) - a special name which should not
appear at all - it should be invisible. This is best avoided!
• All other names are spot colour plate names, which can be previewed
individually.
The names are grouped under three headings, Special, Process colours
and spot colours. You can select all in a group by clicking on the heading.
What can I view?
You can use View Selected in the plate / colours view. Select the items
in the list you want to view. If you do not select anything, the view is
blank.
This can be used to inspect individual process or spot colour plates.
Important: overprinting will be previewed according to your options. If
Contents (version 1.7)
Reveal plates / colours
you do not set the options correctly, overprinting may not be previewed
correctly - How do I use Viewing Options (Overprint Control).
You can also select the other special categories like RGB colour or Lab
colour in order to see where these, possibly unwelcome, colours are used.
Various options are available to control the preview of separations. After
View: you can select Set Viewing Options (Plates/Colours). Options
available include the following.
• View single CMYK or spot plates in greyscale. This option is
initially off. Normally each view is shown in its natural colour (for
instance, cyan for the cyan plate). For light coloured spot plates, this
can make things hard to see. If this option is on, then single CMYK
or spot plates are shown instead in shades of grey. (The grey is not the
same brightness as the original colour; 100% of the original spot or
process colour will be shown as black.) This option has no effect if
you select more than one plate, or if viewing other kinds of item like
RGB colour.
• View images in low resolution. This option is initially on. Many
files for press use have high resolution images which are slow to
preview plates. For the purposes of checking separations, the full high
resolution image is rarely necessary. If this option is on, images are
reduced to 72 dpi. Note that this affects only the view of plates /
colours; the original document still displays with high resolution.
• Show registration on every CMYK or spot plate, as it should
separate. This option is initially on. The special colour called All or
Registration is intended to show on every separation produced. With
this option on, that is how CMYK and spot plates are shown. Turn
this option off only if you want to separately preview your
registration colour. Note that even with this option on, you can click
on the item for Registration in the colour list to view only registration
colours.
Contents (version 1.7)
Reveal plates / colours
Why do grey bars appear for fonts that should not appear on the
plate?
Sometimes you will see grey bars on a plate view, which do not seem to
belong there. They will correspond to text, that should appear on different
plates. If you zoom in, the plate grey bars will vanish.
This is caused by greeking, a technique used by Acrobat to speed up the
display of very small text. Instead of the text itself, a grey block is shown;
the blocks run together to make bars.
When you view a plate, text not on the page is still there, but in white.
This is essential, since this is how other plates can knock out text.
Unfortunately, when it is greeking, Acrobat will show a grey bar even for
white text.
But fortunately, greeking can be turned off. In Acrobat 5.0 this is under
the Display tab of preferences. Modern computers are now so fast, that
very little speed is lost by choosing to turn this option permanently off.
Quite Revealing will warn you if greeking is on, but this warning can be
suppressed.
What actions are available?
After Modify: is a pull-down menu where you can select actions to
perform on the file. (Tip: if you do not see Modify: click the button
marked with a + sign). The following actions are available when using
Reveal plates / colours.
• Selected items to CMYK - select one or more items and use this
option. All spot plates will be converted to process plates (CMYK).
This may invite you to “Fix plates” - see below. What exactly
happens depends on the kind of item you select.
• Spot plates - these are converted to CMYK using the value shown
by Quite Revealing. Important: every spot colour has a colour
equivalent shown in the PDF file, and this is used for conversion.
Neither Acrobat, nor Quite Revealing, has any table giving special
meanings to names, such as those from the Pantone® library.
Contents (version 1.7)
•
•
•
•
Reveal plates / colours
• RGB and Lab - this cannot be converted to CMYK by Quite
Revealing. However, it can be converted by its sister product Quite
A Box Of Tricks. Provided Quite A Box Of Tricks 1.5d or above
is also installed, you can convert RGB and Lab (only both
together), directly from Reveal plates / colours.
• CMYK with profile - the profile is removed, converting to regular
CMYK
In all other cases, Quite Revealing cannot convert. This includes
transparency, registration, and items that are already CMYK,
All spot plates to CMYK - converts all spot plates to CMYK,
without affecting anything else (such as RGB). This may invite you to
“Fix plates” - see below. This ignores which items are selected in the
list.
Rename/recolour one plate - select exactly one spot colour plate in
the list. This may invite you to “Fix plates” - see below. You will be
shown the plate’s name, and its CMYK equivalent. You can change
either or both of these values. Note that you cannot use this to
combine plates - see below for that option. If you change the name
only, the view on screen will not alter. If you change the CMYK
colour values, this does not affect how the plate will separate, but it
does affect the screen view, the printout when not making
separations, and the result of converting this spot plate to process.
You can also type the name Cyan, Magenta, Yellow or Black as the
new name. This will change the plate so it marks on the CMYK plate
of your choice. You will not be able to change it again.
Merge two plates - select exactly two spot plates. You will be shown
the name and CMYK value for both plates. This may invite you to
“Fix plates” - see below. You simply pick the “winner”. All colours
made using the other plate are changed. This is a way of reducing
unnecessary plates in a job, especially when slightly different names
are used for the same task.
Fix all plates - Quite Revealing likes to find all of the spot colours in
a PDF file to be completely consistent and have CMYK colour
values. This is not always the case, and where a plate needs fixing,
you are invited to type in the CMYK value for it. A plate needs fixing
Contents (version 1.7)
Reveal plates / colours
if it does not use CMYK for its alternative colour. Sometimes, Lab or
RGB colour is found in a PDF for this alternative colour. Also, a PDF
might contain the same spot colour name with two different CMYK
values. This means that the on-screen display cannot be right (at least
one of them must be previewed wrongly). It is up to you to pick the
CMYK value that is best for the colour. If you intend only to make
separations, it is not important to pick an exact colour.
• All plates and RGB to CMYK - This option only works if Quite A
Box Of Tricks 1.5d or later is installed. It simply uses Quite A Box
Of Tricks to convert all spot colour, RGB and Lab into CMYK. This
can be done anyway from within Quite A Box Of Tricks, but may be
a convenient place to do the conversion. Note that this also converts
registration colours to CMYK.
Contents (version 1.7)
Reveal profiles / tagged colour
Reveal profiles / tagged colour
•
•
•
•
•
What are profiles / tagged colour?
Why should I care about profiles / tagged colour?
What am I seeing?
What can I view?
What actions are available?
What are profiles / tagged colour?
Colour changes between different people’s systems. Even on two
computer monitors next to one another, the colour of the same file may
look different.
A PDF file can contain information about the colours in the file. This
information gives information about the scanner used to scan images, or
the monitor on which the colours were checked, or the printer for which
they were intended.
This information can be used to adjust the display or printing of colour,
to more closely match the original. This matching is the essence of colour
management, but it is only possible if correct information is known, not
only about the original intention but about the equipment you are using
now. To get accurate colour on screen, you have to accurately describe
your current screen - a process known as profiling.
Profiling creates profiles which are a description of the way colour will
look on a particular device (such as monitor or printer). These profiles are
files that can be embedded in a PDF, and Quite Revealing can report on
them. The action of putting a profile in a PDF is called tagging because
it does not actually change the colours, but only tag the colours with
information to help them display more accurately.
Why should I care about profiles / tagged colour?
Profiles are important because they affect how colours are displayed and
printing. Many people start out with the view that a particular RGB
colour is somehow “absolute”, for instance that 100% red + 100% green
is not only blue but it is the same blue for everyone. This is not the case!
Contents (version 1.7)
Reveal profiles / tagged colour
Similarly, the results of printing a CMYK colour depend on the printing
technology, the ink, and even the paper used.
If you work on a calibrated system (one where the colour characteristics
of your monitor and/or printer are known), it can be useful to tag the PDF
file with profiles to match your working environment. This makes
accurate colour more likely in other environments. However, it cannot
guarantee anything! This is because it can only be accurate if the other
user has a calibrated system. In the general case, outside the publishing
area, only a tiny fraction of systems are calibrated.
For some people it is very important not to have profiles. A particular
case is CMYK colours. Commonly people will design with a specific mix
of CMYK colours. For example, they may design with a colour in mind
called “warm red”, knowing that they require 100% magenta and 80%
yellow on their printer or press. If you have CMYK profiles, you are
asking the printer to change colours to match the profile.
Even if the profile you use exactly matches your printer, some conversion
can take place. Although the result should look the same, the conversion
may lose information like overprinting. So, for many people, removing
CMYK profiles is important.
Acrobat Distiller can be used to set profiles for files; also profiles may
come from the applications used to create the pages, and may come
separately for different graphics. Reveal profiles / tagged colour can be
used to check the usage is consistent.
What am I seeing?
You may see the following entries in the profiles / tagged colour list. You
will see only the ones that are used in the file. This list is alphabetical.
CMYK (untagged) - this is the normal CMYK which is what is wanted
in most pre-press workflows.
CMYK with profile <name> - this is CMYK tagged with an output
profile. This affects on screen display. Caution: CMYK profiles have an
effect which may be unwelcome in many workflows. It may causes
colour to be converted in the printer or imagesetter, so the original
CMYK numbers can be completely changed, including adding process
Contents (version 1.7)
Reveal profiles / tagged colour
colours to pure black. Note: the profile name cannot always be shown.
Quite Revealing will show it if it is available, but sometimes it is lost in
the process of making the PDF, replaced with generic names like
PostScript CSA Profile.
Damaged ICC profile - the profile in this file is damaged; Acrobat
ignores it with no error message. This is seen quite often, because
Distiller 4.0 would always embed broken profiles!
Greyscale uncalibrated - normal greyscale.
Greyscale with profile <name> - this greyscale includes an embedded
profile which allows it to be adjusted for display on screen. It might also
be adjusted on printing.
Greyscale untagged (no profile) - this greyscale includes calibration
information (gamma and white space). Although this is not in the form of
a profile, it otherwise behaves exactly like greyscale with profile.
Lab (always calibrated) - Lab colour in effect has a built in profile, so it
is similar to RGB with profile.
RGB (untagged) - this is normal RGB, which may look different on each
monitor.
RGB with profile <name> - this RGB colour has a profile attached. It
might affect screen and printing colours, and can in theory lead to better
colour matching. Quite A Box Of Tricks can use profiles in conversion to
CMYK.
RGB calibrated (no profile) - this RGB includes information similar to
a profile, but using an older system predating profiles. It otherwise
behaves as if it has a profile. Quite Revealing will report in the detail field
if this is equivalent to common profiles for SRGB, Apple RGB, Adobe
RGB, or ColorMatch RGB.
Spot colour - spot colours do not use profiles, so they are shown
separately. Note that the process plates Cyan, Magenta, Yellow and
Black can be named as spot plates; in this case all profiles are ignored too.
Contents (version 1.7)
Reveal profiles / tagged colour
What can I view?
You can use View Selected in the profiles / calibrated colour view. Select
the items in the list you want to view. If you do not select anything, the
view is blank.
This will let you identify which parts of the file might be a problem.
What actions are available?
After Modify: is a pull-down menu where you can select actions to
perform on the file. (Tip: if you do not see Modify: click the button
marked with a + sign). The following actions are available when using
Reveal profiles / tagged colour.
• Tag - set RGB profile. This allows you to set an RGB profile, which
will affect how RGB items appear on screen, and how they are
converted for printing. This does not affect the display of CMYK or
greyscale items, nor Lab colour.
You will be shown a list of all the RGB profiles in your system profile
folder (the location of this folder varies with the release of operating
system you are using). If you want to use a profile in a different
location, click the Browse button.
You can choose to tag everything in the file, or only images, text or
line art.
There is an option Do not tag data already tagged - leave existing
profiles. If this option is on, and you have existing profiles, they will
be left alone. However, any damaged ICC profiles will be replaced. If
this option is off, the profile you select is applied to all RGB,
overriding existing profiles.
• Tag - set CMYK profile. This allows you to set a CMYK profile,
which will affect how CMYK items appear on screen. It may affect
how they print, though if printing to a PostScript printer it may
require a PostScript 3 printer for the tag to take effect. Options are the
same as for Tag - set RGB profile.
• Tag - set greyscale profile. This allows you to set a greyscale profile,
which will affect how greyscale items appear on screen. Bear in mind
Contents (version 1.7)
Reveal profiles / tagged colour
that an item which looks greyscale may actually be made using RGB
or CMYK colour - use the viewer to decide. Options are the same as
for Tag - set RGB profile. Note, though, that your system may not
contain any greyscale profiles unless you add them.
• Untag - remove all tagging. This will remove all profiles and colour
tagging from the current document, except for Lab colour which is
always tagged. All RGB, CMYK and greyscale colours will be shown
as untagged. Colours now depend completely on the device used to
view or display it.
While this may seem to produce less accurate results, removing tags
can be important, especially if working with CMYK colours for
press.
If you want to remove only CMYK profiles, leaving other profiles
alone, this can be done from a different view; see Reveal plates /
colours. In the plate list, you would select CMYK with Profile and
then the action Selected items to CMYK.
This action can be automated - see Can I automate Quite Revealing?
• Extract embedded profile to file. It may be useful to be able to
match the profiles in several documents. You may also want to use the
same profile with tools like Adobe Photoshop to get matched colours.
If you do not have the original profile file, that can be difficult.
This function allows you to take a profile embedded in a PDF and
write it to a file. This file could be used to tag other PDFs, or placed
in the system profile folder.
Please note that profiles are copyright. When the profile is extracted,
Quite Revealing tells you the copyright information from the file.
There are often limitations on sharing, selling or giving away
copyright items, so if in doubt, consult the copyright holder. The
creator of the profile can also mark it as protected; in this case Quite
Revealing will refuse to extract it.
Contents (version 1.7)
Reveal fonts
Reveal fonts
•
•
•
•
•
•
Why should I care about fonts?
What am I seeing?
What can I view?
What are the font types?
What do the font embedding entries mean?
What actions are available?
Why should I care about fonts?
In most cases, display and printing of fonts is trouble free. However, there
are some causes of problems. First among these is a failure to embed
fonts. Some people also find problems with particular kinds of fonts in
their workflow. However, there is a lot of mythology about bad fonts; if
your printer/imagesetter and other software is up-to-date all font types
should work. Before rejecting font types out of hand, do some tests.
What am I seeing?
The font list is unlike the lists shown in all of the other views of Quite
Revealing, in that it shows the same information three times over. This is
done to provide you with fast access to the information you need.
The fonts are organised into categories, and you can open and close the
listings. Quite Revealing will remember which categories you have open
and closed, so you can largely ignore the categories you are not interested
in. Here are the top-level categories, each of which includes all of your
fonts.
• Fonts by type. This opens to show each type of font used in the
document. If you want to see which fonts are included in each type,
you can open the listing for each one. Only the types actually used in
the current document will appear in the list.
• Fonts by embedding. This opens to show you up to four different
categories of embedding. You can choose to view the fonts in the
categories you are interested in.
Contents (version 1.7)
Reveal fonts
• Fonts by name. This is a single alphabetical list of fonts. Note that
the same font may appear more than once, possibly many times. This
happens if the document contains multiple copies of the same font.
Each copy is potentially different e.g. some may be embedded and
some not.
What can I view?
You can use view selected fonts in the Reveal fonts view. Select the items
in the list you want to view. If you do not select anything, the view is
blank. Tip: by clicking on the group names, such as Embed: no or
TrueType you can easily view all the text in the fonts of these kinds.
There are two view options:
• View selected fonts plus all other objects - this shows everything
normally except the fonts you do not select, which vanish. It is often
useful to see text in its original context, surrounded by pictures etc.
• View selected fonts only, all in black - this shows only the selected
text and nothing else. The colour of text is changed to black, because
sometimes text can be invisible because it is white, yet still cause
problems.
Note that sometimes you still may not see text. This may happen if
the text is used outside the visible page; if only a space character is
used; or if the text has been created to be invisible, for instance by the
Adobe Acrobat Capture product.
What are the font types?
The font listing can show fonts organised by font type. Also, for a font in
any of the listings you can click to see more detail including the type. The
types of font are as follows.
• Type 1, a PostScript font (also known as “ATM fonts”). When
TrueType fonts are printed through PostScript, they often turn into
PostScript fonts too. These fonts are generally the least trouble.
• TrueType, a TrueType font. TrueType fonts have a reputation for
being problematic, but this is not always fair. For most people,
Contents (version 1.7)
Reveal fonts
TrueType fonts will work just as well as PostScript fonts. The main
cause of problems is outdated RIP (imagesetter) software.
• Multiple master (also known as MMType1), a multiple-master
PostScript font - one that can take different shapes. In most cases
these are trouble free.
• Type 3, a font actually made by drawing line art and images. The
quality of these is often poorer than PostScript or TrueType fonts,
especially on screen. However, they rarely cause printing problems.
Note that type 3 fonts are always embedded.
• Type0, Type 1(CID) which is also known as CIDFontType0, and
TrueType(CID) which is also known as CIDFontType2: these are
mainly used for very large fonts typically found in Far Eastern
languages. These are also starting to be used in Western files, to hold
Unicode font information, as they overcome the limit of 256
characters per font. For instance, Adobe InDesign will use these
fonts. These can cause problems on older imagesetter (RIP) software.
If you have problems with these it is best to contact the maker of your
RIP as most have now issued corrections.
What do the font embedding entries mean?
The font listing can show fonts organised by font embedding. Also, for a
font in any of the listings you can click to see more detail including the
embedding status. The types of embedding are as follows.
• Yes (full). This means that the font is embedded in the PDF file. This
should mean that the exact choice of font prints every time. However,
in some systems a printer-resident font of the same name may be
used.
• Yes (subset). This also means that the font is embedded. However,
the font has been modified to remove the characters that are not used.
This should print the embedded font in every case. This makes
smaller files, and is therefore often a good choice. However, if you
merge PDF files with subset fonts, the subsets remain separate and so
the file can actually end up larger.
Contents (version 1.7)
Reveal fonts
• No. This means that the font is not embedded. The font you see will
come from your system, if it is available. Otherwise, Acrobat creates
a substitute. This is not recommended in any workflow where font
accuracy is important. Note: Acrobat has an option View > Use Local
Fonts. If this option is off, then Acrobat will not use the fonts on your
system, and will always make a substitute. This is often a good idea to
see font problems earlier.
• No (base 14). This means that the font is not embedded, but that it is
recognised as one of the “base 14” fonts (the Helvetica, Times and
Courier families, plus Symbol and ZapfDingbats). Acrobat viewers
and printers are required to make these fonts, or ones very like them
available, so they do not need to be embedded. Versions of Acrobat
older than 4.0 would never embed them at all. Opinions differ on
whether failing to embed the base 14 fonts is a good idea.
What actions are available?
Only one action is available in font view, and it has a special purpose.
• When you are inserting pages from one document into another, you
may sometimes get the error “This document contains subset fonts
that cannot be merged.” The causes of this are not clear.
This is also a problem with Quite Revealing, which is unable to show
views of some documents, with the same error.
Quite Revealing has a special action that should get rid of this error,
by making changes to the fonts in the document. The action Font
Fix: avoid duplicate names will do this.
Use this action with caution, because if you use the Text Touch-up
tool to edit document text, you may not be able to do so after the
action. This does not always happen, but it is not possible to predict
whether it will.
In detail, the action will do two things. First, it changes the subset
name of every subset font. The subset name has a six letter prefix, like
ABCXYZ+ArialBold. Second, any type 1 or TrueType font that is
embedded but not subsetted is changed so it appears subsetted. The
font is not reduced in size, just marked. This is needed because the
Contents (version 1.7)
Reveal fonts
error message can occur, misleadingly, for fonts that are not
subsetted.
Contents (version 1.7)
Reveal overprinting
Reveal overprinting
•
•
•
•
•
•
•
•
What is overprinting?
Why should I care about overprinting?
How does the separation method affect overprinting?
How do I use Viewing Options (Overprint Control)
What is Illustrator Overprint Mode?
What am I seeing?
What can I view?
What actions are available?
What is overprinting?
Overprinting is a special technique controlling how printing inks are
mixed. It is a little like transparency, but it is a much older technique.
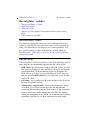
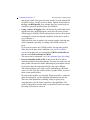
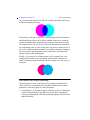
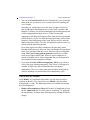
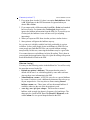
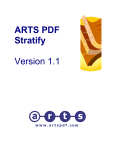
Consider the case of two circles overlapping, one made using magenta
ink and one made using cyan ink. Suppose the magenta one appears on
the page first. Then the appearance will be like this:
This is the normal arrangement, and will look similar on screen, and on
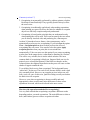
the printed page. Consider what that means on the colour separations. It
does not contain two circles. In fact, the cyan circle will knock out a hole
in the magenta circle. The separations will look like this:
Magenta
separation
Cyan
separation
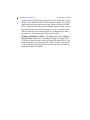
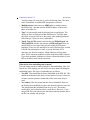
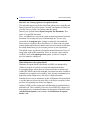
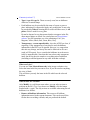
This is normal whenever objects overlap. If they did not, the colours
would mix together. But suppose we wanted the colours to mix. If we
Contents (version 1.7)
Reveal overprinting
were to allow both circles to be full size on their separations, the result
would be something like this:
So the inks would mix to make blue. Many design tools, like Illustrator
and QuarkXPress allow you to choose whether items are to overprint.
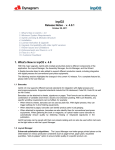
Always remember that overprinting is a property of the item on top (in
the example above, the cyan circle). The item beneath does not need to
be overprinting, since it is the action of the top object to knock it out, or
not. It is a common mistake to think of overprint as needing to belong to
the bottom object (the magenta circle) because this is the object that
changes shape on the printing plate.
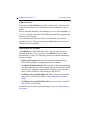
Finally, if you want to see whether items really overprint, here is an
example that actually uses overprinting. All the above examples are
faked, so that they print consistently. In this example, the cyan is set to
overprint.
Why should I care about overprinting?
Overprinting may seem a convenient way to design certain kinds of
effect. However, overprinting is not a general solution to this, and in
particular it will only appear in certain situations:
1. Overprinting is, as its name suggests, related to printing. That means
it does not normally have any effect on screen. This is potentially
serious; it means that the PDF file potentially displays on screen and
prints differently.
Contents (version 1.7)
Reveal overprinting
2. Overprinting is not normally performed by ordinary printers, whether
PostScript or non-PostScript. They typically (but not always) reflect
the screen view.
3. Overprinting is traditionally applied only when making separations
when printing on a press. However, the rules for whether to overprint
objects are still fairly complex and poorly understood.
4. Overprinting is based on the principle that you understand exactly
what printing inks will be used. This is not necessarily the case unless
you are directly involved with, and producing for, a known press.
Acrobat 5.0 introduced a new feature, where transparency can be
automatically used to preview overprinting. If you switch on the option
View > Overprint preview, then Acrobat previews the effect of
overprinting inks, on screen. You can also select the option Apply
overprint preview when you print (this is not switched on
automatically). Take care not to use this option if you want overprinting
to take place in the output device, rather than be simulated by Acrobat!
This can be very valuable, but is not the whole solution. The most
common kind of overprinting is black text. Suppose black text is to be
printed over a coloured background. If the black text knocks out the
coloured plates, the slightest imperfection on the press will cause a white
shadow to appear around the text.
To avoid this, black text is often overprinted. The background has no
“white hole” for the text. The result is still, because black is such a dark
ink, essentially black. However, an overprint preview in this case will
look exactly the same. In this case, Quite Revealing can tell you whether
the black text will overprint.
However, even when overprinting is chosen carefully and used
appropriately, there are still some major differences in how colour
separations are made, which are discussed in the next section.
How does the separation method affect overprinting?
It is very little realised that overprinting can produce different results
depending on how you make separations. The main differences relate to
how (and whether) process colours overprint each other.
Contents (version 1.7)
Reveal overprinting
Looking at the example above (What is overprinting?) it may seem
obvious that it the cyan colour is specified as 100%,0%,0%,0% CMYK,
and the magenta colour is specified as 0%,100%,0%,0% CMYK; and the
cyan object set to overprint; then the results will be to mix cyan and
magenta. Unfortunately this is not always the case.
The differences are for historical reasons, but very much still with us.
Here are four examples of how separations are made and the
corresponding results:
Separation method
Result of cyan + magenta
example
Export level 1 EPS file, place in
QuarkXPress, print separations
Overprint yes (colours mix) in
all cases
Print in-RIP separations to an
Adobe level 2 imagesetter, using
Crackerjack.
Overprint no (colours knock
out) in all cases
Print in-RIP separations to an
Adobe level 3 imagesetter, using
Crackerjack and selecting “Use
level 3” features with correct PPD
Overprint yes (colours mix) provided “Illustrator Overprint
Mode” is selected - What is
Illustrator Overprint Mode?
Print in-RIP separations to Harlequin RIP, using Crackerjack.
Overprint maybe Depends on
settings made in Harlequin RIP.
This is often very unexpected. The rules mainly affect whether process
colours will overprint, and whether greyscale will overprint the cyan,
magenta and yellow plates. There is also a problem of “invisible whites”,
where 0%,0%,0%,0% CMYK which is set to overprint may (or may not)
completely disappear.
You may now be wondering how you can possibly get an accurate
preview. Fortunately Quite Revealing provides a way to test your current
setup and put the results back into settings that affect how overprint is
previewed on screen. This is done by selecting Viewing Options
(Overprint Control).
Contents (version 1.7)
Reveal overprinting
How do I use Viewing Options (Overprint Control)
This selection appears on the list after View: when you are using Reveal
Plates/Colours or Reveal Overprint. Currently four options are listed, but
you don’t have to really worry about what they mean.
Instead, you click the button Open Overprint Test Document. This
opens a 1-page PDF document.
Now, you should use your current system to make separations from that
document. Do exactly what you would normally do. You are only
interested in the magenta plate. Simply examine the four numbered
boxes and see which ones have check boxes. Go back to the Overprint
control options and make sure that the same boxes are checked, and Quite
Revealing should now give an accurate preview of your separations.
The default values are chosen to match the normal behaviour of a level 3
imagesetter with in-RIP separation. These are also the values used by
Acrobat’s built in Overprint preview option. Acrobat’s Overprint
preview cannot be configured.
What is Illustrator Overprint Mode?
Illustrator Overprint Mode (also known as OPM) was introduced by
Adobe in Acrobat 4.0, to help overcome the limitations in their
overprinting design, where process colours would not overprint to an
Adobe RIP. While it does help with that, it becomes one more variable to
remember to get right in your workflow. Also, because overprinting is so
dependent on the output device, the effect is hard to describe.
Probably the best way to summarize is this: if Illustrator Overprint Mode
is on, then process colours are more likely to be able to overprint. It does
not force overprinting, but allows it to happen.
In theory a PDF can have some parts with Illustrator Overprint Mode on,
and others off. This is unlikely to be seen in real PDF files, though. For
most purposes we recommend making sure the option in Distiller (under
Advanced Job Options, conveniently called Illustrator Overprint
mode) is on.
Contents (version 1.7)
Reveal overprinting
If by any chance this option was left off, you can use the actions available
in Reveal Overprinting to switch this option on for the whole file.
What am I seeing?
Reveal overprinting is not used to preview your separations. That is the
job of another part of the plug-in (Reveal plates / colours). Instead, it is
used to check which parts of your document will overprint.
The information is listed in (up to) four categories. Important: the first
two categories are not fixed; depending on how you separate the file, files
may fall into either class. Quite Revealing uses your options to decide
which category to use. If you are interested in overprinting, setting the
options accurately is a must - How do I use Viewing Options (Overprint
Control).
Warning: sometimes overprinting is controlled outside the PDF. For
instance, some imagesetters, and the Crackerjack plug-in have the option
to force black to overprint. We cannot preview these unknown effects.
• Overprint spot and process. This is used for items which should
overprint both spot and process (CMYK) plates. Within this various
categories are shown. Some will mention “Illustrator Overprint
Mode” being on or off - see the above discussion - What is Illustrator
Overprint Mode?
• Overprint spot only. This is used for items which are expected to
overprint spot plates, but which are expected to knock out CMYK
plates.
• Overprint no. These are items which simply do not request
overprint. In many files this is the only category shown.
• Overprint unpredictable. These are items which indicate that they
should overprint, but where we cannot say whether this will happen.
This includes information that is still RGB, and certain kinds of
transparency.
Contents (version 1.7)
Reveal overprinting
What can I view?
You can use View Selected in the plate / colours view. Select the items
in the list you want to view. If you do not select anything, the view is
blank.
Bear in mind still that this is not intended to preview the overprinting. It
is a way of seeing which items in the PDF document will overprint, and
how they will overprint.
Also remember that when two objects are combined, the overprint
settings for the top object are what affect whether the bottom object is
knocked out or overprinted.
What actions are available?
After Modify: is a pull-down menu where you can select actions to
perform on the file. (Tip: if you do not see Modify: click the button
marked with a + sign). The following actions are available when using
Reveal overprint.
• Remove all overprint. Removes the overprint settings from the
entire PDF document. Everything should now overprint.
• Overprint all black elements - this switches on the overprint setting
for all elements that are (exactly) black. Only objects that are CMYK
with 0% cyan, magenta, yellow and 100% black; or greyscale 100%
black, will be considered. This affects text and line art.
• Set Illustrator Overprint Mode ON. This will increase the change
that process colours will overprint - What is Illustrator Overprint
Mode?
Set Illustrator Overprint Mode OFF. Just in case this is wanted. It
may be more use in testing.
Each of the above actions can be automated - see Can I automate Quite
Revealing?
Contents (version 1.7)
Reveal transparency
Reveal transparency
•
•
•
•
•
What is transparency?
Why should I care about transparency?
What am I seeing?
What can I view?
What actions are available?
What is transparency?
Transparency is a method for allowing the objects in a PDF to be partially
see-through and mix with other elements. This is most often used to
produce artistic effects.
Transparency is new with Acrobat 5.0. Earlier versions of Acrobat will
open files without an error, but will not show the transparency - all
objects will be solid (opaque).
At the moment, the main tools able to create transparency are Adobe
Illustrator 9.0 and above, and Adobe InDesign 2.0. In both cases, you
would have to save or export PDF directly. Using Distiller will remove
all actual transparency, and replace with something visually similar. This
is called “flattening”.
Why should I care about transparency?
1. As noted above: if a file with transparency is opened in an earlier
version of Acrobat, the intended effect may be lost, and the end result
when printed may be rejected.
2. Some people use imagesetters (RIPs) that can read PDF files directly.
At the time of writing, very few of these understand the new
transparency, so the effect may be lost.
3. When it is printed from Acrobat 5.0, transparency may produce very
large files, or a loss of quality. This is because areas containing
transparency may have to be turned into images (bitmaps). This is
also the case if an EPS is saved from Acrobat 5.0.
4. Transparency effects may not be obvious on inspection of a page.
Contents (version 1.7)
Reveal transparency
5. Transparency has subtle effects on some of the other aspects of a
PDF. Specifically: some transparency effects cannot be previewed for
separation, as they will depend on conversions made at the time the
file is printed - see Reveal plates / colours; transfer functions and
halftone screens do not apply to transparency; transparent areas will
usually ignore overprinting.
What am I seeing?
You may see the following entries in the transparency list. You will see
only the ones that are used in the file.
• Normal/opaque - this is the ideal state. This part of the file is not
affected by transparency. If the only entry is Normal/opaque, then
the file is clean, with no transparency at all.
• Simple blend - this is a fairly simple kind of transparency. Objects
are simply blended together by mixing their colours (for instance,
there may be 70% of the background, and 30% of the foreground).
• Soft masked image - this is an image to which a soft mask has been
applied. The soft mask allows the image to be from 0% to 100%
transparent, and is usually used to soften edges.
• Complex blend - this is a more complex blend (such as one where
mixing the colours darkens them) or a mixture of blends with soft or
hard masked images.
• Hard masked image - this is not strictly speaking “transparency” in
the sense we have described it above, but it is something worth
knowing about. Hard masked images have a mask which allows only
0% or 100% transparency. These are important because (a) they do
not print correctly in versions of Acrobat older than 5.0 and (b) they
do not print correctly to PostScript level 1 or level 2. To summarise: a
hard masked image must be printed from Acrobat 4 or 5, to
PostScript level 3, or the effect is lost.
What can I view?
Your choices are View Selected and Preview without transparency
effects.
Contents (version 1.7)
Reveal transparency
• You can use View Selected in the View Transparency view. Select the
items in the list you want to view. If you do not select anything, the
view is blank.
Normally you would expect to see the items you have selected, as
they would appear. But transparency is tricky stuff. Consider what
happens if you have a solid (non-transparent) green background, and
a semi-transparent blue shape above it. When viewing with
transparency, the shape will appear yellow, from the mix of green and
yellow. However, if you view only the transparent items, there will no
longer be a blue background to mix with, and you will see only the
shape at the front, in blue. The blue will simply be paler because it is
mixing with the white background.
Even white objects can affect transparency because they can be
blended in different ways. However, these can disappear when shown
alone. You can choose that the view is shown on a grey background,
using View: Set Viewing options (general). In this case it will be
easier to see light or white items. However, these continue to be
treated as blended with a white background; the grey background is
not considered in the transparency mixing.
• If you select Preview without transparency effects, you will see a
view of the page without transparency. This is how it will appear in
Acrobat 4.0 and in any other method that does not support
transparency. The view is always the same and does not depend on
what (if anything) is selected in the list of transparency types.
What actions are available?
After Modify: is a pull-down menu where you can select actions to
perform on the file. (Tip: if you do not see Modify: click the button
marked with a + sign). The following actions are available when using
Reveal transparency.
• Remove all transparency effects will remove all transparency from
the file. Important: this is not the same as “flattening” or “applying”
the transparency. It simply drops all transparency, making all objects
opaque.
Contents (version 1.7)
Reveal transparency
You can use this option if you want to guarantee the file is printed the
same everywhere, whether or not transparency is supported; or, for
example, to send a client a view of how their file might print.
This action can be automated - see Can I automate Quite Revealing?
Contents (version 1.7)
Reveal image resolution
Reveal image resolution
•
•
•
•
Why reveal image resolution?
What am I seeing?
What can I view?
What actions are available?
Why reveal image resolution?
Using Reveal Image Resolution you can check the resolution of the
images in your PDF documents. This function is not designed to give
detailed information on each image, but allows you to decide what range
of resolutions will be acceptable, and quickly see which documents use
images of higher or lower resolutions.
What am I seeing?
There are six categories of information shown in Reveal Image
Resolution. They should be reasonably self explanatory. The assumption
is that you are able to give a range of acceptable resolutions for colour and
greyscale images (the same value), but that you may want a higher
resolution for monochrome images, such as line art, scanned text or
“copy dot” work.
The categories are shown as Low Colour/Greyscale; Medium
Colour/Greyscale; High Colour/Greyscale; Low mono; Medium
Mono; and High Mono. If a category is not shown, it means that there
are no images in that category. This allows a fast check for suitability of
a file.
To change the resolution settings (thresholds) select Set Viewing
Options (Image Resolution) after View:. You choose what resolution is
considered “low” and “high” for each type of image.
Quite Revealing does not give the actual resolutions of images. Our
Quite A Box Of Tricks product can be used to click on images for full
details. This function is active even in the free demo version of Quite A
Box Of Tricks.
Contents (version 1.7)
Reveal image resolution
What can I view?
You can use View Selected in the image resolution view. Select the items
in the list you want to view. If you do not select anything, the view is
blank.
The view will show only images whose resolutions are in the specified
ranges. The view will never shown anything that is not an image.
What actions are available?
No actions are currently available in the image resolution view.
Contents (version 1.7)
Reveal transfer functions
Reveal transfer functions
•
•
•
•
What are transfer functions?
Why should I care about transfer functions?
What can I view?
What actions are available?
What are transfer functions?
Transfer functions are used to change the colours or shades on a page. So
that the PDF contains one colour or shade, but you print or see on screen
a different shade.
One use of transfer functions is to darken or lighten a page to match the
needs of a press. EPS files saved from Adobe Photoshop might do this,
and they would keep the transfer function if they are distilled.
Some programs use transfer functions for special effects, such as to
simulate duotones, or to tint a greyscale image.
Transfer functions are not recommended, and the advice for many years
has been not to use them. This has not stopped inventive programmers for
finding many uses for them.
Why should I care about transfer functions?
1. If transfer functions are lost, the appearance can change, which may
make the results unacceptable.
2. Transfer functions can be lost when you print. In Acrobat 5.0 there is
an option emit transfer functions; if this is off the functions are lost.
In Acrobat 4.0 there is a much less obvious Use printer’s halftone
screen option; if this is on the functions are lost. There may be
similar options when saving an EPS, or using a separation plug-in.
3. Some printers or imagesetters may be set up to ignore transfer
functions, even if you do preserve them when printing.
4. Transfer functions are device dependent. Even if they are not lost,
they can produce different results, depending on how the PDF is
Contents (version 1.7)
Reveal transfer functions
viewed or printed. For instance, tinted images may be much brighter
on screen than on print.
What am I seeing?
You may see the following entries in the transfer function list. You will
see only the ones that are used in the file.
• None/Default - this is the ideal state. There are no transfer functions
used on part of the file. If the only entry is None, then the file is clean,
with no transfer functions at all.
• Identity (flat) function - this is in many cases the same as
None/Default. However, it requests that there is no transfer function.
This can have a different effect if the output device sets a default
transfer function; this may cause that to be ignored, losing any
calibration intended to lighten or darken pages.
• Darkening function - this makes the affected objects darker.
• Lightening function - this makes the affected objects lighter.
• Inverting (negative) function - this turns light to dark and dark to
light, making the affected objects negative. This does not mean you
will see negative on screen, because the original may itself be
negative, so cancelling out the effect.
• Non-tinting transfer function - we can’t describe this as simply
darkening, lightening or inverting, so it may be used for special
effects. But we do know that it only changes brightness, and does not
change the colour (tint).
• Colour transfer function (tint) - this is used to change the colour of
the affected objects completely. It is often used to turn a greyscale
object into a tinted, colour one.
• Complex transfer function - we have not actually seen any of these
in real-world PDF files, but they potentially set a different transfer
function for each colour including spot plates.
• Transparency - transfer unpredictable - the rules of PDF are clear,
if surprising. If any transparency of any kind is used, the transfer
function is to be ignored. However, we suspect that this rule may
Contents (version 1.7)
Reveal transfer functions
change, and it may also not be followed in all cases (such as EPS
export). So we consider the transfer functions in such cases to really
be unpredictable. Note that this item selects only transparent items,
but in fact the rule extends to everything mixed with them (including
a solid background or any other item that overlaps).
What can I view?
You have a choice of View items using selected functions, Preview
apply all, and preview remove all.
• You can use View items using selected functions in the transfer
function view. Select the items in the list you want to view. If you do
not select anything, the view is blank.
• You can choose Preview apply all to see what the effect of using the
Apply all transfer functions action would be. The view is always the
same and does not depend on what is selected.
• You can choose Preview remove all to see what the effect of using
the Remove all transfer functions action would be. The view is
always the same and does not depend on what is selected. This is
useful if you are concerned that transfer functions may be lost when
the file is output. If the file looks wrong in this view, the Apply all
transfer functions action is recommended.
What actions are available?
After Modify: is a pull-down menu where you can select actions to
perform on the file. (Tip: if you do not see Modify: click the button
marked with a + sign). The following actions are available when using
Reveal transfer functions.
• Apply all transfer functions produces a file with no transfer
functions, but attempts to keep the visual appearance unaltered.
This is useful if you are going to send the file to a output where
transfer functions may be lost. It makes the file safer.
Generally, the appearance should not change. However, in the case of
Colour transfer function (tint) the shade may change. We have
found that the applied function is closer to how this would normally
Contents (version 1.7)
Reveal transfer functions
print, but can cause colour shifting on screen. This is because tinting
transfer functions produce different results in RGB (on screen) versus
CMYK (on paper).
• Remove all transfer functions produces a file with no transfer
function. No other changes are made, so the file can change
appearance radically.
Both of the above actions can be automated - see Can I automate Quite
Revealing?
Contents (version 1.7)
Reveal halftone screens
Reveal halftone screens
•
•
•
•
•
What are halftone screens?
Why should I care about halftone screens?
What am I seeing?
What can I view?
What actions are available?
What are halftone screens?
When you view a document on screen, the screen can show millions of
different colours by changing the brightness of each component (red,
green, blue) on the monitor. But most printers are not able to use this
technique.
In most black and white printers, every point on the page is either a black
dot or nothing at all, so you see the white paper. A close pattern of dots
gives the illusion of many shades of grey.
The same technique, more or less, is used on almost all printing presses
and colour printers. (By contrast, most photographic prints can show
many different shades).
A halftone screen is specific way of showing shades of grey or colour.
Instead of a random pattern of very small dots, dots are collected together
into shapes such as circles or squares. These are important on printing
presses, because on many presses ink could not stick to very small dots.
Effectively these shapes get larger or smaller depending on how dark the
shade is to be. Halftones will often photocopy better than random dots
too.
These shapes are arranged in a grid over the page. The size of the grid
controls how much detail you can see. For instance, a newspaper page
may have a grid with 53 cells per inch (that is, 53 x 53 = 2809 cells per
square inch). On the other hand, a quality printed book may have over
150 cells per inch, so much more detail is visible - these cells are smaller.
Since small cells give more detail, it is reasonable to wonder why anyone
would use larger cells. The reason follows from limitations in printing
technology. On newsprint (used for newspapers), ink would not stick to
Contents (version 1.7)
Reveal halftone screens
small cells. Also, if the cell is made of only a few dots, not many different
shades of grey are possible.
The size of cells is measured in terms of the number of cells per inch. This
is called the halftone frequency, or lines per inch. This is most often
written as lpi.
The cells are often at an angle. In colour printing, it is especially
important that the different colour plates use different and very specific
angles, chosen by the press operator, otherwise unpleasant visual effects
can appear.
The important things about a halftone screen, then, are its frequency (lpi),
its angle, and the dot shape. The halftone screen may need to be different
for each colour plate.
A PDF file may store halftone screen information - not just one setting
but possibly many settings for the different parts of the page. Quite
Revealing can report all these.
Note that sometimes the word “halftone” is used to mean almost any
picture or image that will print in shades of grey or colours. We do not
use the term in that sense; for instance, some people might expect an
action “remove all halftone information” to remove images. It does not,
it only removes information that might be used in printing.
Why should I care about halftone screens?
When a PDF file is output, the halftone screen might be used. The might
is important; it often is not.
The halftone screen is never used with a non-PostScript printer.
Otherwise, for all PostScript output, a number of factors will decide
whether it is used. Every printer has a default halftone that it will use if
the information is not specified in another way.
1. If you print from Acrobat 4.0, there is an option Use printer’s
halftone screen. If this is on, all halftones in the PDF document are
ignored when you choose File > Print.
Contents (version 1.7)
Reveal halftone screens
2. If you print from Acrobat 5.0, there is an option Emit halftone. If this
is off, all halftones in the PDF document are ignored when you
choose File > Print.
3. If you output with a different method (not File > Print) each method
has its own rules. For instance the Crackerjack plug-in always
ignores the halftone information from the PDF (so, if you always use
Crackerjack, the halftone viewer will never tell you anything
interesting).
4. When you export an EPS from Acrobat you have similar choices.
5. Some printers will ignore the halftone anyway.
So you can see it is highly variable, but fairly predictable in a given
workflow. In fact, most people do not use halftones in PDF files, but
some people may find that PDF files can override halftone settings
unexpectedly. In this case, removing the halftones may be a good idea.
You cannot choose or set halftones in Quite Revealing. This is done in
your original design application. However, Quite Revealing will report in
detail the halftones it finds in the PDF.
What am I seeing?
You may see the following entries in the halftone list. You will see only
the ones that are used in the file.
• Default (use printer's halftone). This means that the printer’s
default will be used - or a default supplied by some other software.
Anyway there is no information in the PDF.
• Named halftone <name>. A PDF file can refer to a special halftone
by a name. For this to work, a halftone by that name has to be set up
in your output device. You may also see items starting Named
halftone <name> or... These items will use the named halftone if
available, otherwise the rest of the description is used.
• <nn> deg. <nn> lpi. Spot <shape>. This describes a normal
halftone, with an angle (in degrees), frequency (lpi) and shape. The
shape may be a built-in PDF name like Round or Diamond, or the
word Custom if it is a special shape defined in the PDF.
Contents (version 1.7)
Reveal halftone screens
• Type 6, type 10, type 16. These are rarely seen, but are halftones
which use a custom shape.
• Each halftone may be preceded by the name of a spot or process
plate, indicating it is supposed to apply only to that plate. It may also
be preceded by Others: meaning this is used in all other cases, or All
plates: if this is used for every plate.
Do not be alarmed to see plate names that do not appear in the file;
often unused plates are listed. For actual plates see Reveal plates /
colours. You will sometimes see a list containing all of Cyan,
Magenta, Yellow, Black, Red, Green, Blue, Gray.
• Transparency - screen unpredictable - the rules of PDF are clear, if
surprising. If any transparency of any kind is used, the halftone
information in the PDF is to be ignored. However, we suspect that
this rule may change, and it may also not be followed in all cases
(such as EPS export). So we consider the halftones in such cases to
really be unpredictable. Note that this item selects only transparent
items, but in fact the rule extends to everything mixed with them
(including a solid background or any other item that overlaps).
What can I view?
You can use View Selected items only in the image resolution view.
Select the items in the list you want to view. If you do not select anything,
the view is blank.
This will show you only the items in the file which use the selected
halftone.
What actions are available?
After Modify: is a pull-down menu where you can select actions to
perform on the file. (Tip: if you do not see Modify: click the button
marked with a + sign). The only actions are available when using Reveal
halftones is as follows.
• Remove all halftone information. This removes all halftone
information stored in the current document. This can be used if the
file has been overriding a default, and you preferred the default.
Contents (version 1.7)
Reveal halftone screens
This action can be automated - see Can I automate Quite Revealing?