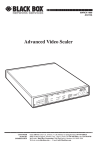
1
LCD Projector Model No. Read these instructions completely before operating this unit. TQBJ 0002 Dear Panasonic Customer: This instruction booklet provides all the necessary operating information that you might require. We hope it will help you to get the most performance out of your new product, and that you will be pleased with your Panasonic LCD projector. The serial number of your product may be found on its back. You should note it in the space provided below and retain this booklet in case service is required. Model number: PT-L592U Serial number: Contents Features IMPORTANT SAFETY NOTICE Precautions with regard to safety Precautions on handling Location and function of each part Before using the remote control unit Turning the power on and off Screen requirements Standard setting-up positions Adjusting the lens Setting-up positions and changing the projection method Basic operation Adjusting the picture to the desired setting Adjusting the white balance Adjusting the sound to the desired setting Adjusting the picture position Adjusting the blanking Adjusting the horizontal amplitude 1 2 3 5 6 9 11 12 13 16 17 18 22 23 24 25 26 27 About dot clock adjustment Using other useful functions System configuration example Wireless mouse Using the serial connector Indicators Cleaning the air filter Lamp unit replacement period Replacing the lamp unit Before asking for service Specifications Dimensions NOTES IMPORTANTES CONCERNANT LA SÉCURITÉ Précautions concernant la sécurité Précautions à suivre lors de la manipulation Période de remplacement de la lampe Remplacement de I’unité de lampe 28 29 33 35 36 38 39 41 41 44 45 47 48 49 51 52 52 Features High luminance, high-density and high-quality pictures A new 1.3-inch (diagonal) polysilicon LCD panel and a 260-W metal halide lamp have been adopted. In addition, a newly-developed optical system enables the projector to produce a high luminance of 600 ANSI lumens while providing high density and high picture quality at S-VGA (800 X 600) resolution. Screens from 30 inches to 300 inches can be used The projector can be positioned so as to project onto screens ranging in diagonal size from 30 inches to 300 inches. A projection method switching function (for switching between front and rear projection), a lens position adjustment function (for light axis shifts) and an electronic zoom/focus lens allow pictures to be projected from a variety of different positions. Lightweight and compact, and setting-up is easy The light and compact body weighs approximately 21.6 Ibs. (9.8 kg), and a carrying handle and a retractable lens function are also provided, so that the projector can be transported easily. The projector can also be set up easily, without the need for complex setting-up adjustments. Equipped with a variety of convenient functions A variety of functions such as the following have been provided. A blue background is projected when no signal is being input, so that the screen is not illuminated. Muting functions for video and audio signals and the input signal display function can be toggled on and off. A countdown timer function is provided. A retractable lens function is provided. The projector automatically switches to standby mode if no signal is input for a continuous period. The function of the POWER button on the remote control unit can be disabled. The language of on-screen displays can be changed. Compatible with Windows 95 Plug-And-Play (DCC1, DCC2B) - 1 - IMPORTANT SAFETY NOTICE WARNING: To prevent damage which may result in fire or shock hazard, do not expose this appliance to rain or moisture. Power Supply: This LCD Projector is designed to operate on 120 volts, 50/60 Hz, AC house current only. The lightning flash with arrowhead symbol, within an equilateral triangle, is intended to alert the user to the presence of uninsulated “dangerous voltage” within the product’s enclosure that may be of sufficient magnitude to constitute a risk of electric shock to persons. The exclamation point within an equilateral triangle is intended to alert the user to the presence of important operating and maintenance (servicing) instructions in the literature accompanying the product. CAUTION: This equipment is equipped with a three-pin grounding-type power plug. Do not remove the grounding pin on the power plug. This plug will only fit a grounding-type power outlet. This is a safety feature. If you are unable to insert the plug into the outlet, contact an electrician. Do not defeat the purpose of the grounding plug. Do not remove WARNING: This equipment has been tested and found to comply with the limits for a Class A digital device, pursuant to Part 15 of the FCC Rules. These limits are designed to provide reasonable protection against harmful interference when the equipment is operated in a commercial environment. This equipment generates, uses, and can radiate radio frequency energy and, if not installed and used in accordance with the instruction manual, may cause harmful interference to radio communications. Operation of this equipment in a residential area is likely to cause harmful interference in which case the user will be required to correct the interference at his own expense. CAUTION: Any unauthorized changes or modifications to this equipment would void the users authority to operate. - 2 - Precautions with regard to safety WARNING Setting-up Do not install this projector in a place which is not strong enough to take the projector’s full weight. If the installation location is not strong enough, the projector may fall down, which could cause severe injury and/or damage. Ask a qualified technician to carry out installation work such as installing the projector in the ceiling. If installation is not carried out correctly, it can cause injury or electric shocks to occur. When using the projector Do not place the projector on top of surfaces which are sloped or unstable. The projector may fall down or tip over. Do not place any objects on top of the projector. If water spills onto the projector or foreign objects get inside it, a short-circuit may occur which could result in fire or electric shocks. If any foreign objects get inside the projector, please consult an Authorized Service Center. Do not cover the air filter and the air outlet. Doing so may cause the projector to overheat, which can cause fire or damage to the projector. Do not stick any foreign objects into the projector. Do not insert any metal objects or flammable objects into the ventilation holes or drop them onto the projector, as doing so can cause fire or electric shocks to occur. Do not remove the cover or modify it in any way. High voltages which can cause severe electric shocks are present inside the projector. For any inspection, adjustment and repair work, please contact an Authorized Service Center. Do not use any type of power cable other than the one supplied with the projector. Use a cable with a three-pronged plug and do not defeat the ground, otherwise electric shocks may result Do not spill water on the projector. This can cause fire or electric shocks to occur. Securely insert the power cord plug as far as it will go. If the plug is not fully inserted, heat may be generated which could cause fire. If the plug is damaged or the wall socket plate is loose, they should not be used. Do not handle the power cord plug with wet hands. Doing so may cause electric shocks to occur. Do not do anything that might damage the power cable. Do not damage the cable, make any modifications to it, place heavy objects on top of it, heat it, place it near any hot objects, twist it, bend it excessively or pull it. To do so may cause fires and electric shocks to occur. If the power cable becomes damaged, have it repaired at an Authorized Service Center. Clean the power cable regularly to prevent it from becoming covered in dust. If dust builds up on the power cord plug, the resultant humidity can damage the insulation, which could result in fire. Pull the power cord out from the wall outlet and wipe it with a dry cloth. If not using the projector for an extended period of time, pull the power cord plug out from the wall outlet. -3- If problems occur during use If a problem occurs (such as no picture or no sound), or if smoke or an abnormal odor starts to come out from the projector, immediately pull the power cord plug out from the wall outlet. If you continue to use the projector in this condition, fire or electric shocks could result. After checking that the smoke has stopped coming out, contact an Authorized Service Center so that the necessary repairs can be made. Repairing the projector yourself is extremely dangerous, and it should never be done. If water or foreign objects get inside the projector, if the projector is dropped, or if the cabinet becomes damaged, disconnect the power cord plug immediately. A short may occur, which could cause fire. Contact an Authorized Service Center for any repairs that need to be made. CAUTION When using the projector Do not use the projector in places which are subject to humidity, dust, oil fumes or steam. Fire or electric shocks could result. Do not place any heavy objects on top of the projector. Doing so can cause the projector to become unbalanced and fall, which could result in damage and/or injury. Do not look into the lens while the projector is being used. Strong light is emitted from the projector’s lens. If you look directly into this light, it can hurt and damage your eyes. Do not bring your hands or other objects close to the air outlet port. Heated air comes out of the air outlet port. Do not bring your hands or face, or objects which cannot withstand heat close to this port, otherwise burns or deformation could result. When disconnecting the power cable, hold the plug, not the cable. If the power cable itself is pulled, the cable will become damaged, resulting in the possibility of fire or serious electric shocks. Be sure to disconnect all cables before moving the projector. If the projector is moved while some of the cables are still connected, the cables may become damaged, and fire or electrical shocks could result. Cleaning and maintenance Take particular care when replacing the lamp unit. The metal halide lamp contains gas under high pressure. If it is dropped or hit against other objects, it may break, which could cause injury or problems with operation. Ask an Authorized Service Center to clean inside the projector at least once a year. If dust is left to build up inside the projector without being cleaned out, it can cause fire or problems with operation to occur. Ask your nearest Authorized Service Center to clean the projector when required. Consult your Authorized Service Center for details regarding cleaning costs. Disconnect the power plug from the wall outlet as a safety precaution before carrying out any cleaning. Electric shocks can result if this is not done. -4- Precautions on handling Cautions regarding setting-up Observe the following at all times when setting up the projector. Avoid setting up in places which are subject to vibration or shocks. If the projector is set up in locations with strong vibration, such as near a motor, or if it is installed inside a vehicle or on board a ship, the projector may be subjected to vibration or shocks which can damage the internal parts and cause malfunctions or accidents. Accordingly, set up the projector in a place which is free from such vibrations and shocks. Do not set up the projector near high-voltage power lines or near motors. The projector may be subject to electromagnetic interference if it is set up near high-voltage power lines or motors. Do not set up the projector directly on top of plastic sheet or carpet. Plastic sheets can stick to the air filter, which can cause the inside of the projector to overheat and the power supply to switch off. If installing the projector to the ceiling, ask a qualified technician to carry out all installation work. If the projector is to be suspended from the ceiling, you will need to purchase the separate installation kit (Model No.: ET-PK592). Furthermore, all installation work should only be carried out by a qualified technician. Notes on use In order to get the best picture quality If outside light or light from indoor lamps is shining onto the screen, the images projected will not have good contrast. Draw curtains or blinds over any windows, turn off any fluorescent lights near the screen and cover any highly-reflective floor and wall surfaces with carpet or wallpaper to prevent reflection. Do not touch the surfaces of the lens with your bare hands. If the surfaces of the lens becomes dirty from fingerprints or anything else, this will be magnified and projected onto the screen. Moreover, when not using the projector, retract the lens and then cover it with the accessory lens cap. About the screen If the screen you are using is dirty, damaged or discolored, attractive projections cannot be obtained. Do not apply any volatile substances to the screen, and do not let it become dirty or damaged. Before carrying out cleaning and maintenance, be sure to disconnect the power cord plug from the wall outlet. Wipe the cabinet with a soft, dry cloth. If the cabinet is particularly dirty, soak the cloth in water with a small amount of neutral detergent in it, squeeze the cloth very well, and then wipe the cabinet. After cleaning, wipe the cabinet dry with a dry cloth. If using a chemically-treated cloth, read the instructions supplied with the cloth before use. Do not wipe the lenses with a cloth that is dusty or which produces lint. If any dust or lint gets onto the lenses, such dust or lint will be magnified and projected onto the screen. Use the blower to clean any dust and lint from the lens surfaces, or use a chamois cloth to wipe off any dust or lint. About condensation Droplets of water form on the windows which are warmed suddenly in winter, and on the outside of beer bottles which are taken out of a fridge in summer. This phenomenon is called condensation; if condensation should occur on the surfaces of the projection lenses or mirror inside the projector, the picture may become fuzzy or it may not be visible at all. If there is high humidity, or if the projector is suddenly brought from a cold environment into a warm one, the projector will normally stop projecting. In such cases, the projector will normally resume projection as it becomes conditioned to the ambient temperature. -5- Location and function of each part Remote control unit <Front view> Arrow buttons (Up: ^ , Down: V Left: <, Right: >) These buttons are used to select items from the menu screen and for changing setting values. Standard (STD) button (page 21) This button is used to reset the picture adjustment values to the factory pre-settings. MENU button (page 21) This button is used to turn display of the menu screen on and off and to return display to the previous screen. Volume adjustment buttons (VOL +/-) (page 20) These buttons are used to adjust the volume of the sound from the built-in speaker and the output level from the AUDIO OUT terminal. MUTE button (page 21) This button is used to temporarily turn off the sound. If you wish to change a setting, this button can also be used to turn off the picture together with the sound. INPUT select button (page 18) This button is used to select the input signal source. Pointer button (page 35) This can be used instead of a mouse pointing device to move the screen cursor. POWER button (page 11) This button is used to turn projection of the picture on and off. Click 2 button (page 35) This button corresponds to the right button on a standard mouse with two buttons. <Side view> Transmitter (page 10) The infrared signals are transmitted from here. Click 1 button (page 35) This button corresponds to the button on a single-button mouse, or to the left button on a standard mouse with two buttons. Battery compartment cover (page 9) NOTE: Do not place the remote control unit upside down, otherwise the pointer button may be pressed down, which will cause the batteries to be consumed. - 6 - Projector < Top and front> INPUT select button (page 18) This button is used to select the input signal source. POWER button (page 11) This button is used to turn projection of the picture on and off. ZOOM adjustment +/- buttons (page 16) MENU button (page 21) This button is used to turn display of These buttons are used to adjust the picture size. the menu screen on and off and to return display to the previous screen. Built-in speakers (page 20) These are built-in speakers which are capable of outputting stereo sound. Carrying handle Pull out the handle and hold it when transporting the projector. Left: <, Right: >) Down: Arrow buttons (Up: These buttons are used to select items from the menu screen and for changing setting values. FOCUS adjustment +/buttons (page 16) These buttons are used to adjust the picture focus. LENS SHIFT dial (page 15) Turning this dial moves the lens up and down. Use it to make fine adjustments to the lens position when setting up the projector. Remote control signal receptor (page 10) This receives the infrared signal transmissions from the remote control unit. Focus ring (page 16) This ring is used to adjust the image focus. Air outlet port Projection lens This lens enlarges the image and projects it onto the screen. Lens cap MAIN POWER switch (page 11) This switch turns the power supply to the projector on and off. Fuse holder This holds a 125 V AC, 8 A fuse. Power input socket (AC IN) The power cord which is supplied with the projector is connected here. TEMP indicator (page 38) This indicator illuminates or flashes as a warning if the temperature inside the projector reaches an abnormal level. LAMP indicator (page 38) This indicator illuminates when the useful life of the lamp is coming to an end, and it flashes when there is a problem with the lamp unit. Power indicator (STAND BY (R)/ON (G)) (page 11) This indicator illuminates red when the projector is in standby mode, green when the projector is on, and orange when in standby mode and the cooling fan is operating. -7- < Back, bottom and right view> Remote control signal receptor (page 10) This receives the infrared signal transmissions from the remote control unit. Lamp unit cover (page 42) Remove this cover to get access to the lamp unit. Front Fixed legs Fixing screw for the lamp unit cover (page 42) Remove this screw when replacing the lamp unit. Adjuster button (page 15) This button is used to unlock the adjustable legs. Air filter Adjustable legs (two) (page 15) These legs can be used to adjust the angle of inclination of the projector. <Side terminal board> VIDEO IN terminal (page 33) This terminal is used to input composite video signals. AUDIO IN (L-R) terminals for S-VIDEO/VIDEO input (page 33) These terminals are used to input audio signals which correspond to the signals input to the VIDEO IN or S-VIDEO IN terminal. S-VIDEO IN terminal (page 33) This terminal is used to input SVIDEO signals. AUDIO OUT terminal (pages 33 and 34) This terminal is used to output audio signals which are input from the AUDIO IN terminal for RGB input or the AUDIO IN (L-R) terminals for S-VIDEO/VIDEO input. The sound output is automatically switched when the audio input source is switched. RGB 2 (RGB IN/AUDIO IN) connector/terminal (page 34) This connector and terminal are used to input RGB signals and the audio signal which accompany them. RGB 1 (RGB IN/AUDIO IN) connector /terminal (page 34) This connector and terminal are used to input RGB signals and the audio signal which accompany them. SERIAL connector (page 36) This connector is used to connect a personal computer to the projector in order to externally control the projector. MOUSE connector (pages 34 and 35) This connector is used to connect an accessory or separate mouse cable. This lets you operate a personal computer using the pointer button and click buttons on the remote control unit instead of using a mouse. -8- Before using the remote control unit Inserting the batteries Insert the AA batteries supplied with the remote control unit making sure that the polarities are correct. Open the battery compartment cover. mark down firmly, and then pull the cover Push the section with the toward you to remove it. Insert the batteries. Insert the batteries so that their direction matches the polarity markings inside the compartment. NOTE: Do not use rechargeable (Ni-Cd) batteries. Close the battery compartment cover. Return the battery compartment cover to its original position. Notes on using the batteries The following should be observed in order to prevent damage to or leaking of the batteries. New Batteries Old Batteries Do not mix old and new batteries or batteries of different types (such as alkali and manganese batteries). Replace both batteries at the same time. Furthermore, do not burn spent batteries or put them in with combustible garbage. DO NOT do any of the following: NG NG NG Do not recharge Do not short-circuit Do not open -9- NG Do not heat or burn Operating range of the remote control unit Point the remote control unit toward the remote control signal receptor on the front or the rear of the projector to operate the projector. Refer to the illustration below for the operating range of the remote control unit. <Top view> 23.0 feet (approx. 7 m) 23.0 feet (approx. 7 m) Remote control unit Remote control signal receptor Projector Remote control signal receptor Remote control unit <Side view> 23.0 feet (approx. 7 m) 23.0 feet (approx. 7 m) NOTE: To operate the projector, the remote control unit should be held in front of the remote control signal receptor within a distance of 23.0 feet (approximately 7 meters). If strong light is allowed to shine onto the remote control signal receptor, or if there are any obstacles between the remote control signal receptor and the remote control unit, correct remote control operation may not be possible. If facing the remote control unit toward the screen The projector can also be operated by pointing the remote control unit toward the screen as shown in the illustration below. Screen Projector NOTE: If facing the remote control unit toward the screen to operate the projector, the operating range of the remote control unit will be limited by the amount of light reflection loss caused by the characteristics of the screen used. -10- Turning the power on and off If the MAIN POWER switch on the projector is pressed while the cooling fan is still operating, the operating life of the projector lamp will be shortened. Be sure to follow the procedures given below when turning the projector power supply on and off. <Remote control unit> Power indicator <Projector> POWER button POWER button MAIN POWER switch Turning on the power 1. Press the MAIN POWER switch. Projector 2. Press the POWER button. Projector Remote control unit Press the MAIN POWER switch on the projector to the ON position. The power indicator will illuminate red and the projector will switch to standby mode. Press the POWER button on either the top of the projector or on the remote control unit. The power indicator will alternate between green and orange. The power indicator will illuminate green and a picture will be projected onto the screen after about 15 seconds. Turning off the power 1. Press the POWER button. Projector Remote control unit Press the POWER button on either the top of the projector or on the remote control unit. The power indicator will illuminate orange and the projector will switch to standby mode. 2. Wait for the cooling fan to stop. Wait for a while (approximately 90 seconds) until the cooling fan stops operating. (When the fan stops, the power indicator will illuminate red.) 3. Press the MAIN POWER switch. Press the MAIN POWER switch on the projector to the OFF position. Projector The power indicator will switch off and the power supply will be turned off. NOTE: If the power is turned off using the POWER button, the cooling fan will continue to operate (for approximately 90 seconds) while the inside of the projector is still at a high temperature. Do not turn the MAIN POWER switch to the OFF position, disconnect the power cord plug from the wall socket or shut off the mains power supply until the cooling fan stops operating. If not using the projector for long periods of time, turn the MAIN POWER switch at the front of the projector to the OFF position. If the POWER switch is accidentally pressed while the projector is being used, the picture may not be displayed if the power supply is immediately turned back on again. The REMOTE POWER function may cause the operation of the POWER button on the remote control unit to be disabled temporarily. For details about this function, refer to page 29. If the MAIN POWER switch has not been turned off, the projector will still draw approximately 8 W of power, even when the POWER button has been turned off and the fan has stopped. There may be cases where the lamp does not turn on straight away. In such cases, the projector will try to turn the lamp on again after 30 seconds have passed. (During this time, the power indicator will alternately flash green and orange.) The projector is equipped with a lens retracting function which will cause the lens to be retracted automatically when the power is turned off. However, the lens will not then return to the previously adjusted position even if the power is turned back on again. If you do not wish this function to operate, turn the function setting off while referring to “Using the lens retracting function” on page 31. -11- Screen requirements This projector is used to project the image onto flat screens. However, the brightness and viewable range will vary depending on which type of screen is used. When selecting a screen, check the characteristics of the screen to ensure that it is suitable for the intended place of use. Screen characteristics (reference) Screen type Polarized screen White screen Screen characteristics Because the surface of the screen has been treated to make it polarized, it will only reflect light from a single direction. Consequently, if you use such a screen with an LCD projector, a clear image can be obtained even in bright rooms because the screen hardly reflects any extraneous light. This type of screen can be seen from anywhere, so there are no limits on the viewing position. However, the surrounding walls should be darkened as in a movie theater, otherwise a clear picture cannot be obtained. White screen Silver screen This type of screen gives a picture which is 2-4 times brighter than a white screen. A variety of types are available from different manufacturers, and each type has different brightness characteristics. Some also have restrictions on the possible range of viewing positions. Care should be taken with screens that have a high gain, as these types of screen can cause color distortion at the left and right edges. Maximum brightness Silver screen This type of screen is recommended when the projector is suspended from the ceiling. Beaded screen This type of screen is similar to the silver screen, except that no color distortion occurs at the left and right edges. Moreover, most of the light is reflected at the same angle as the angle of incidence. This type of screen is recommended when the projector is placed on the floor. Reduced brightness Maximum brightness Beaded screen Flexible translucent screen Rigid-type translucent screen This type of screen is made of PVC (polyvinyl chloride). It has the same characteristics as silver screens, but sometimes it can have hot spots. This type of screen is made of acrylic plastic. It is extremely durable and has excellent optical characteristics. It performs in the same way as silver screens. -12- Standard setting-up positions After determining the appropriate position for the projector by referring to the illustrations and standard setting-up dimensions given below, set up the projector. The distance L from the projector to the screen and the height H do not vary, regardless of whether the projector is being used in the floor, ceiling, front or rear positions. L Projected image L Lower edge of projected image L: Projection distance H: Height from lower edge of projected image to center of lens L Projected image Standard setting-up dimensions Because the projector uses a X 1.5 electronic zoom lens, it is possible to adjust the projection distance. And because there is also a function provided for adjusting the height of the lens, the height of the projector can also be adjusted relative to the position of the screen. For details, refer to pages 14 and 15. Projection size 30 40 60 80 100 150 200 250 300 Projection distance (L) Minimum Maximum 3'3” (1.0 m) 4'7" (1.4 m) 6'10" (2.1 m) 9'2" (2.8 m) 11'9" (3.6 m) 17'8" (5.4 m) 23'7" (7.2 m) 29'6" (9.0 m) 35'5" (10.8 m) 4'11" (1.5 m) 6'6" (2.0 m) 10'2" (3.1 m) 13'9" (4.2 m) 17'4" (5.3 m) 26'2" (8.0 m) 35'1" (10.7 m) 43'11" (13.4 m) 53'1" (16.2 m) Height from lower edge of projected image to center of lens (H) 0–18" (0–0.457 0–24" (0–0.610 0–36" (0–0.914 0–48" (0–1.219 0–60" (0–1.524 0–90" (0–2.286 0–120" (0–3.048 0–150" (0–3.810 0–180" (0–4.572 m) m) m) m) m) m) m) m) m) NOTE: In addition, if the projector is not completely vertical with respect to the screen and horizontal with respect to the floor, distortion of the projected image will result. Adjust the projector horizon by the procedure given on page 15. The values in the table shown above are approximate. -13- Adjusting the position of the projected picture The vertical position of the projected picture can be adjusted by changing the height of the projection lens using the LENS SHIFT dial which is on top of the projector. After determining the projection distance and the setting-up position, adjust the vertical position of the projected picture by carrying out the following procedure. The dial will pop up and it will be possible to turn it to make adjustments. Press the LENS SHIFT dial on top of the projector. LENS SHIFT dial If the LENS SHIFT dial is turned clockwise, the position of the projected image will be raised. LENS SHIFT dial Solid line: Original picture position Dotted line: Picture position after adjustment If the LENS SHIFT dial is turned counterclockwise, the position of the projected image will be lowered. LENS SHIFT dial The dial will pop back in again and adjustment will no longer be possible. Press the LENS SHIFT dial on top of the projector. Lens adjustment dial NOTE: inch (±10.1 mm). However, the The height of the projection lens can be adjusted within a range of adjustment range for the position of the projected picture will vary depending on the size of the projected picture. -14- Setting the projector up horizontally If the projector is not set up so that it is horizontal, it will not be possible to obtain a distortion-free picture. If placing the projector on top of a table or similar surface, carry out the following procedure below to ensure that no distortion of the picture occurs. Adjustment procedure 1. Lift the front of the projector until the projector as a whole is horizontal. While holding it in this position, press the adjuster buttons under the sides of the projector (1 each at left and right). When the buttons are pressed, the left and right adjustable legs will drop down until they reach the setting-up surface. NOTE: Do not release the buttons until both legs have reached the setting-up surface. Adjuster button Adjustable legs Adjuster button 2. Release the adjuster buttons. (The adjustable legs will lock as soon as the buttons are released.) 3. Turn the adjustable legs by hand in either direction to make fine adjustments to the level of the projector so that the projector is perfectly horizontal. NOTE: (60 mm). The legs can be extended by up to If you try to extend them any further than this, they will merely spin freely. UP to (60 mm) <Retracting the adjustable legs> After lifting the front of the projector slightly, press and hold the adjuster buttons and then gently lower the projector. NOTE: Be sure to support the projector firmly while pressing the adjuster buttons. If the adjuster buttons are pressed without supporting the projector, the adjustable legs will suddenly unlock and the projector will fall down, which could damage the projector. Adjuster button Adjustable legs -15- Adjuster button Adjusting the lens The projector is equipped with electronic zoom and electronic focusing mechanisms, so that you can carry out adjustments simply by pressing the ZOOM (+/-) buttons and the FOCUS (+/-) buttons on the top of the projector, or by following the on-screen adjustment display. Alternatively, you can adjust the focus by turning the lens directly. NOTE: If these buttons are pressed while the on-screen display for some other function is on the screen, the buttons pressed will operate but the on-screen display will not switch to the ZOOM or FOCUS adjustment screen. Thus there may be cases where the operation and the display do not match. Adjustment procedure <for direct adjustment> 1. Press the ZOOM (+/-) buttons on the operation panel on the top of the projector to adjust the size of the picture. If the “ + ” button is pressed, the picture becomes larger, and if the “ - ” button is pressed, the picture becomes smaller. 2. Press the FOCUS (+/-) buttons on the operation panel on the top of the projector to adjust the focus of the picture. Adjust so that the image projected onto the screen is at the optimum focus. NOTE: If approximately five seconds pass without any buttons being pressed, the adjustment screen will be cleared. Adjustment procedure <adjusting using the on-screen adjustment display> 1. Press the MENU button to display the MENU screen. 2. Press the “ ” and “ ” buttons to select “ZOOM”. 3. Press the “ <” and “ > ”buttons to display the ZOOM adjustment screen. 4. Press the “ < ” and “ > ”buttons to adjust the picture size. If the “+” button is pressed, the picture will become larger, and if the “ - ” button is pressed, the picture will become smaller. 5. Press the MENU button, or wait for approximately five seconds without pressing any button. The display will then return to the MENU screen. 6. Press the “ ” and “ ” buttons to select “FOCUS”. 7. Press the “ < ”and “ > ”buttons to display the FOCUS adjustment screen. 8. Press the “ < ”and “ > ”buttons to adjust the picture focus. Adjust so that the image projected onto the screen is at the optimum focus. NOTE: If approximately five seconds pass without any buttons being pressed, the display will return to the MENU screen. The projector is equipped with a lens retracting function which will cause the lens to be retracted automatically when the power is turned off. However, the lens will not then return to the previously adjusted position even if the power is turned back on again. If you do not wish this function to operate, turn the function setting off while referring to “Using the lens retracting function” on page 31. -16- Setting-up positions and changing the projection method The projection method used by the projector can be changed in accordance with the setting-up position. At the time of shipment from the factory, the projector is set to the “FRONT” projection method, but this can be changed if required. Setting procedure 1. Press the MENU button to display the MENU screen. 2. Press the “ ” and “ ” buttons to select “OPTION”. 3. Press the “<” and “ >” buttons to display the OPTION screen. 4. Press the “ ” and “ ” buttons to select “SET UP”. 5. Press the “<” and “>” buttons to display the SET UP screen. 6. Press the “ ” and “ ” buttons to select “FRONT/REAR”. 7. Press the “<” and “>” buttons to select “FRONT” or “REAR”. FRONT mounting (Setting condition at the time of shipment from the factory.) REAR mounting NOTE: The adjustment screen and the MENU screen can both be cleared by pressing the MENU button, -17- Basic operation Changing the input source Projector Remote control unit or The video signal input source and the corresponding audio signal input source can be changed in the order shown below each time the INPUT button on the projector control panel or the remote control unit is pressed. The input source selected is displayed on the screen for approximately five seconds. The video signal from the input signal source which is connected to the S-VIDEO IN or VIDEO IN terminal will be projected. At this time, the audio input will be switched to the signal from the input source which is connected to the AUDIO IN (L-R) terminals for S-VIDEO/VIDEO input. However, only one audio signal input system is available, so if you wish to change the audio input source, you will need to remove and insert the appropriate plugs. The signal which is being input to the RGB IN connector for RGB 1 will be projected. The audio signal output will be the signal which is being input to the AUDIO IN connector for RGB 1. The signal which is being input to the RGB IN connector for RGB 2 will be projected. The audio signal output will be the signal which is being input to the AUDIO IN connector for RGB 2. NOTE: The mode name for the currently-selected signal or the name of the signal format will be displayed directly underneath the on-screen display of the input signal source. The on-screen display of the selected input source normally appears when projection starts, and also when the input source is being switched. However, if the input display setting (INPUT DISP) has been turned off, this onscreen display will not appear. (Refer to page 29.) If the S-VIDEO IN and VIDEO IN terminals are both connected at the same time, the S-VIDEO IN signal input will automatically be given priority. If you wish to view the signal being input to the VIDEO IN terminal, disconnect the plug from the S-VIDEO IN terminal. If the picture is not projected normally when an RGB signal is being input, you will need to switch the signal mode to match the input signal. (Refer to page 19.) If S-VIDEO or VIDEO has been selected as the input signal source, it may be necessary to select the correct format which corresponds to the input signal. If the picture is not projected correctly, refer to page 20. -18- <Switching the signal mode during RGB signal input> If the picture is not projected normally when the selected input source is “RGB 1” or “RGB 2” because the signal mode selected does not match, select the correct signal mode by the procedure given below. The factory presetting is “AUTO”, so the projector can usually be used without the need to change this setting. Setting procedure 1. Press the MENU button to display the MENU screen. 2. Press the “ ” and “ ” buttons to select “PICTURE”. 3. Press the “<” and “>” buttons to display the PICTURE screen 4. Press the “ ”and “ ” buttons to select “SIGNAL MODE”. 5. Press the “<” and “>” buttons to switch the signal name. Refer to the table below when switching to the matching signal mode. Display mode name AUTO VGA 400 VGA 480 MAC 13 PC 98 VESA S-VGA 1 S-VGA 2 S-VGA 3 S-VGA 4 S-VGA 5 MAC 16 XGA 1 XGA 2 XGA 3 MAC 19 Signal data Horizontal scanning frequency (kHz) Vertical scanning frequency (Hz) No. of dots Automatically switches to whichever of the following signal modes best matches the input signal, 640 X 400 31.5 70.0 640 X 480 31.5 60.0 640 X 480 35.0 66.7 640 X 400 24.8 56.4 640 X 480 37.9 72.8 800 X 600 35.2 56.3 800 X 600 37.9 60.4 800 X 600 46.9 75.0 800 X 600 48.1 72.0 800 X 600 32.1 51.0 832 X 624 49.7 74.6 1024 X 768 48.4 60.0 1024 X 768 56.4 70.0 1024 X 768 68.7 85.0 1024 X 768 60.2 75.0 NOTE: The display resolution for the PT-L592U projector is 800 X 600 dots. If any of the above signals which have resolutions greater than this are input, the resolution will be converted to 800 X 600 dots. The setting screen and the MENU screen can both be cleared by pressing the MENU button. -19- <System format selection for S-VIDEO (VIDEO) input signals> If S-VIDEO or VIDEO has been selected as the input signal source, there may be times where the signal format is not selected correctly, with the result that a normal picture is not projected. If this happens, select the correct signal format by the following procedure. The default setting is “AUTO”. Setting procedure 1. Press the MENU button to display the MENU screen. 2. Press the “ ” and “ ” buttons to select “PICTURE”. 3. Press the “<” and “>” buttons to display the PICTURE screen. 4. Press the “ ” and “ ” buttons to select “TV-SYSTEM”. 5. Press the “<” and “>” buttons to select either “AUTO”, “NTSC”, “PAL”, “SECAM” or “NTSC 4.43”. Select the appropriate signal format for the input signal while referring to the table below. AUTO NTSC NTSC 4.43 PAL SECAM Horizontal scanning frequency [kHz] Vertical scanning frequency [Hz] Color subcarrier frequency [MHz] Automatically selects NTSC, PAL, SECAM or NTSC 4.43. 3.58 15.7 60.00 4.43 4.43 15.63 50.00 4.25 or 4.41 NOTE: The correct signal format may not be selected if, for instance, you are using a poor-quality signal source, such as a dubbed video tape. Switching the signal format may give better results in such cases. The setting screen and the MENU screen can both be cleared by pressing the MENU button. Adjusting the volume The volume can be adjusted by pressing the VOL (+/-) buttons on the remote control unit. Remote control unit If the “+” button is pressed, the volume will increase, and if the "-" button is pressed, the volume will decrease. NOTE: If these buttons are pressed while the on-screen display for another function is currently on the screen, the volume will still be adjusted but the current volume setting and the volume bar display will not appear. The volume can also be adjusted from an on-screen display menu. Refer to page 24 for details on how to do this. The volume output level will remain displayed on the screen for approximately three seconds. -20- Turning off the sound If the MUTE button on the remote control unit is pressed, “MUTE” will be displayed on the screen as shown in the illustration below and the sound will be muted. If the MUTE button is pressed once more, the on-screen display will be cleared and the normal sound volume will be restored. The volume output level will remain displayed on the screen for approximately three seconds. NOTE: Remote control unit If the MUTE button is pressed while the on-screen display for another function is currently on the screen, the volume will still be muted but the “MUTE” on-screen display will not appear. If the power supply is turned off or either of the VOL (+/-) buttons is pressed, the mute setting will be canceled. It is also possible to have the picture turn off together with the sound when the MUTE button is pressed. Refer to page 32 for details on how to change this setting. When the picture has been turned off in this way, the words “PICTURE MUTE” will be displayed on the screen. Displaying the on-screen menu The menu screen can be displayed by pressing the MENU button on the projector control panel or the remote control unit. Remote control unit Projector If the MENU button is pressed when there is not already an on-screen display, the MENU screen shown at left will be displayed. NOTE: or If the MENU button is pressed while an on-screen display is already appearing, the on-screen display will return to the previously-displayed screen each time the MENU button is pressed. If it is pressed while the MENU screen shown at left is being displayed, the MENU screen will be cleared. Resetting adjustment values to the factory pre-settings (standard values) If the STD (Standard) button on the remote control unit is pressed while the PICTURE screen, POSITION screen, AUDIO screen or one of the individual adjustment screens is being displayed, the adjustment settings being displayed will be reset to the factory pre-settings. Remote control unit If the STD (Standard) button on the remote control unit is pressed while the PICTURE screen, POSITION screen or AUDIO screen is being displayed, the letters “STD” will be displayed in yellow in the top-right corner of the screen and all items displayed will be reset to the factory pre-settings. NOTE: However, the “TV-SYSTEM” and “SIGNAL MODE” settings in the PICTURE screen and the “VOLUME” setting in the AUDIO screen will not return to the factory pre-settings. If the STD (Standard) button on the remote control unit is pressed while one of the individual adjustment screens is being displayed, the value and the bar display will be appeared in yellow and only the item displayed will be reset to the factory pre-setting. -21- Adjusting the picture to the desired setting You can adjust the picture settings for any of the input signal sources selected according to the procedure on page 18. The items which can be adjusted vary depending on the type of input signal. The adjustment procedure below describes the on-screen displays when a signal is being input to the S-VIDEO IN terminal or the VIDEO IN terminal. Adjustment procedure <for the COLOR setting> 1. Press the MENU button to display the MENU screen. 2. Press the “ ” and “ ” buttons to select “PICTURE”. 3. Press the "<" and “>” buttons to display the PICTURE screen. 4. Press the " " and " " buttons to select “COLOR”. NOTE: If the STD (Standard) button is pressed while the PICTURE screen at right is being displayed, the letters “STD” will be displayed in yellow in the top-right corner of the screen and all settings other than the TV-SYSTEM setting will be reset to the factory pre-settings. Furthermore, the values and bar displays for items which have returned to the factory pre-settings will be displayed in yellow. 5. Press the "<" and ">" buttons to display the COLOR individual adjustment screen. 6. Continue pressing the “<” and ">" buttons to adjust the color. The current setting will be displayed on the screen by numerals and a bar. The adjustment operation and the changes made will vary depending on which adjustment item is selected. Refer to the table below for details. Adjustment function display Numeric adjustment level display Adjustment Item COLOR TINT BRIGHT Press Press Press Press Press Press Button the ">" button. the “<” button. the “>” button. the “<” button. the “>” button. the “<” button. Press the ">" button. CONTRAST Press the “<” button. SHARPNESS Press the “>” button. Press the “<” button. Bar display Adjustment Details Adjustment Range Remarks The color becomes darker. Max. value 63 S-VIDEO/VIDEO only The color becomes lighter. Min. value 0 Flesh tones become greenish. Max. value 63 NTSC, NTSC 4.43 (SVIDEO/VIDEO)only Min. value 0 Flesh tones become reddish. The screen becomes brighter. Max. value 63 The screen becomes darker. Min. value 0 The screen becomes brighter Max. value 63 and the picture becomes darker. The screen becomes darker and Min value 0 the picture becomes lighter. The picture quality becomes sharper. Max. value 63 S-VIDEO/VIDEO only The picture quality becomes softer. Min. value 0 NOTE: If approximately five seconds pass without any buttons being pressed while an individual adjustment screen is being displayed, the display will return to the PICTURE screen. Press the MENU button to return to the PICTURE screen or to clear the MENU screen. If the STD (Standard) button is pressed while one of the individual adjustment screens is being displayed, the value and the bar display will be appeared in yellow and only the item displayed will be reset to the factory presetting. Refer to page 20 for details on the TV-SYSTEM setting which is displayed in the PICTURE screen, and to the following page for details on the W-BAL R/G/B setting which is displayed when RGB signals are being input. Furthermore, refer to page 19 for details on the SIGNAL MODE setting when RGB signals are being input. If a PAL or SECAM signal is being input, the TINT item will not appear on the screen. -22- Adjusting the white balance When RGB signals from a personal computer or other signal source are being projected, the picture may become over-saturated with red or blue color, and the white color may not be at the desired degree of whiteness. In such cases, adjust the white balance by the following procedure. (Only effective during RGB signal input) Adjustment procedure <for white balance adjustment of the red component> 1. Press the MENU button to display the MENU screen. 2. Press the “ ” and “ ” buttons to select “PICTURE”. 3. Press the “<” and “>” buttons to display the PICTURE screen. 4. Press the “ ” and “ ” buttons to select “W-BAL R”. NOTE: If the STD (Standard) button is pressed while the PICTURE screen at right is being displayed, the letters “STD” will be displayed in yellow in the top-right corner of the screen and all settings other than the SIGNAL MODE setting will be reset to the factory pre-settings. Furthermore, the values and bar displays for items which have returned to the factory pre-settings will be displayed in yellow. 5. Press the “<” and “>” buttons to display the W-BAL R individual adjustment screen. 6. Continue pressing the “<” and “>” buttons to adjust the W-BAL R setting. The current setting will be displayed on the screen by numerals and a bar. The color being adjusted can be changed by pressing the “ ” and “ ” buttons while the individual adjustment screen is being displayed. Adjustment function display Numeric adjustment level display Adjustment Item W-BAL R W-BAL G W-BAL B Press Press Press Press Press Press Button the “>” button. the “<” button. the ">" button. the “<” button. the ">" button. the "<" button. Bar display Adjustment Range Adjustment Details The red component becomes stronger. The red component becomes weaker. The green component becomes stronger. Max. value 63 Min. value 0 The green component becomes weaker. The blue component becomes stronger. The blue component becomes weaker. NOTE: If these adjustments are not made correctly, none of the colors will be reproduced correctly. If you make an error in adjustment so that the colors do not match correctly, press the STD (Standard) button while one of the individual adjustment screens is being displayed. The value and the bar display will be appeared in yellow and only the item being displayed will be reset to the factory pre-setting. Press the MENU button to return to the PICTURE screen or to clear the MENU screen. Refer to page 19 for details on the SIGNAL MODE setting. -23- Adjusting the sound to the desired setting You can adjust the volume and balance to the desired settings. Adjustment procedure <for volume adjustment> 1. Press the MENU button to display the MENU screen. 2. Press the “ ” and “ ” buttons to select “AUDIO”. 3. Press the “<” and “>” buttons to display the AUDIO screen. NOTE: If the STD (Standard) button is pressed while the AUDIO screen at right is being displayed, the letters “STD” will be displayed in yellow in the top-right corner of the screen and only the BALANCE setting will be reset to the factory presetting. Furthermore, if the BALANCE setting has returned to the factory presetting, the value and the bar display for the BALANCE setting will be displayed in yellow. 4. Press the “ ” and “ ” buttons to select “VOLUME’. To adjust the balance, select “BALANCE” instead. 5. Press the “<” and “>” buttons to display the VOLUME individual adjustment screen. 6. Continue pressing the “<” and “>” buttons to adjust the volume setting. The current setting will be displayed on the screen by numerals and a bar. The adjustment range is between 0 and 63. (However, the adjustment range for the Adjustment funcbalance setting is -32–+31.) tion display While “VOLUME” is selected, the volume of the sound coming from the built-in speakers and the output level of the signal from the Numeric adjustment AUDIO OUT terminal will change. level display While “BALANCE” is selected, the left and right balance of the sound coming from the built-in speaker and the output level of the signal from the AUDIO OUT terminal will change. Bar display NOTE: If approximately five seconds pass without any buttons being pressed while an individual adjustment screen is being displayed, the display will return to the AUDIO screen. Press the MENU button to return to the AUDIO screen or to clear the MENU screen. If the STD (Standard) button is pressed while the BALANCE individual adjustment screen is being displayed, the value and the bar display will be appeared in yellow and only the BALANCE setting will be reset to the factory pre-setting. The “VOLUME” adjustment made from the AUDIO screen has the same effect as pressing the volume adjustment buttons (VOL ) on the remote control unit. If the volume level is set to “0”, no sound will be output from the AUDIO OUT terminal. -24- Adjusting the picture position If the picture is not correctly positioned within the display area of the screen so that part of the edge of the picture does not appear, adjust the position of the picture. The adjustment procedure below describes the on-screen displays when a signal is being input to the S-VIDEO IN terminal or the VIDEO IN terminal. Adjustment procedure <for horizontal position adjustment> 1. Press the MENU button to display the MENU screen. 2. Press the “ ” and “ ” buttons to select “POSITION”. 3. Press the “<” and “>” buttons to display the POSITION screen. NOTE: If the STD (Standard) button is pressed while the POSITION screen at right is being displayed, the letters “STD” will be displayed in yellow in the top-right corner of the screen and all items displayed will be reset to the factory presettings. Furthermore, the values and bar displays for items which have returned to the factory pre-settings will be displayed in yellow. 4. Press the “ ” and “ ” buttons to select “H-POSI”. To adjust the vertical position of the picture, select “V-POSI” instead. 5. Press the “<” and “>” buttons to display the H-POSI individual adjustment screen. 6. Continue pressing the “<” and “>” buttons to adjust the H-POSI setting. The current setting will be displayed on the screen by numerals and a bar. The adjustment range is between 0 and 95. Adjustment function display Numeric adjustment level display <When adjusting the horizontal position (H-POSI)> Bar display If the “<” button is pressed, the picture moves to the left. If the ">" button is pressed, the picture moves to the right. <When adjusting the vertical position (V-POSI)> If the "<" button is pressed, the picture moves down. If the ">" button is pressed, the picture moves up. NOTE: If approximately five seconds pass without any buttons being pressed while an individual adjustment screen is being displayed, the display will return to the POSITION screen. Press the MENU button to return to the POSITION screen or to clear the MENU screen. If the STD (Standard) button is pressed while one of the individual adjustment screens is being displayed, the value and the bar display will be appeared in yellow and only the item displayed will be reset to the factory presetting. -25- Adjusting the blanking The picture area can be adjusted by means of blanking correction. The adjustment procedure below describes the on-screen displays when a signal is being input to the S-VIDEO IN terminal or the VIDEO IN terminal. Adjustment procedure <for blanking correction of the right edge of the picture> The procedure below starts from the POSITION screen. 1. Press the “ ” and “ ” buttons to select “H-BLK-R”. For blanking correction of the left edge of the picture, select “H-BLK-L”; for blanking correction of the top of the picture, select “V-BLK-T”; for blanking correction of the bottom of the picture, select “V-BLK-B”. NOTE: If the STD (Standard) button is pressed while the POSITION screen at right is being displayed, the letters “STD” will be displayed in yellow in the top-right corner of the screen and all items displayed will be reset to the factory presettings. Furthermore, the values and bar displays for items which have returned to the factory pre-settings will be displayed in yellow. 2. Press the “<” and “>” buttons to display the H-BLK-R individual adjustment screen. 3. Continue pressing the “<” and “>” buttons to adjust the H-BLK-R setting. The current setting will be displayed on the screen by numerals and a bar. The adjustment range is between 0 and 63. Adjustment function display Numeric adjustment level display Bar display Right-side blanking correction (for the H-BLK-R) When the “>” button is pressed, the blanking edge will move to the right and the picture area will become wider. When the “<” button is pressed, the blanking edge will move to the left and the picture area will become narrower. Left-side blanking correction (for the H-BLK-L) When the “>” button is pressed, the blanking edge will move to the right and the picture area will become narrower. When the “<” button is pressed, the blanking edge will move to the left and the picture area will become wider. Top blanking correction (for the V-BLK-T) When the “>” button is pressed, the blanking edge will move up and the picture area will become wider. When the “<” button is pressed, the blanking edge will move down and the picture area will become narrower. Bottom blanking correction (for the V-BLK-B) When the “>” button is pressed, the blanking edge will move up and the picture area will become narrower. When the “<” button is pressed, the blanking edge will move down and the picture area will become wider. NOTE: If approximately five seconds pass without any buttons being pressed while an individual adjustment screen is being displayed, the display will return to the POSITION screen. Press the MENU button to return to the POSITION screen or to clear the MENU screen. If the STD (Standard) button is pressed while one of the individual adjustment screens is being displayed, the value and the bar display will be appeared in yellow and only the item displayed will be reset to the factory presetting. -26- Adjusting the horizontal amplitude When VIDEO/S-VIDEO signals are being input, the horizontal amplitude of the picture can be adjusted. Carry out this adjustment by following the procedure given below. (This is only effective when VIDEO/S-VIDEO signals are being input.) Adjustment procedure 1. Press the MENU button to display the menu screen. 2. Press the “ ” and “ ” buttons to select “POSITION”. 3. Press the “<” and “>” buttons to display the POSITION screen. NOTE: If the STD (Standard) button is pressed while the POSITION screen at right is being displayed, the letters “STD” will be displayed in yellow in the top-right corner of the screen and all items displayed will be reset to the factory pre-settings. Furthermore, the values and bar displays for items which have returned to the factory presettings will be displayed in yellow. 4. Press the “ ” and “ ” buttons to select “H-SIZE”. 5. Press the “<” and “>” buttons to display the H-SIZE individual adjustment screen. 6. Continue pressing the “<” and “>” buttons to adjust the H-SIZE setting. The current setting will be displayed on the screen by numerals and a bar. The adjustment range is between 0 and 63. Adjustment function display Numeric adjustment level display Bar display <When increasing the horizontal amplitude> Press the “>” button. The picture area will become wider in the horizontal direction. <When decreasing the horizontal amplitude> Press the “<” button. The picture area will become narrower in the horizontal direction. NOTE: If approximately five seconds pass without any buttons being pressed while an individual adjustment screen is being displayed, the display will return to the POSITION screen. Press the MENU button to return to the POSITION screen or to clear the MENU screen. If the STD (Standard) button is pressed while one of the individual adjustment screens is being displayed, the value and the bar display will be appeared in yellow and only the item displayed will be reset to the factory presetting. -27- About dot clock adjustment When RGB signals are being input, you can make fine adjustments to the dot clock frequency and also adjust the clock phase. Adjustments are made by the following procedure while viewing the picture. (This is only effective when RGB signals are being input.) Adjusting the dot clock frequency When RGB signals are being input, you can adjust the display area of pictures sent from a computer. Adjustment procedure The procedure below starts from the POSITION screen. 1. Press the “ ” and “ ” buttons to select “DOT CLK”. NOTE: If the STD (Standard) button is pressed while the POSITION screen at right is being displayed, the letters “STD” will be displayed in yellow in the top-right corner of the screen and all items displayed will be reset to the factory pre-settings. Furthermore, the values and bar displays for items which have returned to the factory presettings will be displayed in yellow. 2. Press the “<” and “>” buttons to display the DOT CLK individual adjustment screen. 3. Continue pressing the “<” and “>” buttons to adjust the DOT CLK setting. The current setting will be displayed on the screen by numerals and a bar. The adjustment range is between 0 and 63. Adjustment function display Numeric adjustment level display Bar display Adjusting the clock phase You can use this adjustment to eliminate the flicker (localized noise) that appears on the computer screens when RGB signals are input. Adjustment procedure The procedure below starts from the POSITION screen. 1. Press the “ ” and “ ” buttons to select “CLK PHASE”. NOTE: If the STD (Standard) button is pressed while the POSITION screen at right is being displayed, the letters “STD” will be displayed in yellow in the top-right corner of the screen and all items displayed will be reset to the factory presettings. Furthermore, the values and bar displays for items which have returned to the factory pre-settings will be displayed in yellow. 2. Press the “<” and “>” buttons to display the CLK PHASE individual adjustment screen. 3. Continue pressing the “<” and “>” buttons to adjust the CLK PHASE setting. The current setting will be displayed on the screen by numerals and a bar. The adjustment range is between 0 and 63. Adjustment function display Numeric adjustment level display Bar display NOTE: If approximately five seconds pass without any buttons being pressed while an individual adjustment screen is being displayed, the display will return to the POSITION screen. Press the MENU button to return to the POSITION screen or to clear the MENU screen. If the STD (Standard) button is pressed while one of the individual adjustment screens is being displayed, the value and the bar display will be appeared in yellow and only the item displayed will be reset to the factory presetting. -28- Using other useful functions Turning off the on-screen display of input signal information The function which displays the currently-selected input signal onto the screen can be turned off by the following procedure. Setting procedure 1. Press the MENU button to display the MENU screen. 2. Press the “ ” and “ ” buttons to select “OPTION”. 3. Press the “<” and “>” buttons to display the OPTION screen. 4. Press the “ ” and “ ” buttons to select “INPUT DISP”. 5. Press the “<” and “>” buttons to select “OFF”. If this is set to “ON”, the name of the input signal will be displayed on the screen when the input source is changed. (Factory pre-setting) NOTE: Press the MENU button to clear the setting screen and the MENU screen. Disabling the POWER button of the remote control unit The POWER button on the remote control unit can be disabled to prevent the chance of turning the power off by mistake when using the remote control unit. This setting can be made by following the procedure given below. Setting procedure 1. Press the MENU button to display the MENU screen. 2. Press the “ ” and “ ” buttons to select “OPTION”. 3. Press the “<” and “>” buttons to display the OPTION screen. 4. Press the “ ” and “ ” buttons to select “REMOTE POWER”. 5. Press the “<” and “>” buttons to select “OFF”. If this is set to “ON”, the POWER button on the remote control unit can be used to turn the power on and off. (Factory pre-setting) NOTE: Press the MENU button to clear the setting screen and the MENU screen. -29- Changing the on-screen display language to another language At the time of shipment, the language for on-screen displays is set to English. However, you can change it to some other language by the following procedure. Setting procedure <For changing the language to German (DEUTSCH)> 1. Press the MENU button to display the MENU screen. 2. Press the “ ” and “ ” buttons to select “OPTION”. 3. Press the “<” and “>” buttons to display the OPTION screen. 4. Press the “ ” and “ ” buttons to select “LANGUAGE”. 5. Press the “<” and “>” buttons to display the LANGUAGE screen. 6. Press the “ ” and “ ” buttons to select “DEUTSCH”. The setting changes each time the cursor is moved. The languages that can be selected include English (ENGLISH), German (DEUTSCH), French (FRANÇAIS), Spanish (ESPAÑOL) and Japanese NOTE: Press the MENU button to clear the setting screen and the MENU screen. Using the countdown timer The countdown timer can be used at times such as during breaks in meetings by displaying the amount of time remaining for something in the screen. The countdown time can be set to a maximum of 60 minutes, in units of 1 minute. The setting procedure is as follows. Setting procedure 1. Press the MENU button to display the MENU screen. 2. Press the “ ” and “ ” buttons to select “TIMER”. 3. Press the “<” and “>” buttons to display the TIMER screen. 4. Continue pressing the “<” and “>” buttons to set the time. The setting can be made in units of one minute up to a maximum of 60 minutes. This function can be disabled by setting the time to “0”. 5. Press the MENU button to clear the menu screen. The countdown will then start. NOTE: During the countdown, the screen will switch to the color specified by the BACK COLOR setting (refer to page 32). If you would like to cancel the countdown function after it has been activated (if you would like to clear the countdown display), go back to the TIMER screen and set the time to “0” minutes, or press the MENU button. -30- Using the power save function In order to conserve power, the projector is equipped with a power save function which causes it to switch automatically to the standby condition if no signal is input for 10 minutes or more. At the time of shipment from the factory this function is set to “OFF”. If you would like to use the function, change the setting to “ON” by the following procedure. Setting procedure 1. Press the MENU button to display the MENU screen. 2. Press the “ ” and “ ” buttons to select “OPTION”. 3. Press the “<” and “>” buttons to display the OPTION screen. 4. Press the “ ” and “ ” buttons to select “POWER SAVE”. 5. Press the “<” and “>” buttons to change the setting to “ON”. If you change the setting to “OFF”, the power save function will be disabled. NOTE: Press the MENU button to clear the setting screen and the MENU screen. If both this function and the lens retracting function described below are set to “ON”, the lens will be automatically retracted when the projector switches to standby mode. If this happens, you will need to readjust the zoom and focus of the lens after starting the projector again. Using the lens retracting function This function causes the projector lens to be retracted automatically when the projector switches to standby mode, and extends the lens again when the projector starts back up again. Having this function set to “ON” is useful if the projector will not be used for an extended period of time, or when the projector is to be transported somewhere. However, once the lens has been retracted, it will be necessary to readjust the zoom and focus of the lens once the projector has been started up again. At the time of shipment from the factory this function is set to “ON”. Setting procedure 1. Press the MENU button to display the MENU screen. 2. Press the “ ” and “ ” buttons to select “OPTION”. 3. Press the “ ” and “ ” buttons to display the OPTION screen. 4. Press the “ ” and “ ” buttons to select “LENS RETRACT”. 5. Press the “<” and “ ” buttons to change the setting to “ON”. If you set this function to “ON”, the lens will be extended and retracted each time the power is turned on and off. NOTE: If this function is set to “OFF”, the lens will remain extended at all times. Press the MENU button to clear the setting screen and the MENU screen. -31- Setting the screen color when no signal is input and during picture muting The projector can be set to project either a solid blue image or a solid black image onto the screen if nothing is connected to the projector’s input terminals, or if equipment is connected but no signal is being input from it. This setting is also effective when picture muting is active and when the countdown timer is running. At the time of shipment from the factory, the color is set to “BLUE”. Setting procedure 1. Press the MENU button to display the MENU screen. 2. Press the “ ” and “ ” buttons to select “OPTION”. 3. Press the “<” and “>” buttons to display the OPTION screen. 4. Press the “ ” and “ ” buttons to select “MUTE SETTING”. 5. Press the “<” and “>” buttons to display the MUTE SETTING screen. 6. Press the “ ” and “ ” buttons to select “BACK COLOR”. 7. Press the “<” and “>” buttons to change the setting to “BLUE” or “BLACK”. This will set the color to be projected when no signal is being input. NOTE: If a signal that the projector cannot recognize is input, the projector will consider this to be no signal. Press the MENU button to clear the setting screen and the MENU screen. Using the MUTE remote control unit button to turn off both sound and picture At the time of shipment from the factory, the MUTE button on the remote control unit is set so that only the sound is muted when the button is pressed. If you would like the picture to be muted along with the sound, set the PICTURE MUTE function to “ON” by the following procedure. Setting procedure The procedure below starts from the MUTE SETTING screen. 1. Press the “ ” and “ ” buttons to select “PICTURE MUTE”. 2. Press the “<” and “>” buttons to change the setting to “ON”. If the function is set to “ON”, the picture will be muted along with the sound when the MUTE button is pressed. If the function is set to “OFF”, only the sound will be muted when the MUTE button is pressed. (Factory pre-setting) NOTE: Press the MENU button to clear the setting screen and the MENU screen. When PICTURE MUTE is on, the color projected will be the same color as the BACK COLOR setting. -32- System configuration example Notes on system configuration Turn off the power supply of each system component before connecting any of the components. Read the instruction manual for each system component before connecting it. If the necessary cables for connecting any system components are not supplied with the component or available as an option, you may need to fashion a cable to suit the component concerned. If there is a lot of jitter in the video signal input from the video source, the picture on the screen may flicker. In such cases, it will be necessary to connect a TBC (time base corrector). The projector can be connected to video signal sources which out put VIDEO, S-VIDEO and analog RGB signals (0.6-8.0 Vp-p synchronized signals). The projector has built-in speakers. However, you will need to connect a separate audio system to the AUDIO OUT terminal if your needs specify high sound volumes. No sound will come out of the projector’s built-in speaker while the AUDIO OUT terminal is being used. It may not be possible to connect some types of computer. Example of connection to audio-visual equipment VCR Laser disc player Audio system Computer for control use D-SUB9-pin (female) Connector panel at left side of projector NOTE: If the S-VIDEO IN and VIDEO IN terminals are both connected at the same time, the S-VIDEO IN signal input will have priority. If you wish to view the signal being input to the VIDEO IN terminal, disconnect the plug from the S-VIDEO IN terminal. Only one audio signal input system is available for the AUDIO IN (L-R) terminals for S-VIDEO/VIDEO signals, so if you wish to change the audio input source, you will need to remove and insert the appropriate plugs. If the video signal source is connected using a cable with a BNC junction plug, use the BNC/RCA adapter to convert the pin jack. If an audio system is connected to the AUDIO OUT terminal, the sound volume balance and muting can be controlled by the remote control unit which is supplied with the projector. However, if the volume is set to “0”, no audio signal will be output from the AUDIO OUT terminal. -33- Example of connection to a computer Computer Audio system Pin configuration and signal names for RGB connector Signal name Pin No. R 1 1 5 2 G/G.SYNC 6 10 3 B 9 NC 11 15 SDA 12 NOTE: HD/SYNC 13 Pin No. 12 and pin 14 VD No. 15 on 15-pin 15 SCL connectors will 4-8,10, and 11 only work if the GND computer supports them. Computer for control use RGB signal conversion adapter for Macintosh (sold separately) To audio output terminal To video output connector D-SUB 9-pin (female) D-SUB 15-pin (male) 13-pin (male) Mouse cable for PS/2 (supplied as an accessory) Computer D-SUB 15-pin (male) RGB signal cable (supplied as an accessory) To mouse connector To audio output terminal To video output connector NOTE: If the mouse connector on the projector is connected to the mouse connector on the computer with the accessory or separate mouse cable, you can then use the remote control unit in place of the computer’s mouse. However, this function operates only when input to the RGB 1 connector has been selected. For further details, refer to page 35. If you wish to use the infrared mouse function, turn on the main power to the projector before turning on the personal computer. If using a personal computer with a suspend/resume function, the infrared mouse function may not operate until the computer is restarted. Refer to the data on page 19 for details of what kinds of computers can be connected to the projector. If computers other than those listed here are used, correct operation cannot be guaranteed. -34- Wireless mouse A wireless mouse function is provided. This function lets you use the remote control unit to control a personal computer in place of the personal computer’s mouse. This is done by connecting the projector to a personal computer using the mouse cable (6’7” (2.0 m) for PS/2 mouse) which is supplied with the projector. However, if you wish to use the wireless mouse function by connecting the projector to a personal computer which is not PS/2 compatible, you will need to purchase a separate mouse cable which is not included with the projector. This projector is compatible with the following types of mouse only. Other types of mouse cannot be used. PS/2 mouse Macintosh mouse Serial mouse Example of connection Computer To mouse connector 13-pin connector (male) Accessory mouse cable for PS/2 NOTE: If using a computer which is not PS/2 compatible, please purchase a mouse cable that is suitable for the computer to be used. Different mouse cables are used for different types of computers. Therefore, do not use any mouse cables other than the one supplied or a special mouse cable intended for this purpose. The wireless mouse function operates only when input to the RGB 1 connector has been selected. Operation Pointer button Click 1 button Click 2 button Pointer button While gently pressing the pointer button with your thumb, push the pointer button back and forward and to the left and right. The pointer (arrow) will move back and forward and to the left and right on the screen. Pointer Click 1 button This button corresponds to the button on a single-button mouse, or to the left button on a standard mouse with two buttons. Click 2 button This button corresponds to the right button on a standard mouse with two buttons. -35- Using the serial connector The serial connector which is on the side terminal board of the projector conforms to the RS-232C interface specification, so that the projector can be controlled by a personal computer which is connected to this connector. <Side terminal board> SERIAL Computer D-SUB 9-pin Communication cable NOTE: Use a proper communication cable which is suitable for the personal computer to connect the serial connector and the personal computer. Pin layout and signal names for SERIAL connector Pin No. Projector Signal name RXD TXD GND D-SUB 9-pin connector (male) seen from the outside RTS CTS Contents NC Received data Transmitted data NC GND NC Connected internally NC Communication settings Determined by the RS-232C interface Signal level Synchronizing method Asynchronous 9600 bps Baud rate Parity None Character length 8 bits Stop bit 1 bit X parameter None S parameter None Basic format Each packet which is sent from the computer starts with STX. Following this is the command itself and the parameters for that command (if any), and the packet then ends with ETX. Add parameters when necessary according to the control contents. STX C1 C2 C3 : P1 P2 P3 P4 P5 ETX Parameter (1-5 bytes) Colon (1 byte) Start byte Command (3 bytes) NOTE: If sending multiple commands, check that a response has been received from the projector for one command before sending the next command. If an incorrect command is sent from the personal computer, the “ER401” command will be sent from the projector to the personal computer. -36- Control commands The commands which the personal computer can use to control the projector are shown in the following table. Remarks Control Contents Command PON Power ON POF Power OFF In standby mode, all commands other than the PON command are ignored. Parameter 000 Volume AVL 063 AMT IIS = Adjustment value 0 = Adjustment value 63 Mute Parameter 0 1 = = MUTE OFF MUTE ON Input signal selection Parameter VID RG1 RG2 = = = VIDEO RGB1 RGB2 Cable specifications At the computer (DTE specifications) At the projector 1 NC NC 1 2 2 3 3 4 NC NC 5 5 6 4 NC NC 6 7 7 8 8 9 NC NC -37- 9 Indicators There are two indicators on the front of the projector which give information about the operating condition of the projector. These indicators illuminate or flash to warn you about problems that have occurred inside the projector, so if you notice that one of the indicators is on, turn off the power and check the table below for the cause of the problem. LAMP indicator TEMP indicator Indicator name Indicator display Possible cause Problem The internal projector temperature is too Illuminated (red) high. TEMP indicator TEMP Flashing (red) The metal halide lamp has turned off automatically because the internal temperature has risen to an abnormally high level. It is nearly time to replace the lamp Illuminated (red) unit. LAMP indicator LAMP The metal halide lamp switches off automatically. Flashing (red) Remedy The ventilation holes Uncover the ventilation holes. may be covered. Set up the projector in a place The ambient temperature in the where the temperature is between 41°F (5°C) and 104°F (40°C) place of use may and the humidity is between 10% be too high. and 80% (with no condensation). The air filter may be blocked. Turn off the main power supply by following the procedure on page 11, and then clean the air filter (refer to page 39). This occurs when the operation Does “LAMP” time for the lamp unit is nearing appear on the 2,800 hours. Ask your dealer or screen after the projector is turned an Authorized Service Center to replace the lamp unit. on? Wait for a while until the lamp The power may have been turned on unit cools down before immediately after it turning the power back on again. was turned off. There may be an abnormality in the lamp circuit. Turn off the main power supply by following the procedure on page 11, and then contact an Authorized Service Center. NOTE: Be sure to turn off the main power by following the procedure given in “Turning the power on and off” on page 11 before carrying out any of the procedures in the “Remedy” column. If the main power turns off after the TEMP indicator starts flashing, it means that an abnormality has occurred. Please contact an Authorized Service Center so that the necessary repairs can be made. -38- Cleaning the air filter If the air filter becomes clogged with dust, the internal temperature of the projector will rise, the TEMP indicator will flash and the projector will be switched automatically to standby mode. Cleaning procedure 1. Turn off the main power supply and disconnect the power cord plug from the wall outlet. Turn off the main power supply according to the procedure given in “Turning off the power” on page 11 before disconnecting the plug from the wall outlet. 2. Place the projector on top of a blanket so that it will not become scratched. Air filter unit 3. Remove the air filter cover. Hold the indents on the air filter cover with your hands and pull the air filter unit out of the projector. Indent Air filter unit 4. Remove the air filter clamp and then take out the air filter. Insert your finger into the indent in the air filter cover, bend the air filter clamp slightly inward, and then lift the air filter clamp upward to remove it. Indent Air filter clamp Air filter Air filter cover -39- 5. Clean the air filter and the air filter clamps. Use a vacuum cleaner to clean off any accumulated dust. Air filter 6. Install the air filter and the air filter clamp to the air filter cover. Place the air filter inside the air filter cover, and then insert the air filter clamp into its original position as shown in the illustration. 7. Install the air filter cover. Slide the air filter cover into the projector until the hollows in the air filter cover are aligned with the hollows in the projector. NOTE: Be sure to install the air filter cover before using the projector. If the projector is used without the air filter cover installed, dust and other foreign particles will be drawn into the projector, and malfunctions will result. NOTE: If the dust cannot be removed by cleaning, it is time to replace the air filter. Please consult your dealer. -40- Air filter clamp Lamp unit replacement period The lamp used as the light source must be replaced after approximately 2,800 hours of use. If the lamp is not replaced after the cumulative usage time has passed 3,000 hours, the projector will automatically switch to standby mode. Screen display once cumulative usage time exceeds 2,800 hours If you continue to use the lamp unit after 2,800 hours of total usage time have passed, the on-screen display shown at right will appear as a reminder each time the projector is turned on. This display will continue to appear until a button is pressed. Replacing the lamp unit Notes on replacing the lamp unit Because the lamp unit in this projector incorporates a metal halide lamp, the temperature inside the lamp rises during use and the lamp becomes very hot. After turning off the MAIN POWER switch and disconnecting the power cord from the wall socket, wait for the lamp to cool down before replacing the lamp unit. Take extreme care when handling the removed lamp unit, as it contains gas under high pressure and can easily become damaged if it is struck against hard objects or dropped. The old lamp unit may shatter if it is handled roughly after removal. Ask an authorized waste disposal agency to dispose of the old lamp unit. A Phillips screwdriver is necessary for removing the lamp unit. Make sure that your hands are not slippery when using the screwdriver. NOTE: The projector is not supplied with a replacement lamp unit. Please ask your dealer for details. Lamp unit product no.: ET-LA592 CAUTION: Do not use any lamp unit other than the one with the product number indicated above. -41- Replacement procedure NOTE: If the lamp unit is replaced after it has been used for more than 3,000 hours, the projector will switch to standby mode after approximately 10 minutes of operation. Steps 7. to 11. on the following page should thus be completed within 10 minutes. 1. Disconnect the power cord plug from the wall outlet and check that the area around the lamp unit has cooled down. 2. Use a Phillips screwdriver to remove the screw which is securing the lamp unit cover at the right side of the projector, and then remove the lamp unit cover. NOTE: Read the CAUTION on the lamp unit cover before continuing. Lamp unit cover Fixing screw for the lamp unit cover 3. Turn the fixing screw for the lamp unit by hand until it turns freely. CAUTION: The lamp unit will be hot after it has been used, and you might receive burns if you touch it while it is still hot. Fixing screw for the lamp unit 4. Hold the handle which is attached to the lamp unit and gently pull the lamp unit out from the projector. Handle 5. Insert the new lamp unit, while making sure that the direction of insertion is correct, and then turn the fixing screw for the lamp unit by hand until it is securely tightened. NOTE: Insert the lamp unit so that the fixing screw for the lamp unit is facing downward. 6. Securely install the lamp unit cover, and then use a Phillips screwdriver to securely tighten the fixing screw for the lamp unit cover. NOTE: Be sure to install the lamp unit and the lamp unit cover securely. If they are not securely installed, it may cause the protection circuit to operate so that the power cannot be turned on. -42- 7. Insert the power cord plug into the wall outlet and then press the MAIN POWER switch on the front of the projector to turn on the power. NOTE: If the power does not turn on when the MAIN POWER switch is pressed, turn the MAIN POWER switch off again and check that the lamp unit and the lamp unit cover are securely installed. Then turn the MAIN POWER switch back on. 8. Press the POWER button on the projector or remote control unit so that a picture is projected onto the screen. 9. -(1)Press the MENU button to display the MENU screen. (2)Press the “ ” and “ ” buttons to select “OPTION”. 10.-(1)Press the “<” and “>” buttons to display the OPTION screen. (2)Press the “ ” and “ ” buttons to select “SET UP”. 11.-(1)Press the “>” and “>” buttons to display the SET UP screen. (2)Press the “ ” and “ ” buttons to select “LAMP RUNTIME”. The cumulative usage time of the current lamp unit will be displayed on the screen. (3)Press the “<” or “>” button on the projector control panel continuously for three seconds or more. (The “LAMP RUNTIME” display will change to “TIME RESET”.) NOTE: The “<” and “>” buttons on the remote control unit cannot be used at this time. (4)While the SET UP screen (the screen showing “TIME RESET”) is being displayed, turn off the power. This will reset the cumulative usage time for the lamp unit. NOTE: If any other buttons are pressed while “TIME RESET” is being displayed, the display will return to “LAMP RUNTIME” and the button pressed will take effect. -43- Before asking for service, check the following points. Possible cause Problem Power does not turn on. The power cord is not connected. The main power switch on the projector is turned off. The main power supply is not being supplied to the wall outlet. TEMP indicator is illuminated or flashing. Correct the problem while referring to the instructions on page 38. LAMP indicator is illuminated or flashing. Correct the problem while referring to the instructions on page 38. The lamp unit cover has not been correctly installed. The REMOTE POWER function has been set to “OFF”. No picture appears. The lens cap may still be attached to the lens. The video signal input source may not be connected properly. The input selection setting may not be correct. The BRIGHT adjustment setting may be at the minimum possible setting. The PICTURE MUTE function has been set to “ON”. The picture is fuzzy. The lens focus may not have been set correctly, or the projector may not be at the correct distance from the screen. The lens may be dirty. The projector may not be set up so that it is perpendicular to the screen. COLOR is too light or TINT is poor. COLOR or TINT adjustment may be incorrect. The input source which is connected to the projector may not be adjusted correctly. No sound can be heard. The audio signal source may not be connected properly. The volume adjustment may be at the lowest possible setting. The MUTE function may be active. Remote control unit does not operate. The batteries may be spent, or they may not be inserted correctly. There may be an object between the remote control unit and the projector which is blocking the infrared signals. The remote control unit may be out of the operation range. The picture does not display correctly. The correct input signal may not be selected. The input signal setting mode (TV-SYSTEM/SIGNAL MODE) may not be set correctly. There may be a problem with the VCR tape or other signal source. -44- Specifications Power supply: Power consumption: Max amps: LCD panel: Panel size (diagonal): Display method: Drive method: Pixels: Lens: Lamp: Luminosity: Scanning frequency: Projection size (diagonal): Throw distance: Optical axis shift: Screen aspect ratio: Installation: Speaker: Max. usable volume output: Connection terminals: RGB IN: R.G.B.: HD/SYNC: VD: AUDIO IN: S-VIDEO IN: VIDEO IN: AUDIO IN L-R: AUDIO OUT terminal: SERIAL input connector: MOUSE input connector: Power cord length: 120 V AC, 50/60 Hz 390 W (During stand by (when fan is stopped): Approx. 8W) 4.0 A 1.3 3 transparent LCD panels (RGB) Active matrix method 1,440,000 F 2.5-3.1 f 48-72 Retractable lens mechanism Metal halide (260 W) 600 Im/ANSI (for normal white, 40-inch screen) During S-VIDEO/VIDEO signal input H 15.75J/15.63 kHz, V 50/60 Hz During RGB signal input Built-in data selection (point scan) method H 23-69 kHz, V 50-85 Hz 30-300 inches 33-532 (1.0-16.2 m) ± 0/10 4:3 Ceiling/Floor/Front/Rear (Menu selection method) (4 cm X 2.85 cm) ellipse X 2 (stereo) 2W (1 W + 1 W) (10% THD) Double-line D-SUB HD 15-pin (female) 0.7 Vp-p (1.0 Vp-p at G·SYNC signal) , 75 , BNC 0.6-8.0 Vp-p high impedance, automatic plus/minus polarity compatible 0.6-8.0 Vp-p high impedance, automatic plus/minus polarity compatible Double-line 0.5 Vrms M3 jack (Stereo MINI) Single-line, Mini DIN 4-pin Y 1.0 Vp-p, C 0.286 Vp-p, 75 ,NTSC/PAL/SECAM/NTSC 4.43-compatible Single-line, RCA pin jack (S-VIDEO priority) 1.0 Vp-p, 75 ,NTSC/PAL/SECAM/NTSC 4.43-compatible 0.5 Vrms RCA pin jack X 2 (L-R) M3 jack (Stereo MINI) X 1 (monitoring output and stereo compatible) 0-2.0 Vrms (variable) D-SUB 9-pin (male) For computer-controlled operation 13-pin round connector For wireless mouse function (PS/2, Macintosh and serial computer compatible) 96 (2.9 m) -45- Dimensions: Width: Height: Length: Weight: Operating environment: Temperature: Humidity: Certifications: <Remote control unit> Power supply: Operation range: Weight: Dimensions: Width: Height: Length: Accessories Remote control unit (TNQE003): AA-size batteries: Power cord (TSX2414): VGA cable (TSXF095): PS/2 mouse cable (TSXF096): Optional accessories: (421 mm) (163 mm) (300 mm) (not including lens extension length) 21.6 Ibs. (9.8 kg) 32°F-104°F (0-40°C) 20-80% (no condensation) UL1950, C-UL FCC 3 V DC (two AA-size batteries) 23.0’(Approx. 7 m) (When operated from directly in front of the signal receptor) 0.218 Ibs. (Approx. 99g) (with batteries) (46 mm) (34 mm) (180 mm) 1 2 1 (125 V, 10 A) 1 (6’7” [2.0 m], D-SUB HD 15-pin [male] D-SUB HD 15-pin [male]) DIN 6-pin [male]) 1 (6’7” [2.0 m], 13-pin round [male] CEILING MOUNT BRACKET ET-PK592 Design and specifications are subject to change without notice. Weight and dimensions shown are approximate. Trademark Acknowledgements PS/2, VGA and XGA are trademarks of International Business Machines Corporation. Macintosh is a registered trademark of Apple Computer, Inc. PC-98 is a trademark of NEC Corporation. VESA, S-VGA are registered trademarks of the Video Electronics Standards Association. Windows is a registered trademark of Microsoft Corporation. All other trademarks are the property of the various trademark owners. -46- Dimensions UNIT: inch (mm) -47-