1
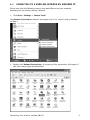
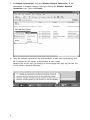
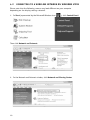
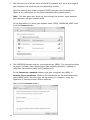
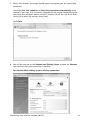
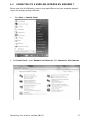
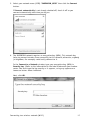
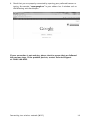
HI-SPEED INTERNET
USER GUIDE
Connecting to a Wireless Network (Wi-Fi)
2012-10 VERSION
1-800-360-8555
Connecting to a wireless network (Wi-Fi)
TABLE OF CONTENTS
4. Connecting to a Wireless Network (Wi-Fi)...........................3
Before you connect to a wireless network...............................3
4.1 Connecting to a Wireless Network on Windows XP.............5
4.2 Connecting to a Wireless Network on Windows Vista........10
4.3 Connecting to a Wireless Network on Windows 7.............15
2
4. Connecting to a Wireless
Network (Wi-Fi)
1. Before you connect to a wireless network, make sure that:
- your cable modem is correctly installed and configured;
- your Internet access is working properly when your computer is connected to the router with a physical connection (Ethernet cable);
- your computer is equipped with a built-in wireless adapter.
- Your wireless adapter is on (if necessary).
- On a laptop computer, the wireless adapter is turned off by default. Refer to your computer’s user manual for how to turn it (Wi-Fi) on;
- you have on hand during the configuration:
- The name of your wireless network (SSID)
Example: SSID: SAGEMCOM_XXXX. The XXXX portion will consist of various letters and numbers.
- Your encryption key (WPA)
Example: WPA: XXXXXXXX. The XXXXXXXX portion will be made up of
various letters and numbers that you must type exactly as they appear, making sure to use upper or lower case letters, where indicated.
This information appears on the label underneath your modem router.
Example of a label:
Connecting to a wireless network (Wi-Fi)
3
2- Depending on the operating system you are using, click on the link to go
directly to the appropriate section.
- If you have a Windows XP operating system, click here:
Connecting to a Wireless Network on Windows XP
- If you have a Windows Vista operating system, click here:
Connecting to a Wireless Network on Windows Vista
- If you have a Windows 7 operating system, click here:
Connecting to a Wireless Network on Windows 7
4
4.1 CONNECTING TO A WIRELESS NETWORK ON WINDOWS XP
Please note that the following screens may look different on your computer
depending on the display settings selected.
1.Click Start-> Settings -> Control Panel.
The Network Connections shortcut may appear and, if so, select it and go directly
to Step 3.
2. Double-click Network Connections. A summary of the connections will appear if
you have several types of connections.
Connecting to a wireless network (Wi-Fi)
5
3. In Network Connections, find your Wireless Network Connection. If the
connection is disabled, enable it by right-clicking the Wireless Network
Connection icon. Then click Enable.
4. Once the network connection has been enabled, a small icon representing your
Wi-Fi connection will appear at the bottom of your screen.
Double-click on this icon (or directly on the message that pops up) to view the
list of wireless networks detected.
6
5. Find your wireless network name (SSID) that you want to connect to. (Refer to
the information on the label underneath your modem router).
Note : The more green bars there are, the stronger the wireless signal between your computer and your modem router.
Select your network name (SSID) “SAGEMCOM_XXXX”, then click Connect.
6. In the Wireless Network Connection window, type your encryption key (WPA)
in Network Key. (Refer to the information on the label underneath your modem
router. You must type the key exactly as it appears, using any uppercase or
lowercase letters, where indicated.
Confirm the network key by typing it a second time. Then click the Connect
button.
Connecting to a wireless network (Wi-Fi)
7
7. Wait a few seconds and a message that says “Acquiring network address”
will appear.
8. Wait until the word Connected appears next to your network name.
You have finished setting up your wireless connection.
8
9. Check that you are indeed connected by opening your preferred browser or typing, for example, “www.google.ca” in your address bar. A window such as the
following one should open.
If your connection is not working, please check to ensure that you followed
the previous steps. If the problem persists, contact Technical Support
at 1-800-360-8555.
Connecting to a wireless network (Wi-Fi)
9
4.2 CONNECTING TO A WIRELESS NETWORK ON WINDOWS VISTA
Please note that the following screens may look different on your computer
depending on the display settings selected.
1.In Start (represented by the Microsoft Windows icon
), click Control Panel.
Then click Network and Internet.
2. In the Network and Internet window, click Network and Sharing Center.
10
3. In Network and Sharing Center, you should see a message saying that wireless
networks are available. If so, click on the link “Connect to a network”.
If you do not see this message or this link, check to make sure that Wi-Fi has
indeed been enabled on your computer and that you are within range of the
wireless network (Wi-Fi).
If the link still does not appear, you can click on Manage wireless networks
(in the left-hand panel).
4. The Connect to a network window appears. In the drop-down list, click Display
Wireless networks to only display the available Wi-Fi networks. Use the
drop-down list to select “SAGEMCOM_XXXX”, then click the Connect button.
Connecting to a wireless network (Wi-Fi)
11
5. You will then see all of the names of the Wi-Fi networks that are within range of
your computer and to which you can potentially connect:
Find the name of your wireless network (SSID) that you want to connect to.
(Refer to the information on the label underneath your modem-router.)
Note: The more green bars there are, the stronger the wireless signal between
your computer and your modem router.
In the drop-down list, select your network name (SSID) “SAGEMCOM_XXXX” then
click the Connect button.
6. The SAGEMCOM network requires an encryption key (WPA). This network key helps
to prevent intruders from connecting to your network; otherwise, anybody (a
neighbour, for example) could easily connect to it.
In the Connect to a network window, type your encryption key (WPA) in
Security key or passphrase. (Refer to the information on the label underneath
your modem-router. You must type the key exactly as it appears, using any
uppercase or lowercase letters where indicated.
Next, click the Connect button.
12
7. Wait a few seconds. A message should appear saying that you are successfully
connected.
Leave the Save this network and Start this connection automatically boxes
checked if you want this connection remembered and started automatically the
next time your computer detects the Wi-Fi network (it will be a lot faster than
having to re-enter the settings every time).
Click Close.
8. You will be returned to the Network and Sharing Center window. An Internet
icon confirms that your connection is working.
You have finished setting up your wireless connection.
Connecting to a wireless network (Wi-Fi)
13
9. Check that you are indeed connected by opening your preferred browser or typing, for example, “www.google.ca” in your address bar. A window such as the
following one should open.
If your connection is not working, please check to ensure that you followed the
previous steps. If the problem persists, contact Technical Support
at 1-800-360-8555.
14
4.3 CONNECTING TO A WIRELESS NETWORK ON WINDOWS 7
Please note that the following screens may look different on your computer depending on the display settings selected.
1.Click Start -> Control Panel.
2.In Control Panel, under Network and Internet, click Connect to the Internet.
Connecting to a wireless network (Wi-Fi)
15
3.Click Wireless in answer to the question “How do you want to connect?”
4. Next, you will see all of the names of the Wi-Fi networks that are within range
of your computer and to which you can potentially connect:
Find the name of your wireless network (SSID) to which you want to connect.
(Refer to the information on the label underneath your modem router.)
Note: The more green bars there are, the stronger the wireless signal between
your computer and your modem router.
16
5. Select your network name (SSID) “SAGEMCOM_XXXX” then click the Connect
button.
If Connect automatically is not already checked off, check it off so you
connect automatically next time you log on.
6. The SAGEMCOM network requires an encryption key (WPA). This network key
helps to prevent intruders from connecting to this network; otherwise, anybody
(a neighbour, for example) could easily connect to it.
In the Connect to a Network window, type your encryption key (WPA) in
Security key. (Refer to the information on the label underneath your modem
router. You must type the key exactly as it appears, using any uppercase or
lowercase letters where indicated.
Next, click OK.
Connecting to a wireless network (Wi-Fi)
17
7. Wait a few seconds as your computer is connecting to the network.
8. Once the network connection has been enabled, a small icon representing your
Wi-Fi connection will appear at the bottom of your screen.
Double-click on the small icon (or directly on the message that appears) to
view your wireless network with the word Connected next to it.
You have finished setting up your wireless connection.
18
9. Check that you are properly connected by opening your preferred browser or
typing, for example, “www.google.ca” in your address bar. A window such as
the following one should open.
If your connection is not working, please check to ensure that you followed
the previous steps. If the problem persists, contact Technical Support
at 1-800-360-8555.
Connecting to a wireless network (Wi-Fi)
19