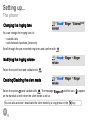
1
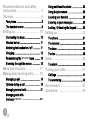
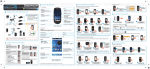
D530/D530P USER GUIDE Dear customer, You have just acquired a new generation Sagemcom telephone and thank you for placing your confidence in us. This product follows a strategy of continuous development. We reserve the right to make changes without notice, modifications and improvements to the products described in this user manual. To operate the device safely and easily, please read carefully the paragraph “Recommendations and safety instructions”, page 4. The CE label confirms that the product complies with the 1999/5/EC regulations of the European Union Parliament regarding wireless systems and telecommunications. The declaration of compliance may be looked up on the www.sagemcom.com website section «Support», or can be obtained from the following address : Sagemcom Broadband SAS 250, route de l'Empereur 92848 Rueil-Malmaison Cedex - France Copyright © Sagemcom Broadband SAS All rights reserved Sagemcom is a registered trademark. 2 Recommendations and safety instructions ................................ 4 Discover... .................................. 6 Your phone ......................................................6 The handset screen .....................................9 Setting up................................. 10 Connecting the base ................................. 10 Handset set-up ........................................... 11 Switching the handset on / off ............... 11 Charging ...................................................... 12 Personalising the D530P base ............ 13 Browsing through the menus ................. 13 Using additional handsets .......................24 Using the phonebook ................................26 Locating your handset ..............................29 Listening to your messages .....................30 Locking / Unlocking the keypad .............30 Setting up... .............................. 31 The phone .....................................................31 The handset .................................................33 The base .......................................................35 The line ..........................................................38 Alarm........................................ 39 The alarm ......................................................39 Menu tree structure .................. 17 Making and receiving calls........ 18 Tracing your calls...................... 41 Managing a call .......................................... 18 Options during a call ................................ 19 Managing several calls ............................. 21 Managing calls with the base D530P .........................................22 Environment ............................. 43 Guarantee ................................ 44 3 Call logs ........................................................41 The events log .............................................42 Recommendations and safety instructions For safety reasons, never put the handset in the base station without the battery inserted or without the lid on the battery compartment as this could cause an electric shock. To avoid damaging your handset/base, only use certified rechargeable batteries NiMH 1.2 V 600 mAh, never use non-rechargeable batteries. Insert the batteries in the handset/base battery compartment respecting polarity. Only use the power unit supplied and connect it to the electricity mains in accordance with the installation instructions in this user manual and the details on the sticker regarding voltage, electrical current and frequency. As a precaution if there is a risk of danger, the power plug can be pulled out to disconnect the 230 volt power supply. Therefore the sockets should be near the device and easily accessible. Do not install your DECT telephone in a damp environment, such as a bathroom, washroom, kitchen etc, and not within 1.50 metres of a source of water or outside. This device is designed for use in temperatures of between 5 °C and 40 °C. Your DECT telephone has a range of approx. 50 metres indoors and up to 300 metres outdoors. The range can be affected by the proximity of metal objects, such as a television and electrical devices. Zones without reception may appear owing to elements in the building. This can cause brief interruptions in the conversation, caused by faulty transmission. 4 Certain medical equipment and highly-sensitive machines or security systems may be affected by the transmission power of the telephone. In these cases we recommend adhering to the safety information. In regions greatly affected by electrical storms we recommend that you protect your telephone circuit with a special fixture for excess voltage. Your D530 has anti-skid pads that should leave no traces on your furniture and ensure stability. However, given the wide variety of finishes used by furniture manufacturers, traces may appear on surfaces in contact with the parts of your D530. Sagemcom Broadband SAS decline all responsibility in any such cases of damage. Do not attempt to remove screws or open the appliance. It does not contain any user-replaceable parts Worn out batteries must be disposed of in line with the recycling regulations in this user manual. This device is designed to be used for connecting to the public telephone network. If problems should arise, contact your nearest specialist dealer. Only use the telephone cable supplied. 5 Discover... Your phone The pack Check that you have the following items in your pack: a D530 or D530P base according to model, two rechargeable batteries (type NiMH 1.2 V 600 mAh), a telephone connection cord, a mains power supply with connection cord, a belt clip, this user guide. If you have purchased a Duo or Trio pack, you will also find for each extra handset: a charger, a mains power supply with connection cord, two rechargeable batteries (type NiMH 1.2 V 600 mAh), a belt clip. 6 The base 1 2 Handset location. Handset(s) Search / Pairing key • Long press: pairing of handsets. • Short press: paging of handsets. Display: • Displays the current time. • P: indicates PM if the time format is 12 Hour. Volume keys: • VOL -: To reduce the volume. • VOL +: To increase the volume. Hands-free key: • Standby screen/During a call from the handset to (de)activate the hands-free mode • On receiving a call: to answer in hands-free mode; press again to hang up. • During a call from the base: to end the call. To call My favourite numbers (direct call keys see page 37). 3 4 5 6 Model D530 1 2 Model D530P 1 2 3 4 M1 M3 M2 M4 6 7 5 The handset 1 2 3 Indicator light - incoming call. Loudspeaker. Graphic screen. 4 Upper and lower side keys : • To Increase / Decrease the volume. • Browsing through the menus. Phonebook access key. Menu access / validation key. Mute button: cuts off the microphone. "Hang up" button • Short press: return to main menu. • Long press: switch handset on / off. Alphanumeric keypad. "Hash" key • Long press : (un)lock the keypad. Microphone. Charging terminals. "Star" key • Long press: to (de)activate the silent mode. "Open line" key • During a call: to (de)activate the hands-free mode. 5 6 7 8 9 10 11 12 13 14 1 2 3 18 17 16 15 14 4 5 6 7 8 9 13 10 12 11 8 15 Browsing through the menus / Upper and lower • To increase / Decrease the volume. • Browsing through the menus. • : See the list of calls received. • : See the list of outgoing calls. 16 R key (flashing, to manage several calls). 17 Cancel / Intercom / Delete character key. 18 Side key : (de)activate the amplifier. keys: The handset screen THE ICONS DISPLAYED In standby mode or during use, your phone screen informs you of your phone’s current state through icons, and in particular: 1 Status icons: Indicates your phone’s current state. 1 Speakerphone Battery charge condition enabled Silent mode There are messages on your online activated message recorder Alarm on 2 Keypad locked Handset.1 12:30 2 Information field: in the normal state, displays the name of the handset and the current time. When the 12-hour time format is set, AM or PM is displayed after the time. 9 Setting up... Connecting the base Before making connections, please see the safety instructions at the start of the booklet. 1 2 3 4 5 Turn the base over. Take the telephone connection cord, click it into its socket and connect the other end of the cord to the telephone socket. Take the mains power supply. Connect the jack plug of the power supply underneath the base and connect the power supply to the mains. D530P - the display lights up. Pass the cords through the cord grips provided. Place the base where you want it located. 2 4 1 3 10 Handset set-up 1 2 Take the batteries provided in the packaging. Turn over your handset and press the top of the hatch to release it. 3 Insert the batteries one by one according to their polarities as indicated in the illustration opposite. 4 Fit the hatch to the handset by pushing it up until it is completely closed. 5 The screen turns on. Place your handset on its base and fully charge the batteries. 6 A beep sounds when you place the handset on the base. The battery charging icon moves to inform you that charging is in progress. The icon display stops moving when the batteries are charged. Switching the handset on / off To switch on the handset, give a long press on the key . To switch off the handset, give a long press on the key The message Switch off HS? is displayed. . Press the key 11 to confirm. Charging To charge your phone, place the handset on the base, making sure that the base is connected to an AC outlet. To ensure optimum charging, leave the handset on the base for at least 15 hours when using the phone for the first time. During charging, the batteries may heat up. This is quite normal and perfectly safe. If you do not obtain radio contact with your base, check the electrical connections to your base. Battery replacement 1 2 3 4 Turn off the handset. Turn it over to access the battery compartment hatch. Remove the battery compartment hatch. Remove the old batteries, insert the new batteries one by one the right way as indicated by their polarities. Refit the battery compartment hatch. Worn out batteries should be discarded in accordance with the recycling instructions given in chapter “Environment”, page 43. To prevent damage to your handset, only use approved AAA format NiMH 1.2 V 600 mAh rechargeable type batteries. Never use non-rechargeable batteries. 12 Personalising the D530P base The "M" keys on the base can be personalised with a photo of the user associated with the key. Place a pointed tool in one of the two dimples on the "M" key. Lift off the plastic cover. Use the cover as a template to cut the photo to size. Insert the photo and replace the plastic cover. Browsing through the menus Browser This browser allows you to quickly access menus and change your settings easily. It points in two directions. To access the phone menu, press . When choosing menus, press the top or the bottom of the browser to access the previous or next menu. During a call, press the top of the browser to increase the volume or the bottom to decrease it. 13 The multifunction keys Your telephone has two and "multifunction" keys which you can use in several ways: From the standby screen In a menu To access the telephone menu. To enter a menu, to validate an action in a menu. To make an Intercom call (call to another handset). To return to the previous menu. To delete characters. With each press, the character preceding the cursor is deleted. Illustration To browse-through menus, use the browser [or right side keys] and two multifunction buttons: 1 Press the key . The main menu is displayed on the screen. 2 Press the top or bottom of the browser key to scroll through the menus and access the desired function. Confirm your choice/Enter the displayed menu by pressing the key . Cancel your choice/Exit the displayed menu: • either by pressing the key . 3 4 • or by pressing the : key; the home screen is displayed. 14 DETAILED BROWSER EXAMPLE: ADJUST THE DATE AND TIME It is recommended to set the date and time accurately to allow you to keep track of the timings of your calls and messages. If you have the Display number option, the date and time will, depending on your operator, be set automatically when you receive a call. To access the date and time setting menu: 1 2 Press the key . The main menu is displayed on the screen. Scroll through the menus to the Settings menu by pressing the top or bottom of the browser key . 3 Enter the Settings menu by pressing the key . 4 Scroll through the menus to the Date/Time/Alarm menu by pressing the top or bottom of the browser key . 5 Enter the Date/Time/Alarm menu by pressing the key . 6 Enter the Date & Time menu by pressing the key . 7 Scroll through the menus to the Enter time menu by pressing the top or bottom of the browser key . 8 Enter the Enter time menu by pressing the key . 9 Enter the time: using the numeric keypad (hours then minutes). 10 Confirm your entry by pressing the key . The home screen displays the message Saved. 15 11 Scroll through the menus to the Enter date menu by pressing the top or bottom of the browser key . 12 Enter the Enter date menu by pressing the key . 13 Enter the date using the numeric keypad (day, month and year) in the form DD/MM/YY. 14 Confirm your entry by pressing the key . The home screen displays the message Saved. You have just set your phone’s current date and time. You can also set the date and time display format (see “Setting the date and the time”, page 32). Refer to the “Menu tree structure”, page 17 section to find out about your phone’s functions. Procedures in your booklet The procedures in your booklet are presented in the form of sheets. To facilitate their implementation, each of them includes the following as appropriate : • the keys associated to directly access the function described, and/or • the path for accessing the function described in the menu. EXAMPLE : TO (DE)ACTIVATE THE SILENT MODE (Long press): > Sound > Ringer > Ringer volume > Off means you can use the key(s) offered to access the function. means you can access this function by displaying the menu, then going down the menus displayed to the function Ringer volume and selecting the state Off. 16 Menu tree structure Call log Empty Call log All Calls Missed calls Sound Ringer External Internal Ringer volume Tones Key beep Confirmation Battery low No coverage Settings Handset settings Select base Display Contrast Handset name Date/Time/Alarm Date & Time Time format Date format Enter time Enter date Language Auto Answer Register handset De-Register Handset Reset Base settings Ringer* Ringtone Ringer volume Dial Mode Tone Pulse Flash time Alarm Alarm On/Off Enter time Ringtone Memory keys* M1 M2 M3 M4 100 ms 250 ms 300 ms 600 ms System PIN Base reset 17 * Only for D530P Making and receiving calls... Managing a call Making a call FROM THE HANDSET - METHOD 1 1 2 Dial your contact’s number. If you make a mistake, press the Press the key key to delete the last character entered. . FROM THE HANDSET - METHOD 2 1 2 Press the key . Dial your contact's number. A beep sounds. At the end of the call, press the handset key and replace the handset on its base. FROM THE BASE To do this, the keys M1 to M4 must be programmed. For more details, see the section “Defining the memory keys (M1 to M4) - D530P only”, page 37. Press one of the "M" keys, the Hands-free key lights up and the call is started. 18 Receiving a call 1 Press the key to take the call. 2 At the end of the call, press the handset A beep sounds. key and replace the handset on its base. Your handset includes an Auto Answer. function. For further details, refer to the “Answering automatically”, page 34. Options during a call You can use the following options during a call: Enable/Disable loudspeaker (speakerphone mode) HANDSET LOUDSPEAKER The icon (during a call) appears on the handset screen when the hands-free mode is active. BASE LOUDSPEAKER (D530P ONLY) (during a call) When the battery charge icon is at minimum, the hands-free function is not available until the next charging cycle. 19 Adjusting the volume FROM THE HANDSET , and (during a call) • To increase the volume, press in the browser or on the key handset. • To decrease the volume, press in the browser or on the key handset. • To increase the volume during a call, press the return to normal volume, press this key again. FROM THE (D530P BASE ONLY) Enabling/Disabling the secret mode , on the right side of the on the right side of the key on the left side of the handset. To and (communication in progress from the base) (during a call) The secret mode allows you to temporarily mute the line so that you are not heard by the caller. Once enabled, the Mute On message flashes on the screen. 20 Managing several calls Your phone allows you to take and manage several calls when you are already on the line (depending on your line provider). These calls can be managed with the key . Receiving a second call + During a call, a beep indicates the arrival of a second call. To take this call, press the key then the key . Your first call is put on hold and you can talk with the second caller. Making a second call During a call, press the key + Number of your contact then dial your contact’s number. Switching from one call to the other Press the key then the key + to switch from one call to the other. The call in progress is then put on hold and you can take back the previous call. 21 Ending one of the calls in progress Press the key then the key + to end the current call. You will return to the other call. Talking with two contacts at the same time (3-way conference) Press the key followed by the key + . You can then talk with your two contacts at the same time. To end the 3-way conference, press the key . Managing calls with the base D530P With the D530P base there are more ways of sending and receiving calls using the Which can be used not only to activate the hands-free mode, but also to take a call. key, Receiving a call Press the key to take a call from the base. 22 Using the Conference mode When you are already connected from the handset, you can keep the handset call and activate the hands-free mode on the base (Conference mode). You can also speak to your correspondent from the handset and another person can join the conversation from the base. Press the key on the base to (de)activate the conference mode during a call on the handset. Once it is activated, the message Conference is displayed. Switching between the handset and the base During a call on the handset, press the key on the base. You will then hear your contact both on the handset and on the base (Conference mode). You may get feedback in Conference mode if the handset is too close to the base. • To end a call on the handset and continue on the base alone, press the on the handset. • To continue the call only on the handset and end it on the base, press the handset then press the key on the key on the base. • During a call, if you have placed the handset on the base; pick it up again to continue the call on the handset alone. 23 Using additional handsets You can associate additional handsets with your phone: You can then make and receive outside calls or calls between these handsets. You first have to pair the handsets with the base. For further details, refer to the “Associating a new handset”, page 34 . Calling another handset (intercom) If you only have two paired handsets on the same base, the handset called rings automatically. Simply take the call with the key. If you have more than two paired handsets on the same base: 1 Press the key . Select the handset with the 2 Press the key 3 Take the call from the handset by pressing 4 End the call by pressing or key. . The selected handset rings. . . Transferring a call to another handset (during communication) You must have at least two handsets paired on the same base. 24 If you only have two paired handsets on the same base, the call is transferred directly to the second handset. Simply take the call on the second handset with the call on the first handset with the key and hang up the key. To cancel the transfer before hanging up the second handset, press the If you have more than two paired handsets on the same base: 1 Select the handset to which you want to transfer the call using the or 2 Press the key . The handset called rings. 3 Pick up the other handset and then transfer the call by pressing key. key. . 3-way conference During a call, you can have a second person in your home take part by activating the call on the second handset. To do this, you must have paired both handsets to the base. 1 2 3 Take your contact's call as usual by pressing the key on your handset. During the call, press the key. If necessary select the desired handset with the or key. The selected handset will ring. Your contact is put on hold. 4 Connect the call to the second handset with the key. 5 On the first handset, press the key to display the call options. 6 Select the Conference option with the or key, then press . You can then all talk to each other. The handsets display the message Conference. 25 Using the phonebook Create an entry 1 Press the key . The directory opens. If there are no entries, the message Empty is displayed. 2 Press the key . 3 Select New entry with the or key and press . 4 Specify the required information by confirming at each step with : • Name: enter your contact’s name, • Number: enter their number, • Group: if necessary, select the group in which to include the contact. Call the contact from their entry 1 2 3 4 Press the key . The directory opens. Select the contact to call with the or key. Press the key . Select the option Call and press . You can also press the key to call the contact selected in the directory directly. 26 Search for an entry 1 2 Press the key . The directory opens. Enter the first letter of the name. Changing an entry 1 2 Press the key . The directory opens. Select the entry to be modified with the 3 Press the key or key. . 4 Select the option Edit and press 5 Change the name and/or number and/or number type and confirm with . . Deleting an entry The action Delete deletes the selected entry. The action Delete all deletes all the entries in the directory. 1 2 Press the key . The directory opens. Select the entry to be deleted with the or 3 Press the key 4 Select the option Delete and press 5 Confirm the deletion by pressing the 27 . . key. key. Checking available directory space 1 2 3 4 Press the key . The directory opens. Press the key . Select the option Capacity and press . The number of existing entries is displayed with the total possible number (2/50). Associating a Speed dial number with an entry Speed dial allows you to associate a numeric key, for example key , with an entry in your directory. Once you have made the association, you can dial your contact's number automatically by long press on the associated key (e.g 1 2 3 4 5 ). Press the key . The directory opens. Press the key . Select the option Speed dial and press . Select with or the numeric key of your choice and press Select the desired contact with or and press . . 28 Transferring entries from one handset to another You must have at least two handsets paired on the same base. Each handset has its own phonebook. To transfer one or more entries from a phonebook to another handset: 1 Press the key . The directory opens. 2 Press the key . 3 Select the desired option and press . • COPY: to transfer the current entry. • COPY ALL: to transfer all the directory entries. 4 Select the handset to which the data are to be transferred. The receiving handset rings and displays the message Accept PB Entries?. 5 Accept the transfer on the destination handset by pressing the key . Locating your handset If you have misplaced your handset, press the 29 key on the base. The handset rings. Listening to your messages If you have a voice mail service with your line provider, dial the number given by your line provider directly. Follow the instructions given by your line provider to listen to and manage your messages. The icon appears on the handset screen when you have at least one new message. Locking / Unlocking the keypad You can lock the keypad when you are not making a call. Give a long press on the key to lock and unlock the keypad. The message Keypad locked and the icon is locked. appear on the handset screen when the keypad 30 Setting up... The phone > Sound > Ringer > External and Internal Changing the ringing tone You can change the ringing tone of: • outside calls, • calls between handsets (intercom). Scroll through the pre-recorded ring tones and confirm with > Sound > Ringer > Ringer volume Modifying the ringing volume Select the sound level and validate with Enabling/Disabling the silent mode . . > Sound > Ringer > Ringer volume Select the option Off and validate with . The message Ringer off and the icon on the handset screen when the silent mode is active. You can also activate / deactivate the silent mode by a long press on the 31 key. appear Enabling/Disabling audio alerts > Sound > Tones > Key beep and Confirmation and Battery low and No coverage The audio alerts apply to: • keypad keys pressed, • confirming a menu, • low battery, • loss of signal between the base and the handset. Select the desired state, On or Off, and validate with Setting the date and the time . > Settings > Date/Time/Alarm > Date & Time 1 Select the desired Time format: 24 Hour or 12 Hour. 2 Select the desired Date format: dd/mm (day, month) or mm/dd (month, day). 3 Enter the hour in Enter time: starting with the hours and then the minutes. 4 Enter the date in Enter date. For further details, refer to the “Illustration”, page 14. 32 The handset > Settings > Handset settings > Select base This function allows you to specify the priority base to be used for making calls. Define the priority base for a handset Only if you have paired the same handset on several bases. Select the base that the handset should use first and confirm with . > Settings > Handset settings > Display > Contrast Adjusting the contrast Select the desired level of contrast and validate with . > Settings > Handset settings > Display > Handset name Personalising the name of a handset You can personalise the name of your handset. Enter the desired name and validate with > Settings > Handset settings > Language Changing the display language Select the language to be used and confirm with 33 . . Answering automatically > Settings > Handset settings > Auto Answer With this function you can answer a call simply by lifting the handset from the base. Select the desired state, On or Off, and validate with Associating a new handset . > Settings > Handset settings > Register handset Your phone allows you to associate other handsets with the base. You then have to pair them so that they are recognized. FROM THE BASE: 1 Enable the base pairing mode. Refer to section“Enabling the pairing mode”, page 35. FROM THE HANDSET: 2 3 Enable the handset pairing mode. Enter the base code if necessary (by default 0000). Once the handset is registered, the pairing mode is automatically exited. 34 Removing a handset registered on the base 1 Enter the base code and confirm with > Settings > Handset settings > De-Register . The default code is 0000. 2 Select the handset to unpair from the base and validate with . > Settings > Handset settings > Handset Reset Resetting the handset When you reset your handset, all the settings are returned to their initial values (factory settings), except for the phonebook. Follow the instructions on the screen and confirm. The base Enabling the pairing mode (long press) You enable the pairing mode when you associate an additional handset, for example. Give a long press on the key on the base. On the base D530P only, the 35 key flashes: the base is in pairing mode. Your base will remain in pairing mode for about 1 minute > Settings > Base settings > System PIN Changing the default code 1 Enter the current code and validate with 2 Enter the new code and validate with . 3 Re-enter the new code to confirm and validate with . Resetting the base . > Settings > Base settings > Base reset When you reset your base, all the settings are returned to their initial values (factory settings), except for the phonebook. Follow the instructions on the screen and confirm. Modifying the base ring tone - (D530P only) > Settings > Base settings > Ringer > Ringtone Scroll down the pre-recorded ring tones and validate with . 36 Modifying the base ring tone volume (D530P only) Select the sound level and validate with . Defining the memory keys (M1 to M4) D530P only > Settings > Base settings > Ringer > Ringer volume > Settings > Memory keys Use this menu to set your favourite numbers and associate them with direct call keys M1 to M4 on the base. 1 2 Select the key to set and validate with . Enter the telephone number to associate with this key and validate with . Pressing the defined keys M1 to M4 will now automatically call the saved number. 37 The line We do not recommend that you change line settings without first contacting your line provider, as this may result in your phone line being disconnected. Changing the dialling type > Settings > Base settings > Dial Mode You can use a voice frequency [Tone] or pulse [Pulse] based dialling system . Select the desired system and validate with Changing the flash duration . > Settings > Base settings > Flash time You can configure the flash duration if you use your phone abroad or on a private network. Select the desired value and validate with . 38 Alarm... The alarm The alarm sounds through the handset speaker. To stop the alarm clock, press any key on the handset. Programming the alarm > Settings > Date/Time/Alarm > Alarm To program the alarm: 1 2 3 Depending on the alarm status, enable or disable the Alarm function. Select the time at which you want to be woken up. If necessary, change the ring tone. For further details, refer to the following sections. Finding out the alarm status When the icon is displayed on the handset screen the alarm is activated. Enabling / Disabling the alarm > Settings > Date/Time/Alarm > Alarm > Alarm On/Off Select the desired state, On or Off, and validate with 39 . Once the alarm is enabled, the Defining the wake-up time 1 icon is displayed on the screen. > Settings > Date/Time/Alarm > Alarm > Enter time Enter the desired time and validate with . When the 12-hour time format is set, use the (before 12 o'clock) and PM (after 12 o'clock). 2 3 key to switch between AM Select the desired repetition frequency: • Once: a single time on the same day or on the following day at the set time. • Daily: every day at the set time. Validate with . Changing the ringing tone > Settings > Date/Time/Alarm > Alarm > Ringtone Scroll down the list of available ring tones and confirm with . 40 Tracing your calls... Call logs Logs are lists of numbers or events received by your phone. Depending on your line provider, call logs contain the following information : • your contact’s name or number, • the call time or date. Viewing the received call log > Call log Scroll through the list of stored numbers. Missed calls are preceded by a black dot. You can use the options described in section “Managing incoming or outgoing calls”, page 42. A shortcut is set as default for the key to access the log directly. Viewing the dialled call log Scroll through the list of stored numbers. You can use the options described in section “Managing incoming or outgoing calls”, page 42. 41 Managing incoming or outgoing calls Use the following options from the call list to: • Details: display the information about the selected call, • Delete: delete the selected log entry, • Delete all: delete all the numbers in the list. • Call: call the displayed number, • Store number: save the number in your phonebook, Configuring the incoming calls log 1 Select the type of call to display in the incoming call log - All Calls, - Missed calls only. 2 Validate with > Call log > Call log . The events log A screen message tells you that you have received a call or voice mail in your absence: • Message !: tells you that there is voicemail on your line provider's answering system, • New. call: tells you that there is a missed call, • New. calls: tells you that there are several missed calls. 42 Environment Environmental protection and sustainable development is an important priority for Sagemcom. Sagemcom has a policy of using environmentally- friendly systems and makes environmental protection an essential part of the life-cycle of its products – from the manufacturing, to the installation, operation and disposal. Packaging The logo (green point) on the packaging means that a fee is paid to an authorised national organisation to improve packaging recycling and the recycling infrastructure. Follow the local sorting regulations for this type of waste product in order to improve recycling. Batteries If your product contains batteries, they must be disposed of at the designated collection points. The product The crossed out dustbin displayed on the product signifies that it belongs to the electrical and electronic equipment group. The European regulations request you to carry out your own selective recycling collection at : •the sales outlet when you buy a similar new device. •the collection points available in your area (recycling centres, sorting points, etc). This means you participate in the recycling and valorisation of used electric and electronic goods which would otherwise have a negative impact on the environment and health. 43 Guarantee Terms and Conditions for United Kingdom & Ireland only. In order to apply the guarantee, you should contact the Sagemcom Helpdesk or the retailer where you purchased the equipment. Proof of purchase will be required in either case. Please make sure that you use your equipment only for the purpose for which it was designed and under normal usage conditions. Sagemcom do not accept any liability for the equipment if used outside the frame of its original designed purpose or any consequence that may arise from this usage. Should any malfunction arise, the Sagemcom Helpdesk or your retailer will advise you how to proceed. A)General Guarantee conditions Sagemcom undertakes to remedy by repair or exchange at its own convenience, free of charge for labour and replacement parts, any defects in the equipment during the guarantee period of 12 (twelve) months or 3 (three) months for accessories, from the date of original invoice of the Equipment, where those defects are a result of faulty workmanship. Unless the customer has concluded with Sagemcom a maintenance contract in respect of the equipment which specifically provides for repairs to be carried out at the customer`s premises, the repairs will not be carried out on the equipment at the customer premises. The customer must however return the defective equipment at his/her own expense, to the address supplied by the Sagemcom Helpdesk or by the retailer. 44 In the case that a product needs to be sent in for a repair, it must always be accompanied by a proof of purchase (which is not altered, written on or in any way made illegible) showing that the product is still under guarantee. In the case that no proof of purchase is enclosed, the Sagemcom repair centre will use the production date as its reference for establishing the guarantee status of the product. Apart from all legal obligatory rules, Sagemcom, do not give any Guarantee, either implicit or explicit which is not set force in the present section, and can not be held responsible for any direct or indirect, material or immaterial damage, either in or out of the frame of the present guarantee. If any provision of this guarantee shall be held to be in whole or in part invalid or illegal due to an obligatory rule applicable to consumers pursuant to their national legislation, such invalidity or illegality shall not impair or affect the remaining provisions or parts of this guarantee. This guarantee does not affect the Customer statutory rights. B)General Guarantee conditions Sagemcom shall have no liability under the guarantee in respect of: • Damage, defects, breakdown or malfunction due to one or more of the following : - Failure to properly follow the installation process and instructions for use - An external cause to the equipment (including but not limited to: lightening, fire, shock, vandalism, inappropriate conditions of electrical network or water damage of any nature) - Modifications made without the written approval of Sagemcom - Unsuitable operating conditions, particularly of temperature and humidity - Repair or maintenance of the equipment by persons not authorised by Sagemcom • Wear and tear from normal daily use of the equipment and its accessories • Damage due to insufficient or bad packaging of equipment when returned to Sagemcom • Usage of new versions of software without the previous approval of Sagemcom • Work on any equipment or software modified or added without the prior written consent of Sagemcom 45 • Malfunctions not resulting from the Equipment or from software installed in user workstations for the purpose of use of the equipment. • Communication problems related to an unsuitable environment including - Problems related to access and/or connection to the Internet such as interruptions by access networks or malfunction of the line used by the subscriber or his correspondent - Transmission faults (for example poor geographical coverage by radio and TV transmitters, interference or poor line quality) - Local network faults (wiring, servers, workstations) or the failure of the transmission network (such as but not limited to interferences, fault or poor quality of the network) - Modification of the parameters of the cellular or broadcast network carried out after the sale of the Product • Normal servicing (as defined in the user guide supplied with the equipment) as well as malfunctioning due to servicing not being carried out. Servicing costs are in any event always borne by the customer. Malfunctions resulting from the usage of products, consumables or accessories not compatible with the equipment. C) Out of Guarantee Repairs In the cases set forth in B) as well as after expiry of the guarantee period, the customer must ask the Authorised Sagemcom Repair Centre for a cost estimation prior to work being carried out. In such cases, the repair and delivery costs will be invoiced to the customer. The foregoing shall apply unless otherwise agreed in writing with the customer and only for the United Kingdom and Ireland. 46 253456941-A - 02/2012 reserved. Sagemcom Broadband SAS reserves the right to change the technical characteristics of its products and services or to stop marketing them at any time. The information and specifications included are subject to change without prior notice. Sagemcom Broadband SAS tries to ensure that all information in this document is correct, but does not accept liability for error or omission. Non contractual document. All trademarks are registered by their respective owners. Simplified joint stock company Capital 35 703 000 € - 518 250 360 RCS Nanterre 250, route de l'Empereur 92848 Rueil-Malmaison Cedex - France Tel. +33(0)1 57 61 10 00 - Fax : +33(0)1 57 61 10 01 www.sagemcom.com All rights Sagemcom Broadband SAS