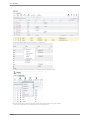
1
Intersalon
User Manual
Created: Monday, April 02, 2012
Copyright © Vaalto Technologies. All Rights Reserved.
intersalon
copyright © Vaalto Technologies. All rights reserved.
http://www.salonsoftware.co.uk
The information contained in this document is subject to change without notice.
This document contains proprietary information which is protected by copyright.
All rights are reserved. No part of this document may be photocopied, reproduced,
or translated to another language without the prior written consent of Vaalto Technologies.
Table of Contents
1
Intersalon
Fundamentals
About the home screen
Introducing Intersalon Widgets
Navigator
Clock
Open Tickets
Closed Tickets
Customer Selection
Single service/Linked Service
Multi Service Search
New Customer
Cash Register Tools
Quick Reports
Quick Charts
Quick Sale
Creating Stylists and Services
Adding appointments
Checking out an appointment
Linked services
Retrieving sales information
Sales tax options
Running reports
Cashing Up
Stock control
Integrating online booking within your existing website
Setting stylist/therapist working patterns
Making a series of recurring appointments
Understanding styling rates
Order payment method and status
Managing resources
What do the various icons mean around Intersalon?
How To...
How to use the WYSIWYG editor
Paste from Word
Inserting an Image
Creating Links
Can I use my existing domain with Intersalon?
How to save report data to Excel?
How to prevent staff accessing Intersalon away from the salon?
How to create and send an issue based newsletter
How do I setup my SMS account?
How do I create a Gift Voucher?
How do I filter and sort grids within Intersalon?
How do I issue a refund?
How to customise Intersalon captions
Reference Guide
What is the default security setup for each role?
1
2
3
6
8
11
12
13
15
17
19
21
23
26
28
30
37
39
42
45
47
48
50
53
55
58
61
66
69
71
72
76
78
79
80
82
86
89
90
93
95
99
102
104
107
109
111
112
Administration
Users
Event Log
Web Log
Workstations
Analytics
Sales
Appointments
Planner
Appointment List
Multi-Service Booking
Clients
Client List
Client Files & Photos
Custom Fields
Subscribing Clients To Newsletters
Ecommerce
General
Emails
Payment Methods
Shipping Options
Newsletters
Newsletters
Email Queue
Reports
Report List
Daily Sales Summary
Inventory
Stylist Appointment List
Retail
Orders
Till Requests
Products
Manufacturers
Discount Vouchers
Discount Levels
Loyalty Points
Receipt Template
Analysis
Settings
Appointments
Planner Events
System Settings
Salon Settings
SMS Text Messages
Account Settings
Mailshots
Appointment Reminders
Stylists and Services
Stylists
Services
Styling Rates
Service Groups
114
115
117
119
121
123
124
125
126
129
130
132
133
136
137
140
141
142
144
145
146
147
148
149
150
151
153
154
155
156
157
159
160
163
164
166
168
169
170
171
172
174
176
177
179
180
182
184
186
187
190
193
195
Salon Roles
Stylist Groups
Resources
Social Networking
Social Settings
Late Availability
Discount Vouchers
Existing Customers - New Version Help
What's new in Intersalon?
Contacting Intersalon
197
198
199
200
201
204
207
210
213
217
Intersalon . 1
Home > Intersalon
Welcome to the Intersalon Help System
Existing Customers
The new version of Intersalon includes substantial changes and improvements for our customers. We've produced a
guide specifically for existing customers on how to customise the planner screen. Get a head start and read about the
new layout by clicking here.
What's New?
Fundamentals
Find out what's new in the latest version of
Intersalon.
A simple user guide to setting up and using your
Intersalon package.
How To Guides
Out of Hours Support
Step by step guides on advanced Intersalon
features.
For further assistance, log a support request at our
zendesk support desk.
Contact Us
Get contact details and talk directly to the
Intersalon support team.
Can't find the answers you're looking for?
●
●
●
●
Contact our support team on 01909 512131.
Email [email protected] and we'll personally get back to you as quickly as we can.
Check out our Support Portal, available 24/7 at intersalon.zendesk.com.
Or let us know by leaving a comment below:
intersalon
2 . Intersalon
Home > Intersalon > Fundamentals
Fundamentals
About the home screen
Introducing Intersalon Widgets
Creating Stylists and Services
Adding appointments
Checking out an appointment
Linked services
Retrieving sales information
Sales tax options
Running reports
Cashing Up
Stock control
Integrating online booking within your existing website
Setting stylist/therapist working patterns
Making a series of recurring appointments
Understanding styling rates
Order payment method and status
Managing resources
What do the various icons mean around Intersalon?
See also
How To...
Reference Guide
Existing Customers - New Version Help
What's new in Intersalon?
Contacting Intersalon
Can't find the answers you're looking for?
●
●
●
●
intersalon
Contact our support team on 01909 512131.
Email [email protected] and we'll personally get back to you as quickly as we can.
Check out our Support Portal, available 24/7 at intersalon.zendesk.com.
Or let us know by leaving a comment below:
Intersalon . 3
Home > Intersalon > Fundamentals > About the home screen
About the home screen
The Home screen is your starting point within Intersalon. From here you get immediate access to appointments, customers, sales and reports.
Lets take a closer look at how the home screen is put together. Firstly, you'll notice the row of icons along the top of the screen. We call this the
widget menu bar.
Widget menu bar
The Widget menu bar allows a user to enable and disable various extra Intersalon tools or 'helpers'. We call these tools our Intersalon 'Widgets - and
you can learn lots more about them by clicking here. You'll also notice some quick links on the left - instantly return to the home screen by clicking
the 'home' menu option, or sign out securely from Intersalon by clicking the 'padlock' menu option.
The Planner
The planner is at the heart of Intersalon. While Intersalon is a constantly evolving system, with new features added almost daily, the planner remains
intersalon
4 . Intersalon
our most popular feature. In this version of Intersalon, we've made it even easier to do most Intersalon tasks without needing to move away from
the planner. This provides a better experience for both staff, and customers.
Planner Sidebar
intersalon
Intersalon . 5
The planner sidebar is a mini-control panel for your planner.
Selecting a date directly from the help calendar control will move the planner to your chosen day. Use
the arrows at the top left and right of each calendar month to cycle through future or past months
and years.
Intersalon Tip
If you need to view today's availability in a hurry, simply press the 'Today' button directly
below the calendar to jump immediately to today's date.
You'll also notice any created stylist groups have appeared towards the bottom of the planner sidebar.
Clicking on a specific group will switch the planner into only showing stylists within the selected stylist
group. This also includes a 'Resource View' allowing users to ensure good resource usage across their
business.
Finally the planner sidebar also shows the currently selected customer. In our example, we don't have a
customer selected, but this constantly updates with the last selected customer. A customer can be
selected from the customer selection widget.
The sidebar can also be minimised or adjusted to suit. To minimise, just click on the small arrow on the
right of the sidebar, in the middle of the screen. This will 'collapse' the sidebar against the left side of
the screen. Click the arrow again to expand the sidebar. You can also adjust the sidebar width by
clicking and dragging the vertical bar between the sidebar and the planner. Just let go of the mouse
button when you're happy, and the sidebar will remember your preference.
Together these three sections make up the Intersalon home screen. On a fully set up system, most
daily duties are available from this home screen, and other areas are available via the Intersalon
Navigator widget.
You can find out more information on widgets, and learn how to organise your home screen elsewhere
in this guide.
See also
Introducing Intersalon Widgets
Creating Stylists and Services
Adding appointments
Checking out an appointment
Linked services
Retrieving sales information
Sales tax options
Running reports
Cashing Up
Stock control
Integrating online booking within your existing website
Setting stylist/therapist working patterns
Making a series of recurring appointments
Understanding styling rates
Order payment method and status
Managing resources
What do the various icons mean around Intersalon?
Can't find the answers you're looking for?
●
●
●
●
Contact our support team on 01909 512131.
Email [email protected] and we'll personally get back to you as quickly as we can.
Check out our Support Portal, available 24/7 at intersalon.zendesk.com.
Or let us know by leaving a comment below:
intersalon
6 . Intersalon
Home > Intersalon > Fundamentals > Introducing Intersalon Widgets
Introducing Intersalon Widgets
The Intersalon home page is a powerful hub connecting your salon planner with typical daily duty tasks. It's also extremely customisable with a
number of extra tools to help you get the most from Intersalon. These 'widgets' can be enabled and disabled, and moved around the screen to suit
your individual needs. In this document, we'll take a look at how to achieve the right setup for your salon, and take a look at the widgets
themselves.
Here's a list of available widgets. Click the link to get more detailed information about a particular widget
Navigator
Clock
Open Tickets
Closed Tickets
Customer Selection
Single service/Linked Service
Multi Service Search
New Customer
Cash Register Tools
Quick Reports
Quick Charts
Quick Sale
At the top of the Intersalon home screen you'll notice the widget menu bar. Hovering the mouse pointer over each of these icons will provide a 'tool
tip' offering extra information about that particular widget. There's also a 'Learn More' link, with direct access to other areas of this guide offering
specialist help on each widget.
Enabling and disabling widgets
To enable a widget, simply click on the menu option on the widget menu bar. Once a widget is enabled, it's menu option will be greyed slightly.
However, clicking the menu option again will bring that widget in front of any others that may be open. Here's an example using the Customer
widget:
Customer widget NOT enabled
In this image, the customer widget is not greyed out, and therefore not visible on the screen. Clicking the
menu option will enable the widget.
Customer widget enabled
In this second image, the customer widget has already been enabled, so the menu option is greyed out.
Clicking the menu option will bring the widget to the front of any other widgets.
Repositioning widgets
Once you have opened a selection of widgets, you may wish to move them around the screen to allow better access to planner and calendar space,
or just for personal preference. This is easy to do, and works in the same way as you'd move a window around in Windows or Mac OSX.
intersalon
Intersalon . 7
1.
2.
3.
Start by opening a widget. In this case we're using the 'Single/Linked Treatment Search' widget.
Move the mouse to the top grey title bar on the widget. You'll notice the mouse point changes to the movement pointer. Click and hold the
mouse button down.
Once you are happy with the new location, release the mouse button, and the widget will remain in it's new position. Intersalon will
remember the location of widgets, even after closing them.
Usually customers decide upon a set up that suits their business fairly quickly, and Intersalon remembers this set up on a computer basis. This ensures
the planner and home screen are fully customisable for individual computers, tablets and smartphones.
See also
About the home screen
Creating Stylists and Services
Adding appointments
Checking out an appointment
Linked services
Retrieving sales information
Sales tax options
Running reports
Cashing Up
Stock control
Integrating online booking within your existing website
Setting stylist/therapist working patterns
Making a series of recurring appointments
Understanding styling rates
Order payment method and status
Managing resources
What do the various icons mean around Intersalon?
Can't find the answers you're looking for?
●
●
●
●
Contact our support team on 01909 512131.
Email [email protected] and we'll personally get back to you as quickly as we can.
Check out our Support Portal, available 24/7 at intersalon.zendesk.com.
Or let us know by leaving a comment below:
intersalon
8 . Intersalon
Home > Intersalon > Fundamentals > Introducing Intersalon Widgets > Navigator
Navigator
During the day to day running of your business you'll probably find you generally stay on the Appointment Planner/Home Screen area
within Intersalon. However, for some administration duties and other advanced tasks, you'll need to use the Navigator.
The navigator 'widget' enables access to these additional areas within Intersalon. Lets enable the navigator by clicking the icon shown
below. You'll find it in the main icon bar at the top of every screen.
Once you've clicked this icon, you'll be presented with the Navigator.
Intersalon Tip
If you click on any any menu option on the widget tool bar and it's already open, Intersalon will bring the selected
widget to the front of any other open widgets. This is a quick way of locating the widget you wish to view.
The navigator shows a list of menu options as shown below.
To move around the Intersalon system, simply click the appropriate menu option. Here's a quick rundown of what you can expect to
find behind each option:
Administration
Setup salon users and their roles. View event history for the
salon and website. Configure each of terminals where the
system is to be accessed from.
Appointments
Manage the salon appointment diary. Use the planner to add
appointments and move them from stylist to stylist using the
drag and drop features.
Customers
Create and edit customer details. View customer appointment
history, notes and product sales. Use the post code lookup to
easily get the customers address.
ECommerce
Configure how salon products are sold online via the website.
Automatically schedule email responses and add any custom
payment and shipping methods.
intersalon
Intersalon . 9
Social Networking
Setup your social networking accounts to allow Intersalon to
communicate with your clients.
Newsletters
Create email newsletters and the subscribers. Check the email
queue and resend or delete failed emails.
Stylists and Services
Create the salons stylists, services, styling rates and resources.
Add stylist groups to take advantage of multi salon mode.
Reports
Run reports to view the performance of the salon, the stylists
and how well the website is working for online sales.
Retail
Run reports to view the performance of the salon, the stylists
and how well the website is working for online sales.
Settings
Setup the basic operation of the salon. How the salon diary
looks and functions and the how online booking works.
SMS Text Messages
Create message templates for appointment reminders and then
set the delivery schedule. Use mailshots to send marketing
messages to salon customers.
Once you've selected a menu option from the navigator, you'll usually be presented with a list of horizontal tabs. Click on each tab to
jump to that section. Here's an example:
You can return to the Planner home screen at any point by pressing the Home icon in the top menu bar. It's the first option on the
left, as seen here:
See also
Clock
Open Tickets
Closed Tickets
Customer Selection
Single service/Linked Service
Multi Service Search
New Customer
intersalon
10 . Intersalon
Cash Register Tools
Quick Reports
Quick Charts
Quick Sale
Can't find the answers you're looking for?
●
Contact our support team on 01909 512131.
Email [email protected] and we'll personally get back to you as quickly as we can.
●
Check out our Support Portal, available 24/7 at intersalon.zendesk.com.
●
Or let us know by leaving a comment below:
●
intersalon
Intersalon . 11
Home > Intersalon > Fundamentals > Introducing Intersalon Widgets > Clock
Clock
The Date and Time widget, as it's name suggests simply displays the current date and time based on the set timezone. The
timezone defaults to GMT/BST but can be modfied from within the Settings area of Intersalon. You can access this from the
Intersalon Navigator widget.
You can also adjust the date format if required.
Its generally useful to have the Date and Time widget on display, usually positioned in a corner of the screen. This prevents
obstruction of the system, but allows at-a-glance date and time checks when using Intersalon.
See also
Navigator
Open Tickets
Closed Tickets
Customer Selection
Single service/Linked Service
Multi Service Search
New Customer
Cash Register Tools
Quick Reports
Quick Charts
Quick Sale
Can't find the answers you're looking for?
●
●
●
●
Contact our support team on 01909 512131.
Email [email protected] and we'll personally get back to you as quickly as we can.
Check out our Support Portal, available 24/7 at intersalon.zendesk.com.
Or let us know by leaving a comment below:
intersalon
12 . Intersalon
Home > Intersalon > Fundamentals > Introducing Intersalon Widgets > Open Tickets
Open Tickets
Open Tickets can be defined as any appointment marked customer 'arrived', but not checked out. Future appointments are also
'Open Tickets'. The Open Ticket widget lists these open tickets and offers suggestions on what action an Intersalon user should
take. Here's a few examples:
●
A future appointment will offer the option to mark a customer as 'Arrived'
●
An appointment which as been marked as 'Arrived' will show an option to 'Checkout' that appointment.
●
If an appointment as NOT been marked as 'Arrived' after 30 minutes have passed from the end of the appointment, a user
can mark this as a 'No Show'.
Changes made in the Open Tickets widget will be reflected immediately in the planner and appointment list views. Checking out an
appointment in the Open Tickets widget will move this ticket/appointment to the Closed Tickets widget.
Daily duty
Checking the Open Tickets widget at the end of the day is a useful way of ensuring all appointments have been
actioned. If an appointment has been missed the Open Tickets widget will suggest the best course of action. At the
end of each day, there should be no open tickets listed.
See also
Navigator
Clock
Closed Tickets
Customer Selection
Single service/Linked Service
Multi Service Search
New Customer
Cash Register Tools
Quick Reports
Quick Charts
Quick Sale
Can't find the answers you're looking for?
●
●
●
●
intersalon
Contact our support team on 01909 512131.
Email [email protected] and we'll personally get back to you as quickly as we can.
Check out our Support Portal, available 24/7 at intersalon.zendesk.com.
Or let us know by leaving a comment below:
Intersalon . 13
Home > Intersalon > Fundamentals > Introducing Intersalon Widgets > Closed Tickets
Closed Tickets
The Closed Tickets widget shows all completed and checked out appointments for the day. Appointments manually marked as
'Complete' on the appointment planner are also listed. Each ticket listed also displays either the clients next appointment date, or in
lieu of this, a 'Rebook' button. The rebook button allows an Intersalon user to pre-populate the Single/Multi Service Search widget
with the correct data. If the widget is not visible, it can be enabled from the Intersalon Navigator widget.
Although the rebook button will pre-populate this information, it can also be edited as required by the customer or salon. It should
be noted that this widget will only attempt to rebook a specific single or linked service. For example, it will not automatically rebook all
of a customers other appointments on the same day.
The Closed Tickets widget is usually used in conjunction with the Open Tickets widget, which shows appointments that haven't yet
been checked out
Intersalon Tip
The Closed Tickets widget is also useful for checking a client's next appointment date. If they don't have one, the
system will offer an automatic 'Rebook' option. Ensuring each customer has a future booking will help to ensure repeat
intersalon
14 . Intersalon
custom.
See also
Navigator
Clock
Open Tickets
Customer Selection
Single service/Linked Service
Multi Service Search
New Customer
Cash Register Tools
Quick Reports
Quick Charts
Quick Sale
Can't find the answers you're looking for?
●
Contact our support team on 01909 512131.
Email [email protected] and we'll personally get back to you as quickly as we can.
Check out our Support Portal, available 24/7 at intersalon.zendesk.com.
●
Or let us know by leaving a comment below:
●
●
intersalon
Intersalon . 15
Home > Intersalon > Fundamentals > Introducing Intersalon Widgets > Customer Selection
Customer Selection
The customer selection widget allows a user to search the client database directly from the planner. When adding an appointment, it
also allows selection of a customer.
The customer selection widget is a mini-grid layout of your client database. From here you can search, sort, customise columns and
select clients in much the same way as the main Clients area.
To find a specific client or clients, just type in the textboxes immediately below the column headers.
You can add and remove columns from the table depending on what information you wish to display when selecting a customer.
Shown below is how to add and remove columns from the grid, if you click the 'customise columns' button you will be given the
screen below.
Column headers can be dragged and dropped between the table and the field chooser. You can also add your custom fields
You may also wish to order the customer list. To do this, click a column header and the data will be sorted in assending order. Click
again for decending order.
intersalon
16 . Intersalon
See also
Navigator
Clock
Open Tickets
Closed Tickets
Single service/Linked Service
Multi Service Search
New Customer
Cash Register Tools
Quick Reports
Quick Charts
Quick Sale
Can't find the answers you're looking for?
●
●
●
●
intersalon
Contact our support team on 01909 512131.
Email [email protected] and we'll personally get back to you as quickly as we can.
Check out our Support Portal, available 24/7 at intersalon.zendesk.com.
Or let us know by leaving a comment below:
Intersalon . 17
Home > Intersalon > Fundamentals > Introducing Intersalon Widgets > Single service/Linked Service
Single service/Linked Service
There are a number of ways to add appointments to your Intersalon planner. In this document, we'll be looking at the Single
service/Linked service search widget method. You can find more information on adding appointments by clicking here.
Single appointment search widget
A more advanced option for adding appointments is via the Single appointment search widget. Find the widget in the top widget
menu bar.
Click to enable this widget.
The single/linked service search is most suitable for hair salons as these business are most likely to deal in single appointments with
customers. Hair salons are also more likely to use 'bookback' or linked services such as a colour and cut. Beauty studios and spas may
find the Multi Service Search more beneficial to their business needs.
1.
2.
3.
4.
5.
Firstly select a client. A drop down list of clients will appear when this textbox is selected. You can also type the first few
characters of a client's name to filter the list.
If a client has a preference, choose a stylist.
Once a stylist is selected, choose the first service. and the second if required.
For each service, you can assign a resource. If 'Automatic resource allocation' is turned on, you'll need to select a resource,
and 'None' will not be permitted. The system will also default to the first valid resource for the selected service. This can be
modified if required. If 'Automatic resource allocation' is not enabled, you'll be able to select 'None' as an option here.
Finally, select a date, day period and click 'find availability' Day period options are 'All Day', 'Morning' and 'Afternoon'
intersalon
18 . Intersalon
6.
When the results are shown you can choose to jump to the next or previous day should a suitable appointment time not be
7.
found.
Click select on the timeslot the client wishes to book and the appointment will be added into the planner..
See also
Navigator
Clock
Open Tickets
Closed Tickets
Customer Selection
Multi Service Search
New Customer
Cash Register Tools
Quick Reports
Quick Charts
Quick Sale
Can't find the answers you're looking for?
●
●
●
●
intersalon
Contact our support team on 01909 512131.
Email [email protected] and we'll personally get back to you as quickly as we can.
Check out our Support Portal, available 24/7 at intersalon.zendesk.com.
Or let us know by leaving a comment below:
Intersalon . 19
Home > Intersalon > Fundamentals > Introducing Intersalon Widgets > Multi Service Search
Multi-Service Booking
There are a number of ways to add appointments to your Intersalon planner. In this document, we'll be looking at the Multi service
search widget method. You can find more information on adding appointments by clicking here.
This widget is usually more suitable to beauty salon or studios, where a customer is more likely to book multiple appointments at the
same time. However, many of our hair salon users also see benefits. The multi appointment search widget is accessed in much the
same way as the single appointment search widget - from the widget menu bar.
Clicking on this menu option will enable the widget.
By filling in the relevant details, you'll get availability displayed in much the same way as the previous widget. It's important to note
that you will need to select the services in the orderyou wish to book them in. You'll see the service order under the heading
'Selected services / search order:'.
intersalon
20 . Intersalon
Press the 'Book' button to add the appointments to the planner.
See also
Navigator
Clock
Open Tickets
Closed Tickets
Customer Selection
Single service/Linked Service
New Customer
Cash Register Tools
Quick Reports
Quick Charts
Quick Sale
Can't find the answers you're looking for?
●
●
●
●
intersalon
Contact our support team on 01909 512131.
Email [email protected] and we'll personally get back to you as quickly as we can.
Check out our Support Portal, available 24/7 at intersalon.zendesk.com.
Or let us know by leaving a comment below:
Intersalon . 21
Home > Intersalon > Fundamentals > Introducing Intersalon Widgets > New Customer
New Customer
The Quick Customer Add widget allows you to create a new client this is useful when a new customer visits the salon and wishes to
book an appointment.
Fill out the new clients' details and click 'Add customer' they will be saved to the system.
❍
❍
❍
❍
❍
First & last name: These are required fields
When you have finished, click 'Add customer'and the new entry will be saved
and are marked with an asterisk *, the
and the new customer will be selected for the next appointment.
required fields can be altered in
settings>system settings>new customer
required fields and modify the check boxes.
Phone Numbers: At least one phone
number from the client is reccomended to
ensure it is possible to reach the client if
needed.
Email: If an email in provided the client will
be eligible to recieve the salon newsletter if
provided.
Birthday: This feature is used when SMS
messages are sent, e.g. send an SMS to
every client with their birthday within the
month offering a store discount or
promotions.
Subscriptions: Clients can be subscribed to
SMS features and various salon newsletters
depending on how you use these features.
See also
Navigator
Clock
Open Tickets
intersalon
22 . Intersalon
Closed Tickets
Customer Selection
Single service/Linked Service
Multi Service Search
Cash Register Tools
Quick Reports
Quick Charts
Quick Sale
Can't find the answers you're looking for?
●
Contact our support team on 01909 512131.
Email [email protected] and we'll personally get back to you as quickly as we can.
●
Check out our Support Portal, available 24/7 at intersalon.zendesk.com.
●
Or let us know by leaving a comment below:
●
intersalon
Intersalon . 23
Home > Intersalon > Fundamentals > Introducing Intersalon Widgets > Cash Register Tools
Cash Register Tools
The Cash Register widget is used for monitoring, adding and removing funds in the till.
Here's an example of removing some petty cash from the till and how you would record it using the system.
You would enter the amount to be removed and a reason why cash has been taken out.
Once the cash is removed a reciept will prompt to print and a preview will be shown like the one below.
intersalon
24 . Intersalon
Another feature of the cash register widget is cashing up usually done at the end of the day when you empty the till, and check the
balance with the one shown within the system.
When you choose to 'Cash Up', the totals will be reset to zero and you will be given the option to print a summary of the tills
contents which can be useful for many things. such as organising accounts and keeping track of how well the salon is doing.
Once you have removed all cash from the till you may want to add float for use as change for the first few sales the next day.
To add float simply click the button and enter the amount and a reason just like the petty cash feature except in the opposite
direction.
See also
Navigator
Clock
Open Tickets
Closed Tickets
Customer Selection
Single service/Linked Service
Multi Service Search
New Customer
Quick Reports
Quick Charts
Quick Sale
Can't find the answers you're looking for?
intersalon
Intersalon . 25
●
●
●
●
Contact our support team on 01909 512131.
Email [email protected] and we'll personally get back to you as quickly as we can.
Check out our Support Portal, available 24/7 at intersalon.zendesk.com.
Or let us know by leaving a comment below:
intersalon
26 . Intersalon
Home > Intersalon > Fundamentals > Introducing Intersalon Widgets > Quick Reports
Quick Reports
The Quick Reports widget provides easy access to frequently requested reports, daily sales, stylist's appointments and inventory.
Unlike the main reporting module there are no special security permissions required to run these reports.
The reports are run by clicking on the icon in the report toolbar. Before the report will output any data the user must complete the
parameters and click the 'Update' button.
If required the report can be printed by cllicking on the print icon, highlighted in the screenshot below.
See also
Navigator
Clock
Open Tickets
Closed Tickets
Customer Selection
Single service/Linked Service
Multi Service Search
New Customer
Cash Register Tools
Quick Charts
Quick Sale
Can't find the answers you're looking for?
●
●
intersalon
Contact our support team on 01909 512131.
Email [email protected] and we'll personally get back to you as quickly as we can.
Intersalon . 27
●
Check out our Support Portal, available 24/7 at intersalon.zendesk.com.
●
Or let us know by leaving a comment below:
intersalon
28 . Intersalon
Home > Intersalon > Fundamentals > Introducing Intersalon Widgets > Quick Charts
Quick Charts
The Quick Charts widget allows you to access Key Performance Indicators (KPI's) direct from the home screen. A KPI is a simple data
summary that measures the performance of one key aspect of everyday salon activity. The Intersalon collection of KPI's should; at a
glance, give the salon owner/manager an overview of how well the salon is performing.
The KPI's can be viewed for various periods; week, month and year.
KPI 1 - Bookings - Up or Down
The simplest way to see how your salon business is performing is to look at whether you're bookings are up or down. The
percentage figure displayed is compared against the previous period. An increase in bookings is showed above the line in green and a
reduction in booking is displayed as a negative number, red and below the line.
KPI 2 - Client Retention
Intersalon measures client retention by firstly getting a count of all the customers that had an appointment in a 3 month period
starting 6 months from the current date and then checking how many of these customers have revisited in the last 3 months.
Writing that in words is harder than understanding the logic behind it.
A client retention greater than 75% represents excellent performance and you can rest assured that your staff are doing a good job
and your clients are satsified with your products and service. Typically most salons run a client retention level between 55% and 75%
and this is an acceptable level which requires no immediate action by the salon owner/manager.
If your client retention is low then it could be that a new salon has opened up in the area and some of your clients are trying it out.
Alternatively maybe some of your stylists are doing work outside the salon, this is more of a concern and something that would need
addressing.
Intersalon provides Email and SMS mailshots which can be targetted at clients that have not re-visited during the retention period and
both provide powerful tools to enable you to improve your client retention.
KPI 3 - No Shows
intersalon
Intersalon . 29
No shows are the pain of every salon owners life, cositng both time and money. We think it's such an important an issue that we've
included it as one of our Key Performance Indicators (KPI) on the salon's dashboard.
The dashboard lets you see how no shows are impacting on your bottom line and allows you to select the period over over which
the number and total costs are accumulated.
KPI 4 - New Customer Count
The new customers KPI simply shows the number of new customers through a salon's doors in the selected time frame
See also
Navigator
Clock
Open Tickets
Closed Tickets
Customer Selection
Single service/Linked Service
Multi Service Search
New Customer
Cash Register Tools
Quick Reports
Quick Sale
Can't find the answers you're looking for?
●
●
●
●
Contact our support team on 01909 512131.
Email [email protected] and we'll personally get back to you as quickly as we can.
Check out our Support Portal, available 24/7 at intersalon.zendesk.com.
Or let us know by leaving a comment below:
intersalon
30 . Intersalon
Home > Intersalon > Fundamentals > Introducing Intersalon Widgets > Quick Sale
Quick Sale
The quick sale widget allows a user to quickly checkout a customer without leaving the planner. It's especially useful for product
purchases and improves processes for your business and customers.
As with the checkout process, creating a new sale using the quick sale widget is a 3 step process:
1. Select a customer
2. Add appointments, products or adhoc services
3. Apply any discounts, allocate commission and take payment
An added feature not available as part of the checkout process is the ability to select a 'Walk In' customer.
Step 1 - Select a Customer
The customer grid provides a view of all the salon's customers. By clicking on a column header the customer list can be sorted, by typing
into the 'filter row' the customer list can be filtered and using the 'Customise Columns' button the fields displayed in the grid can be
customised. For more information about using the Intersalon grid please follow this link.
Once the customer has been found or a 'Walk-In' selected, you can step on by clicking the 'Next' button.
Step 2 - Add Items
Once the customer is known Intersalon will automatically search for any un-completed appointments that customer might have and add
them to their shopping cart.
intersalon
Intersalon . 31
Add Appointments
The 'Add Appointments' button will open a pop up screen where any other uncompleted appointments can be added to the shopping
cart.This feature is particularly useful when one customer is paying for another customers service e.g. for merging the bills for a family.
Add Products
The 'Add Products' button will open a pop up screen where products can be added to the shopping cart. These products can be either
'Retail' products or 'Stock' products. If a Stock product is added then the customer is not charged and the product will not sho on their
receipt but the available items will be ammended accordingly.
If a bar code scanner is being used then searching for a product is easy, simply scan the bar code and grid will apply a filter using the
product number to search for the product. If the product is found click the 'Add' button and product will be added to the shopping cart
and the filter reset so the grid now shows all products again.
intersalon
32 . Intersalon
Adding and Redeeming Vouchers
Any products that are marked a a 'voucher' will provide an additional button in the product list. The 'Redeem' button will add a product
to the sale but will deduct the value of the voucher from the sale total.
Add Service
In some walk-in situations the customer the appointment might not exist in the salon diary. The 'Add Service' button provides an easy
way to quickly select the correct price for a service. The button will open a pop up window where the user can search for the service
using the stylist/therapist and the service group.
If a mistake is made any item can be removed from the shopping card by clicking the 'Remove' button the shopping cart content.
If the customer has a discount coupon the user can enter the coupon code at this step. The system will check the validity of the coupon
and adjust the bill as required.
intersalon
Intersalon . 33
Ad-hoc Price Change
Once an appointment, product or service has been added to the bill the selling price is displayed along with any sales tax that needs to
be applied. A price adjustment can be achieved by clicking the 'Edit' button on the line item. Any price adjustments are applied to the
product for this purchase only and will not affect the base price for the item for future purchases.
Step 3 - Apply Discounts, Commission & Take Payment
The final step is the sales process it to review the sale, apply any discounts and take payment.
Applying Discounts
Discounts can be applied by clicking the 'Discount' button. Discounts can applied as a percentage or a fixed discount and applied to
products, service or all items in the bill. Discounts can be restricted to authorised staff by assigning a 'PIN' number in the 'System
Settings'.
intersalon
34 . Intersalon
Loyality Discounts
If the loyalty options has been enabled, discounts can be applied by using the some of the client's accumulated loyalty points by clicking
on the 'Loyalty' button. All or part of the customers loyalty point value can be used against the bill. The loyalty points used will be
removed from the clients accumulated loyalty points.
intersalon
Intersalon . 35
Assigning Commission
Commission is assigned automatically to the stylist/therapist for service based sale items but for the products the commission needs to be
assigned manually. If there product items in the sale then the 'Commission' button will be available for the user to click. The 'Assign
Commission' pop up screen allows you to index through each of the products in the sale and select which stylist/therapist should receive
the commission, the 'Skip Item' button allows the user to not allocate commission to the product if required. When all products have
been assigned then a message is displayed and the screen can be closed.
Payment Methods
Intersalon supports a number of different payment methods. The table below details whether if the method allows deposit payments and
whether loyalty points are added to the customers account.
Method
Cash
Card
Cheque
Cash / Card
No Payment
Deposit
Yes
Yes
No
No
No
Add Loyalty
Yes
Yes
Yes
Yes
No
intersalon
36 . Intersalon
Completing the Sale & Printing a Receipt
Pressing 'Complete & Print' will add the sale and optionally print a receipt. A 'Completed' image will be displayed as confirmation that
the sale has been succesfully added. A receipt wil be opened in a new window so ensure that your browser is not set to block pop ups.
The 'Enable Receipt Printing' option can be found in the 'System Settings' section.
Note: If the sale has been created during the checkout process the 'Completed' image is not displayed and instead the broweser is
returned the system 'Home' screen.
See also
Navigator
Clock
Open Tickets
Closed Tickets
Customer Selection
Single service/Linked Service
Multi Service Search
New Customer
Cash Register Tools
Quick Reports
Quick Charts
Can't find the answers you're looking for?
●
●
●
●
Contact our support team on 01909 512131.
Email [email protected] and we'll personally get back to you as quickly as we can.
Check out our Support Portal, available 24/7 at intersalon.zendesk.com.
Or let us know by leaving a comment below:
intersalon
Intersalon . 37
Home > Intersalon > Fundamentals > Creating Stylists and Services
Managing Staff and Services
The setup wizard will assist you in adding your first stylist/therapist and at your first treatment as part of the initial logon. Having these pre-loaded into the
system ensures you can experience how Intersalon presents the services and manages the stylist/therapist's salon diary. However, to put Intersalon 'live' in
the salon then the 'Stylists and Services' section in Intersalon will certainly need some expansion.
Understanding the purpose of each of the different Entities
The 'Stylist and Services' module in Intersalon is broken down into the following entities.
●
Stylists
Services
●
Styling Rates
●
Service Groups
●
Salon Roles
Stylist Groups
Resources
●
●
●
Stylists or Therapists
Each of the employees who works in the salon should be added as a 'Stylist or Therapist', even if you don't want them to appear in the salon diary. This
is because when allocating commission Intersalon will present a list of all the 'Stylists' so if they don't exist then they can't get any commission on product
sales.
When creating a stylist you can set the following fields:
❍
❍
❍
❍
❍
❍
❍
❍
❍
❍
❍
❍
First and last name: Both these will be included on online booking pages and on the treatment description on receipts.
Role: The role is displayed on stylist/therapist website pages and can be useful when checking styling rate prices.
Planner Order Priority: This number changes the position of the stylist/therapist in the diary.
Stylist group: Employee's can be placed in groups either by discipline e.g. hair, beauty etc or for multi-salon systems by location. The group allows the
stylists displayed in the salon diary to be quickly filtered and can be useful on the website for segmented the online booking options.
Photo: Upload a photo if you want to improve the appearance of the salon diary.File extensions supported include jpg, jpeg, gif and png, Intersalon will
resize the imageto fit in the salon diary header.
Enabled Online: This option controls whether the stylist/therapist will appear in online booking options.
Enabled: Check this box if the product is currently on sale, un-check it if a product is out of stock or been discontinued.
Show Planner: Whether the employee appears in the salon diary.
No Longer Works At The Salon: You can set this option if a stylist/therapist leaves the salon but you want to retain their history of appointments. If you
'Delete' a stylist then their appointment history will be lost.
Automaticaly Create Styling Rates: If you check this option then when the new stylist is saved Intersalon will create a 'Styling Rate' for all services. To
learn more about styling rates click here .
Web Description: An HTML description of the stylist or therapists qualifications, styles, like and dislikes that can be used on the website.
Commission Rates: The percentage commission received on 'Product' sales and 'Service' sales. To learn more about allocating commission please read
the 'Quick Sale Widget ' description.
Services
Service or treatments have the following fields:
❍
❍
❍
❍
❍
Service Name: A short name for the service, this name will appear in all the booking and search facilities in Intersalon and on the website.
Description: A full description for the service, this will only be used on the website treatment lists.
Duration: The duration of the service in minutes.
Base Price: The default service price, this can be adjusted on a stylist by stylist basis see 'Styling Rates' .
Service Group: When adding appointments in the salon diary or using the multi-service search widget or online to service group is to help users find
individual services quickly.
Styling Rates
Styling Rates are the association of a service to a stylist or therapist. Without this connection then the service will not be bookable for the stylist. To read
more about styling rates and custom pricing click here .
Service Groups
See above description in 'Services'.
Salon Role
intersalon
38 . Intersalon
The role is generally an information only field that an be useful on the website andwhen setting styling rates, see 'Stylists or Therapists' above.
Stylist Groups
See above description in 'Stylists and Therapists'.
Resources
Resources are normally treatment rooms but can be any other shared resource where the booking has to be controlled, see 'Managing Resources' .
See also
About the home screen
Introducing Intersalon Widgets
Adding appointments
Checking out an appointment
Linked services
Retrieving sales information
Sales tax options
Running reports
Cashing Up
Stock control
Integrating online booking within your existing website
Setting stylist/therapist working patterns
Making a series of recurring appointments
Understanding styling rates
Order payment method and status
Managing resources
What do the various icons mean around Intersalon?
Can't find the answers you're looking for?
●
●
●
●
Contact our support team on 01909 512131.
Email [email protected] and we'll personally get back to you as quickly as we can.
Check out our Support Portal, available 24/7 at intersalon.zendesk.com.
Or let us know by leaving a comment below:
intersalon
Intersalon . 39
Home > Intersalon > Fundamentals > Adding appointments
Adding appointments
Adding appointments with Intersalon is a simple process, but with extensive advanced options if required. There are three main options for adding
appointments:
●
Right-click menu on the planner.
●
Single/Linked Treatment Search widget.
●
Multi Treatment Search widget
Right-click menu
Perhaps the simplest way to add your first appointment is by interacting directly with the planner. Lets start by ensuring we have a customer
selected.
We need to select a client.
Click on the Customer Selection widget menu option
intersalon
40 . Intersalon
Use the 'Select' buttons to select the correct client.
At this point a client has been selected, and we're ready to add an appointment. Navigate to the correct date using the calendar in the planner
sidebar. Find the correct time period for this appointment start time, and right-click with the mouse.
The menu system works in stages. Start by clicking 'Add Appointment' and hover over a stylist group to see all services in that group. If a service is a
linked (or bookback) service, you'll see further menu options. Left click the required service, and the appointment is added to the planner.
Single appointment search widget
Find out more about this method by clicking here.
Multi appointment search widget
Find out more about this method by clicking here.
See also
About the home screen
Introducing Intersalon Widgets
Creating Stylists and Services
Checking out an appointment
Linked services
Retrieving sales information
Sales tax options
Running reports
intersalon
Intersalon . 41
Cashing Up
Stock control
Integrating online booking within your existing website
Setting stylist/therapist working patterns
Making a series of recurring appointments
Understanding styling rates
Order payment method and status
Managing resources
What do the various icons mean around Intersalon?
Can't find the answers you're looking for?
●
Contact our support team on 01909 512131.
Email [email protected] and we'll personally get back to you as quickly as we can.
●
Check out our Support Portal, available 24/7 at intersalon.zendesk.com.
●
Or let us know by leaving a comment below:
●
intersalon
42 . Intersalon
Home > Intersalon > Fundamentals > Checking out an appointment
Checking out an appointment
Checking out appointments is easy with Intersalon, with two main methods of starting the process.
1.
Find the specific appointment in the planner that you wish to check out. Right-click on the appointment to bring up the appointment menu.
The top option is marked 'Checkout' - click to start the process.
2.
Using the Open Tickets widget, you'll see action buttons for 'Arrived' and 'Checkout'. A customer must be marked as 'Arrived' for the
'Checkout button to be visible. To begin the process, just press the 'Checkout' button.
Step 1
From this point on, the checkout method is the same regardless of starting point. Step 1 of the checkout process will now be displayed.
intersalon
Intersalon . 43
Intersalon will automatically select the correct customer here, so a single click on either the 'Select' or 'Next' buttons will move onto the next step.
Step 2
Step 2 of the checkout process allows a user to review the shopping cart content, and add additional appointments, services and products. Adding
products is pretty self-explanatory, but its important to note the differences between services and appointments. Adding an appointment will allow a
client to pay for additional appointments - even for another client. This is useful if a parent wishes to checkout their childrens appointment at the
same time. Adding a service allows the Intersalon user to add generic services to a bill - even if such services have not been added as appointments in
the planner. This is useful for clients who have had 'on-the-fly' extra services during an appointment.
You also have the option to remove items from the shopping cart, and manually adjust prices.
To continue to the next step, press the 'Next' button.
Step 3
The final step allows a further confirmation of the shopping cart content, and a number of other options.
Two discounting options are available. Loyalty allows payment/discount by a client's loyalty points total. The discount button allows a salon manager,
or other staff member to offer a non-specific discount. This is useful for goodwill gestures and is the fastest discount method. This option can be
protected with a 4 digit pin code, allowing a manager to offer a discount, without the need to sign out and in with a manager account.
intersalon
44 . Intersalon
A payment method must be selected before checkout can be completed. Simply click on the valid icon. Each method requires a slightly different
process. Cash will ask for the tendered value, where Card will ask for the value being paid. This allows for partial payments by card.
Commission for appointments and services is automatically allocated, but products need to be assigned manually. You can do this by pressing the
'Assign commission' button.
Finally, press 'Complete and Print' to complete the process and, if enabled, print a receipt.
To read more about the checkout process and it's features, please visit the Quick Sale document.
See also
About the home screen
Introducing Intersalon Widgets
Creating Stylists and Services
Adding appointments
Linked services
Retrieving sales information
Sales tax options
Running reports
Cashing Up
Stock control
Integrating online booking within your existing website
Setting stylist/therapist working patterns
Making a series of recurring appointments
Understanding styling rates
Order payment method and status
Managing resources
What do the various icons mean around Intersalon?
Can't find the answers you're looking for?
●
●
●
●
Contact our support team on 01909 512131.
Email [email protected] and we'll personally get back to you as quickly as we can.
Check out our Support Portal, available 24/7 at intersalon.zendesk.com.
Or let us know by leaving a comment below:
intersalon
Intersalon . 45
Home > Intersalon > Fundamentals > Linked services
Linked services
Linked services are typically used in hair salons where a primary service such as a 'Colour' is usually followed by a second service e.g. 'Cut
and Finish'. Normally there is also some waiting time after the first service where the stylist is available for other customers.
The waiting time or processing time is called 'Bookback Duration' in Intersalon.
Linking Services
To create linked services then both services must already exisit, to learn how to configure a service click here. After both services have
been created then we can link them together. On the 'Services' page click the 'Link Services' toolbar button to display the link services
pop up screen.
The primary service (first service) and linked second service can be selected, the 'Book Back Duration' in minutes enterred and then
saved by clicking 'Add'. 'Linked Service Saved' will be displayed as a confirmation message and the 'Linked Services' grid updated to
show the linked second service.
There is no limit as to how many second services can be linked to a primary service and linking services doesn't mean the second service
cannot be booked without the primary service.
Using Linked Services
The table below details where llinked services can be used:
Feature
Single Service Search Widget
Multi Service Search Widget
Salon Diary
Default Online Booking (mobile)
Single Service Online Booking
Multi Service Online Booking
Support Linked Services Notes
Yes
No
Yes
No
Yes
No
Primary services are not displayed
Primary services are not displayed
Adding a Linked Service in the Salon Diary
intersalon
46 . Intersalon
To learn how to add appointments in the salon diary click here. The image below details how linked services appear on the services
menu. In this example we have two primary services, 'Colour Correction' and 'Mens Natural Glossing'. 'Mens Natural Glossing' is selected
and it has two second/linked services to choose from: 'gents cut' and 'Blow Dry'.
See also
About the home screen
Introducing Intersalon Widgets
Creating Stylists and Services
Adding appointments
Checking out an appointment
Retrieving sales information
Sales tax options
Running reports
Cashing Up
Stock control
Integrating online booking within your existing website
Setting stylist/therapist working patterns
Making a series of recurring appointments
Understanding styling rates
Order payment method and status
Managing resources
What do the various icons mean around Intersalon?
Can't find the answers you're looking for?
●
●
●
●
Contact our support team on 01909 512131.
Email [email protected] and we'll personally get back to you as quickly as we can.
Check out our Support Portal, available 24/7 at intersalon.zendesk.com.
Or let us know by leaving a comment below:
intersalon
Intersalon . 47
Home > Intersalon > Fundamentals > Retrieving sales information
Retrieving sales information
Getting sales information is vital for any business. Intersalon provides a number of widgets and data views that make it easy to get
sales information, some provide a simple snaphost with limited customisation while others are more powerful and allow the user to
drill-down into the detail.
Cash Register Widget
The 'Cash Register Widget' provides an summary of all POS (Point of Sale) transactions at a single workstation. It calculates a running
total as far back as the last 'Cashing Up' point.
Daily Sales Summary Report
The 'Daily Sales Summary' report gives a sales breakdown on a daily basis. The report allows the user to select the day and
provides a breakdown of sales for each of the different payment methods. The payment method and the status of the sale is used in
combination to determine whether the payment was actually received. To learn more about payment methods and order status
please click here.
The 'Daily Sales Summary' report can be accessed using the 'Quick Reports' widget. Like with all of the Intersalon widgets this is not
protected by the security system, this means any member of staff can run this report from the widget. The report can also be ran
from the 'Reports' module but the report module is restricted to users with the correct permissions so please check your security
configuration.
Order List
The 'Orders List' provides a list of all the transactions that have been completed, either using the POS system or online through the
website. Unlike the 'Cash Register Widget' or the 'Daily Sales Summary Report' the order list shows all orders irrespective of
where they were created, the payment method or their status. To learn more about payment methods and status please click here .
The user can customise the columns and filter the data using the order list grid to get the required information. To learn more about
using the grids in Intersalon please click here .
See also
About the home screen
Introducing Intersalon Widgets
Creating Stylists and Services
Adding appointments
Checking out an appointment
Linked services
Sales tax options
Running reports
Cashing Up
Stock control
Integrating online booking within your existing website
Setting stylist/therapist working patterns
Making a series of recurring appointments
Understanding styling rates
Order payment method and status
Managing resources
What do the various icons mean around Intersalon?
Can't find the answers you're looking for?
●
●
●
●
Contact our support team on 01909 512131.
Email [email protected] and we'll personally get back to you as quickly as we can.
Check out our Support Portal, available 24/7 at intersalon.zendesk.com.
Or let us know by leaving a comment below:
intersalon
48 . Intersalon
Home > Intersalon > Fundamentals > Sales tax options
Sales tax options
VAT has changed in the new version of Intersalon. It's important to setup Intersalon correctly in order to produce accurate
reporting. The VAT setup screen can be found within the Settings area of Intersalon, under the Tax Options tab.
VAT Mode Selection
Intersalon can operate under 3 different VAT Tax modes.
1.
2.
Not registered for Sales Tax
Registered for Sales Tax and want to work exclusive of Tax
3.
Registered for Sales Tax and want to work inclusive of Tax
By default Intersalon runs in mode 1 - not registered for sales tax. No tax is calculated.
In mode 2, where products and services are priced exclusive of VAT requires a VAT registration number. This number is displayed on
receipts. When switching to this mode, existing products will have a VAT tax class added automatically. New products will also be
created with the VAT tax class added.
In mode 3, products and services are priced inclusive of VAT. No prices are adjusted, but VAT will be calculated on Intersalon
reports. This mode also required a VAT registration number.
Note
Intersalon keeps the VAT rate correct. Intersalon users do not need to update the VAT rate.
See also
About the home screen
Introducing Intersalon Widgets
Creating Stylists and Services
Adding appointments
Checking out an appointment
Linked services
Retrieving sales information
Running reports
Cashing Up
Stock control
Integrating online booking within your existing website
Setting stylist/therapist working patterns
Making a series of recurring appointments
intersalon
Intersalon . 49
Understanding styling rates
Order payment method and status
Managing resources
What do the various icons mean around Intersalon?
intersalon
50 . Intersalon
Home > Intersalon > Fundamentals > Running reports
Running reports
Reporting in Intersalon comes in two flavours. We have the most popular options available directly from the Planner screen, and a large
number of extra reports in the main Reports area of Intersalon.
Quick Reports
You can find out more about the Quick Reports widget by clicking here.
Intersalon Reports
Open the Intersalon Navigator widget and select the Reports menu option.
A number of reports are available in Intersalon, and we regularly add new ones based on customer requests and feedback.
intersalon
Intersalon . 51
Most reports take a common standard format.
There is a parameter area where you can set variables such as dates, specific stylists and services etc, In the screenshot below this is
'Available items less than'
Below is the 'Update' button which you must click each time you change the parameters to get the correct values.
There are also 'Save' and 'Print' buttons, the save button will store the results of the report and the print button will promp to print
the report.
Content is shown in a table style format, we have run an Inventory report to use as an example.
intersalon
52 . Intersalon
There are many different reports that you can run, the categorys include Sales, Stylists, Appointments, Customers and Services.
See also
About the home screen
Introducing Intersalon Widgets
Creating Stylists and Services
Adding appointments
Checking out an appointment
Linked services
Retrieving sales information
Sales tax options
Cashing Up
Stock control
Integrating online booking within your existing website
Setting stylist/therapist working patterns
Making a series of recurring appointments
Understanding styling rates
Order payment method and status
Managing resources
What do the various icons mean around Intersalon?
Can't find the answers you're looking for?
●
●
●
●
Contact our support team on 01909 512131.
Email [email protected] and we'll personally get back to you as quickly as we can.
Check out our Support Portal, available 24/7 at intersalon.zendesk.com.
Or let us know by leaving a comment below:
intersalon
Intersalon . 53
Home > Intersalon > Fundamentals > Cashing Up
Cashing Up
Intersalon keeps track of all the transactions that you make and totals up cash, card and cheque totals and allows you to reset these
and balance the till at the end of the day.
To perform an end of day Cash Up within intersalon, open up the 'Cash Register Tools' Widget click here to learn more.
You will be shown the amount of Cash taken, the number of Cheques taken and the amount of Card transactions plus the amount
taken since the last Cash Up.
Click the 'Cash Up' button, you will be asked to confirm this operation and the totals will be reset.
A receipt will be generated and prompt to print.
The reciept will show the Date & Time the cash up occured, the total cash, amount of Cheques and total value, the amount of Card
transactions and total value and the Grand total (total income).
Once the Cash Up is complete, the totals on the Cash register widget will be reset to 0.00, it may be useful to add float back into
the till for the following day to learn how to Add float click here.
See also
About the home screen
Introducing Intersalon Widgets
intersalon
54 . Intersalon
Creating Stylists and Services
Adding appointments
Checking out an appointment
Linked services
Retrieving sales information
Sales tax options
Running reports
Stock control
Integrating online booking within your existing website
Setting stylist/therapist working patterns
Making a series of recurring appointments
Understanding styling rates
Order payment method and status
Managing resources
What do the various icons mean around Intersalon?
Can't find the answers you're looking for?
●
●
●
●
intersalon
Contact our support team on 01909 512131.
Email [email protected] and we'll personally get back to you as quickly as we can.
Check out our Support Portal, available 24/7 at intersalon.zendesk.com.
Or let us know by leaving a comment below:
Intersalon . 55
Home > Intersalon > Fundamentals > Stock control
Stock control
Retail and Stock Products
Stock is the management of products you sell i.e. 'Retail' products and products that are use in the treatment process i.e. 'Stock'
products. Both types of product are defined in a similiar manner but behave differently within Intersalon.
Creation and management of all products is done using the 'Retail' module which can be accessed by the 'Navigator Widget' .
Creating a Product
To add a new product, navigate to the 'Retail' module, select the 'Products' tab and then click on the 'New' button in the toolbar to
open the new product page.
❍
❍
❍
❍
❍
❍
❍
❍
❍
❍
❍
❍
Product Name: Write the product name so
that it is easily identified.
Price: The product price, this could be the
selling price of the product or the Nett price
depending on how the tax options have
been configured.
Stock Code: Manufacturer code, for reordering, the code to be given to the
supplier.
Product Number: This would be the barcode
number of the product, if you have a
barcode scanner, scan in the product
number. This should always be unique.
RRP: The Recommended Retail Price from
the manufacturer. This is for information
only.
Whole sale price: The price of this item when
sold in bulk. This is for information only.
Enabled: Check this box if the product is
currently on sale, un-check it if a product is
out of stock or been discontinued.
Is Voucher: check this box if the product is a
store voucher, click here to learn more
Available Items: The number of items in
stock.
Minimum stock level: When stock reaches
this level new stock should be reordered.
Manufacturer: The company that
manufactures or supplies the product, a new
one can be added by clicking 'add new'.
Internal status: Whether the item is classified
as Retail or Stock.
When you have saved the product you will be presented with extra web option fields where you can specify package size & weight
options and the immediate availability of the product can be added if the product is going to be available online.
Using Products
Both types of product i.e. Retail and Stock should be added to the customers bill at the second step of the POS (Point of Sale)
checkout process . If the product is 'Stock' then the customer will not be charged and the item will not appear on the receipt.
When the sale is completed then Intersalon will reduce the 'Available Items' field for the product. If the product is sold online then
the 'Available Items' is adjusted at the last step of the online checkout process.
Checking Stock Levels
intersalon
56 . Intersalon
Intersalon currently provides two methods for checking stock levels. The first is to use the filters on the 'Product List' to select only
those items where 'Available Items' is less than the 'Minimum Stock Level'. The 'Reorder' column in the 'Product List' does the
calculation and provides a simple checkbox that can be used to filter to find only those items that need re-ordering.
The second method is to use the 'Inventory' which can be accessed from the 'Quick Reports Widget' or from the 'Report Module' .
Updating Stock Levels
To update stock levels, locate the product in the 'Product List' and click the edit button
the new re-stocked amount and 'Save'.
See also
About the home screen
Introducing Intersalon Widgets
Creating Stylists and Services
Adding appointments
Checking out an appointment
Linked services
Retrieving sales information
Sales tax options
Running reports
Cashing Up
Integrating online booking within your existing website
intersalon
, update the 'Available items' to
Intersalon . 57
Setting stylist/therapist working patterns
Making a series of recurring appointments
Understanding styling rates
Order payment method and status
Managing resources
What do the various icons mean around Intersalon?
Can't find the answers you're looking for?
●
●
●
●
Contact our support team on 01909 512131.
Email [email protected] and we'll personally get back to you as quickly as we can.
Check out our Support Portal, available 24/7 at intersalon.zendesk.com.
Or let us know by leaving a comment below:
intersalon
58 . Intersalon
Home > Intersalon > Fundamentals > Integrating online booking within your existing website
Integrating online booking within your existing website
You can integrate your Intersalon online booking system with an existing external website using an iFrame. This is a quick and simple
solution which allows our clients to keep an existing website, but still gain from the benefits an Intersalon online booking system
provides.
iFrames allow a second website to sit within the frame of another. So while your website doesn't move, a single page with an iFrame
included allows the online booking system from Intersalon to appear within it. You can learn more about iFrames by visiting the
W3Schools website.
You will need access to your website control panel and preferably basic knowledge of HTML in order to use this method.
The following HTML code needs to be added to your website.
<iframe width="100%" height="415px" frameborder="0" scolling="NO" src="http://base.intersalon.co.uk?
iframe=true">
<p>Your browser does not support iframes.</p>
</iframe>
Please make sure you replace 'http://base.intersalon.co.uk' with your correct Intersalon website address. It's also important to ensure
the 'src' section ends with iframe=true which will remove your logo which appears on the mobile version of the booking page.
The image below shows how an iframe might look in your website. The iFrame is highlighted by the dashed, red area.
intersalon
Intersalon . 59
See also
About the home screen
Introducing Intersalon Widgets
Creating Stylists and Services
Adding appointments
Checking out an appointment
Linked services
Retrieving sales information
Sales tax options
Running reports
Cashing Up
Stock control
Setting stylist/therapist working patterns
Making a series of recurring appointments
Understanding styling rates
Order payment method and status
Managing resources
What do the various icons mean around Intersalon?
Can't find the answers you're looking for?
intersalon
60 . Intersalon
●
●
●
●
Contact our support team on 01909 512131.
Email [email protected] and we'll personally get back to you as quickly as we can.
Check out our Support Portal, available 24/7 at intersalon.zendesk.com.
Or let us know by leaving a comment below:
intersalon
Intersalon . 61
Home > Intersalon > Fundamentals > Setting stylist/therapist working patterns
Setting stylist/therapist working patterns
In many salon businesses, working patterns vary from stylist to stylist and from day to day. Because Intersalon is fully integrated into your website
online booking engine, it's important to ensure these patterns are accurate. This help document will examine a typical working week and detail how
best to enter this information into Intersalon.
Our typical salon:
●
The salon employs three stylists - Sergio, Mia and Leoni.
●
The salon is not open on a Sunday.
●
Normal working hours are 9:00 am to 6:00pm, with late opening on Friday till 9:00pm.
●
Sergio is still training and visits college on Monday. He also starts at 10:00am on Thursdays
Mia works all week but finishes at lunchtime on Fridays
Leoni has Wednesday off and takes time out to do the accounts on Monday, usually between 12:00pm and 3:00pm
●
●
How do I set Intersalon up so that appointments can only be added
during working time?
Lets start by setting the earliest opening time and latest closing time during the working week. You will need to go to Settings --> Appointments
using the Intersalon Navigator widget.
Use the planner start and planner end settings to provide this information. On the same page, lets mark Sunday as a Non-working day. Press OK to
save these settings.
Let's create some planner events in order to block out time when a stylist is unavailable. These can be as generic or as specific as you require, and
there's no limit to the number of different planner events you can create. In this example, we've created planner events called 'Closed','Day
intersalon
62 . Intersalon
Off','Training' and 'Accounts'.
Here's the first day of our example salon's week.
You can see that we have blocked the planner with our events from 18:00 to 21:00. This is because the planner is set up to finish at 21:00 to
cope with Friday's late finish. Planner events are added to the planner in much the same way as an appointment would be created. Simply right-click
on an empty area of the planner, and choose 'Add other event' from the menu.
You'll also notice Sergio's time is blocked out for the entire day as he is training on Mondays.
The next two images give a view of the salon's planner on a tuesday. The closing time is 18:00 again and 'Leoni' does the accounts between 12:00
and 15:00.
intersalon
Intersalon . 63
Now lets take a look at Wednesday, when the salon again closes at 18:00pm and Leoni has the day off.
Here's Thursday, when Sergio has a late start at 10:00am.
intersalon
64 . Intersalon
Fridays' planner with late opening until 21:00, and Mia finishing at midday.
On Saturday, all stylists work through until 18:00pm.
intersalon
Intersalon . 65
Finally Sunday is a non-working day so the planner is blank.
Planner events can even be used with recurrency, which together provide a powerful way of automating staff working patterns.
See also
About the home screen
Introducing Intersalon Widgets
Creating Stylists and Services
Adding appointments
Checking out an appointment
Linked services
Retrieving sales information
Sales tax options
Running reports
Cashing Up
Stock control
Integrating online booking within your existing website
Making a series of recurring appointments
Understanding styling rates
Order payment method and status
Managing resources
What do the various icons mean around Intersalon?
Can't find the answers you're looking for?
●
●
●
●
Contact our support team on 01909 512131.
Email [email protected] and we'll personally get back to you as quickly as we can.
Check out our Support Portal, available 24/7 at intersalon.zendesk.com.
Or let us know by leaving a comment below:
intersalon
66 . Intersalon
Home > Intersalon > Fundamentals > Making a series of recurring appointments
Making a series of recurring appointments
All appointments and events supported by Intersalon can be simple (non-recurring) or recurring. Non-recurring appointments occur only once in a
specified time interval. Recurring appointments occur many times in the same time interval on different dates.
Recurring appointments are created as series of appointments, specified by the recurrence pattern and indicated with the
recurrence sign.
Recurrence Pattern
The recurrence pattern contains information on appointment recurrence (a start date and time of the recurrence series and a rule according to
which a series is repeated). You can create and edit the recurrence pattern of an appointment or event in the recurrency screen, by selecting the
Recurrence check box. The image below demonstrates how to select an appointment in the planner and then use the right click menu to access
the recurrency screen.
intersalon
Intersalon . 67
The image below demonstrates the common appearance of the recurrence screen.
In this screen you can specify all the required values of different elements to define the recurrence behavior. The base element of the recurrence
pattern is frequency. It specifies how often corresponding appointments will occur: Daily, Weekly, Monthly or Yearly.
In addition, for each of these frequency types you can define periodicity - the time interval in which the recurrence's frequency will be applied. For
instance, if you have defined that appointments occur Daily, you can also specify whether appointments repeat every several days or every week
day. For the Monthly appointment frequency, you can specify for how many weeks and on which week days an appointment will recur.
Also, you can specify when appointment recurrence must be stopped.
Exceptions
If an occurrence (appointment that belongs to a series of recurring appointments) has some of its properties modified, it is called an Exception.
Such appointments are marked with the
crossed recurrence sign.
You can delete one or several occurrences in the recurrence chain. Deleted occurrence is a kind of Exception for the recurrence pattern. They are
not visualized by the plannerl.
intersalon
68 . Intersalon
To replace an exception with a normal occurrence and discard all modifications, right-click the exception and click on the Restore Default State
item of the invoked menu.
Checking Out Recurrent Appointments
Appointments with a recurrency specification can be checked out in the normal manner. When the checkout process is complete Intersalon will
replace the current instance of the checked out appointment with a simple, non recurring appointment and then move the recurrency pattern
forward by specified recurrency period.
See also
About the home screen
Introducing Intersalon Widgets
Creating Stylists and Services
Adding appointments
Checking out an appointment
Linked services
Retrieving sales information
Sales tax options
Running reports
Cashing Up
Stock control
Integrating online booking within your existing website
Setting stylist/therapist working patterns
Understanding styling rates
Order payment method and status
Managing resources
What do the various icons mean around Intersalon?
Can't find the answers you're looking for?
●
Contact our support team on 01909 512131.
●
Email [email protected] and we'll personally get back to you as quickly as we can.
Check out our Support Portal, available 24/7 at intersalon.zendesk.com.
Or let us know by leaving a comment below:
●
●
intersalon
Intersalon . 69
Home > Intersalon > Fundamentals > Understanding styling rates
Understanding styling rates
Styling rates are the connection between a service/treatment and stylist/therapist. Styling rates are fundamental to Intersalon: all the appointment
search and adding features check for the existence of a styling rate as confirmation that the selected stylist or therapist does actually perform the
particular service or treatment.
When a styling rate is created, it normally inherits the base price of the service but this price can be adjusted so that each stylist/therapist can have
their own prices. Also, each styling rate can be selectively made available for online booking.
Note: If the price of a styling rate is set differently to the base price of the service then future adjustments to the base price of the
service will not apply to the styling rate.
Adding Styling Rates
Styling rates are normally created when the service is created. Once the basic settings of the service i.e. name, description, base price and duration
have been set and saved the styling rates grid will appear for the service. Selecting the 'checkbox' in the left hand column will create the styling
rate with the base price. If the 'Enable Online Booking' checkbox is checked is set then this will automaticaly enable online booking for the styling
rate. Un-selecting the checknox in the left hand column will delete the styling rate.
Use the 'Edit' button on the styling rate to change the price or online booking option.
Manipulating Styling Rates
The 'Styling Rates' tab on the 'Stylist and Services' section lists all styling rates. This list is useful for checking that the pricing has been set correctly
for each of the services or stylist/therapist role.
Other functions on the styling rate list allow you to create, delete, copy and change the price of selected styling rates.
See also
About the home screen
Introducing Intersalon Widgets
Creating Stylists and Services
intersalon
70 . Intersalon
Adding appointments
Checking out an appointment
Linked services
Retrieving sales information
Sales tax options
Running reports
Cashing Up
Stock control
Integrating online booking within your existing website
Setting stylist/therapist working patterns
Making a series of recurring appointments
Order payment method and status
Managing resources
What do the various icons mean around Intersalon?
Can't find the answers you're looking for?
●
Contact our support team on 01909 512131.
●
Email [email protected] and we'll personally get back to you as quickly as we can.
Check out our Support Portal, available 24/7 at intersalon.zendesk.com.
Or let us know by leaving a comment below:
●
●
intersalon
Intersalon . 71
Home > Intersalon > Fundamentals > Order payment method and status
Order payment method and status
The sales and ecommmerce systems in Intersalon are designed to support both internal and online sales. Each sale is called an 'Order'
whether it be created at the salon's POS (Point of Sale) system or through the website. A full list of orders can be found on the first
tab of the 'Retail' section. Each order has an 'Payment Method' and a 'Status' which are used in calculating sales totals.
Understanding how each of these work is important when interpreting sales information.
The table below details each of the payment methods, whether it is designed for use within the salon or on the website and any
additional information recorded as part of the sale.
Payment Method POS / Online Order Value Amount Tendered Cash or Change
Cash
POS
Order Total
Amount Tendered
Change
0
Card
POS
Order Total
Amount Tendered
Cheque
POS
Order Total
Order Total
0
Cash / Card
POS
Order Total
Card Amount
Cash Amount
No Payment
POS
Order Total
0
0
Online
Order Total
0
0
PayPal
The table below details each of the order statuses and their intended use.
Order Status
Useage
Description
Payment Not Made
Online
An order has been made but not yet paid
In Progress
Online
The salon should use this status when preparing online order for dispatch
Payment Failed
Online
The client attempted to pay but the payment process failed
Online
Payment has been received
Payment Received
Complete
Part Payment
POS / Online Payment has been recieved and the customer has the goods
POS
The customer has made a partial payment either by 'Cash' or 'Card'
See also
About the home screen
Introducing Intersalon Widgets
Creating Stylists and Services
Adding appointments
Checking out an appointment
Linked services
Retrieving sales information
Sales tax options
Running reports
Cashing Up
Stock control
Integrating online booking within your existing website
Setting stylist/therapist working patterns
Making a series of recurring appointments
Understanding styling rates
Managing resources
What do the various icons mean around Intersalon?
Can't find the answers you're looking for?
●
●
●
●
Contact our support team on 01909 512131.
Email [email protected] and we'll personally get back to you as quickly as we can.
Check out our Support Portal, available 24/7 at intersalon.zendesk.com.
Or let us know by leaving a comment below:
intersalon
72 . Intersalon
Home > Intersalon > Fundamentals > Managing resources
Managing resources
Managing resources is a key feature in Intersalon. A resource can be anything but is generally a treatment room or facility e.g.
sunbed. Resource allocation can be done manually or automatically.
Manual Resource Allocation
Allocating a resource manually is done using the planner. Open the right click menu on any appoinment or event and navigate to the
'Assign Resource' sub menu. Each of the resources are listed, clicking on the appropriate resource will allocate the resource.
Intersalon will check to see if the resource is available only if 'Check Resource Allocation' option is set.
Assigning a resource manually using the right click menu.
intersalon
Intersalon . 73
Automatic Resource Allocation
Using automatic resource Intersalon will assign the resource when the appointment is inserted or check for its availability when
searching. For automatic resource allocation to work, Intersalon needs to know which resources can be used with which service or
treatment. When a service is editted or created then 'Resources' tab should be displayed next to the 'Styling Rates'.
In the above image 'Room 1' is a requirement for the service/treatment '1stService'. If you select more than one resource then
Intersalon will interpret this as a logical 'OR'. This means that at least one resource is required but it can be any of those selected.
intersalon
74 . Intersalon
Using Automatic Resource Allocation in the Planner
Once Intersalon knows which resources to assign, it will attempt to find and then allocate an available resource when the
appointment is added. If the appointment is a linked to another appointment and the linked appointment has resource dependency
then resources must be available for both appointments. If no resources are available then a message is displayed to the user.
When the resource is assigned it appears within parenthesis (brackets) on the appointment description in the planner. In the
screenshot above you can see that the 'Dryer Room' is assigned for the 'Cut & Blow' with Emma Liles.
Using Automatic Resource Allocation with the Widgets
Automatic resource allocation is enabled on the 'Multi Service Search' widget and is NOT enabled on the 'Single Service Search'
widget. The 'Multi Service Search' widget is generally intended to be used when booking beauty treatments, where many services
are added for a customer in a single search. The 'Single/Linked Service Search' widget is normally used for booking hair services where
their is a maximum of two services booked in a single search and so the user can easily select which resources are required.
Using the Planner Resource View
The planner view can be switched to show the allocation of the resources instead of the stylists or therapists.
The planner has restricted functionality in resource view, no appointments can be added only events.
See also
About the home screen
Introducing Intersalon Widgets
Creating Stylists and Services
intersalon
Intersalon . 75
Adding appointments
Checking out an appointment
Linked services
Retrieving sales information
Sales tax options
Running reports
Cashing Up
Stock control
Integrating online booking within your existing website
Setting stylist/therapist working patterns
Making a series of recurring appointments
Understanding styling rates
Order payment method and status
What do the various icons mean around Intersalon?
intersalon
76 . Intersalon
Home > Intersalon > Fundamentals > What do the various icons mean around Intersalon?
What do the various icons mean around Intersalon?
There are many icons within intersalon, this page covers the functions of the most common.
This is the delete icon, where ever you see it within intersalon, it is always a delete action.
●
●
This icon is always a link to an editing page, for example, it is found in the client list and can be clicked to edit
client details.
●
This icon means edit in line, the editor opens under the selected object on the same page.
●
This is the 'New' icon, wherever found and clicked, it opens the relative page to create a new entry to the section.
●
This icon when clicked selects all items on a page to be used with another action e.g. delete.
●
This icon un-selects all items on a page.
●
This icon means 'Print' and is usually found in the 'Reports' section.
●
This icon means 'Save' and is also found in the 'Reports' section.
●
This icon means 'Merge' and is found in the 'Clients' section and merges 2 client's details into one.
This icon opens the field customisation pop-up, you can hide fields from a list or restore hidden or non-default
●
ones.
This icon is used in the services section to link two services together e.g. cut&colour.
●
●
●
This icon represents the 'Copy' function and can be found in Stylists&Services>Styling Rates and is used to copy
styling rates between stylists.
This icon represents the 'Search' function and is found in the planner, it is not used in lists as they have the built in
field search.
Event Log & Web Log Icons.
●
This icon represents 'New' and can be seen in the Event Log.
●
This icon represents the action of something being 'Edited' and is found in the Event Log.
●
This icon represents the 'Delete' action and can also be found in the Event Log.
●
This icon can be found in the 'Web Log' and shows a succesfull user authentication.
●
This icon is also found in the 'Web Log' and shows a failed user authentication or an application error that has
been logged.
See also
About the home screen
Introducing Intersalon Widgets
Creating Stylists and Services
Adding appointments
Checking out an appointment
Linked services
intersalon
Intersalon . 77
Retrieving sales information
Sales tax options
Running reports
Cashing Up
Stock control
Integrating online booking within your existing website
Setting stylist/therapist working patterns
Making a series of recurring appointments
Understanding styling rates
Order payment method and status
Managing resources
Can't find the answers you're looking for?
●
Contact our support team on 01909 512131.
●
●
Email [email protected] and we'll personally get back to you as quickly as we can.
Check out our Support Portal, available 24/7 at intersalon.zendesk.com.
●
Or let us know by leaving a comment below:
intersalon
78 . Intersalon
Home > Intersalon > How To...
How To...
The How To... section offers simple step-by-step guides for basic Intersalon tasks.
How to use the WYSIWYG editor
Can I use my existing domain with Intersalon?
How to save report data to Excel?
How to prevent staff accessing Intersalon away from the salon?
How to create and send an issue based newsletter
How do I setup my SMS account?
How do I create a Gift Voucher?
How do I filter and sort grids within Intersalon?
How do I issue a refund?
How to customise Intersalon captions
See also
Fundamentals
Reference Guide
Existing Customers - New Version Help
What's new in Intersalon?
Contacting Intersalon
Can't find the answers you're looking for?
●
●
●
●
intersalon
Contact our support team on 01909 512131.
Email [email protected] and we'll personally get back to you as quickly as we can.
Check out our Support Portal, available 24/7 at intersalon.zendesk.com.
Or let us know by leaving a comment below:
Intersalon . 79
Home > Intersalon > How To... > How to use the WYSIWYG editor
WYSIWYG editor toolbar
The default toolbar looks like this:
As you can see, it provides similar functionality to Microsoft Word editor. Still, there are several buttons that may require additional
explanation:
Paste as plain text - this command pastes the content of your clipboard while cleaning out all
formatting.
Paste from Word - this command allows you to clean the content pasted from Microsoft Word. It
cleans up the HTML code so that it doesn't contain extra code and so that it fits your web site
design. You can find more details in chapter Copy & Paste from Microsoft Word .
Insert/edit link - creates a link from selected text. See chapter Creating links for more details.
Insert/edit image - inserts an image into the current cursor position. See chapter Inserting images
for more details.
Can I use my existing domain with Intersalon?
How to save report data to Excel?
How to prevent staff accessing Intersalon away from the salon?
How to create and send an issue based newsletter
How do I setup my SMS account?
How do I create a Gift Voucher?
How do I filter and sort grids within Intersalon?
How do I issue a refund?
How to customise Intersalon captions
Can't find the answers you're looking for?
●
●
●
●
Contact our support team on 01909 512131.
Email [email protected] and we'll personally get back to you as quickly as we can.
Check out our Support Portal, available 24/7 at intersalon.zendesk.com.
Or let us know by leaving a comment below:
intersalon
80 . Intersalon
Home > Intersalon > How To... > How to use the WYSIWYG editor > Paste from Word
Paste from Word
When, copying text from Microsoft Word, the text is encapsulated with lots of unnecessary tags that may break your web page design. Thus,
the editor allows you to clean the pasted text so that it contains only basic formatting.
Select the text in Microsoft Word document and copy it to the clipboard (CTRL+C):
Place the cursor into the text in CMS editor and click Paste from Word. The Paste from Word dialog opens. Paste the text into the box using
CTRL+V and check both boxes:
Click OK to paste the text. The pasted text looks like this:
intersalon
Intersalon . 81
As you can see, the style follows your web site design. However, since Word doesn't provide appropriate tagging information, some formatting
may not be preserved and you may need to apply the design manually.
Click Save to save the changes.
Inserting an Image
Creating Links
Can't find the answers you're looking for?
●
●
●
●
Contact our support team on 01909 512131.
Email [email protected] and we'll personally get back to you as quickly as we can.
Check out our Support Portal, available 24/7 at intersalon.zendesk.com.
Or let us know by leaving a comment below:
intersalon
82 . Intersalon
Home > Intersalon > How To... > How to use the WYSIWYG editor > Inserting an Image
Inserting an Image
You can insert an image into the text using the
opens:
Insert/edit image button in the WYSIWYG editor toolbar. The Image properties dialog
You can either insert the URL address of the image if you know it or you can click Browse Server and choose the image in the content
tree:
intersalon
Intersalon . 83
If the image hasn't been uploaded yet, you can click Upload file in the upper right corner and choose the file to be uploaded from your
local computer:
Click Save to upload the image and then click Page image in the image preview:
intersalon
84 . Intersalon
Now you can see the preview of the image in the Image Properties window and change its alignment, size or add alternative (ALT) text for
better usability.
Click OK to insert the image into the text:
intersalon
Intersalon . 85
Click Save to save the changes.
Paste from Word
Creating Links
Can't find the answers you're looking for?
●
Contact our support team on 01909 512131.
●
Email [email protected] and we'll personally get back to you as quickly as we can.
Check out our Support Portal, available 24/7 at intersalon.zendesk.com.
Or let us know by leaving a comment below:
●
●
intersalon
86 . Intersalon
Home > Intersalon > How To... > How to use the WYSIWYG editor > Creating Links
Creating Links
You can create a link by selecting the text that will serve as a link and clicking the
Insert/edit link button in the editor toolbar.
The Link dialog opens:
You can enter the target URL or you can click Browse Server and choose some of the pages of your web site:
intersalon
Intersalon . 87
Choose the page and click OK. Now you can preview the URL:
You can also change the target frame (e.g. new window) on the Target tab and specify link title for better accessibility on the
Advanced tab. Click OK and the selected text is now used as a link to the chosen URL:
Click Save to save the changes.
intersalon
88 . Intersalon
See also
Paste from Word
Inserting an Image
Can't find the answers you're looking for?
●
●
●
●
Contact our support team on 01909 512131.
Email [email protected] and we'll personally get back to you as quickly as we can.
Check out our Support Portal, available 24/7 at intersalon.zendesk.com.
Or let us know by leaving a comment below:
intersalon
Intersalon . 89
Home > Intersalon > How To... > Can I use my existing domain with Intersalon?
Can I use my existing domain with Intersalon?
All Intersalon customers are provided with a free Intersalon subdomain. This mean you can access your salon software via a domain
name similar to http://mysalon.intersalon.co.uk/cmsdesk. Your customer site becomes http://mysalon.intersalon.co.uk.
Some of our clients already have existing domains, or want a top-level domain name such as http://www.mysalon.co.uk. Intersalon
supports this fully, though you'll need to use an external domain registrar to achieve this. You can use any domain registrar, but we
advise Fasthosts or 123-Reg.
Once you've completed your domain registration, please wait 24 hours before continuing with this process.
1.
2.
3.
4.
Firstly you'll need to access the online control panel for your domain name. This is provided by the domain registrar you chose.
Every control panel is different, but you need to look for the 'Advanced DNS' section. This is sometimes called the 'Records'
section instead.
You should be looking at a screen detailing information regarding 'A Records' and 'MX Records'. To enable your domain name
for use with Intersalon you need to create an 'A record'. Before adding this, ensure there is no existing 'A record' that is
either blank or marked as 'www'. If either of these exist, edit these existing records rather than creating new ones.
Create or edit these existing 'A records' and set the value of both to '77.68.44.30'. If you're creating new records, you'll
need two. The first should be 'www' and the other should be left blank, with just the value set as above.
That's it! However, you'll need to contact our support team to complete the process, as we need to enable your domain
within the Intersalon system.
See also
How to use the WYSIWYG editor
How to save report data to Excel?
How to prevent staff accessing Intersalon away from the salon?
How to create and send an issue based newsletter
How do I setup my SMS account?
How do I create a Gift Voucher?
How do I filter and sort grids within Intersalon?
How do I issue a refund?
How to customise Intersalon captions
Can't find the answers you're looking for?
●
Contact our support team on 01909 512131.
Email [email protected] and we'll personally get back to you as quickly as we can.
Check out our Support Portal, available 24/7 at intersalon.zendesk.com.
●
Or let us know by leaving a comment below:
●
●
intersalon
90 . Intersalon
Home > Intersalon > How To... > How to save report data to Excel?
How to save report data to Excel?
Sometimes you may wish to use data within your Intersalon system in external programs and tools. You may wish to use report data
for external marketing or other business systems. In this guide, we'll export report data to Microsoft Excel.
1.
Firstly, open and create a new Excel workbook.
2.
3.
Select and run the required report within Intersalon
Hover anywhere over the report data with your mouse then then press the right click mouse button. A menu should be
displayed with an option to 'Select All'. The first image below shows the menu in Firefox but 'Select All' is also an option in
Internet Explorer, Google Chrome and Safari. It may just appear in a different position on the menu.
intersalon
Intersalon . 91
4.
With everything selected, right click again and this time select the 'Copy' option.
5.
Then switch to your new Excel document and click on the cell in the worksheet, usually somewhere near the top left hand
corner, and then right click again and select 'Paste'. The content of the report should get correctly converted into Excel rows
and columns. You can add extra formatting as required using the standard tools in Excel.
See also
How to use the WYSIWYG editor
Can I use my existing domain with Intersalon?
intersalon
92 . Intersalon
How
How
How
How
How
How
How
to prevent staff accessing Intersalon away from the salon?
to create and send an issue based newsletter
do I setup my SMS account?
do I create a Gift Voucher?
do I filter and sort grids within Intersalon?
do I issue a refund?
to customise Intersalon captions
Can't find the answers you're looking for?
●
●
●
●
intersalon
Contact our support team on 01909 512131.
Email [email protected] and we'll personally get back to you as quickly as we can.
Check out our Support Portal, available 24/7 at intersalon.zendesk.com.
Or let us know by leaving a comment below:
Intersalon . 93
Home > Intersalon > How To... > How to prevent staff accessing Intersalon away from the salon?
How to prevent staff accessing Intersalon away from the
salon?
Intersalon can be accessed from any internet-connected computer, tablet or smartphone. However, you may not want all staff to
have access away from the salon. This security feature is easy to set up on an account by account basis.
Intersalon Tip
A 'salon owner' account is always able to access the system from anywhere. This is a security feature to prevent a
system from being locked out. In this case, consider changing a user's account to a lower role in order to enable 'salon
access only'
●
To setup salon only access you must first setup a workstation. This marks a specific computer as asalon computer - a
computer within the salon.
Navigate to Administration --> Users.
●
Click the 'edit' button next to the user you wish to limit.
●
Check the 'Salon Access Only' box as shown above.
Click 'OK' and the settings will be saved. The user will now only be able to log in from the salon computer(s).
●
●
See also
How to use the WYSIWYG editor
Can I use my existing domain with Intersalon?
How to save report data to Excel?
How to create and send an issue based newsletter
How do I setup my SMS account?
How do I create a Gift Voucher?
How do I filter and sort grids within Intersalon?
How do I issue a refund?
How to customise Intersalon captions
Can't find the answers you're looking for?
intersalon
94 . Intersalon
●
Contact our support team on 01909 512131.
●
Email [email protected] and we'll personally get back to you as quickly as we can.
●
Check out our Support Portal, available 24/7 at intersalon.zendesk.com.
Or let us know by leaving a comment below:
●
intersalon
Intersalon . 95
Home > Intersalon > How To... > How to create and send an issue based newsletter
Creating and sending Issue based Newsletters.
Intersalon allows you to create and send newsletters via email. first navigate to the Newsletters Module which can be accessed by clicking 'Newsletters' in the Navigator Widget.
When you are in the Newsletter Module, you will be presented with a list of configured newsletters. As standard; there is always at least one newsletter in your system, this is called
the '_base newsletter' and is a 'Dynamic' newsletter. Newsletters in Intersalon are classified as either 'Static' or 'Dynamic'. A 'Static' newsletter is one where the content; once
created will not vary for that issue, if you want to change the content then you would normally create another issue. A 'Static' newsletter has no connection to your Intersalon website.
A 'Dynamic' newsletter points to one of the Intersalon website pages, it's called 'Dynamic' because the assumption is made that the content of this page will vary, either automatically if
it is showing news or blog posts or manually if it is a page that is updated by a user.
In this tutorial we are going to create a 'Static' newsletter and produce a single issue of that newsletter.
To create a new newsletter click the 'New' button on the toolbar. If this button is 'dim' or 'greyed out' then you do not have the correct security priviledges. The newsletter
configuration page sets up the type of newsletter and some of basic settings required for the newsletter.
Field Descriptions:
●
●
●
●
Newsletter display name: e.g. Intersalon News, this for your purposes only but must be unique.
Sender name: This is the name that will appear as the sender in the customers email inbox.
Sender e-mail: This is the email address that you want to appear in the customer email inbox. Intersalon's newsletter system does not support replies so we would suggest an
email address that gives that impression to the customer e.g. [email protected]
Subscription confirmation: It is a regulatory requirement that businesses sending newsletters provide the customer with a mechanism where they can confirm their
intersalon
96 . Intersalon
subscription and receive an email confirming this. Intersalon provides a standard template for this confirmation email and unless you specifically require some custom details this
should be set to'Simple Confirmation'.
●
Unsubscription confirmation: It is a regulatory requirement that businesses sending newsletters provide the customer with a mechanism where they can unsubscribe from
newsletters and receive an email confirming this. Intersalon provides a standard template for this confirmation email and unless you specifically require some custom details this
should be set to'Simple Unsubscribe'.
●
For a static newsletter we need to select the 'Template Based Newsletter' option and pick a newsletter template. In this tutorial we are going to create a very simple
newsletter with no custom styling or presentation so we will select the 'Basic' template which provides one, large editable region where we can add our newsletter text and
images.
When all the fields have been compleeted click 'OK' to save the newsletter configuration, Intersalon will then return you to the newsletter list which should now include your newly
created newsletter.The next step is to create our first 'Issue'.
You will need to edit your newsletter to be able to create an issue.
You will now be taken to the newsletter details page on the 'Issues' tab. Click the click the 'New' button to create our first issue.
'Step 1' when creating the issue is to assign a subject and add your content. The subject will appear in the subject column of your customers email inbox so it is important it draws their
attention. Be careful not to use words like 'Free' or 'Discount' in the subject because these might be interpreted as SPAM by the customers email sytem and put in their junk folder. Use
a subject that reflects the content of the issue, if you're sending newsletter monthly you might want to call the newsletter 'Monthly News' or similiar.
Depending on how the newsletter template has been configured you may be presented with one or more 'Editable Regions'. The 'Basic' template that we selected for our
newsletter only has one editable region and you can see if the screenshot below we have one large region where we can place our text and images.
Each editable region includes an 'WYSIWYG' (pronounced WIZIWIG) editor that allows you to add style to your content. To learn more about the detiled use of the editor please click
here .
As well as static text and images, you can include dynamic data that will help you personalise your newsletter. These are called 'Macros' and Intersalon allows you to insert them
anywhere in your newsletter issue content. A macro's text will be generated when the recipient is known, i.e. when the newsletter is sent.
intersalon
Intersalon . 97
When you have finished designing the newsletter you can click next where 'Step 2' you will be shown a preview.
Once you have reviewed the newsletter, click next. Now you can choose when the newsletter issue should be sent out
●
●
●
Send now - the newsletter issue is sent out immediately to all subscribers.
Scheduled newsletter mail-out - the newsletter issue is sent out on a specified date and time.
Send the newsletter manually later - the newsletter is not sent and you can decide on the mail-out time later.
intersalon
98 . Intersalon
After choosing a send option click finish to complete. To learn how to add subscribers to your email click here.
Can't find the answers you're looking for?
●
●
●
●
Contact our support team on 01909 512131.
Email [email protected] and we'll personally get back to you as quickly as we can.
Check out our Support Portal, available 24/7 at intersalon.zendesk.com.
Or let us know by leaving a comment below:
intersalon
Intersalon . 99
Home > Intersalon > How To... > How do I setup my SMS account?
How do I setup my SMS account?
Intersalon customers link their salon software account to our text anywhere SMS supplier. This guide explains the process, and how customers can enable this functionality.
Creating a TextAnywhere account
If you don't already have an account, we start by creating one.
1.
Expand the Tools section of the Intersalon left hand menu, and click on SMS Text Messages.
2.
The SMS Text Messages section will consist of a single tab asking for your account settings. Once these are filled in, appointment reminders and mailshots will become available.
Since we don't have an account yet, click on "Create Account".
3.
This will pass you to our 3rd party SMS supplier TextAnywhere. Ensure you read and accept their terms and conditions, and complete Organisation and Contact details. For
account type, ensure "Full Account" is selected to ensure continuous service. Also ensure "TextOnline" is set as your Primary Application. Continue by pressing "Register" at the
bottom of the page.
NOTE: If you choose to pay via BACS or Direct Debit, your account will have unlimited credits and you will be billed by TextAnywhere at the end of each month. If you choose to
pay by Credit Card, you are paying for a set number of texts up front. Charges are dependent on quantity sent. More information is available by clicking here.
4.
At this point you will be taken to a signup complete page. A TextAnywhere customer service representative will then call you directly to confirm your Login and Password details.
You'll also receive email confirmation of your signup.
Attaching your TextAnywhere account to your Intersalon software
1.
Return to www.textanywhere.co.uk and click Client Login in the top right area of the screen.
2.
Enter your email and password from your TextAnywhere signup email, and Press login.
intersalon
100 . Intersalon
3.
Once you have logged in, continue to your Admin Panel, found on the top right of the following screen.
4.
From your Admin Panel, make a note of your Client_ID and Client_Pass. These are highlighted in purple text.
5.
Return to the SMS Text Messages section of Intersalon and enter your Client ID and Client Password into the relevant fields. Enter your mobile number and press the Send button
to confirm your account. If you receive the SMS correctly, tick the checkbox for "Did you receive this SMS?".
6.
The screen will update to verify your account. Press the save button to confirm all settings.
Note
See also
How to use the WYSIWYG editor
Can I use my existing domain with Intersalon?
How to save report data to Excel?
How to prevent staff accessing Intersalon away from the salon?
How to create and send an issue based newsletter
How do I create a Gift Voucher?
How do I filter and sort grids within Intersalon?
How do I issue a refund?
How to customise Intersalon captions
Can't find the answers you're looking for?
●
●
●
●
Contact our support team on 01909 512131.
Email [email protected] and we'll personally get back to you as quickly as we can.
Check out our Support Portal, available 24/7 at intersalon.zendesk.com.
Or let us know by leaving a comment below:
intersalon
Intersalon . 101
intersalon
102 . Intersalon
Home > Intersalon > How To... > How do I create a Gift Voucher?
How do I create a Gift Voucher?
This help topic deals with both the selling and redeeming of directly-purchased gift vouchers in the salon.
Creating Product Based Gift Vouchers
Gift vouchers that are sold to customers are called 'Product Based Gift Vouchers'. They are created as a Product with an additional
option which changes the way the product is added to a customers bill and then redeemed.
When the product is created ensure "Is Voucher" is selected.
Gift Voucher Bar Codes
Its always a good idea to get printers to add a bar code to the vouchers. This can then be added to the 'Product Number'
field on the product and will make it much easier to locate when selling and redeeming vouchers.
Vouchers can be easily identified in the product list by the 'Gift Voucher' icon.
Selling and Redeeming Gift Vouchers
In the checkout process , select "Add Product". Using any of the filters or bar code scanner to find the correct voucher. You'll then
notice a voucher has two options, 'Buy'or 'Use'.
Selecting 'Buy' will add the value of the voucher to the bill, selecting 'Use' will deduct the value of the voucher from the bill.
See also
How to use the WYSIWYG editor
Can I use my existing domain with Intersalon?
How to save report data to Excel?
How to prevent staff accessing Intersalon away from the salon?
How to create and send an issue based newsletter
How do I setup my SMS account?
How do I filter and sort grids within Intersalon?
How do I issue a refund?
How to customise Intersalon captions
intersalon
Intersalon . 103
Can't find the answers you're looking for?
●
Contact our support team on 01909 512131.
Email [email protected] and we'll personally get back to you as quickly as we can.
●
Check out our Support Portal, available 24/7 at intersalon.zendesk.com.
●
Or let us know by leaving a comment below:
●
intersalon
104 . Intersalon
Home > Intersalon > How To... > How do I filter and sort grids within Intersalon?
How do I filter and sort grids within Intersalon?
All list views in Intersalon use the same grid system for presentation. To get information quickly and efficiently from Intersalon it's
important to understand how to use the grids.
Layout Customisation
Hide and Show Columns
The number of columns of some of the list views in Intersalon have been restricted to make the data intially easier to read. To
customise the columns the 'Field Chooser' can be invoked wherever the 'Customise' icon or 'Customise Columns' button is
found.
To hide a column, invoke the Customization Window, and drag the column's header onto it.
To make a column visible, drag its header from the Customization Window and drop it onto the column header panel.
Reorder Grid Columns
To reorder columns, drag a column header to a new position within the column header panel.
intersalon
Intersalon . 105
Selection and Navigation
Page Navigation in Grids
To switch between pages, use the grid's Pager:
When data is grouped, rows that belong to one group may be displayed on different pages. This occurs when the number of rows
contained within a group exceeds the maximum number of rows that can be displayed on a page. In this instance, to indicate that
rows belong to a group, the image is displayed within the top data row(s). Hovering over this image displays parent group rows.
Data Presentation
Filter Grid Data
Type text within the Auto Filter Row. A filter condition is automatically created based upon the value entered, and this is applied to
the corresponding column.
intersalon
106 . Intersalon
To remove the column's filter, clear the text from the auto-filter row. To remove the grid's entire filter, click the 'eraser' icon.
Changing the Filter Criteria
The 'filter' icon at the side of each cell in the Auto Filter Row allows the filter logic to be changed for the column.
See also
How to use the WYSIWYG editor
Can I use my existing domain with Intersalon?
How to save report data to Excel?
How to prevent staff accessing Intersalon away from the salon?
How to create and send an issue based newsletter
How do I setup my SMS account?
How do I create a Gift Voucher?
How do I issue a refund?
How to customise Intersalon captions
Can't find the answers you're looking for?
●
●
●
●
intersalon
Contact our support team on 01909 512131.
Email [email protected] and we'll personally get back to you as quickly as we can.
Check out our Support Portal, available 24/7 at intersalon.zendesk.com.
Or let us know by leaving a comment below:
Intersalon . 107
Home > Intersalon > How To... > How do I issue a refund?
How do I issue a refund?
A refund is used to return payment to a client.To create a refund in Intersalon we create a new transaction (order). This transaction
ensures that all the sales summaries for the day are accurately adjusted and a record is kept of when and why the refund was issued.
As part of the refund process the user can also choose which payment method the refund is going to be issued with, these currently
include 'Cash' and 'Card'. To read more about the different payment methods please click here . Also, the refund can be used to return
products to stock, loyalty points to be removed and stylist commission compensated.
Since we are creating a new 'Order' for the refund we need to navigate to the 'Retail' module.
A refund can only be issued against an existing order, the order must first be located in the 'Order List' and selected using the selection
checkbox in column 1. To learn more about how to use the Intersalon gris to quickly find data please click here .
If the user attempts to issue a refund without first selecting a 'Order' then a message will be displayed.
Once a valid order has been selected and the 'Refund Selected' button has been click the refund page will be displayed. The refund page
details each of the items that were included as part of the original sale, the client, date and the original order method.
intersalon
108 . Intersalon
The 'Total' to be refunded will intially be zero because the first step is to select which item is to be refunded. The checkbox in first column
will select all the items in the row or the user can use the 'up' and 'down' arrows on the 'Quantity' field to select the number of items to
be refunded. As items are selected the 'Total' will be calculated.
Once the items have been selected then the user must enter a 'Refund Reason', this is a mandatory field. Options for removing any
loyalty, returning retail stock and deducting stylist commission are initially checked but these can be unchecked as required.
Finally the method of refund payment method must be selected. The 'Complete Refund' will process the refund and return the user to the
'Orders List'. The refund order has been added to the system with a negative value which identifies the record as a refund. The 'Order
Note' field is used to record the details of the refund and the original order ID.
See also
How to use the WYSIWYG editor
Can I use my existing domain with Intersalon?
How to save report data to Excel?
How to prevent staff accessing Intersalon away from the salon?
How to create and send an issue based newsletter
How do I setup my SMS account?
How do I create a Gift Voucher?
How do I filter and sort grids within Intersalon?
How to customise Intersalon captions
Can't find the answers you're looking for?
●
●
●
●
Contact our support team on 01909 512131.
Email [email protected] and we'll personally get back to you as quickly as we can.
Check out our Support Portal, available 24/7 at intersalon.zendesk.com.
Or let us know by leaving a comment below:
intersalon
Intersalon . 109
Home > Intersalon > How To... > How to customise Intersalon captions
How to customise Intersalon captions
The captions in Intersalon have been initially phrased in English to suit the Hair salon industry but these can be easily customised to
suit either the business and/or the language. 'Custom Captions' is a feature which allows any text or phrase in the salon
management system to be customised.
The caption replacement system involves providing Intersalon with the text you want to replace and the new version, for example
stylist=therapist. In the this case 'stylist' is replaced with 'therapist' in all areas of the system.
Note: It is important to recognise that the replacement is looking for an exact match and that includes case and white space, so
'Stylist' is not the same as 'stylist'.
Each seperate replacement must be sepeated by a comma ','.
The caption replacements are enterred on the 'System Settings' tab of the 'Settings' module.
Enter the text string of replacements in the text-area for 'Caption Replacements' and click save. The replacements are activated
immediately.
Sample replacements for a Beauty Salon
Copy and paste the text below into your 'Caption Replacements' to switch the business language of Intersalon from Hair to Beauty.
stylist=therapist,stylists=therapists,Stylist=Therapist,Styl 5
ists=Therapists,service=treatment,Service=Treatment,Styling
Rate=Treatment Rate,styling rate=treatment rate
6
intersalon
110 . Intersalon
See also
How to use the WYSIWYG editor
Can I use my existing domain with Intersalon?
How to save report data to Excel?
How to prevent staff accessing Intersalon away from the salon?
How to create and send an issue based newsletter
How do I setup my SMS account?
How do I create a Gift Voucher?
How do I filter and sort grids within Intersalon?
How do I issue a refund?
Can't find the answers you're looking for?
●
Contact our support team on 01909 512131.
●
●
Email [email protected] and we'll personally get back to you as quickly as we can.
Check out our Support Portal, available 24/7 at intersalon.zendesk.com.
●
Or let us know by leaving a comment below:
intersalon
Intersalon . 111
Home > Intersalon > Reference Guide
Reference Guide
Welcome to the Intersalon Reference Guide. Each module within Intersalon is listed below. Please click an area of interest to
continue.
What is the default security setup for each role?
Administration
Analytics
Appointments
Clients
Ecommerce
Newsletters
Reports
Retail
Settings
SMS Text Messages
Stylists and Services
Social Networking
See also
Fundamentals
How To...
Existing Customers - New Version Help
What's new in Intersalon?
Contacting Intersalon
Can't find the answers you're looking for?
●
●
●
●
Contact our support team on 01909 512131.
Email [email protected] and we'll personally get back to you as quickly as we can.
Check out our Support Portal, available 24/7 at intersalon.zendesk.com.
Or let us know by leaving a comment below:
intersalon
112 . Intersalon
Home > Intersalon > Reference Guide > What is the default security setup for each role?
What is the default security setup for each role?
This page will describe the default security setup for each Intersalon security role. Please note that this refers to the user role set
within the Administration section of Intersalon. It is NOT connected to the 'Salon Role' option within Stylists and Services.
Default Roles
The default roles within Intersalon are:
1.
2.
Salon Owner
Salon Super User
3.
Salon User
In general these roles can be broken down fairly easily - a 'salon user' can create, but not modify or delete. A 'super user' can
create, modify but not delete. Finally a 'salon manager' can create, modify and delete. However, this is only a general rule, so lets
have a look at each role section-by-section.
Module
Salon Owner
Salon Super User
Administration
Full access to all features
Appointments
Customers
E-Commerce
Full access to all features
Full access to all features
'Purchase process" disabled
Newsletters
"Create Newsletter" disabled
Reports
Full access to all features
Cannot delete users
Cannot delete workstations
Cannot clear event/web logs
Full access to all features
Cannot delete customers
Cannot modify e-commerce
settings.
Cannot modify or delete
newsletters.
No access to module
Retail
Full access to all features
Cannot view/modify/delete discount
voucher list
Cannot view/modify/delete discount
level list
Cannot access Open Till
Cannot modify receipt
Cannot modify Loyalty settings
Cannot delete a product
Cannot delete a manufacturer
Settings
Full access to all features
No access to module
Module not visible
No access to module
SMS Text
Messages
Social
Networking
Stylist and
Services
See also
Administration
Analytics
Appointments
Clients
Ecommerce
intersalon
Full access to all features
Full access to all features
Full access to all features
Cannot post voucher codes
Cannot read voucher codes
Cannot delete a resource
Cannot delete a roll
Cannot delete a service
Cannot delete a service group
Cannot delete a stylist
Cannot delete a stylist group
Salon User
No access to module
Module not visible
Full access to all features
Cannot modify customers
No access to module
Module not visible
No access to module
Module not visible
No access to module
Module not visible
No access to module
Module not visible
No access to module
Module not visible
No access to module
Module not visible
Cannot post availability
Cannot modify settings
No access to module
Module not visible
Intersalon . 113
Newsletters
Reports
Retail
Settings
SMS Text Messages
Stylists and Services
Social Networking
Can't find the answers you're looking for?
●
●
●
●
Contact our support team on 01909 512131.
Email [email protected] and we'll personally get back to you as quickly as we can.
Check out our Support Portal, available 24/7 at intersalon.zendesk.com.
Or let us know by leaving a comment below:
intersalon
114 . Intersalon
Home > Intersalon > Reference Guide > Administration
Administration
The administration section allows creation, deletion and modification of user accounts and roles. It allows provides Intersalon log files
and Workstation setup.
Subsections
Users
Event Log
Web Log
Workstations
See also
What is the default security setup for each role?
Analytics
Appointments
Clients
Ecommerce
Newsletters
Reports
Retail
Settings
SMS Text Messages
Stylists and Services
Social Networking
Can't find the answers you're looking for?
●
●
●
●
intersalon
Contact our support team on 01909 512131.
Email [email protected] and we'll personally get back to you as quickly as we can.
Check out our Support Portal, available 24/7 at intersalon.zendesk.com.
Or let us know by leaving a comment below:
Intersalon . 115
Home > Intersalon > Reference Guide > Administration > Users
Users
This document explains the features of the page 'Administration > Users'
The Users section allows creation, modification and deletion of Intersalonu sers.
●
●
●
The pencil & paper button on the left is the 'Edit' button, this allows user details to be edited.
The 'X' button on the right is the 'Delete' button, clicking this will open a confirmation dialogue and if confirmed, the selected user will be deleted.
The text boxes under each column name are search functions, each column can be searched to find a specific user or user activity e.g 'who logged on
yesterday'.
●
The 'New' button is a link to the new user setup page. Note: This creates a new Intersalon user. This is not a customer creation tool.
●
The new user page is shown below;
The user creation page is easy to use and only requires basic details.
The 'Enabled' check box allows a user's access to the system to be suspended by un-checking the box.
●
●
intersalon
116 . Intersalon
●
The 'Is editor' check box should be checked for users that can edit content on the salon website.
●
●
The available salon roles are shown above, 'SalonSuperUser' is a salon user account with less restrictions.
SalonOwner allows other users to be created/deleted. You can read further details on roles by clicking here .
●
Enter a unique password of the users choice twice to confirm.
Once all fields are correct, click 'OK' to save the new user.
Intersalon Tip
You can find out more information about the various icons used within Intersalon by clicking here.
See also
Event Log
Web Log
Workstations
Can't find the answers you're looking for?
●
●
●
●
Contact our support team on 01909 512131.
Email [email protected] and we'll personally get back to you as quickly as we can.
Check out our Support Portal, available 24/7 at intersalon.zendesk.com.
Or let us know by leaving a comment below:
intersalon
Intersalon . 117
Home > Intersalon > Reference Guide > Administration > Event Log
Event Log
This document explains the features of the page 'Administration > Event Log'
The Event Log shows what has been created, edited and deleted and which user did it.
The Event Log can be used to track a users actions or for example if data was deleted the event log would show who was responsible.
●
●
●
●
●
●
The 'Event Type' column shows what type of action has been logged.
The 'Event Message' field shows a short description of the the event.
The 'User' & 'Workstation' fields show which user and where the event occurred.
For definitions of the Icons in intersalon, click here
The 'Delete' button will clear the log and start a blank one, you may want to do this each week/month.
Clearing the event log will clear traces of actions by all users.
Intersalon Tip
You can find out more information about the various icons used within Intersalon by clicking here.
See also
Users
Web Log
Workstations
intersalon
118 . Intersalon
Can't find the answers you're looking for?
●
Contact our support team on 01909 512131.
●
●
Email [email protected] and we'll personally get back to you as quickly as we can.
Check out our Support Portal, available 24/7 at intersalon.zendesk.com.
●
Or let us know by leaving a comment below:
intersalon
Intersalon . 119
Home > Intersalon > Reference Guide > Administration > Web Log
Web Log
This document explains the features of the page 'Administrator > Web Log'
The 'Web Log' displays which users have logged on and weather there log on was successful or not.
It also displays any application errors if any are to have occurred.
●
●
●
The Web Log can be searched by each field for e.g. when a user logged on or what error just occurred.
Definitions of the icons seen on this page can be found here
When you click the small arrow on the far left of the page in the first column of an event, extra information will be shown related to the
event.
intersalon
120 . Intersalon
●
Clicking the delete button will clear the log, once the log has been cleared you will not be able to get back cleared data.
Intersalon Tip
You can find out more information about the various icons used within Intersalon by clicking here.
See also
Users
Event Log
Workstations
Can't find the answers you're looking for?
●
Contact our support team on 01909 512131.
●
Email [email protected] and we'll personally get back to you as quickly as we can.
Check out our Support Portal, available 24/7 at intersalon.zendesk.com.
Or let us know by leaving a comment below:
●
●
intersalon
Intersalon . 121
Home > Intersalon > Reference Guide > Administration > Workstations
Workstations
This document explains the features of the page 'Administrator > Web Log'
It is very important that you set your salon's workstation in order for the salon diary to display correctly. Click here to find out what the salon
diary should and should not look like.
●
●
●
●
●
●
To setup a new workstation, click the 'New' button in the workstations section.
For an explanation of the icons within intersalon, click here
When adding a new workstation, intersalon automatically determines your computers screen resolution.
You must add a workstation description e.g. 'salon computer'.
if the computer is the one used at the salon check the 'salon computer' box.
if you wish yo use intersalon in Kiosk mode (full screen) check the box and the planner will be optimized for full screen viewing.
Intersalon Tip
You can find out more information about the various icons used within Intersalon by clicking here.
See also
Users
Event Log
Web Log
Can't find the answers you're looking for?
●
●
●
●
Contact our support team on 01909 512131.
Email [email protected] and we'll personally get back to you as quickly as we can.
Check out our Support Portal, available 24/7 at intersalon.zendesk.com.
Or let us know by leaving a comment below:
intersalon
122 . Intersalon
intersalon
Intersalon . 123
Home > Intersalon > Reference Guide > Analytics
Analytics
Here is some sample text. Here is some sample text. Here is some sample text. Here is some sample text. Here is some sample text.
Here is some sample text. Here is some sample text. Here is some sample text. Here is some sample text. Here is some sample text.
Here is some sample text. Here is some sample text. Here is some sample text.
Sales
Intersalon Tip
If you click on any any menu option on the widget tool bar and it's already open, Intersalon will bring the selected
widget to the front of any other open widgets. This is a quick way of locating the widget you wish to view.
Daily Duty
If you click on any any menu option on the widget tool bar and it's already open, Intersalon will bring the selected
widget to the front of any other open widgets. This is a quick way of locating the widget you wish to view.
Weekly Duty
If you click on any any menu option on the widget tool bar and it's already open, Intersalon will bring the selected
widget to the front of any other open widgets. This is a quick way of locating the widget you wish to view.
See also
What is the default security setup for each role?
Administration
Appointments
Clients
Ecommerce
Newsletters
Reports
Retail
Settings
SMS Text Messages
Stylists and Services
Social Networking
Can't find the answers you're looking for?
●
●
●
●
Contact our support team on 01909 512131.
Email [email protected] and we'll personally get back to you as quickly as we can.
Check out our Support Portal, available 24/7 at intersalon.zendesk.com.
Or let us know by leaving a comment below:
intersalon
124 . Intersalon
Home > Intersalon > Reference Guide > Analytics > Sales
Sales
Here is some sample text. Here is some sample text. Here is some sample text. Here is some sample text. Here is some sample text.
Here is some sample text. Here is some sample text. Here is some sample text. Here is some sample text. Here is some sample text.
Here is some sample text. Here is some sample text. Here is some sample text.
Intersalon Tip
If you click on any any menu option on the widget tool bar and it's already open, Intersalon will bring the selected
widget to the front of any other open widgets. This is a quick way of locating the widget you wish to view.
Daily Duty
If you click on any any menu option on the widget tool bar and it's already open, Intersalon will bring the selected
widget to the front of any other open widgets. This is a quick way of locating the widget you wish to view.
Weekly Duty
If you click on any any menu option on the widget tool bar and it's already open, Intersalon will bring the selected
widget to the front of any other open widgets. This is a quick way of locating the widget you wish to view.
See also
Can't find the answers you're looking for?
●
●
●
●
intersalon
Contact our support team on 01909 512131.
Email [email protected] and we'll personally get back to you as quickly as we can.
Check out our Support Portal, available 24/7 at intersalon.zendesk.com.
Or let us know by leaving a comment below:
Intersalon . 125
Home > Intersalon > Reference Guide > Appointments
Appointments
The Appointments module contains the main appointment planner, and a searchable appointment list.
Subsections
Planner
Appointment List
Multi-Service Booking
See also
What is the default security setup for each role?
Administration
Analytics
Clients
Ecommerce
Newsletters
Reports
Retail
Settings
SMS Text Messages
Stylists and Services
Social Networking
Can't find the answers you're looking for?
●
●
●
●
Contact our support team on 01909 512131.
Email [email protected] and we'll personally get back to you as quickly as we can.
Check out our Support Portal, available 24/7 at intersalon.zendesk.com.
Or let us know by leaving a comment below:
intersalon
126 . Intersalon
Home > Intersalon > Reference Guide > Appointments > Planner
Note:
A major new version of Intersalon has been released. This help document is awaiting review, and as such may contain obsolete content. For more information please contact support. To find out what's new please click here.
Planner
This document explains the features of the page 'Appointments > Planner'
The planner is the heart of intersalon, it shows the day's appointment schedule or can show in week/month format.
●
The 'Client' button is used to select a client to be used with the right click menu or the search (availability checker) function.
●
These are stylist groups and clicking them allows you to switch between groups or display all.
To learn how to create stylist groups, click Stylist Groups
●
This button allows you to search for an available appointment slot.
●
The 'New' Button opens the new appointment pop-up.
●
The new appointment pop-up allows appointments to be created, an example is shown above.
This button allows you to select a client when clicked, a list of clients will open.
●
intersalon
Intersalon . 127
●
The 'Resource View' button switches the planner to a resource/room view
●
The resource view show's appointments by which room/resource they use.
●
Clicking the button will hide the end stylist in the planner, clicking it each other time will hide one more stylist then you can use the < > buttons to toggle through stylists, this feature is ideal for smaller screens, clicking the + button will then
restore an extra stylist to the page.
●
●
Clicking the < > buttons either side of the 'Today' button will move the planner a day in the preffered direction and to return to today's planner click 'Today'
The planner has three available view's; day view (standard), week view and month view.
Week View:
●
Month View:
●
-
Intersalon Tip
You can find out more information about the various icons used within Intersalon by clicking here.
See also
Appointment List
Multi-Service Booking
intersalon
128 . Intersalon
Can't find the answers you're looking for?
●
●
●
●
Contact our support team on 01909 512131.
Email [email protected] and we'll personally get back to you as quickly as we can.
Check out our Support Portal, available 24/7 at intersalon.zendesk.com.
Or let us know by leaving a comment below:
intersalon
Intersalon . 129
Home > Intersalon > Reference Guide > Appointments > Appointment List
Note:
A major new version of Intersalon has been released. This help document is awaiting review, and as such may contain obsolete content. For more information please contact support. To find out what's new please click here.
Appointment List
This document explains the features of the page 'Appointments > Appointment List'
●
The Appointment List shows all the appointments on one page in text format, it can be exported to PDF or Excel and can then be printed.
More information is given on the appointment list opposed to the planner for example the appointment list shows wether a client has recieved an SMS appointment remiender and also shows the 'No show risk'.
●
Appointments can be edited by clicking the edit icon
●
The image above shows an appointment with the in-line editor open, from here you can change the stylist the appointment is booked with, also the status and referral type.
●
You can search the appointment list by every field, e.g. here I have searched for mens services.
●
See also
Planner
Multi-Service Booking
Can't find the answers you're looking for?
●
●
●
●
Contact our support team on 01909 512131.
Email [email protected] and we'll personally get back to you as quickly as we can.
Check out our Support Portal, available 24/7 at intersalon.zendesk.com.
Or let us know by leaving a comment below:
intersalon
130 . Intersalon
Home > Intersalon > Reference Guide > Appointments > Multi-Service Booking
Note:
A major new version of Intersalon has been released. This help document is awaiting review, and as such may contain
obsolete content. For more information please contact support. To find out what's new please click here.
Multi-Service Booking
●
Multi service booking can be accessed from the availabilty checker on the dashboard or the search feature in the planner.
●
The way the new booking engine works is, you select your client and stylist first, then a service group and then
one or more services, you can select multiple services in each group and the selected services are shown at the bottom.
●
Once you have the required services selected, click 'Find Availability'
intersalon
Intersalon . 131
●
If there is available slots, they will be shown below, to choose a slot, click the 'Book button and the appointments will be
added to the planner.
See also
Planner
Appointment List
Can't find the answers you're looking for?
●
●
●
●
Contact our support team on 01909 512131.
Email [email protected] and we'll personally get back to you as quickly as we can.
Check out our Support Portal, available 24/7 at intersalon.zendesk.com.
Or let us know by leaving a comment below:
intersalon
132 . Intersalon
Home > Intersalon > Reference Guide > Clients
Clients
The clients module contains your customer database, including birthdays and appointment notes.
Subsections
Client List
Client Files & Photos
Custom Fields
Subscribing Clients To Newsletters
See also
What is the default security setup for each role?
Administration
Analytics
Appointments
Ecommerce
Newsletters
Reports
Retail
Settings
SMS Text Messages
Stylists and Services
Social Networking
Can't find the answers you're looking for?
●
●
●
●
intersalon
Contact our support team on 01909 512131.
Email [email protected] and we'll personally get back to you as quickly as we can.
Check out our Support Portal, available 24/7 at intersalon.zendesk.com.
Or let us know by leaving a comment below:
Intersalon . 133
Home > Intersalon > Reference Guide > Clients > Client List
Note:
A major new version of Intersalon has been released. This help document is awaiting review, and as such may contain obsolete content. For more information
please contact support. To find out what's new please click here.
Client List
This document explains the features of the page 'Clients > Client List'
●
Intersalon features a client database which stores all customer information, the client database can be exported to either PDF or Excel format for record or printing.
●
The client list can be searched to make client selection much faster
●
To add a new client, Click the 'New' button. To edit a client click the Pen & Paper icon the edit page is the same as the create page.
●
Client details should be filled out like shown above, only first & last name are required by default but this can be changed in Settings>System settings>New
intersalon
134 . Intersalon
customer required fields.
●
Multiple or all clients can be selected for deletion.
●
You can select 2 identical clients and click merge to make the 2 records into one.
●
By clicking the small key icon next to each search box, you can change the way the database is searched.
●
When you click the 'Customise' button, the field chooser window will open and this enables you to drag and drop fields
on and off the column headers, so you can hide fields you don't use and add other ones.
intersalon
Intersalon . 135
Intersalon Tip
You can find out more information about the various icons used within Intersalon by clicking here.
See also
Client Files & Photos
Custom Fields
Subscribing Clients To Newsletters
Can't find the answers you're looking for?
●
Contact our support team on 01909 512131.
●
Email [email protected] and we'll personally get back to you as quickly as we can.
●
Check out our Support Portal, available 24/7 at intersalon.zendesk.com.
●
Or let us know by leaving a comment below:
intersalon
136 . Intersalon
Home > Intersalon > Reference Guide > Clients > Client Files & Photos
Note:
A major new version of Intersalon has been released. This help document is awaiting review, and as such may contain obsolete
content. For more information please contact support. To find out what's new please click here.
Client Files & Photos
A new feature which has been added to intersalon is the ability to add files and photos to a client's information.
Here you can upload client photos of previous treatments/cuts etc. Also you may upload any other relevant files such as a series of client notes.
To upload a file or photo, click 'Browse' in the bottom right, select your file or image then click 'Upload'.
You can also create new folders with the folder icon, rename files and folders with the pen&paper icon, move with the curved arrow and delete
with the red 'X'.
The last two icons (circle and arrow) are Refresh and download, refreshing will reload the content and downloading will save the selected file or
photo to your computer.
See also
Client List
Custom Fields
Subscribing Clients To Newsletters
intersalon
Intersalon . 137
Home > Intersalon > Reference Guide > Clients > Custom Fields
Note:
A major new version of Intersalon has been released. This help document is awaiting review, and as such may contain obsolete
content. For more information please contact support. To find out what's new please click here.
Custom Fields
In the latest release of Intersalon we have included a feature which allows users to create their own fields to be used when selecting and adding a
new client.
●
Here's the page you'll see when you navigate to (Customers>Custom Fields) We have two example entries shown, these will not be visible
on your system
if you are configuring custom fields for the first time.
●
To add a new custom field, click the 'New' button as you would when adding a new client.
intersalon
138 . Intersalon
●
●
●
●
●
The creation form will then open within the same page, you need to enter a name for the custom field and choose the data type such as
text, number or date.
Once you have filled out the two fields, click update to save changes.
Data type explanations;
*Text: Allows any letters or numbers of your choice up to 100 characters.
*Number: Only allows numbers to be entered and edited, no letters.
*Date: A date in DD/MM/YYYY format.
*Yes/No: A single checkbox to check for yes and uncheck for no.
Each data-type is shown below in the same order as the explanations.
Now when you go to add or edit a client, there will be a new tab on the end called 'custom fields' like shown above, this is where the
fields you have created can be populated.
intersalon
Intersalon . 139
●
To use your new custom fields in the grid views you will need to add the columns by clicking 'Customise' which will open the field chooser
and allow you to drag the fields into the grid.
See also
Client List
Client Files & Photos
Subscribing Clients To Newsletters
intersalon
140 . Intersalon
Home > Intersalon > Reference Guide > Clients > Subscribing Clients To Newsletters
Subscribing Clients To Newsletters
Customers can be added as a subscriber to a specific newsletter in any one of the following ways:
1.
2.
3.
4.
Creating a new customer using the 'New Customer' widget - click here to learn more
Using a newsletter subscription web part on your Intersalon website so the client subscribes themselves
Editting the client's details and adding their subscription on the 'Newsletters' tab - click here to learn more
Subscribing a group of the clients using the menu on the Client list toolbar
Subscribing a Group of Clients to a Newsletter
You can use the client list to subscribe a group of clients to a specific newsletter. The first step is to navigate the client list and use
the selection checkboxes at the side of the clients name to select each of the clients you want to become subscribers. To learn how
to use the grid to quickly find clients then click here.
Next click on the 'Subscribe Selected' toolbar button.
<image to go here>
A popup screen will appear that will list all your configured newsletters. Select the checkbox for the newsletter(s) you wish to
subscribe the client to and then click 'Subscribe'
<image to go here>
Intersalon will gather the selected email address from their records and add this email address as a subscriber to the newsletter(s)
selected. If the client doesn't have a valid email address then they will not be added as subscriber. If they are already a subscriber
their email address will not be added twice.
A client can be unsubscribed to a newsletter by either following the unsubscribe link that must be provided in the newsletter
content or they can be unsubscribed by the salon either by editting the clients newsletter subscriptions or deleting them as a
subscriber on the newsletter configuration page.
See also
Client List
Client Files & Photos
Custom Fields
Can't find the answers you're looking for?
●
●
●
●
intersalon
Contact our support team on 01909 512131.
Email [email protected] and we'll personally get back to you as quickly as we can.
Check out our Support Portal, available 24/7 at intersalon.zendesk.com.
Or let us know by leaving a comment below:
Intersalon . 141
Home > Intersalon > Reference Guide > Ecommerce
Ecommerce
This module contains advanced options connected to your website's ecommerce offering.
Subsections
General
Emails
Payment Methods
Shipping Options
See also
What is the default security setup for each role?
Administration
Analytics
Appointments
Clients
Newsletters
Reports
Retail
Settings
SMS Text Messages
Stylists and Services
Social Networking
Can't find the answers you're looking for?
●
●
●
●
Contact our support team on 01909 512131.
Email [email protected] and we'll personally get back to you as quickly as we can.
Check out our Support Portal, available 24/7 at intersalon.zendesk.com.
Or let us know by leaving a comment below:
intersalon
142 . Intersalon
Home > Intersalon > Reference Guide > Ecommerce > General
Note:
A major new version of Intersalon has been released. This help document is awaiting review, and as such may contain
obsolete content. For more information please contact support. To find out what's new please click here.
General
ECommerce is an online shop system that is built into Intersalon which can be used for selling salon products online.
These settings only apply when you have an online shop built by us. For more information please email: [email protected]
●
●
●
●
For ECommerce
You can enter a
shipping.
By checking the
By checking the
to function correctly you must first set your location, choose your country from the drop down list.
minimum amount so when a sale price is greater than or equal to that amount the client is not billed for
'Allow anonymous customers' will allow clients without a registerd account to buy products off your website.
'Use an extra company address'
Intersalon Tip
You can find out more information about the various icons used within Intersalon by clicking here.
See also
Emails
Payment Methods
Shipping Options
Can't find the answers you're looking for?
●
intersalon
Contact our support team on 01909 512131.
Intersalon . 143
●
Email [email protected] and we'll personally get back to you as quickly as we can.
●
Check out our Support Portal, available 24/7 at intersalon.zendesk.com.
●
Or let us know by leaving a comment below:
intersalon
144 . Intersalon
Home > Intersalon > Reference Guide > Ecommerce > Emails
Note:
A major new version of Intersalon has been released. This help document is awaiting review, and as such may contain
obsolete content. For more information please contact support. To find out what's new please click here.
Emails
●
ECommerce sends email notifications to clients and you, for this to work you must enter an email address
to send emails to clients from and one for you to receive notifications.
●
The 'Send order notification' feature will email clients an email reviewing their order.
The 'Send payment notification' feature will email clients notifying them of successful payment.
●
See also
General
Payment Methods
Shipping Options
intersalon
Intersalon . 145
Home > Intersalon > Reference Guide > Ecommerce > Payment Methods
Note:
A major new version of Intersalon has been released. This help document is awaiting review, and as such may contain obsolete content. For more information
please contact support. To find out what's new please click here.
Payment Methods
●
Various online payment methods can be used with intersalon, e.g. PayPal and Google Checkout.
●
To setup a new payment method, click the 'New' button.
●
Gateway Url: This is the link to your external payment page, you can get this from you're chosen payment service.
Class: The type of service that is provided by the payment company.
Failed order status: The notification to be sent on failed payment.
Successful order status: The notification to be sent on payment being recieved.
●
●
●
See also
General
Emails
Shipping Options
intersalon
146 . Intersalon
Home > Intersalon > Reference Guide > Ecommerce > Shipping Options
Note:
A major new version of Intersalon has been released. This help document is awaiting review, and as such may contain obsolete content. For more information
please contact support. To find out what's new please click here.
Shipping Options
●
Here you can configure the shipping options for what customers are able to select when buying products off your website.
●
To add a new postal method, click the 'New' button.
●
Fill in the details, once done click 'Update' to save.
The new shipping option will now appear within online booking
●
See also
General
Emails
Payment Methods
intersalon
Intersalon . 147
Home > Intersalon > Reference Guide > Newsletters
Newsletters
This module controls your newsletter options, issues and subscribers.
Subsections
Newsletters
Email Queue
See also
What is the default security setup for each role?
Administration
Analytics
Appointments
Clients
Ecommerce
Reports
Retail
Settings
SMS Text Messages
Stylists and Services
Social Networking
Can't find the answers you're looking for?
●
●
●
●
Contact our support team on 01909 512131.
Email [email protected] and we'll personally get back to you as quickly as we can.
Check out our Support Portal, available 24/7 at intersalon.zendesk.com.
Or let us know by leaving a comment below:
intersalon
148 . Intersalon
Home > Intersalon > Reference Guide > Newsletters > Newsletters
Note:
A major new version of Intersalon has been released. This help document is awaiting review, and as such may contain
obsolete content. For more information please contact support. To find out what's new please click here.
Newsletters
The 'Newsletter Module' in Intersalon allows you to configure, populate and send email newsletters.
Newsletters in Intersalon are classified as either 'Static' or 'Dynamic'. A 'Static' newsletter is one where the content; once created
will not vary for that issue, if you want to change the content then you would normally create another issue. A 'Static' newsletter
has no connection to your Intersalon website. A 'Dynamic' newsletter points to one of the Intersalon website pages, it's called
'Dynamic' because the assumption is made that the content of this page will vary, either automatically if it is showing news or blog
posts or manually if it is a page that is updated by a user.
To learn how to create a 'Static' newsletter, produce your first issue and send then click here .
To learn how to setup a webpage within your Intersalon website and set this page as a 'Dynamic' newsletter then click here.
The newsletter list is a list of all the configured newsletters and their types in your system. As standard Intersalon comes preconfigured with the '_baseNewsletter' which is dynamic newsletter.
There is no limitation in Intersalon on the number or types of newsletter you can have.
See also
Email Queue
intersalon
Intersalon . 149
Home > Intersalon > Reference Guide > Newsletters > Email Queue
Note:
A major new version of Intersalon has been released. This help document is awaiting review, and as such may contain
obsolete content. For more information please contact support. To find out what's new please click here.
Email Queue
This opening paragraph should describe the feature that you are documenting. Explain how it is commonly used and what the
benefits are. For example: The Widget Master email link allows you to easily send information about each widget to various
departments within your company. Often, the feature that you are documenting can be best explained by walking the reader
through step by step. Use screenshots to illustrate the steps where possible.
[SubHeading]
This opening paragraph should describe the feature that you are documenting. Explain how it is commonly used and what the
benefits are. For example: The Widget Master email link allows you to easily send information about each widget to various
departments within your company. Often, the feature that you are documenting can be best explained by walking the reader
through step by step. Use screenshots to illustrate the steps where possible.
1.
2.
3.
Start the application by…
On the startup screen, click the…
Note
See also
Newsletters
intersalon
150 . Intersalon
Home > Intersalon > Reference Guide > Reports
Reports
The reports module contains a vast array of reporting features designed for salon businesses.
Subsections
Report List
Daily Sales Summary
Inventory
Stylist Appointment List
See also
What is the default security setup for each role?
Administration
Analytics
Appointments
Clients
Ecommerce
Newsletters
Retail
Settings
SMS Text Messages
Stylists and Services
Social Networking
Can't find the answers you're looking for?
●
●
●
●
intersalon
Contact our support team on 01909 512131.
Email [email protected] and we'll personally get back to you as quickly as we can.
Check out our Support Portal, available 24/7 at intersalon.zendesk.com.
Or let us know by leaving a comment below:
Intersalon . 151
Home > Intersalon > Reference Guide > Reports > Report List
Note:
A major new version of Intersalon has been released. This help document is awaiting review, and as such may contain obsolete
content. For more information please contact support. To find out what's new please click here.
Report List
Intersalon features a built in reporting system which allows you to monitor your salon's progress.
●
There are multiple reports for each seciton of the system, choose a report to runand click the 'Run Report' button (the first one in the
line)
intersalon
152 . Intersalon
●
Once you have ran the report and the results are shown, you can save or print the results, if you do neither of these and navigate away
from the page, the current report will be lost.
See also
Daily Sales Summary
Inventory
Stylist Appointment List
intersalon
Intersalon . 153
Home > Intersalon > Reference Guide > Reports > Daily Sales Summary
Daily Sales Summary
Here is some sample text. Here is some sample text. Here is some sample text. Here is some sample text. Here is some sample text.
Here is some sample text. Here is some sample text. Here is some sample text. Here is some sample text. Here is some sample text.
Here is some sample text. Here is some sample text. Here is some sample text.
Intersalon Tip
If you click on any any menu option on the widget tool bar and it's already open, Intersalon will bring the selected
widget to the front of any other open widgets. This is a quick way of locating the widget you wish to view.
Daily Duty
If you click on any any menu option on the widget tool bar and it's already open, Intersalon will bring the selected
widget to the front of any other open widgets. This is a quick way of locating the widget you wish to view.
Weekly Duty
If you click on any any menu option on the widget tool bar and it's already open, Intersalon will bring the selected
widget to the front of any other open widgets. This is a quick way of locating the widget you wish to view.
See also
Report List
Inventory
Stylist Appointment List
Can't find the answers you're looking for?
●
●
●
●
Contact our support team on 01909 512131.
Email [email protected] and we'll personally get back to you as quickly as we can.
Check out our Support Portal, available 24/7 at intersalon.zendesk.com.
Or let us know by leaving a comment below:
intersalon
154 . Intersalon
Home > Intersalon > Reference Guide > Reports > Inventory
Inventory
Here is some sample text. Here is some sample text. Here is some sample text. Here is some sample text. Here is some sample text.
Here is some sample text. Here is some sample text. Here is some sample text. Here is some sample text. Here is some sample text.
Here is some sample text. Here is some sample text. Here is some sample text.
Intersalon Tip
If you click on any any menu option on the widget tool bar and it's already open, Intersalon will bring the selected
widget to the front of any other open widgets. This is a quick way of locating the widget you wish to view.
Daily Duty
If you click on any any menu option on the widget tool bar and it's already open, Intersalon will bring the selected
widget to the front of any other open widgets. This is a quick way of locating the widget you wish to view.
Weekly Duty
If you click on any any menu option on the widget tool bar and it's already open, Intersalon will bring the selected
widget to the front of any other open widgets. This is a quick way of locating the widget you wish to view.
See also
Report List
Daily Sales Summary
Stylist Appointment List
Can't find the answers you're looking for?
●
●
●
●
intersalon
Contact our support team on 01909 512131.
Email [email protected] and we'll personally get back to you as quickly as we can.
Check out our Support Portal, available 24/7 at intersalon.zendesk.com.
Or let us know by leaving a comment below:
Intersalon . 155
Home > Intersalon > Reference Guide > Reports > Stylist Appointment List
Stylist Appointment List
Here is some sample text. Here is some sample text. Here is some sample text. Here is some sample text. Here is some sample text.
Here is some sample text. Here is some sample text. Here is some sample text. Here is some sample text. Here is some sample text.
Here is some sample text. Here is some sample text. Here is some sample text.
Intersalon Tip
If you click on any any menu option on the widget tool bar and it's already open, Intersalon will bring the selected
widget to the front of any other open widgets. This is a quick way of locating the widget you wish to view.
Daily Duty
If you click on any any menu option on the widget tool bar and it's already open, Intersalon will bring the selected
widget to the front of any other open widgets. This is a quick way of locating the widget you wish to view.
Weekly Duty
If you click on any any menu option on the widget tool bar and it's already open, Intersalon will bring the selected
widget to the front of any other open widgets. This is a quick way of locating the widget you wish to view.
See also
Report List
Daily Sales Summary
Inventory
Can't find the answers you're looking for?
●
●
●
●
Contact our support team on 01909 512131.
Email [email protected] and we'll personally get back to you as quickly as we can.
Check out our Support Portal, available 24/7 at intersalon.zendesk.com.
Or let us know by leaving a comment below:
intersalon
156 . Intersalon
Home > Intersalon > Reference Guide > Retail
Retail
The retail module contains your order history, product database as well as discount vouchers and levels configuration.
Subsections
Orders
Till Requests
Products
Manufacturers
Discount Vouchers
Discount Levels
Loyalty Points
Receipt Template
Analysis
See also
What is the default security setup for each role?
Administration
Analytics
Appointments
Clients
Ecommerce
Newsletters
Reports
Settings
SMS Text Messages
Stylists and Services
Social Networking
Can't find the answers you're looking for?
●
●
●
●
intersalon
Contact our support team on 01909 512131.
Email [email protected] and we'll personally get back to you as quickly as we can.
Check out our Support Portal, available 24/7 at intersalon.zendesk.com.
Or let us know by leaving a comment below:
Intersalon . 157
Home > Intersalon > Reference Guide > Retail > Orders
Note:
A major new version of Intersalon has been released. This help document is awaiting review, and as such may contain obsolete
content. For more information please contact support. To find out what's new please click here.
Orders
●
The Orders page is where you will find the history of all sales that have gone thorugh the system. Here you can create, edit and delete
orders.
The order list can be exported to Excel or PDF format
●
Clicking the 'New' button on the orders page has the same function as clicking 'New Sale' in the point of sale menu, it allows you to select
a customer and go through the checkout process as usual.
intersalon
158 . Intersalon
●
●
●
By clicking the 'Daily Report' button on the top toolbar, you can view a basic sales report for any day of your choice, an example is shown
above.
The order list can be searched using the text entry boxes at the top of each column.
The order list can be exported to Adobe PDF or Excel spreadsheet formats, to do this click either of the buttons on the top right.
See also
Till Requests
Products
Manufacturers
Discount Vouchers
Discount Levels
Loyalty Points
Receipt Template
Analysis
intersalon
Intersalon . 159
Home > Intersalon > Reference Guide > Retail > Till Requests
Note:
A major new version of Intersalon has been released. This help document is awaiting review, and as such may contain obsolete
content. For more information please contact support. To find out what's new please click here.
Till Requests
Intersalon keeps track of till openings and they can be specified one of these reasons, Float, Cash-Up and Petty Cash.
●
●
●
Shown above are example records for each type of till request.
Till requests can be exported to PDF or Excel format like most data within intersalon.
Till requests can be deleted seperatley or in bulk by using the 'Select All' option then deleting.
See also
Orders
Products
Manufacturers
Discount Vouchers
Discount Levels
Loyalty Points
Receipt Template
Analysis
intersalon
160 . Intersalon
Home > Intersalon > Reference Guide > Retail > Products
Note:
A major new version of Intersalon has been released. This help document is awaiting review, and as such may contain obsolete
content. For more information please contact support. To find out what's new please click here.
Products
Here you can create, edit and delete products, follow the tutorial below to learn how to add a product.
●
Navigate to the retail section in the tools menu, then click the products tab, then click 'New'.
●
you will be taken to the new product details list
Fill in the required product details (marked with an asterisk *) and the others are optional but reccomended.
●
intersalon
Intersalon . 161
❍
❍
❍
❍
❍
Product Name:Write the product name so
that it is easily identified.
Price:The amount to be charged when the
product is sold.
Stock Code:Manufacturer code, for reordering, the code to be given to the
supplier.
Product Number:Use this field if you have a
quick reference number for a product.
RRP: The Reccomended retail price from the
manufacturer.
❍
Whole sale price: The price of this item
when sold in bulk.
❍
Enabled: Check this box if the product is
currently on sale, un-check it if a product is
out of stock or been discontinued.
Is Voucher: check this box if the product is
a store voucher.
Available Items:The amount of this item in
stock.
Minimum stock level: When stock reaches
this level new stock can be re-orderd
Manufacturer:The company that makes the
product, a new one can be added by clicking
'add new'. Click here for more info.
❍
❍
❍
❍
❍
Internal status: Whether the item
Retail/Stock.
●
Now click 'Save' to save the new product, extra optional fields will be shown, these fields are web-related items and are not
necesarry at this land will be coverd in a later tutorial.
●
Now click on the 'Products' tab again to return to the product list.
Your new product will now be shown in the list and will be available for selection when completing a sale.
From the product list, you can check a box at the start of a row then click the price change button on the tool bar, you can enter a
new price or go up in percentage.
●
●
See also
Orders
Till Requests
Manufacturers
Discount Vouchers
Discount Levels
Loyalty Points
Receipt Template
Analysis
intersalon
162 . Intersalon
intersalon
Intersalon . 163
Home > Intersalon > Reference Guide > Retail > Manufacturers
Note:
A major new version of Intersalon has been released. This help document is awaiting review, and as such may contain obsolete
content. For more information please contact support. To find out what's new please click here.
Manufacturers
1.
To add a new manufacturer, navigate to the 'Retail' section, then click the 'Manufacturers' tab.
2.
3.
Click the 'New' button and you will see something similar to the screen below.
Enter the manufacturer's details, (Name & Website). Check the 'Manufacturer Enabled' box if the product is available for sale, this will
also enable the product on the salon website.
Once all details are entered, click 'Update' to save changes.
4.
If you have any further needs,
please send an email to:
[email protected]
intersalon
164 . Intersalon
Home > Intersalon > Reference Guide > Retail > Discount Vouchers
Note:
A major new version of Intersalon has been released. This help document is awaiting review, and as such may contain obsolete
content. For more information please contact support. To find out what's new please click here.
Discount Vouchers
Intersalon features the use of discount vouchers that can be sold or given to customers as promotions etc.
●
To create a new voucher, navigate to the 'Retail' section on the tools menu and then to the 'Discount Vouchers' tab.
●
Click the 'New' button to continue to the next step, you will see the screen below in which you can enter the voucher details.
intersalon
Intersalon . 165
❍
Discount coupon name: The name of the
voucher e.g. '£10 discount voucher'
❍
Discount coupon code: The Product ID of
the voucher.
❍
Absolute discount: A set cash amount to
be reduced from the final price of an order.
Relative discount: A percentage discount
of the final price of the order.
Discount value: The amount in £ or the
percentage to be discounted.
❍
❍
●
❍
Valid from: The date from when the
voucher can be used
❍
Valid to: The date the voucher is no longer
valid.
Once all details are correct, click 'OK' and the changes will be saved.
See also
Orders
Till Requests
Products
Manufacturers
Discount Levels
Loyalty Points
Receipt Template
Analysis
intersalon
166 . Intersalon
Home > Intersalon > Reference Guide > Retail > Discount Levels
Note:
A major new version of Intersalon has been released. This help document is awaiting review, and as such may contain obsolete
content. For more information please contact support. To find out what's new please click here.
Discount Levels
Intersalon features the ability to use internal discounts which can be used if the salon has offers on or it is a time such as the january sales.
●
Navigate to the 'Discount Levels' tab within the Retail section.
●
Click the 'New' button to continue.
intersalon
Intersalon . 167
❍
❍
❍
❍
●
Discount Level Enabled: Check this box if
the discount is currently live and being used.
Discount Level Name: The name of the
discount period/level e.g. 'January Sales'
Discount Level (%): The percentage to be
taken off orders.
Valid from/to: Enter the dates of when
the discount voucher can be used.
Fill in the details of the discount and click 'Update' to save, the new discount level will now be shown in the list.
If you have any further needs,
please send an email to:
[email protected]
intersalon
168 . Intersalon
Home > Intersalon > Reference Guide > Retail > Loyalty Points
Note:
A major new version of Intersalon has been released. This help document is awaiting review, and as such may contain obsolete
content. For more information please contact support. To find out what's new please click here.
Loyalty Points
With intersalon, you can allow customers to collect loyalty points with each purchase they make.
●
Loyalty Point settings can be found in Retail>Loyalty Points.
●
The settings on this page should be fairly self explanatory as all you need to do is set the amount of points awarded per £ and the value
of a point when they are used.
See also
Orders
Till Requests
Products
Manufacturers
Discount Vouchers
Discount Levels
Receipt Template
Analysis
intersalon
Intersalon . 169
Home > Intersalon > Reference Guide > Retail > Receipt Template
Note:
A major new version of Intersalon has been released. This help document is awaiting review, and as such may contain obsolete
content. For more information please contact support. To find out what's new please click here.
Reciept Template
You can customise your reciept template if you are competent with HTML (how websites are built) but you can email us what you want your
reciept to look like and we can do that for you.
At the bottom of the image you can see the list of 'Macros' these fetch data from the system and show the real time value, they can be put in
the reciept template.
See also
Orders
Till Requests
Products
Manufacturers
Discount Vouchers
Discount Levels
Loyalty Points
Analysis
intersalon
170 . Intersalon
Home > Intersalon > Reference Guide > Retail > Analysis
Note:
A major new version of Intersalon has been released. This help document is awaiting review, and as such may contain
obsolete content. For more information please contact support. To find out what's new please click here.
Analysis
This opening paragraph should describe the feature that you are documenting. Explain how it is commonly used and what the
benefits are. For example: The Widget Master email link allows you to easily send information about each widget to various
departments within your company. Often, the feature that you are documenting can be best explained by walking the reader
through step by step. Use screenshots to illustrate the steps where possible.
[SubHeading]
This opening paragraph should describe the feature that you are documenting. Explain how it is commonly used and what the
benefits are. For example: The Widget Master email link allows you to easily send information about each widget to various
departments within your company. Often, the feature that you are documenting can be best explained by walking the reader
through step by step. Use screenshots to illustrate the steps where possible.
1.
2.
3.
Start the application by…
On the startup screen, click the…
Note
See also
Orders
Till Requests
Products
Manufacturers
Discount Vouchers
Discount Levels
Loyalty Points
Receipt Template
intersalon
Intersalon . 171
Home > Intersalon > Reference Guide > Settings
Note:
A major new version of Intersalon has been released. This help document is awaiting review, and as such may contain
obsolete content. For more information please contact support. To find out what's new please click here.
Settings
The settings module allows you to customise the system to your needs, enable extra features such as email notifications, and adding
planner events.
See also
What is the default security setup for each role?
Administration
Analytics
Appointments
Clients
Ecommerce
Newsletters
Reports
Retail
SMS Text Messages
Stylists and Services
Social Networking
intersalon
172 . Intersalon
Home > Intersalon > Reference Guide > Settings > Appointments
Note:
A major new version of Intersalon has been released. This help document is awaiting review, and as such may contain obsolete
content. For more information please contact support. To find out what's new please click here.
Appointments
1.
To access the different features of Intersalon use the navigation menu on the left hand side of the screen. Most of the common everyday features are included under the section called 'Point Of Sale'. To access the system settings we need to open up the 'Tools' group
and then click on the item called 'Settings'.
2.
The first page that is displayed is all about setting up the appointment system. There are quite a few options on this page, some of
which control how the 'Online Booking' system works which will be covered in detail in later tutorials. For the moment we'll concentrate
on the one that we need to get started.
Settings Explained
●
●
●
●
●
●
●
●
●
●
●
First Appointment Booking Time - Is used for appointment searching when booking online or in the
salon. Set this to the time when you want to start accepting appointments.
Last Appointment Booking Time - Is used for appointment searching when booking online or in the
salon. Set this to the time when you want to last appointment time.
Planner Start and End Times - These settings control the view size for the planner. Eveybody's
computer screen size is different so you might to adjust these to get the view you want.
Interval - The interval sets the size of each block on the planner. Its usually best to set this to a half
of your smallest service time.
Salon Non Working Days - This is used for online booking only.
Show Photo's In Planner - If you want to show stylist photo's in their column on the planner check
this box
Auto Bookback- When adding services in the planner 'Using the Right Click Menu' Intersalon will
automatically add dependant second services to the same stylist. This is normal for most salon's.
Enforce Styling Rates - This option will ensure that when services are added to the planner that the
chosen stylist performs that service and that a cost has been associated with i.e. a styling rate
Check Resource Allocation - If Intersalon is being used to manage both stylist diaries and resources
eg. treatment rooms then this option needs to be checked
Allow Appointments Without Customer - We don't recommend that you allow appointments to be
booked without having a customer selected because it breaks the checking out process, however
this option should be checked if you do.
Planner Background Colour - We have chosen colours in the planner that best suit the range of
colours we offer for the services. However, if you prefer you can turn these colours off and have a
plain white background on the planner.
intersalon
Intersalon . 173
●
Email Appointment Reminder & Confirmation - You can choose to email your clients a confirmation
email every time they book an appointment. Also, you can select to send them a reminder on the
day prior to the appointment.
The 'Online Booking' options will be discussed in a later tutorial.
See also
Planner Events
System Settings
Salon Settings
intersalon
174 . Intersalon
Home > Intersalon > Reference Guide > Settings > Planner Events
Note:
A major new version of Intersalon has been released. This help document is awaiting review, and as such may contain obsolete
content. For more information please contact support. To find out what's new please click here.
Planner Events
Planner events are periods of time in the planner that are not appointments, they can be used for anything from Lunch breaks to Prep time.
To beable to add events to the planner, you will first need to create one, you can learn how to do this in the following turorial.
●
First, you'll need to navigate to the 'Settings' section within the 'Tools' menu and then to the 'Planner Events' tab at the top.
●
Once you're at the planner events page, click the 'New' button to get started.
●
Once you've clicked the new button, various fields will be shown, you will need to enter a name for the event, you can either enter a
specific duration or tick the 'All Day' box
the event duration can be edited from the planner later on if needed, you will also need to select what colour the event will be shown as
in the planner.
Once you have populated all the fields, click 'Update' in the bottom corner to save the new event.
●
intersalon
Intersalon . 175
●
●
Back in the planner, after you have saved the new event, right-click an availiable slot and mouse over 'Add Other Event' you will then see
the event
you just created is now shown in the list.
The event can now be used at anytime, anywhere in the planner, they can be used to create blocks in the planner to prevent booking
e.g if a stylist is off ill.
The events also will prevent online bookings going into their place, so if a stylist is off work, you can fill their availability in the planner so no
appointments can be booked there.
See also
Appointments
System Settings
Salon Settings
intersalon
176 . Intersalon
Home > Intersalon > Reference Guide > Settings > System Settings
Note:
A major new version of Intersalon has been released. This help document is awaiting review, and as such may contain obsolete
content. For more information please contact support. To find out what's new please click here.
System Settings
In this settings area there are some basic preferences that can be set.
Settings Explianed;
●
●
●
●
●
●
Automatic styling rate inserts and updates: This option should be checked if your stylists charge the same for a service, when you add a
new service with this option checked,
the base price you enter will be assigned to the stylists you mark as able to provide the service. However if you do not have this option
checked, you will have to enter all styling rates manually.
Mark appointments as complete using amount tendered: Appointments will only be marked as complete when the full amount is paid.
Request PIN for discounts: Checking this option will require a PIN code for a discount to be given on an order, you may edit the pin code
in the box below.
Enable reciept printing: This option when checked will attempt to print a reciept at the end of the checkout process, we reccomend you
leave this off to save time unless you have a reciept printer.
Time zone offset: This option must be set right for your location to ensure events are logged at correct times etc.
New customer required fields: You can choose what information is required when a new client is created, we reccomend you take a
mobile number and an email address as the option for sms & emails are available.
See also
Appointments
Planner Events
Salon Settings
intersalon
Intersalon . 177
Home > Intersalon > Reference Guide > Settings > Salon Settings
Note:
A major new version of Intersalon has been released. This help document is awaiting review, and as such may contain
obsolete content. For more information please contact support. To find out what's new please click here.
Salon Settings
VAT has changed in the new version of Intersalon. It's important to setup Intersalon correctly in order to produce accurate
reporting. The VAT setup screen can be found within the Settings area of Intersalon, under the Tax Options tab.
VAT Mode Selection
Intersalon can operate under 3 different VAT Tax modes.
1.
2.
3.
Not registered for Sales Tax
Registered for Sales Tax and want to work exclusive of Tax
Registered for Sales Tax and want to work inclusive of Tax
By default Intersalon runs in mode 1 - not registered for sales tax. No tax is calculated.
In mode 2, where products and services are priced exclusive of VAT requires a VAT registration number. This number is displayed on
receipts. When switching to this mode, existing products will have a VAT tax class added automatically. New products will also be
created with the VAT tax class added.
In mode 3, products and services are priced inclusive of VAT. No prices are adjusted, but VAT will be calculated on Intersalon
reports. This mode also required a VAT registration number.
Salon Details
intersalon
178 . Intersalon
These settings are used for the mobile booking website, you need to fill this out in the same way as shown above but relevant to
your salon.
See also
Appointments
Planner Events
System Settings
intersalon
Intersalon . 179
Home > Intersalon > Reference Guide > SMS Text Messages
Note:
A major new version of Intersalon has been released. This help document is awaiting review, and as such may contain
obsolete content. For more information please contact support. To find out what's new please click here.
SMS Text Messages
The SMS Text Messages allows you to link your TextAnywhere account to Intersalon, and once confirm, send appointment reminders
and mailshots.
See also
What is the default security setup for each role?
Administration
Analytics
Appointments
Clients
Ecommerce
Newsletters
Reports
Retail
Settings
Stylists and Services
Social Networking
intersalon
180 . Intersalon
Home > Intersalon > Reference Guide > SMS Text Messages > Account Settings
Note:
A major new version of Intersalon has been released. This help document is awaiting review, and as such may contain obsolete content. For more information please
contact support. To find out what's new please click here.
Account Settings
Intersalon customers can now link their salon software account to our text anywhere SMS supplier. This guide explains the process, and how customers can enable this functionality.
Creating a TextAnywhere account
If you don't already have an account, we start by creating one.
1.
2.
Expand the Tools section of the Intersalon left hand menu, and click on SMS Text Messages.
The SMS Text Messages section will consist of a single tab asking for your account settings. Once these are filled in, appointment reminders and mailshots will become available.
Since we don't have an account yet, click on "Create Account".
3.
This will pass you to our 3rd party SMS supplier TextAnywhere. Ensure you read and accept their terms and conditions, and complete Organisation and Contact details. For
account type, ensure "Full Account" is selected to ensure continuous service. Also ensure "TextOnline" is set as your Primary Application. Continue by pressing "Register" at the
bottom of the page.
NOTE: If you choose to pay via BACS or Direct Debit, your account will have unlimited credits and you will be billed by TextAnywhere at the end of each month. If you choose to
pay by Credit Card, you are paying for a set number of texts up front. Charges are dependent on quantity sent. More information is available by clicking here.
4.
At this point you will be taken to a signup complete page. A TextAnywhere customer service representative will then call you directly to confirm your Login and Password details.
You'll also receive email confirmation of your signup.
Attaching your TextAnywhere account to your Intersalon software
1.
Return to www.textanywhere.co.uk and click Client Login in the top right area of the screen.
intersalon
Intersalon . 181
2.
Enter your email and password from your TextAnywhere signup email, and Press login.
3.
Once you have logged in, continue to your Admin Panel, found on the top right of the following screen.
4.
From your Admin Panel, make a note of your Client_ID and Client_Pass. These are highlighted in purple text.
5.
Return to the SMS Text Messages section of Intersalon and enter your Client ID and Client Password into the relevant fields. Enter your mobile number and press the Send button
to confirm your account. If you receive the SMS correctly, tick the checkbox for "Did you receive this SMS?".
6.
The screen will update to verify your account. Press the save button to confirm all settings.
Note
See also
Mailshots
Appointment Reminders
intersalon
182 . Intersalon
Home > Intersalon > Reference Guide > SMS Text Messages > Mailshots
Note:
A major new version of Intersalon has been released. This help document is awaiting review, and as such may contain obsolete
content. For more information please contact support. To find out what's new please click here.
Sending SMS Mailshots.
1.
Navigate to the SMS Text Messages section within the tools menu, then to the Mailshots tab.
2.
SMS mailshots can be used for various things such as newsletters or to promote sales or discounts. Just enter the text you would like to
send into the message box and the name of the sender (salon name) in the title box.
Once happy with the message, click 'Next' to continue.
3.
Here you can check the customers that will recieve the message,type '07' into the phone number filter at the top of the list this will
prevent SMS being sent to landlines and wasted.
intersalon
Intersalon . 183
4.
Once you have selected the customers you would like to send the mailshot to, click 'Send SMS' to complete, providing you have enough
SMS messages available, they will all be sent.
If you have any further needs,
please send an email to:
[email protected]
intersalon
184 . Intersalon
Home > Intersalon > Reference Guide > SMS Text Messages > Appointment Reminders
Note:
A major new version of Intersalon has been released. This help document is awaiting review, and as such may contain obsolete
content. For more information please contact support. To find out what's new please click here.
SMS Appointment Remeinders.
1.
Navigate to the 'Appointement Remeinders' tab in the SMS Text Messages section.
2.
From here, you can alter who gets sent SMS messages, what time they are sent and how many days before the appointment.
3.
The message contents can also be edited, you can write the message or use the default. You can insert the client name, the stylist,
service, time, date and day.
put the cursor where you want the object then click it on the right hand side to insert. Click 'Preview Msg' and an example message will be
shown how the client would recieve it.
Click 'Save' and SMS text messages will be sent to subscribed customers or what category of customers you have selected, to make a
customer eligible, navigate to the clients section, go to the customer you want and click 'Details' then go to the 'Sms' tabthen you can
check the boxes to subscribe the client to SMS appointment remienders or SMS newsletters
4.
intersalon
Intersalon . 185
See also
Account Settings
Mailshots
intersalon
186 . Intersalon
Home > Intersalon > Reference Guide > Stylists and Services
Note:
A major new version of Intersalon has been released. This help document is awaiting review, and as such may contain
obsolete content. For more information please contact support. To find out what's new please click here.
Stylists and Services
The Stylists and Services module contains all configuration options for your stylists, such as roles and stylist groups. Services, service
groups and styling rates and also found here.
See also
What is the default security setup for each role?
Administration
Analytics
Appointments
Clients
Ecommerce
Newsletters
Reports
Retail
Settings
SMS Text Messages
Social Networking
intersalon
Intersalon . 187
Home > Intersalon > Reference Guide > Stylists and Services > Stylists
Note:
A major new version of Intersalon has been released. This help document is awaiting review, and as such may contain obsolete
content. For more information please contact support. To find out what's new please click here.
Stylists
1.
Navigate to the 'Stylists and Services' secton in the tools menu, the stylist list will be shown (see screenshot below). In our example,
we have already created six stylists but if you are configuring your first stylist, expect the list to be empty.
2.
Click the 'New' button to continue to the next step.
intersalon
188 . Intersalon
Field Descriptions;
❍
Role: Stylist can be assigned their role in the
salon e.g style director, senior stylist. The
role is used when presenting stylist
information on the salon web site.
❍
Stylist Group:If the salon has a large
number of stylists or if the software is being
used to manage multiple salons, each stylist
can be placed in a group. The stylist group
can then be selected in the planner.There
must always be a minimum of one stylist
group.
Photo:A small photo of the stylist can be
displayed in their column in the planner. The
system will accept file of the type jpeg, gif
and bmp and will automatically scale the
image so that it fits into the spcae provided
in the planner.
Enabled Online:The salon can decide which
services are available to be booked online,
however without this option being selected
then the stylist will not appear in the online
booking.
Show Planner:If the salon has members of
staff that they do not want to show in the
planner then this box can be left unchecked.
Auto Create Styling Rates:If services exist
when the stylist is created, checking this box
will create default styling rates for the stylist
and set thier value to the base value for the
service.
❍
❍
❍
❍
3.
Fill in the stylist's details and add a photo if required. The fields marked with an asterisk (*) are required and all others are optional
but recomended.
4.
when details are correct, click 'Save' and you will be redirected to the stylists page.
intersalon
Intersalon . 189
5.
The new stylist is now saved and will be shown in the planner and appointments can be added for the new stylist.(please note, if you
are new to intersalon there won't be any other stylists, these are just examples)
See also
Services
Styling Rates
Service Groups
Salon Roles
Stylist Groups
Resources
intersalon
190 . Intersalon
Home > Intersalon > Reference Guide > Stylists and Services > Services
Note:
A major new version of Intersalon has been released. This help document is awaiting review, and as such may contain obsolete
content. For more information please contact support. To find out what's new please click here.
Services
1.
Navigate to the 'Services' tab in the stylists and services section.
2.
'New Service' button to continue to the next step.
Field Descriptions
intersalon
Intersalon . 191
❍
❍
❍
❍
❍
Service Name:Each service requires a unique
name. This name is used globally within the
software when appointments are added or
viewed
Description: An optional description can
be included for the service. The description
can be displayed on the web site to give
customers a more detailed explanation of
what the service involves.
Duration: The length of the service in
minutes
Base Price: The starting or base price is the
price that will be used when initially adding
styling rates.
Service Group: Each service needs to be
placed in a group. The group is used in the
appointment menu on the planner and in the
reports so it important to choose your
groups carefully.
3.
Fill in the details of the new service to be added then click 'Save' to continue. When the Service has been saved succesfully the
'Styling Rate' grid will be displayed where the service can be allocated to the stylist. The checkbox in the left column will create the
styling rate and allocate it the base price set for the service. The actual price can be adjusted by clicking on the 'Edit' link, changing the
price and then clicking Update.
4.
Click the 'Services' tab again to return to the service list and the new service will be shown
intersalon
192 . Intersalon
See also
Stylists
Styling Rates
Service Groups
Salon Roles
Stylist Groups
Resources
intersalon
Intersalon . 193
Home > Intersalon > Reference Guide > Stylists and Services > Styling Rates
Note:
A major new version of Intersalon has been released. This help document is awaiting review, and as such may contain obsolete
content. For more information please contact support. To find out what's new please click here.
Styling Rates
Styling rates are used to define the price of each service performed by stylists.
●
On the styling rates page (Stylists and services>Styling Rates) you can define prices for services for each stylist, you only have to do this if
your stylists charge diffrent for the same services,
if they all charge the same, you can set automatic styling rates so they are created automatically.
●
There are example styling rates shown above, this is what a complete styling rate setup would look like.
To create a new styling rate,click the 'New' button and the creation form will open, what you will see is shown below.
●
●
●
You just need to select the stylist, service and enter the price they charge and you can enable this service to be booked online for the
stylist.
When details are correct, click 'Update' to save.
intersalon
194 . Intersalon
See also
Stylists
Services
Service Groups
Salon Roles
Stylist Groups
Resources
intersalon
Intersalon . 195
Home > Intersalon > Reference Guide > Stylists and Services > Service Groups
Note:
A major new version of Intersalon has been released. This help document is awaiting review, and as such may contain obsolete
content. For more information please contact support. To find out what's new please click here.
Service Groups
Service groups are used to sort services when creating appointments and they are assigned a colour to make service types easier to interpret
from a glance at the planner.
●
Shown above are example service groups that we have on our demo site, you would use groups that are relevant to you're service types.
intersalon
196 . Intersalon
●
If you click the 'New' button you will see what is shown in the image above, you only need to enter a name and select a colour.
●
click 'Update' to save the new service group.
See also
Stylists
Services
Styling Rates
Salon Roles
Stylist Groups
Resources
intersalon
Intersalon . 197
Home > Intersalon > Reference Guide > Stylists and Services > Salon Roles
Note:
A major new version of Intersalon has been released. This help document is awaiting review, and as such may contain obsolete
content. For more information please contact support. To find out what's new please click here.
Salon Roles
Salon roles are used when organising styling rates, they can be sorted in role order so for example, you may have junior stylists that charge £15
for a service where a senior stylist charges £20.
To add a salon role, just click 'New' and enter the name then click 'Update' and it will then be shown in the list.
See also
Stylists
Services
Styling Rates
Service Groups
Stylist Groups
Resources
intersalon
198 . Intersalon
Home > Intersalon > Reference Guide > Stylists and Services > Stylist Groups
Note:
A major new version of Intersalon has been released. This help document is awaiting review, and as such may contain obsolete
content. For more information please contact support. To find out what's new please click here.
Stylist Groups
Stylist groups are used when categorising stylists in the planner and it can be used to manage multiple salons to a certain extent.
A common use for stylist groups is when a salon provides both hair and beauty treatments and the stylists and therapists can be wieved
seperately in the planner instead of all been together.
To create a stylist group, click the 'New' button and enter your chosen name for the group then click 'Update'
See also
Stylists
Services
Styling Rates
Service Groups
Salon Roles
Resources
intersalon
Intersalon . 199
Home > Intersalon > Reference Guide > Stylists and Services > Resources
Note:
A major new version of Intersalon has been released. This help document is awaiting review, and as such may contain obsolete
content. For more information please contact support. To find out what's new please click here.
Resources
Resources are either rooms or equipment that can be involved in services, if you allocate resources to a service, another service that requires the
same resource cannot be booked at the same time.
To add a new resource, click 'New' and enter it's name, then click 'Update'
Automatic resource allocation
Resources can be assigned to services when creating them, which means when you book a service the resource is automatically booked out for
the duration of the service. The automatic resource allocation works when you book an appointment using the right click menu, multi service
search and online booking.
See also
Stylists
Services
Styling Rates
Service Groups
Salon Roles
Stylist Groups
intersalon
200 . Intersalon
Home > Intersalon > Reference Guide > Social Networking
Note:
A major new version of Intersalon has been released. This help document is awaiting review, and as such may contain
obsolete content. For more information please contact support. To find out what's new please click here.
Social Networking
This opening paragraph should describe the feature that you are documenting. Explain how it is commonly used and what the
benefits are. For example: The Widget Master email link allows you to easily send information about each widget to various
departments within your company. Often, the feature that you are documenting can be best explained by walking the reader
through step by step. Use screenshots to illustrate the steps where possible.
[SubHeading]
This opening paragraph should describe the feature that you are documenting. Explain how it is commonly used and what the
benefits are. For example: The Widget Master email link allows you to easily send information about each widget to various
departments within your company. Often, the feature that you are documenting can be best explained by walking the reader
through step by step. Use screenshots to illustrate the steps where possible.
1.
2.
3.
Start the application by…
On the startup screen, click the…
Note
See also
What is the default security setup for each role?
Administration
Analytics
Appointments
Clients
Ecommerce
Newsletters
Reports
Retail
Settings
SMS Text Messages
Stylists and Services
intersalon
Intersalon . 201
Home > Intersalon > Reference Guide > Social Networking > Social Settings
Note:
A major new version of Intersalon has been released. This help document is awaiting review, and as such may contain obsolete content.
For more information please contact support. To find out what's new please click here.
Social Networking>Settings
Intersalon now supports intergration with facebook and twitter, in this tutorial you will learn how to link your intersalon system into your salon's facebook
and twitter accounts.
●
The first thing we'll need to do once we're in the social networking section is choose which service we will set up first, in this tutorial, we'll do
facebook first.
●
To get started, we're going to click the 'Connect' button with the facebook 'F' logo.
●
Once you've clicked the connect button, you will be taken to this page where you need to allow intersalon access to your facebook, to do this,
intersalon
202 . Intersalon
●
●
●
click the 'Allow' button.
If the setup was successful you should see this page, click the blue link in the bottom corner to return to your system.
Facebook is now setup with your system, you can post late availability and discounts to your wall.
Now we'll go through setting up twitter, click 'Connect with Twitter' to get started, make sure you're back on the main system social networking
page.
●
When you have clicked the 'Connect with Twitter' button you will be taken to the above page, you need to click allow to continue.
●
If you see the above screen, your twitter settings have been saved successfully.
Now, when we navigate back to the social networking section within the system you should see that both facebook and twitter are linked with
intersalon, or either if you've chosen to use one. like shown below.
●
intersalon
Intersalon . 203
●
You have successfully setup intersalon with facebook and twitter, please see the following tutorials on how to publish availability and discount
vouchers.
If you are having any problems with the new social networking module, please send an email to: [email protected]
See also
Late Availability
Discount Vouchers
intersalon
204 . Intersalon
Home > Intersalon > Reference Guide > Social Networking > Late Availability
Note:
A major new version of Intersalon has been released. This help document is awaiting review, and as such may contain obsolete
content. For more information please contact support. To find out what's new please click here.
Late Availability
The late availability function allows you to post available slots in the planner to facebook and/or twitter.
●
To get started, we need to navigate to the socail networking section then the 'Late Availability' Tab.
●
When you are on the late availability page, the first thing we need to do is format a message to be sent out, to do this, click 'Format
message'
intersalon
Intersalon . 205
●
Here you can customise the message you wish to post to facebook/Twitter. The buttons at the top are macros when these are inserted,
the appropriate variables will be shown in the posts.
it is reccomended that you use all of them to get out the most information. You can click the 'preview msg' button and an example
message will be shown below. Once you're happy with the message, click 'Save', then close when the window reloads.
●
Here we can select which stylists we want to publish availability for note: for stylists to appear here they must be 'Enabled Online' this can
be turned on when editing a stylist's details. Once stylists are selected click either 'Post selected' or 'Tweet selected'
●
You will be asked to confirm the post, click 'OK' and the content will be posted/tweeted.
intersalon
206 . Intersalon
●
Here is what an example post looks like on facebook, below is an example tweet.
●
Late availability is now setup, you can post availability to facebook and twitter at anytime and unlimited times.
If you are having any problems with the new social networking module, please send an email to: [email protected]
see also
Social Settings
Discount Vouchers
intersalon
Intersalon . 207
Home > Intersalon > Reference Guide > Social Networking > Discount Vouchers
Note:
A major new version of Intersalon has been released. This help document is awaiting review, and as such may contain obsolete
content. For more information please contact support. To find out what's new please click here.
Discount Vouchers
The Social Networking module supports the posting of discount vouchers to Facebook and Twitter.
●
To get started, we need to navigate to the 'Discount Vouchers' tab within the Social Networking section.
●
First we're going to want to format the message template, to do this, we need to click 'Format Message' the screen below will then be
shown.
We reccomend you insert all of the Macro's, these represent the valid data that is available when a post is made. A few examples are
shown below.
intersalon
208 . Intersalon
●
Here's an example message.
●
Once you are happy with the example message and it is how you want it to look on the post, click save, then close when the page
reloads.
intersalon
Intersalon . 209
●
Here you can select the vouchers you want to post/tweet, once you have selected the ones you want to post, you will need to click 'OK'
on the confirmation dialogue.
Here is waht the posts should look like.
●
Facebook;
●
Twitter;
●
If you are having any problems with the new social networking module, please send an email to: [email protected]
See also
Social Settings
Late Availability
intersalon
210 . Intersalon
Home > Intersalon > Existing Customers - New Version Help
Existing Customers - New Version Help
The new version of Intersalon is now live. This version brings a massive number of improvements and new features, and a brand new look and feel.
For existing customers, the change can look quite substantial. However, in this quick 5-step guide, we'll show you how to make Intersalon look a little bit like
the original style.
1.
On first login, you'll be presented with a choice of Intersalon versions. This is a temporary option, and all users will be moved onto the new system
shortly. For this reason, we'd advise choosing 'Connections'.
2.
Firstly to ensure you'rel getting the best from the new version of Intersalon, we need to complete a full refresh. Press CTRL and F5 on your
keyboard at the same time. On a mac, Press Option and R. On other devices, use the browser's Refresh button.
3.
By default, Intersalon opens all widgets, so the planner screen can look quite scary at first! Solve this by clicking the X in the top corner of each
widget. Note: this is not the X in the top corner of your screen.
intersalon
Intersalon . 211
4.
Turn on the following widgets: Navigator and Date/Time.
5.
Move these two widgets to an area of the screen you are happy with. For example, move the Navigator to the top left, and the Date/Time to the
bottom left.
This completes our quick-start guide to using the new system. However, there's much more to read about. Try the links below, or hit the main menu for
intersalon
212 . Intersalon
more help.
See also
Fundamentals
How To...
Reference Guide
What's new in Intersalon?
Contacting Intersalon
Can't find the answers you're looking for?
●
●
●
●
Contact our support team on 01909 512131.
Email [email protected] and we'll personally get back to you as quickly as we can.
Check out our Support Portal, available 24/7 at intersalon.zendesk.com.
Or let us know by leaving a comment below:
intersalon
Intersalon . 213
Home > Intersalon > What's new in Intersalon?
What's new in Intersalon?
Intersalon updates are free to all customers, and arrive automatically. On this page you can find out whats new, updated or changed
in the latest version.
Build your own dashboard with our new Widgets
'Widgets' are new for 2012. Widgets are small pieces of salon software functionality that can be selected, hidden and shown by the
salon user as required. Each widget has been chosen to perform a regular routine task within the salon, whether that be adding a
customer, searching for availability or checking daily sales figures. All salon's use the software differently and the widgets will help each
salon customise and build their own dashboard where they can easily do the tasks and get the information they need quickly.
New Home Screen
Existing customers will notice a change when they first login to the new salon management system. The 'Home' page of Intersalon
has be redesigned to include the new salon software widgets. The diary or planner is central to the new home screen but widgets
can now be selected and organised to customise the home screen to meet the requirements of the salon.
Help and support plays a key role in the new home screen and customer can now review online documentation, watch video tutorials
and get direct support from our support team, all directly from the main home screen. The widgets menu has been designed to be
'touch screen friendly', recognising the growing number of Intersalon customers that use the software on tablets.
intersalon
214 . Intersalon
Salon Software Issue Based Newsletter
Traditionally newsletters in Intersalon were produced by adding a page on the salon website within the software and then setting
the scheduler to mail this page out to all subscribers. This was a nice, simple way of producing newsletters and suited the way most
salons wanted to work but didn't allow the salon to produce different newsletter types, manage different subscriber sets and view
newsletter history. Issue based newsletter solve all these problems and allow the salon to produce an infinite number of newsletters
and then within each newsletter an infinite number of issues.
So for example a salon that sells products online might have seperate newsletters for
product offers and a different newsletter for salon news and treatment offers. One
could then be published monthly and the other quarterly, each with its own
subscribers.
Salon's will be able to select from a number of standard in-built templates to make the
production of a newsletter quick and easy.
Customer File Management
Another exciting new feature is 'Customer File Management'. Intersalon now allows a salon to attach any number of files to a
customer record card. These can be photographs, questionairre results or any piece of electronic information that pertains to a
customer. We anticipate this feature being particularly useful for salons and clinics that offer a course of treatments and would like to
visually track progress using photographs.
intersalon
Intersalon . 215
Custom Captions for the Ultimate Customisation
Intersalon versatility has been a key factor in its success. In this release we've introduced a feature that will extend this even further
making not only suitable for many different salon business sectors but also unleashsing its potential world wide. 'Custom Captions'
allow the end user to customise any piece of text or message in Intersalon. This might mean in the case of beauty salons changing
the word 'Stylist' for 'Therapist' and 'Service' for 'Treatment' but it doesn't need to stop there, captions can be localised to suit salon
languages and cultures as well as business type.
Other New Features
Automatic Resource Allocation - Allocating resources for services and treatments now got even easier. Automatic resource
allocation allows the salon to select which resources are mandatory for a service. All the mutli service availability checkers will check
the usage of the resource before presenting booking options.
Card Deposits - Taking a deposit by 'Credit or Debit Card' is now supported. Intersalon will prompt the user to select the value
being paid by card rather than assume its the full amount.
Automated Refund Process - In this release we've incorporate a new system for issuing refunds and tracking their history. The
refund can be issued in cash or creditted to a card.
Documentation Update - We've taken the major step of producing a brand new set of online documentation. The help system
now includes videos as well tutorials and a reference guide for each of Intersalons features.
Improved Remote Access - 'Quick Support' is the Intersalon remote access system that enables our support team to help you
through any difficulties you might have with getting started or advanced tasks in Intersalon. The quick support application is
downloadable from within the 'Help' menu in Intersalon and we have included versions for both PC and Mac.
Improved Mobile Online Booking - The new customer registration, login and online booking functionality has been improved on all
our booking modules.
See also
Fundamentals
How To...
Reference Guide
intersalon
216 . Intersalon
Existing Customers - New Version Help
Contacting Intersalon
Can't find the answers you're looking for?
●
Contact our support team on 01909 512131.
●
●
Email [email protected] and we'll personally get back to you as quickly as we can.
Check out our Support Portal, available 24/7 at intersalon.zendesk.com.
●
Or let us know by leaving a comment below:
intersalon
Intersalon . 217
Home > Intersalon > Contacting Intersalon
Contacting Intersalon
It's easy to get in touch with Intersalon.
●
Telephone: 01909 512131
●
Email: [email protected]
Write to Us: Vaalto Technologies, The Turbine, Coach Close, Shireoaks, Nottinghamshire. S81 8AP
●
Intersalon Tip
Did you know the fastest way to our exceptional customer support team is through our support portal? Just visit
intersalon.zendesk.com to create a support request.
See also
Fundamentals
How To...
Reference Guide
Existing Customers - New Version Help
What's new in Intersalon?
Can't find the answers you're looking for?
●
●
●
●
Contact our support team on 01909 512131.
Email [email protected] and we'll personally get back to you as quickly as we can.
Check out our Support Portal, available 24/7 at intersalon.zendesk.com.
Or let us know by leaving a comment below:
intersalon
Index