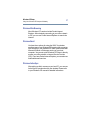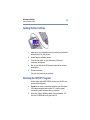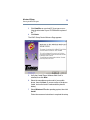
1
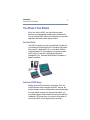
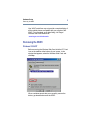
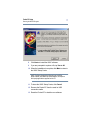
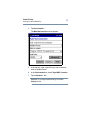
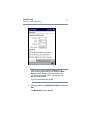
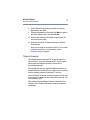
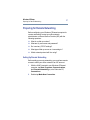
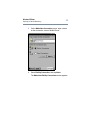
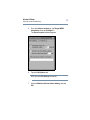
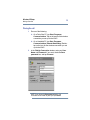
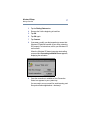
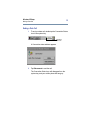
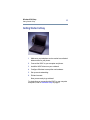
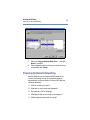
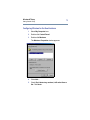
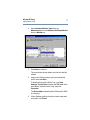
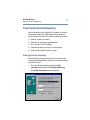
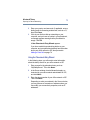
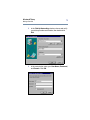
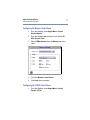
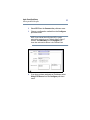
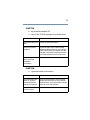
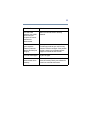
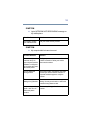
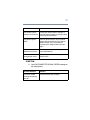
Targus Wireless
Web Card
TM
Data-Capable Mobile Phone
Wireless Web Card
®
User’s Guide
2
Chapter 1 - Introduction
The World Is Your Network
The Wireless Web Card (WWC) lets you connect your datacapable mobile phone to a Windows-based mobile
computer or Apple PowerBook so you can send and receive
email and faxes, browse the web, connect to your office
network and synchronize files— all wirelessly! The WWC
lets you access the Internet from anywhere in your wireless
coverage area.
Introduction
Your Phone Is Your Modem
3
Your Phone Is Your Modem
When you use the WWC, you don’t need a modem,
because your data-capable mobile phone simulates one.
You can use the WWC with remote networking or any other
application that works with a regular modem.
One Size Fits All
The WWC fits directly into the CompactFlash I/O card slot
of a Windows Powered Pocket PC or Windows CE-based
Palm-size PC, Handheld PC Pro, or pen tablet. With the
CompactFlash-to-PC Card adapter, you can also use the
WWC in the PC card slot of a Windows CE-based
Handheld PC Pro, Windows 95/98/2000/NT notebook or
Apple PowerBook.
Overview of WWC Setup
Setting up the WWC involves two main steps. First, the
mobile computer must recognize the WWC. Second, the
mobile computer must be configured for remote networking.
For most mobile computers to recognize the WWC, you
must install Targus’ setup software by running the included
installation CD. During setup, it is crucial to know when to
connect the WWC to your particular type of mobile
Introduction
How this Manual is Organized
4
computer. For instructions, refer to the chapter that covers
your operating system.
How this Manual is Organized
This chapter, the Introduction, describes key features of the
WWC, reviews some preliminary checkpoints before
installation, details how this manual is organized and
identifies the package contents.
Chapter 2, Hardware Setup, describes how to connect the
WWC to your computer and phone and how to remove the
WWC from your computer.
Chapter 3, Pocket PC Setup, shows how to install the WWC
drivers and configure your Pocket PC for remote
networking.
Chapter 4, Windows CE Setup, shows how to install the
WWC drivers and configure your Windows CE-based
computer for remote networking.
Chapter 5, Windows 95/98 Setup, shows how to install the
WWC drivers, how to configure Windows to accept the new
hardware and how to set up your Windows 95/98 notebook
for remote networking.
Chapter 6, Windows 2000 Setup, shows how to install the
WWC drivers, how to configure Windows to accept the new
hardware and how to set up your Windows 2000 notebook
for remote networking.
Chapter 7, Windows NT Setup, shows how to configure
Windows to accept the new hardware and how to set up
your Windows NT notebook for remote networking.
Chapter 8, Apple PowerBook Setup, shows how to install
the WWC drivers and configure your Apple PowerBook for
remote networking.
Introduction
How this Manual is Organized
5
Appendix A, Specifications, provides technical
specifications for the WWC.
Appendix B, Hints and Tips, gives tips for using the system
efficiently.
Appendix C, Troubleshooting, gives advice for fixing the
most common problems you may encounter while using the
WWC.
Appendix D, Need More Help?, tells you how to reach
Targus for technical support.
Contents of the Connection Kit
The Targus Wireless Web Card Data Connection Kit
includes these items:
❖ A Targus Wireless Web Card (CompactFlash card
Type I)
❖ A data cable, already attached to the WWC, customized
for a specific range of mobile phones
❖ A CompactFlash-to-PC Card adapter
❖ The Targus Wireless Web Card Installation CD
❖ The Targus Wireless Web Card Installation Guide
6
Chapter 2 - Hardware
Setup
Overview
This chapter describes how to insert the Wireless Web
Card (WWC) into your computer, how to connect the WWC
to your phone, and how to remove the WWC from your
computer.
Connecting the WWC to Your Computer
You can operate the WWC in a CompactFlash I/O card slot
or, by using the CompactFlash-to-PC Card adapter, in a PC
Card (PCMCIA) slot.
7
Hardware Setup
Connecting the WWC to Your Phone
OR
Plug the WWC directly into a
CompactFlash I/O card slot
Plug the WWC into a
CompactFlash-to-PC Card
adapter, then insert the
combined unit into a PC Card slot.
Connecting the WWC to Your Phone
After attaching the Wireless Web Card to your computer,
connect the free end of the data cable to the data port of
your mobile phone.
Hardware Setup
Removing the WWC
8
Your WWC’s retail box may not provide a complete listing of
all the mobile phones compatible with your version of the
WWC. For a complete, up-to-date listing, visit Targus’
Wireless Web Card Web site at:
www.targus.com/wirelessweb
Removing the WWC
Windows 95/98/NT
Before removing the Wireless Web Card, click the PC Card
icon on the taskbar at the bottom of your screen. In the
window that appears, select the Wireless Web Card, and
click Stop.
When a window reports that you may safely remove the
device, go ahead and remove the WWC.
9
Hardware Setup
Removing the WWC
Computers Without Card Eject Buttons
If your computer does not have a card eject button, you can
remove the WWC from a CompactFlash I/O card slot by
gripping the inner edge of the black plastic bezel. This bezel
runs across the end of the card on either side of the cable
connector. It extends slightly beyond the WWC’s metal
surface on the card’s bottom side.
This side-view of the WWC shows where to pull:
WWC CompactFlash Card
Black Bezel
Pull Here
PC Card Adapters
If you are using the WWC with a CompactFlash-to-PC Card
adapter, remove the combined unit from your computer by
using the PC Card eject button on your mobile computer.
10
Chapter 3 - Pocket PC
Setup
Overview
The Wireless Web Card (WWC) lets you connect your
mobile phone to a Windows Powered Pocket PC so you can
wirelessly access your office network or the Internet. This
chapter describes how to configure your Pocket PC so it will
recognize the WWC.
CAUTION: For most Pocket PCs, you must run the Targus
Wireless Web Card Installation CD, included in the package,
to install the WWC drivers. After installing the software and
setting up the hardware, you must also configure your
Pocket PC for remote networking.
Pocket PC Setup
Using Your Pocket PC Wirelessly
11
Using Your Pocket PC Wirelessly
You can use your Pocket PC’s remote communications
capabilities to make your mobile phone work as a wireless
modem.
Wireless Web Browsing
All Pocket PC versions include Pocket Internet Explorer.
After wirelessly connecting to your office network or ISP, you
can use Pocket Internet Explorer to browse the Internet.
Wireless Email
You have three options for using the WWC for wireless
email access on your Pocket PC. With ActiveSync, your
Pocket PC’s Inbox synchronizes with Microsoft Outlook or
Exchange running on your host computer. You can also set
up the Pocket PC Inbox to directly access your office
network or Internet Service Provider (ISP). If you have
Pocket Internet Explorer, you can also use web-based
email services.
Wireless ActiveSync
After setting up dial-in access on your host PC, you can use
ActiveSync to synchronize with your desktop. Please refer
to your Windows CE manual for detailed instructions.
Pocket PC Setup
Getting Started is Easy
12
Getting Started is Easy
1
Make sure your telephone service carrier has activated
data services for your phone.
2
Install Targus’ software drivers.
3
Connect the WWC to your Pocket PC and phone.
4
Set up your Pocket PC for remote networking.
5
Dial and connect.
Now you are ready to go wireless!
Running the SETUP Program
Follow these steps before inserting the WWC:
1
Establish an active connection between your Pocket PC
and a host PC. Use your Pocket PC’s serial or USB
connection cable.
2
Insert the Targus Wireless Web Card Installation CD
into the CD-ROM drive of your host PC.
3
Click Start/Run on your host PC, type D:\SETUP (use the
drive letter of your CD-ROM drive in place of D:) and
follow the instructions on your host PC.
Pocket PC Setup
Running the SETUP Program
The WWC Setup Center Welcome Page appears.
4
Click Next>.
13
Pocket PC Setup
Running the SETUP Program
14
The WWC Setup Center Main Page appears.
5
Verify that “Install Targus Wireless Web Card software”
is selected, then click Next>.
The Phone Manufacturer and Model screen appears.
Pocket PC Setup
Running the SETUP Program
6
15
Select the manufacturer and model of your mobile
phone, then click Next>. (If you are unsure of the phone
model, look on the back or underneath the phone’s
battery.)
Pocket PC Setup
Running the SETUP Program
16
The Target Operating System screen appears.
7
Select Windows CE as the operating system, then click
Install.
The WWC Welcome screen appears.
Pocket PC Setup
Running the SETUP Program
8
Click Next> to install the WWC software.
9
If you are prompted to replace a file, tap Yes to All.
17
10 When the installation is complete, click Main to return to
the WWC Setup Center.
HINT: The Setup Center’s Main Page lets you install the
WWC software, view WWC user documentation, and explore
third-party applications supplied on the CD.
11 To leave the WWC Setup Center, click Cancel.
12 Remove the Pocket PC from the serial or USB
connection cradle.
13 Reset the Pocket PC to load the new software.
Pocket PC Setup
Preparing for Remote Networking
18
Now you are ready to connect the WWC to your Pocket PC
and phone. For instructions, refer to Hardware Setup on
page 6.
After connecting the hardware, follow the instructions in
Preparing for Remote Networking on page 18 to configure
remote networking.
Preparing for Remote Networking
Before configuring your Pocket PC for remote networking,
contact your office network administrator or Internet Service
Provider (ISP) with the following questions:
❖ What is my dial-up number?
❖ What are my user name and password?
❖ Do I need any TCP/IP settings?
❖ What type of dial-up server am I connecting to?
❖ Which network protocol will I be using?
Setting up Remote Networking
Before setting up dial-up networking, you must have remote
access to either your office network or an ISP account.
1
With the WWC inserted into your Pocket PC, tap
and then Settings.
2
On the bottom of the Settings window, tap the
Connections tab.
,
Pocket PC Setup
Preparing for Remote Networking
3
On the Connections screen, tap the Modem icon.
The Modem Connections screen appears.
19
Pocket PC Setup
Preparing for Remote Networking
4
20
Tap New Connection… .
The Make New Connection screen appears.
5
In the top box, enter a name for your new connection,
such as “Mobile Phone.”
6
In the Select a modem box, select Targus WWC Connection.
7
Tap the Advanced… box.
WARNING: Do not change the default settings in the Port
Settings window.
Pocket PC Setup
Preparing for Remote Networking
21
NOTE: If you use server-assigned IP addresses, you can
probably keep the default settings in the TCP/IP and Name
Servers windows. Otherwise, follow the instructions from
your network administrator or ISP to configure specific IP
and name server addresses.
If you don't know what to enter, tap OK.
8
When you return to the Make New Connection window, tap
Next.
The Mobile Phone screen appears.
Pocket PC Setup
Preparing for Remote Networking
9
22
Enter the phone number of your office network or ISP
and tap Next.
10 Uncheck Wait for dial tone before dialing, then tap Finish.
23
Pocket PC Setup
Making a Data Call
Making a Data Call
After installing the software drivers, connecting the
hardware, and configuring for remote networking, you are
ready to make a data call.
Preliminary checkpoints
❖ Make sure the cable and connectors are fastened
securely to your phone and the WWC is inserted in your
Pocket PC.
❖ Make sure your mobile phone is turned ON with the
antenna extended. If possible, position your phone
upright.
❖ Make sure your phone has enough battery power for
your data call.
❖ Make sure your phone is receiving a digital signal. On
some phones, the display will show a , indicating that
your phone is in digital mode. Make sure the signal
strength is sufficient.
Placing the call
1
With the WWC inserted in your Pocket PC, tap
then Programs.
2
On the Programs screen, tap the Connections icon.
and
Pocket PC Setup
Making a Data Call
3
24
On the Connections screen, tap the icon with the name
you gave your WWC connection.
The Connect To window appears.
4
Enter your User name and Password. In the Dial from box,
select your location.
NOTE: You can check the Save password box, but your
password will be saved only after you start the connection.
5
Tap Dialing Options… .
6
Tap the Dialing Patterns Box.
7
Remove the 9 at the beginning of each line.
8
Tap OK.
9
Tap OK again.
10 Tap Connect.
Pocket PC Setup
Ending a Data Call
25
When the Status screen reports that the call has
Connected, you are ready to use your email, fax, webbrowsing and file synchronization applications —
wirelessly!
Ending a Data Call
When you are ready to end your data call:
1
Go to Windows , then Today and tap the Connection
Status icon
in your Pocket PC’s task tray.
A status window appears.
2
Tap Disconnect to end the connection.
The Connection Status icon will disappear from the task
tray, and your mobile phone will hang up.
26
Chapter 4 - Windows CE
Setup
Overview
The Wireless Web Card (WWC) lets you connect your
mobile phone to a Windows CE-based mobile computer so
you can wirelessly access your office network or the
Internet. This chapter describes how to configure Windows
CE from your mobile computer so that it will recognize the
WWC.
CAUTION: You must run the Targus Wireless Web Card
Installation CD, included in the kit, to install the WWC
drivers. After installing the software and connecting the
hardware, you must also configure your Windows CE-based
computer for remote networking.
Using Your Windows CE Computer Wirelessly
You can use the remote communications capabilities of
Windows CE to make your mobile phone work as a wireless
modem.
Windows CE Setup
Using Your Windows CE Computer Wirelessly
27
Wireless Web Browsing
Most Windows CE versions include Pocket Internet
Explorer. After wirelessly connecting to your office network
or ISP, you can use Pocket Internet Explorer to search the
Internet.
Wireless Email
You have three options for using the WWC for wireless
email access on your Windows CE-based mobile computer.
With ActiveSync, the Windows CE Inbox synchronizes with
Microsoft Outlook or Exchange running on your host
computer. You can set up the Windows CE Inbox to directly
access your office network or Internet Service Provider
(ISP). If you have Pocket Internet Explorer, you can also use
web-based email services.
Wireless ActiveSync
After setting up dial-in access on your host PC, you can use
ActiveSync to synchronize with your desktop. Please refer
to your Windows CE manual for detailed instructions.
Windows CE Setup
Getting Started is Easy
28
Getting Started is Easy
1
Make sure your telephone service carrier has activated
data services for your phone.
2
Install Targus’ software drivers.
3
Connect the WWC to your Windows CE-based
computer and phone.
4
Set up your Windows CE-based computer for remote
networking.
5
Dial and connect.
You are now ready to go wireless!
Running the SETUP Program
Follow these steps BEFORE inserting your WWC into
your mobile computer:
1
Establish an active connection between your Windows
CE-based computer and a host PC. Use the serial
connection cable included with your device.
2
Insert the Targus Wireless Web Card Installation CD
into the CD-ROM drive of your host PC.
Windows CE Setup
Running the SETUP Program
29
3
Click Start/Run on your host PC, then type D:\SETUP
(Use the drive letter of your CD-ROM drive in place of
the D:).
4
Click Next>.
The WWC Setup Center Welcome Page appears.
5
Verify that “Install Targus Wireless Web Card” is
selected, then click Next.
6
Select the manufacturer and model of your mobile
phone, then click Next. (If you are unsure of the phone
model, look on the back or underneath the phone’s
battery.
7
Select Windows CE as the operating system, then click
Install.
Follow the on-screen instructions to complete the setup.
Windows CE Setup
Running the SETUP Program
30
8
When Microsoft’s ActiveSync prompts to install the
applications, click Yes.
9
When the installation is complete, click Main to return to
the WWC Setup Center, then click Cancel.
10 Remove the Windows CE-based computer from the
serial connection cable.
11 Reset the Windows CE-based computer to load the
new software.
Now you are ready to connect the WWC to your mobile
computer and phone. For instructions, refer to
Hardware Setup on page 6.
Things to Remember
This chapter features Windows CE screen images from
Palm-size PCs. If you use a Handheld PC, your computer
screens will have different formats, but they will be
functionally equivalent.
This chapter will note any significant differences that may
exist between the wording shown on Palm-size PC screens
and the wording shown on Handheld PC screens.
Some Windows CE-based computers support a touch pad
and not a pen, so whenever these instructions say “tap,” you
may substitute “click.”
After setting up the hardware, follow the instructions in to
configure your Windows-CE based computer for remote
networking.
Windows CE Setup
Preparing for Remote Networking
31
Preparing for Remote Networking
Before configuring your Windows CE-based computer for
remote networking, contact your office network
administrator or Internet Service Provider (ISP) with the
following questions:
❖ What is my dial-up number?
❖ What are my user name and password?
❖ Do I need any TCP/IP settings?
❖ What type of dial-up server am I connecting to?
❖ Which network protocol will I be using?
Setting Up Remote Networking
Before setting up remote networking, you must have remote
access to either your office network or an ISP account.
1
With the WWC inserted in your Windows CE-based
computer, tap Start, Programs, Communications,
then Remote Networking or, on a Palm-size PC,
Connections.
2
Double-tap Make New Connection.
Windows CE Setup
Preparing for Remote Networking
32
3
On the Make New Connection screen, enter a name
for the connection, such as “Mobile Phone.”
4
Select Dial-Up Connection, then tap Next>.
The Make New Dial-Up Connection window appears.
Windows CE Setup
Preparing for Remote Networking
5
33
From the Select a modem list, tap Targus WWC
Connection, then tap Configure… .
The Device Properties window appears.
6
Tap the Call Options tab:
NOTE: Ignore the Port Settings windows tab.
7
Uncheck Wait for dial tone before dialing, then tap
OK.
Windows CE Setup
Preparing for Remote Networking
8
34
After returning to the Make New Dial-Up Connection
window, tap TCP/IP Settings… .
The TCP/IP Settings window appears.
9
Following the instructions from your network
administrator or ISP, enter the necessary configuration
options.
❖ If you do not use a server-assigned IP address,
uncheck the Use server-assigned IP address
box. Enter your static IP address in the IP address
box, and tap the Name Servers tab to enter your
DNS and WNS addresses if necessary.
❖ When you have entered all the information, tap OK.
❖ If you don't have instructions from your network
administrator or ISP or don't know what to enter, tap
X to cancel.
Windows CE Setup
Making a Data Call
35
10 In the Make New Dial-Up Connection window, tap
Next>.
11 Enter the phone number of your office network or
Internet Service Provider. Select Force long distance,
then tap Finish.
Making a Data Call
After installing the software, connecting the hardware, and
configuring for remote networking, you are now ready to
make a data call.
Preliminary checkpoints
❖ Make sure the cable and connectors are fastened
securely to your phone and the WWC is inserted in your
Windows CE-based computer.
❖ Make sure your mobile phone is turned ON with the
antenna extended. Position your phone upright for the
best results.
❖ Make sure your phone has enough battery power for
the data call.
❖ Make sure your phone is receiving a digital signal.
Some phones will show a on the display, indicating
that your phone is in digital mode. Make sure the signal
strength is sufficient.
Windows CE Setup
Making a Data Call
36
Placing the call
1
Do one of the following:
❖ On a Palm-Size PC, tap Start, Programs,
Communications. Tap on the name of the wireless
connection you set up for the WWC.
❖ On a Handheld PC, tap Start, Programs,
Communications, Remote Networking. Doubletap on the icon for the wireless connection you set
up for the WWC.
2
In the Dial-Up Connection window, enter your User
Name and Password. If you want, check the Save
password box, and tap Connect.
NOTE: If you choose the Save password option, the
information will be saved only after you tap Connect.
Windows CE Setup
Making a Data Call
37
3
Tap the Dialing Patterns box.
4
Remove the 9 at the beginning of each line.
5
Tap OK.
6
Tap OK again.
7
Tap Connect.
8
If necessary, modify your dial properties to ensure that
Windows CE dials the number of your office network or
ISP properly. For instructions, refer to your Windows CE
user manual.
When the Windows CE-based computer starts calling,
a screen titled Connecting to Mobile Phone appears,
displaying the call status.
9
Once the connection is established, the Connection
Status icon appears in your system tray.
You are ready to use your email, fax, web-browsing, and
file synchronization applications—wirelessly!
38
Windows CE Setup
Making a Data Call
Ending a Data Call
1
To end your data call, double-tap the Connection Status
icon in the system tray.
Connection
Status icon
A Connection status window appears.
2
Tap Disconnect to end the call.
The Connection Status icon will disappear from the
system tray, and your mobile phone will hang up.
39
Chapter 5 Windows 95/98 Setup
Overview
The Wireless Web Card (WWC) lets you connect your
mobile phone to a Windows-based notebook so you can
wirelessly connect to your office network or the Internet.
This chapter describes how to configure your Windows 95/
98 notebook so it will recognize the WWC.
CAUTION: You must run the included Targus Wireless Web
Card Installation CD to install the WWC drivers. After
installing the software and connecting the hardware, you
also need to configure Windows to accept the new hardware,
and then configure your notebook for remote networking.
Windows 95/98 Setup
Getting Started is Easy
40
Getting Started is Easy
1
Make sure your telephone service carrier has activated
data services for your phone.
2
Connect the WWC to your computer and phone.
3
Install the WWC drivers on your notebook.
4
Configure Windows to accept the new hardware.
5
Set up remote networking.
6
Dial and connect.
Now you are ready to go wireless!
For instructions on connecting the WWC to your computer
and phone, refer to Hardware Setup on page 6.
Windows 95/98 Setup
Running the SETUP Program
41
Running the SETUP Program
Windows 95
The first time you insert the WWC, you will see a screen
titled Update Device Driver Wizard.
1
Insert the installation CD and click Next>.
2
Click Other Locations and specify your CD drive.
3
When the driver is found, click Finish.
Windows 98
The first time you insert the WWC, the Add New Hardware
Wizard screen appears.
1
Click Next>.
2
Click Search for the best driver for your device, and
then click Next>.
3
Insert the installation CD.
4
Check CD-ROM drive and click Next>.
5
When the driver is found, click Next>.
6
When Windows has finished installation, click Finish.
Windows 95/98 Setup
Configuring Windows for the New Hardware
42
Configuring Windows for the New Hardware
This section provides general guidelines for setting up
Windows 95/98 but features screen images only from
Windows 98. In most cases, Windows 95 will have
functionally equivalent screens.
1
From the desktop, click Start, Settings, then Control
Panel.
2
In the Control Panel, double-click Modems.
The Modems Properties window appears.
3
Click Add… .
Windows will ask whether you want to install a PCMCIA
or an “other” type of modem.
Windows 95/98 Setup
Configuring Windows for the New Hardware
43
4
Select Other, then click Next>.
5
Check Don't detect my modem; I will select from a
list. Click Next>.
6
Select Standard Modem Types from the
Manufacturers box and Standard 19200 bps Modem
from the Models box, then click Next> to continue.
Windows 95/98 Setup
Preparing for Remote Networking
7
Select the Targus Wireless Web Card … and click
Next> to continue.
8
When Windows confirms that your modem is set up
successfully, click Finish.
Preparing for Remote Networking
Before configuring your Windows 95/98 notebook for
remote networking, contact your corporate network
administrator or Internet Service Provider (ISP) with the
following questions:
❖ What is my dial-up number?
❖ What are my user name and password?
❖ Do I need any TCP/IP settings?
❖ What type of dial-up server am I connecting to?
❖ Which network protocol will I be using?
44
Windows 95/98 Setup
Preparing for Remote Networking
45
Setting Up Remote Networking
This section gives general guidelines for setting up
Windows 95/98 but features screen images only from
Windows 98. In most cases, Windows 95 will have
functionally equivalent screens. Significant differences will
be noted.
Before setting up a dial-up connection, you need to have
remote access capabilities to either your corporate network
or an ISP account.
1
From the Windows desktop, double-click My
Computer.
2
In the My Computer window, double-click Dial-Up
Networking.
3
In the Welcome to Dial-Up Networking window, click
Next>.
NOTE: In Windows 95 and early versions of Windows 98, a
Dial-Up Networking window will appear instead. Doubleclick Make New Connection.
4
In the Make New Connection window, type in a name
for the connection. We recommend using the name
“<Your ISP Name> - Wireless.”
Windows 95/98 Setup
Preparing for Remote Networking
5
46
Select Standard 19200 bps Modem from the modem
list. Click Next>.
NOTE: If Standard 19200 bps Modem does not appear in
the drop-down menu, you still need to install the modem.
Refer to the previous section, “Configuring Windows for
New Hardware,” for instructions.
Windows 95/98 Setup
Preparing for Remote Networking
6
47
Enter the dial-up number of your office network or ISP.
Click Next>.
The next window will report that you have successfully
created the connection.
7
Click Finish.
In most cases, your connection is now ready. But if your
network administrator or ISP has specific dialing or
configuration instructions, you may need to further
modify the connection's properties.
Modifying the connection’s properties
1
In the Dial-Up Networking window, right-click the icon
with the name of the connection you chose, then select
Properties.
2
From the Properties window, click Server Types.
Depending on your Windows version, this may appear
as a button on the bottom of the window or as a tab on
the top of the window.
Windows 95/98 Setup
Preparing for Remote Networking
3
48
Use this screen to configure your connection as
directed by your network administrator or ISP. To modify
IP, DNS, and/or WINS addresses, click on TCP/IP
Settings... .
CAUTION: If you don't have instructions or don't know what
to do, click Cancel.
Windows 95/98 Setup
Making a Data Call
4
49
In the TCP/IP Settings screen, enter the appropriate IP,
DNS, and WINS addresses as directed by your network
administrator or ISP. Click OK.
CAUTION: If you don't have instructions or don't know what
to do, click Cancel.
5
When you return to the Properties window, click OK.
6
Restart your computer to make sure the changes take
effect.
Making a Data Call
After connecting the hardware, installing the software,
configuring Windows and setting up remote networking, you
are now ready to make a data call.
Windows 95/98 Setup
Making a Data Call
50
Preliminary checkpoints
❖ Check that the Wireless Web Card is connected to the
phone and inserted in the notebook.
❖ Make sure your phone is turned ON with the antenna
extended. For the best reception and transmission,
position your phone upright.
❖ Make sure the phone is receiving a digital signal. On
some phones a , indicating that your phone is in digital
mode, will appear on the display. Make sure the signal
strength is sufficient.
❖ Make sure your phone has enough battery power for
your data call.
Placing the call
1
In the Dial-Up Networking window, double-click the
wireless connection you have set up.
Windows 95/98 Setup
Making a Data Call
51
A Connect To window appears.
2
Enter your User Name and Password, verify the phone
number and your location, then click Connect.
NOTE: If you select the Save password option, the
information will be saved only after you click Connect.
Windows 95/98 Setup
Making a Data Call
52
3
When the computer starts the call, you should see the
call status on both the computer screen and phone
display.
4
Click Close when your notebook displays the
Connection Established screen.
A Dial-up icon appears in the status area of the
taskbar. Now you are ready to use your email, fax, webbrowsing and file synchronization applications—
wirelessly!
Windows 95/98 Setup
Using Applications
53
Ending a Data Call
1
Double-click the Dial-up icon in the status area of the
taskbar.
The connection status window appears.
2
Click Disconnect.
The Dial-up icon will disappear from your taskbar, and
your mobile phone will hang up.
Using Applications
The Wireless Web Card works with any application that you
use with a regular modem, but some applications need to
be previously configured for digital data. Determine if your
application needs this by referring to the software’s user
documentation.
If needed, configure your application with the following
modem settings:
❖ Modem type: Standard Hayes Compatible Modem
Windows 95/98 Setup
Using Applications
54
❖ Transmission speed: 19200 bps or 19.2 Kbps
❖ Flow Control: Hardware or RTS/CTS
❖ Do not wait for dial tone before dialing
For help on faxing, refer to Using the WWC for Faxing on
page 93.
55
Chapter 6 Windows 2000 Setup
Overview
The Wireless Web Card (WWC) lets you connect your
mobile phone to a Windows-based notebook so you can
wirelessly connect to your office network or the Internet.
This chapter describes how to configure your Windows
2000 notebook so it will recognize the WWC.
CAUTION: You must run the included installation CD to
install the WWC drivers. After installing the software and
connecting the hardware, you also need to configure
Windows to accept the new hardware, and then configure
your notebook for remote networking.
Windows 2000 Setup
Getting Started is Easy
56
Getting Started is Easy
1
Make sure your telephone service carrier has activated
data services for your phone.
2
Connect the WWC to your computer and phone.
3
Install the WWC drivers on your notebook.
4
Configure Windows to accept the new hardware.
5
Set up remote networking.
6
Dial and connect.
Now you are ready to go wireless!
For instructions on connecting the WWC to your computer
and phone, refer to Hardware Setup on page 6.
Windows 2000 Setup
Running the Setup Program
57
Running the Setup Program
The first time you insert the WWC, the Add New Hardware
Wizard screen appears.
1
Click Next>.
2
Click Search for the best driver for your device. Click
Next>.
3
Insert the installation CD.
4
Check CD-ROM drive and click Next>.
5
When the driver is found, click Next>.
6
Follow the instructions and click Finish.
Configuring Windows for the New Hardware
1
From the desktop, click Start, Settings, then Control
Panel.
2
In the Control Panel, double-click Phone and Modem
Options.
Windows 2000 Setup
Running the Setup Program
58
The Phone and Modems Options window appears.
3
Click the Modems tab, then click Add… .
Windows 2000 Setup
Running the Setup Program
59
An Add/Remove Hardware Wizard appears.
4
Check Don’t detect my modem; I will select it from a
list. Then click Next>.
5
Select Standard 19200 BPS Modem, then click Next>.
Windows 2000 Setup
Preparing for Remote Networking
60
6
To verify the COM port setting, click the PC Card icon
on the taskbar at the bottom of your screen.
7
The WWC should be listed with its port. Go back and
select that port.
8
When Windows reports that modem installation is done,
click Finish.
Preparing for Remote Networking
Before configuring your Windows 2000 notebook for remote
networking, contact your corporate network administrator or
Internet Service Provider (ISP) with the following questions:
❖ What is my dial-up number?
Windows 2000 Setup
Preparing for Remote Networking
61
❖ What are my user name and password?
❖ Do I need any TCP/IP settings?
❖ What type of dial-up server am I connecting to?
❖ Which network protocol will I be using?
Setting Up Remote Networking
Before setting up a dial-up connection, you must have
remote access capabilities to either your corporate network
or an ISP account.
1
From the Windows desktop, double-click My
Computer.
2
In the My Computer window, double-click Control
Panel, then select Network and Dial-up Connections.
3
In the Network and Dial-up Connections window,
double-click Make New Connection.
A Network Connection Wizard appears.
4
Click Next>.
5
In the next window, specify your network connection
type. If necessary, ask your network administrator or
Internet Service Provider. Then click Next>.
Windows 2000 Setup
Preparing for Remote Networking
6
62
In the next window, select the Standard 19200 bps
Modem in the port where you inserted the WWC. Then
click Next>.
If multiple Standard 19200 bps modems are listed and
you don’t know which to choose, click the PC Card icon
on the taskbar at the bottom of your screen. The WWC
should be listed with its port. Then go back and select
the modem in that port.
Windows 2000 Setup
Preparing for Remote Networking
63
7
In the Phone Number to Dial window, enter the phone
number of your office network or ISP. Click Next>.
8
In the Connection Availability window, choose who
can access your new connection. Then click Next>.
9
Enter a name for your new connection. We suggest
using the name “<Your ISP name>-Wireless.” After
entering the name, click Finish.
In most cases, your connection is now ready. But if your
network administrator or ISP has specific dialing or
configuration instructions, you may need to make
further modifications to the connection's properties.
10 To modify the connection, in the Network and Dial-up
Connections window, right-click the icon with the name
of the connection you chose, then select Properties.
11 From the Properties window, click the Networking tab.
Modify the connection as directed by your network
administrator or ISP.
CAUTION: If you don’t have instructions or don’t know what
to do, click Cancel.
Windows 2000 Setup
Preparing for Remote Networking
64
Configuring TCP/IP properties
If you need to configure TCP/IP properties:
1
Select Internet Protocol (TCP/IP) from the
Components list, then click Properties.
2
In the Internet Protocol Properties window, configure
your connection as directed by your network
administrator or ISP, then click OK.
3
After returning to the connection properties window,
click OK.
4
Restart your computer to make sure the changes take
effect.
Windows 2000 Setup
Making a Data Call
65
Making a Data Call
After connecting the hardware, installing the software,
configuring Windows and setting up remote networking, you
are now ready to make a data call.
Preliminary checkpoints
❖ Check that the Wireless Web Card is connected to the
phone and inserted in the notebook.
❖ Make sure your phone is turned ON with the antenna
extended. For the best reception and transmission,
position your phone upright.
❖ Make sure the phone is receiving a digital signal. On
some phones a , indicating that your phone is in digital
mode, will appear on the display. Make sure the signal
strength is at least two bars.
❖ Make sure your phone has enough battery power for
your data call.
Placing the call
1
In the Network and Dial-up Connections window,
double-click the wireless connection you have set up.
Windows 2000 Setup
Making a Data Call
2
66
In the next window, enter your User Name and
Password. Make sure the correct phone number is
displayed, then click Dial.
NOTE: If you select Save password, the information will
be saved only after you click Dial.
When the computer starts the call, both the computer
screen and phone display should report different stages
of calling activity.
When connected, your notebook will show the
connection status screen. Now you are ready to use
your email, fax, web-browsing, and file synchronization
applications—wirelessly!
Windows 2000 Setup
Using Applications
67
Ending a Data Call
1
Double-click the Connection Status icon in the system
tray.
The connection status window appears.
2
Click Disconnect.
The Connection Status icon will disappear from the
system tray, and your mobile phone will hang up.
Using Applications
The Wireless Web Card works with any application that you
use with a regular modem, but some applications need to
be previously configured for digital data. Determine if your
application needs this by referring to the software’s user
documentation.
If needed, configure your application with the following
modem settings:
❖ Modem type: Standard Hayes Compatible Modem
❖ Transmission speed: 19200 bps or 19.2 Kbps
❖ Flow Control: Hardware or RTS/CTS
❖ Do not wait for dial tone before dialing.
For help on faxing, please refer to Using the WWC for
Faxing on page 93.
68
Chapter 7 - Windows NT
Setup
Overview
The Wireless Web Card (WWC) lets you connect your
mobile phone to a Windows-based notebook so you can
wirelessly connect to your office network or the Internet.
This chapter describes how to configure your Windows NT
Workstation 4.0 notebook so it will recognize the WWC.
CAUTION: You do NOT need to run the included Targus
Wireless Web Card Installation CD for Windows NT. After
connecting the hardware, you must configure Windows to
accept the new hardware, and you must configure your
notebook for remote networking.
Windows NT Setup
Getting Started is Easy
69
Getting Started is Easy
1
Make sure your telephone service carrier has activated
data services for your phone.
2
Connect the WWC to your computer and phone, then
turn the computer on.
3
Configure Windows to accept the new hardware.
4
Set up remote networking.
5
Dial and connect.
Now you are ready to go wireless!
You must insert the WWC before you boot. If you insert the
WWC while Windows NT is running, you must reboot.
NOTE: Some computer models require a card manager to
recognize the Wireless Web Card. Current versions of
Phoenix Card Executive and System Soft CardWizard
support the WWC and also provide hot-swapping
capabilities.
For instructions on connecting the WWC to your computer
and phone, refer to Hardware Setup on page 6.
Windows NT Setup
Getting Started is Easy
70
Configuring Windows for the New Hardware
1
Select My Computer icon.
2
Double-click Control Panel.
3
Double-click Modems.
The Modems Properties window appears.
4
Click Add… .
5
Check Don't detect my modem; I will select from a
list. Click Next>.
Windows NT Setup
Getting Started is Easy
71
6
Select Standard Modem Types from the
Manufacturers box and Standard 19200 bps Modem
from the Models box.
7
Click Next> to continue.
The next window will ask where you want to install the
modem.
8
Choose the COM port where you have inserted the
WWC, then click Next>.
To identify which port the WWC is in, go to Start,
Settings, Control Panel. Double-click PC Card. In the
next window, select the WWC card, then click
Properties.
The Device Map will identify which COM port the WWC
is occupying.
9
When Windows confirms that your modem setup was
successful, click Finish.
Windows NT Setup
Preparing for Remote Networking
72
Preparing for Remote Networking
Before configuring your Windows NT notebook for remote
networking, contact your office network administrator or
Internet Service Provider (ISP) with the following questions:
❖ What is my dial-up number?
❖ What are my user name and password?
❖ Do I need any TCP/IP settings?
❖ What type of dial-up server am I connecting to?
❖ Which network protocol will I be using?
Setting Up Remote Networking
Before setting up a dial-up connection, you need to have
remote access capabilities to either your corporate network
or an ISP account.
1
From the Windows desktop, double-click My
Computer, then double-click Dial-Up Networking.
A Location Information window appears.
Windows NT Setup
Preparing for Remote Networking
73
2
Enter your country and area code. If applicable, enter a
dialing prefix for accessing outside lines, such as a “9,”
then click Close.
3
If this is your first time dial-up networking on your
computer, and you have no entries in your phonebook,
a message appears warning that the phonebook is
empty. Click OK.
A New Phonebook Entry Wizard appears.
If you have used dial-up networking before on your
computer, and your phonebook already has information
about your office network or ISP, then proceed to
Making a Data Call on page 74.
Using the Phonebook Entry Wizard
In the following steps, you will need to enter information
about the dial-up server for your office network or ISP.
1
Enter a name for the phonebook entry, such as
“MyDialUpServer.” Then click Next>.
2
In the Server window, check all boxes that apply, as
instructed by your office network administrator or ISP,
and click Next>.
3
Enter the phone number of your office network or ISP.
Then click Next>.
Depending on what you selected in the Server window,
you may now see a succession of windows where you
can modify your connection’s properties, such as IP
addresses.
Windows NT Setup
Making a Data Call
4
74
Follow the configuration instructions from your network
administrator or ISP.
CAUTION: If you don’t know what to do, click Cancel.
5
When the window reports that the phone entry is done,
click Finish.
Making a Data Call
After connecting the hardware, installing the software,
configuring Windows and setting up remote networking, you
are now ready to make a data call.
Preliminary checkpoints
1
Check that the Wireless Web Card is connected to the
phone and inserted in the notebook.
2
Make sure your phone is turned on with the antenna
extended. For the best reception and transmission,
position your phone upright.
3
Make sure the phone is receiving a digital signal. On
some phones a , indicating that your phone is in
digital mode, will appear on the display. Make sure the
signal strength is sufficient.
4
Make sure your phone has enough battery power for
your data call.
Placing the call
1
In My Computer, double-click Dial-Up Networking.
Windows NT Setup
Making a Data Call
75
2
In the Dial-Up Networking window, choose and verify
your dial-up number and location, then double-click
Dial.
3
In the next window, enter your User Name, Password,
and Domain. Click OK.
Windows NT Setup
Making a Data Call
76
When the computer starts the call, you should see the
call status on both the computer screen and phone
display.
4
When connected, the Connection Complete screen
appears. Click OK.
Now you are ready to use your email, fax, webbrowsing and file synchronization applications —
wirelessly!
Ending a Data Call
1
Double-click the Connection Status icon in the system
tray to access Dial-Up Networking Monitor.
2
Click Hang up.
The Connection Status icon disappears from the
system tray, and your mobile phone will hang up.
Windows NT Setup
Using Applications
77
Using Applications
The Wireless Web Card works with any application that you
use with a regular modem, but some applications need to
be previously configured for digital data. Determine if your
application needs this by referring to the software’s user
documentation.
If needed, configure your application with the following
modem settings:
❖ Modem type: Standard Hayes Compatible Modem
❖ Transmission speed: 19200 bps or 19.2 Kbps
❖ Flow Control: Hardware or RTS/CTS
❖ Do not wait for dial tone before dialing
For help on faxing, please refer to Using the WWC for
Faxing on page 93.
78
Chapter 8 - Apple
PowerBook Setup
Overview
The Wireless Web Card (WWC) lets you connect your
mobile phone to an Apple PowerBook so you can wirelessly
access your office network or the Internet. This chapter
describes how to configure your PowerBook so it will
recognize the WWC.
CAUTION: You must run the Targus Wireless Web Card
Installation CD, included in the kit, to install the WWC
drivers. After connecting the hardware and installing the
software, you must also configure the Modem Control
Panel, TCP/IP Control Panel, and set up remote access.
Apple PowerBook Setup
Getting Started is Easy
79
Getting Started is Easy
1
Make sure your telephone service carrier has activated
data services for your phone.
2
Connect the WWC to your PowerBook and mobile
phone.
3
Install the WWC drivers on your PowerBook.
4
Configure the Modem Control Panel and TCP/ICP
Control Panel.
5
Configure Remote Access.
6
Make a connection.
Connecting the Hardware
1
Turn on your PowerBook.
2
Plug the WWC into the PC Card adapter, then plug the
combined unit into your PowerBook.
Apple PowerBook Setup
Running the SETUP Program
3
80
Wait for a card icon to appear on the desktop, then
connect the free end of the data cable to your phone.
If you need further help on connecting the hardware, refer to
Hardware Setup on page 6.
Running the SETUP Program
After connecting the hardware, insert the Targus Wireless
Web Card Installation CD into the CD-ROM drive. Doubleclick the Wireless Web Card Installer icon. You will not
need to restart the computer after running the installer.
Preparing for PowerBook Configurations
Before configuring your PowerBook, contact your office
network administrator or Internet Service Provider (ISP)
with the following questions:
❖ What is my dial-up number?
❖ What are my user name and password?
❖ Do I need any TCP/IP settings?
❖ What is my IP address?
❖ What is the IP address of the Domain Name Server?
❖ What type of dial-up server am I connecting to?
❖ Which network protocol will I be using?
For more information on configuring your PowerBook, refer
to your PowerBook user manual or visit Apple’s support
Web site at: www.apple.com/support/.
Apple PowerBook Setup
Running the SETUP Program
Configuring the Modem Control Panel
1
From the Desktop, select Apple Menu, Control
Panels, Modem.
2
From the Connect via pull-down menu, select CF+
DPC Generic Card.
3
Select CDMA Handset from the Modem pull-down
menu.
4
Close the Modem Control Panel.
5
Click Save when prompted.
Configuring the TCP/IP Control Panel
1
From the Desktop, select Apple Menu, Control
Panels, TCP/IP.
81
Apple PowerBook Setup
Running the SETUP Program
82
2
Select PPP from the Connect via: pull-down menu.
3
Choose a configuration method from the Configure:
pull-down menu.
NOTE: If your Internet Service Provider (ISP) or system
administrator assigned you an IP Address (called a Static IP
Address), select Manually from the Configure pulldown menu and enter the address in the IP Address field.
4
If you have not been assigned an IP address, select
Using PPP Server from the Configure pull-down
menu.
Apple PowerBook Setup
Running the SETUP Program
83
5
In the Name server address field, enter the IP
Addresses of the Domain Name Servers.
6
In the Search domains field, enter the domain name.
NOTE: If your email address is name@your_domain.com on
the network you will be connecting to, the Search domain
will be your_domain.com.
7
Close the TCP/IP Control Panel by clicking the Close Box in
the upper-left corner.
8
Choose Save when prompted.
Apple PowerBook Setup
Running the SETUP Program
Configuring Remote Access
1
From the Desktop, select Apple Menu, Control Panels,
Remote Access.
2
Select Registered User and enter your user Name,
Password and phone Number supplied by your
company's system administrator or Internet Service
Provider (ISP). Then click Options.
84
Apple PowerBook Setup
Making A Data Call
85
3
In the Options dialog box, click the Protocol tab.
4
Check Connect automatically when starting TCP/IP
applications, then click OK.
5
Close the Remote Access control panel by clicking the
Close Box in the upper-left corner.
6
Choose Save when prompted.
Making A Data Call
After connecting the hardware, installing the software and
configuring your PowerBook, you are now ready to make a
data call.
Apple PowerBook Setup
Making A Data Call
86
Preliminary checkpoints
1
Make sure the cable and connectors are fastened
securely to your phone and the WWC is inserted into
your PowerBook.
2
Make sure your phone is turned on with the antenna
extended. For the best results, position your phone
upright.
3
Make sure the phone is receiving a digital signal. On
some phones a , indicating that your phone is in digital
mode, will appear on the display. Make sure the signal
strength is sufficient.
4
Make sure your phone has enough battery power for
the data call.
Placing the call
1
From the Desktop, select Apple Menu, Control
Panels, Remote Access.
2
Click Connect.
When successful, your phone display should show that
the call has connected. Now you are ready to use your
email, fax, web-browsing and file synchronization
applications— wirelessly!
Ending a Data Call
1
From the Desktop, select Apple Menu, Control
Panels, Remote Access.
2
Click Disconnect.
Your mobile phone will hang up.
Apple PowerBook Setup
Using Applications
87
Using Applications
The Wireless Web Card works with any application that you
use with a regular modem, but some applications need to
be previously configured for digital data. Determine if your
application needs this by referring to the software’s user
documentation.
If needed, configure your application with the following
modem settings:
❖ Modem type: Standard Hayes Compatible Modem
❖ Transmission speed: 19200 bps or 19.2 Kbps
❖ Do not wait for dial tone before dialing
For help on faxing, please refer to Using the WWC for
Faxing on page 93.
88
Appendix A Specifications
Physical Characteristics
CF I/O Card Size: 1.43 x 1.69 x 0.13 in
(36.4 x 42.8 x 3.3 mm)
Interconnect Cable Length: 22 in (559 mm)
Power Consumption
Inactive: 0 mA (0 mW)
Active (typical): 3 mA (10 mW)
Interface Standards
CompactFlash Interface: CompactFlash I/O card slot,
Type I
With CompactFlash-to-PC Card Adapter: PCMCIA,
Type II
Serial Communications: TTL
Operating System Support
89
Operating System Support
Windows CE, v. 2.11 or greater
Windows 95/98/2000/NT 4.0
MacOS 8.5.1 or greater
Mobile Handsets Supported
Handset support is determined by the specific cable
included in the Wireless Web Card Connection Kit package.
Kits are available for various Motorola, Qualcomm,
Samsung, Siemens, Sprint and Touchpoint digital handsets.
Support for other handsets and manufacturers is pending.
For a current compatibility list, visit:
www.targus.com/wirelessweb
Software Compatibility
Windows COM port
MacOS
Hardware Compatibility
Standard Card (without PC Card adapter)
Windows CE-based Palm-size and Pocket PCs including
devices from Casio, Compaq, and Hewlett Packard.
Windows CE-based Handheld PC Pro devices and pen
tablets with CompactFlash I/O card slot.
With CompactFlash-to-PC Card adapter
Windows CE-based Handheld PCs and pen tablets,
Windows 95/98/2000/NT 4.0 notebooks. Apple
Software Included
90
PowerBooks with MacOS 8.5.1 or greater and Open
Transport 2.0.3 or greater.
Software Included
Targus Wireless Web Card Installation CD
Compatible Applications
Windows Remote Dial-up, ActiveSync, Pocket Outlook,
FTP, Telnet, AvantGO, Citrix, pcANYWHERE, BSquare
applications, streaming video, etc.
Warranty
CompactFlash Card and Non-removable Cable: Lifetime
CompactFlash-to-PC Card Adapter: Three years
Certification
FCC: Part 15, Class B,
CE: EN55022
C-TICK N2953
91
Appendix B - Hints and
Tips
Optimizing Signals and Connections
For the best results for each data call, review the following
checkpoints before connecting:
1
Make sure the cable and connectors are fastened
securely to your mobile computer and your phone.
2
Make sure the phone is receiving a digital signal. A or
equivalent will appear on the display of some phones.
3
Make sure the signal strength is sufficient. To optimize
the signal, extend the antenna, position the phone
upright and, if necessary, move to a different location.
4
Make sure your phone has enough battery power for
your data call.
Choosing the Right Applications
92
Choosing the Right Applications
Not all applications are ideal for wireless networking. For
example, downloading a large file wirelessly takes longer
than it does over a landline phone line with a regular
modem. Experiment with your applications to determine
which ones work best for you wirelessly.
Using Multiple Modems
Pocket PCs and other Windows CE-based computers can
support multiple modems, but you must create a separate
dial-up connection for each modem that you use. When
making a data call, you must select the dial-up connection
for the specific modem in use.
To create multiple dial-up networking connections, follow the
steps outlined in the “Setting Up Remote Networking”
section for your device, but include the following
modifications:
1
In the Make New Connection screen, when naming
connections, select names that clearly distinguish the
modem in use. For example, you might choose “Internet
Service Provider-Wireless” and “Internet Service
Provider-Landline.”
2
In the Select a modem: box, choose Targus WWC
Connection for a wireless connection. Choose your
existing modem for a landline connection.
For other applications, such as faxing, refer to your fax
program’s user documentation on using multiple modems
or changing between modems.
Using the WWC for Faxing
93
Using the WWC for Faxing
Follow these guidelines to set up your computer to send
and receive faxes wirelessly with the WWC.
Setting up your fax software for the WWC
Because fax software programs vary, the procedure for
setting up computers to fax with the WWC also varies.
You may need to configure the software with the following
settings:
❖ Fax class: 2.0
❖ Initialize at: 19,200 bps
❖ Maximum transmission speed: As fast as possible
❖ Minimum transmission speed: 14,400 bps (CDMA
phone) or 9,600 bps (GSM phone)
❖ Use hardware flow control or RTS/CTS
Preliminary checkpoints for sending or receiving faxes:
1
Connect the WWC to your mobile phone and computer.
Make sure the cable and connectors are fastened
securely.
2
Make sure that your mobile phone is turned ON with the
antenna extended. For best results, position the phone
upright.
Using the WWC for Faxing
94
3
Make sure the phone is receiving a digital signal. Some
phones will show a on the display, indicating that your
phone is in digital mode. Make sure the signal strength
is at least two bars.
4
Make sure your phone has enough battery power for
the data call.
Sending a fax
1
Start the fax call from your fax software. When the
notebook begins calling, the call status should appear
on both the computer screen and phone display.
2
After the phone connects, your fax software will
automatically start sending the fax.
3
After sending the fax, your fax software will
automatically disconnect.
Receiving a fax
1
Set your phone to receive incoming fax calls only. This
can be done using the menus on the phone.
For example, for the Qualcomm QCP-2760 or QCP2760F phone, go to Features, Network, Data/Fax In. From
the Data/Fax In menu, select fax call. The next call you
receive will be treated as a fax call. Afterwards, the
phone will return to its normal operating mode.
If you select fax only instead of fax call, your phone will
remain in fax mode. To receive voice calls again, power off
your phone or turn off fax calls only.
2
Set your fax software to automatically answer all
incoming calls. For instructions, refer to your software’s
user manual.
Using the WWC for Faxing
95
3
Call the sender, requesting the fax now. If you call the
sender from your mobile phone, you need to hang up to
receive the fax call.
4
When the incoming call arrives, the phone will ring, and
a message will appear on the display indicating the call.
Your fax software will automatically answer the incoming
fax call.
5
After you receive the fax, the fax software will
automatically disconnect.
96
Appendix C Troubleshooting
SYMPTOM
❖ My computer does not recognize my phone.
❖ My computer does not respond to AT commands.
❖ I cannot place a call.
Possible Reasons
Solution
Your phone is not
turned on.
Power ON your phone.
Your phone is not
communicating
properly with your
computer.
Power your phone OFF, then ON again.
The cable between
your phone and the
WWC is not connected
correctly.
Make sure you are using the correct data
cable and all connectors are securely
fastened.
97
Possible Reasons
Solution
Other software is using
the COM port.
Deactivate any other software that is using
the COM port. Hint: Check ActiveSync
settings
You have multiple
modems set up on
your computer, and
your software is
configured for the
modem other than the
mobile phone.
Configure your communications software for
a WWC connection. Select your mobile
phone as the modem.
Your fax software is set
to Auto Answer and is
using the COM port.
Disable the Auto Answer feature on your fax
software.
The COM port is
disabled
Consult your computer’s user guide for help
managing COM ports.
Your data cable or PC
Card adapter are
damaged.
Check the pins (metal contacts) on either end
of the cable and/or adapter. If any appear
bent or unaligned, you may need them
replaced.
There is a conflict with
COM ports and IRQs.
Consult your computer’s user guide for help
managing COM ports.
Your computer is
waiting for the dial
tone.
Make sure that the Wait for dial tone box is
unchecked. Refer to the chapter for your
computer type to modify your connection’s
settings.
98
SYMPTOM
❖ My call fails immediately OR
❖ I get a CALL FAILED message on my mobile phone.
Possible Reasons
Solution
The phone battery has
died.
Charge or replace the battery.
Temporary network
problems.
Try the call again. CALL FAILED usually
disappears after a second try. If you still get
CALL FAILED, power your phone OFF, then
ON again. If this doesn’t resolve the problem,
your mobile wireless service may be down.
Your service provider
won’t accept low
bandwidth
connections.
Contact your service provider.
SYMPTOM
❖ I get disconnected in mid-session.
Possible Reasons
Solution
The mobile signal has
faded, or you have
traveled outside the
mobile coverage area.
Raise the phone antenna. On your phone
display, there should be an icon to indicate
digital coverage. If you have left the coverage
area, return to it and call again.
Your phone battery has
run out of power.
Replace or recharge the battery.
99
Possible Reasons
Solution
The data cable
between your mobile
phone and your
computer is loose or
has become
disconnected.
Make sure the data cable is securely
fastened.
The other modem
(your corporate
network or Internet
Service Provider) has
hung up.
Your corporate network or Internet Service
Provide may terminate your call for many
reasons. Place the call again. If the problem
persists, contact your corporate network
support or Internet Service Provider.
Your call was dropped.
Try the call again.
You were automatically
disconnected due to
inactivity.
Some software will terminate a call after a
period of inactivity. Check your software for
controls on automatic disconnect.
100
SYMPTOM
❖ I get a NETWORK NOT RESPONDING message on
my mobile phone.
Possible Reasons
Solution
Your need to update
your mobile account.
Call your mobile service provider.
SYMPTOM
❖ My computer dials but cannot connect.
Possible Reasons
Solution
You have multiple
modems set up on
your computer, and the
software is configured
for a modem other than
the mobile phone.
Configure your communications software for
a WWC connection. Select your mobile
phone as the modem.
You are dialing the
wrong number.
Check the number, including the area code.
Contact your Internet Service Provider or
corporate network support to verify the
number.
The number you are
dialing is long distance.
Check the area code of the number you are
dialing. You may need to add a 1 before the
number for long distance calls.
You are using a dialing
prefix—such as a 9—
before the phone
number.
Remove any dialing prefixes from the phone
number.
101
Possible Reasons
Solution
The modem you are
calling is out of service.
Contact your Internet Service Provider or
corporate network support to verify the status
of their server and modems.
Your phone signal is
weak.
Raise the phone antenna. On your phone
display, there should be an icon to indicate
digital coverage. If you are outside the
coverage area, change locations and call
again.
Your user name and/or
password is incorrect.
Check that you have entered the proper user
name and password.
You have entered the
wrong domain name.
Check that you have entered the proper
domain name.
SYMPTOM
❖ I get a DISCONNECTED SIGNAL FADED message on
my mobile phone.
Possible Reasons
Solution
You left the mobile
coverage area during
the call.
Change locations and call again.
102
SYMPTOM
❖ My mobile phone shows that the call has connected but
my communications software does not.
Possible Reasons
Solution
The call took so long to
establish that the
communications
software gave up
(timed out).
Increase the time-out interval on your
communications software and try the call
again.
SYMPTOM
❖ My communications software shows that the call has
connected, but my mobile phone does not.
Possible Reasons
Solution
Your call was dropped,
but your
communications
software is still waiting
before it gives up on
the call.
Cancel the call from you communications
software and try again.
103
SYMPTOM
❖ I cannot receive voice calls.
Possible Reasons
Solution
You have set up your
mobile phone to
receive data or fax calls
only.
Follow the instructions that came with your
phone to configure for voice calls instead of
fax or data calls. You can usually access this
feature from the phone’s menu.
You are engaged in a
data call.
During data calls, you cannot receive voice
calls. Hang up and, if necessary, switch your
phone back to voice mode.
SYMPTOM
❖ I cannot receive fax calls OR
❖ I cannot receive data calls.
Possible Reasons
Solution
The phone is not set
up to receive fax/data
calls.
Follow the instructions that came with your
phone to set up the phone to receive fax/data
calls. You can usually access this feature
from the phone’s menu.
Your fax/
communications
software is not
answering in time.
Set your fax/communications software to
answer after fewer rings, preferably 0.
Consult the software’s user manual for
instructions.
104
SYMPTOM
❖ The data is transmitting slowly.
Possible Reasons
Solution
CDMA networks have
a maximum
connection speed of
14,400 bps. GSM
networks have a
maximum connection
speed of 9,600 bps.
Visit Targus’ Web site at
Dial-in or web servers
have heavy traffic.
Connect at a different time, when your
corporate network or Internet Service
Provider is less busy.
www.targus.com/support for suggestions
on how to use your system more efficiently.
SYMPTOM
❖ I cannot access my email OR
❖ I cannot use my web browser.
Possible Reasons
Solution
You are not connected
to your corporate
network or Internet
Service Provider.
Connect again.
Your dial-up
networking settings are
incorrect.
Check that your dial-up networking settings
match those provided by your corporate
network support or Internet Service Provider.
Your user name(s)
and/or password(s) are
incorrect.
Check that you have entered the proper user
name and password for your various
services, including email accounts, NT
servers, and proxy servers.
105
Appendix D Need More Help?
How to Contact Targus
If you cannot resolve a technical problem with the Wireless
Web Card, contact Targus’s technical support department
prepared with the following information:
❖ The serial number of your WWC
❖ The name and version of your operating system
❖ The manufacturer and model number of your mobile
computer
❖ The manufacturer, model number and carrier of your
mobile phone
❖ If you use the WWC with a Pocket PC or other Windows
CE-based computer, the version of Windows on your
host PC
❖ What you did to try to correct the problem
❖ What you do to consistently replicate the problem
How to Contact Targus
106
To reach Targus’s technical support department:
❖ Visit Targus’ Web site at www.targus.com/support.
❖ Email questions to [email protected].
❖ Phone Targus’ technical support department
at (800) 283-6325.
Limited Warranty
Targus warrants this product against defects in material and
workmanship, under normal use and service, for the following periods
from the date of purchase:
❖
CompactFlash I/O card and cable: Lifetime (Three years if not
registered)
❖
CompactFlash-to-PC Card adapter: Three years
Incompatibility is not a defect covered by Targus' warranty. During the
warranty period, Targus will, at its option, repair or replace the defective
product at no charge when furnished with proof of retail purchase,
provided that you deliver the product to Targus.
The returned product must be accompanied by a return material
authorization (RMA) number issued by Targus. If you ship the product,
you must use the original container or equivalent, and you must pay the
shipping charges to Targus. Targus will pay shipping charges back to any
location in the contiguous United States. This warranty applies only to the
original retail purchaser and is not transferable.
Targus may, at its option, replace or repair the product with new or
reconditioned parts, or refund to Customer the purchase price paid for
the defective product, and the returned product becomes Targus'
property. Targus warrants the repaired or replaced products to be free
from defects in material or workmanship for ninety (90) days after the
return shipping date, or for the duration of the original warranty period,
whichever is greater.
This warranty does not cover the replacement of products damaged by
abuse, accident, misuse or misapplication, nor as a result of service or
modification other than by Targus.
TARGUS IS NOT RESPONSIBLE FOR INCIDENTAL OR
CONSEQUENTIAL DAMAGES RESULTING FROM BREACH OF ANY
How to Contact Targus
107
EXPRESS OR IMPLIED WARRANTY, INCLUDING DAMAGE TO
PROPERTY AND, TO THE EXTENT PERMITTED BY LAW, DAMAGES
FOR PERSONAL INJURY. THIS WARRANTY IS IN LIEU OF ALL
OTHER WARRANTIES INCLUDING IMPLIED WARRANTIES OF
MERCHANTABILITY AND FITNESS FOR A PARTICULAR PURPOSE.
Some states do not allow limitation of implied warranties, or the exclusion
or limitation of incidental or consequential damages, so the above
limitations or exclusions may not apply to you. This warranty gives you
specific legal rights and you may also have other rights which vary from
state to state.
This product may contain fully tested, recycled parts, warranted as if new.
Copyright Notice
Copyright © 2000 Targus Group International. All rights reserved.
Targus and the Targus logo are registered trademarks of Targus Group
International.
Battery Friendly is a registered trademark of Socket Communications,
Inc.
Wireless Web Card is a trademark of Targus Group International.
All other trademarks, registered trademarks, brand and product names
are property of their respective owners.
Regulatory Compliance
This equipment has been tested and found to comply with the limits for a
Class B digital device, pursuant to Part 15 of the FCC rules. This
equipment is also CE EN55022 and C-TICK compliant. These limits are
designed to provide reasonable protection against harmful interference
when the equipment is operated in a commercial environment.
This equipment generates, uses, and can radiate radio frequency energy
and, if not installed and used in accordance with the instruction manual,
may cause harmful interference to radio communications. Operation of
this equipment in a residential area is likely to cause harmful interference
in which case the user will be required to correct the interference at his or
her own expense.
If this equipment does cause harmful interference to radio or television
reception, which can be determined by turning the equipment off and on,
How to Contact Targus
108
the user may try to correct the interference by one or more of the
following measures:
❖
Reorient or relocate the receiving antenna of the radio or television.
❖
Increase the distance separating the equipment and the receiver.
❖
Connect the equipment to an outlet on a different branch circuit than
that of the receiver.
❖
Consult the dealer or an experienced radio/TV technician or help.
The user may find the following booklet helpful:
How to Identify and Resolve Radio-TV Interference Problems
This booklet is available from the U.S. Government Printing Office,
Washington, D.C. 20402.
The Leading Global Supplier of Portable Solutions
Visit our website at www.targus.com
NEW YORK • LOS ANGELES • TORONTO • HONG KONG
SINGAPORE • SYDNEY • LONDON • PARIS • BRUSSELS • HANNOVER
TOKYO • AMSTERDAM • MILANO • BARCELONA
Features and specifications are subject to change without notice. © 2000 Targus Corp.
400-0013-001A