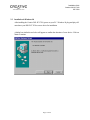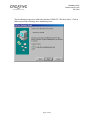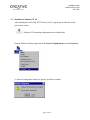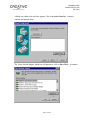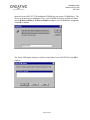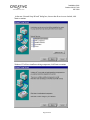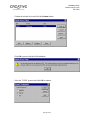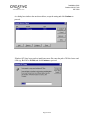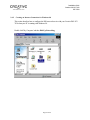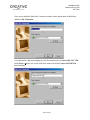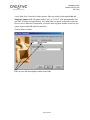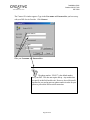
1
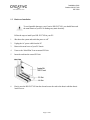
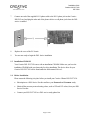
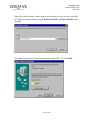
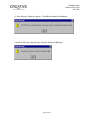
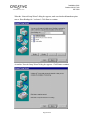
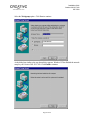
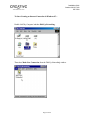
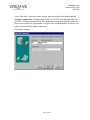
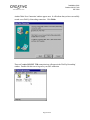
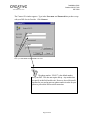
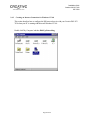
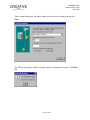
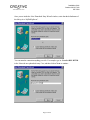
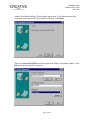
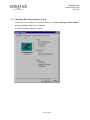
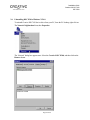
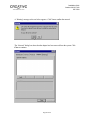
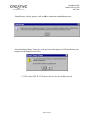
Table of Contents
1
INTRODUCTION ................................................................................................................ 1
1.1
Minimum System Requirements............................................................................................ 2
1.2
Hardware Installation........................................................................................................... 3
1.3
Installation CD-ROM .......................................................................................................... 4
1.4
Before Installation................................................................................................................ 4
2
INSTALLATION IN WINDOWS 95, 98, AND NT4.0...................................................... 5
2.1
Installation in Windows 95 ................................................................................................... 6
2.2
Installation in Windows 98 ................................................................................................. 11
2.3
Installation in Windows NT 4.0.......................................................................................... 17
2.4
Creating an Internet Connection for Windows 95, 98 and Windows NT 4.0 ....................... 33
2.4.1 Creating an Internet Connection for Windows 95......................................................... 33
2.4.2 Creating an Internet Connection for Windows 98......................................................... 41
2.4.3 Creating an Internet Connection for Windows NT 4.0.................................................. 49
2.5
Uninstalling DSL 7430 in Windows 95 & 98...................................................................... 55
2.6
Uninstalling DSL 7430 in Windows NT 4.0........................................................................ 59
3
APPENDIX.......................................................................................................................... 63
3.1
Appendix A - Changing Your DSL Network Settings......................................................... 63
3.1.1 Changing the VPI and VCI values during installation..................................................... 63
3.1.2 Changing the VPI and VCI values after installation....................................................... 67
3.2
Appendix B – Windows NT 4.0 Installation with a Network Interface Card........................ 69
3.3
Appendix C - Diagnostic Tools .......................................................................................... 79
3.3.1 Advanced Diagnostic Tools......................................................................................... 80
3.3.2 Hardware Diagnostics................................................................................................. 82
3.3.3 Troubleshooting .......................................................................................................... 84
3.3.4 Connector Pin-out....................................................................................................... 85
4
CONTACT INFORMATION............................................................................................ 87
5
WARRANTY INFORMATION........................................................................................ 89
6
REGISTRATION CARD................................................................................................... 91
Installation Guide
Creative DSL PCI 7430
RFC 2364
1
INTRODUCTION
Creative Blaster DSL PCI 7430 is developed with the most advanced technology today,
bringing very high-speed connections to common households through a regular phone line. With
its DSL technology, you can now enjoy the ‘always on’ Internet connection, download and
upload information within seconds, watch Internet movies, execute video conferencing, and view
video clips without waiting for images to be delivered frame-by-frame. Moreover, you no longer
need to add additional phone lines to avoid missing important phone calls while on the net.
Compliant with ITU-T G.99 2.1 (G.DMT), Creative DSL PCI 7430 is capable of DSL full-rate
operation up to 8Mbps downstream and 640Kbps upstream, depending upon your agreement
with your DSL Service Provider. The PCI interface allows you to integrate your PC internally
with the DSL connection.
This Installation Guide provides you with instructions on hardware and device driver installation as
well as setting up the Internet connection for your Creative DSL PCI 7430. Utilizing the Windows
Plug-and-Play feature, you will be able to install the device drivers quickly and easily.
To ensure the proper performance of your Creative DSL PCI 7430, you must go through the
following sections completely in order to confirm the proper setup of your hardware environment.
1.1.
Minimum System Requirements
1.2.
Hardware Installation
1.3.
Installation CD-ROM
1.4.
Before Installation
Page 1 of 98
Installation Guide
Creative DSL PCI 7430
RFC 2364
1.1
Minimum System Requirements
Refer to the minimum system requirements listed below to ensure the proper operation of your
Creative Modem Blaster DSL PCI 7430:
•
100 Mhz Intel Pentium IBM compatible PC
•
32MB of RAM
•
30MB of free hard disk space
•
Windows 95, Windows 98, or Windows NT
•
Available PCI slot
•
2x CD-ROM drive for DSL PCI 7430 driver installation
•
Subscribed service with a DSL Service Provider
•
One RJ-11 phone cable = connects DSL PCI 7430 to a DSL service-ready phone line
(supplied with package)
Page 2 of 98
Installation Guide
Creative DSL PCI 7430
RFC 2364
1.2
Hardware Installation
To avoid possible damage to your Creative DSL PCI 7430, you should first touch
the metal chassis of your PC to discharge any static electricity.
Follow the steps to install your DSL PCI 7430 in your PC:
1
Shut down the system and switch the power to ‘off’
2
Unplug the AC power cable from the PC
3
Remove the metal cover of your PC chassis
4
Unscrew the ‘Metal Plate’ from an unused PCI slot
5
Insert the card into the unused PCI slot
6
Firmly press the DSL PCI 7430 into the slot and secure the card to the chassis with the chassis
bracket screw
Page 3 of 98
Installation Guide
Creative DSL PCI 7430
RFC 2364
7
Connect one end of the supplied RJ-11 phone cable to the RJ-11 phone jack on the Creative
DSL PCI card, and plug the other end of the phone cable to a wall phone jack where the DSL
service is enabled
8
Replace the cover of the PC chassis
9
You are now ready to begin the DSL device installation
1.3
Installation CD-ROM
Your Creative DSL PCI 7430 comes with an installation CD-ROM. Make sure you have the
installation CD-ROM with you when ready for driver installation. The device driver for your
Creative DSL PCI 7430 can be found under the folder named ‘Drivers’.
1.4
Before Installation
Please ensure the following is in place before you install your Creative Blaster DSL PCI 7430:
•
Subscription to a DSL Service Provider and have your Password and Username ready.
•
Obtain all the necessary network setting values, such as VPI and VCI values, from your DSL
Service Provider
•
Connect your DSL PCI 7430 to a DSL service-ready phone line
Page 4 of 98
Installation Guide
Creative DSL PCI 7430
RFC 2364
2
INSTALLATION IN WINDOWS 95, 98, AND NT4.0
This chapter provides you installation instructions for your Creative DSL PCI 7430 in Windows
as well as setting up Internet connections and device driver uninstallation. It is organized as
follows:
2.1
Installation in Windows 95
2.2
Installation in Windows 98
2.3
Installation in Windows NT 4.0
2.4
Creating an Internet Connection for Windows 95 and 98
2.5
Creating an Internet Connection for Windows NT 4.0
2.6
Uninstalling DSL 7430 in Windows 95 and 98
2.7
Uninstalling DSL 7430 in Windows NT 4.0
Depending on your PC system set up, you may need the Microsoft Windows
Operating System installation CD in order to complete the DSL device driver
installation. In case, you should have your PC Windows system CD ready.
Page 5 of 98
Installation Guide
Creative DSL PCI 7430
RFC 2364
2.1
Installation in Windows 95
After installing your Creative DSL PCI 7430 card, plug the power cable back into the PC system
and turn the power on.
Before installing the Creative DSL PCI 7430 card, you must first install / upgrade
your Dial-Up Networking (DUN) application to version 1.3 or above. The
Microsoft DUN is conveniently included on the provided Creative DSL PCI 7430
installation CD-ROM under folder Drivers\Win95.
Please follow the steps below to upgrade your Win95 DUN:
(Also refer to Section 2.4.1: Creating an Internet Connection for Windows 95.)
•
At your desktop, click Start and select Run from the menu. The ‘Run’ window appears.
•
Insert the Creative DSL PCI 7430 installation CD-ROM into your PC CD-ROM drive.
Specify the path for the msdun13.exe file in the ‘Open’ box as
D:\Drivers\Win95\msdun13.exe or E:\Drivers\Win95\msdun13.exe and click OK.
•
The ‘Microsoft Dial-Up Networking 1.3’ window appears with the message: ‘This will install
Microsoft Dial-Up Networking for Windows 95. Do you still wish to continue?’ Click Yes.
•
An End-User License agreement will appear. Click Yes.
•
The ‘Microsoft TCP/IP Networking ver.2.0’ setup window continues. Click OK.
•
The ‘Microsoft Dial-Up Networking 1.3’ window appears again. You will be asked ‘do you
want to restart your computer now?’ Click Yes.
•
Upon rebooting, Win 95 DUN setup and Network Identification screen appears. Define the
settings and click Close.
•
The computer will ask you to insert the Win 95 CD. Specify the path for the Win 95 folder
on the CD, (D for example): Win 95 (e.g. D:\Win95), then click OK.
•
The Copying File window appears next. Click OK.
•
The system will ask for the Win 95 CD three more times. Repeat these steps until all
necessary files are installed.
•
When installation is complete, the ‘Restart…’ window appears. Click Yes to finish the
installation.
Page 6 of 98
Installation Guide
Creative DSL PCI 7430
RFC 2364
TO Start the DSL 7430 Device Driver Installation -The ‘Add New Hardware Wizard’ will detect your Creative DSL PCI 7430 as a ‘PCI Network
Controller’. Click Next.
Insert the supplied Creative DSL PCI 7430 installation CD-ROM into your PC CD-ROM drive.
The ‘Update Device Driver Wizard’ will try to detect the DSL 7430 Driver. Click Other
Locations to proceed.
Page 7 of 98
Installation Guide
Creative DSL PCI 7430
RFC 2364
When ‘Select Other Location’ window appears, in the text entry bar, type in your Creative DSL
PCI 7430 driver location path, for example, D:\Drivers\Win95 (or E:\Drivers\Win95). Then
click OK.
The ‘Update Device Driver Wizard’ will then find the Creative DSL 7430, click Finish.
Page 8 of 98
Installation Guide
Creative DSL PCI 7430
RFC 2364
During installation, Windows may again request you to insert the Creative DSL PCI
7430 installation CD. Clicks on OK and then browse to your systems CD-ROM
drive, for example, D:\ Drivers\Win95 (or E:\Drivers\Win95). Then click OK to
continue the installation.
Windows will continue loading the DSL driver until a ‘Service Option’ dialog box as shown
below appears. To accept the defaulted service option, click on Next to proceed the installation
process.
Unless there are special VPI and VCI values provided by your DSL Service
Provider, you should stay with the recommended installation (the default value).
To change the VPI and VCI value, refer to Appendix A: Section 3.1.1, Changing
VPI and VCI values during Installation.
During the installation process you may be asked to insert your Windows 95 CD.
Insert the Windows 95 CD into the CD-ROM drive and click OK. If during the file
copying process a file is reported as ‘not found’, please enter the path <CD Drive
letter>, for example D:\Win 95 (or E:\Win 95).
At the conclusion of the Creative DSL PCI 7430 driver installation, the Diagnostic Tool icon
(Referring to Appendix C) will appear, although inactive on the task bar. Once the Internet
connection is established, the Diagnostic Tool icon will then become active.
Page 9 of 98
Installation Guide
Creative DSL PCI 7430
RFC 2364
In order for your new DSL PCI modem configuration to be effective, Windows will now ask to
restart your computer. Click on Yes to continue.
Congratulations! You have now successfully installed your Creative DSL PCI 7430 in
Windows 95. You may now proceed to Section 2.4.1: Creating an Internet Connection for
Windows 95 for setting up your DSL Internet connection.
Page 10 of 98
Installation Guide
Creative DSL PCI 7430
RFC 2364
2.2
Installation in Windows 98
After installing the Creative DSL PCI 7430, power on your PC. Windows 98 plug-and-play will
auto-detect your DSL PCI 7430 as a new device for installation.
A dialog box similar the one below will appear to confirm the detection of a new device. Click on
Next to continue.
Page 11 of 98
Installation Guide
Creative DSL PCI 7430
RFC 2364
An ‘Add New Hardware Wizard’ dialog box appears next. Select ‘Search for the best driver for
your device. (Recommended)’. Click on Next to continue.
An ‘Add New Hardware Wizard’ dialog box will then appears in searching for the DSL 7430
driver. At this time, insert the provided Creative DSL PCI 7430 installation CD-ROM.
Referring back to the dialog box on screen and check the ‘Specify a location’ box. Type in the
device driver path as shown, either D:\Drivers\Win98 or E:\Drivers\Win98, depending on
your CD-ROM drive location. Click on Next to continue.
Page 12 of 98
Installation Guide
Creative DSL PCI 7430
RFC 2364
The next dialog box appears to confirm the detection of DSL PCI 7430 device driver. Click on
Next to proceed the remaining driver installation process.
Page 13 of 98
Installation Guide
Creative DSL PCI 7430
RFC 2364
Windows will continue loading the DSL driver until a ‘Service Option’ dialog box as shown
below appears. To accept the defaulted service option, click on Next to proceed the installation
process.
Unless there are special VPI and VCI values provided by your DSL Service
Provider, you should stay with recommended installation (the default value).
To change the VPI and VCI value, refer to Appendix A: Section 3.1.1, Changing
VPI and VCI values during Installation.
During the installation process you may be asked to insert your Windows 98 CD.
Insert the Windows 98 CD into the CD-ROM drive and click OK. If during the file
copying process a file is reported as ‘not found’ enter the path D:\Win98 (or
E:\Win98).
Page 14 of 98
Installation Guide
Creative DSL PCI 7430
RFC 2364
Windows will continue loading and configuring your DSL PCI device driver. Finally, a dialog
box similar to the one below will appear to confirm that you have successfully completed the
driver installation process.
Click on Finish.
In order for your new DSL PCI 7430 configuration to be effective, Windows will now ask to
restart your computer. Click on Yes to continue.
Congratulations! You have now successfully installed your Creative DSL PCI 7430. You may
now proceed to You may now proceed to Section 2.4.2: Creating an Internet Connection for
Windows 98 for setting up your DSL Internet connection.
Page 15 of 98
Installation Guide
Creative DSL PCI 7430
RFC 2364
2.3
Installation in Windows NT 4.0
After installing the Creative DSL PCI 7430 into your PC, plug the power cable back in and
power on the system.
Windows NT Networking configuration must be installed first.
From the Windows Desktop, right-click on the Network Neighborhood icon, then Properties.
A ‘Network Configuration’ dialog box appears, click Yes to continue.
Page 17 of 98
Installation Guide
Creative DSL PCI 7430
RFC 2364
The ‘Network Setup Wizard’ dialog box appears, select ‘Wired to the network’ and click Next
to continue.
Page 18 of 98
Installation Guide
Creative DSL PCI 7430
RFC 2364
A dialog box similar to the one below appears. Click on the Select from list… button to
continue your network setup.
The ‘Select Network Adapter’ dialog box will appear next, click on Have Disk… to continue.
Page 19 of 98
Installation Guide
Creative DSL PCI 7430
RFC 2364
Insert the Creative DSL PCI 7430 installation CD-ROM into your system CD-ROM drive. The
drivers are located on your installation CD as <your CD-ROM drive letter> and Drivers/Winnt,
such as D:/Drivers/Winnt or E:/Drivers/Winnt according to your CD-ROM drive assignment.
Click OK to continue.
The ‘Select OEM Option’ dialog box will have selected the Creative DSL DI7430, click OK to
continue.
Page 20 of 98
Installation Guide
Creative DSL PCI 7430
RFC 2364
The ‘Network Setup Wizard‘ will appear. Place a check mark next to the Creative DSL 7430
Adapter as shown below, click Next to continue.
Select and check the TCP/IP Protocol box. Click Next to continue.
Page 21 of 98
Installation Guide
Creative DSL PCI 7430
RFC 2364
At the next ‘Network Setup Wizard” dialog box, observe that all services are checked, click
Next to continue.
Windows NT will now install networking components, click Next to continue.
Page 22 of 98
Installation Guide
Creative DSL PCI 7430
RFC 2364
When a ‘Windows NT Setup’ dialog box as the one shown below appears, insert your Microsoft
Windows NT CD-ROM into your PC CD-ROM drive and enter the path <CD-ROM drive
letter> and :\i386, such as D:\i386 or E:\i386 according to your CD-ROM drive assignment.
Click Continue to proceed.
Windows NT now needs a specific DSL device driver file, re-insert the Creative DSL PCI 7430
installation CD-ROM and click Retry to continue. Be sure to allow your system CD-ROM
drive a few seconds to initialize the DSL 7430 installation CD-ROM before clicking the Retry
button.
Page 23 of 98
Installation Guide
Creative DSL PCI 7430
RFC 2364
Again, Windows NT files are needed, re-insert the Microsoft Windows NT 4.0 CD-ROM at this
point. Enter the path <CD Drive letter> and :\i386, such as D:\i386 or E:\i386 according to your
system CD-ROM drive assignment. Click Continue to proceed.
Windows will continue loading files until a ‘Service Option’ dialog box appears. To accept the
default service option settings, click Next to proceed with the installation.
Unless there are special VPI and VCI values provided by your DSL Service
Provider, you should stay with recommended installation (the default value).
To change the VPI and VCI value, refer to Appendix A: Section 3.1.1, Changing
VPI and VCI values during Installation.
During the installation process you may be asked to insert your Windows NT CDROM again. Insert the Windows NT 4.0 CD-ROM into your system CD-ROM
drive and click OK. If during the file copying process a file is reported as ‘not found’
enter the path D:\i386 (or E:\i386).
Page 24 of 98
Installation Guide
Creative DSL PCI 7430
RFC 2364
The ‘Setup Message’ for Remote Access Services will appear. Click the OK button to install
RAS.
The ‘Windows NT Setup’ dialog box appears to request for more files. With the Windows NT
4.0 CD-ROM still in the CD-ROM drive, enter the path <CD Drive letter> and :\i386, such as
D:\i386 or E:\i386 according to your drive assignment. Click Continue to proceed.
With the specified RAS Capable Device defined, click OK to continue the installation.
Page 25 of 98
Installation Guide
Creative DSL PCI 7430
RFC 2364
Confirm the selected device and click the Continue button.
Click OK to proceed with the RAS installation.
Select the ‘TCP/IP’ protocol and click OK to continue.
Page 26 of 98
Installation Guide
Creative DSL PCI 7430
RFC 2364
As a dialog box similar to the one shown below, accept the setting and click Continue to
proceed.
‘Windows NT Setup’ now needs to install some more files, enter the path <CD Drive letter> and
:\i386 (e.g. D:\i386 or E:\i386) and click Continue to proceed.
Page 27 of 98
Installation Guide
Creative DSL PCI 7430
RFC 2364
A ‘Setup Message’ dialog box appears. Click OK and continue the installation.
Confirm the following ‘Setup Message’ dialog by clicking the OK button.
Page 28 of 98
Installation Guide
Creative DSL PCI 7430
RFC 2364
When the ‘Network Setup Wizard’ dialog box appears, make sure that the all services option
next to ‘Show Bindings for:’ is selected. Click Next to continue.
As another ‘Network Setup Wizard’ dialog box appears. Click Next to continue.
Page 29 of 98
Installation Guide
Creative DSL PCI 7430
RFC 2364
Select the Workgroup option. Click Next to continue.
As the dialog box similar to the one shown below appears, Windows NT has finished the network
setup for your Creative DSL PCI 7430. Click Finish to continue.
Page 30 of 98
Installation Guide
Creative DSL PCI 7430
RFC 2364
In order for your new DSL PCI 7430 configuration to be effective, Windows will not ask to
restart your computer.
Click on Yes to restart the system.
Congratulations! You have now successfully installed your Creative DSL PCI 7430. You may
proceed to Section 2.4.3, Creating an Internet Connection for Windows NT 4.0 for setting up
your DSL Internet connection in Windows NT 4.0
Page 31 of 98
Installation Guide
Creative DSL PCI 7430
RFC 2364
2.4
Creating an Internet Connection for Windows 95, 98 and Windows NT 4.0
This section describes how to configure the DSL network service for your Creative DSL PCI. It
is organized as follows:
2.4.1
2.4.1
Creating an Internet Connection for Windows 95
2.4.2
Creating an Internet Connection for Windows 98
2.4.3
Creating an Internet Connection for Windows NT 4.0
Creating an Internet Connection for Windows 95
This section describes how to configure the DSL network service with your Creative DSL PCI
7430 when your PC is running with Windows 95.
Make sure the Dial-Up Networking (DUN) application in Windows 95 is version 1.3
or above. To upgrade your system DUN to version 1.3, the msdun13.exe file is
conveniently included in the provided Creative DSL PCI 7430 Installation CDROM. The next few instructions will explain how to install DUN.
From your Windows desktop, click on Start, and then select Run from the menu. The 'Run'
window appears.
Type in the path for the msdun13.exe file in the 'Open' box, i.e. <CD Drive Letter> (D for
example) and then the DUN file name: \msdun13.exe, such as D:\msdun13.exe or
E:\msdun13.exe according to your system CD-ROM drive assignment and click OK.
The 'Microsoft Dial-Up Networking 1.3' window appears with the message: ‘This will install
Microsoft Dial-Up Networking 1.3 for Windows 95. Do you wish to continue?’ Click Yes to
continue.
An ‘End-User License Agreement’ will appear next. Click Yes.
The 'Microsoft Dial-Up Networking 1.3' window appears again. You will be asked, ‘Do you
want to restart your computer now?’ Click Yes.
You may be asked to restart your computer system again. Choose Yes to this
option. You will also be asked for the Windows 95 CD-ROM to complete the
installation of msdun13.exe for upgrading your Dial Up Network in Windows 95.
Page 33 of 98
Installation Guide
Creative DSL PCI 7430
RFC 2364
To Start Creating an Internet Connection in Windows 95 --
Double click 'My Computer' and then Dial-Up Networking.
Then select Make New Connection from the 'Dial-Up Networking' window.
Page 35 of 98
Installation Guide
Creative DSL PCI 7430
RFC 2364
Once you are inside the 'Make New Connection' window, notice that the name of the dial-up defaults to
My Connection.
You can name the connection anything you wish, for example type in: Creative DSL PCI 7430. In the
‘Select a device:’ bar, use the scroll down menu to locate the Creative DSL, then click Next.
Page 36 of 98
Installation Guide
Creative DSL PCI 7430
RFC 2364
A new 'Make New Connection' window appears. Enter any number for the Area Code and
Telephone Number fields. The phone number ‘408’ & ‘123-4567’ is the default number since
your DSL 7430 does not require dial-up. Any number that you specify in this field would work.
However, due to Microsoft’s requirement, you need to enter any phone number in order for your
system to proceed the DSL network connection.
Click Next to continue.
Page 37 of 98
Installation Guide
Creative DSL PCI 7430
RFC 2364
Another 'Make New Connection' window appears next. It will indicate that you have successfully
created a new Dial-Up Networking connection. Click Finish.
The new Creative DSL PCI 7430 connection icon will appear in the 'Dial-Up Networking'
window. Double-click this icon to log on for your DSL connection.
Page 38 of 98
Installation Guide
Creative DSL PCI 7430
RFC 2364
The 'Connect To' window appears. Type in the User name and Password that you have set up
with your DSL Service Provider. Click Connect.
Enter your User name and Password in the field.
The phone number ‘1234567’ is the default number
since your DSL 7430 does not require dial-up. Any number that
you specify in this field would work. However, due to Microsoft’s
requirement, you need to enter any phone number in order for your
system to proceed the DSL network connection.
Page 39 of 98
Installation Guide
Creative DSL PCI 7430
RFC 2364
The 'Connection Established' window will appear indicating You are connected to Creative
DSL PCI 7430.
Click Close and the 'Diagnostic Tool' icon will appear on the task bar.
Congratulations! Your Creative DSL PCI 7430 Internet connection in Windows 95 is now
established!
Page 40 of 98
Installation Guide
Creative DSL PCI 7430
RFC 2364
2.4.2
Creating an Internet Connection for Windows 98
This section describes how to configure the DSL network service with your Creative DSL PCI
7430 when your PC is running with Windows 98.
Double click 'My Computer' and then Dial-Up Networking.
Page 41 of 98
Installation Guide
Creative DSL PCI 7430
RFC 2364
Then select Make New Connection from the 'Dial-Up Networking' window.
The ‘Location Information’ box will appear, enter the area (or city) code and click Close.
Page 42 of 98
Installation Guide
Creative DSL PCI 7430
RFC 2364
Once you are inside the 'Make New Connection' window, notice that the name of the dial-up
defaults to My Connection.
You can name the connection anything you wish, for example type in: Creative DSL PCI 7430.
In the Select a device: bar, use the scroll down menu to locate the Creative DSL DI7430,
then click Next.
Page 43 of 98
Installation Guide
Creative DSL PCI 7430
RFC 2364
A new 'Make New Connection' window appears. Enter any number for the Area Code and
Telephone Number fields. The phone number ‘408’ & ‘123-4567’ is the default number since
your DSL 7430 does not require dial-up. Any number that you specify in this field would work.
However, due to Microsoft’s requirement, you need to enter any phone number in order for your
system to proceed the DSL network connection.
Click on Next to continue.
Enter any area code and telephone number in the fields.
Page 44 of 98
Installation Guide
Creative DSL PCI 7430
RFC 2364
Another 'Make New Connection' window appears next. It will indicate that you have successfully
created a new Dial-Up Networking connection. Click Finish.
The new Creative DSL PCI 7430 connection icon will appear in the 'Dial-Up Networking'
window. Double-click this icon to log on for your DSL connection.
Page 45 of 98
Installation Guide
Creative DSL PCI 7430
RFC 2364
The 'Connect To' window appears. Type in the User name and Password that you have set up
with your DSL Service Provider. Click Connect.
Enter your Username and Password here.
The phone number ‘1234567’ is the default number
since your DSL 7430 does not require dial-up. Any number that
you specify in this field would work. However, due to Microsoft’s
requirement, you need to enter any phone number in order for your
system to proceed the DSL network connection.
Page 46 of 98
Installation Guide
Creative DSL PCI 7430
RFC 2364
The 'Connection Established' window will appear indicating You are connected to Creative
DSL PCI 7430.
Click Close and the 'Diagnostic Tool' icon will appear on the task bar.
Congratulations! Your Creative DSL PCI 7430 Internet connection in Windows 98 is now
established!
Page 47 of 98
Installation Guide
Creative DSL PCI 7430
RFC 2364
2.4.3
Creating an Internet Connection for Windows NT 4.0
This section describes how to configure the DSL network service with your Creative DSL PCI
7430 when your PC is running with Microsoft Windows NT 4.0.
Double click 'My Computer' and then Dial-Up Networking.
Page 49 of 98
Installation Guide
Creative DSL PCI 7430
RFC 2364
Then ‘Location Information’ will appear. Enter the area code you are calling from and click
Close.
The ‘Dial-Up Networking’ window will appear stating ‘The phonebook is empty’. Click OK to
add.
Page 50 of 98
Installation Guide
Creative DSL PCI 7430
RFC 2364
Once you are inside the ‘New Phonebook Entry Wizard' window, notice that the default name of
the dial-up is to ‘MyDialUpServer’.
You can name the connection anything you wish. For example, type in: Creative DSL DI7430
in the ‘Name the new phonebook entry:’ bar, and then click on Next to continue.
Page 51 of 98
Installation Guide
Creative DSL PCI 7430
RFC 2364
A new 'Phone Number’ window appears. Enter any number for the Phone number field. The
phone number ‘408-123-4567’ is the default number since your DSL 7430 does not require dialup. Any number that you specify in this field would work. However, due to Microsoft’s
requirement, you need to enter any phone number in order for your system to proceed the DSL
network connection.
Click on Next to continue.
Enter any phone number in the field.
Page 52 of 98
Installation Guide
Creative DSL PCI 7430
RFC 2364
Another ‘New Phonebook Entry Wizard' window appears next. It will indicate that you have
successfully created a new Dial-Up Networking connection. Click Finish.
The new Creative DSL DI7430 connection appear in the 'Dial-Up Networking' window. Click
Dial icon to to log on for DSL connection.
Page 53 of 98
Installation Guide
Creative DSL PCI 7430
RFC 2364
The 'Connect To' window appears. Type in the User name and Password that you have set up
with your DSL Service Provider. Click OK.
Enter your User name and Password in the field.
Check both boxes below and click OK to complete the DUN setup.
Congratulations! Your Creative DSL PCI 7430 Internet connection in Windows NT 4.0 is
now established!
Page 54 of 98
Installation Guide
Creative DSL PCI 7430
RFC 2364
2.5
Uninstalling DSL 7430 in Windows 95 & 98
To delete the Creative DSL PCI 7430 device drivers, go to Start→
→ Settings → Control Panel
and select System. Double click on System.
A ‘System Properties’ dialog box appears.
Page 55 of 98
Installation Guide
Creative DSL PCI 7430
RFC 2364
Select the Device Manager tab and a dialog box similar to the one shown below will appear.
Page 56 of 98
Installation Guide
Creative DSL PCI 7430
RFC 2364
Referring to the dialog box below, in the ‘Device Manager’ listing, click on Network adapters ,
select Creative DSL DI7430, and click Remove to proceed the device driver removal.
A warning message ‘You are about to remove this device from your system’ will then appear.
Click OK to remove the drivers.
Page 57 of 98
Installation Guide
Creative DSL PCI 7430
RFC 2364
Your PC system must be restarted for the changes to take effect. Click on Yes to restart your
computer.
** You have now completed the steps in removing the DSL PCI 7430 device driver.
Page 58 of 98
Installation Guide
Creative DSL PCI 7430
RFC 2364
2.6
Uninstalling DSL 7430 in Windows NT 4.0
To uninstall Creative DSL 7430 device driver from your PC, from the PC desktop, right click on
The Network Neighborhood icon, then Properties.
The ‘Network’ dialog box appears next. Select the Creative DSL 7430b, and then click on the
Remove button.
Page 59 of 98
Installation Guide
Creative DSL PCI 7430
RFC 2364
A ‘Warning’ message as the one below appears. Click Yes to confirm the removal.
The ‘Network’ dialog box shows that the adapter has been removed from the system. Click
Close to continue.
Page 60 of 98
Installation Guide
Creative DSL PCI 7430
RFC 2364
‘Setup Message’ window appears, click on OK to continue the uninstallation process.
‘Network Settings Change’ dialog box as the one below then appears, click Yes and restart your
computer for the changes to take effect.
*** The Creative DSL PCI 7430 device driver is now successfully removed.
Page 61 of 98
Installation Guide
Creative DSL PCI 7430
RFC 2364
3
APPENDIX
3.1
Appendix A - Changing Your DSL Network Settings
This section will guide your through setting up your VPI and VCI network settings. The driver
should automatically setup these value for you, however if your DSL provider changes or updates
to new VPI and VCI values, please read the following section to change your settings.
3.1.1
Changing the VPI and VCI values during installation
To update new VPI and VCI values during DSL PCI 7430 device driver installation, when the
‘Service Option’ window appears, click Advanced.
Page 63 of 98
Installation Guide
Creative DSL PCI 7430
RFC 2364
A ‘Service Options’ window as the one shown below appears. Enter the VPI and VCI values
provided by your ISP. Make sure the ‘Framing’ is set to LLC/SNAP. Click OK.
Enter specific VPI and VCI values that supplied by your DSL service provider.
Unless your DSL service provider provides instructions on ‘Select ADSL Mode’, do not change
the default setting.
Page 64 of 98
Installation Guide
Creative DSL PCI 7430
RFC 2364
The previous ‘Service Option’ window will appear.
Click on Next to continue the updated settings.
Please refer back to Section 2.1 ‘Installation in Windows 95’, Section 2.2
‘Installation in Windows 98’, and Section 2.3 ‘Installation in Windows NT
4.0’ for the remaining steps of the device driver installation.
Page 65 of 98
Installation Guide
Creative DSL PCI 7430
RFC 2364
3.1.2
Changing the VPI and VCI values after installation
Right click on the light indicator of ‘Diagnostic Tools’, located at the lower right hand corner of
your screen in the System Tray, as shown below.
A diagnostic tool menu as shown below will appear.
Page 67 of 98
Installation Guide
Creative DSL PCI 7430
RFC 2364
A ‘Service Options’ window as the one shown below appears. Enter the VPI and VCI values
provided by your ISP. Make sure the ‘Framing’ is set to LLC/SNAP. Click OK.
Enter specific VPI and VCI values that supplied by your DSL service provider.
Unless your DSL service provider provides instructions on ‘Select ADSL Mode’, do not change
the default setting.
Page 68 of 98
Installation Guide
Creative DSL PCI 7430
RFC 2364
3.2
Appendix B – Windows NT 4.0 Installation with a Network Interface Card
This section will help you to install your Creative DSL PCI 7430 in Windows NT 4.0 when a
Network Interface Card has already been previously installed on your PC.
From the Windows Desktop, right-click on the Network Neighborhood icon, then click
Properties.
Page 69 of 98
Installation Guide
Creative DSL PCI 7430
RFC 2364
In the ‘Network’ window, click the Adapters tab.
Page 70 of 98
Installation Guide
Creative DSL PCI 7430
RFC 2364
In the Adapters tab, click the Add… button.
Page 71 of 98
Installation Guide
Creative DSL PCI 7430
RFC 2364
You will now come to a ‘Select Network Adapter’ window. Click Have Disk.
At this time, please insert your Creative DSL PCI 7430 installation CD into your CD-ROM
drive. Then type in the path of the DSL PCI 7430 device driver, such as e:\drivers\winnt (or
f:\drivers\winnt, depending on where your CD-ROM drive is located).
Page 72 of 98
Installation Guide
Creative DSL PCI 7430
RFC 2364
The ‘Select OEM Option’ dialog box will have selected the Creative DSL DI7430, Click OK to
continue.
Window will continue loading files until the ‘Service Option’ dialog box appears. To accept the
default service option settings, click Next to proceed with the installation.
Unless there are special VPI and VCI values provided by your DSL Service Provider,
you should stay with recommended installation (the default value).
To change the VPI and VCI value, refer to Appendix A Section 3.1.1 ‘Changing VPI
and VCI values during Installation’.
During the installation process you may be asked to insert your Windows NT 4.0 CDROM. Insert the Windows NT 4.0 CD-ROM into the CD-ROM drive and click OK.
If during the file copying process a file is reported as ‘not found’, enter the path
D:\i386 (or E:\i386).
Page 73 of 98
Installation Guide
Creative DSL PCI 7430
RFC 2364
The ‘Setup Message’ for the Remote Access Services will appear. Click the OK button to install
RAS.
The ‘Windows NT Setup’ dialog box appears to request for more files. With the Windows NT
4.0 CD-ROM still in the CD-ROM drive, enter the path <CD Drive letter> and :\i386, such as
D:\i386 or E:\i386 according to your drive assignment. Click Continue to proceed.
Page 74 of 98
Installation Guide
Creative DSL PCI 7430
RFC 2364
With the specified RAS Capable Device defined, click OK to continue the installation.
Confirm the selected device and click Continue button.
Page 75 of 98
Installation Guide
Creative DSL PCI 7430
RFC 2364
The ‘Network’ window will reappear. Click Close to complete the installation.
Page 76 of 98
Installation Guide
Creative DSL PCI 7430
RFC 2364
In order for your new DSL PCI 7430 configuration to be effective, Windows will not ask to
restart your computer.
Click on Yes to restart the system.
Congratulations! You have now successfully installed your Creative DSL PCI 7430. You may
proceed to Section 2.4.3, Creating an Internet Connection for Windows NT 4.0 for setting up
your DSL Internet connection in Windows NT 4.0
Page 77 of 98
Installation Guide
Creative DSL PCI 7430
RFC 2364
3.3
Appendix C - Diagnostic Tools
The ‘Diagnostic Tools’ allow you to monitor your Creative DSL PCI 7430 connectivity, setup the
service connection address, and run diagnostic tests. The ‘Diagnostic Tools’ icon is displayed on
the task bar as shown below.
Diagnostic Tools
Max. Transfer Rate
Max. Receiving Rate
By positioning the mouse cursor over the icon, a summary of your DSL PCI connection status is
displayed, e.g. upstream and downstream line rates.
The Diagnostic Tool icon consists of two lights side by side. The left light indicates data is being
transmitted whereas the right light indicates data is being received. The state of the connection can
be determined as follows:
Diagnostic Light Indication Table
Color Code
(Left, Right)
Red, Red
Black / Yellow or
Yellow/Black flashing
Black, Black
Black, Green
Green, Black
Green, Green
∅
Description
No DSL connection and No DSL handshaking.
Check your connection cable.
DSL handshaking – Connection not established.
Precursor to establishing a DSL connection.
DSL connection established – no data traffic or idle
connection
DSL connection established – NIC is receiving data
(TX/off, RX/on)
DSL connection established – NIC is transmitting data
(TX/on, RX/off)
DSL connection established – NIC is transmitting and
receiving data
(TX/on, RX/on)
NIC is disconnected or a driver problem exists. Try using
‘Connect’ command in Diagnostic Tools. If problem
persists, restart the PC system and as a last resort reload
the drivers.
Page 79 of 98
Installation Guide
Creative DSL PCI 7430
RFC 2364
3.3.1
Avanced Diagnostic Tools
On the Diagnostic Tools icon on the right hand side of the status bar, right-click the icon to
display the menu as shown below.
Click on Open. The ‘ADSL Diagnostic Tools’ window appears on the desktop as shown below.
The three tabs of the Diagnostic Tools are ‘ADSL Status’, ‘Diagnostic’, and ‘ADSL Statistic’.
The following is a brief explanation of the windows under each tab.
ADSL Status
This window displays the current state of the Creative DSL PCI 7430 connection, including
current ADSL state, ADSL protocol in use, and the net data rates for upstream and downstream
data.
Page 80 of 98
Installation Guide
Creative DSL PCI 7430
RFC 2364
Diagnostic
This window is used for hardware testing of the Creative DSL PCI 7430 card.
ADSL Statistic
This window keeps tabs on errors that might affect the overall system performance. The counts
are reset whenever the PC system is restarted. This window contains three sub-categories:
a. ADSL Information
Re-training Count
This tracks the number of ADSL connections performed. Due to unexpected line condition
changes, the drivers can retrain the connection causing the ‘Re-training Count’ total to
increment. The ‘Diagnostic Tool’ icon will flash yellow while reconnecting.
FEC Count
This tracks the forward error correction count.
CRC Count
This tracks the accuracy of correcting data errors over each 17msec.
ATM HEC Count (header error check)
This records errors as an indication of ATM packet accuracy.
b. ATM Received Side Statistics
Good Received Packets
Bad Received Packets
c. ATM Transmission Side Statistics
Transmitted Packets
ADSL implements Reed Solomon (RS) error checking:
As a measure of packet transfer performance, the ‘Packet Errors’ are counted and tracked
against the total number of ‘Packets Received’. An error rate of less than 0.1% is reasonably
under clean ADSL line conditions.
If you have Bad Received Packets and are concerned about your service, multiply the ‘Bad
Received Packets’ count by 1000 and compare the result with the total ‘Packets Received’
count. If the number is smaller than the total ‘Packets Received’ count, then the board is operating
normally.
Page 81 of 98
Installation Guide
Creative DSL PCI 7430
RFC 2364
3.3.2
Hardware Diagnostics
Remember that the Diagnostic Tool is used to verify the Creative DSL PCI card functionality.
Running the ‘Diagnostic’ program will disconnect the NIC from the ADSL line. Close all Dial-up
sessions and close all files before running the ‘Diagnostic’ program.
Right click the Diagnostic Tool icon (located on the lower right-hand corner of the taskbar), then
select the Diagnostic option. A dialog box such as the one shown below will appear.
Product information (e.g. driver revisions) is displayed by clicking the Product Info tab.
Product Information lists the versions of the Diagnostic Tools (e.g. version 2.2) and the protocol
drivers installed (e.g. Version 2.0.11). The DLL version describes the software being used by
both the drivers and Diagnostic Tools software.
This information is helpful whenever making a technical support call. Click Close and
exit the product information window.
Page 82 of 98
Installation Guide
Creative DSL PCI 7430
RFC 2364
Click Run Diagnostics to run the diagnostic program that will test PC functionality and report
the status. A warning message pops up that your DSL service will be disconnected before
performing the Diagnostic test. If connected to the Internet at this time, running diagnostic will
disconnect any Dial-up sessions. Click Yes to begin the Diagnostic program or click No to exit
the diagnostic program. The Diagnostic program performs a brief hardware check and displays
the hardware status.
A dialog box similar to the one shown below provides a sample result of the diagnostic.
If your Creative DSL PCI 7430 fails the Diagnostic tests (shown below), then record the test
results and contact customer support.
ADSL Bridge - PCI I/O Test I90188 chip test
I90135 Register Test
I90135 Memory Test
ADSL Bridge - Loopback
90135 Utopia Loopback
I90135 chip test è
I90135 chip test è
I90188 Fast datapath
…Interleave datapath
I90135 Fast datapath
…Interleave datapath
è
Pass
Pass
Pass
è
è
è
è
Trial 20, Pass 20
Trial 20, Pass 20
Trial 20, Pass 20
Trial 20, Pass 20
For all loop back tests, both Trial and Pass counts need to be equal to 20 for
success.
Click Close to exit the Diagnostic program when you are finished running your DSL PCI 7430
diagnostic. Your Creative DSL PCI 7430 should reconnect to the DSL service automatically
once it is closed from these diagnostic tests.
Page 83 of 98
Installation Guide
Creative DSL PCI 7430
RFC 2364
3.3.3
Troubleshooting
If you have completed the Creative DSL PCI 7430 installation procedures and your DSL
connection is not operational, then refer to the following guidelines for assistance in getting your
DSL PCI 7430 connection up and running.
Questions & Answers
1
Why isn’t there a Diagnostic Icon on the Taskbar?
q Restart your PC to allow all new setup to be effective.
q Make sure the correct drivers are installed for the Windows operating system’s used.
q Delete the drivers and try the installation again.
2
Why doesn’t my Creative DSL PCI 7430 achieve DSL connection?
q Right click on the ‘Diagnostic Tools’ and select Connect option to get connection.
q Make sure the RJ-11 cable is properly installed between the Creative DSL PCI 7430 and
the DSL service ready phone line.
q Restart your PC to allow all new setup to be effective.
3
Why is my Creative DSL PCI 7430 constantly trying to negotiate a connection – with
blinking yellow panels – but failing to reach DSL connection?
q Select Disconnect from the Diagnostic Tools then try to reconnect.
q Restart the PC system and try to reconnect.
q Examine the RJ-11 connectors and cable for any deterioration.
q Ensure the wiring for your DSL service has not been altered recently.
q If condition changes throughout the day, there is a possible problem with line noise. Install
microfilters to the phone lines.
q Ensure there are no appliances near the PC system introducing noise into your DSL service
line.
q Power down the PC system and re-seat your Creative DSL PCI 7430.
4
Why is my Creative DSL PCI 7430 achieving DSL connection - but can’t reach the
Internet?
q Make sure the service connection address is connect.
q Can you PING the Internet? To run the PING command, Open DOS and type:
<C:\Windows\PING Gateway Address (e.g. C:\Windows\Ping www.microsoft.com)
q Ping Connects? If Yes, then upgrade the Internet browser or check the ‘Option’ settings for
your Internet browser.
q Ensure your Internet browser is configured correctly – check your browser documentation.
5
Must TCP/IP be loaded for Bridged Ethernet protocol?
q Yes. Please carry out the TCP/IP installation procedure before loading the Creative DSL
PCI 7430 driver.
6
Driver installation resulted in unexpected errors or warnings, and you can’t connect.
q Verify which version of Microsoft Windows is loaded in the PC system.
q Perform the Creative DSL PCI 7430 driver removal procedure
q Install the Creative DSL PCI 7430 device driver again.
Page 84 of 98
Installation Guide
Creative DSL PCI 7430
RFC 2364
3.3.4
Connector Pin-out
The Creative DSL PCI 7430 is equipped with a RJ-11 jack for connection to the
DSL data port. The center two pins, pins 3 and 4, are used for DSL data. For the
Creative DSL PCI 7430 card to make a proper DSL connection, the installed
DSL data port should also use pins 3 and 4 for data. If the DSL data port
installation uses pins 2 and 5 for data, then a wiring converter will be required. Do
not alter or remove the wiring converter if present. Consult with your DSL
service provider before attempting any wiring changes.
Page 85 of 98
Installation Guide
Creative DSL PCI 7430
RFC 2364
4
CONTACT INFORMATION
Reach us by Phone:
Telephone support is available Monday through Friday, 8:30am to 5:30pm, Pacific Standard
Time. To reach our DSL support by phone, please call:
Digicom Technical Support Hotline: (408) 719-5179
Reach us by E-Mail:
You may also send your questions and comments to the following E-Mail address:
E-Mail: [email protected]
Reach us by Mail:
Digicom Systems Inc. – A Creative Company
188 Topaz Street
Milpitas, CA 95035
General Line: (408) 719-5100
General Fax: (408) 262-1390
Page 87 of 98
Installation Guide
Creative DSL PCI 7430
RFC 2364
5
WARRANTY INFORMATION
DSI warrants that equipment furnished will be free from defects in material and workmanship for a
period of (3) three years from the confirmed date of purchase of the product new from the retail
location. Upon written notice of any such defect, the manufacturer will, at its option, repair or
replace the defective item under the terms of this warranty, subject to the provisions and specific
exclusions listed herein.
This warranty shall not apply to equipment that has been previously repaired or altered outside
our facilities in any way, nor will it apply if the equipment has been used in a manner exceeding its
specifications or if the serial number has been removed.
We do not assume liability for consequential damages as a result from our product use, and in any
event our liability shall not exceed the original selling price of the equipment.
The equipment warranty of Digicom Systems Inc. shall constitute the sole and exclusive remedy of
any Buyer of the manufacturer’s equipment and the sole and exclusive liability of the manufacturer,
its successors or assigns, in connection with equipment purchase and in lieu of all other warranties
expressed, implied or statutory, including, but not limited to, any implied warranty of
merchantability or fitness and all other obligations or liabilities of the manufacturer, its successors,
or assigns.
** Please fill out the next page and mail or fax to Digicom Systems for product registration.
Page 89 of 98
Installation Guide
Creative DSL PCI 7430
RFC 2364
6
REGISTRATION CARD
Creative DSL PCI 7430 Product Registration
Name:
Company:
Address:
City/State/Zip:
Phone:
E-mail:
Serial Number:
Purchased from:
Date of Purchase:
Please cut out the above Product Registration Card and send in with a self-addressed stamped
envelope to:
DIGICOM SYSTEMS INC.
188 TOPAZ STREET
MILPITAS CA 95035
ATTN: Customer Service
Page 91 of 98
Installation Guide
Creative DSL PCI 7430
RFC 2364
FCC Registration Information for Users
This product is compliant and registered with the CFR47-Part 68 of the Federal Communications
Commission (FCC). The FCC requires us to provide you with the following information:
• Connection to the nationwide telephone network should be made by using standard modular
telephone jacks, type RJ-11
• This equipment may not be used with ‘Party Line’ services or with ‘Coin Telephone’ lines
• You should provide the FCC registration number and Ringer Equivalent Number (REN) of this
product to your telephone company. The REN is useful in determining the number of devices
you may connect to your telephone line and still have all of these devices ring when your
telephone number is called
• If your telephone equipment causes harm to the telephone network, the telephone company may
discontinue your service temporarily. If possible, they will notify you in advance. If advance
notice is not practical, you will be notified as soon as possible. You will have an opportunity
to correct the problem, and you will be informed of your right to file a complaint with the
FCC. Your telephone company may make changes in its facilities, equipment, operations, or
procedures that could affect the proper functioning of your product. If such changes are
planned, you will be notified in advance
• If it is determined that the equipment still fails to operate properly, the FCC requires that the unit
be disconnected from the telephone line until the problem has been corrected. Repair to this
equipment can only be made by the manufacturer, its authorized agents, or other parties who
are authorized by the FCC
Page 93 of 98
Installation Guide
Creative DSL PCI 7430
RFC 2364
DISCLAIMER:
© 2000 Digicom Systems, Inc. All rights reserved.
Digicom logo is a registered trademark of Digicom Systems, Inc. in the United States and/or other countries. Creative logo and brand
name are trademarks or registered trademarks of Creative Technology Ltd. in the United States and/or other countries. Microsoft and
Windows are registered trademarks of Microsoft Corporation in the United States and/or other countries. Pentium is a registered
trademark of Intel Corporation. IBM is a registered trademark of IBM Corporation. All other logos and brand names are trademarks
or registered trademarks of their respective holders.
Manual contents and specifications are subject to change without prior notice from Digicom Systems, Inc.
Creative DSL PCI 7430 Installation Guide, pmc 21000700v22364, pn 239-10010
Page 97 of 98
Installation Guide
Creative DSL PCI 7430
RFC 2364
Page 98 of 98