1
Contents
Chapter 1 Overview
8
1.1 Introduction
1.2 Audio sources
8
1.3 Record
8
1.4 Networking
1.5 Others
9
Chapter 2 Installation
2.1 Connections
8
9
15
15
2.1.1 Ethernet LAN
15
2.1.2 Wireless LAN (WLAN)
16
2.2 Switching On
16
- Network setting - LAN
17
- Network setting –WLAN (with WiFi Dongle)
18
- Can not find Access Point
19
- Fail to connect to Access Point
20
- Select an AP that does not use encryption
21
2.3 Power On
Chapter 3 CD
23
24
3.1 Inserting a CD into the CD Tray
24
3.2 Getting CD Information
3.3 Playing a CD
24
3.4 CD Ripping
27
26
3.4.1 Converting All the Tracks within the Disc
27
3.4.2 Ripping Selected Tracks from the Disc
27
3.5 Now Playing
3.6 Lyrics
3.7 Balance
Chapter 4 Internet Radio
29
30
31
32
4.1 Introduction
32
4.2 World Station
32
4.2.1. Listen to World Station
32
4.3 SHOUTCast
34
4.4 Add/Delete a Radio Station to your Favourites
34
Contents
4.5 Internet Radio Recording
35
4.5.1 Both USB and SD/MMC Storage Media are Ready
35
4.5.2 Only One Storage Medium is Ready
35
Chapter 5
USB drive and Memory Card
5.1 Playing Songs on a USB Drive or Memory Card
5.2 Recording Folders
Chapter 6
i-Pod
37
37
38
39
6.1 Apple i-Pod support
39
6.2 Playing Songs on Apple i-Pod
39
Chapter 7
FM Radio
40
7.1 Listening to FM Radio
40
7.2 Tuning the FM Frequency
7.3 Auto-scanning for FM Stations
40
41
7.4 Manually Pre-setting FM Stations
7.5 Listening to a Preset Station
42
7.6 Recording From FM
43
Chapter 8
Media Server
42
44
8.1 Supported Media Server programmes
44
8.2 Setting Upnp Environment
44
8.2.1 Connecting up the UPnP network
44
8.3 Playing Songs on the UPnP Media Server
45
Chapter 9
File Manager
46
9.1 Copy/Move Files to an USB Disk or SD/MMC Card
46
9.2 Copy/Move Files to iPod
47
Contents
Chapter 10
AUX
49
10.1 AUX Mode
49
10.2 Recording in AUX Mode
49
Chapter 11
Setup
11.1 Date & Time
51
51
11.1.1 Tuning Time Synchronisation off or on
51
11.1.2 Setting the Date
51
11.1.3 Setting the Time
52
11.1.4 Setting Time Format, World Time Zone and DST
53
11.2 Alarm
54
11.2.1 Setting the Alarm
54
11.2.2 Setting the Alarm Sound
54
11.2.3 Alarm Volume
56
11.2.4 Snooze
56
11.2.5 Snooze minutes
56
11.2.6 Disarming the Alarm
57
11.3 Sleep
11.3.1 SLEEP Mode
11.4 Network
57
57
57
11.4.1 Understanding the Networking States on Smart Boombox
58
11.4.2 Setting the Wi-Fi Connectivity
59
11.4.3 Setting the Wi-Fi Connectivity by Wi-Fi Wizard
62
11.4.4 Inputting Static IP address
63
11.4.5 Inputting DNS address
64
11.4.6 Inputting Proxy server address
64
11.5 Information Display
11.6 Language
67
11.7 Reset All Settings
68
11.8 Firmware Upgrade
68
11.8.1 On-Line Upgrade
Chapter 12 Trouble Shooting
67
69
71
Safety information
Mains supply
This equipment is designed to operate from a 230 Volt, 50Hz ~ AC mains supply. Other power sources may damage it.
Check that the rating label on the back of the equipment states 230V AC before you plug it in for the first time.
Mains plug
We have fitted this equipment with a standard mains plug.
• If the mains lead gets damaged it must be replaced by the manufacturers service agent with an approved lead of the same
type and rating to avoid an electrical hazard.
• If you cut off the mains plug, for example to fit a different type, please destroy the old plug, as it would be
dangerous if inserted into a live power outlet. Carefully follow the wiring instructions supplied with the new plug.
• If a fuse is fitted to the plug, remove the fuse before throwing the plug away.
• Carefully follow the wiring instructions supplied with a new mains plug.
• Never use a fused mains plug without the fuse cover.
Mains plug wiring for the UK
•
In a re-wirable plug the wires in the mains lead of this equipment must be connected as follows.
•
The wire-coloured brown must be connected to the terminal that is marked with the letter L.
•
The wire-coloured blue must be connected to the terminal that is marked with the letter N.
•
Do not connect anything to the earth terminal which is
marked E, or
•
You must make sure the mains lead is firmly secured under the cord clamp.
Mains fuse
UK standard (BS1363) plugs must have a 3 or 5 amp (BS1362 type) fuse fitted. Replace the plug or have the power
lead assembly replaced if the fuse cover is lost.
Symbols
This equipment is double insulated and an
earth connection is not required.
Dangerous voltage constituting a risk of
electric shock is present inside this equipment.
This mark is applied to show the equipment
conforms to European safety and electromagnetic compatibility standards.
There are important operating and
maintenance instructions in the literature
accompanying this equipment.
Safe use and care of your equipment
We have designed and made this product to meet European safety standards, but as with any electrical equipment you
must take care to get the longest working life from it and stay safe. Here are a few tips to help you do this.
Read these instructions carefully before you try to use the equipment.
Protect the mains lead. You must ensure the mains lead cannot be walked on, crushed, chafed or cut.
Avoid harsh conditions such as wet or damp places, high humidity, strong vibration, extremely high or low
temperatures, strong sunlight and places which are very dusty.
Never push objects into holes and ventilation slots.
To save power, switch off mains power or pull out the mains power plug when you are not using the equipment,
unless the function of the equipment requires a continuous power supply.
Don't continue to use this equipment if you have spilt liquids in it, if it is damaged in any way or if it does not work
normally. Immediately unplug the equipment and get expert advice.
Pull the mains plug out of the wall socket during thunderstorms.
This product is designed for domestic use only. Any other use may invalidate the guarantee and
might be dangerous.
Ventilation
Place the equipment on a hard flat surface away from direct sunlight and heat sources. If it is in a cabinet, allow at
least a 10cm gap all around. Don't obstruct the ventilation slots, including those underneath, with soft furnishings.
Overheating will shorten the life of the equipment and increase the risk of fire.
Cleaning
Disconnect the mains supply and use only a lightly dampened soft cloth. Do not use chemical solvents or strong
detergents as these may damage the cosmetic finish.
Batteries
Remove batteries when the remote will not be used for a long time. Batteries left in equipment may cause damage through
deterioration and corrosive leakage, invalidating the guarantee. To protect the environment please use local recycling facilities for
battery disposal.
Disposal
Waste electrical and electronic products must not be disposed of with household waste. Please
refer to the retailer from whom you purchased this item for disposal instructions.
Batteries and packaging materials can be recycled using your local collection facilities.
Important Safety warnings
•
To prevent electric shock, do not remove any cover.
•
If anything goes wrong, don't try and fix it yourself, get a qualified service agent to look at the product.
•
Do not expose this equipment to dripping or splashing or place any objects filled with liquids, such as vases,
on the equipment.
•
Never put a naked flame source on or near this equipment.
•
Small parts. Do not let young children play with the equipment.¡¡
•
Connect headphones with the volume set low and increase it if required. Prolonged listening through some
headphones at high volume settings can result in hearing damage.
Copyright Statements
Ɣ Music recognition technology and related data are provided by Gracenote®. Gracenote is the industry standard in music
recognition technology and related content delivery. For more information visit http://www.gracenote.com/.
Ɣ CD and music-related data from Gracenote, Inc., copyright © 2000-2007 Gracenote. Gracenote Software, copyright ©
2000-2007 Gracenote. This product and service may practice one or more of the following U.S. Patents: #7,228,280;
#7,167,857; #6,983,289; #6,330,593; #6,304,523; #6,240,459; #6,230,207; #6,230,192; #6,161,132; #6,154,773;
#6,061,680; #5,987,525, and other patents issued or pending.
Gracenote, CDDB, and MusicID are either registered trademarks or trademarks of Gracenote in the United States and/or
other countries. The Gracenote logo and logotype, and the "Powered by Gracenote" logo are trademarks of Gracenote.
Ɣ MEPG Layer-3 audio coding technology licensed from Fraunhofer IIS and Thomson.
Ɣ Supply of this product does not convey a license nor imply any right to distribute content created with this product in
revenue-generating broadcast systems (terrestrial, satellite, cable and/or other distribution channels), streaming
applications (via Internet, intranets and/or other networks), other content distribution systems (pay-audio or
audio-on-demand applications and the like) or on physical media (compact discs, digital versatile discs, semiconductor
chips, hard drives, memory cards and the like). An independent license for such use is required. For detail please visit
http://mp3licensing.com.
Ɣ Microsoft® and Windows Media® are either registered trademarks or trademarks of Microsoft Corporation in the United
States and/or other countries.
Ɣ RealNetworks, RealAudio and the Real logo are trademarks or registered trademarks of RealNetworks, Inc. Portions of this
software are included under license from RealNetworks, Inc. Copyright 1995-2007, RealNetworks, Inc. All rights reserved.
Ɣ iPod and iTunes are trademarks of Apple Inc., registered in the United States and other countries.
Ɣ Shuffle is a trademark of Apple Inc.
Notice
Recording/Ripping any audio content made with this system is only for your personal use. It should
not be sold, distributed, and played for a public audience without copyright holder’ permission.
Gracenote® End User License Agreement
Version 20061005
This application or device contains software from Gracenote, Inc. of Emeryville, California (“Gracenote”).
The software from Gracenote (the “Gracenote Software”) enables this application to perform disc and/or
file identification and obtain music-related information, including name, artist, track, and title information
(“Gracenote Data”) from online servers or embedded databases (collectively, “Gracenote Servers”) and to
perform other functions. You may use Gracenote Data only by means of the intended End-User functions
of this application or device.
You agree that you will use Gracenote Data, the Gracenote Software, and Gracenote Servers for your own
personal non-commercial use only. You agree not to assign, copy, transfer or transmit the Gracenote
Software or any Gracenote Data to any third party. YOU AGREE NOT TO USE OR EXPLOIT
GRACENOTE DATA, THE GRACENOTE SOFTWARE, OR GRACENOTE SERVERS, EXCEPT AS
EXPRESSLY PERMITTED HEREIN.
You agree that your non-exclusive license to use the Gracenote Data, the Gracenote Software, and
Gracenote Servers will terminate if you violate these restrictions. If your license terminates, you agree to
cease any and all use of the Gracenote Data, the Gracenote Software, and Gracenote Servers. Gracenote
reserves all rights in Gracenote Data, the Gracenote Software, and the Gracenote Servers, including all
ownership rights. Under no circumstances will Gracenote become liable for any payment to you for any
information that you provide. You agree that Gracenote, Inc. may enforce its rights under this Agreement
against you directly in its own name.
The Gracenote service uses a unique identifier to track queries for statistical purposes. The purpose of a
randomly assigned numeric identifier is to allow the Gracenote service to count queries without knowing
anything about who you are. For more information, see the web page for the Gracenote Privacy Policy for
the Gracenote service.
The Gracenote Software and each item of Gracenote Data are licensed to you “AS IS.” Gracenote
makes no representations or warranties, express or implied, regarding the accuracy of any Gracenote
Data from in the Gracenote Servers. Gracenote reserves the right to delete data from the Gracenote
Servers or to change data categories for any cause that Gracenote deems sufficient. No warranty is made
that the Gracenote Software or Gracenote Servers are error-free or that functioning of Gracenote
Software or Gracenote Servers will be uninterrupted. Gracenote is not obligated to provide you with new
enhanced or additional data types or categories that Gracenote may provide in the future and is free to
discontinue its services at any time.
GRACENOTE DISCLAIMS ALL WARRANTIES EXPRESS OR IMPLIED, INCLUDING, BUT NOT
LIMITED TO, IMPLIED WARRANTIES OF MERCHANTABILITY, FITNESS FOR A
PARTICULAR PURPOSE, TITLE, AND NON-INFRINGEMENT. GRACENOTE DOES NOT
WARRANT THE RESULTS THAT WILL BE OBTAINED BY YOUR USE OF THE GRACENOTE
SOFTWARE OR ANY GRACENOTE SERVER. IN NO CASE WILL GRACENOTE BE LIABLE
FOR ANY CONSEQUENTIAL OR INCIDENTAL DAMAGES OR FOR ANY LOST PROFITS OR
LOST REVENUES.
© Gracenote 2006
Chapter 1
Overview
1.1 Introduction
Your Internet Radio Audio System combines digital audio playback
functions with network connectivity, so you can play Audio CD, Data CD with
MP3 or WMA audio files USB disk, SD/MMC card, FM radio and over 5,000
internet radio stations.
1.2 Audio Sources
● Audio CD
● MP3,Windows Media® audio files (WMA)including
ID3V1, 2 tags.
● Supports static lyrics and synced lyrics (.txt /.lrc /.smi)
● USB Flash drive and USB HD drive
● SHOUTCast Internet Radio (http: //www.shoutcast.com)
● World Station - Local Radio On-line.
● FM (87.5~108MHz)
● Auxiliary analogue input (AUX)
1.3 Record
● Convert Audio CD tracks into 128kbps MP3 file and save to a USB disk or
SD/MMC card . By connecting to Gracenote Music Recognition
service, you may gather CD track information about the playing CD
● Record Internet Radio Station ( SHOUTcast and World Radio) and save to
a USB disk or SD/MMC card as MP3 files
● Record FM Radio and save to USB disk or SD/MMC card as MP3
files.
● Record AUX into 128kbps MP3 file save to USB disk or SD/MMC card
●Support storage backup management program
GB-8
1.4 Networking
● Supports Ethernet 10/100 Mbps
● Supports Wireless LAN IEEE 802.11 b/g Dongle(included)
● Supports Infrastructure /Ad-Hoc
● Supports WEP 64/128 and WPA-PSK encryption
● Supports Proxy Setting
● Wireless setting wizard to make wireless network setup easier.
1.5 Others
● Two alarm clock settings
● On-line time sync technology (network must be available.)
● Firmware upgrade by Internet.
GB-9
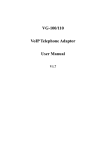
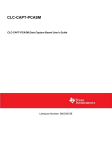
Back panel features
USB 'A-type' plug
USB 'A-type' socket
Bar
USB Wi-Fi dongle
and connector
Align the USB plug with the USB socket so that the
bars do not collide, then push the Wi-Fi dongle home.
FM antenna
connector
Reset hole
Ethernet LAN
connector
Right / Left
speaker output
AUX input (3.5mm
stereo jack)
AC power cord
Right / Left
audio output
GB-10
Woofer output
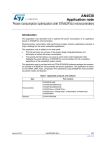
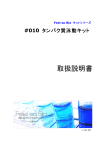
Front panel features
Menus and navigation
Display the main menu with the [MENU] button.
Highlight and scroll with the up
, down , left
(skip forward) and right
(skip
backward) buttons. Confirm with [OK]. Step back up a menu level with [STOP/ESC].
Step back a menu level with [STOP/ESC].
SKIP BACK - jump the play
point forward or b ackward
one track or file.
Move highlight LEFT in
displayed menu.
SKIP FORWARD (FWD) jump the play point forward
or backward one track or file.
Move highlight RIGHT in
displayed menu.
Power ON / Stand-by
MUTE - Turn sound off and on.
SNOOZE - Turn off alarm for a
few minutes.
Infra-red
remote sensor
MENU - displays
main menu in LCD
window.
SELECT / OK Confirms
highlighted choice
in displayed menu.
Move highlight
UP and DOWN
in menu
navigation.
RECORD onto USB drive
or memory slot.
Me mory card slot
Headphone
socket
VOLUME - adjusts
sound level.
USB flash drive
and HDdrive slot
SETUP - Displays menu for setting
Date and time
Alarm
Sleep time
Network settings
Menu language.
It also provides firmware information
display, firmware upgrade and function
to reset settings to original state.
PLAY / PAUSE - Start
playing a file or disc. Press
to pause, press again to
resume at same point.
MEMORY - Store FM
radio stati ons in ten
pre-set memories.
GB-11
STOP / RETURN - Stop
file or dis c play or return
to previous menu level.
Stop recording.
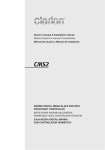
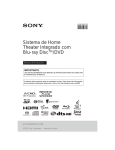
Remote control - 1
Power ON / Stand-by
STANDBY
AUTOSCAN - automatically find and
store FM radio stations in the pre-set
memories.
Number buttons for pre-set station
selection and password entry.
- / -- single or double digit entry
Sound source selection: CD,
Internet radio, USB drive, SD or
MMC memory card, FM radio ,
Media server or AUXiliary input.
Move highlight UP in menu navigation.
UP NP
Start File Manager for USB
drive or memory card
MEMORY - Store FM radio stations
in ten pre-set memories.
SKIP FORWARD (FWD) - jump the
play point forward or backward
one track or file.
Move highlight RIGHT in
displayed menu.
OK - Confirm highlighted choice
in displayed menu.
SKIP BACK - jump the play point
forward or backward one track
or file.Move highlight LEFT in
displayed menu.
STOP / ESC - Stop file or disc play
or jump back to previous menu
level. Stop recording.
Move highlight DOWN in menu
navigation.
REC - record onto USB drive
or memory slot.
SETUP - see next page...
SLEEP
TIMER - Display timer
setting menu
P.EQ - select pre-set
equaliser tone control
settings while playing music.
RANDOM - press during play to
start playing all tracks or
files in random order
A-B - see next page...
CLOCK - Display clock
setting menu
X-BASS - bass boost¡only
for some audio sources).
PLAY / PAUSE - Start playing a file
or disc. Press to pause, press again
to resume at same point.
VOL+ increases sound level
VOL- decreases sound level
REPEAT, INFO, ST.MO,
SLEEP, MUTE - see next
page...
DIMMER - changes back-light
level of LCD display.
Menus and navigation
Highlight and scroll with the up
, down , left
(skip forward) and right
(skip
backward) buttons. Confirm with [OK]. Step back up a menu level with [STOP/ESC].
Step back a menu level with [STOP/ESC].
GB-12
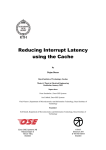
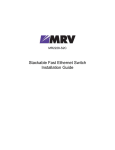
Remote control - 2
STANDBY
SETUP
Press while main menu is visible to
display the set-up menu for the
following:
Date and time
Alarm
Sleep time
Network settings
Menu language.
REPEAT
Press to select repeat mode
- repeat track or file
- repeat album or disc
- no repeat
UP NP
A-B
While playing music, press once to
mark beginning and once more to mark
the end of a section. Section then
plays repeatedly. Press again to
resume normal play.
It also provides firmware information
display, firmware upgrade and function
to reset settings to original state.
Press while playing music to display
settings for the following:
Play Mode (Repeat one, Repeat all,
Random play)
Equaliser (Normal, Classic, Jazz,
Rock)
Balance
Bass boost
INFO - press to display
firmware information.
ST.MO - Stereo / mono switch
for FM radio.
SLEEP
SLEEP - Turn unit off (to stand-by)
after the number of 'sleep' minutes
set in the set-up menu.
MUTE - Turn sound off and on.
Preparing the Remote Control for Operation
You must install the batteries in the remote control before use.
Open the battery compartment, insert two AAA (R03) alkaline batteries as shown, then close the compartment.
The remote control range is approximately 5 metres. Keep within about 30 degrees of the remote sensor.
+
-
-+
+
-
-+
30
GB-13
30
Before you start
Before you can use the Internet part of your audio system you must have a working
broadband Internet connection with one of the following:
x
A wireless (Wi-Fi) access point (an 'AP').
In this case you will also need the Wi-Fi USB adaptor or 'dongle' for the audio system.
x
An Ethernet connection with an RJ45 plug.
If you do not already have broadband Internet, we recommend you contact your telephone,
cable or satellite service provider to find out about availability in your area and to arrange
installation. When the installation engineer has finished you will have a modem and a router
ready to connect either by ethernet cable or wireless link to 'clients' such as computer and
Internet audio system.
The Modem and router may be in one box, or you may have to go out and buy either a wired
(ethernet) or wireless router to go with the modem.
Strictly speaking you do not need to have a computer: usually the ex-factory (default) settings
of the router and modem are sufficient to get them working automatically with the audio
system. The audio system's network set-up wizard will help.
However, a computer on the network can be important, for example it can verify the rest of
the network is working properly and you can change the router and modem set-up by using it
as a control panel (see the modem / router instructions and support service if you need to do
this).
x
If your wireless network is already in use it might have Wired Equivalent Privacy
(WEP) or Wi-Fi Protected Access (WPA) data encryption. You will need to enter the
WEP or WPA key word into the audio system so it can communicate with the router.
x
The 'access point' in a wireless network has a name known as the 'SSID'. You will
need to 'tell' the Internet audio system the SSID when setting it up for the first time.
Usually the SSID starts out as the brand and model of the router, although it is a good
idea to change it if there are other networks, so identification of the correct network
(SSID) is easier. Legally speaking, you should not connect to the Internet through
someone else's network ! Apart from the legal aspect, sharing a wireless link will make
audio from the internet more prone to interruptions.
x
Wireless router range is usually enough for domestic use but can be adversely
affected by some building materials and interference sources such as other nearby
wireless networks.
If after setting everything it seem your Internet connection is still not working, always try
disconnecting mains power to all the devices in the network .Then switch things back on in this order:
1 - Modem. Wait a minute for the indicator lights to settle down.
2 - Router (if separate). Again, wait a minute for the indicator lights to settle down.
3 - Computer(s) re-start.
4 - Internet audio system.
GB-14
Chapter 2 Installation
2.1 Connections
The proper voltage for the audio system is AC 100V~240V/50-60Hz.
Please check the voltage in your area before plugging in the unit.
The following illustrations show typical ways of connecting up a small network
for Internet, computer and audio system. You can read details about audio
system network set-up in Chapter 11.4 - 'Setup' - 'Network'.
2.1.1 Ethernet LAN
Your audio system is shipped set for automatic network configuration (DHCP).
Other devices on the network must also be set to DHCP. It is the usual exfactory (default) setting.
Typical home or small office network infrastructure
AUDIO SYSTEM
This kind of arrangment is commonly known as
a local area network or 'LAN'.
PC or media server
Usually one router port is marked 'Modem', for that connection. Other
ports, which are numbered, can be connected in any order to 'clients' in
the network. Please read the router instructions for more detail.
You can receive audio files from your PC by running a media server
programme on it: please see chapter 8 - 'Media Server'. Articles on the
Internet and Windows Media Player version 11 or higher may help.
GB-15
See 'Back
panel features'
for location of
the ethernet
port.
This kind of arrangment is known as a wireless local area network or 'WLAN'.
AUDIO SYSTEM
PC or media server
Ԧ
Usually one router port is marked 'Modem',
for that connection. As well as the radio
link there are usually numbered ports,
which can be connected by ethernet cable
in any order to 'clients' in the network.
Please read the router instructions for more detail.
PC or media server
ʳ
2.2 Switching on
What happens when you switch on mains power depends on the kind of network you choose. The following pages describe what
happens in various situations.
If no networks are available you cannot connect with Internet Radio and Media Server audio sources and time and date will not
be set automatically. Every time mains power is switched on you will have to highlight 'EXIT' with SKIP FWD and confirm
with 'OK'.
You can disable automatic time synchronisation - see section 11.1.1 - 'Turning time synchronisation on or off''.
GB-16
Checking
Network Device
ԦCAN NOT GET DHCP
Choose LAN to connect to the internet
ԦNETWORK SETTING – LAN
GB-17
Exit network mode
You'll see this display if the
cable is not plugged in or
the device it connects to is
turned off.
If there is no network connection you will see the display
opposite. Press skip fwd
or back
button to
highlight your choice, then press OK.
Choose WLAN to connect to the internet
LAN / Cable
Exit network mode
Choose WLAN to connect to the internet
Choose LAN to connect to the internet
Checking
Network Device
ԦNETWORK SETTING – WLAN (with Wifi dongle)
GB-18
'AP' means the wireless
Access Point.
Don’t Remove The Dongle
Connect to AP
Connect to AP
97%
WIRELESS
Network Setting.......
Lock symbol means access point
has encryption: see next page plus
two, 'Select an AP...' and see
WEP / WPA in Chapter 11.4 'Setup' - 'Network'
100%
Penbex-MIS
Choose AP
See 'Back panel features'
about location and
insertion of USB dongle.
If there is no network connection you will see
the display opposite. Press skip fwd
or back
button to highlight your choice, then press OK.
Time Sync ....
OFF
AM
06-OCT-31
OFF
Mon
ԦCAN NOT FIND ACCESS POINT
No access point.
Success this time !
Choose from several access points.
Lock symbol means access point has
encryption: see next page plus one, 'Select an
AP...' and see WEP / WPA in Chapter
11.4 - 'Setup' - 'Network'
Select access point by pressing skip
fwd
or back
to highlight your
choice and confirm with the OK button.
OR
SelectψEXITωto quit
(1) CAN NOT FIND ANY ACCESS POINT
Ԧ There may be an access point which is not broadcasting its name (the SSID), so it will not appear on the 'Choose AP' list.
The access point (the router) must broadcast it's name for this audio system wireless connection to work.
You will need to change the settings of the access point (router) then 'rescan' with the audio system.
(2) CAN NOT FIND THE AP YOU WANT, PRESSψ
ψOKω
ωTO ENTER RESCAN MODE
SelectψRESCANωto search again
OR
SelectψEXITωto quit
ԦLock symbol means access point has encryption: see next page plus one, 'Select an AP...' and
see WEP / WPA in Chapter 11.4 - 'Setup' - 'Network'
GB-19
ԦFAIL TO CONNECT TO ACCESS POINT
Ԧ Authentication method
(WPA or WEP) of router
and audio system may not
match or the router setting
may not be compatible with
the audio system.
ԦAudio system may not be
compatible with the
encryption method of the
router (only use TKIP).
ԦCheck settings of router
Network Setting.......
and check network set-up
menu of audio system.
1. Select ψRetryωto try again;
2. or SelectψWizardωto scan for other access points;
3. or SelectψEXITωto quit
ԦCAN NOT GET DHCP
Ԧ Router may be set to
static IP addressing.
ԦCheck settings of router
and check network set-up
menu of audio system.
Network Setting.......
1. Select ψRetryωto try again;
2. or SelectψWizardωto scan for other access points;
3. or SelectψEXITωto quit
GB-20
or
buttons to highlight the correct one and press [SELECT / OK].
GB-21
Ԧ If you change router settings, always save the new settings and re-boot the router either by its control interface or by unplugging the power for a few seconds
'Choose AP' list. You must change the SSID mode of the router to 'broadcast' to work with this audio system.
ԦAs an extra security measure, a wireless router may be set so that it does not broadcast the access point name, or SSID, so this name will not appear in the
with WPA2 or AES encryption. You may have to change the encryption settings of the router to allow the audio system Internet link to work.
ԦThis audio system is compatible with wireless security types WEP 64-bit, WEP 128-bit and WPA with PSK (pre-shared key), but it is not compatible
instructions for how to do this, however the router control interface is usually accessible through the Internet browser on the PC by entering http://192.168.2.1/
in the address bar. When you know the settings of the router, ʳwe recommend using the wireless network set-up menu described in section 11.4 of this manual.
ԦFind the correct encryption method, password and keys from the
ʳ set-up menu of the router. You will need a computer and you will have to study the router
OR SelectψNoωto select other Access Pointsʳ
ʳ
To input the key phrase (for WEP) or the pre-shared key (for PSK) which is configured in the router, press the
UP or DOWN buttons
at each character position until the correct character is displayed. Press briefly to
change one character at a time. Press and hold the button to change slowly at first then more rapidly as the
button is held for longer. Move character position with the SKIP FWD
and SKIP BACK
buttons. When
complete press OK. For button locations, see 'Front panel features' or 'Remote control - 1'
ʳ
OR SelectψNoωto select other Access Points
After inputting the key, , SelectψYesωto make a connection
ԦSELECT AN AP THAT USES ENCRYPTIONʳ
Select by pressing skip fwd
or
back
to highlight your choice
SelectψYesωto make a connection
and confirm with the OK button.
DOWN
Ԧ If the system detects multiple wireless networks, press the UP
ԦSELECT AN AP THAT DOES NOT USE ENCRYPTIONʳʳ
Normal start-up sequence after connecting mains power
After connecting mains power for the first time and getting the network working properly, the audio system normally starts
up as follows:
1
i 3HQEH[
Radio 3HQEH[
Ш
The audio system looks for the network device
it expects to find.
Connect mains power and the Internet Radio
logo appears.
Ш
Network Setting
Automatic configuration takes place.
Time is set automatically from an Internet
time server.
0D\
0D\7KX
7KX
It may take up to 30 seconds or so to
finish this start-up process.
30
30
2II
RII
You must set the world time zone in
order to display the correct time !
- see Section 11.1, 'Setup' - Date and time'.
When the start-up sequence is complete,
the unit goes to stand-by mode.
GB- 22
2.3 Power On
After you switch on mains power and network configuration has finished as described on
the preceding page, the audio system will have gone on stand-by.
Press the STANDBY button to switch on the system.
Each time the system will search for USB drive, memory card and compact disc, during which time you will see
'Loading' on the display.
Press STANDBY again to put the unit back on stand-by.
Ш
30
30
2II
&'
&'
0D\
7KX
0D\
7KX
/RDGLQJ…
/RDGLQJ RII
PressψPowerωin Stand-By Mode
Audio sources checking
6'00&
6'00&
&'
&'
Ш
CD / Internet Radio / USB
SD/MMC / FM / Media Server
1
1
&'
&'
)LOH0JU
)LOH0JU
FileMgr / AUX / Setup
Press B.L. (Dim) to adjust the brightness
ԦYou can adjust the brightness of the display backlight by pressing the DIMMER button on the remote.
GB-23
Chapter 3 CD
3.1 Inserting a CD into the CD Tray
1. Press the open/close button to open the CD top cover.
2. Insert an Audio CD or data CD with MP3 or WMA files into the CD tray.
3. Press the open/close button again to close the CD top cover.
4.
icon will show on the top of the display when a CD is detected.
&'
&'
&'
&'
Ш
/RDGLQJ…
/RDGLQJ After inserting a disc…
Insert CD
&'
&'
icon will show on the display.
3.2 Getting CD Information
Providing the internet is working, the system will try to get album information for an audio
CD from Gracenote Music Recognition Service, so that you can see album, artist and track
titles on the display. You may start playing the CD before this information comes through.
Κ
Such information is usually included in MP3 and WMA files.
1. After CD Loading, select
icon from the main menu by pressing skip fwd or back
Then press theψSELECT/OKωbutton to enter CD function.
icon will show on the display while obtaining CD information.
2.
3. Track names will be listed on the display instead of track numbers after getting
CD track information.
GB-24
&'
&'
&'
&'
Ш
/RDGLQJ…
/RDGLQJ PressψSELECT/OKω
Processing
&'
Ш
$OO
7UDFN
7UDFN
will show on the display
Connecting to Gracenote
1
&'
&'
&'
&'
$OO
$OO
$OO
$OO
&DQ’W6WRS/RYLQJ<RX
&DQ W6WRS/RYLQJ<RX
W6WRS/RYLQJ<RX
8QNQRZ
8QNQR
7UDFN
Unknown
Track 01 7UDFN
'R<RX5HPHPEHU
Unknown Track 02
8QNQRZ
8QNQRZ7UDFN
CD information obtained from Gracenote
Shows 'Unknown' if information is not available
GB- 25
&'
&'
&'
&'
$OO
$OO
$OO
$OO
&DQ’W6WRS/RYLQJ<RX
&DQ W6WRS/RYLQJ<RX
W6WRS/RYLQJ<RX
&DQ’W6WRS/RYLQJ<RX
&DQ W6WRS/RYLQJ<RX
W6WRS/RYLQJ<RX
or
'R<RX5HPHPEHU
'R<RX5HPHPEHU
'R<RX5HPHPEHU
PressψMEMORYωto make a check mark
Select [All], then press PLAY or SELECT to
, then
pressψPLAYωto play.
play
&DQ’W6WRS/RYLQJ<RX
&DQ W6WRS/RYLQJ<RX
W6WRS/RYLQJ<RX
3KLO&ROOLQV
3KLO&ROOLQV
/RYH6RQJV$&RPSLODWLRQ
/RYH6RQJV$&RPSLODWLRQ
Κ
Κ
Κ
Κ
Music playing
3.3 Playing a CD
x The system will play audio CD and data CD containing MP3 and WMA files.
x For WMA and MP3 files the system can display static lyrics and synchronised lyrics ( file types.txt /.lrc /.smi)
- See 'Lyrics' in the 'Now playing' section...
x The system does not support MPEG 1 Layer 2 files.
There are two ways to play a CD.
A. Playing all the tracks within the disc
1. Highlight [ All] (or scroll down to the first track or file name) by pressing up or down buttons.
2. PressψPLAYωorψSELECT/OKωbutton to play all songs.
B. Playing selected tracks within the disc
1. Scroll up/down to a track (or file) name by pressing up or down buttons, then pressψMEMORYω
button to make a check mark .
2. Repeat Step 1 to select other tracks.
3. PressψPLAYωbutton once to play these marked songs.
C. Playing one track within a folder or disc
1. Scroll up/down to a track (or file) name by pressing up or down buttons then pressψMEMORYω
button to make a check mark .
2. PressψPLAYωbutton once to play the marked song.
If you interrupt marked play, the CD continues playing after the last of the selected tracks.
x Press PLAY/PAUSE to suspend play temporarily or resume from the same point.
x Press SKIP FWD
to jump to the start of the next track or file.
x Press SKIP BACK
to jump to the start of the present track or file, or press twice to go to the start of
x Press and hold SKIP BACK or SKIP FWD to move rapidly backward or forward through the track
the previous track.(audio will be muted but the display will show the elapsed track time changing quickly.)
x Press STOP/ESC to end play or step back up a menu level.
GB- 26
&'
&'
&'
&'
$OO
$OO
or
3KLO&ROOLQV
3KLO&ROOLQV
ROOLQV
$OO
$OO
3KLO&ROOLQV
3KLO&ROOLQV
'R<RX5HPHPEHU
'R<RX5HPHPEHU
Select [All], then press PLAY or SELECT to play.
PressψMEMORYω, then pressψPLAYωto play.
&DQ’W6WRS/RYLQJ<RX
&DQ W6WRS/RYLQJ<RX
W6WRS/RYLQJ<RX
3KLO&ROOLQV
3KLO&ROOLQV
/RYH6RQJV$&RPSLODWLRQ
/RYH6RQJV$&RPSLODWLRQ
ODWLRQ
Κ
Κ
Κ
Κ
Music playing
3.4 CD Ripping
x 'Ripping' essentially means recording tracks from an audio CD and trans-coding them into media
files like MP3 or WMA. You cannot therefore 'rip' an MP3 or WMA disc: use the audio system's 'File manager'
(chapter 9) or a computer if you wish to copy files from a CD to USB drive or memory stick.
x Auto categorisation function will be activated when ripping a song to USB drive or SD or MMC memory card,
so artist, track name, genre and similar information (if available), will be tagged to the music files.
x iPod will be updated after ripping a song to iPod.
x CD will not be recorded if the Audio CD is copy-protected.
x If the audio system cannot convert the source music into a file or if the memory space of the storage medium is
less than 10MB it will stop recording.
x You can press the STOP/ESC button to stop the rip before it is complete.
3.4.1 Converting All the Tracks within the Disc
1. Insert an Audio CD into the CD tray.
2. Select
icon from the main menu, then press ψSELECT/OKωbutton
to enter CD function.
3. Highlight [Γ All] with up or down button then pressψRECωbutton to record.
4. If both USB Disk and SD/MMC Card are detected, press up
or down to highlight
a storage medium where you want to store recorded files, then press
ψSELECT/OKω
The audio system will display 'Preparing to rip', display the free memory space in
the media and, if there is enough free space, it will start to record.
5. icon will show on the top row of the display when converting.
3.4.2 Ripping Selected Tracks from the Disc
1. Insert an Audio CD into the CD tray.
2. Select
icon from the main menu, then pressψSELECT/OKωbutton.
GB-27
3. Scroll up
down to a track name, then pressψMEMORYωbutton to make a
or
check mark .
4. Repeat the Step 3 to select other songs and then pressψRECωbutton to
record.Audio system will display 'Preparing to rip'.
5. If both USB Disk and SD/MMC Card are detected, scroll up/down to
select a storage medium where you want to store recorded files, then press
ψSELECT/OKω The audio system will display 'Preparing to rip',display the free
memory space in the medium and, if there is enough free space, it will start to record.
6. An icon will show on the top row of the display when converting.
If the memory space of a storage medium is less than 10MB, or if for any
reason it has failed to convert, the audio system will stop recording.
&'
&'
$OO
$OO
&DQ’W6WRS/RYLQJ<RX
W6WRS/RYLQJ<RX
&DQ
W6WRS/RYLQJ<RX
3KLO&ROOLQV
3KLO&ROOLQV
/RYH6RQJV$&RPSLODWLRQ Ш
&DQ
&DQ’W6WRS/RYLQJ<RX
W6WRS/RYLQJ<RX
W6WRS/RYLQJ<RX
'R<RX
'R<RX5HPHPEHU
5HPHPEHU
Κ
Κ
Select [All], then pressψRECωto rip
Κ
Κ
icon will show on the display when ripping
or
&'
&'
$OO
$OO
&DQ
&DQ’W6WRS/RYLQJ<RX
W6WRS/RYLQJ<RX
W6WRS/RYLQJ<RX
&DQ’W6WRS/RYLQJ<RX
W6WRS/RYLQJ<RX
&DQ
W6WRS/RYLQJ<RX
3KLO&ROOLQV
3KLO&ROOLQV
/RYH6RQJV$&RPSLODWLRQ
/RYH6RQJV$&RPSLODWLRQ
Ш
Κ
Κ
'R<RX5HPHPEHU
'R<RX5HPHPEHU
Κ
Κ
icon will show on the display when ripping.
Press MEMORY, then Press REC to rip
or
&'
&'
&'
&'
$OO
$OO
&DQ
&DQ’W6WRS/RYLQJ<RX
W6WRS/RYLQJ<RX
W6WRS/RYLQJ<RX
Ш
'R<RX5HPHPEHU
'R<RX5HPHPEHU
$OO
$OO
6DYHDV
86%
86%
&DQ
&DQ’W6WRS/RYLQJ
W6WRS/RYLQJ
W6WRS/RYLQJ
6'00&
6'00&
'R<RX5HPHPEHU
Press MEMORY, then Press REC to rip
Select USB or SD/MMC if necessary.
or
&'
&'
$OO
$OO
&DQ
’W6WRS/RYLQJ<RX
W6WRS/RYLQJ<RX
W6WRS/RYLQJ<RX
HPHPEHU
'R<RX5HPHPEHU
PressψRECωto rip the whole CD
Ш
0HVVDJH
0HVVDJH
)UHH6SDFH0%
)UHH6SDFH0%
6WDUWLQJ5HFRUG
6WDUWLQJ5HFRUG
Checking the memory space of the storage medium
GB- 28
3.5 Now Playing
x
The ‘Now playing’ functions are only available while a track or file is actually
playing.
x
The ‘Now playing’ functions are most easily operated by remote control, but you
can press the SETUP button to change them using a menu display. Please see
‘Menus’ if you need to know how the menus work.
Pre-set sound equaliser and bass boost
You can only change the pre-set sound equaliser and bass boost during play.
Press the P-EQ button repeatedly to cycle through the sound equaliser modes. Each
mode is shown with its corresponding indicator on the top row of the display:
Normal (no indicator) Æ Classic ('Cls') Æ Jazz ('Jaz') Æ Pop ('Pop') Æ Rock ('Roc')
These equaliser modes can be combined with bass boost by pressing the X-BASS
button: the top row of the display will then show Bass +Normal (‘B-n’) Æ
Bass+Classic (‘B-C’) Æ Bass+Jazz (‘B-J’) Æ Bass+Pop (‘B-P’), Æ Bass+Rock
(‘B-R’).
Repeat mode
Set the repeat mode by pressing the REPEAT button to cycle through the repeat
modes. Corresponding indication on the top row of the display is shown in brackets:
Normal (no indicator) Æ Repeat One (‘One’) Æ Repeat All (‘All’)
A-B Loop
1.
2.
3.
x
PressNjOKnjto set the starting point A when playing. An A icon will show on
the top row of the display.
PressNjOKnjagain to set the end point B. The system will now repeatedly play
between the marked points. An AB icon will show on the top row of the
display.
PressNjOKnjagain to stop repeating the A-B loop.
The AB icon will disappear.
The A-B loop time for music playing must be at least 5 seconds.
Random play
Press RANDOM on the remote during music play or press SETUP then select ‘Play
mode’ and ‘Shuffle’ from the displayed menu. All tracks in the current album, folder
or disc will be played in random order.
&DQ’W6WRS/RYL
&DQ W6WRS/RYLQJ<RX
W6WRS/RYLQJ<RX
QJ<RX
3KLO&ROOLQV
3KLO&ROOLQV
/RYH6RQJV$&RPSLODWLRQ
Κ
Κ
Κ
Κ
Press NUMBER buttons on the remote control.
Ш
'R<RXUHPHPEHU
'R<RXUHPHPEHU
3KLO&ROOLQV
3KLO&ROOLQV
/RYH6RQJV$&RPSLODWLRQ
Κ
Κ
Κ
Κ
Jump to the track automatically.
GB-29
or
&DQ’W6WRS/RYLQJ<RX
&DQ W6WRS/RYLQJ<RX
W6WRS/RYLQJ<RX
3KLO&ROOLQV
3KLO&ROOLQV
/RYH6RQJV$&RPSLODWLRQ
Κ
Κ
Ш
Κ
Κ
Input a track number to jump to the track quickly.
Press -/-- button on the remote control.
or
&DQ’W6
&DQ W6WRS/RYLQJ<RX
W6WRS/RYLQJ<RX
WRS/RYLQJ<RX
3KLO&ROOLQV
3KLO&ROOLQV
/RYH6RQJV$&RPSLODWLRQ
/RYH6RQJV$&RPSLODWLRQ
Κ
Κ
Ш
&DQ’W6WRS/RYLQJ<RX
&DQ W6WRS/RYLQJ<RX
W6WRS/RYLQJ<RX
3KLO&ROOLQV
3KLO&ROOLQV
/RYH6RQJV$&RPSLODWLRQ
/RYH6RQJV$&RPSLODWLRQ Κ
Κ
Κ
Κ
Κ
Κ
The EQ icon will show on the display
Press EQ to change equalizer.
or
&DQ’W6WRS/RYLQJ<RX
&DQ W6WRS/RYLQJ<RX
W6WRS/RYLQJ<RX
3KLO&ROOLQV
3KLO&ROOLQV
/RYH6RQJV$&RPSLODWLRQ
&DQ’W6WRS/RYLQJ<RX
&DQ W6WRS/RYLQJ<RX
W6WRS/RYLQJ<RX
3KLO&ROOLQV
3KLO&ROOLQV
/RYH6RQJV$&RPSLODWLRQ Κ
Κ
Κ
Κ
Κ
Κ
Press REPEAT to change play mode.
Κ
Κ
The Repeat icon will show on the display.
&DQ’W6WRS/RYLQJ<RX
&DQ W6WRS/RYLQJ<RX
W6WRS/RYLQJ<RX
3KLO&ROOLQV
3KLO&ROOLQV
/RYH6RQJV$&RPSLODWLRQ
/RYH6RQJV$&RPSLODWLRQ &DQ’W6WRS/RYLQJ<RX
&DQ W6WRS/RYLQJ<RX
W6WRS/RYLQJ<RX
3KLO&ROOLQV
3KLO&ROOLQV
/RYH6RQJV$&RPSLODWLRQ
/RYH6RQJV$&RPSLODWLRQ
Κ
Κ
Κ
Κ
Κ
Κ
Press ψSELECT /OKωto set A when playing.
Press ψSELECT /OKωagain to repeat A-B loop.
6HWWLQJ
6HWWLQJ
&DQ’W6WRS/RYLQJ<RX
&DQ W6WRS/RYLQJ<RX
W6WRS/RYLQJ<RX
3KLO&ROOLQV
3KLO&ROOLQV
/RYH6RQJV$&RPSLODWLRQ
Κ
Κ
Κ
Κ
Κ
Κ
3OD\0RGH
3OD\0RGH
!
(TXDOL]HU
(TXDOL]HU
1RUQDO
%DODQFH
%DODQFH
Press SETUP when playing.
!
Select a function.
3.6 Lyrics
ԦSupports static lyrics and synced lyrics (.txt /.lrc /.smi).
1.MP3 – ID3V2 Embedded LyricΕ .LrcΕ .Txt
2.WMA – Embedded LyricΕ . SmiΕ .Txt
ԦEdit lyrics for your MP3/WMA files if necessary.
Adding static lyrics is easy: just create a text file with the same name as the song,
using 'Notepad' or a similar application using your PC. Copy the lyrics into it from one of the
many on-line sources of lyrics.
GB- 30
.
&DQ’W6WRS/RYLQJ<RX
&DQ W6WRS/RYLQJ<RX
W6WRS/RYLQJ<RX
3KLO&ROOLQV
3KLO&ROOLQV
/RYH6RQJV$&RPSLODWLRQ
/RYH6RQJV$&RPSLODWLRQ
7HDULQJDQGEUHDNLQJGRZQ
7HDULQJDQGEUHDNLQJGRZQ
7HDULQJP\KHDUW
7HDULQJP\KHDUW
7HDULQJDQGEUHDNLQJGRZQ
7HDULQJDQGEUHDNLQJGRZQ
Κ
Κ
Ш
Κ
Κ
Κ
Κ
Κ
Κ
The lyrics will show on the display.
Press INFO when playing.
or
&DQ’W6WRS/RYLQJ<RX
&DQ W6WRS/RYLQJ<RX
W6WRS/RYLQJ<RX
3KLO&ROOLQV
3KLO&ROOLQV
/RYH6RQJV$&RPSLODWLRQ
Κ
Κ
1R/\ULFV
1R/\ULFV
Ш
Κ
Κ
Κ
Κ
Κ
Κ
No lyrics available
Press INFO when playing.
3.7 Balance
Ԧ Balance changes the sound output of one speaker relative to the other.
&DQ’W6WRS/RYLQJ<RX
&DQ W6WRS/RYLQJ<RX
W6WRS/RYLQJ<RX
3KLO&ROOLQV
3KLO&ROOLQV
/RYH6RQJV$&RPSLODWLRQ
/RYH6RQJV$&RPSLODWLRQ Κ
Κ
Play Mode
Ш
Equalizer
Press SETUP.
Highlight 'Balance' with up
Press OK.
/
>
Nornal
>
Balance
Κ
Κ
PressψSettingωwhen playing
%DODQFH
%DODQFH
Music Setting
5
5
Press Left/Right button to modify the output
GB- 31
or down
buttons.
Chapter 4 Internet Radio
4.1 Introduction
Internet radio is an audio broadcasting service transmitted via the Internet. By
using internet radio devices, listeners receive a continuous stream of audio from
internet radio stations. This audio system supports World Stations and SHOUTCast.
ԦSHOUTCast (http://www.shoutcast.com)
Today most traditional FM radio stations in the world offer on-line radio
services or programs. The audio system connects to those on-line radio services,
categorises the stations by country, and sorts them
into a World Station list. This makes it easy to find a particular radio
station.
4.2 World Station
System requirements:
We strongly recommend connecting with a broadband router to have
better quality audio streaming (if the audio data arrives too slowly, playback will have gaps.)
Please note, Internet Radio does not support PPPoE(with ADSL) or ISP Proxy servers.
Ԧ If there is no internet connection on your system, the Network Wizard will be
automatically activated when you select Internet Radio. Please see the network connection
and set-up instructions elsewhere in this manual, and the trouble-shooting guide if necessary.
4.2.1 Listen to World Station
ԦPress MENU, then highlight
with the skip fwd button
ԦHighlight [World Station] with up or down buttons
and pressψSELECT/OKω.
then pressψSELECT/OKω
ԦHighlight a station with up or down buttons
then pressψSELECT/OKωto play it.
ԦYou will hear music after buffering reaches 100%.
x Stop play and step back up a menu level with [STOP/ESC].
Note 1Κ
ΚTo scroll faster though the list of Internet radio stations, pressψ
to the next or previous page of the list.
GB-32
or
button to jump
Note 2Κ
ΚPressψ
ψINFOω
ωto show the total number of internet radio stations in a particular
country and the number of the one you have selected.
Listening to Internet Radio
Use the up and down buttons
to move the highlight and and [OK] button to confirm.
,QWHUQHW5DGLR
,QWHUQHW5DGLR
,5DGLR
,5DGLR
Ш
)DYRULWH
)DYRULWH
!
:RUOG6WDWLRQ
:RUOG6WDWLRQ
!
6+287&DVW
6+287&DVW
!
Choose World Station
Choose Internet Radio
:RUOG6WDWLRQ
:RUOG6WDWLRQ
!
$PHULFDV
$PHULFDV
!
$VLD
$VLD
!
Ш
6RXWK.RUHD
6RXWK.RUHD
!
6UL/DQND
6UL/DQND
!
7DLZDQ
7DLZDQ
!
Categorised by Country
Categorised by Area
:RUOG6WDWLRQ
:RUOG6WDWLRQ
$IULFD
$IULFD
!
$PHULFDV
$PHULFDV
!
$VLD
$VLD
!
Press
/
Ш
&DULEEHDQ
&DULEEHDQ
!
(XURSH
(XURSH
!
0LGGOH(DVW
0LGGOH(DVW
!
‘$
$’1(767$7,21
1(767$7,21
1(767$7,21
7KH2OGLHV&KDQQHO
7KH2OGLHV&KDQQHO
$XGLR
$XGLR)RU7KH
)RU7KH
Ш
PressψINFOω
,QWHUQHW5DGLR
,QWHUQHW5DGLR
The name of Radio stations change alphabetically
button to scroll faster
86$
86$
$VLD
$VLD
$IULFD
$IULFD
:RUOG6WDWLRQ
:RUOG6WDWLRQ
‘$
$’1(767$7,21
1(767$7,21
1(767$7,21
7KH2OGLHV&KDQQHO
7KH2OGLHV&KDQQHO
$XGLR
$XGLR)RU7KH
)RU7KH
The number of radio stations will show on the display.
,QWHUQHW5DGLR
%&&1HZV5DGLR
%&&1HZV5DGLR
%&&&ODVVLFDO
%&&&ODVVLFDO
%FF3RS
%FF3RS
Categorised by Radio Station
DGLR
%&&1HZV5D
Ш
%&&1H
ZV!
5($/.ESV
It shows the format and bitrates when Playing
GB-33
4.3 SHOUTCast
4.3.1 Listen to SHOUTCast
ԦPress [MENU] , highlight
with the skip fwd button
ԦHighlight [SHOUTCast] with the up or down buttons
and pressψSELECT/OKω.
then pressψSELECT/OKω.
ԦHighlight a letter (A, B, etc.) with
and pressψSELECT/OKω
x Highlight a genre with
and press [ SELECT / OK ].
x Highlight a station with
and press [ SELECT / OK ].
x You will hear music after buffering reaches 100%
Note 1Κ
ΚPressψ
ψINFOω
ωto show the total number of radio stations in the
category you are browsing.and the number of the one you have selected.
4.4 Add/Delete a Radio Station to your Favourites
NOTEΚThe maximum number of favourites than can be memorised is 20.
ԦPress up or down buttons
to highlight the station you want to add to the favourites list.
ԦHoldψSELECT/OKωbutton for 2 seconds and the highlight bar will blink twice.
ԦOr you can add a station into 'Favorites' by pressingψMEMORYωwhen playing
ԦTo delete an internet radio station from the favourites list, highlight the
radio station you want to delete and holdψSELECT/OKωfor 2 seconds. Choose
[Yes] with left / right
buttons and press [ SELECT/OK ] to confirm the deletion.
ԦThe display will inform you if a station you try to add into the favourites list already exists.
ԦIt may use more than 1 storage space if the radio station information is
extensive.
GB- 34
:RUOG6WDWLRQ
:RUOG6WDWLRQ
:RUOG6WDWLRQ
:RUOG6WDWLRQ
%&&1HZV5DGLR
%&&1HZV5DGLR
%&&&ODVVLFDO
%&&&ODVVLFDO
%&&3RS
%&&3RS
Ш
%&&1HZV5DGLR
%&&1HZV5DGLR
%&&&ODVVLFDO
%&&&ODVVLFDO
%&&3RS
%&&3RS
Rolling bar blinks twice
PressψSELECT / OKωfor 2 sec, orψMEMORYω
)DYRULWH
)DYRULWH
RULWH
)DYRULWH
)DYRULWH
%&&1HZV5DGLR
%&&1HZV5DGLR
Ш
%&&1HZV5DGLR
%&&1HZV5DGLR
HoldψSELECT/OKω2 seconds to delete a station
Adding a station into 'Favorite'.
)DYRULWH
)DYRULWH
'HOHWH)DYRULWH
'HOHWH)DYRULWH
'HOHWHWKLVVWDWLRQ"
'HOHWHWKLVVWDWLRQ"
ChooseψYesωthen pressψSELECT/OKωto delete
Confirm
4.5 Internet Radio Recording
Note 1: The recording quality depends on the broadcast quality of the internet
radio station.
Note 2: The broadcast audio stream format is shown on the display
when the station is playing. Audio streams can only be recorded
if they are in MP3 format. Attempting to record stations broadcast in
WMA or REAL format displays the message 'No Support to Record'.
4.5.1 Both USB and SD/MMC Storage Media are Ready
1. Press up/down
to highlight a station and then pressψSELECT/OKωbutton to play.
2. PressψRECωbutton to record.
3. If both USB Disk and SD/MMC Card are detected, press up / down
one you want to record on, then press
ψSELECT/OKωto start recording.
to highlight the
4. icon will show at the top of the display when recording.
5. PressψSTOP/ESCωto stop recording.
4.5.2 Only One Storage Medium is Ready
1. Press up/down
to highlight a station and then pressψSELECT/OKωbutton to play.
2. PressψRECωbutton to record.
3. icon will show at the top of the display when recording.
4. PressψSTOP/ESCωto stop recording
GB-35
L5DGLR
L5DGLR
L5DGLR
L5DGLR
:KLVSHULQJ
:KLVSHULQJ
3KLO&ROOLQV!&DQ’W6WRS/R
3KLO&ROOLQV!&DQ W6WRS/R
Ш
03.ESV
:KLVSHULQJ
:KLVSHULQJ6DYHDV
86%
3KLO&ROOLQV!&D
3KLO&ROOLQV!&D86%
6'00&
6'00&
03.E
PressψRECωto record.
Select one storage medium.
or
L5DGLR
L5DGLR
:KLVSHULQJ
:KLVSHULQJ
Ш
03.ESV
3KL
S/R
3UHSDULQJWR5LS S/R
3KL
PressψRECωto record.
Checking free space on the disk.
3KLO&ROOLQV!&DQ’W6WRS/R
W6WRS/R
3KLO&ROOLQV!&DQ
L5DGLR
0HVVDJH
3 )UHH6SDFH0%
L5DGLR
L5DGLR
6WDUWLQJ5HFRUG
L5DGLR
L5DGLR
:KLVSHULQJ
:KLVSHULQJ
/R
3KLO&ROOLQV!&DQ’W6WRS/R
3KLO&ROOLQV!&DQ W6WRS/R
03.ESV
Recording
Prepare to Recording
x Please also read 'Chapter 5, Playing songs on USB drive or
Memory card' and 'Recording folders'.
GB-36
Chapter 5. USB drive and memory card
5.1 Playing Songs on a USB Drive or Memory Card
1. Insert a USB drive with MP3/WMA audio files into the USB port on the front.
or
Insert a SD or MMC memory card with MP3/WMA audio files into the SD/
MMC card slot port on the front, label side up, contacts down.
2.
icon will show on the top row of the display when a USB drive is detected.
icon will show on the top row of the display when a memory card drive is detected.
3. For USB, press [MENU] and highlight the USB icon
with the up , down ,
left
and
right buttons, then press [ SELECT/OK ]. For memory card, highlight the
memory card icon
and press [ SELECT/OK ].
x Highlight a song, folder or [ All] with up/down buttons
, then pressψPLAYωto play.
To play a selection of songs in a folder: PressψMEMORYωbutton to make a check mark
x Stop play and step back up a menu level with [STOP/ESC].
86%
86%
86%
86%
$OO
$OO
3KLO&ROOLQV
3KLO&ROOLQV
or
'R<RX5HPHPEHU
$OO
$OO
3KLO&ROOLQV
3KLO&ROOLQV
'R<RX5HPHPEHU
PressψPLAYωbutton
PressψMEMORYωto make a check mark
, then
pressψPLAYωto play.
&DQ
&DQ’W6WRS/RYLQJ<RX
W6WRS/RYLQJ<RX
W6WRS/RYLQJ<RX
3KLO&ROOLQV
3KLO&ROOLQV
/RYH6RQJV$&RPSLODWLRQ
/RYH6RQJV$&RPSLODWLRQ
Κ
Κ
Κ
Κ
x 'Recording Folders', which follows, explains in more detail how
to find recordings made on USB drive or memory card (SD/MMC) from CD, World
Radio, ShoutCast, Internet radio favourites, FM radio and auxiliary input.
GB-37
5.2 Recording Folders
When the audio system makes a recording it creates a folder structure on the media chosen for
the recording. The folders are named according to the source of the recording, for example if
you made a recording of an Internet radio station stored in ‘Favorites’, the recorded file would
appear in the ‘Favorites’ folder.
Press down button ź to highlight
‘Recording’, then press [SELECT/OK]
g
Recording
Press down button ź to highlight chosen
folder.
Cd
Favorites
Fm
Press down button ź to scroll highlight
down to next page of folders, if required.
Press [SELECT/OK] to open folder.
x Step back up a menu level with
[STOP/ESC].
Line-in
ShoutCast
WorldStation
Press down button ź to highlight chosen
recording, then press [SELECT/OK] to play it.
fa000001
fa000002
fa000003
GB-38
Chapter 6. i-Pod
6.1 Apple i-Pod Support
6.2.1 Supported iPod Models
iPod
USB
iTunes Version
iPod 3G
Internet Radio iPod List OK
iPod Shuffle
Internet Radio iPod List OK
7.3.1.3
iPod nano
Internet Radio iPod List OK
iPod Video
Internet Radio iPod List OK
Note : If your iPod is not compatible, please try '7.9 Firmware
upgrade' to upgrade the firmware of this audio system.
6.2 Playing Songs on Apple i-Pod
1. Connect the Apple iPod with the i-Pod USB cable to the USB port on the front of the system.
icon will show at the top of the display when the i-Pod is detected.
2.
3. Press [MENU] and highlight the USB icon
with the up
left
and
right buttons, then press [ SELECT/OK ].
, down
,
4. Highlight a category such as 'All songs', 'Artists' or 'Albums'. Press [ SELECT/OK ] to open
the category. Navigate to the song you want by pressing up ,down and [ SELECT/OK ].
5. Play the highlighted song by pressingψSELECT/OKω.
.
x Stop play and step back up a menu level with [STOP/ESC].
86%
86%
86%
86%
Ш
Highlight [USB], then press SELECT.
$OO6RQJV
$OO6RQJV
!
$UWLVWV
$UWLVWV
!
$OEXPV
$OEXPV
!
Browse by songs, artists or albums.
If you see this message, please do online upgrade (Chapter 7.9) to get the newest firmware.ʳ
x Play of some songs may be prevented by limitations imposed by a software license.
For example, the license may only allow the song to be played on the i-Pod. The terms
of the license will be determined by your i-Tunes account.
GB- 39
Chapter 7 FM Radio
7.1 Listening to FM Radio
Ԧ Press [MENU] and highlight the
icon with with the up , down , left
and right
PressψSELECT/OKωto start the FM function. Make sure the FM aerial is connected !
x Stop play and step back up a menu level with [STOP/ESC].
.
)0
)0
)0
buttons.
0+]
0+]
Ш
PressψSELECT/OKω
FM Radio
7.2 Tuning the FM Frequency
● Pressψ ωbutton briefly to decrease frequency by 0.05MHz.
● Pressψ ωbutton briefly to increase frequency by 0.05MHz.
Press and hold the button to change frequency rapidly.
Auto search mode will be activated by holding the button for more than one second
then releasing it. Auto search will keep tuning until it finds a signal, then stop. If
it is a bad signal or not the one you want, press and hold the button for another second to
resume auto search. You can press [ STOP ] to stop auto-search.
] button scans up (87.5MHz to 108MHz and left [
Right [
scans down (108MHz to 87.5MHz).
)0
)0
0+]
0+]
] button
0+]
0+]
0+]
Ш
Press
or
to adjust frequency
Increase/decrease 0.05MHz per step
GB-40
7.3 Auto-scanning for FM Stations
1. Go to [FM], press and holdψSELECT/OKωuntil “Pre-Scanning” shows on the
display. Or you can press theψAUTOSCANωbutton on the remote.
2. The unit will automatically find and store broadcasting FM radio station frequencies
in up to a maximum of ten 'channel' memories.
3. To save your favourite radio stations individually, please see '7.4 Manually
Pre-setting FM stations'.
.
)0
)0
0+]
0+]
3UH
3UH6FDQ
6FDQ
0+]
0+]
3UH
3UH6FDQQLQJ…
6FDQQLQJ Ш
Press and holdψSELECT/OKωuntil
ReleaseψSELECT/OKωbutton to start scanning all
“Pre-Scan” shows on the display.
active radio stations from 87.5MHz.
1
1
)0
)0
0+]
0+]
3UH
3UH6FDQQLQJ…
6FDQQLQJ Ш
0+]
0+]
3UH
3UH6FDQQLQJ…
6FDQQLQJ Finding an available radio station
Finding an available radio station
1
1
)0
)0
0+]
0+]
3UH
3UH6FDQQLQJ&RPSOHWHG
6FDQQLQJ&RPSOHWHG
0+]
0+]
Ш
Prescanning completed
PressψPLAYωto listen to the radio stations that have
been found by prescanning
GB- 41
7.4 Manually Pre-setting FM Stations
1. This audio system has ten FM pre-set station memories. These can be manually
set in two ways while you are listening to a station, or they can all be automatically set C
using the 'Autoscan' function described in section 7.3
H1
2A. Find a radio station and press a number button on the remote control for about one
second. This will add a radio station into preset memory
. ( Press number [2]
for memory
and so on. Press number [0] for preset channel
)
If over-writing previous data in the preset memory, you will see 'Overwrite ?' on the display
'Highlight 'Yes' with left button
and press [SELECT/OK] to proceed, or 'No' to abort.
OR
2B. Find a radio station and press the [ MEMORY ] button. While 'CH #' is flashing in the
display, press left
or right
button to change memory number. After about
five seconds 'CH #' stops flashing and the station data is stored, over-writing any previous
data. Otherwise press [SELECT/OK] to store the station: now if over-writing previous data
you will get a 'Yes' or 'No' choice to proceed.
The channel memory number icon on the display will change to a light background to confirm storage.
0+]
0+]
)0
0+]
0+]
0+]
3UHVHW
3UHVHW
Ш
)0
Press
PressψMEMORYωbutton and then “Preset” will
to find a frequency you
or
show up
want to store
1
)0
)0
0+]
0+]
0+]
&+
&+
0+]
0+]
0+]
&+
&+
Ш
CH1 icon will flash on the display.
Press
or
to find a channel, and press
ψSELECT/OKωbutton to store
7.5 Listening to a Preset Station
ԦIn FM mode, press number buttons [1]-[0] on your remote control to play
the stations in pre-set channels 1 to 10.
Or
ԦPress up or down to select a pre-set channel
GB- 42
.
)0
)0
0+]
0+]
0
0+]
0+]
+]
&+
&+
Ш
Press up /downψ
Radio Playing
ωto change pre-set.
1
)0
0+]
0+]
&+
&+
You haven’t pre-set a frequency for this channel yet
The audio system won't let you select a pre-set that has
nothing stored in it, unless you press [SELECT/OK] then
or
buttons.
This mode only lasts for about five seconds, during which 'CH#' is highlighted.
7.6 Recording from FM
ԦPressψRECωwhen listening to FM
)0
0+]
0+]
)0
Ш
Press
or
or
to change pre-set.
0+]
0+]
0+]
PressψRECωto record
to adjust frequency
x Recordings made from FM radio are saved in 'Recordings' - 'FM' folder on memory card
or USB drive. Please see '5.2 Recording folders' for more detail of how the audio
system organises recordings.
GB-43
Chapter 8 Media Server
You need to download and install the application program on your computer which
will make it work as a media server. When everything is connected and correctly
set up, you can browse the music files and play them with the audio system using
the UPnP function.
8.1 Supported Media Server programmes
Download and install one of the following media server programmes
ԦWMP11(Windows Media Player 11) (Running under Windows XP with
Service Pack 2 or Vista Premium 32 bit)
ԦRhapsody URLΚhttp://www.rhapsody.com/welcome.html
ԦTwonkyMedia URLΚhttp://www.twokyvision.com/
ԦMediaTumb (for Linux platform) URLΚhttp://mediatomb.cc/
NOTE:
ʳ Making TwonkyMedia work normally, ID3v2 tags may need to be edited.
8.2 Setting Upnp Environment
Ԧ Make sure the media server programme you have chosen is running on the computer.
Ԧ Computer'firewalls' usually block UPnP connections. To allow the connection you
will need to create an entry for UPnP, and the mdeia server programme, in the
'exception list' of the firewall. Please read the local and on-line help menus for how
to do this (for example press F1 key in Windows XP or Vista).
x Disable the Proxy function in the network set-up menu of the audio system.
x Some routers have built-in firewalls. As with the computer firewall, you may
have to modify the router's security settings to allow UPnP connection.
Please see the router instructions for how to do this.
8.2.1 Connecting up the UPnP network
ԦThe audio system and the UPnP Media Server must be on the same local
network.
AUDIO SYSTEM
GB-44
UPnP network with wired and wireless connections
x You can have several media servers, connected
by ethernet cable or wireless link. Most wireless
routers have several ethernet connectors as well
as the wireless link.
x Usually one router port is marked 'Modem',
for that connection. Other ports, which are
numbered, can be connected in any order
to 'clients' in the network. Please read the
router instructions for more detail.
8.3 Playing Songs on the UPnP Media Server
1. Start the computer and Media Server programme.
2. Start the audio system and allow the network connection to establish. Please see section
11.4.1 about network state indications on the audio system display.
3. Highlight the UPnP
icon from the main menu and press ψSELECT/OKω
to enter the Media Server function.
4. Press up
or down
button to highlight one of the available media servers.
and press [SELECT/OK] to open it.
5. Highlight a category. Press [ SELECT/OK ] to open the category. Navigate through
categories and albums to the song you want to play by pressing up, down and
[ SELECT/OK ] buttons.
x You can press PLAY/PAUSE to play a whole album (but not a whole category).
x
Step back a menu level with [STOP/ESC].
6HUYHUV
UPNP
6HUYHUV
8313
:LQGRZV0HGLD&RQQHFW3HQEH[
:LQGRZV0HGLD&RQQHFW3HQEH[
,QWHO$90HGLD6HUYHU/LDQEDQ 0HGLD7RPE
0HGLD7RPE
Press MENU. Highlight UPnP icon with
and pressψSELECT/OKω
or
Highlight a server with
or
then press
[SELECT/OK]
Browse
Album
!
Picture
All Tracks
!
Videos
Artist
Mus ic
Highlight a folder, then press
ψSELECT/OKωto open it.
(You can only open music files.)
!
Highlight a category with
or
and press
[SELECT/OK] to open it. Navigate to the song or
album you want with
or
and press
[SELECT/OK] or [PLAY/PAUSE] to play it.
GB-45
Chapter 9 File Manager
9.1 Copy/Move Files to an USB Disk or SD/MMC Card
x
1. Insert a CD-ROM (data CD, USB drive or SD/MMC card.
2. Highlight
icon from the main menu, then pressψSELECT/OKωbutton to
enter File Manager function.
3. Scroll up/down to [CD], [USB] or [SD/MMC], then pressψSELECT/OKω
button to enter.
4. Scroll up/down to a file or folder, then pressψMEMORYωbutton to make a
check mark . You can select more than one file.
5. Press ψRECωbutton and highlight [Copy], [Move] or [Delete], then press
ψSELECT/OKωbutton to confirm.
icon will show on the display.
x You can only copy files from a data CD so only 'copy' is displayed.
6A. If you confirmed move or copy the file or folder, navigate to the new location.
PressψRECωbutton again and highlight [Paste], then pressψSELECT/OKω
button to paste the file in the new location.
6B If you confirmed delete the file or folder, highlight 'Yes' to proceed or
'No' to abort and press [SELECT/OK].
)LOH0JU
)LOH0JU
)LOH0JU
)LOH0JU
&'
&'
!
86%
86%
!
6'00&
6'00&
!
or
$OO
$OO
5HFRUGLQJ
5HFRUGLQJ
5HDGPHW[W
5HDGPHW[W
$OO
$OO
5HFRUGLQJ
5HFRUGLQJ
5HDGPHW[W
5HDGPHW[W
Select a file or folder, then press ψMEMORYω.
Select [USB], then pressψSELECT/OKω
)LOH0JU
)LOH0JU
)LOH0JU
)LOH0JU
&RS\
&RS\
0RYH
0RYH
'HO
'HO &'
&'
!
86%
86%
!
6'00&
6'00&
!
icon will show on the display.
PressψRECω, then select a function.
1
)LOH0JU
)LOH0JU
)LOH0JU
)LOH0JU
&'
&'
!
86%
86%
!
6'00&
6'00&
!
Select a target directory.
GB-46
3DVWH
3DVWH
&DQFHO
&DQFHO
1RILOHV
1RILOHV
PressψRECωagain to paste.
)LOH0JU
)LOH0JU
)LOH0JU
)LOH0JU
86%7R6'Κ
86%7R6'Κ
86%7R6'Κ
86%7R6'Κ
6XFFHVVIXO
6XFFHVVIXO
&RS\LQJ
&RS\LQJ
Copy or move finished successfully.
Copying files
9.2 Copy/Move Files to iPod
1. Insert a CD-ROM (data CD) or SD/MMC card. Connect an i-Pod to the USB port.
icon from the main menu, then pressψSELECT/OKωbutton to
2. Highlight
enter File Manager function.
3. Scroll to [SD/MMC] or [CD] and then pressψSELECT/OKωbutton.
4. Scroll to a MP3 file or folder, then pressψMEMORYω button to
make a check mark . You can select more than one file.
5. PressψRECω button to select [Copy] , [Move] or [Delete], then press
ψSELECT/OKωbutton to confirm. (Only 'copy' is available for CD.)
x
icon will show on the display.
6. Scroll to [iPod], then pressψSELECT/OKωbutton.
Display shows 'Add MP3 to iPod ?' so you can confirm or abort the operation.
7. Scroll to [Yes] then pressψSELECT/OKωbutton to paste.
.
8. After finishing, the iPod music list will be updated.
NOTE: You can only copy or move MP3 files to the i-Pod. If you try to open
the i-Pod to copy or move a file from it, the system will warn you
'Select MP3 first !'
)LOH0JU
)LOH0JU
)LOH0JU
)LOH0JU
&'
&'
!
L3RG
L3RG
!
6'00&
6'00&
!
Select SD/MMC or CD
)LOH0JU
)LOH0JU
$OO
$OO
5HFRUGLQJ
5HFRUGLQJ
+HOORPS
+HOORPS
or
$OO
$OO
5HFRUGLQJ
5HFRUGLQJ
+HOORPS
+HOORPS
Select a file or folder, then pressψMEMORYω
)LOH0JU
)LOH0JU
&RS\
&RS\
0RYH
0RYH
'HO
'HO &'
&'
!
L3RG
L3RG
!
6'00&
6'00&
!
icon will show on the display.
PressψRECω, then select a function.
GB-47
)LOH0JU
)LOH0JU
)LOH0JU
)LOH0JU
&'
&'
!
L3RG'LVN
L3RG'LVN
L3RG
L3RG
!
$GG03WRL3RG"
$GG03WRL3RG"
6'00&
6'00&
!
Select iPod
)LOH0JU
)LOH0JU
Select YES to start file copy or move
)LOH0JU
)LOH0JU
6'7RL3RGΚ
6'7RL3RGΚ
8SGDWLQJL3RG
8SGDWLQJL3RG
6XFFHVVIXO
6XFFHVVIXO
&RS\LQJ03
&RS\LQJ03
Copy or move finished sucessfully.
Copying Files
Press [SELECT/OK] to resume file
manager menu.
ʳ
If you see this message, please do online upgrade (Chapter 7.9) to get the newest firmware.
GB- 48
Chapter 10 AUX
10.1 AUX Mode
This audio system can accept sound from different audio sources (such as MP3 Player,
Discman, or Bluetooth audio receiver) by connecting with a 3.5mm stereo
audio input cable to the 'AUX' socket on the back.
1. Scroll to the
icon in the main menu and press [SELECT/OK] button to
enter, or press [AUX] button on the remote. AUX will appear on the display.
2. Play the audio source. Adjust volume and equaliser on the audio system as you require.
x Highlight, scroll or navigate with the up
and
down buttons. Step back a menu
level with [STOP/ESC]. Confirm with [SELECT/OK].
$8;
$8;
$8;
$8;
Ш
AUX
Select [AUX] and pressψSELECT/OKω
Enter AUX Mode
1
$8; $8;
$8;
AUX
AUX
In AUX mode, volume and P-EQ are adjustable
Adjusting EQ
10.2 Recording in AUX Mode
1.
2.
3.
4.
Connect up audio source and select 'Aux' mode as described in 10.1 above.
Get the audio source ready to play.
PressψRECω
The system displays 'Save to ... SD/MMC or USB'. Highlight the
destination for the recording and press [SELECT/OK].
5. The system displays 'Free space...MB .. Starting to record'. Recording starts as the
recording indicator appears at top left of the display. Play the audio source just
after recording starts, so that you do not cut the beginning of the recording.
6. PressψSTOP/ESCωto stop recording.The system briefly displays 'Update library'.
x Recordings will be placed in the 'Recordings' - 'Line-in' folder on the USB drive or
memory card. The recording files will be named 'AUX00001', 'AUX00002' and so on.
Please see '5.2 Recording folders' for more detail of how the audio system organises
recordings.
GB- 49
$8;
$8;
AUX
Ш
AUX
$8;
$8;
3UHSDULQJWR5LS…
3UHSDULQJWR5LS PressψRECωto start recording
Enter AUX mode
1
1
$8;
$8;
AUX
The recording quality depends on the quality
$8;
$8;
AUX
6DYLQJWR6'00&…
6DYLQJWR6'00& PressψSTOP/ESCωto stop recording
of your audio source.
GB- 50
Chapter 11 Setup
x Throughout the set-up menus, highlight, scroll or navigate with the up
and down
buttons. Step back up a menu level with [STOP/ESC]. Confirm with [SELECT/OK].
11.1 Date & Time
Ԧ The audio system uses NTP (network time protocol) to automatically synchronise
time and date via the Internet at 00:00 and 12:00 or every time the system is switched on.
Ԧ Automatic time sync can be disabled so date and time can be set manually.
ԦSupports DST (Daylight Saving Time).
x To display synchronised time correctly, the World Time Zone must be correctly set
( see 11.1.5 'Time Zone').
.
The Time Sync function will auto-run when turn on/off and 12:00 am/pm everyday.
11.1.1 Turning Time Synchronisation off or on
ԦPressψSETUPωbutton, then scroll up/down to [Date & Time] and press
ψSELECT/OKωbutton.
ԦThe default [TimeSync] is'On'. To set the time and date manually, press
[OK] to change it to 'Off'. Press [OK] to turn time sync back on again.
11.1.2 Setting the Date
x
Ԧ Scroll to 'Date' and press [OK]. Press up or down buttons to change the day. Change to
.month and year setting by pressing [OK] and adjust each with the up or down buttons.
Completing the year setting returns you to the 'Date & Time' menu.
ψω
ԦPressψSTOP/ESCωbutton to step back to the main menu.
.
6HWWLQJ
6HWWLQJ
'DWH7LPH
'DWH7LPH
!
$ODUP
$ODUP
!
6OHHS
6OHHS
!
'DWH7LPH
'DWH7LPH
Ш
7LPH6\QF
7LPH6\QF
GB-51
<HV
'DWH
'DWH
!
7LPH
7LPH
!
The default TimeSync is Yes
Select [Date & Time], and pressψSELECT/OKω
'DWH7LPH
'DWH7LPH
7LPH6\QF
7LPH6\QF
<HV
<HV
'DWH
'DWH
!
7LPH
7LPH
!
'DWH
'DWH
Ш
Scroll to [Date] and pressψSELECT/OKω
Press Up / Down
to adjust the year, month, and day
Change item with skip fwd / skip back buttons
'DWH7LPH
'DWH7LPH
7LPH6\QF
7LPH6\QF
.
<HV
<HV
'DWH
'DWH
!
7LPH
7LPH
!
After finishing, the changes will be saved
11.1.3 Setting the Time
ԦPressψSETUPωbutton, then scroll up/down to [Date & Time] and press
ψSELECT/OKωbutton to enter [Time] submenu.
ԦThe default [TimeSync] is 'On'. To set the time and date manually, press
[OK] to change it to 'Off'.
Ԧ Scroll to 'Time' and press [OK]. Press up or down buttons to change the hours. Change
to minutes by pressing [OK] and adjust with the up or down buttons. Completing the
minutes setting returns you to the 'Date & Time' menu. You can't adjust seconds.
6HWWLQJ
6HWWLQJ
'DWH7LPH
WH7LPH
'DWH7LPH
!
$ODUP
$ODUP
!
6OHHS
6OHHS
!
Ш
Select [Date & Time], and pressψSELECT/OKω
'DWH7LPH
'DWH7LPH
7LPH6\QF
7LPH6\QF
'DWH
'DWH
!
7LPH
7LPH
!
7LPH6\QF
7LPH6\QF
'DWH
'DWH
!
7LPH
7LPH
!
7LPH
7LPH
Ш
Κ
ΚΚ
Κ
Scroll to [Time] and pressψSELECT/OKω
'DWH7LPH
'DWH7LPH
<HV
<HV
7LPH6\QF
7LPH6\QF
The default TimeSync is Yes
<HV
<HV
'DWH7LPH
'DWH7LPH
Press Up / Down
to adjust the hours and minutes
Change item with skip fwd / skip back buttons
<HV
<HV
'DWH
'DWH
!
7LPH
7LPH
!
After finishing, the changes will be saved
GB-52
.
.
11.1.4 Setting Time Format, World Time Zone and DST
•
•
•
•
•
Press [SETUP] button, then scroll to [Date & Time] and press [SELECT/OK]
button.
Scroll down to ‘Time Format’ and press [SELECT/OK] button to change
between 12-hour and 24-hour time display.
Scroll down to ‘Time Zone’ and press [SELECT/OK].
Time zone menu is displayed. Press up or down buttons to change the time zone.
Each zone is indicated by major cities and the number of hours difference to
Universal Co-ordinated Time (UTC). (UTC is commonly called Greenwich Mean
Time, or GMT, although there is a tiny difference between the two.)
Press [SELECT/OK] to confirm time zone and return to the ‘Date & Time’
menu.
Time Zone
Time format
0 Ca sa bl a n ca , Mo nr ov ia
Time zone
0 D u bli n, E di nb ur g h, L is b
DST
Off
+1 W e s t - m i d d l e A f r i c a n
Select ‘Time Zone’, press [OK].
•
•
Scroll up or down to change zone
and press [OK] to confirm.
Scroll to ‘DST’ and press [SELECT/OK] to change DST to ‘On’ or ‘Off’. When
set to ‘On’, the time display automatically advances an hour in Spring and falls
back an hour in Autumn.
Press [STOP/ESC] if you wish to step back to the main menu.
Time format
Time format
Time zone
Time zone
DST
DST
Off
Select ‘DST’, press [OK].
GB-53
On
11.2 Alarm
ԦFeatures two alarm clock settings.
ԦFeatures daily alarm clock.
ԦFeatures different alarm-clock sounds (Beep / i.Radio / USB / SD/MMC / FM).
11.2.1 Setting the Alarm
1. PressψSETUPωbutton, then scroll down to [Alarm] and press
ψSELECT/OKωbutton.
2. Scroll to [Use Alarm 1] submenu and pressψSELECT/OKωbutton to activate
the alarm. The default [Use Alarm 1] is 'No' (inactive).
3. Scroll to [Set Alarm 1] to set the alarm clock and press [SELECT/OK].
4. Press up or down button to adjust alarm hours and pressψSELECT/OKω.
5. Press up or down button to adjust alarm minutes.
6. Press [ SELECT/OK ] to finish and return to the Alarm menu.
7. For the alarm to work the audio system must be put on stand-by by pressing
the [STANDBY] button.
$ODUP
$ODUP
$ODUP
$ODUP
8VH$ODUP
8VH$ODUP
OFF
6HW$ODUP
6HW$ODUP
!
8VH$ODUP
8VH$ODUP
1R
8VH$ODUP
8VH$ODUP
On
6HW$ODUP
6HW$ODUP
!
8VH$ODUP
8VH$ODUP
1R
Scroll to [Set Alarm 1] to set the alarm clock
The default [Use Alarm 1] is Off.
$ODUP
$ODUP
Ш
0D\
7KX
0D\
7KX
30
30
30
RII
Press Up / Down to adjust the hours and minutes
After finishing, the changes will be saved
Change and finish with1 [OK]
Alarm status is shown on the bottom row
of the time display.
0D\
7KX
7KX
0D\
30
30
30
RII
will show if DST(Daylight Saving Time)is chosen
11.2.2 Setting the Alarm Sound
1. PressψSETUPω,scroll down to [Alarm] and pressψSELECT/OKω.
2. Scroll to [Alarm Source] then pressψSELECT/OKω
3. Scroll to the alarm sound you require and press
ψSELECT/OKωbutton to confirm.
In some circumstances the display of the audio system will flash to inform you
there is an alarm time entry error. Make sure the clock time is correct and the hours
are correctly entered if you have chosen 24h format in the date & time set-up menu.
If you have chosen 12h format, make sure 'AM' or 'PM' is correctly set.
GB-54
.
$ODUP6RXUFH
$ODUP6RXUFH
%HHS
%HHS
&'
&'
,QWHUQHW5DGLR
,QWHUQHW5DGLR
Scroll UP/DOWN button to determine an alarm sound, and then pressψSELECT/OKωbutton to confirm
Put the audio system into stand-by by pressing the [STANDBY] button.
ԦThe default alarm sound is “Beep”.
Ԧ When the system is on stand-by, the alarm will go off with the chosen sound when
the alarm time is up.
ԦThe default alarm music of i.Radio is the first radio station in the
FAVORITE file. For other music sources it will be the first song in the 'all' list or
the first file or track on CD.
GB-55
11.2.3 Alarm volume
1.
3.
Press [SETUP] , scroll down to ‘Alarm’ and press [SELECT/OK] to display the
alarm menu.
Scroll down to ‘Alarm Volume’ and press [SELECT/OK] to change the setting,
‘1’ being the quietest and ‘3’ being the loudest. The default setting is ‘2’.
Press [STANDBY] or [STOP/ESC] to exit.
•
The normal volume control does not have any effect when the alarm is operating.
2.
11.2.4
1.
2.
3.
Snooze
Press [SETUP] , scroll down to ‘Alarm’ and press [SELECT/OK] to display the
alarm menu.
Scroll down to ‘Snooze’ and press [SELECT/OK] to change the setting to ‘On’
or ‘Off’. When snooze is on, you can press the [MUTE] or [MUTE/SNOOZE]
button to shut off the alarm for a few extra minutes. You can set how long in
‘Snooze minutes’…
Press [STANDBY] or [STOP/ESC] to exit.
11.2.5 Snooze minutes
1.
2.
3.
Press [SETUP] , scroll down to ‘Alarm’ and press [SELECT/OK] to display the
alarm menu.
Scroll down to ‘Snooze’ and press [SELECT/OK] to change the setting to ‘5’,
‘10’ or ‘15’ minutes. If you press [MUTE/SNOOZE] while the alarm is
operating, and ‘Snooze’ is set to ‘On’ (see 11.2.4 above), it will shut the alarm off
for this many minutes.
Press [STANDBY] or [STOP/ESC] to exit.
Alarm
2
Alarm volume
Snooze
On
Snooze Minutes
10
Press
or
to scroll up or down.
Press [SELECT/OK] to change
settings.
1
0D\
0D\7KX
7KX
30
30
30
RII
Press [STANDBY] or [STOP/ESC] to disarm the alarm
GB-56
11.2.6 Disarming the Alarm
ԦWhen alarm time is up in the “Standby Alarm”
mode, the display will flash and
the alarm source will be played.
ԦPressψStandbyω, orψSTOP/ESCω,
button to disarm the alarm.
$ODUP
$ODUP
0D\
0D\:HG
:HG
Ш
30
30
30
30
30
30
RII
RII
STAND BY Mode
When alarm time is up, the display will flash.
$ODUP
$ODUP
6QRR]H
6QRR]H
30
30
30
30
30
30
30
RII
RII
Press [Snooze] to enter SNOOZE mode if
When alarm time is up, the display will flash.
Snooze function has been activated,
11.3 Sleep
11.3.1 SLEEP Mode
1. Press [SETUP] , scroll down to 'Sleep' and press [SELECT/OK] to display the 'Sleep' menu.
2. The sleep function can be enabled or disabled: Scroll to 'Sleep' and press [SELECT/OK] to
change the setting to 'On' or 'Off'.
3. Scroll
Ԧ to 'Sleep Minutes' then press the
ψSELECT/OKω button to switch sleep timer
to 5, 10, 15, 20, 30, 60, 90 or 120 minutes.
4. Press [MENU] or [STOP/ESC] to resume normal operation.
.
x After the set 'sleep minutes' the system will automatically shut down to stand-by.
Ԧ
icon will show at the top of the display when the sleep timer is on.
x You can enable or disable the sleep timer directly from the remote by pressing the [SLEEP] button.
&'
&'
&'
&'
Ш
icon will show on the display.
PressψSLEEPωto set sleep timer.
11.4 Network
This audio system supports the following network types and wireless security:
ԦLAN (Ethernet) and WLAN with 801.11b/g USB Wi-Fi dongle.
x WEP64/128 and WPA-PSK authentication with TKIP encryption. It does
not support WPA2 or AES encryption. Default wireless setting is no security.
x Dynamic IP adressing usingDHCP (Dynamic Host Configuration Protocol) . Also
supports static IP addressing. The default setting is ethernet LAN and DHCP.
x Upnp. (Universal Plug and Play).
GB- 57
11.4.1 Understanding the Networking States on Smart Boombox
ԦThe network connectivity status icon will show at the top of the display.
Table 11.4.1.1
- LAN Status
7LWOH
7LWOH
Ш
7LWOH
7LWOH
Ш
7LWOH
7LWOH
Ш
● Failed to detect the Ethernet cable.
● Successfully detected the Ethernet cable.
● Failed to get DHCP information.
● Successfully detected the Ethernet cable.
● Successfully detected DHCP information
x
Table 11.4.1.2
Ethernet network connection is OK.
- WLAN Status
7LWOH
7LWOH
Ш
● Failed to detect the USB Wi-Fi adapter.
● Successfully detected the USB Wi-Fi adapter.
7LWOH
7LWOH
Ш
● Successfully detected DHCP information.
ԦWifi Dongle is ready.
7LWOH
7LWOH
Ш
7LWOH
7LWOH
Ш
● Successfully detected the USB Wi-Fi adapter.
● Failed to get DHCP information.
● Successfully detected the USB Wi-Fi adapter.
● Successfully detected DHCP information.
x
Table 11.4.1.3
Data link not established.
- WLAN signal strength for Internet radio or UPnP modes.
7LWOH
7LWOH
Ш
7LWOH
7LWOH
Ш
7LWOH
7LWOH
Ш
ԦSignal strength received from AP is under 20%
● Signal strength received from AP is between
20% - 59%.
ԦSignal strength received from AP is between
60% - 79%.
GB-58
7LWOH
7LWOH
Ш
ԦSignal strength received from AP is above
80%.
NOTEΚSingle strength above 70% is considered as a good single source.
x Throughout the set-up menus, highlight, scroll or navigate with the up
and
down
buttons. Step back a menu level with [STOP/ESC]. Confirm with [SELECT/OK].
11.4.2 Setting the Wi-Fi Connectivity
1. Insert a Wi-Fi USB adapter into the USB connector at the rear. (The Wi-Fi USB
adapter is optional)
2. Press [SETUP] button, then scroll up/down to [Network] and press the
[SELECT/OK] button.
3. Scroll to [Connect] and press [SELECT/OK] to change [LAN] to [WLAN].
4. Scroll up / down
to [Wireless] and then press [SELECT/OK] button to open the
‘Wireless’ menu.
5. Scroll up /down to [Connect mode], [SSID], [Encryption] or [Site Survey] then
press [SELECT/OK] button to open those respective menus.
Connect mode
Always set to ‘Infra’ when the system is wirelessly linked to other devices via a
wireless router.
Set to ‘Ad-Hoc’ mode if the system is wirelessly linked directly to a computer acting
as router or server.
SSID
The SSID is the network name, usually the name of the router if no-one has changed
it. Normally the router broadcasts this name although router settings may allow it not
to be. For this audio system to work the SSID must be broadcast.
To change the SSID manually, scroll to ‘SSID’ and press [SELECT/OK]. Change
each character with the up
or down
buttons, or the number buttons on the
remote. Select the next character with the skip forward
or backward
button.
Press [STOP/ESC] to delete a character. Press [SELECT/OK] again to finish.
•
If the ‘SSID’ is ‘any’ (the default setting), the audio sytem will automatically try
to connect to the first wireless link that it finds.
•
It may be easier to set the SSID using the Wi-Fi Wizard – see section 11.4.3.
Encryption
In a computer network with wireless links, it may be possible for unauthorised
persons to pick up transmitted data you would not want them to have. To guard
against this, the data can be encrypted. To enable communication between devices on
the network, each one must have the same encryption settings. There are various
encryption methods, some of which are not compatible with this audio system (please
see under ‘11.4 Network’).
To change the encryption, scroll to ‘Encryption’ and press [SELECT/OK].
Scroll to ‘Encryption mode’ and press [SELECT/OK] to change setting. These are
the possible settings:
[None]
This is the default setting. The audio system can communicate with any network
which is unsecured.
[WEP]
Wired Equivalent Privacy : This provides “basic” security. As you select ‘WEP’, new
menu items appear:
‘Auth’ : Press [SELECT/OK] to change between ‘Open system’ and ‘Share key’.
GB-59
•
•
‘Open system’ means the network type is WEP, but there actually is no
encryption.
‘Share key’ is the key phrase which the computer(s) and router must ‘know’
in order to decrypt the data. You must enter the same key phrase into these
devices.
‘Encode mode’ : Press [SELECT/OK] to change between ‘HEX’ and ‘ASCII’. You
will not know which is best until you have seen the set-up menu of the router, since
the key phrase generates key numbers which may be shown either as hexadecimal
numbers or as the equivalent ASCII characters. You choose the ‘encode mode’ which
best matches your router (and computer) display. ‘Hex’ is the default mode, which
usually makes it easier to set the key phrase (see below).
‘Bits’ : Press [SELECT/OK] to change between ‘64’ and ‘128’ bit encryption. The
more bits, the more secure it is. Whatever you set, the router and computer must
match it.
‘Key’ : Providing you chose ‘Hex’ encode mode (above), the Pass Phrase in WEP
causes the audio system, router or computer to generate four key numbers and you
choose which one to use. Again, the router and computer must use the same one. The
key phrase in 128-bit WEP generates just one key number.
‘Set Key’ : Press [SELECT/OK] to open the sub-menu :
• ‘Passphrase’: The phrase is case-sensitive and can contain letters, numbers
and a few other characters, for example: ‘W3izzy’. It will make the audio
system automatically generate the encryption key numbers. Some routers also
have this facility.
To enter the Pass Phrase, scroll to ‘Passphrase’ and press [SELECT/OK].
Change each character with the up
or down
buttons or the number
buttons on the remote. Select the next character with the skip forward
or
backward
button. Press [STOP/ESC] to delete a character. Press
[SELECT/OK] again to finish.
• ‘Set Key’ : 64-bit WEP : Scroll to ‘Set Key’ and press [SELECT/OK].
Se t Ke y
Se t Ke y
K2: xx-xx-xx-xx-xx
> 2E971F6C45
K3: xx-xx-xx-xx-xx
K4: xx-xx-xx-xx-xx
Press
or
to scroll up or down.
Press [SELECT/OK] to display the
selected hexadecimal key number.
•
The key number can be edited in the
same way as the pass phrase, using
skip forward, backward, left and right
buttons. Press [SELECT/OK] to
confirm and return to the previous
display. Press [STOP/ESC] to return
to the ‘Encryption’ menu.
Set Key’ : 128-bit WEP : Scroll to ‘Set Key’ and press [SELECT/OK].
Se t Ke y
> 86216FFE95E87
9E2B205B92615
Again the key number can be edited in
the same way as the pass phrase,
using skip forward, backward, left and
right buttons. Press [SELECT/OK] to
confirm and return to the previous
display. Press [STOP/ESC] to return
to the ‘Encryption’ menu.
GB-60
•
Read off the key number and enter it into your router, or read the number off
your router and enter it into the audio system. Or use the Pass Phrase to
automatically generate the same key numbers in both devices !
[WPA]
Wireless Protected Access : this provides better security than WEP. As you select
‘WPA’, the only menu item that appears is ‘Passphrase’. This is actually the WPA
Pre-Shared Key (WPA-PSK).
You can enter the Pass Phrase in the same way as for WEP, above. The system may
demand an 8 to 63 character Pass Phrase the one you enter is too short.
• Press [SELECT/OK] to finish the Pass Phrase.
• Press [STOP/ESC] to return to ‘Encryption’.
Important !
In the wireless router security set-up:
• You can choose WPA-PSK but not WPA2-PSK authentication.
• You can choose ‘TKIP’ encryption (Temporal Key Integrity Protocol) but not
‘AES’ (Advanced Encryption Standard).
• The router must broadcast the SSID (network name).
Site Survey
Scroll to ‘Site Survey’ and press [SELECT/OK]. The system displays Scanning
and lists the names (SSIDs) of any available wireless networks it has found. But of
you want to change which wireless network it is using, use the Wireless Network
Wizard.
Finish network set-up
To finish network set-up, press [MENU] or step back out of the set-up menus with
[STOP/ESC]. The audio system will display
until it has finished
Apply
negotiating the connection, assuming you
Setting
changed something! Check the network state
indicator (11.4.1) to see if the attempt has been successful. To confirm it, switch off
main power and re-connect. If all is well the display will follow the start-up sequence
shown in section 2.2 – ‘Network setting – WLAN’.
GB- 61
11.4.3 Setting the Wi-Fi Connectivity by Wi-Fi Wizard
1. Make sure physical connections have been made and the Wi-Fi USB adaptor has been inserted at
the rear of the system as described in chapter 2 - 'Installation'. Switch on the wireless modem /
router first. Connect power to the audio system and allow it to attempt network connection.
If necessary highlight [EXIT]. Press [STANDBY] to turn it on.
2. PressψSETUPωbutton, then scroll up/down to [Network] and press
ψSELECT/OKωbutton.
3. Scroll to [Connect] and press [SELECT/OK] to switch [LAN] to [WLAN].
4. Scroll to [Wizard] and pressψSELECT/OKωbutton.
The system displays 'SCANNING', then lists any available AP (access points) it can find.
5. Scroll up/down to an access point you want to connect, and then press
ψSELECT/OKωbutton. Encrypted access points are listed with a padlock symbol.
The system requests confirmation. Press left / right button to highlight 'Yes' or 'No'.
Press [SELECT/OK] to confirm.
6. If the access point that you chose has encryption, you can input the encryption
Pass Phrase. Press UP/DOWN (or number) button to
change characters and press left / right button to shift character position.
Press [STOP/ESC] to delete a character.
7. PressψSELECT/OKωto finish and confirm Pass Phrase entry and wait for
the system to resolve the new network settings.
icon will show at the top of the display if the wireless setting is
8.
successful.
1HWZRUN
1HWZRUN
1HWZRUN
1HWZRUN
/$1
&RQQHFW
&RQQHFW
,36HWWLQJ
,36HWWLQJ
!
8VH3UR[\
8VH3UR[\
1R
&RQQHFWDQ\a
&RQQHFWDQ\a
Ш
Select [Connect] and switch [LAN] to [WLAN].
DS
DS
'/,1.
/,1.
GHIDXOW
GHIDXOW
:/$1
:L]DUG
:L]DUG
!
,36HWWLQJ
,36HWWLQJ
!
Select [Wizard] and press [SELECT/OK] button
:L]DUG
:L]DUG
:L]DUG
:L]DUG
! Enter [Wizard], then all available AP and its signal
Ш
Use UP/DOWN (or numbered keys) and left/right buttons
strength will be shown on the display.
to input an encryption key to access the AP, if necessary.
Press up / down buttons to highlight
one and [OK] to confirm it.
After entering the encryption key, press
ψSELECT/OKωand press ψSTOP/ESCωto exit
:L]DUG
:L]DUG
1HWZRUN
1HWZRUN
&RQQHFWDS
&RQQHFWDS
:/$1
:/$1
,36HWWLQJ
,36HWWLQJ
!
:LUHOHVV
:LUHOHVV
!
will show when the setting is successful.
Proofing the encryption key…
GB-62
To finished network set-up, press[MENU] or step back out of the set-up menus with[STOP/ESC].
The audio system may display 'Apply Setting' and 'Network' setting as it attempts to negotiate
the connection. Check the network state indicator(11.4.1)to see if the attempt has been successful.
To confirm it, switch off main power and re-connect. If all is well the display will follow the
start-up sequence shown in section 2.2 -'Network setting' - 'Ethernet LAN'.
11.4.4 Inputting Static IP address
x This is an advanced set-up feature for network engineers.
1. PressψSETUPωbutton, then scroll up/down to [Network] and press
ψSELECT/OKωbutton.
2. Scroll up/down to [IP Setting] and then pressψSELECT/OKωbutton to enter.
3. Select [IP Source] and pressψSELECT/OKωbutton to switch [Dynamic] to
to return to the IP setting menu.[Static].
4. Scroll up/down to [TCP/IP] and then pressψSELECT/OKωbutton to start
editing..
5. Press UP/DOWN button to change numbers. Press LEFT/RIGHT button
to shift.
6. After finishing, pressψSTOP/ESCωbutton once to finish editing and again
to return to the IP setting menu.
1HWZRUN
1HWZRUN
&RQQHFW
&RQQHFW
/$1
,36HWWLQJ
,36HWWLQJ
!
8VH3UR[\
8VH3UR[\
1R
1R
,36RXUFH
,36RXUFH
,36RXUFH
,36RXUFH
Ш
Select [IP Setting], then pressψSELECT./OKω
,36HWWLQJ
,36HWWLQJ
PressψSELECT/OKωto switch [IP Source] to [Static]
'16
'16
!
7&3,3
7&3,3
6WDWLF
6WDWLF
!
'\PDQLF
'\PDQLF
7&3,3
7&3,3
,36HWWLQJ
,36HWWLQJ
Ш
Select [TCP/IP], then pressψSELECT./OKω
,3
,3
0DVN
0DVN
*:
*:
Press UP/DOWN (or numbered key) then
LEFT/RIGHT to input IP.
Press [STOP/ESC] twice to finish.
x The display will warn you if you choose an IP address, sub-net mask or gateway (GW)
address outside the 'legal' range. Then the settings will revert to their default values.
.
7&3,3
7&3,3
7KH,36HWWLQJ9DOXHLV
7KH,36HWWLQJ9DOXHLV
LOOHJDO6HWWLQJLV
LOOHJDO6HWWLQJLV
&KDQJHGWR'HIDXOW
&KDQJHGWR'HIDXOW
GB- 63
11.4.5 Inputting DNS address
x This is an advanced set-up feature for network engineers.
1. PressψSETUPωbutton, then scroll up/down to [Network] and press
ψSELECT/OKωbutton.
2. Select [DNS] and then pressψSELECT/OKωbutton.
3. Press UP/DOWN button to change numbers. Press LEFT/RIGHT button
to shift position.
4. After finishing, pressψSELECT/OKωbutton once to finish editing and again
to return to the IP setting menu.
5. Press [STOP/ESC] to step back out of the set-up menus. The system will display
'Apply Setting' and attempt to negotiate the connection with the new settings.
,36HWWLQJ
,36HWWLQJ
,36RXUFH
,36RXUFH
6WDWLF
7&3,3
7&3,3
!
'16
'16
!
'16
'16
Ш
'16
'16
'16
'16
Select [DNS] and pressψSELECT/OKωbutton
Press UP/DOWN (or numbered key) then
LEFT/RIGHT to input IP
Press [STOP/ESC] twice to finish.
11.4.6 Inputting Proxy Server address
1. PressψSETUPωbutton, then scroll up/down to [Network] and press
ψSELECT/OKωbutton.
2. Scroll up/down to [Use Proxy] and then pressψSELECT/OKω button to
switch to [Yes].
3. Scroll up/down to [Proxy Server] and then pressψSELECT/OKω button to
input domain name or IP address.
4. PressψSELECT/OKωbutton, then press UP/DOWN or remote number buttons to change
characters, press LEFT/RIGHT button to shift.
5. PressψSELECT/OKωbutton to confirm and return to Network menu.
6. Scroll up/down to [Proxy Port] and then pressψSELECT/OKωbutton.
Input port number in same manner as domain name or IP address (step#4).
7. Press SELECT/OK button to confirm and return to Network menu.
8. Press [STOP/ESC] to step back out of the set-up menus. The system will display
'Apply Setting' and attempt to negotiate the connection with the new settings.
GB-64
Input table for proxy server address
Key
Description
OK / Select Start and finish editing
STOP/ESC
Delete a character
Up
Change character 0-9, a-z ,A-Z, symbol
DOWN
Change character 0-9, a-z ,A-Z, symbol
LEFT
Shift to left
RIGHT
Shift to right
1
1./_!@#ʳʷʳʸʳ˱ʳʹʳʽʳˍʳˎʳ ʳ ʺʳ ʳ ʵʳ ʳ ˂ʳ ʳ ˯ʳʻʳʼʳˮʳ˰ʳ̎ʳ̐ʳ ʳ ̆̃˴˶˸
2
2 abc ABC
3
3 def DEF
4
4 ehi EHI
5
5 jkl JKL
6
6 mno MNO
7
7 pqrs PQRS
8
8 tuv TUV
9
9 wxyz WXYZ
0
0
.
3UR[\6HUYHU
3UR[\6HUYHU
3UR[\6HUYHU
3UR[\6HUYHU
! !SUR[\KLQHWQHW
!SUR[\KLQHWQHW
Ш
Ready to Edit
Press UP/DOWN (or numbered key) then
LEFT/RIGHT to input characters.
3UR[\6HUYHU
3UR[\6HUYHU
!SUR[\KLQHWQHW
!SUR[\KLQHWQHW
PressψSELECT/OKωto confirm
GB-65
ԦSelect [Proxy Port] to input a proxy server port
Input table
for proxy port number
Key
Description
OK / Select Start and end editing
STOP/ESC Delete a character
Up
Change character 0-9
DOWN
Change character 0-9
LEFT
Shift to left
RIGHT
Shift to right
1
1
2
2
3
3
4
4
5
5
6
6
7
7
8
8
9
9
0
0
Table 11.4.6.2
3UR[\3RUW
3UR[\3RUW
3UR[\3RUW
3UR[\3RUW
! !
!
Ш
Press UP/DOWN (or numbered key) then
Ready to Edit
LEFT/RIGHT to input characters
3UR[\3RUW
3UR[\3RUW
!
!
PressψSELECT/OKωto confirm
GB- 66
11.5 Information Display
. button, scroll up/down to [Information] and press the [SELECT/OK] button.
Press [SETUP]
Press up/down buttons to display further information including network settings and detailed
operating system version information. (Displayed information may vary according to firmware version.)
ExampleΚ
[ General Info ]
F/W Ver. 1.0.3
uP Ver: 0x25
9HUVLRQ
9HUVLRQ
26˖
26˖[[[[[[[[
[[[[[[[[
6:˖
6:˖[[[[[[[[[[[[
[[[[[[[[[[[[
X3˖
X3˖;[;;
;[;;
1HWZRUN
1HWZRUN
,36RXUFHΚ
,36RXUFHΚ'+&3
'+&3
0$&Κ
0$&Κ[[[[[[[[[[[[
[[[[[[[[[[[[
[[[[[[[[[[[[
,3Κ
Κ[[[[[[[[[[[[
,3
60Κ
60Κ[[[[[[[[[[[[
[[[[[[[[[[[[
*:Κ
*:Κ[[[[[[[[[[[[
[[[[[[[[[[[[
1HWZRUN7\SH
1HWZRUN7\SH
66,'Κ
66,'Κ[[[
[[[
11.6 Language
ԦSupports 11 languages – EnglishΕGermanΕSpanishΕPortugueseΕFrenchΕ
GB- 67
ItalianΕSwedishΕFinlandΕDutchΕDanishΕTraditional Chinese. The default
language of the audio system is English.
6HWWLQJ
6HWWLQJ
/DQJXDJH
/DQJXDJH
!
,QIRUPDWLRQ
,QIRUPDWLRQ
!
5HVHWDOO6HWWLQJV
5HVHWDOO6HWWLQJV
OO6HWWLQJV
!
/DQJXDJH
H
Ш
(QJOLVK
(QJOLVK
*HUPDQ
6SDQLVK
PressψSETUPωand then chooseψLanguageω
Select language with up
with the up
or down
[SELECT/OK]
pressψSELECT/OKω
buttons and press
or down
Press [STOP/ESC] or [MENU]
to return to main menu.
11.7 Reset All Settings
Press [SETUP] button, scroll up/down to [Reset All Settings] and
press the /OK] button. The 'Reset' menu appears.
Press down
button to scroll to 'Yes' and press [OK].
The display shows 'Reset to Default' and all settings are
restored to ex- factory values.
11.8 Firmware Upgrade
ԦThis audio system supports on-line upgrade over the Internet.
GB- 68
and
NOTE: You will have to enter all settings again after the firmware upgrade.
11.8.1 On-line upgrade
1. Make sure the Internet environment is ready
2. PressψSETUPωbutton, then scroll up/down to [Firmware Upgrade] and press
ψSELECT/OKωbutton.Highlight 'Yes' in confirmation display and press [OK] again.
3. The audio system will restart automatically after finishing upgrade.
4. Do not switch off or press any function key during the upgrade
procedure, otherwise your audio system may become inoperable.
NOTE: You will need to check all settings after upgrading.
x Select an item (move the highlight) with the up
6HWWLQJ
6HWWLQJ
,QIRUPDWLRQ
,QIRUPDWLRQ
!
5HVHWDOO6HWWLQJV
5HVHWDOO6HWWLQJV
!
)LUPZDUH8SJUDGH
)LUPZDUH8SJUDGH
!
Select [Firmware Upgrade], then pressψSELECT/OKω
or down
8SJUDGH
8SJUDGH
Ш
buttons.
1R
1R
<HV
<HV
!
Select [Yes] and pressψSELECT/OKωto confirm
GB- 69
1
1
8SJUDGH
8SJUDGH
DGH
1R
1R
/RDG
/RDG
6'00&
6'00&
2QOLQH
2QOLQH
<HV
<HV
8SJUDGH
8SJUDGH
&KHFNLQJ)LUPZDUH…
&KHFNLQJ)LUPZDUH Select [Online], and press
Searching for updated firmware version
ψSELECT/OKω
1
1
8SJUDGH
8SJUDGH
8SJUDGH
8SJUDGH
60%%BB,0$*(B9(5B
60%%BB,0$*(B9(5B
Ш
60%%BB,0$*(B9(5B
60%%BB,0$*(B9(5B
9LVLEOHΚ
9LVLEOHΚ
8SJUDGH7RΚ
8SJUDGH7RΚ
Available version will show on the display.
Select [Yes] to confirm
1
8SJUDGH
8SJUDGH
'RZQORDGLQJ…
'RZQORDGLQJ 3URFHVVLQJ…
3URFHVVLQJ &RPSOHWHG
&RPSOHWHG
!3UHVV&DQFHOWR([LW
!3UHVV&DQFHOWR([LW
Downloading…pressψSTOP/ESCωto cancel download
Upgrading the firmware…
This process takes around 2 minutes.
&'
&'
The upgrade is complete.
GB- 70
Chapter 12 - Troubleshooting
If you have any of the problems listed below please use this troubleshooting guide to try
and solve them.
A little time spent in this way may save you the inconvenience of returning your
equipment.
Problems
Items to check
Power
System does not turn on,
or does not respond to
controls.
x
Make sure AC mains plug is secure in the outlet, and outlet has
power.
x
Pull the mains plug out for 1 minute then re-connect and try
again. If this does not work, leave the unit unplugged before
seeking advice.
Memory card
x
Is the memory stick compatible with the unit, try another type of
stick.
x
Make sure there are music files on the memory card and that
they are supported types.
CD
x
Make sure disc label is facing up.
Disc won't play.
x
Make sure disc is clean and not damaged. Try another disc.
x
Pause mode is activated; press the [PLAY/PAUSE] button.
x
Check the internet connection is working (see Internet and
Network…)
x
Try ejecting the disc and inserting it again.
x
The disc does not match any information in the Gracenote
Media Database.
x
Data CD (MP3 or WMA files) is not supported by the Gracenote
function.
Sound skips or pickup
sticks
x
Make sure disc is clean and not badly scratched.
x
Vibration can cause the disc to skip.
FM RADIO
x
Make sure the FM antenna is connected.
Poor reception
x
Move the unit away from other operating electrical equipment
such as motorised appliances, transformers, televisions and
computer monitors.
x
Please be aware the structure of some buildings blocks radio
waves.
x
Is the sound muted ? - press the MUTE button. Turn the volume
up.
x
Are the headphones connected to the unit ? – unplug them.
Wrong functions or
x
Insert new batteries
Short range
x
Aim from straight in front of the remote sensor.
Not playing
Can’t get CD information
from Gracenote Music
Recognition Service.
NO SOUND
REMOTE
GB-71
INTERNET RADIO
The radio station is listed
but I cannot play it.
x
x
x
x
x
x
x
The station is not broadcasting at this time of the day (it may be
in a different time zone).
The station has reached the maximum number of simultaneous
listeners it can provide.
The Internet connection path between your radio and the server
is slow, so it takes quite a long time for the audio buffer to fill
up, or it can't fill up fast enough to keep pace with real time
playback.
The station name is listed but it is not broadcasting any more.
The link to the audio stream used by the radio is out of date, so
it does not connect.
The radio station is broadcasting using an audio format which is
not playable by your audio system.
Try checking the radio station audio stream via the broadcaster's
web site using a PC.
‘Select network’ menu is
displayed.
x
Network connection is not working. Check chapter 2 –
‘Installation’ and chapter 11 – ‘Setup’ – ‘Network’. Also
‘Network’ in this guide.
RECORDING
x
Make sure the memory card or USB drive has enough free
space.
x
Make sure the memory card or USB drive is not write-protected.
x
You may be trying to copy an unsupported file type (only MP3
is supported).
Check that a computer connected to the local network can
access the Internet.
The most common trouble with wireless networks is incorrect
entry of the network name (SSID) or Pass Phrase. Remember
these are case-sensitive and every character counts, including
spaces. See section 11.4.2, ‘Setting the Wi-Fi connectivity’.
Use Windows Media Player 11 or similar UPnP media server
software which will automatically configure Microsoft
Windows XP or Vista built-in firewall.
Check that your access point (router) does not restrict
connections to particular MAC addresses. In your router set-up
menu this will probably be under Firewall – MAC address
filtering.
As a temporary measure, you maybe able to turn off the router
firewall to prove whether or not it is blocking communication,
especially for the UPnP Media Server function.
Please read the router opertating instructions for how to do this.
If you get in a mess with the settings, you can always start again
with section 11.8 – ‘Reset all settings’.
Routers and similar ‘access point’ devices have built-in help
menus, on-line support and telephone support. Microsoft
Windows and similar operating systems have local help menus
(press the F1 key) and masses of Internet support. You may be
able to make use of these facilities.
NETWORK
x
Can’t resolve
connection…
x
Clock won’t auto-set
even though ‘Time Sync’
is on.
x
No Internet radio.
Media Server function
just displays ‘Scanning
server’ but does not find
any server.
x
x
x
x
GB- 72