1
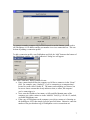
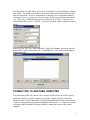
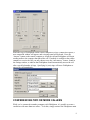
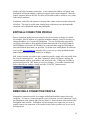
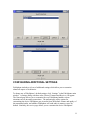
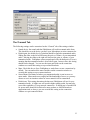
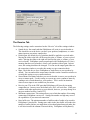
Fideliphone Version 1.0 User Manual Copyright © 2010 Fidelisoft LLC, all rights reserved This manual is a work in progress, and will be completed before the official release of Fideliphone 1.0. Please submit any suggestions for improving this manual at www.fideliphone.com. 1 PREFACE Fideliphone is a high quality internet telephony application suitable for use by broadcasters, podcasters, musicians, and others who demand only the best audio quality. Simply put, Fideliphone creates one or more bi-directional audio connections from one computer to another using the industry standard Internet Protocol and your existing sound hardware. Fideliphone version 1.0 offers the following features: 44100Hz, monaural or stereo audio. User selectable bit rates from 32 to 350 kbps. Input and output gain and mute controls for each caller. Input and output VU meters for each caller. Input and output bandwidth indicators for each caller. Easy to use connection manager for storing and retrieving connection information. Peer-to-peer conferencing of up to 65535 callers through one computer (subject to memory, CPU and bandwidth constraints). Peer-to-peer conferencing of an unlimited number of callers distributed among multiple computers and Internet connections. 2 CONTENTS PREFACE.......................................................................................................................2 CONTENTS....................................................................................................................3 INTRODUCTION...........................................................................................................3 GETTING STARTED.....................................................................................................4 INSTALLATION............................................................................................................5 ADDING A CONNECTION PROFILE ..........................................................................6 CONNECTING TO ANOTHER COMPUTER ...............................................................8 CONFERENCING TWO OR MORE CALLERS ............................................................9 EDITING A CONNECTION PROFILE........................................................................10 REMOVING A CONNECTION PROFILE...................................................................10 CONFIGURING ADDITIONAL SETTINGS ............................................................... 11 The General Tab........................................................................................................12 The Transmit Tab ......................................................................................................13 The Receive Tab........................................................................................................14 Appendix A: Technical Support Options .......................................................................15 No Cost Support Options........................................................................................... 15 Contract Support Services ......................................................................................... 15 INTRODUCTION Thank you for choosing Fideliphone. The Fideliphone development team has designed Fideliphone from the ground up to be simple and easy to use, while including powerful features which make Fideliphone flexible enough to be used in a variety of situations. We understand that not everyone wants to read a long complicated manual just to get started with a new piece of software. For this reason, we’ve chosen to give you a simple set of instructions right up front to help you get started using Fideliphone right away. We also understand that you may run into problems along the way, or that you may just have questions about how Fideliphone works, that can’t be answered in a quick start guide. The later sections of this manual contain comprehensive information about every feature we’ve included in Fideliphone. Finally, since a written manual can’t take into account every user’s unique situation, Appendix A contains a list of options for obtaining one-onone training and support. GETTING STARTED This section lists the basic steps for setting up and using Fideliphone. For more detailed instructions or information, please refer to the following sections. 1. Install Fideliphone. a. Insert the Fideliphone disc into your computer’s CD or DVD drive. b. Accept the Fideliphone license agreement. c. Choose the folder where Fideliphone will be installed. d. Choose whether to create desktop, quick launch, and start menu items. e. Finish the installation. f. Run Fideliphone. g. Fideliphone will now listen for incoming connection requests on the default UDP port, 4242. h. Click the “SETTINGS” button if you need to change the default UDP port. This change will take affect when Fideliphone is restarted. i. If your computer is behind a router, make sure the default UDP port, 4242, or the UDP port you chose in the previous step, is forwarded to the IP address of the computer running Fideliphone. Refer to your router’s instruction manual for more details. 2. Add a connection profile. a. Click the “ADD” button located at the bottom of the Fideliphone main window. b. Enter a name for your new connection profile. c. Enter the host name or IP address of the computer you wish to connect to. d. Enter the port number the remote computer receives Fideliphone connections on. e. Press the “OK” button to save the new connection profile, or press “CANCEL” to discard your changes. 3. Connect to another computer. a. Make sure Fideliphone is running on the computer you wish to connect to. b. Highlight the connection profile for the computer you wish to connect to in the saved connections list. c. Press “CONNECT”. On the remote computer, press “Answer”. Use the “TX GAIN” and “TX MUTE” controls to adjust your audio level to the remote computer. d. Use the “TX RATE” control to increase or decrease the rate of data sent to the remote computer. A higher data rate will provide better audio quality than a lower data rate. For most users of high-speed local area networks, the maximum data rate will most likely work fine. Users of Internet connections may need to choose a lower data rate to prevent data from being lost between the sender and the receiver. e. Use the RX Gain and RX Mute controls to adjust the level of the received audio from the remote computer. 4 f. The TX stereo/mono buttons can be used to send monaural or stereo audio. Monaural audio will consume roughly half the bandwidth of stereo audio at the same TX rate setting. 4. Close the connection. a. Press the “hang up” button or the close symbol in the upper right corner of the connection Window. This will close your connection to the remote computer, but it will not exit the Fideliphone program. 5. Exit Fideliphone. a. Press the close symbol in the upper right corner of the Fideliphone main window. Any remaining connections will be closed before Fideliphone exits. INSTALLATION If you’re familiar with installing programs on the Microsoft Windows ® operating system, then the Fideliphone installation process will most-likely be familiar to you. If you’re not, don’t panic. The installation process is fairly straight-forward. First, insert the Fideliphone disk into your computer’s CD or DVD drive. If you’ve downloaded Fideliphone from www.fideliphone.com, run the fideliphone-1.xx-setup.exe file by double clicking on it. Some versions of Windows ® will display a warning that running downloaded files from the Internet presents a security risk. This is absolutely true and we can assure you that, if you’ve downloaded your copy from www.fideliphone.com, the file will contain no viruses, spyware, or malware. Still, it’s a good idea to scan the Fideliphone setup file with your virus scanner before running it. If you’ve already done that, then proceed past the warning screen by clicking “Run”. After a short delay, the Fideliphone setup wizard should appear. The first page of the Fideliphone setup wizard is simply an introduction. Click the “Next” button to proceed to the license agreement screen. The license agreement screen contains information about when and how you may use Fideliphone. Read it carefully, but here are the basics. You may use Fideliphone free of charge for commercial or noncommercial use. You may redistribute Fideliphone under the terms of the GNU General Public License, which states that any versions you distribute must also contain a copy of the license and give credit to the original copyright holder, Fidelisoft LLC. You may modify Fideliphone in any way you whish, and even distribute copies of your modified version, as long as you also distribute your changes under the terms of the GPL, which is included with every copy of Fideliphone. If you’re a commercial user of Fideliphone, and you require technical support or custom features, you may contact Fidelisoft LLC to purchase a support contract. If you’re satisfied with the licensing terms, click “I Agree”, then click “Next” to proceed to the folder selection screen. 5 The folder selection screen allows you to choose where to install your copy of Fideliphone. In most cases, the default folder will be fine. Press “Next” to proceed to the start menu folder selection screen. The start menu folder selection screen allows you to choose where Fideliphone will install its icons in the start menu. In most cases, the default location will be fine. When you’ve finished selecting a start menu folder, press next to proceed to the additional tasks screen. The additional tasks screen allows you to create a Fideliphone icon on your desktop or on the quicklaunch toolbar. Check either or both of the checkboxes on the additional tasks screen, then press next to proceed to the confirmation screen. The confirmation screen displays a summary of the installation selections you made on the previous screens. If you’re satisfied with your choices, press next to continue with the installation. A progress screen will be displayed while Fideliphone is being installed. When Fideliphone has successfully been installed, the setup program will display one more screen. This screen indicates that the installation was successful, and allows you to launch Fideliphone immediately if you choose. Click “Finish” to exit the setup program. If you’ve checked the “Launch Fideliphone” box, the setup program will exit and immediately launch Fideliphone. If you choose to start Fideliphone later, you can start it from the Fideliphone desktop icon or start menu shortcut. ADDING A CONNECTION PROFILE When you start Fideliphone for the first time, you’ll see exactly 1 (one) connection profile in the “Saved Connections” list. This profile is called “Local Loopback”, and comes prepackaged with every Fideliphone installation. This profile can be used to test your audio settings before connecting to another computer and will be described in more detail in the following section. 6 To connect to another computer on your local network or on the Internet, you’ll need to tell Fideliphone it’s IP address and the port number it receives connections on. This can be done by adding a connection profile. To add a connection profile, start Fideliphone and click the “Add” button at the bottom of the Fideliphone window. An “Add Connection” dialog box will appear. The “Add Connection” dialog contains 4 items: Enter a name that describes the computer you’d like to connect to in the “Name” field. For example, enter “Studio B”, if you’re connecting to a computer that’s located in a room called “Studio B”. The name can be anything you choose, but be sure to choose a name that clearly indicates what, or where, the computer you’re connecting to is. Next, enter the IP address, host name, or fully qualified domain name of the computer you wish to connect to in the “Address” field, E.g. 192.168.0.2, studiob, or studiob.fideliphone.com. If the copy of Fideliphone on the computer you wish to connect to is listening on the default port, 4242, then simply leave the port field alone. Otherwise, enter the number of the port that that copy of Fideliphone receives connections on. 7 The jitter buffer size field allows you to select a minimum size for Fideliphone’s adaptive jitter buffer. The default size should work on most local network connections and some Internet connections. If you’re connecting to a computer over a questionable network connection, however, you may wish to try setting a slightly larger minimum jitter buffer size. When you’ve finished making all of your choices, press “OK” to save your new connection profile, or press “CANCEL” to return to the main window without saving the profile. After you press “OK”, the “Add Connection” dialog will disappear and a new item will appear in the “Saved Connections” list. Congratulations! You’ve successfully added a connection profile! CONNECTING TO ANOTHER COMPUTER The connection profile you created in the previous section can now be used to quickly and easily connect to a remote computer at any time. Simply select the connection profile from the “Saved Connections” list in the Fideliphone main window and click the “Connect” button at the bottom of the Fideliphone main window. A connection window will appear and Fideliphone will begin sending a connection request to the remote computer. 8 When the copy of Fideliphone on the remote computer receives a connection request, a new connection window will appear, and a ringing sound will be heard. Press the “Answer” button on the remote computer to accept the call and Fideliphone will begin sending audio to the computer that placed the call. If nobody is available at the remote computer to receive the call, you may choose to use the “auto answer” feature, found in the settings window, to indicate that Fideliphone should automatically answer the call after a specified number of rings. Specifying 0 (zero) rings will cause Fideliphone to answer the call immediately. CONFERENCING TWO OR MORE CALLERS While you’re connected to another computer with Fideliphone, it’s possible to create a conference with more than two callers. To do this, simply return to the Fideliphone main 9 window and click on another connection. A new connection window will appear, and Fideliphone will begin sending a connection request to the remote computer. When the remote computer answers the call, all callers will be able to talk to, and hear, every other caller in the conference. In addition, each caller can connect to as many other callers as their network connection will allow. This may be useful when creating large conferences since the bandwidth consumed can be distributed among the participants. EDITING A CONNECTION PROFILE Once a connection profile has been created, it may be necessary to change it’s details. For example, if the IP address of a particular computer changes, it may be necessary to change the address you’ve stored in Fideliphone. You can avoid having to do this by specifying a host name or fully qualified domain name instead of an actual IP address, and Fideliphone will resolve the IP address at connection time using the DNS address associated with the host name you specified. For home users with dynamic IP addresses, a service like www.dyndns.org can easily allow you to set up a fully-qualified domain name which will follow your IP address as it changes. Still, in the event that you need to edit a connection profile, simply select the profile from the “Saved Connections list”. An “Edit Connection” dialog will appear, showing the connection name, address, port number, and jitter buffer size. Change any field that is incorrect and press the “OK” button to save your changes. If you make a mistake and wish to discard your changes, simply press the “CANCEL” button instead. REMOVING A CONNECTION PROFILE Sometimes a connection profile is no longer needed and should be removed to avoid confusion. To remove a connection profile, select it from the “Saved Connections” list in the Fideliphone main window and click the “Remove” button located at the bottom of the Fideliphone main window. Fideliphone will not prompt you to make sure you want to actually remove the connection, so be careful to only remove profiles you’re sure you’ll no longer need. 10 CONFIGURING ADDITIONAL SETTINGS Fideliphone includes a rich set of additional settings which allow you to customize almost all aspects of its behavior. To change any of Fideliphone’s default settings, click “Settings” in the Fideliphone main window. A settings dialog with three tabs, General, Transmit and Receive, will appear. The General page allows you to customize the way Fideliphone handles various situations such as incoming connections. The transmit page offers options for customizing the device Fideliphone gets its audio from, the default volume and quality of the transmitted audio, and whether Fideliphone will send audio in mono or stereo by default. Similarly, the receive page allows you to customize the device Fideliphone 11 sends received audio to, the default volume of the received audio, and whether the received audio should be played only in mono, or whether it should be played in stereo if available. Most of these settings represent defaults that Fideliphone will use the first time you connect to a newly created connection profile. If, while you’re connected, you change any settings on the connection Window, Fideliphone will save those settings in its configuration file and restore them the next time you connect to that computer. This allows you to choose a high transmit rate when connecting to a computer on your local area network, for example, but use a lower default transmit rate when connecting to a computer over the Internet for the first time. The General Tab The following settings can be customized on the “General” tab of the settings window: Name: your name as it will be displayed to the person you’re calling. E-mail address: your e-mail address. (this is not currently used, but is reserved for future applications. Audio API: the method that Fideliphone uses to access your sound card. o MME: an older access method first introduced in Windows 3.1. This method has higher latency, but is sometimes subject to fewer glitches. o DirectSound: A newer access method, first introduced in Windows 95. This method can have lower latency than MME, but can also be subject to more audio glitches on some sound cards. Ring file: the file that will be played when Fideliphone receives an incoming call. This file must have a 44.1 Khz sampling rate and can either be monno or stereo. Ringback file: the sound file that will be played when Fideliphone makes a call to another user. This file should also have a 44.1 Khz sampling rate and can either be monno or stereo. Ring device: the sound device Fideliphone will use to play the ring file when a new connection request is received. This can be the same device as the output device, but can also be set to a separate device to prevent ringing from being heard over the air. Autoanswer after: Check this checkbox to tell Fideliphone to answer a call after the desired number of rings. Checking this box and setting the number of rings to 0 (zero) will cause Fideliphone to answer calls immediately. 12 The Transmit Tab The following settings can be customized on the “General” tab of the settings window: Sound device: the sound card that Fideliphone will read its transmit audio from. This should be set to the device you have your Microphone or mixer connected to. Default gain: the default level of gain that should be applied to transmitted audio. Sliding the slider to the left will decrease the gain, or volume, of your transmitted audio. Moving the slider to the right will increase the gain, or volume, of your transmitted audio. Fideliphone comes prepackaged with a default gain of 0 (zero) meaning that the transmitted audio is sent with no gain. In most cases, this setting should not be changed. You can use the input gain slider on the connection window to override this setting on a per-connection basis. Mute: Check this box to force Fideliphone to send silence to new connections by default. You can uncheck the mute checkbox on the connection window to override this setting on a per-connection basis. Stereo/Mono: Determines whether your transmitted audio is sent in stereo or mono mode. Mono mode uses roughly half the bandwidth of stereo, so you may choose to use it in situations where no stereo material will be transmitted. Default rate: This setting determines the data rate Fideliphone will use for your transmitted audio. A higher rate will result in higher quality audio, but may also exceed the capabilities of your network connection. A default rate of around 93K for stereo audio should be sufficient for most podcast or AM/FM broadcast applications and, as always, you can override this setting on the connection window on a per-connection basis. 13 The Receive Tab The following settings can be customized on the “Receive” tab of the settings window: Sound device: the sound card that Fideliphone will write its received audio to. This should be set to the device you have your speakers, headphones, or a mixminus input on your mixer connected to. Default gain: the default level of gain that should be applied to received audio. Moving the slider to the left will decrease the gain, or volume, of your received audio. Moving the slider to the right will increase the gain, or volume, of your received audio. Fideliphone comes prepackaged with a default gain of 0 (zero) meaning that the received audio is sent to your speakers with no gain. In most cases, this setting should not be changed. You can use the output gain slider on the connection window to override this setting on a per-connection basis. Mute: Check this box to force Fideliphone to send silence to your speakers by default. You can uncheck the output mute checkbox on the connection window to override this setting on a per-connection basis. Stereo/Mono: Determines whether your received audio is sent to your speakers in stereo or mono mode. Use this setting to convert any stereo content to mono by sending a mix of both channels to your speakers. This is useful in situations where a stereo input is not available on your mixer. Receive port: This is the UDP port that Fideliphone will listen for incoming connections on. In most cases, the default port, 4242, will work fine. If this port conflicts with other applications on your network, however, you may change it to any port number between 1 and 65535. Maximum connections: This setting allows you to limit the number of incoming connections Fideliphone can receive. Setting this number too high may exceed the capabilities of your network connection. Jitter buffer size: The minimum number of milliseconds of audio to be stored in Fideliphone’s jitter buffer. Storing more audio in the jitter buffer will reduce the number of audio glitches you might hear on less than optimal network paths, but it will also increase the amount of network delay. Fideliphone will dynamicly 14 adjust the size of its jitter buffer based on current network conditions, so Fideliphone will only use this value as a starting point. Suggested sound device latency: This setting is used to suggest the amount of buffering Fideliphone will use before writing audio to the sound device. A larger value will impose more delay, but may also eliminate audio glitches on some hardware. Setting this value too low may result in distorted audio. Adjust this setting with care. Appendix A: Technical Support Options No Cost Support Options There are two methods of obtaining support at no charge. The first, and recommended, method of obtaining support is through the Fideliphone user community. The “Mailing List” link at www.fideliphone.com will provide you with the most current information about how to describe to the Fideliphone support mailing list where you can submit your questions to the Fideliphone user community. As you gain experience with Fideliphone, we hope you’ll also remain subscribed to the mailing list and help other Fideliphone users with their problems as well. The help desk at www.fideliphone .com can be used to submit questions, suggestions, and bug reports. A member of the Fideliphone technical support team will do their best to answer your questions when their time permits. Please remember that the Fideliphone support team will answer your help desk questions only when we’re not too busy helping customers who have paid for support contracts. Contract Support Services TBA 15