1
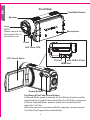
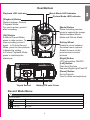
1. Introduction
Welcome and thank you for choosing a TOSHIBA product.
For details about your TOSHIBA product, refer to the User’s Manual or online
documentation which contains further information.
2. Safety Instructions
1. Do not drop, puncture or disassemble the camcorder; otherwise the warranty will be voided.
2. Avoid all contact with water, and dry hands before using.
3. Do not expose the camcorder to high temperature or leave it in direct sunlight.
Doing so may damage the camcorder.
4. Use the camcorder with care. Avoid pressing hard on the camcorder body.
5. For your own safety, avoid using the camcorder when there is a storm or lightning.
6. Do not use batteries of different specifications. Doing so may lead to the potential for
serious damage.
7. Remove the battery during long periods between usages, as a deteriorated battery may
affect the functionality of the camcorder.
8. Remove the battery if it shows signs of leaking or distortion.
9. Use only the accessories supplied by the manufacturer.
10. Keep the camcorder out of the reach of infants.
11. Risk of explosion if battery is replaced by an incorrect type.
12. Dispose of used batteries according to the instructions
3. TOSHIBA support
Need help?
For the latest driver updates, user’s manuals & FAQs please have a look at the
TOSHIBA options & services support page:
www.mytoshiba.com.au
www.mytoshiba.co.nz
Toshiba Support Centre:
Australia
: 13 30 70
New Zealand: 0800 445 439
Expert staff provides technical assistance during normal business hours, 5 days a week,
excluding public holidays.
Be sure to have the following information available before you call:
Product serial number and part number
Place of purchase
Applicable error messages or fault symptoms
Operating system (if applicable)
Installed third-party hardware and software (if applicable)
1
4. Getting Started
Load the rechargeable Li-ion battery /SD card (Optional)
Insert the battery according to the correct polarity marks (+ or -)/SD card (Optional).
NOTE: Please remove the insulator on battery connection before use.
Close the battery/SD card cover firmly.
Recommended memory capacity of the SD card (Optional) -- 1GB or above.
Insert the SD card (Optional)
into the right position.
To remove an SD card, press
it down and take it out.
Li-ion battery
Charge your battery
You must use the supplied AC charger or the USB cable.
The camcorder must be turned OFF;
blinking light confirms charging,
and the light becomes constant after the charging is completed.
Then, the light will turn itself off automatically after 5 minutes. (In AC charging Mode)
2
5. Tour of Your Camcorder
Record & Play
1
5
6
2 3 4
2 4
7
2 4
1 Flip to power on
4 To capture picture
Flip out the LCD panel or hold
Press Mode Button
Power
Button for one second.
If no operation is made in 3 minutes,
the Camcorder will turn itself off
automatically to conserve battery power.
2 To start or stop recording
5 To zoom in or out
Press Mode Button
Press T / W
or touch
on the screen to switch to
Movie Record mode. (The Movie
Mode LED Indicator
Press
or touch
on the screen to switch to
Movie Record mode. (The Movie
Mode LED Indicator
will light up.)
Press
6 To review movies/pictures
Press
will light up.)
7 To operate more advanced options
Touch
(on-screen icon) to
access the option menu.
3 Dual record
When recording movies, press Mode
For more detailed operational
instructions, please refer to User’s
Manual-Section 3 4 on the supplied
CD.
Button
to capture the image.
Dual record icon
appears on the
LCD monitor.
3
Front/Side
Tele/Wide Button
Speaker
Lens
NOTE:
Please remove the
lens protect film on
lens before use.
Microphone
Flash
Self Timer LED
LCD Touch Panel
Mini USB 2.0 Port
TV Port
HDMI Port
Power Button
Pre-Record/YouTube Direct Button
In Record Mode, press to activate the Pre-Record function and the
movies will be recorded 3 seconds before the OK Button is pressed.
In Movie Playback Mode, press to select the current movies to
upload to YouTube.
When the camera is connected with the computer, press to launch
YouTube Direct application automatically.
4
Rear/Bottom
Movie Mode LED Indicator
Playback LED Indicator
Picture Mode LED Indicator
[Playback] Button
ISwitch between Record
/Playback Mode.
For quick review, press it
after recording.
[Mode] Button
When recording movies,
press to capture the image.
Switch between Movie
Mode and Picture Mode.
[OK] Button
In Movie Record Mode,
press to take movies. To
stop recording, press it
again. In Picture Record
Mode, press to take pictures.
Validate the setting.
In Picture Playback Mode,
press to start/stop the
slideshow.
Tripod Socket
Rolling Wheel
Rotate to move between
the wheel menu options.
Rotatel to move to the
previous/next movies/
pictures.
[Right] Button
LCD Information ON/OFF.
[Left] Button
Flash Auto/ Red eye
Reduction/Digital Light/Flash Off
[Down] Button
During Playback:
Press to delete movies/pictures.
Battery/SD card Cover
Record Mode Menu
Resolution
Movie Resolution
FHD (1080p 30)
1920X1080p (30fps)
HD (720p 30)
1280X720p (30fps)
WVGA 60
848X480 (60fps)
VGA (4:3)
640 X 480
5
Picture Resolution
High(16MP) 4608X3456 (16M pixels)
Std(10MP)
3664 x 2748 (10M pixels)
Low (3MP)
2048x1536 (3M pixels)
White Balance
Auto
Automatic adjustment
Daylight
Use under outsides light condition
Fluorescent
Use under fluorescent light condition
Tungsten
Use under tungsten light condition
Scene
Shoot without any special effect on the image
Auto
Skin
Shoot with an effect that makes skin tones more natural
Night
Use Night mode for night scenes or low light conditions.
Backlight
You can take shots when bright light is behind the subject.
B/W
The image is converted to black-and-white.
Classic
The image is converted to sepia look.
Negative
The image is converted as the negative of the normal
Effect
Movie Effect
Stabilization
Macro Mode
On
Off
Disable motion stabilization
Auto
Focus Range:Wide:10cm( 3.9 inch )~Infinite , Tele:100cm( 39 inch )~Infinite.
Motion Detect
Macro
Focus Range: Wide:1cm( 0.39 inch )~ Infinite, Tele:80cm( 31.2 inch )~ Infinite
On
Start video recording while detecting movements of objects.
Off
Disable Motion detection
Record videos with slow motion effect. When the video is played,
the playback time will be longer than the actual recording time.
Disable Slow Motion
Off
Disable Time Lapse.
Off
Slow Motion
Time Lapse
Enable motion stabilization, giving you smooth and stable video.
Stabilization doesn’t apply on FHD (1080p 30) and WVGA60.
On
1 Sec.
Record one frame per second.
3 Sec.
Record one frame every 3 seconds.
5 Sec.
Record one frame every 5 seconds.
Picture Effect
Self-Timer
Macro Mode
On
Off
Disable Self-timer
Auto
Focus Range:Wide:10cm( 3.9 inch )~Infinite , Tele:100cm( 39 inch )~Infinite.
Macro
Auto
ISO
Activate 10-second-delayed Self-timer
800
1600
Focus Range: Wide:1cm( 0.39 inch )~ Infinite, Tele:80cm( 31.2 inch )~ Infinite
Disable The camera adjusts the ISO sensitivity of its images automatically.
The larger the number is, the higher the ISO sensitivity is set to.
Select a small number to shoot a smoother image.
Select a large number to shoot an image in a dark location or to shoot a subject
moving at high speed. (Note that the image may become noisy when the number is large.)
Setting
Sound
TV
On
Enable operation sound
Off
Disable operation sound
NTSC (60Hz) TV output setting is NTSC standard.
PAL (50Hz)
TV output setting is PAL standard.
6
Language
Format
English, Czech, Danish, Dutch, Finnish, French, German, Greek, Italian, Norwegian, Polish,
Portuguese, Russian, Swedish, Spanish, Turkish.
Format memory/ card
Yes
No
Do not format memory/ card
Time Setting
Set up Date and Time
Default Setting
Yes
Restore default factory setting
No
Do not restore default factory setting
6. Plug & Share
Install the bundled application software, ArcSoft MediaImpression, to
view the movies correctly on PC.
Connect the computer and camcorder with the supplied mini USB2.0
cable as shown.
Movies and pictures can be found on your computer at
“My Computer\Removable Disk\DCIM\100MEDIA.”
Under this folder, you can view, delete, move, or copy the recorded
movies and pictures you want.
Uploading Video Files to YouTube
You can also share the recorded
movies on YouTube website via the
built-in YouTube Direct application
which offers you an easy way to
upload your video clips to YouTube
instantly.
(For more detailed operational
instructions, please refer to User’s
Manual-Section 9 on the supplied CD.)
Install bundled ArcSoft Software
1. Insert the supplied CD into your computer’s CD-ROM drive.
2. The autorun screen appears. Then, click on [Install Application Software].
Follow the on-screen instructions to complete the installation.
ArcSoft MediaImpression is a user-friendly application that helps you
managing your media, burning your video into a DVD, and uploading your
videos to YouTube easily.
ArcSoft MediaConverter is a powerful application that converts multiple
video formats into compatible format with your camcorder.
7
About the battery pack
Use only batteries recommended by TOSHIBA as replacements. The battery
pack is lithium ion batteries, which can explode if not replaced, used, handled
or disposed of properly. Dispose of the battery as required by local ordinances
or regulations.
Charge the battery pack only in an ambient temperature between
5 and 35 degrees Celsius. Otherwise, the electrolyte solution might leak,
battery pack performance might deteriorate and the battery life might be
shortened.
Never install or remove the battery pack without first turning off the power and
disconnecting the AC adaptor.
Use only the product connected to an AC power source or optional TOSHIBA
Battery charger to charge the battery pack. Never attempt to charge the battery
pack with any other charger.
8