1
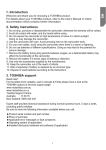
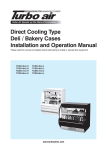
Introduction
Thank you for purchasing this Keychain Digital Photo Frame.
Please read this manual carefully FIRST in order to get the most
out of your device.
What your Digital Photo Frame includes:
•
Photo Frame
•
USB cable
•
User’s Manual
Computer System Requirements for Windows
To be able to download photos to your PC you will need the
following minimum configuration:
•
•
•
•
•
•
Windows XP/Vista (NOT Compatible with Mac)
Pentium-based PC (or equivalent)
150 MB hard disk free space and 128 MB or more
RAM
Available USB Interface
Color display (16 bit or higher recommended)
Screen resolution 1024 X 768
2
A Quick Look at Your Device
1. LCD screen
2. Power/Menu button
3. Page Up button
4. Page Down button
5. USB port
3
Preparing Your Device for Use
To charge battery for your photo frame
Your device has a built-in lithium battery. A red battery icon
will flicker on the LCD screen when your Photo Frame
battery is running low. After 10 seconds, your Photo Frame will
automatically turn off. You can recharge your lithium battery by
connecting your photo frame to the computer with the USB
cable.
Starting Your Digital Photo Frame
Power on Your Photo Frame:
Press and hold the Power/Menu button for about 3 seconds to
power on your Digital Photo Frame.
Note:
Please make sure that your Photo Frame has sufficient battery
power in order to operate properly.
Power Off Your Photo Frame
When your Photo Frame is turned on, press and hold the
Power/Menu button for about 3 seconds. On your LCD screen,
4
the message “Power Off” will appear, and your Photo Frame will
power off.
Viewing Different Photos On Your Photo Frame
If multiple photos are loaded on your Photo Frame, you can
press the Page Up or Page Down buttons to view different
photos on your LCD screen.
Exploring the Settings Options
To change or adjust any of the settings options for your Photo
Frame, first power on your Photo Frame, and then press the
Power/Menu button. On your LCD screen, you will see the
heading “Main Menu”, followed by a list of settings that can be
adjusted on your Photo Frame. Use the Page Up button or
Page Down button to scroll through the list of settings options.
When the setting you wish to adjust is highlighted, press the
Power/Menu button to make adjustments. Your Photo Frame
features the following settings which can be adjusted:
5
Main Menu
USB Connect
Slide Show
AUTO Off
LCD Contrast
Backlight
Display Clock
Set Clock
Delete One
Delete All
Exit
6
1. USB CONNECT
A. Press the Power/Menu button once.
B. Press the Page Up or Page Down button repeatedly until
USB CONNECT is highlighted.
C. Press the Power/Menu button to make adjustments to the
USB CONNECT setting.
USB CONNECT SETTINGS
YES: When YES is selected, you can connect your Photo Frame
to your computer in order to load photos on to your Photo
Frame.
NO: When NO is selected, your computer will not recognize
your Photo Frame and you will not be able to load photos from
your computer.
You can use the Page Up or Page Down buttons to highlight
YES or NO. You can press the Power/Menu to enter this
setting.
NOTE: The USB CONNECT option must be set to YES in order
to load photos from your computer onto your photo frame.
7
2. SLIDE SHOW
A. Press the Power/Menu button once.
B. Press the Page Up or Page Down button repeatedly until
SLIDE SHOW is highlighted.
C. Press the Power/Menu button to make adjustments to the
SLIDE SHOW setting.
SLIDE SHOW SETTINGS
The SLIDE SHOW SETTINGS allow you to choose the number of
seconds that each of your photos will be displayed. You can
choose anywhere between 0-15 seconds. Press the Page Up
button repeatedly to toggle through the amount of seconds
you’d like to select, and press the Power/Menu button to enter
the setting.
NOTE: By selecting 0 seconds, you will turn the slide
show off. Your Photo Frame will only display one photo
without periodically switching to others.
8
3. AUTO OFF
A. Press the Power/Menu button once.
B. Press the Page Up or Page Down button repeatedly until
AUTO OFF is highlighted.
C. Press the Power/Menu button to make adjustments to the
AUTO OFF setting.
AUTO OFF SETTINGS
The AUTO OFF SETTINGS allow you to choose the number of
minutes until your Photo Frame automatically shuts off in order
to save battery power. You can choose anywhere between 0-30
minutes. Press the Page Up button repeatedly to toggle
through the amount of minutes you’d like to select, and press
the Power/Menu button to enter the setting.
NOTE: By selecting 0 seconds, your Photo Frame will not
automatically turn off automatically. To turn it off, you will have
to manually turn off your Photo Frame.
4. LCD CONTRAST
A. Press the Power/Menu button once.
B. Press the Page Up or Page Down button repeatedly until
LCD CONTRAST is highlighted.
9
C. Press the Power/Menu button to make adjustments to the
LCD CONTRAST setting.
LCD CONTRAST SETTING
The LCD CONTRAST SETTINGS allow you to adjust the amount
of contrast shown on your LCD screen. You can choose
anywhere between levels 1 (low contrast) and 6 (high contrast).
Press the Page Up button repeatedly to toggle through the
amount of contrast you’d like to select, and press the
Power/Menu button to enter the setting.
5. BACKLIGHT
A. Press the Power/Menu button once.
B. Press the Page Up or Page Down button repeatedly until
BACKLIGHT is highlighted.
C. Press the Power/Menu button to make adjustments to the
BACKLIGHT setting.
10
BACKLIGHT SETTING
The BACKLIGHT SETTINGS allow you to adjust the strength of
backlighting on your LCD screen. You can choose anywhere
between levels 1 (very dark) and 21 (very bright). Press the
Page Up button repeatedly to toggle through the amount of
backlight you’d like to select, and press the Power/Menu
button to enter the setting.
6. DISPLAY CLOCK
A. Press the Power/Menu button once.
B. Press the Page Up or Page Down button repeatedly until
DISPLAY CLOCK is highlighted.
C. Press the Power/Menu button to turn on the DISPLAY
CLOCK.
By choosing the DISPLAY CLOCK option, your Photo Frame will
display the date, time and day of the week instead of showing
photos stored on your Photo Frame. By pressing the
Power/Menu button, you can go back to showing stored
photos.
11
7. SET CLOCK
A. Press the Power/Menu button once.
B. Press the Page Up or Page Down button repeatedly until
SET CLOCK is highlighted.
C. Press the Power/Menu button to make adjustments to the
CLOCK setting.
SET CLOCK SETTING
The SET CLOCK SETTING allows you to adjust the Display Clock
so that it displays accurate time and date information. To do so,
press the Page Up button or Page Down button to choose the
correct date or time setting, and press the Power/Menu button
to enter these settings.
8. DELETE ONE
A. Press the Power/Menu button once.
B. Press the Page Up or Page Down button repeatedly until
DELETE ONE is highlighted.
C. Press the Power/Menu button to make adjustments to the
DELETE ONE setting.
DELETE ONE SETTINGS
12
YES: When YES is selected, the last photo that has been loaded
on your Photo Frame will be deleted.
NO: When NO is selected, the last photo that has been loaded
on your Photo Frame will not be deleted.
You can use the Page Up or Page Down buttons to highlight
YES or NO. You can press the Power/Menu to enter this
setting.
9. DELETE ALL
A. Press the Power/Menu button once.
B. Press the Page Up or Page Down button repeatedly until
DELETE ALL is highlighted.
C. Press the Power/Menu button to make adjustments to the
DELETE ALL setting.
DELETE ALL SETTINGS
YES: When YES is selected, all photos that have been loaded on
your Photo Frame will be deleted.
13
NO: When NO is selected, all photos that have been loaded on
your Photo Frame will not be deleted.
You can use the Page Up or Page Down buttons to highlight
YES or NO. You can press the Power/Menu to enter this
setting.
10. EXIT
A. Press the Power/Menu button once.
B. Press the Page Up or Page Down button repeatedly until
EXIT is highlighted.
C. Press the Power/Menu button to EXIT the settings option
menu.
LOADING PHOTOS FROM YOUR COMPUTER ONTO YOUR
PHOTO FRAME
In order to load photos from your computer, simply connect
your Photo Frame to your computer by inserting one end of the
included USB connection cable to the USB port on your Photo
Frame, and the other end to an available USB port on your
computer. Make sure that you have the USB Connect setting
on your Photo Frame selected. To do so, follow the steps below:
14
USB CONNECT
A. Press the Power/Menu button once so that the Main Menu
appears on your Photo Frame.
B. Press the Page Up or Page Down button repeatedly until
USB CONNECT is highlighted.
C. Press the Power/Menu button to make adjustments to the
USB CONNECT setting.
USB CONNECT SETTINGS
YES: When YES is selected, you can connect your Photo Frame
to your computer in order to load photos on to your Photo
Frame.
NO: When NO is selected, your computer will not recognize
your Photo Frame and you will not be able to load photos from
your computer.
You can use the Page Up or Page Down buttons to highlight
YES or NO. You can press the Power/Menu to enter this
setting.
15
NOTE: The USB CONNECT option must be set to YES in order
to load photos from your computer onto your photo frame.
When your Photo Frame is connected to your computer, and the
USB CONNECT option is properly set, the LCD Screen of your
Photo Frame will display “USB CONNECT”.
USING DPFMate Software.
Once your Photo Frame is connected to your computer,
DPFMate software will automatically start. No additional
software disks are needed.
16
1. In the lower left hand corner of the screen, there is a
directory of files and folders on your computer. Find the picture
file you would like to load onto your Photo Frame and left click
on it with your mouse.
2. You can adjust the appearance of the photo you have
selected by clicking on the + (expand), - (contract), RotateL
(rotate left), RotateR (rotate right) or RECT buttons. The RECT
17
button automatically resizes your photo so it will fit in your
Photo Frame. After that the RECT button will change to Clear
button and when you click Clear button, the photo will get back
to its original size.
3. Click on the ADD button to add the photo to the right hand
column. All photos listed on the right hand column can be
added to your Photo Frame by clicking on the DOWNLOAD
button.
In the upper right hand corner of the screen you also have
options to SAVE (this saves a selected photo from your Photo
Frame to your computer), SAVEALL (this saves all photos on
your Photo Frame to your computer), EXIT (this exits the
DPFMate program), ALL (this highlights all the photos on your
Photo Frame), and DELETE (this deletes any unwanted photos
from your Photo Frame).
4. The setting button allows you to change the text color and
background color seen on the LCD screen of your Photo Frame.
NOTE: Do not unplug your Photo Frame while photos are being
transferred.
18
FCC Compliance
19
20
GFM Guarantee
If you are not totally satisfied with this GFM product,
you may return it to any Meijer store for a full refund
within 12 months (365) days of purchase when
accompanied by a receipt.
For customer support, please call (866) 845-9436 or go
to www.gfmprducts.com.
Dist. By Wholesale Merchandisers Inc.,
2929 Walker, NW.
Grand Rapids MI 49544
Made in China
21