1
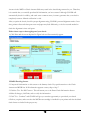
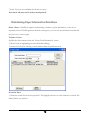
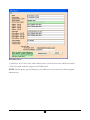
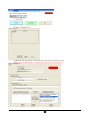
VERSION 8.0
We’ve got it wired.
Instruction Manual
TABLE OF CONTENTS
CHECK PRINTING SYSTEM FOR WINDOWS
Instruction Manual
© CHAX®, Inc.
606-A Venice Blvd.• Venice, CA 90291
Phone 310.827.4901 • Fax 310.827.7261
TABLE OF CONTENTS
CHAPTE R
1
CHAPTE R
Overview
6
ACH
CHAX®
1
What is ACH?
21
Package Contents
2
Initial ACH Setup in CHAX®
21
Technical Support
2
What are the different
classifications for ACH?
CHAPTE R
24
Entering ACH Transaction
2
Hardware & Software
Information
27
Requirements
Installation of CHAX®
3
CHAPTE R
Opening of CHAX®
4
Banks
Data File Backup
4
Overview of automatic bank
7
routing feature
CHAPTE R
29
3
CHAX® Setup
CHAPTE R
8
Opening CHAX®
6
Password & Users
CHAX® Startup Screen
6
Maintaining Users
31
Navigating through CHAX®
9
Assign Rights
32
Menu Items on Startup Screen
9
Buttons on Startup Screen
10
CHAPTE R
9
Transaction Reporter
CHAPTE R
4
Entering Control Information
Transaction Reporter
33
Purge Transactions
34
About the Control Entry Screen 11
Printer Setup
12
CHAPTE R
10
MICR Toner
CHAPTE R
MICR Toner
5
35
Creating Checks with CHAX®
About the Check Entry Screen
14
Entering Check Information
17
CHAPTE R 11
Proofing & Printing your Check 17
Encouraging Customer Use
Maintaining Payer Information
Encouraging Customer Use of
Data Base
19
CHAX®
36
Chapter
1
INTRODUCTION
CHAX®
The CHAX® software was created to not only accelerate the payment process but also provide the
user with a complete sense of security while this processing is occurring. There are times in your business when
it is important that you receive a payment immediately; in the past, you were at the mercy of your customers’
standard billing cycles and a host of delivery services. That was until CHAX®! Now you can take control of
the process and deposit the funds the same day your customer authorizes payment!
CHAX® allows you to create a check which can be deposited into your bank account as simply as any
ckeck. The law allows this as long as you have the permission of the payer (the party that would normally issue
the check).
Note: Although permission may be verbal MBS suggests that you receive specific authorization before creating
a check.
Your customer can either fax a copy of the check to you or give you the information you need over the
phone or through email correspondence, and then have them either file the check away or destroy the check.
Note: If this information is provided to you over the phone, make sure to have your customer read to you the
check number first and then the MICR numbers on the bottom of the check. You should tell them to mark
“VOID –CHAXed” on their copy of a check which they will retain. The payer should retain the original
check for his/her records, this original copy should never be deposited.
The key to CHAX® is that it prints a check containing the MICR characters, just as they appear on a regular
check. The American Bankers Association requires printing in accordance with specific standards, within very
tight tolerances. CHAX® offers a patented feature that ensures compliance with these tolerances.
CHAX® should not be used for Certified Checks, Bank Teller Checks, or Money Orders.
1
Package Contents (for New Purchase of Software)
•
CHAX® Version 8 Installation CD
•
20 Blank Economy check forms
•
License and Warranty Information
•
This Manual
Package Contents (for Upgrade of Software)
•
CHAX® Version 8 Installation CD
•
Upgrade Instructions
•
License and Warranty Information
•
This Manual
Technical Support
CHAX® offers free technical support for a period of six months after date of purchase of CHAX®. In order
to receive free technical support you must be a registered user. If you have any questions to which you cannot
find the answer within this manual, please contact a CHAX® representative at (800)354-6427 (Monday Friday: 9 AM - 5 PM Pacific Standard Time) or visit our website at www.chax.com.
2
Chapter
2
The following instructions are to be used to guide you through the installation of your
CHAX® software on various operating systems.
HARDWARE AND SOFTWARE REQUIREMENTS FOR
INSTALLATION
CHAX® requires the following equipment and software:
Recommended:
•
Windows 98SE, ME or XP
•
Windows NT4.5 or higher
•
Laser or other printer that supports TT fonts
•
100 MB (megabytes) free storage space
•
Minimum screen resolution of 800 x 600
•
2x CD-ROM drive
Installation of CHAX®
Installation is quick and easy with CHAX®. Before installing CHAX® you should verify that your
package contains all of the intended items (See Chapter 1), and that your system meets all requirements. For users
of Windows® XP, NT, 2000, or 2003, you must make sure you have administrative rights while installing the
software. After installation and during normal operation full administrative privileges are not required.
Complete the setup instructions on your screen, Start CHAX®, and you are ready to create your first check
using CHAX®.
To install CHAX®:
1. Shut down all programs that are running, including disabling virus protection programs.
2. Insert the CHAX® CD-Rom into your computer’s CD-Rom drive and let the installer begin.
3
3. Enter your serial number located on your CD-Rom sleeve, invoice or Chax® license agreement, when
prompted for it.
4. Toggle through the next few screens, until you reach the screen in which you can select your
destination folder. If you’re installing the software onto a network directory, this is the point where you
would click on the browse button and select that network path.
Note: You must have proper rights to create, add, and modify directories, as well as search them, and
remove files from the network path you are installing to as well as the local machine. The software
installs the executables on your local drive and places the databases files on your network path.
5. Once installation is complete, you can immediately access CHAX® and print a check with no reboot
necessary.
Opening of CHAX®
There are several methods of accessing CHAX® that are available after successful installation. Two quick
methods are explained below:
METHOD 1
a) Click on the CHAX8.EXE icon on your desktop
b) Click "Enter Checks" or "Enter ACH Items" and the "Entry " Screen will appear
METHOD 2
a) Click on your "Start" button in Windows
b) Go to "All Programs"
c) Select the CHAX Group
d) Select CHAX8.exe
e) Click "Enter Checks" or "Enter ACH Items" and the "Entry " Screen will appear
Data File Backup
It is always good practice to regularly backup all the important files on your disks. Since you may be
saving check batch data for later printing and/or databases of payers and payees, a loss of data could
4
cause considerable inconvenience. We strongly recommend that you review your back up procedures to
make sure that the CHAX® files are backed up sufficiently to meet your needs.
You can select where to have your database files (NOTE: The path you designate must be accessible by
your computer anytime you run CHAX®) during installation by clicking browse (shown below) and
navigating to the path:
If you have already installed CHAX® and want to change where the database files are placed:
1) Open CHAX®
2) Click on "SetUP"
3) Select "Change Database Path"
4) Select the new path and hit "OK"
5
Chapter
3
CHAX® SETUP
Opening CHAX®
After installing CHAX®, you can open the software by either selecting the CHAX8.EXE file placed
on your desktop or by clicking on your Start button, then All Programs, CHAX, CHAX8.EXE.
CHAX® Startup Screen
This is the CHAX® Startup Screen
On the following page are descriptions for each selectable field on this screen
6
Payee – This is where you can select which payee to use while creating a check, and add the necessary
information for this specific payee to be able to use the ACH feature of CHAX®. If you would like to use a
payee other than the default payee, then select the payee and click on exit. You will now override the default
payee for one check only or you can enter Payees that will be available in the future. This might be used if you
are creating checks to be paid for services rendered by your subsidiary.
Start typing the name of
the payee and payees
will fill the list. Double
click on the selection to
select a payee
Click on appropriate
button
Payee Screen
¾ You can add an unlimited number of Payees
¾ Each Payee should have unique information
¾ In order to change or select a payee you must have been assigned rights to do
so.
¾ If you wish to add, delete or change a payee double click on the appropriate
button and enter the information
¾ When you exit this window you will be given the chance to make the selected
payee the default
7
¾ ACH Account ID must be entered if you want to use this payee for ACH
transactions. This ID has already been given to you by your financial institution,
if you are unsure of it, contact your financial institution for assistance in
determining this number.
¾ SEC (Standard Entry Class) is setup in the password screen. Click on the drop
menu to select the appropriate class.
Note: If you have not already designated the Entry Classes available to this
user, the drop down menu will be empt when clicked. To select the appropriate class
follow these steps (click here).
SetUP – This is where you can setup for printing preferences while using CHAX®
Maintain Users – In this section, you can add/update/delete users that can use CHAX®. You
may also set specific permissions per user profile.
Transmit ACH – Transmit ACH allows you to view and transmit any pending/failed ACH
transactions.
Transaction Reports – In transaction reports, you can generate any number of
printed/transmitted checks or ACH transactions. You can view the report by payer or date.
Archive – From this section, you can generate an archive file of previous transactions. You can
save the record by transaction number or any and all transactions up to a certain date. NOTE:
Generating the archived transactions removes them from the transaction database.
Reindex – Reindexing rebuilds and compresses ALL the databases. NOTE: Be sure to create a
backup of all your databases before using the Reindex feature.
Help – Opens this help file.
Exit - Exit: Exits the main program.
Enter Checks – Accepts and saves your entries and returns you to the main CHAX screen,
Enter Check Information.
Enter ACH Items – Accepts and saves your entries and returns you to the main CHAX screen,
Enter Check Information.
8
Navigating through CHAX®
Although it is easiest to operate CHAX® using a mouse, it is not essential. You can also move the cursor
by using the keypad.
Here are some tips to help you move around CHAX® using only your keypad:
1.) Use the Tab Key and the Reverse Tab Key (hold the Shift Key down while pressing the Tab Key) to
move respectively forwards and backwards from field to field.
2.) To enter data into a field press the Enter Key or the Tab Key.
Menu Items on Startup Screen
Payee: This is where you can select which payee to use while creating a check or ACH entry. If you
would like to use a payee other than the default payee, then select the payee and click on exit. You will
now override the default payee for one check only or you can enter Payees that will be available in the
future. This might be used if you are creating checks to be to be deposited to other Payee/Bank
accounts.
SetUP: This is where you can setup for printing preferences while using CHAX®.
Maintain Users: This is where you can manage your users, such as: adding or deleting users, enabling
security, restricting certain features for specific users.
Transaction Reports: As CHAX® items are produced, an entry for each is added to the transaction
database. The Transaction Reporter is provided for viewing and maintaining this Transaction database.
Archive: This is where you archive (move to another file for long term storage) transactions that have
taken place while using CHAX®. You must make sure that you're the only one accessing your CHAX®
software or database files when you do this. You will not be able to reverse this process. Items moved to
an archive file are no longer accessible for automatic population of data to screen nor for automatic
duplicate check number checking. Make sure you have a backup before archiving.
Reindex: This is where you can reindex your database files. This is useful for maintenance purposes of
your database. Before running we strongly recommend that you have a backup of the databases.
Exit: Exit the software
Help: Brings you to this help file
9
Buttons on Startup Screen
Enter Checks: Will take you to the main check entry screen for CHAX®.
Enter ACH Items: Will take you the screen to enter ACH transactions.
Note: You must make sure to that the active payee has an ACH account number entered before selecting
this button.
EXIT: Exits the program.
10
Chapter
4
ENTERING CONTROL INFORMATION
About the Control Entry Screen
MENU ITEMS
Printers: Gives you access to information about the MICR default printer. Within Printers, you
can select a different printer for your checks.
Check Style: Choose either Economy Checks or Safety Checks.
Enter Serial Number: This is where you can change/update the serial number associated with this
computer's installed CHAX® software.
Signature Message: Choose between two messages that prints below the signature line for your check
printout.
Help: Opens the help file.
BUTTONS
OK/Exit: Accepts and saves your entries and returns you to the main CHAX® screen.
Print Test: Prints a test check showing the defaults you have entered and the alignment marks for proper
positioning.
Reset Offsets: Resets the Print Offsets to their status the last time you chose OK/Exit and saved your
settings.
Printer Setup
Follow these steps to setup your printer in CHAX®:
1. Enter Print Offset measurements which determine the vertical and horizontal position of the check on
the form. Although the default is set at 0.38 vertical and 0.38 horizontal, these measurements will vary
for each printer. Adjust the measurements for your printer by following these guidelines.
1.0 = one inch of movement. 0.1 = 1/10 inch of movement
Increasing the vertical number moves the image down, decreasing it moves the image up.
Increasing the horizontal number moves the image to the right, decreasing it moves the image
left.
If decreasing either the vertical or horizontal measurement to zero does not move the image
enough upwards or to the left, then use a leading minus sign to move it further.
2. Verify that the Device Name and Device Output fields indicate the appropriate MICR printer and
port. CHAX® will automatically set a default printer based on your previous settings (The first time you
use CHAX® will set the printer to the system default printer), so it is likely that you will only need to
verify these fields and not have to change them.
12
Skip steps 3-5 unless you need to change the Device Name or Device Output field.
3. Select the Printers menu item to select a printer other than the default printer and port. The Print
Setup Window will appear. See Figure below.
Print Setup Window.
4. Scroll to the desired printer in the Specific Printer text box and the printer and its port will
automatically appear in the Device Name and Device Output fields.
Do not change the Orientation from Portrait or the paper size from 8 ½ x11; they are the correct
settings for proper printing.
5. Choose the tray as the source for blank check forms
6. Choose OK.
7. Click the Print Test button to print a sample check. Make sure both sets of alignment marks straddle
the top perforation and that the box evenly surrounds the word ‘date’. .
8. If your check is not aligned properly, adjust the Printer Offset fields (see Step 1) and select Print Test.
Repeat this procedure until the check is properly aligned.
13
Chapter
5
CREATING CHECKS WITH CHAX®
About the Check Entry Screen
Enter Check Information Screen.
Note: Fields in yellow are required, those in white are optional.
MENU ITEMS
Payee: Allows you to create a check with a payee other than the default payee. This field will override
the default payee for one check only or you can enter Payees that will be available in the future. This
might be used if you are creating checks to be paid for services rendered by your subsidiary.
14
Payee Screen
1. In order to change or select a payee you must have been assigned rights to do so. (See Password
Changes.)
2. If you wish to add, delete or change a payee, double click on the appropriate button and enter the
information
3. When you exit this window you will be given the chance to make the selected payee the default
Batch Print: Accesses the batch printing functions. This allows you to save the actual printing of the
checks until some convenient time. By clicking on "Enabled," you activate the batch printing feature
which will save the information for each check into a batch file on your disk. You save the check to the
batch file by clicking "Print to Batch." Click "Print Batch" to print the checks that have been previously
saved.
15
•
If there are still checks saved in the batch file on disk, you will be reminded that there are checks
to be printed in the batch when you exit from CHAX® and when you re-enter CHAX®. If there
are previous checks to be printed in this batch file, entering new checks in the Batch Print
Enabled mode will just add to the batch saved.
•
After printing the batch of saved checks (Batch Print - Print Batch) the batch file is deleted and
the saved check information is no longer available for printing except in the transaction reports.
Manage Memorized: Let's you access, edit, or delete transactions you completed in CHAX® and
previously had CHAX® memorized.
Note: Before using this, you must have previously "Memorized" some checks.
Exit: Lets you exit either the check entry screen or the entire CHAX® Program.
•
Do not exit CHAX® if you are in the middle of creating a check. When you exit, your
current incomplete entry will be lost. If you are interrupted and need to work on something else,
minimize the window by clicking the minimize button in the upper right-hand corner. To resume
your work just click on the CHAX® icon.
BUTTONS
Print: Starts the print/save process which will display the check for visual inspection/confirmation
before printing it.
•
Inspect all information carefully, especially the Check Amount and the MICR line.
•
After you confirm that the check information is correct, all entry fields will be cleared to prepare
for creation of a new check.
Clear: Cancels all entries and returns them to their default settings.
Memorize: After entering all check information, click here to save the check information for periodic
check printing. (i.e. Daily, Weekly, Monthly, Yearly.)
Exit: Exits the CHAX® Entry screen. See the Exit menu item for more details.
Change Payee: This is where you can select which payee to use while creating a check. If you would like
to use a payee other than the default payee, then select the payee and click on exit. You may now override
the default payee for one check only or you can enter Payees that will be available in the future. This
might be used if you are creating checks to a subsidiary or client.
16
Entering Check Information
Note only those fields shown in yellow are required.
Enter Check Information Screen: Follow these steps to complete this screen and create a check.
1. Enter the Payer Name (address and telephone number are optional).
2. The Bank Name field is generated automatically from the Routing Number.
2. Enter the Check Number as it appears on the dummy check.
3. Select or enter the date of the check to be paid. (When using the calendar view, select the day of the
month to continue. When manually entering the check date, the format is MM/DD/YYYY)
4. Enter the EXACT amount for the check. If the amount is not exactly as it appears on the dummy
check then you must obtain additional permission from the payer.
5. OPTIONAL. In the Memo field you can type a note to help you and the payer keep accurate records.
For example you could type “1st Installment - Aluminum Siding” to remind you and your customer of
the purpose of the check.
6. Complete the routing number. (If you receive an error, double check the routing number.)
7. Enter the Account Number as it shows on the check.
Proofing & Printing your Check
It is critical that you verify the layout and contents of your check.
17
An error in the MICR or Check Amount fields may result in the check being returned to you. Therefore,
it is essential that you carefully proofread all information you have entered. Although CHAX® will
automatically check for validity, and catch some common errors, it cannot guarantee that your check is
completely accurate. Manual verification is vital.
After you print the check, check for proper alignment using CHAX®’s patented alignment marks. Over
time, printer rollers and other parts wear and paper may feed differently, so the few seconds needed to
check the alignment is time well spent.
Follow these steps to thoroughly proof your check:
1.) Click Print and the screen depicted in Figure below will automatically appear.
CHAX® Proofing Screen:
2. Compare all information on this screen to the dummy check. Pay special attention to the Check
Amount and MICR line. If all information appears correct, skip to Step 7.
3. Click the "No - Re-Edit" button. This will return you to the Enter Check Information Screen.
4. Make all changes, click Print, and re-verify the information.
5. Click "Yes - Continue" and CHAX® will give you another opportunity to proofread your check.
6. Before you print, make sure that the MICR toner cartridge is installed in your printer and that the blank
check forms are loaded in the proper tray.
18
7. Select Yes if you are confident that all data is correct.
Your check will print and is ready to be deposited!
Maintaining Payer Information Data Base
Select a Payer: CHAX® is capable of maintaining a database of payer information, so that if you
repeatedly receive CHAX® payments from the same payees, you can save the information entered and
thus not have to enter it again.
To Select a Payer
1.) Click the Select function from the “Enter Check Information” screen
2.) Pick a Payer by highlighting an entry and double clicking.
3.) Search for a Payer by selecting a search method from the pull down arrow
Search for Payer
1.) Enter the search data in the box provided. The highlight will move as each character is entered. The
Name Field is case sensitive.
19
Add (Edit) Payer
1.) Add Payer If you click on the Add or Edit buttons you will be shown the Add Payer window.
2.) Fill in the fields needed to prepare the CHAX® check.
NOTE: The Frequency type and Frequency days fields are not used and are for future program
enhancements.
20
Chapter
6
ACH
Á
What is ACH?
The Automated Clearing House (ACH) is a nationwide electronic funds transfer (EFT) system
that facilitates the inter-bank clearing of credit and debit transactions and information exchanges
among participating financial institutions.
ACH is one of the groups of processing institutions that have networked to exchange (clear and
settle) electronic transactions. According to Computer World magazine, “The Automated
Clearing House is a secure, private electronic payment transfer system that connects all U.S.
financial institutions. Direct paycheck deposits and debit card purchases are two examples of
electronic fund transfers that go through this network.” Other typical ACH payments include
salaries, recurring bill payments, and Social Security benefits.
“Executing ACH payments is cheaper and faster than processing paper checks. Both business-tobusiness and business-to-consumer e-commerce activities are becoming ever more dependent on
the ACH system, thus forcing it to evolve,” notes Computer World.
According to the Federal Reserve Bank of New York, “In 2000, over 4.8 billion payments with a
total value of more than $12 trillion were processed by ACHs through the Federal Reserve
System.”
Á
Initial ACH Setup in CHAX®
Before accessing the ACH feature for CHAX®, you must follow these steps:
1. Open the CHAX® software
2. Select "Maintain Users" in the tool bar
21
3. Select "Update User"
4. Double click the proper ACH Entry Class selection(s) for this account
Note: After double clicking,your selection(s) will move to the left field.
22
5. Now click "Complete Update." You will now be taken back to the CHAX® main screen.
6. Click on Payee in the toolbar.
7. Select your Payee from the list.
8. Enter the ACH Account ID for this account in it's assigned field.
9. Click the drop menu for the default Entry Class and select the appropriate class for this Payee.
23
Á
What are the different classifications for ACH?
TEL - TELEPHONE INITIATED ENTRY: A SINGLE TRANSACTION
DEBIT TO A CUSTOMER'S ACCOUNT THAT WAS INITIATED AND
AUTHORIZED BY TELEPHONE.
WEB - INTERNET-INITIATED ENTRY: TRANSACTIONS (EITHER
RECURRING OR SINGLE ENTRY) THAT WERE AUTHORIZED THROUGH
THE WEB BY A CUSTOMER OR CUSTOMER'S REPRESENTATIVE.
ARC - ACCOUNTS RECEIVABLE ENTRY: SINGLE ENTRY
TRANSACTIONS THAT CONVERTS CONSUMER CHECKS RECEIVED VIA
U.S. MAIL OR DROP-BOX LOCATION, INTO SINGLE ENTRY ACH
TRANSACTIONS.
RETURNED CHECK RE-SUBMISSION: CHECKS OR TRANSACTIONS
THAT HAVE TO BE RE-SUBMITTED THROUGH ACH DUE TO PREVIOUS
MISCUES (I.E. INSUFFICIENT FUNDS, OR INVALID ACCOUNT
INFORMATION.)
DESTROYED CHECK ENTRY: SINGLE ENTRY OF A PHYSICAL CHECK
THROUGH ACH THAT WAS DESTROYED BECAUSE OF A DISASTER.
CONSUMER OR CORPORATE ENTRY: A DEBIT TRANSACTION MADE
THROUGH THE ACH SYSTEM TO A DEMAND DEPOSIT ACCOUNT USING
THE CCD PAYMENT FORMAT.
Á
ACH Entry Screen
24
Enter Check Information Screen.
Note: Fields in yellow are required, those in white are optional.
ACH Transactions Purchased: Located in the upper right hand corner of the screen, if enabled
(disabled in the above picture) this box will show you the number of ACH Transactions that you have
authorized.
Account Type: Located in the lower right hand corner of the screen, this feature lets you select if the
account you are currently working with is either a Business Checking Account, Consumer Account or a
MM/Savings Account.
Note: Fields in yellow are required, those in white are optional.
MENU ITEMS
Payee: Allows you to create a check with a payee other than the default payee. This field will override
the default payee for one check only or you can enter Payees that will be available in the future. This
might be used if you are creating checks to be paid for services rendered by your subsidiary.
25
Payee Screen
1. In order to change or select a payee you must have been assigned rights to do so. (See Password
Changes.)
2. If you wish to add, delete or change a payee, double click on the appropriate button and enter the
information
3. When you exit this window you will be given the chance to make the selected payee the default
Batch Print: Accesses the batch printing functions. This allows you to save the actual printing of the
checks until some convenient time. By clicking on "Enabled," you activate the batch printing feature
which will save the information for each check into a batch file on your disk. You save the check to the
batch file by clicking "Print to Batch." Click "Print Batch" to print the checks that have been previously
saved.
♦ If there are still checks saved in the batch file on disk, you will be reminded that there are checks to be
printed in the batch when you exit from CHAX® and when you re-enter CHAX®. If there are previous
checks to be printed in this batch file, entering new checks in the Batch Print Enabled mode will just add
to the batch saved.
♦ After printing the batch of saved checks (Batch Print - Print Batch) the batch file is deleted and the
saved check information is no longer available for printing except in the transaction reports.
Manage Memorized: Let's you access, edit, or delete transactions you completed in CHAX® and
previously had CHAX® memorized.
Note: Before using this, you must have previously "Memorized" some checks.
Exit: Lets you exit either the check entry screen or the entire CHAX® Program.
♦ Do not exit CHAX® if you are in the middle of creating a check. When you exit, your current
incomplete entry will be lost. If you are interrupted and need to work on something else, minimize the
window by clicking the minimize button in the upper right-hand corner. To resume your work just click
on the CHAX® icon.
BUTTONS
Print: Starts the print/save process which will display the check for visual inspection/confirmation
before printing it.
♦ Inspect all information carefully, especially the Check Amount and the MICR line.
♦ After you confirm that the check information is correct, all entry fields will be cleared to prepare for
creation of a new check.
26
Clear: Cancels all entries and returns them to their default settings.
Memorize: After entering all check information, click here to save the check information for periodic
check printing. (i.e. Daily, Weekly, Monthly, Yearly.)
Exit: Exits the CHAX® Entry screen. See the Exit menu item for more details.
Change Payee: This is where you can select which payee to use while creating a check. If you would like
to use a payee other than the default payee, then select the payee and click on exit. You may now override
the default payee for one check only or you can enter Payees that will be available in the future. This
might be used if you are creating checks to a subsidiary or client.
Entering ACH Transaction Information
Transaction Number: Enter the Transaction Number for this specific transaction.
Note: If you are generating payments for periodic entries, you should be aware that many banks
verify check numbers to determine if it was a previously used number and may reject a check if
this number duplicates a check number from past activity for the same payer bank account.
Payer Name and Address: Enter the payer information from the original check. The payer is the party
paying for your products or services. The payer's name is required, and the payer's address is optional.
Bank Name: This is automatically filled when you add your routing number.
27
Routing Number: The routing number from the original check. Enter it exactly as it is on the check.
Enter the 9-digit bank routing number which is surrounded by 2 routing symbols. When you move from
this field, the bank name will automatically be inserted into the BANK NAME field. If it does not exist
on the database, chances are that it is an error. If you are sure it is not an error, you will be able to type a
bank name and override the error message.
Account Number: Enter the customer’s bank account number. Do not enter the special MICR
symbols. Enter the check number only in the check number entry box. The only special symbol you
should enter is the “-“ (dash). If you had a previous transaction for this same bank account, the screen
will automatically populate from the transaction file. Note that this only occurs from items in the
transaction database. If you have moved items to the archive database, be aware that the archived data is
not checked for previous activity for the same account number.
Note: CHAX® will automatically check the MICR code at the time you enter it, to attempt
to move to the next field. If CHAX® detects an error, it will inform you with an error
message. Although CHAX®’s screening may detect many common errors, it will not
necessarily detect all typos. It is still necessary for you to double-check this entry when
you proof your check.
Date: Enter the Date (required) as it appears on the dummy check, in the MM/DD/YYYY format or
click on the Calendar to select the appropriate check date.
Amount: Enter the exact Check Amount. If the amount is not exactly as it appears on the dummy check
then you must obtain additional permission from the payer. Do not enter the dollar ($) sign, use only
numerals with decimal points.
28
Chapter
7
BANKS
Á
Overview of automatic bank routing feature
CHAX® 8.0 includes a feature that will automatically maintain and update the routing information for
banks nationwide, so when you enter your routing number into the software, it will automatically generate
the correct banking information for your financial institution. Since an updated file is available
approximately every 30 days, a download screen will appear approximately 30 days after the last update.
To update your locally stored file, simply click "Download" on this screen:
29
After you've downloaded the banking information and print a check, your bank name and transit number
will be populated automatically, as shown below:
30
Chapter
8
PASSWORDS & USERS
Maintaining Users
Maintain User: Accesses the Security Permissions Screen. Use this to add users, to change passwords,
and assign rights to users. When the system is first set up, the user id - "admin" and password is
"masteradmin" (not case sensitive.) If the password is blank, no password is needed to access the
system. Once you change your password, be sure to write it down and store in a safe place, or you will
not be able to access the CHAX® system without entering the proper password. When changing the
password enter any combination of letters or numbers (no spaces or special characters). You will be
requested to type it again. Only if the first typing agrees with the second will the new password be
accepted and take effect. You will only be allowed to change those items that you have rights to.
NOTE: Should you wish to remove the password, just enter a blank password.
31
Assign Rights
You must be signed into CHAX® with supervisory rights to add/update users or to change
access rights for any user.
For each individual user you can assign the rights that would allow them to either participate or
not participate in these features:
Supervisory: allows the user full access to all privileges in CHAX®
Select Payers: allows the user to select from all the payers in the database.
Maintain Payers: allows the user to edit/delete payers from the database.
Run Transaction Reports: allows the user to create transaction reports.
Print Batch Checks: allows the user to print batch checks.
Purge Transactions: allows the user to purge/delete unwanted transactions.
Enter Repetitive Checks:
Permit ACH Transactions: allows the user to generate ACH transactions.
Permit CHAX® Check Entry: allows the user to enter/print a CHAX® check.
32
Chapter
9
TRANSACTION REPORTER
Transaction Reporter
As CHAX® checks are produced, an entry for each check is added to the transaction database. The
Transaction Reporter is provided for viewing and maintaining this Transaction database.
33
Select File to Use
You can select between transaction databases. If you have previously moved some transactions to an
archive database, you may select one of those archive files as input to the transaction reporter, or you can
use the "current transaction file."
You can sort your report by Date, or Payer. To setup Restriction guidelines, select which type of
transactions to include in the report, as well as, the date range.
Click on OK to print a transaction report. The report will first display on screen, then you will have an
option to print it.
Purge Transactions
Use the Purge Transaction function to remove obsolete Transactions.
NOTE: You must have supervisory rights to perform this function.
34
Chapter
10
MICR TONER
MICR Toner
MICR (Magnetic Ink Character Recognition) toner is not legally required to produce a valid check. However, the
U.S. banking system uses special equipment for reading and sorting check documents that require certain magnetic
properties to properly process a check. If you do not use the special MICR toner in your printer, it is possible that the
banks will have to add a special additional strip on the bottom of the check which they would manually encode with
MICR characters. This costs the bank extra time and thus extra expense. The bank may charge you and or your
customer for this extra expense of processing the checks. In some instances banks have returned such checks unpaid
because they were not encoded with MICR toner. If you use special MICR toner offered for sale by Micro Business
Software, (1-800-354-MICR) you will insure your CHAX checks meet the American Bank Association standards
(ANSI X9.27 standard) and thus can be processed by the banks without any additional intervention.
35
Chapter
11
ENCOURAGING CUSTOMER USE
Encouraging Customer Use of CHAX®
Some of your customers may have questions about the use of CHAX®. We suggest that you explain the
benefits of using CHAX® to send the funds. Use the following explanations as appropriate for an individual
situation:
CHAX® checks are safer than regular checks. When you send a CHAX® check you are providing no more
information than if you mailed the check. Checks can be intercepted or lost in the mail. CHAX® are sent by fax
and thus you have positive, instant confirmation of their receipt. CHAX® checks look different from regular
checks and so cannot be easily cashed but must be deposited into a bank account, leaving an audit trail.
You control your money. You control the float. You can send the CHAX® checks on the day you wish to
release the funds. You no longer have to build in extra time to cover delays.
You can eliminate the need to use expensive overnight delivery service when you have to get a check delivered in
a hurry.
If you have merchandise on hold for receipt of funds, you can have it shipped the same day.
You can avoid COD charges and the problems of having to leave the check ready and waiting for the trucker.
Using CHAX® checks instead of credit cards will not tie up your credit card's available credit and will avoid the
hassles of getting reimbursed for business purchases.
Keep your accounting simple. CHAX® checks are generated by you just like regular checks (you create
a regular check, fax it, and retain the original for your records). If you use CHAX® instead of your
credit card, you won't have to analyze and allocate your credit card account statement for tax and audit
36