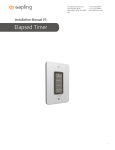
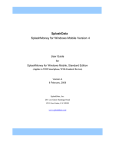
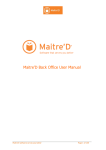
1
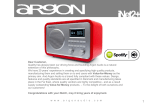
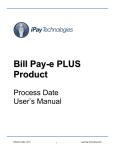
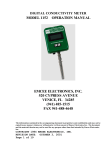
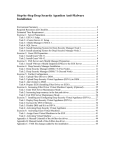
Checks by Fax/Phone System
for Windows
User Manual
⎯⎯⎯⎯⎯
606-A Venice Blvd.
Venice, CA 90291
310-827-4901
FAX 310-827-7261
V7.x.1
© Copyright 1995 - 2002 by Micro Business Software - All rights reserved
Patent 5,347,302 & Patents Pending
V7.x
2
Serial Number _______________
Table of Contents
Chapter 1: Introduction
Overview................................................................................................................ 3
Package Contents................................................................................................... 3
Technical Support .................................................................................................. 4
Navigating through CHAX™ ................................................................................. 4
Accessing CHAX................................................................................................... 4
Chapter 2: Installation
System Requirements............................................................................................. 5
Hardware Setup...................................................................................................... 5
Installation ............................................................................................................. 6
Chapter 3: Entering Control Information
About the Screen.................................................................................................... 7
Entering Information.............................................................................................. 8
Chapter 4: Creating Checks with CHAX
Enter Check Information...................................................................................... 11
About the Screen ........................................................................................... 11
Entering Information ..................................................................................... 14
Proofing & Printing your Check......................................................................... 16
Maintaining Payer Information Data Base........................................................... 17
Chapter 5: Transaction Reporter Program
Transaction Reporter............................................................................................ 20
Purge Transactions............................................................................................... 22
Chapter 6: Back up Your Data
Back up Your Data Files...................................................................................... 23
Appendices:
A. Encouraging Customer use of CHAX............................................................ 24
B. MICR Toner ................................................................................................... 25
C. Upgrading....................................................................................................... 26
D. Example of Authorization Request ................................................................ 27
V7.x
3
Chapter 1: Introduction
Overview
This software was created to accelerate the payment process. There are times in your
business when it is important that you receive a payment immediately. In the past, you
were at the mercy of your customers’ standard billing cycles and a host of delivery
services. With CHAX you can take control of the process and deposit the funds the same
day your customer authorizes payment!
CHAX allows you to create a check which can be deposited into your bank account as if
it were any other check. The law allows this as long as you have the permission of the
payer, the party that would normally issue the check.
Although permission may be verbal MBS suggests that you receive specific authorization
before creating a check. Your customer can either fax a copy of the check to you or give
you the information you need over the phone or through email. If on the phone have
your customer read to you the check number first and then the MICR numbers on the
bottom of the check. You should tell them to mark “VOID –CHAXed” on their copy of a
check which they will retain. The payer should retain the original check for his/her
records, this original copy should never be deposited.
The key to CHAX is that it prints a check containing the MICR characters, just as they
appear on a regular check. The American Bankers Association requires printing in
accordance with specific standards, within very tight tolerances. CHAX offers a patented
feature that ensures compliance with these tolerances.
CHAX should not be used for Certified Checks, Bank Teller Checks, or Money
Orders.
Package Contents
•
CHAX Installation CD
•
20 Blank Check forms
•
Registration Form (note, if software was purchased directly from MBS then you are
automatically registered and no registration form is enclosed)
•
License and Warranty Information
•
This Manual
If you are missing any one of these items please contact MBS immediately.
V7.x
4
Technical Support
Micro Business Software offers free technical support for a period of one month after
date of purchase of CHAX. In order to receive free technical support you must be a
registered user. If you have any questions to which you cannot find the answer within
this manual, please contact an MBS representative at 310-827-4901 (Monday - Friday: 9
AM - 5 PM Pacific Time).
Navigating through CHAX
Although it is easiest to operate CHAX using a mouse; it is not essential. You can also
move the cursor by using the keypad. Here are some tips to help you move around
CHAX using only your keypad:
•
Use the Tab Key and the Reverse Tab Key (hold the Shift Key down while pressing
the Tab Key) to move respectively forwards and backwards from field to field.
•
To enter data into a field press the Enter Key or the Tab Key.
•
To select a command button or menu item depress the Alt Key while typing the
appropriate letter. For example, to enter SetUP from the Enter Check Information
Screen, hold down the Alt Key while pressing the letter S.
Accessing CHAX
After successful installation (see Chapter 2).
•
Click on the newly-created CHAX program group on your main desktop or use the
newly created shortcut on your desktop.
•
Click on the CHAX icon. See Figure 1-1.
•
Choose OK and the ‘Enter Check Information’ Screen will appear.
Figure 1-1.
V7.x
5
Chapter 2: Installation
Installation is quick and easy with CHAX. Before installing CHAX you should verify
that your package contains all items (See Chapter 1), and that your system meets all
requirements. Then install the software CD into your CD-Rom reader. In most cases the
install program will automatically start. Should it not start by itself click on Start, Run,
and browse to the setup.exe file on your CD-Rom drive. Complete the setup instructions
on your screen, Start CHAX®, and you are ready to create your first check.
System Requirements
•
IBM-compatible PC
•
Windows 95 or higher
•
Laser Printer
•
MICR toner cartridge is optional (see below).
Hardware Setup
Although the banking industry prefers that all checks be created with a MICR encoding
that meets the American Bank Association and ANSI standards, it is not strictly legally
required. If you process checks without special MICR toner in your printer there is a
chance that the banks will have to do extra processing (attach an added strip to the bottom
of the check with the MICR codes printed in MICR compatible ink). In such cases it is
within the banks rights to charge their customer for this extra processing. Some banks
may reject such non MICR encoded checks entirely, while others may just delay the
processing.
It is therefore recommended that you use a MICR toner cartridge. If you do not already
have one, you may purchase one from MBS. Please follow your printer’s instructions for
installing the special toner cartridge.
A MICR toner cartridge is different from others because the toner powder has magnetic
properties.
* Although it is not mandatory, we suggest that you keep this toner cartridge in at all
times. MICR toner will not make your other documents look any differently than if
they were printed with standard toner, and the prices of both toners are comparable.
If you take the MICR toner out after printing a check, the next time you go to print a
check you must remember to replace the toner. If you do not, your bank may not
accept the check, your payment may be delayed, and a service charge may be applied
to your or your customer’s account. Toner cartridges are delicate and light
sensitive. Repeated removal and insertion may damage them.
V7.x
6
* Replace the toner cartridge as soon as required (as suggested in your printer’s
instructions). This will help insure that checks can be mechanically processed
through bank check processing equipment.
Installation
Follow these steps for proper installation:
1.
Exit (close) all open/running programs.
2.
Login to your computer with administrative (supervisory) rights.
3.
Insert the CHAX Installation CD in your CD drive.
4.
If the CHAX installation doesn’t automatically start click START > Run on the
Windows taskbar.
5.
Type drive:\AUTORUN, where drive is the drive letter of your CD-ROM drive.
6.
Click OK.
7.
Follow the on-screen installation instructions.
8.
When asked to select the location accept the default unless you are installing
CHAX® to be used on a network in a shared environment or are upgrading from a
previous version. If so browse to the previously established folder location.
11.
CHAX will now copy all files to the location you just indicated. This should take a
few moments.
12.
CHAX will notify you when installation is complete.
V7.x
7
Chapter 3: Enter Control Information
Before you begin inputting the data to be printed on your check you should input default
settings on the ‘Enter Control Information’ screen. Control Information determines the
payee and printer default settings for all future checks. CHAX is flexible. You can
easily override these default settings to create new, non-standard checks. Generally you
should only need to enter Control Information one time before you create your first
check.
If you are not certain how to launch CHAX refer to Accessing CHAX in Chapter 1.
Access the Enter Control Information Screen by selecting Setup from the menu bar
on the Enter Check Information Screen. The Enter Control Information Screen will
appear.
Menu
Items
Buttons
Figure 3-1: Enter Control Information Screen.
About the Screen
There are three buttons and one menu item available on the Enter Control Information
Screen:
MENU ITEM
Printers: gives you access to information about the MICR default printer. Within
Printers you can select a different printer for your checks.
BUTTONS
OK: accepts and saves your entries and returns you to the main CHAX screen, Enter
Check Information.
V7.x
8
Print Test: prints a test check showing the defaults you have entered and the alignment
marks for proper positioning.
Reset Settings: resets all fields (except the printer) to their status the last time you chose
OK and saved your settings.
Entering Information
Follow these steps to enter all information:
1.
2.
Enter Print Offset measurements which determine the vertical and horizontal
position of the check on the form. Although the default is set at 0200 vertical and
0200 horizontal, these measurements will vary for each printer. Adjust the
measurements for your printer by following these guidelines.
•
720 equals one inch of movement.
•
Increasing the vertical number moves the image down, decreasing it moves the
image up.
•
Increasing the horizontal number moves the image to the right, decreasing it
moves the image left.
•
If decreasing either the vertical or horizontal measurement to zero does not
move the image enough upwards or to the left, then use a leading minus sign to
move it further.
Verify that the Device Name and Device Output fields indicate the appropriate
MICR printer and port. CHAX will automatically set a default printer based on
your previous settings (The first time CHAX will set the printer to the system
default printer), so it is likely that you will only need to verify these fields and not
have to change them.
Skip steps 6-8 unless you need to change the Device Name or Device Output field.
6.
Select the Printers menu item to select a printer other than the default printer and
port. The Print Setup Window will appear. See Figure 3-2.
Figure 3-2: Print Setup Window.
V7.x
9
7.
Scroll to the desired printer in the Specific Printer text box and the printer and its
port will automatically appear in the Device Name and Device Output fields.
*
Do not change the Orientation from Portrait or the paper size from 8 ½ x11;
they are the correct settings for proper printing.
8.
Choose the tray as the source for blank check forms.
8.
Choose OK.
9.
Click the Print Test button to print a sample check. Make sure both sets of
alignment marks straddle the top perforation and that the box evenly surrounds the
word ‘date’. See Figure 3-3 for proper alignment.
PERFORATION
Alignment
Marks
Ð
“Date”
should be
centered
within the
rectangle.
Figure 3-3: Properly Aligned Check.
10.
If your check is not aligned properly, adjust the Printer Offset fields (see Step 3)
and select Print Test. Repeat this procedure until the check is properly aligned.
V7.x
10
Chapter 4: Creating Checks with CHAX
Now that your default settings are set, you can create your first check. This process is
very simple. First you must ask your customer to fax you a copy of a check made
payable to you/your company. Request your customer to include a note, either on the
face of the check or on an attached page, which clearly states that “this check authorizes
you to charge our bank account as per the attached check”. (This check is created solely
for the purpose of facilitating the process and it will never be deposited. Hereafter, we
will refer to this faxed copy as a “dummy check”.) Next you must enter the information
contained on the dummy check using CHAX and double-check the information. Lastly,
you will print the check, check the registration, and of course, deposit the check. CHAX
will automatically print two copies of each check on the same page. One is for your
records and the other is to be mailed to your customer for your customer’s records.
* Occasionally, because this process is unfamiliar, your customers may initially resist
faxing you the copy of the check. Remind them that the purpose of their check is to
provide you with the correct information to create an accurate check, and for them to
retain a permanent accounting record. You might also remind them that this faxed
check contains no other information than would appear on any check they would
have mailed to you, and thus it poses no additional risk to their security. You can
further assure them that this process is entirely legal and proper as provided in the
Uniform Commercial Code (UCC).
V7.x
11
Enter Check Information
About the Screen
There are three menu items and six buttons on the Enter Check Information Screen.
Menu
Items
Buttons
Figure 4-1: Entry Enter Check Information Screen.
MICR ENTRY STYLE
Figure 4-2: Switch MICR Entry Styles
MICR Entry Style: clicking on either choice will select alternative entry styles. One is
the classic style that is entered from a fax just the way you see it. The second is
separately for the bank routing number and customer’s bank account number. Once you
change the style it is remembered for the next time you enter CHAX as your default style.
See Figure 4-2 and 4-3
Figure 4-2: Classic MICR Entry Style
V7.x
12
Classic MICR Entry Style: When entering in this style enter the MICR line just as it
appears on the check. Include the special symbols as shown by pressing the keys
corresponding to the special symbols.
Figure 4-3: Simple/Phone MICR Entry Style
Simple/Phone MICR Entry Style: in the Routing Number box enter the 9 digit bank
routing number which is surrounded by to “routing number” symbols. Then enter the
customers bank account number. Do not enter the special MICR symbols. Enter the
check number only in the check number entry box. The only special symbol you should
enter is the “-“
MENU ITEMS
Payee: allows you to create a check with a payee other than the default payee. This field
will override the default payee for one check only or you can enter Payees that will be
available in the future. This might be used if you are creating checks to be paid for
services rendered by your subsidiary. See Figure 4-2.
Start typing the name
of the payee and
payees will fill the list.
Double click on the
selection to select a
payee
Click on appropriate
button
Figure 4-4: Payee Screen.
1.
In order to change or select a payee you must have been assigned rights to
do so. See Password Changes
2.
If you wish to add, delete or change a payee double click on the
appropriate button and enter the information
3.
When you exit this window you will be given the chance to make the
selected payee the default
Setup: accesses the Enter Control Information Screen, if you decide that your default
settings are no longer appropriate and you wish to change them.
Maintain Password: accesses the Maintain Password Screen. Use this to add users, to
change passwords, and assign rights to users When the system is first set up the
password is masteradmin for user id admin. If the password is blank no password is
V7.x
13
needed to access the system. If you enter a password be sure to remember it (you might
write it down and store it in some safe place) as you will, from then on, not be able to
enter the CHAX system without entering the proper password. When changing the
password enter any combination of letters or numbers (no spaces or special characters).
You will be requested to type it again. Only if the first typing agrees with the second will
the new password be accepted and take effect. You will only be allowed to change those
items that you have rights to.
Figure 4.5
* Remember the password (you might write it down and store it in some safe
place) as you will, from then on, not be able to enter the CHAX system without
entering the proper password. Should you wish to eliminate the password
requirement just change the password to blanks.
Batch Print: accesses the batch printing functions. This allows you to save the actual
printing of the checks until some convenient time. By clicking on Enabled the program
each time you “print “ the check from within CHAX the program will actually save the
check information for each check in a batch file on your disk until you instruct it to print
all the checks saved. Click on Print Batch to print the checks that have been previously
saved.
* If there are still checks saved in the batch file on disk, you will be reminded
that there are unprinted checks in the batch when you exit from CHAX and
when you reenter CHAX. If there are previously unprinted checks in this batch
file, entering new checks in the Batch Print Enabled mode will just add to the
batch saved.
V7.x
14
* After printing the batch of saved checks (Batch Print - Print Batch) the batch
file is deleted and the saved check information is no longer available.
Exit: exits you from the CHAX Program.
* Do not exit CHAX if you are in the midst of creating a check. When you exit, your
default control information will be saved but all other information you entered will
be lost. If you are interrupted and need to work on something else, minimize the
window by clicking the downward arrow in the upper right-hand corner. To resume
your work just click on the CHAX icon.
BUTTONS
Select: allows you to find and select a previously saved Payer (see figure 4-9).
Print: prints the check and clears all entry fields to prepare for creation of a new check.
* Inspect all information carefully, especially the Check Amount and the MICR line.
Cancel: cancels all entries and returns them to their default settings.
Payee: displays the same screen as the Payee menu item. See the Payee menu item for
more details.
Exit: exits the program. See the Exit menu item for more details.
Entering Information
The name of the
current payee will
automatically appear
in this field.
Figure 4-6: Enter Check Information Screen.
V7.x
15
Figure 4-6 shows a completed Enter Check Information Screen. Note only those fields
shown in yellow are required.
Follow these steps to complete this screen and create a check:
1.
Enter the Check Number as it appears on the dummy check.
2.
If you are using the Classic MICR Entry Format, type the MICR line into the
MICR Line Info field. The MICR line is a series of specially formed numbers and
characters that appear on the bottom of every check. It tells the bank which account
to charge so be sure to type all numbers and symbols exactly.
Since the unusual symbols that are part of the MICR line cannot be found on your
keyboard, CHAX will convert specific characters to MICR code. A key to help
you type this line properly is located just below the MICR Line Info text box. See
Figure 4-9.
KEY
Figure 4-9: MICR Line Info Text Box.
If you are using the Simple/Phone MICR entry style in the Routing Number box
enter the 9 digit bank routing number which is surrounded by to “routing number”
symbols. Then enter the customer’s bank account number. Do not enter the special
MICR symbols. Enter the check number only in the check number entry box. The
only special symbol you should enter is the “-“
•
CHAX will automatically check the MICR code at the time you enter it or
attempt to move to the next field. If CHAX detects an error, it will inform you
with an error code (see Figure 4-10). Although CHAX’s screening may detect
many common errors, it will not necessarily detect all typos. It is still
necessary for you to double-check this entry when you proof your check.
Figure 4-10: Error Message.
•
If CHAX detects an error, compare the number you typed to that on the dummy
check
3.
If you have previously entered a check for this same checking account number the
Payer Name and address as well as the Bank Name and address will be
automatically entered in the appropriate fields.
4.
Enter Payer Name and Address, as well as Phone number. The payer is the party
paying for your products or services. Only the name is required.
V7.x
16
5.
Enter the payer’s Bank Name and Address, as well as the Transit Number. Only
the bank name is required
The Transit Number (not required) appears under the check number in the upper
right hand portion of each check. It should be entered like this: “#-##/###_ _
###” For an example of a Transit Number and how to enter it into CHAX see
Figure 4-7 and 4-8.
Check
Number
876
1-12 0827
280
Transit Number
Figure 4-7: Upper right hand corner of standard check.
1-12/280__0827
* ”_ _ ” stands for 2 spaces.
Figure 4-8: Entering Transit Number in Figure 4-5.
6.
Enter the Date (required)as it appears on the dummy check, in the MM/DD/YY
format.
7.
Enter the exact Check Amount. If the amount is not exactly as it appears on the
dummy check then you must obtain additional permission from the payer.
Include decimal points but do not enter commas or dollar signs.
7.
< OPTIONAL > In the Memo field you can type a note to help you and the payer
keep accurate records. For example you could type “1st Installment - Aluminum
Siding” to remind you and your customer of the purpose of the check.
Proofing & Printing your Check
It is critical that you verify the layout and contents of your check.
A mistake in the MICR or Check Amount fields may result in the check being returned to
you. Therefore it is essential that you carefully proofread all information you have
inputted. Although CHAX will automatically check for validity, and catch some
common errors, it cannot guarantee that your check is completely accurate. Manual
verification is vital.
* After you print the check, check for proper alignment using CHAX’s patented
alignment marks. Over time, rollers wear and paper may feed differently, so the few
seconds needed to check the alignment is time well spent.
Follow these steps to thoroughly proof your check:
V7.x
17
1.
Click Print and the screen depicted in Figure 4-11 will automatically appear.
Figure 4-11: CHAX Proofing Screen.
2.
Compare all information on this screen to the dummy check. Pay special attention
to the Check Amount and MICR line. If all information appears correct skip to
Step 7.
3.
Click the Re Edit button. This will return you to the Enter Check Information
Screen.
4.
Make all changes, click Print, and re-verify the information.
5.
Click OK and CHAX will give you another opportunity to proofread your check.
6.
Before you print, make sure that the MICR toner cartridge is installed in your
printer and that the blank check forms are loaded in the proper tray.
7.
Select Yes if you are confident that all data is correct.
Your check will print and is ready to be deposited!
Maintaining Payer Information Data Base
Select a Payer: CHAX is capable of maintaining a database of payer information, so
that if you repeatedly receive CHAX payments from the same payees, you can save the
information entered and thus not have to enter it again.
Click the Select function from the “Enter Check Information” screen (figure 4-3).
Pick a Payer by highlighting an entry and double clicking.
V7.x
18
Search for a Payer by selecting a search method from the pull down arrow
Figure 4-12: Search for Payer
Enter the search data in the box provided. The highlight will move as each character is
entered.
* Use the reindex button to reestablish the index should you observe entries that appear
out of sequence or missing. Depending on the size of your data base and the speed of
your computer, this function may take several minutes.
Figure 4-13: Add (Edit) Payee
Add Record or Edit Record Allows you to add or edit payers. If you click on the Add
or Edit buttons you will be shown the Add or Edit Payer window.
V7.x
19
*
Remember every time you enter a new customer checking account, it is
automatically added to the database.
Fill in the fields needed to prepare the CHAX check.
*
The Frequency type and Frequency days fields are not used and are for future
program enhancements.
Chapter 5: Transaction Reporter Program
Transaction Reporter Program
As CHAX checks are produced, an entry for each is added to the transaction database.
The Transaction Reporter is provided for viewing and maintaining this Transaction
database. This is a separate program to access it find and click on the
icon
in the run>CHAX folder.
The following screen will appear:
V7.x
20
Transaction Reporter
As CHAX checks are produced, an entry for each is added to the transaction database.
The Transaction Reporter is provided for viewing and maintaining this Transaction
database.
Figure 4-14 Select a Transaction
Click on the Search Field arrow to choose search method
Enter the search information in the search data box to list transactions.
Click on Print to print a transaction report.
*
*
The database grows with each check produced. The delete function is provided to
remove records that are old or that you have previously printed and kept the printout
for archive purposes. Use this function with care, once deleted, transactions cannot
be recalled.
Use the re-index button to reestablish the index should you observe entries that
appear out of sequence or missing. Depending on the size of your database and the
speed of your computer, this function may take several minutes.
V7.x
21
Purge Transactions
Since the transaction file keeps building as you use CHAX, the transaction file can get
very large. This function lets you remove older transactions. You must have special
security permission to purge items.
You are not given the ability to delete individual transactions as an audit trail protection.
V7.x
22
Chapter 7: Back Up Your Data Files
It is always a good practice to regularly back up all the important files on your disks.
Since you may be saving check batch data for later printing and/or databases of payers
and payees, a loss of data could cause considerable inconvenience. We strongly
recommend that you review your back up procedures to make sure that the CHAX files
are backed up sufficiently to meet your needs.
V7.x
23
Appendix A: Encouraging Customer use of CHAX
Some of your customers may have questions about the use of CHAX®. We suggest that you
explain the benefits of using CHAX to send the funds. Use the following explanations as
appropriate for an individual situation:
⇒ CHAX checks are safer than regular checks. When you send a CHAX check
you are providing no more information than if you mailed the check. Checks
can be intercepted or lost in the mail. CHAX are sent by fax and thus you
have positive, instant confirmation of their receipt. CHAX checks look
different from regular checks and so cannot be easily cashed but must be
deposited into a bank account, leaving an audit trail.
⇒ You control your money. You control the float. You can send the CHAX
checks on the day you wish to release the funds. You no longer have to build
in extra time to cover delays.
⇒ You can eliminate the need to use expensive overnight delivery service when
you have to get a check delivered in a hurry.
⇒ If you have merchandise on hold for receipt of funds, you can get it shipped
the same day.
⇒ You can avoid COD charges and the problems of having to leave the check
ready and waiting for the trucker.
⇒ Using CHAX checks instead of credit cards will not tie up your credit card
available credit and will avoid the hassles of getting reimbursed for business
purchases.
⇒ Keep your accounting simple. CHAX checks are generated by you just like
regular checks (you create a regular check, fax it, and retain the original for
your records). If you use CHAX instead of your credit card, you won’t have
to analyze and allocate your credit card account statement for tax and audit
purposes
V7.x
24
Appendix B: MICR Toner
MICR Toner
MICR (Magnetic Ink Character Recognition) toner is not legally required to
produce a valid check. However, the U.S. banking system uses special equipment
for reading and sorting check documents that require certain magnetic properties to
properly process a check. If you do not use the special MICR toner in your printer
it is possible that the banks will have to add a special additional strip on the bottom
of the check which they would manually encode with MICR characters. This costs
the bank extra time and thus extra expense. The bank may charge you and or your
customer for this extra expense of processing the checks. In some instances banks
have returned such checks unpaid because they were not encoded with MICR
toner. If you use special MICR toner offered for sale by Micro Business Software
(1-800-354-MICR) you will insure your CHAX® checks meet the American Bank
Association standards (ANSI X9.27 standard) and thus can be processed by the
banks without any additional intervention.
V7.x
25
Appendix C: Upgrading
Upgrade instructions for Chax® V6.x
For Windows 95 & Higher
from V2.1 or earlier versions of CHAX®.
Note: Whenever upgrading it is recommended that you back up your present
CHAX® directory before performing any updates
The new version of CHAX® uses an updated data base for storing the Payer information. This new format is not
compatible with the old version. Prior to installing the new CHAX version, when a V2.1 or previous version was
installed on the computer, erase the old WCHAX directory and install the new version into a new directory. Be
aware that the payer information entered into the prior version will be lost and will have to be manually reentered
into the new version.
Follow the install instructions for the new version.
from V2.2 and later versions of CHAX®.
Note: Whenever upgrading it is recommended that you back up your present
CHAX® directory before performing any updates
Install the new version into the same directory into which the previous version had previously been installed. Your
old information will be updated into a new database.
To install follow the install directions for the new version.
V7.x
26
Appendix D: Example of Authorization Request:
Although it is not legally necessary some CHAX® customers wish to have a written
authorization from the customer faxing them a check. The following is an example of a
form that may be faxed to a customer to obtain authorization. They then can fax the
completed form back to you with a copy of the check to be processed.
Example of Authorization Request
Date:
To:
From:______________________________________________
(Name)
Address:____________________________________________
___________________________________________________
Phone:______________________________________________
has permission to charge my bank account as per the faxed check that accompanies this authorization.
___________________
Check#
___________________
Payable To
$___________
Amount
________________________________________________
Signature – Title
________________________________________________
Print Your Name
Note: Pre-authorized checks have been universally accepted in the banking industry for years. Moreover, faxing a
check is just as safe as mailing a check. In fact, it’s much safer than providing credit card information. You can
further assure that this process is entirely legal and proper as provided in the Uniform Commercial code Title Three
“Commercial Paper.”
Please remember that the purpose of your faxed check is to provide us with the correct information to create an
accurate check, and for you retain a permanent accounting record. Also, please remember that this faxed check
contains no other information than would appear on any check you would have mailed to us, and thus it poses no
additional risk to security.
You should retain the original check for your records. We will forward a check confirmation to you.