1
Allen-Bradley
DeviceView
Configurator
(2707-DNC)
User
Manual
Important User Information
Solid state equipment has operational characteristics differing from
those of electromechanical equipment. “Safety Guidelines for the
Application, Installation and Maintenance of Solid State Controls”
(Publication SGI-1.1) describes some important differences between
solid state equipment and hard–wired electromechanical devices.
Because of this difference, and also because of the wide variety of
uses for solid state equipment, all persons responsible for applying
this equipment must satisfy themselves that each intended
application of this equipment is acceptable.
In no event will the Allen-Bradley Company be responsible or liable
for indirect or consequential damages resulting from the use or
application of this equipment.
The examples and diagrams in this manual are included solely for
illustrative purposes. Because of the many variables and
requirements associated with any particular installation, the
Allen-Bradley Company cannot assume responsibility or liability for
actual use based on the examples and diagrams.
No patent liability is assumed by Allen-Bradley Company with
respect to use of information, circuits, equipment, or software
described in this manual.
Reproduction of the contents of this manual, in whole or in part,
without written permission of the Allen-Bradley Company is
prohibited.
Throughout this manual we use notes to make you aware of safety
considerations.
!
ATTENTION: Identifies information about practices
or circumstances that can lead to personal injury or
death, property damage, or economic loss.
Attentions help you:
• identify a hazard
• avoid the hazard
• recognize the consequences
Important: Identifies information that is especially important for
successful application and understanding of the product.
DeviceView is a trademark of Allen-Bradley Company, Inc.
Microsoft Windows is a trademark of Microsoft.
DeviceNet is a trademark of Open DeviceNet Vendor Association, Inc.
CAN is a trademark of Robert Bosch GmbH
Table of Contents
Introduction
Chapter 1
Equipment and Supplies . . . . . . . . . . . . . . . . . . . . . . . . . . . . . . . .
Accessories . . . . . . . . . . . . . . . . . . . . . . . . . . . . . . . . . . . . . .
Skills and Knowledge . . . . . . . . . . . . . . . . . . . . . . . . . . . . . . . . . .
Terminology . . . . . . . . . . . . . . . . . . . . . . . . . . . . . . . . . . . . . . . .
Related Publications . . . . . . . . . . . . . . . . . . . . . . . . . . . . . . . . . .
How the DeviceView
Configurator works
Chapter 2
Setting up a DeviceView
Configurator
Chapter 3
Running the DeviceView
Configurator
Chapter 4
What is a DeviceView Configurator? . . . . . . . . . . . . . . . . . . . . . . .
Physical Features . . . . . . . . . . . . . . . . . . . . . . . . . . . . . . . . . . . .
Display and Keypad . . . . . . . . . . . . . . . . . . . . . . . . . . . . . . . . . . .
Operating Modes . . . . . . . . . . . . . . . . . . . . . . . . . . . . . . . . . . . . .
DeviceView Configurator’s three editing modes . . . . . . . . . . . . .
Other Functions . . . . . . . . . . . . . . . . . . . . . . . . . . . . . . . . . . . . . .
DeviceView Downloader Software . . . . . . . . . . . . . . . . . . . . . . . . .
Editing . . . . . . . . . . . . . . . . . . . . . . . . . . . . . . . . . . . . . . . . . . . .
Configurator connections . . . . . . . . . . . . . . . . . . . . . . . . . . . . . . .
System Setups . . . . . . . . . . . . . . . . . . . . . . . . . . . . . . . . . . . . . .
Installing DeviceView Downloader Software . . . . . . . . . . . . . . . . . .
Using DeviceView Downloader Software . . . . . . . . . . . . . . . . . . . .
EDS files . . . . . . . . . . . . . . . . . . . . . . . . . . . . . . . . . . . . . . . . .
1–1
1–1
1–1
1–2
1–2
2–1
2–2
2–5
2–6
2–6
2–7
2–8
2–8
3–1
3–2
3–4
3–5
3–6
Config Mode Menu . . . . . . . . . . . . . . . . . . . . . . . . . . . . . . . . . . .
4–1
OnLIne Setup Mode . . . . . . . . . . . . . . . . . . . . . . . . . . . . . . . . . . .
4–2
Enhanced (EDS) Mode . . . . . . . . . . . . . . . . . . . . . . . . . . . . . . . .
4–4
Downloading EDS files . . . . . . . . . . . . . . . . . . . . . . . . . . . . . . .
4–4
Using EDS files . . . . . . . . . . . . . . . . . . . . . . . . . . . . . . . . . . . .
4–7
The Image Functions and Parameters Menus . . . . . . . . . . . . . . 4–10
Basic Mode . . . . . . . . . . . . . . . . . . . . . . . . . . . . . . . . . . . . . . . . . 4–13
Node Commissioning Mode . . . . . . . . . . . . . . . . . . . . . . . . . . . . . 4–16
Auxiliary Functions Mode . . . . . . . . . . . . . . . . . . . . . . . . . . . . . . . 4–19
Downloading EDS files . . . . . . . . . . . . . . . . . . . . . . . . . . . . . . . 4–19
Downloading Operating System files . . . . . . . . . . . . . . . . . . . . . 4–19
Clearing unneeded EDS files from DeviceView Configurator memory 4–21
Setting the Terminating Resistor . . . . . . . . . . . . . . . . . . . . . . . . 4–22
ii
Table of Contents
Troubleshooting and
Maintenance
Chapter 5
Appendix A
Specifications
Appendix B
Menu Structure
Glossary
Index
Cleaning the Display Window . . . . . . . . . . . . . . . . . . . . . . . . . . . .
Hardware Problems . . . . . . . . . . . . . . . . . . . . . . . . . . . . . . . . . . .
Operating Problems . . . . . . . . . . . . . . . . . . . . . . . . . . . . . . . . . . .
5–1
5–2
5–2
This chapter covers the following topics:
• Equipment and supplies
• Skills and knowledge
• Terminology
• Related publications.
Equipment and Supplies
The 2707-DNC DeviceView Handheld Configurator comes with this
manual: 2707-806 DeviceView Configurator User Manual.
Accessories
The following cables and power supplies may be used with the
DeviceView Configurator:
Catalog No.
Description
2707-NC13
Network cable with bare leads
2707-NC14
Network cable with Micro-connector (Male)
2707-NC15
Network cable with Micro-connector (Female)
2707-NC16
Network power cable
2707-NC8
Upload/download cable
2707-PS120H
120 VAC power supply, AC to DC adapter
2707-PS220
220 VAC power supply, AC to DC adapter
One or more EDS files specific to each device may be loaded into
the Configurator. In order to load these files, you will need:
• a 3 1/2” disk with 2707-DP1 DeviceView Downloader Software
• a personal computer with at least 1 megabyte RAM, 4 MEG
recommended
• Microsoft Windows 3.1 or better
• an upload/download cable (see above).
Skills and Knowledge
The DeviceView Configurator is designed to configure devices on a
DeviceNet system. All configuration options in the DeviceView
Configurator are menu driven. Current menus or options appear on
the display screen.
To use the DeviceView Configurator you should understand:
• network systems in general and DeviceNet in particular
• how to read printed or electronic EDS files.
1–2
Variable Content TTL:Chap Is Linked To HD:Running
DeviceView Downloader Software runs on a personal computer
under Windows. To use this software you should understand:
• how to use Windows menus
• how to use a mouse (optional).
Terminology
For unfamiliar terms, refer to the Glossary in the back of this
manual.
Conventions used in this manual:
A key on the DeviceView Configurator is referred to
– using bold small capital letters, for instance HOME
– using the symbol on the key, for instance ↵.
Configurator refers to the DeviceView Handheld Configurator.
Device (unless noted) refers specifically to a device that is or will
be connected on a DeviceNet network.
Downloader software is the DeviceView Downloader Software
installed in a personal computer. It may be used to download EDS
files or an Operating System file to a DeviceView Configurator.
EDS file is an Electronic Data Sheet supplied by the device
manufacturer that contains information about a device.
Operating system (OS) is the firmware for the DeviceView
Configurator. Future updates of the firmware can be downloaded
to DeviceView using the Downloader software.
Related Publications
The DeviceNet Specification manual is Part No. 956166, Catalog
No. D9240-DNDOC.
• DeviceNet Specification. Volume I: DeviceNet Communication
Model and Protocol Open DeviceNet Vendor Association, Inc.,
Coral Springs FL 1994.
• DeviceNet Specification. Volume II: DeviceNet Device Profiles
and Object Library Open DeviceNet Vendor Association, Inc.,
Coral Springs FL 1994.
How the DeviceView
Configurator works
This chapter covers the following topics:
• What is a DeviceView Configurator?
• Physical features
• Display and keypad
• Functions of a DeviceView Configurator
• Other functions
• DeviceView Downloader Software.
What is a DeviceView
Configurator?
A DeviceView Configurator is a hand-held device that can configure
individual devices on a DeviceNet network.
Devices on a DeviceNet network are often configured using a
personal computer with a configuration program and a DeviceNet
interface. A DeviceView Configurator provides an alternative.
The DeviceView Configurator communicates with and configures:
• devices on a DeviceNet network
• devices that will be connected to a DeviceNet network at a later
time.
Use the keypad on the configurator to respond to a set of linked
menus and commands displayed by the configurator.
DeviceNet network
The DeviceNet network provides both signal and power connections
to devices in a system. The network usually contains a logic
controller, which sends information to other devices on the network
and receives information from them. These devices may include
starters, bar code scanners, controllers, input/output devices and
PLCs.
2–2
How the DeviceView Configurator works
Configuring devices
All the devices on the network should be able to communicate with
one another. This means that:
• all devices must be set to the same baud rate
• each device must have a unique address on the network.
In addition, each device may have other parameters that allow it to
do its task in running the operation. Those parameters are determined
by the device manufacturer, and provided either as an EDS file or on
paper.
Devices may be configured in either of two ways.
• Some devices use DIP switches, jumpers or other hardware
settings. The settings must be adjusted by hand.
• Some devices have parameters that can be set by software. Those
parameters may be configured using a DeviceView Configurator.
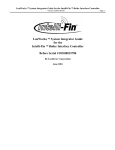
Physical Features
The DeviceView Configurator has on its front face:
• a 2 line by 16 character display where the current information or
option is displayed
• a keypad to change the display or enter a value.
The keypad is separated by color into easily identified groups or
functions.
Color:
Key:
1-9, 0
.
B ck
Black
+/-
CE (Clear Entry)
Dark Grey
▲ (Increment) or ▼
(Decrement)
HOME
B ue
Blue
NEXT or PREV
*
Light Grey
↵ (Enter)
Is used to:
enter a value.
place a decimal point as the value is
entered.
enter a negative number, toggle a value
between positive and negative, or toggle a
bit between 0 and 1.
clear the field in which data is being
entered, setting it to 0 or to the field’s
minimum value.
display the last or next:
• entry in an enumerated data type
• value in a data entry screen
• bit number being viewed in a bit field.
These keys may be held down for
auto-repeat to allow you to sequence
rapidly to the desired value.
display the Home Menu by exiting the
current function without saving it.
scroll forward or backward in a scrolling
menu.
(Has no function in the current revision.)
accept the displayed choice and move to
the next logical step in the process
or enter the modified value when editing
attributes in Enhanced Mode.
How the DeviceView Configurator works
Communications Port
Power Port
Front
Power Port
Communications Port
DeviceView
Config Mode
OnLine Setup
Display
Home
Keypad
PREV
NEXT
*
1
2
3
CE
4
5
6
▲
7
8
9
▼
+/–
0
•
2–3
2–4
How the DeviceView Configurator works
It also has two ports:
• a communications port to connect the configurator to a device, a
network or a personal computer
This port has an RS-232 channel, a DeviceNet channel and a
power connection. The DeviceNet Configurator gets its power
through this port when it is connected to a DeviceNet network.
• a power port
The power port is a 2-conductor power jack used to connect an
external 11 to 25 VDC power source to the configurator when it
is not connected to a DeviceNet network.
Communications
Connect the DeviceView Configurator Communications Port to one
of the following:
• a DeviceNet network through which it can send to a selected
device the data needed to configure it for the system
• an individual device to set:
– only the baud rate and node address, or
– all the data needed to configure it.
• a computer with DeviceView Downloader Software installed,
from which it can download EDS or Operating System files over
an RS-232 channel.
Communication and power connections are described and illustrated
starting on Page 3–2.
How the DeviceView Configurator works
Display and Keypad
2–5
The upper line in the display depends on the status of the
configurator. The lower line lists options, reports on what action is
going on, or indicates a choice that the user can make.
Config Mode
Enhanced (EDS)
ƞ
Ɵ
The upper line may:
• give the title of the menu
• indicate the present status
• provide options.
R
Conventions used in the display upper right corner:
– hollow block indicates that the configurator is in OffLine
mode
– solid block indicates that the configurator is in OnLine mode
– indicates an error
– indicates that the configurator’s DeviceNet interface is in a
“Bus off” condition.
Note: This may indicate the baud rate is incorrect and may
be accompanied by a Fail message.
The lower line gives a variety of options
ƞ
Ɵ
▲
▼
• When the display has a hollow up/down arrow, the displayed
command option may be:
– changed by pressing the PREV or NEXT key, or
– accepted by pressing the ↵ key.
• When the display has a solid up/down arrow, the displayed value
may be:
– changed by pressing the Increment/Decrement keys, or
– accepted by pressing the ↵ key.
• When a flashing cursor is on a number, that number may be:
– edited by pressing numeric keys, the Increment/ Decrement
keys, the CE key, the decimal point key, or the +/- key, or
– accepted by pressing the ↵ key.
• When a ↵ symbol is displayed, press the ↵ key to go to the main
menu or some other option not covered by the above symbols.
• When no option is given, wait until the configurator has finished
with its current process and a new display appears.
2–6
How the DeviceView Configurator works
To access a different mode:
1. Return to the main menu.
2. Press the PREV or NEXT key until the mode is displayed.
3. Press the ↵ key.
Operating Modes
The five modes are:
• OnLine Setup Mode
• Enhanced (EDS) Mode
• Basic Mode
• Node Commission Mode
• Aux Functions Mode.
The configurator can perform a variety of tasks. It can:
• download EDS files from a personal computer into its flash
memory (in Aux Functions mode)
• display each parameter from a device’s EDS file so the operator
can edit it using the keypad (in Enhanced mode)
• allow the operator to select and edit parameters from the device
itself without an EDS file (in Basic mode).
• locate a specific device on the network and change configuration
data in its memory (in Enhanced or Basic mode)
• set baud rate and node address for a device connected
point-to-point, in a few seconds (in Node Commission mode)
• perform housekeeping tasks (in Aux Functions mode)
DeviceView Configurator’s three editing modes
In Node Commissioning Mode the configurator sets only the baud
rate and node address for a device connected point-to-point. See
Page 4–16 for step-by-step instructions.
Note: This mode should not be used when the DeviceView
Configurator is connected to a network.
In Basic Mode, the configurator can display and modify adjustable
attribute values in a selected device on a DeviceView network. See
Page 4–13 for step-by-step instructions.
In Enhanced Mode, the user must download an EDS file from a
personal computer to the configurator for each device that will be
configured. Then a device on a DeviceNet network is selected and
configured according to the EDS file parameters. See Page 4–4 for
step by step instructions.
How the DeviceView Configurator works
2–7
Note: An EDS file is a specially formatted ASCII file supplied by
the device manufacturer. It:
• describes each parameter, including its name and default value
• provides a range of settings for each configurable parameter.
Refer to the DeviceNet Specification for a complete discussion of
EDS File requirements.
Other Functions
The EDS Download function allows the operator to download a
number of EDS files one at a time. The DeviceView Configurator
has 62K of flash memory reserved for EDS storage. This memory
can hold up to 31 EDS files, depending on how large they are.
Typical files are about 4K. See Page 4–4 for step-by-step
instructions.
If the configurator’s flash memory is full, a message appears on the
computer screen and on the configurator’s display, and the download
is aborted. EDS files are never overwritten.
Memory Full
Download Aborted ↵
The Operating System Download function allows the operator to
replace the operating system with a new version. Operating System
Download is rarely used, since the DeviceView Configurator comes
with the current operating system version installed and ready to use.
However, Allen-Bradley may produce a diskette with an updated
operating system. See Page 4–19 for step-by-step instructions.
The EDS View/Delete function allows the operator to mark and
purge EDS files in its flash memory, to make room for new files to
be downloaded. See Page 4–21 for step-by-step instructions.
The OnLine Setup function is required before the DeviceView
Configurator can access a DeviceNet Network. It makes the
configurator active on the network with the CAN (Controller Area
Network) chip enabled. See Page 4–2 for step-by-step instructions.
If the baud rate and/or node address are changed, the operator is
given the option of saving the changes in flash memory. The values
in flash memory will be the default values the next time the
DeviceView Configurator is powered up.
2–8
How the DeviceView Configurator works
DeviceView Downloader
Software
A DeviceView Configurator requires DeviceView Downloader
Software. When this Software is installed on a personal computer it
may be used to download:
• EDS files, which have extension .EDS (see Page 4–4)
• an operating system firmware file used to update the configurator,
which has extension .HEX (see Page 4–19).
The DeviceView Configurator has core code firmware in ROM. This
core code:
• performs power-up diagnostic tests
• passes control to an operating system
• supports downloading of an operating system file from a personal
computer.
The operating system in flash memory performs all the other tasks
summarized in this chapter and discussed in the manual.
Editing
All editing changes take place on an image of the data in the
configurator’s RAM. The edited image may be sent to a device or
stored in the configurator’s flash memory or both.
Saving edited values
The operator can send parameter values to the device from the image
in the configurator’s RAM:
• one at a time (Enhanced and Basic Modes)
• all together in the form of the RAM image at the end of the
session (Enhanced and Node Commissioning Modes).
Every time the operator sends a modified value or file to a device,
the requested change must be confirmed. The following message will
appear on the DeviceView display:
Image Functions
Confirm
• Press the ↵ key to confirm the changes.
• Or press the NEXT or PREV keys to leave the device’s
configuration unchanged and move to another option.
Note: In Enhanced mode, the values may also be saved to the stored
EDS file, replacing the original values.
How the DeviceView Configurator works
2–9
Exiting from a function:
• Press the HOME key to return to the Home Menu.
• Or display the Done command (if it is available in the current
function) by using the PREV or NEXT key, and select it by
pressing the ↵ key.
The configurator is usually online, so when it returns to the Home
Menu it defaults to the Enhanced mode. If it is offline, it defaults to
the OnLine Setup mode.
Config Mode
Enhanced (EDS)
Config Mode
OnLine Setup Setting up a DeviceView
Configurator
This chapter covers the following topics:
• Configurator connections
• Safety guidelines
• System setups
• Installing DeviceView Downloader Software
• Using Downloader Software.
Configurator connections
Connect the DeviceView Configurator to one of the following three
sources of DC power:
• a DeviceNet network through the cable connected to the
Communication Port
• a DeviceNet network power cable
• a separate DC power source connected to the Power Port,
whenever the Communication Port is connected to a PC for
program transfers or to a device that has not yet been connected
to a DeviceNet network.
!
ATTENTION: Only one DeviceNet device should be
connected to the DeviceView communications port
when using the DeviceView power supply or network
power cable. The DeviceView Configurator does not
provide any current limiting.
Connect the DeviceView Configurator Communications Port to one
of the following:
• a DeviceNet network
• an individual device
• a personal computer.
3–2
Setting up a DeviceView Configurator
System Setups
When the Communications port is connected to a computer or a
device that is not on the network, connect the Power port to one of
the following:
• a DC power supply or
• a DeviceNet network (using a network power cable).
Ä
Ä
Ä
Ä
Ä
ÂÂÂÂÂÂÂÂÂÂÂÂÂ
Ä ÄÄ Ä Ä Ä
Ä
Power
Supply
2 Amps
Logic
Controller
Power Port
Communications Port
Device
From Network Power Cable
Device
From 15-25 VDC
Power Supply
To Computer
RS-232 Port
Upload/Download Cable
or DeviceView Communications Cable
Or to an Individual Device
or Network
You can use any of the DeviceView accessories listed in the table on
page 1–1.
Setting up a DeviceView Configurator
3–3
When the configurator is connected to a DeviceNet network, it gets
its power through the same cable that provides two-way
communication:
Power Port
(not used)
Communications Port
Ä
Ä
ÂÂÂÂÂÂÂÂÂÂÂÂÂ
Ä Ä
ÄÄ
Ä Ä
Ä
Ä Ä
Ä
Device
DeviceView Communications Cable
Catalog No. 2707–NC13, -NC14, -NC15
Communications
(Two Way)
Power
Supply
Device
Power
(To Configurator)
Summary of connections
The DeviceView Configurator may be connected in three ways.
Connect to:
Purpose
Communications
Port
Power Port
Personal
computer
Download EDS and
Operating System
(OS) files
To computer
RS-232 port
To DC power
source
Any device not
yet connected to
the network
1.Configure device
2.Set baud rate and
node address
Point-to-point to the
DeviceNet port on
the device
To DC power
source - or To network power
using a network
power cable
DeviceNet
network
Configure devices on
the network
To a tap on the
network
(none)
3–4
Setting up a DeviceView Configurator
Installing DeviceView
Downloader Software
The DeviceView Downloader Software must be installed on the hard
drive of your computer.
1. Start Windows.
2. Insert the downloader software disk in the floppy drive. For
purposes of these instructions we call it Drive A.
3. Double-click on File Manager, then click on the A: drive.
4. Double-click on the SETUP.EXE file.
5. A DeviceView Setup screen appears. In a few seconds it is
replaced by:
6. Select Continue to accept this directory.
Or highlight the directory and type in a different destination
directory.
Or select Exit to abort the installation procedure.
7. An interim screen shows the progress of the installation. Then the
new program group appears.
8. Double-click on the DeviceView Downloader icon to open the
program.
Or double-click on the Help icon to open the Help Table of
Contents.
Note: A subdirectory was created during installation to contain EDS
files. However, the DeviceView Downloader Software can find these
files anywhere if the path is specified.
Setting up a DeviceView Configurator
Using DeviceView
Downloader Software
3–5
Before starting to download:
1. If necessary, delete some EDS files in the DeviceView
Configurator to make room for the new ones (see page 4–21).
2. Put the DeviceView Configurator into EDS Download Mode (see
Page 4–4).
3. Connect the Communications port on the configurator to the
RS-232 port of the computer.
4. Connect the Power port on the configurator to a DC power
supply.
RS-232 Port
Programming Cable
Catalog No. 2707-NC8
Programming Computer
Power Port
Communications Port
DC Power Supply
2707-PS120H
or 2707-PS220
DeviceView
Configurator
5. Double-click on the DeviceView Downloader icon to open the
main window:
Title Bar
Menu Bar
Tool Bar
Status Bar
3–6
Setting up a DeviceView Configurator
Downloading
See the section starting on Page 4–4 which gives step-by-step
procedures for downloading EDS files to the DeviceView
Configurator and using them.
See the section starting on Page 4–19, which gives step-by-step
procedures for downloading OS files to the DeviceView
Configurator
To set the computer RS-232 port:
• Click on the Select Port command to display the Select Port
dialog.
• The current port has a dot in its radio button; if it is correct, click
either OK or Cancel
If necessary, click on a different Com port number and click OK.
EDS files
EDS (Electronic Data Sheet) files are supplied by the device’s
manufacturer. If only a printed page is sent with the device, an EDS
file may be created on the computer using any text editor or word
processor that can edit ASCII text files.
Setting up a DeviceView Configurator
3–7
To access Help
• Click the Help icon, then click on an item. A context-sensitive
Help screen will appear.
• Or select a command on the Help menu:
– click on Contents... to bring up an index of DeviceView
Downloader Software Help Contents
– click on Using Help... to bring up an index on how to use
Help
– click on About DeviceNet Downloader... to view the
version number and copyright date of the downloader
software.
Note: Be ready to give the version and date if you have to
call Allen-Bradley for assistance with the downloader
software.
Running the DeviceView
Configurator
This chapter covers the following topics:
• Config Mode Menu
• OnLine Setup Mode
• Enhanced (EDS) Mode
• Basic Mode
• Node Commissioning Mode
• Auxiliary Functions Mode.
Config Mode Menu
The DeviceView Configurator has six modes of operation. Five of
them are accessed through commands on the Configuration Mode
menu. Each mode has submenus and commands for its own set of
functions.
Cycle through these commands by pressing the PREV or NEXT key
until the desired one is displayed, then press the ↵ key.
Config Mode
OnLine Setup
Prev/Next
Prev/Next
↵
Enter
↵
Config Mode
Enter
Enhanced (EDS) Config Mode
Basic
Prev/Next
Prev/Next
↵
Enter
↵
Config Mode
Enter
Node Commission Config Mode
Aux Functions
Prev/Next
↵
Enter
4–2
Running the DeviceView Configurator
Displays that require a response have either:
• a symbol in the lower right corner to indicate the key to press
• a flashing cursor where a data entry choice is to be made
OnLIne Setup Mode
First configure the DeviceView Configurator itself so it can
communicate with other devices.
OnLine Setup is the menu default when the configurator is offline. It
appears when:
• the DeviceView Configurator is powered up
• the system resets, for instance after an operating system is
downloaded.
To set up the DeviceView Configurator:
1. Use the PREV or NEXT key if necessary to cycle through the main
menu until the OnLine Setup command is displayed, and press
the ↵ key.
Config Mode
OnLine Setup
This display appears while the Autobaud function is checking the
DeviceNet baud rate:
AutoBaud Rate
Detect...Abort ↵
2. To abort the procedure, press the ↵ key before a baud rate is
displayed. Otherwise, wait until the next display appears.
▲
▼
3. The DeviceView Configurator displays the detected or default
baud rate with a flashing Increment/Decrement symbol. Change
the baud rate as required by cycling through the values with the
Increment or Decrement key, and press the ↵ key.
DeviceNet Port
Baud Rate: 125 kb▲
▼
!
ATTENTION: Changing this value overrides the
value determined by Autobaud. If the DeviceView
Configurator is connected at the wrong baud rate for
the network, it will cause network errors.
Running the DeviceView Configurator
▲
▼
4–3
4. The DeviceView Configurator displays the default node address
with a flashing cursor over it. To change it:
• enter a number (0 to 63) from the keypad. or
• use the Increment or Decrement key to display other numbers
in sequence.
Configurator
Node Addr: 61
To accept the displayed address, press the ↵ key.
Note: The following screen will appear if either or both settings
are changed from the default:
Setup Changed
Save Changes
Press the ↵ key to select Save Changes and save the settings as
the default for the next powerup.
Or press the NEXT key and the ↵ key to select Continue. This
maintains the previous default settings in memory but allows the
DeviceView Configurator to go online with the changed settings.
5. The DeviceView Configurator checks the current address setting
using the DUP MAC (Media Access Control) ID test. This test
determines if the address is unique in the network.
If the test is successful, the address and baud rate are displayed
and the DeviceView Configurator is placed online. Note that the
box in the upper right corner is now filled, indicating that the
DeviceView Configurator is online:
OnLine Success
Node:61 125kb ↵
If it fails, an error message appears. Note that the box in the upper
right corner is replaced by an E, for Error.
DUP MAC ID Fail Continue
↵
6. Press the ↵ key to return to the OnLine Setup command.
7. Go through the steps again, but select an address that is different
from any device on the attached network.
4–4
Running the DeviceView Configurator
Enhanced (EDS) Mode
This mode is the simplest way to configure devices on a network.
See Page 3–2 for a summary of the different device configuration
modes.
Downloading EDS files
Set up the DeviceView Configurator:
1. Connect the DeviceView Configurator Communications port to
the serial port of the personal computer. Connect the power port
to a 11-25 VDC power source. See Page 3–5.
Config Mode
Aux Functions
2. Use the PREV or NEXT key to cycle through the Config Mode
menu until Aux Functions Mode is displayed. The first command
on the Aux Functions submenu is EDS Download.
Aux Functions
EDS Download
3. Press the ↵ key. The display reports:
EDS File
Initialize...
EDS File
Waiting...
Start the DeviceView Downloader Software in the personal computer.
1. Click on the EDS icon on the toolbar to open the Open dialog.
Or click on the Choose Download menu, then click on the
Download EDS File command.
Running the DeviceView Configurator
4–5
By default, files in the C:\DEVICEVW\EDS subdirectory with a
.EDS extension appear in the window. If the required one(s):
• are in a different directory, double-click on the C:\ icon and
then on the directory where the files are stored
• are on a floppy disk, insert it in a drive, click the down-arrow
by the Drives: box, and click on the drive letter
• have a different filename extension than .EDS, click the
down-arrow by the List Files of Type: box and then on the All
Files (*.*) command to list all files in the selected drive and
directory.
2. Click on the file to be downloaded; it appears in the File
Name: window.
3. The default file name is the device’s catalog number. If desired,
change the file name.
The “Configuration
Identifier” string that
appears here defaults
to the catalog number
from the EDS file.
Optionally, you can
change it to a more
descriptive name.
Observe progress
in the Status Bar
4. Click the OK button to start the download. The EDS file is parsed
(checked for errors) by DeviceView Downloader Software, and is
then ready for downloading. The DeviceView Configurator must
be in Download Mode and ready to receive the file.
Or click the Cancel button to cancel the procedure.
EDS File
Waiting...
4–6
Running the DeviceView Configurator
5. Check that the DeviceView Configurator display reads Waiting,
then select Continue in the personal computer. The EDS file is
downloaded into the DeviceView Configurator’s RAM, then
copied into flash memory.
EDS File
Download Done ↵
Note: If you like, you can download the same file from the
personal computer several times, each time with a different
configuration identifier. Edit parameter settings in each one for a
different configuration and save the files. Then when a device
configuration is needed in another system, its values are already
set up.
If there is a problem with the download, an error message
appears.
• some problems are fatal, and the download aborts.
• other problems give a warning, but the download may
continue.
If the DeviceView Configurator’s EDS flash memory has too
little room for the new file, the display reads:
Memory Full
Download Aborted ↵
In this case, one or more of the EDS files in DeviceView
Configurator memory will have to be deleted before any new files
can be loaded. See Page 4–21.
6. Press the ↵ key to return to the Aux Functions submenu.
Or press the HOME key at any time to abort the download and
return to the Enhanced (EDS) menu option.
Running the DeviceView Configurator
4–7
Using EDS files
To select a device on the network:
1. Connect the DeviceView Configurator Communications port to a
DeviceNet network and go through the OnLine Setup procedure.
Config Mode
Enhanced (EDS)
2. Enhanced (EDS) Mode is the default main menu display when
the DeviceView Configurator is online. If necessary use the PREV
or NEXT keys to cycle through the main menu choices until it
appears. Press the ↵ key. In the Device Address display the value
has a flashing cursor over it.
Device Address
Node:0
▲
▼
3. Select a device by entering its node address using the keyboard
numbers or the Increment/Decrement keys. Press the ↵ key. The
DeviceView Configurator displays the name of the device at that
address. For example:
Device Present
2705T
If it is not the desired device, press the NEXT key and the ↵ key to
select Next Device. The DeviceView Configurator looks for the
next active node.
4. If no device is at that address, this message appears:
No Device Found
Next Device
• Press the ↵ key to select Next Device. The DeviceView
Configurator tries each node in turn starting with the next higher
number, looking for a node with a device.
• Or press the NEXT key and the ↵ key to select CONTINUE to
continue Enhanced Mode operation without an attached device.
Options that require a device connection will not be available in
this case.
4–8
Running the DeviceView Configurator
To select an EDS file that matches the device:
Device Present
2705T
1. When a device is located, its embedded Product Name is
displayed. Press the ↵ key to call up the corresponding EDS file
so it is loaded into RAM. The file must match the device in its:
– product type
– product code
– vendor ID.
2. If a matching EDS file is found its name is the first selection
displayed.
EDS File Select
RediStation{1} • press the ↵ key to accept it, or
• use the PREV or NEXT key to cycle through the names until the
desired one is displayed, and press the ↵ key.
3. If the EDS file matches the selected device, the Image Functions
menu appears (see below). If the EDS file does not match the
selected device:
EDS MisMatch
Enter New EDS
• press the ↵ key to return to the EDS file list and select a different
file
• if necessary, download an EDS file that matches the device
• or press the NEXT key and the ↵ key to select Continue and go to
the Image Functions menu.
!
ATTENTION: If the operator selects a file that does
not match the device, configuration errors may occur.
Running the DeviceView Configurator
4–9
To select an EDS file with no device chosen:
An EDS file may be selected and edited even when no device has
been found or the DeviceView Configurator is in OffLine mode.
1. Use the PREV or NEXT keys to move through the main menu to
the Enhanced (EDS) option. Note that the box in the upper left of
the display is hollow unless OnLine Setup has been run.
Config Mode
Enhanced (EDS)
2. Press the ↵ key to get to the EDS File Select display.
EDS File Select
Generic–V1.00
3. Use the PREV or NEXT key to display each EDS file in the
DeviceView Configurator flash memory in turn. When the correct
one is displayed, press the ↵ key. The Image Functions menu will
be displayed.
Note: Options that require a device connection will not be seen.
4. Press the Next key and the ↵ key to select Continue and go to the
Image Functions menu.
4–10
Running the DeviceView Configurator
The Image Functions and Parameters Menus
Configure the device using the Image Functions menu and the
Parameter submenu. All editing on an image of the EDS file is done
in volatile memory. Use commands in the Image Functions menu to
send the edited file to the device, and to store it in flash memory.
To set parameters:
Image Functions
Get From Device
1. First load the initial data image:
• press the ↵ key to select Get From Device to use the parameter
data presently in the device
• or use the NEXT key to display Get From File, and press the ↵
key to use parameter data from the EDS file
2. The View Parameters screen appears. Press the ↵ key to access
parameter Groups.
Image Functions
View Parameters ▲
▼
3. The flashing cursor is on the Increment/Decrement keys symbol.
Cycle through the list of Group names and press the ↵ key to
select one. Then repeat with the list of Parameter names in that
group.
Note: The lists of Group Names and Parameter Names are
specific to the device being configured.
Enter Group:
IO Assembly
▲
▼
Enter Param:
Input Data
▲
▼
4. Edit each parameter separately. The flashing cursor is on the
value that can be edited:
Input Data
Input 1
:0
Note: In data entry screens, you must press the ↵ key to accept
the edited value.
Running the DeviceView Configurator
4–11
For each parameter:
• to get the value from the device, select Val from Device in this
menu
• to get the value from the DeviceView Configurator file, select
Val from File in this menu.
Input Data
Val from File
Edit the value according to this table:
If the value is:
Then:
Numeric Type
Use the number keys, the +/- key,or the decimal (.) key on
the keypad to enter a value
Or use the Increment or Decrement keys to change the
value
Or use the CE key to clear the display.
String of Bytes
Displays up to four byes which can be edited in sequence
using the numeric keys (see Basic Mode display)
Bit Enumeration Type
Use the Increment or Decrement key until the correct bit
name appears, and then use the +/- key or the 0 and 1
keys to toggle between 0 and 1
Enumerated Type
Use the Increment or Decrement key until the correct text
string appears.
5. Usually the whole parameter image is sent to the device at once,
see below. However,
• if the data were uploaded from the device (Step 1 above, Get
From Device), and
• if only one or two parameters have to be changed,
then each parameter may be sent when it is edited. Press the
NEXT key until Val to Device appears, then press the ↵ key. This
display appears:
Input Data
Confirm ↵
Press the ↵ key again.
Note: Whenever a value or parameter image is sent to a device,
the operator must confirm the change.
6. When all values are correct, use the PREV or NEXT key and the ↵
key to select another parameter in the same group, or another
group for the same device.
Input Data
Enter New Param Input Data
Enter New Group 4–12
Running the DeviceView Configurator
7. When all editing is finished for this device, use the PREV or NEXT
key to display the Image Functions option. Press the ↵ key to
return to the Image Functions menu.
Input Data
Image Functions To save the Parameter Image file:
Use the PREV or NEXT key to cycle through the Image Function
menu choices. Press the ↵ key to select one of the following:
• Save To Device sends the edited Parameter Image to the selected
device. Press the ↵ key again to confirm the operation.
Image Functions
Confirm
↵
• Save To File stores the edited Parameter Image in the
DeviceView Configurator’s non-volatile memory
• Set To Defaults sets the Image to default values specified in the
EDS file
• New Device returns to the Device Address display. Enter a
different node address and select another device for editing.
To exit from Enhanced Mode:
• use DONE to return to the Enhanced (EDS) option on the main
menu.
• or use the HOME key at any time to abort the current function and
return to the Enhanced (EDS) option on the main menu.
Running the DeviceView Configurator
Basic Mode
4–13
The DeviceView Configurator’s Basic Mode may be used if any of
the following applies:
• no EDS file is available for the device
• the correct EDS file is not loaded
• the operator wants to work with parameters that were not called
out in the device’s EDS file.
Note: The values selected or entered in Basic Mode may be sent to
or retrieved from a device, but edited values are not stored in the
DeviceView Configurator’s memory.
Each parameter is defined by its DeviceNet Class, Instance, and
Attribute number, which are specified by the manufacturer.
• The Class number identifies an Object Class.
• The Instance number identifies the particular occurrence of that
object within a device. A device may have a number of instances
of the same object class.
• Attributes are parameters that are part of this Object Class. They
may be Class Attributes or Instance Attributes. Attributes are the
editable values in a class or instance.
As an example, the Identity Class is Class 1. Within that Class,
Instance 1 Attribute 7 is the device’s serial number as specified by
the DeviceNet specification.
To select a device on the network:
1. Connect the DeviceView Configurator Communications port to a
DeviceNet network and go through the OnLine Setup procedure.
Config Mode
Basic
2. Use the PREV or NEXT keys to cycle through the main menu
choices until Basic appears. Press the ↵ key.
3. In the Device Address display the value flashes.
Device Address
Node:0
Select a device by entering its node address using the keyboard
numbers or the Increment/ Decrement keys. Press the ↵ key.
4–14
Running the DeviceView Configurator
▲
▼
4. The DeviceView Configurator displays the embedded product
name of the device at that address.
Device Present
2705T
If it is the desired device, press the ↵ key to configure it; see
below.
If it is not the desired device, press the NEXT key and the ↵ key to
select New Device. The DeviceView Configurator looks for the
next active node.
5. If no device is at the address, this message appears:
No Device Found
Next Device • Press the ↵ key to select Next Device. The DeviceView
Configurator tries each node in turn starting with the next higher
number, looking for a node with a device.
• Or press the NEXT key and the ↵ key to select DONE to return to
the main menu.
6. When a device is located, a Product Name is displayed. Then:
• press the ↵ key to accept the displayed device
• or press the NEXT key and the ↵ key to search for another device
at a different node address.
To configure a device using Basic Mode:
When a device is located, its embedded Product Name is displayed.
Press the ↵ key. The flashing cursor is on the value in the next three
choices. Change the value by using the numeric keys or the
Increment/Decrement keys.
1. Enter a value representing the parameter’s Class ID and press the
↵ key.
Enter Class
ID:1
2. Enter the Instance Number and press the ↵ key.
Enter Instance
Number:1
Running the DeviceView Configurator
4–15
3. Enter the Attribute Number and press the ↵ key.
Enter Attribute
Number:7
The next display screen has the specified three values as the top line.
It is similar to the Parameter menu in Enhanced (EDS) Mode.
C001 I001 A007
5 |50 |55 |48
The value is displayed as a series of one to four bytes separated by
vertical bars.
To configure the attribute
1. The flashing cursor is on the first byte on the left. Use the
numeric keys to enter a new value if required and press the ↵ key.
The flashing cursor moves to the next byte. Enter a new value and
press the ↵ key. Repeat with the remaining bytes.
Or press the NEXT key to display Val From Device and press the
↵ key. The attribute display appears and can be edited as above.
2. Use the NEXT key to display Val To Device and press the ↵ key to
send the edited attribute to the device.
C001
I001 A007
↵
Confirm
3. Press the ↵ key to confirm the value.
Some attributes are fixed (non-settable), but others may be
configured. Bring up the configurable attributes one at a time, using
information from the manufacturer’s printed data sheet.
• For the next attribute in the current class and instance, use the
NEXT key to display Change Attrib and press the ↵ key to return
to the Enter Attribute Number display.
Enter the number of the new attribute and press the ↵ key.
• For the next instance in the current class, use the NEXT key to
display Change Instance and press the ↵ key to return to the Enter
Instance Number display.
Enter the new instance number and press the ↵ key.
Enter an attribute number for this instance, press the ↵ key, and
enter its value.
4–16
Running the DeviceView Configurator
• for the next class, use the NEXT key to display Change Class and
press the ↵ key to return to the Enter Class Number display.
Enter the new class number and press the ↵ key.
Enter an instance number for this class and press the ↵ key.
Enter an attribute number for this instance, press the ↵ key, and
enter its value.
Then select or enter the value for each attribute in turn. Repeat until
all configurable attributes have been checked.
To exit from the Basic Mode menu:
• use the NEXT key to display Next Device, and press the ↵ key
The Device Address Node display comes up. Enter a different
node number to select another device.
• or use the NEXT key to display DONE, and press the ↵ key to
return to the main menu.
• or use the HOME key at any time to abort the current function and
return to the main menu.
Node Commissioning
Mode
Use this mode when only the baud rate and node address of a device
are to be configured. A commissioned device may be put on a
network later.
!
ATTENTION: Do not use this mode when the
DeviceView Configurator is connected to a network.
This mode should only be used in point-to-point
connections with a single device.
To commission the device for a network:
1. Connect the DeviceView Configurator Communications port to a
device’s DeviceNet port. Connect the Power port to an 11-25
VDC power source. See Page 3–2.
2. Check that the Termination Resistor is In. See Page 4–22.
3. Place the DeviceView Configurator OnLine.
4. Use the PREV or NEXT key to cycle through the main menu until
Node Commission is displayed, and press the ↵ key.
Config Mode
Node Commission Running the DeviceView Configurator
4–17
5. In the Device Address display the value has a flashing cursor.
Device Address
Node:0
▲
▼
6. Select the device by entering its node address using the keyboard
numbers or the Increment/ Decrement keys. Press the ↵ key. The
DeviceView Configurator displays the name of the device at that
address.
Note: Most devices use node address 63 for out-of-box default.
Device Present
2705T
7. If no device exists at this address, a message appears:
No Device Found
Next Device • Press the ↵ key to select Next Device. The DeviceView
Configurator tries each node address in turn starting with the next
higher number, looking for the address currently set in the device.
• Or press the NEXT key and the ↵ key to select DONE, to return to
the main menu.
8. When the device is located, its Product Name is displayed. Press
the ↵ key to select it.
9. The Node Address display shows the default node address. The
flashing cursor is over the value on the second line. Enter a new
address (0 to 63).
Node Address:15
Change To:23
Note: If a number of devices are being commissioned, the default
address is the last address entered, plus 1. Thus if the last device
commissioned was at address 22, the current default is 23.
4–18
Running the DeviceView Configurator
10.The Baud Rate display shows the current baud rate. Use the
Increment/Decrement keys to cycle through the values to the
desired one. Then press the ↵ key to send the new settings to the
device.
Baud Rate: 125kb
Change To: 125kb ▲
▼
If the device was successfully updated, the new settings are
displayed. Press the ↵ key
Update Success
Node: 23 125kb ↵
If the update failed, this display appears. Press the ↵ key.
Update Failed
Continue
↵
11. In either case, the Node Commission screen appears.
Node Commission
Next Device To commission another device, connect it to the DeviceView
Configurator in place of the one just commissioned, and press the ↵
key.
To return to the main menu, use the NEXT key to display DONE and
press the ↵ key.
Running the DeviceView Configurator
Auxiliary Functions Mode
4–19
Use this mode to download files from a personal computer, and to
perform housekeeping tasks in the DeviceView Configurator.
Press the HOME key at any time to exit the Aux Functions mode and
return to the Config Mode main menu.
Downloading EDS files
This function is described in detail on Page 4–4.
Downloading Operating System files
Note: This is not a routine procedure. An operating system is loaded
in the DeviceView Configurator at the factory. Use an Operating
System (OS) download only when Allen-Bradley sends an upgrade
disk.
Set up the DeviceView Configurator:
1. Connect the DeviceView Configurator Communications port to
the serial port of the personal computer. Connect the Power port
to an 11-25 VDC power source. See Page 3–5.
2. Use the PREV or NEXT key to cycle through the main menu until
Aux Functions is displayed, and press the ↵ key.
Config Mode
Aux Functions
3. Use the PREV or NEXT key to display OS Upgrade, and press the
↵ key.
Aux Functions
OS Upgrade
4–20
Running the DeviceView Configurator
To start the DeviceView Downloader Software in the personal
computer.
1. Click on the OS icon to display the Open dialog.
Or select the Choose Download menu, then select the Download
Operating System command.
2. Click on the .HEX filename in the List Files of Type: box.
Operating System files have a .HEX extension.
The default directory is the Install Directory. If the new operating
system is somewhere else in the system, click on the correct drive
and directory to bring the .HEX file to the window.
3. Click the OK button to start the download.
Or click the Cancel button to cancel the procedure.
4. The DeviceView Configurator waits while the file is selected and
downloaded by the personal computer. The display reports one of
these results:
OS Upgrade
Download Done
↵
Download Abort
Reset
5. In either case, press the ↵ key to reset the DeviceView
Configurator.
To abort the download, press the HOME key at any time.
↵
Running the DeviceView Configurator
4–21
Clearing unneeded EDS files from DeviceView Configurator
memory
The DeviceView Configurator can store up to 31 EDS files in its
flash memory, depending on how large they are. Sooner or later the
EDS Download function will not have enough room in the
DeviceView Configurator to store new files.
Note: Files are not overwritten. If there is not enough memory when
a file is downloaded from the personal computer, the download is
aborted. Error messages appear on the computer screen and the
DeviceView Configurator display.
Use the EDS File View/Delete command to see which EDS files are
loaded and to erase selected files from DeviceView Configurator
memory.
1. Use the PREV or NEXT key to cycle through the main menu until
Aux Functions is displayed, and press the ↵ key.
Aux Functions
EDS View/Delete
2. Use the PREV or NEXT key to display EDS File View/Delete, and
press the ↵ key to display the first EDS file.
3. Use the PREV or NEXT key to view each of the EDS files loaded
in the DeviceView Configurator.
EDS View/Delete
Redistation{1}
4. Press the ↵ key to mark each file to be deleted. A check mark
appears to the right of the filename.
EDS View/Delete
Redistation{1}√
Press the ↵ key again to unmark the file name and remove the
check mark.
5. After all EDS files in memory have been displayed, the last item
is DONE. Press the ↵ key.
If any files were marked for deletion, they are removed at this time.
Whether files are deleted or not, the display returns to the Aux
Functions EDS Download option.
4–22
Running the DeviceView Configurator
Setting the Terminating Resistor
The DeviceNet network has a terminating resistor at each end of the
network. The DeviceView Configurator has a terminating resistor as
well, which can be enabled or disabled. When:
• the DeviceView Configurator is on a network, the resistor should
be OUT
• the DeviceView Configurator is connected to one other device
point-to-point, the resistor should typically be IN.
!
ATTENTION: If the resistor is enabled when the
DeviceView Configurator is OnLine, it could cause
network errors.
To set the resistor:
1. Use the PREV or NEXT key to cycle through the main menu until
Aux Functions is displayed, and press the ↵ key.
Aux Functions
Termination
2. Use the PREV or NEXT key to display Termination, and press the
↵ key.
3. Use the Increment or Decrement key to toggle the resistor
between Out and In (Circuit), and press the ↵ key.
Termination
Resistor: Out
▲
▼
4. The display returns to the Aux Functions EDS Download screen.
The current setting is stored in flash memory and becomes the
default the next time the DeviceView Configurator is powered up.
Troubleshooting and
Maintenance
This chapter covers the following topics:
• Cleaning the display window
• Hardware problems
• Operating problems
Cleaning the Display
Window
To clean the display window:
1. Disconnect power from the DeviceView Configurator at the
power source.
2. Clean the display with a mild soap or detergent, using a clean
sponge or soft cloth.
3. To prevent water spots, dry the display with a chamois or moist
cellulose sponge.
!
ATTENTION: Do not scrub the window or use
brushes.
Abrasive cleansers or solvents may damage the
window.
Some types of paper towels may scratch the window.
To remove paint and grease:
1. Disconnect power from the DeviceView Configurator at the
power source.
2. Remove paint splashes and grease as quickly as possible by
rubbing lightly with isopropyl alcohol.
3. Clean the display with a mild soap or detergent, using a clean
sponge or soft cloth.
4. To prevent water spots, dry the display with a chamois or moist
cellulose sponge.
5–2
Troubleshooting and Maintenance
Hardware Problems
Use a voltmeter to verify that the correct power source is connected
to the terminal.
ATTENTION: Always disconnect power when
checking wiring connections. If power is left on, there
may be severe electrical shock which can injure people
and damage equipment.
!
No internal components can be serviced by the user. If DeviceView
Configurator has what appear to be hardware problems, call your
Allen-Bradley distributor for assistance.
Operating Problems
The following messages may appear if a problem occurs while
DeviceView configurator is running.
Error Messages
Message
Reason
Corrective Action
DeviceView Configurator
did not pass one of the
self-tests at startup. The
failed self-test is identified
by “xx” (see test code table
below)
The Operating System may
have a problem. Call the
local Allen-Bradley
distributor
Critical Fault
Code xxxxx RESET
DeviceView Configurator
has a major problem
Make a note of the code
number and call your local
Allen-Bradley distributor for
help.
DownLoad Abort
Continue
There is a problem in
downloading an EDS or OS
file
Check the connections
between the computer and
the configurator.
Check that the correct Com
port on the computer is
specified.
Power–Up Test
#xx FAILED
↵
↵
If you encounter a problem that is not listed in the table, contact your
local Allen-Bradley distributor for assistance.
xx: Codes for Failed Power-Up Tests
Code
Meaning
10
Internal RAM test failure
11
External RAM test failure
20
Core ROM test failure
30
CAN hardware failure
Specifications
LCD Display
Character Size (H x W)
Character Format
Column and Character
Backlight
Contrast
Display Viewing Area (H x W)
Viewing Angle
0.22 x 0.12 in (5.56 x 2.96 mm)
5 x 7 dot matrix
2 lines x 16 characters
Yellow-green LED, fixed intensity
Fixed
0.58 x 2.35 in (15mm x 60 mm)
Horizontal ± 30
Vertical -20 to +30
Keypad
Keypad Type
Operation Force
Operational Life
Tactile embossed, domed keys,
sealed membrane
16 oz. (453 grams )
1 million operations
Electrical
Communications Port
Communication Distances
Input Voltage Range
Input Power, typical
Input Current
DeviceNet baud rates
RS-232
50 ft. (15 meters) maximum
11-25 VDC
1.8 Watt
164 mA @ 11 Volts
72 mA @ 25 Volts
125k, 250k, 500k
Environmental
Operating Temperature
Storage Temperature
Relative Humidity
Shock
Agency Rating
0 to 55C (32 to 131° F)
-20 to 70° C (-4 to 158° F)
5 to 95%, non-condensing
30G operating
50G non-operating
UL, C-UL
A–2
Specifications
Mechanical
Dimensions (Approximate)
Height:
Width:
Depth:
5.1 inch (129.5 mm)
3.55 inch (90.2 mm)
0.975 inch (24.8 mm)
Communications connection
PIN #
8
7
6
5
3
4
2
1
8-Pin Female C DIN Connector
1
2
3
4
5
6
7
8
Shell
Signal Name
11-25 VDC from DeviceNet
VDC Common
Cable Shield
Receive Data (RXD)
CAN-L
CAN-H
Transmit Data (TXD)
Signal Ground
Cable Shield
Startup, Test, and Main
Menu
POWER-UP/RESET
Power–Up Test
#xx FAILED
↵
↵
To page B–7
(OS Upgrade)
Critical Fault
Code:xxxxx RESET
No OS or Invalid OS
RESET
↵
Config Mode
OnLine Setup
Prev/Next
↵
Config Mode
Enhanced (EDS) Prev/Next
Config Mode
Basic
↵
Prev/Next
↵
Config Mode
Node Commission Prev/Next
Config Mode
Aux Functions
To page
B–2
To page
B–4
↵
To page
B–7
To page
B–3
To page
B–6
B–2
Menu Structure
OnLIne Setup Mode
Online Setup Mode is used to set the baud rate and node address for
the DeviceView Configurator itself.
From Page
B–1
OnLine Setup
Mode...
Fail or ↵
Auto Baud Rate
Detect ... Abort ↵
AutoBaud Failed
Adjust Manually ↵
DeviceNet Port
Baud Rate:125kb
↵
▲
▼
↵
↵ No Changes
DeviceView
Node Addr:61
↵ After Changes
Setup Changed
Save Changes
↵
Setup File
Updating...
Prev/Next
↵
Setup Changed
Continue
Setup File
Copying to Mem..
DUP MAC Check
Wait...
OnLine Success
Node:61 125kb ↵
↵
RETURN TO
MAIN MENU
DUP MAC ID Fail ↵
Continue
↵
Menu Structure
Node Commission Mode
B–3
Node Commission Mode is used to set node address and baud rate
only.
From Page
B–1
Node Commission
Mode...
CFG Not OnLine
Continue
↵
↵
RETURN TO
MAIN MENU
Device Address
Node: 63
↵
No Device Found
Next Device
↵
Device Present
<product name>
Device Search
Wait...
Prev/Next
Prev/Next
No Device Found
Continue
↵
↵
Node Address:63
Change To:xx
RETURN TO
MAIN MENU
Device Present
Next Device
↵
Baud Rate:125kb
Change To:xxxxx
↵
Updating Device
Wait...
Update Success
Node:62 250kb ↵
Update Failed
Continue
↵
↵
↵
Node Commission
Next Device
Prev/Next
Node Commission
Done
↵
RETURN TO
MAIN MENU
↵
↵
B–4
Menu Structure
Enhanced (EDS) Mode
Enhanced Mode is used to configure devices that have EDS files
loaded in the DeviceView Configurator.
From Page
B–1
Enhanced Config
Mode...
From Page
B–5
↵
OffLine
OnLine
Device Address
Node: 30
↵
No Device Found
Next Device
↵
Device Search
Wait...
Prev/Next
No Device Found
Continue
↵
Device Present
<product name>
Prev/Next
↵
Device Present
Next Device
Checking EDS
Files...
EDS File Select
<File 1,2...n>
↵
↵
EDS Mismatch
Enter New EDS
Prev/Next
EDS Mismatch
Continue
↵
To page
B–5
↵ No Matching EDS
Files Found
↵
↵
Menu Structure
Enhanced Mode
(Continued)
From Page
B–4
Image Functions
Get From Device
↵
Image Functions
Get From File
↵
↵
Image Functions
Save To Device
▲
▼
* <ParamName>
Val: xxxxx units <ParamName>
Val From Device
↵
Prev/Next
Prev/Next
Image Functions
Save To File
<ParamName>
Val To Device
↵
Prev/Next
Prev/Next
Image Functions
Set To Defaults
<ParamName>
Val From File
↵
Prev/Next
Prev/Next
To Page
B–4
Enter Param:
<ParamNames>
Prev/Next
Prev/Next
↵
▲
▼
↵
Prev/Next
Image Functions
View Parameters
Enter Group:
<Group Names>
↵
Prev/Next
↵
B–5
↵ Image Functions
New Device
<ParamName>
Enter New Param
↵
Prev/Next
Prev/Next
Image Functions
Done
<ParamName>
Enter New Group
↵
Prev/Next
RETURN TO
MAIN MENU
<ParamName>
Image Functions
*
If a String of Bytes
If a Bit Field Type
<ParamName>
<www|xxx|yyy|zzz>
<ParamName>
<bitname>
↵
If an Enum. Type
<ParamName>
<enumtext>
B–6
Menu Structure
Basic Mode
Basic Mode is used to configure devices that have no EDS files
available.
From Page
B–1
Basic Config
Mode...
CFG Not OnLine
Continue
↵
↵
RETURN TO
MAIN MENU
Device Address
Node: 30
↵
No Device Found
Next Device
↵
Cccc Iiii Aaaa
www|xxx|yyy|zzz
Device Search
Wait...
Prev/Next
Prev/Next
↵ No Device Found
Continue
Device Present
<product name>
↵
Cccc Iiii Aaaa
Val From Device ↵
Prev/Next
Prev/Next
RETURN TO
MAIN MENU
↵
Device Present
Next Device
Cccc Iiii Aaaa
Val To Device
Enter Class
ID:xxx
↵
Cccc Iiii Aaaa
Change ↵Instance
Prev/Next
↵
Enter Attribute
Number:xxx
↵
Cccc Iiii Aaaa
Change Attrib
Prev/Next
Enter Instance
Number:xxx
↵
↵
Prev/Next
↵
↵
Cccc Iiii Aaaa
Change Class
Prev/Next
↵
Cccc Iiii Aaaa
New Device
Prev/Next
Cccc Iiii Aaaa
Done
↵
RETURN TO
MAIN MENU
Menu Structure
Auxiliary Functions Mode
B–7
The Auxiliary Functions have to do with downloading EDS files or
Operating System files from the personal computer and performing
housekeeping tasks.
From Page
B–1
Aux Functions
Mode...
Aux Functions
EDS Download
↵
Prev/Next
↵
EDS View/Delete
<File 1, 2...n>
EDS View/Delete
Done
Unchanged
↵
Aux Functions
EDS View/Delete Home
Prev/Next
Aux Functions
Done
↵
RETURN TO
MAIN MENU
Prev/Next
Aux Functions
Termination
Changed
File Table
Updating...
EDS Download
Waiting...
Prev/Next
↵
Aux Functions
OS Upgrade
↵
EDS File
Downloading...
EDS File
Copying to Mem...
OS Upgrade
Waiting DownLoad
EDS File
DownLoad Done
Home
OS Upgrade
DownLoading
↵
DownLoad Abort
↵
RESET
↵
OS Upgrade
Copying to Mem...
Termination
Resistor: Out
↵
RESET
▲
▼
Unchanged
Changed
↵
OS Upgrade
↵
Download Done
↵
Setup File
Updating...
Attribute
In a DeviceNet network, the part of the Object Class that is edited. It
may be a Class Attribute or an Instance Attribute.
Autobaud
In this manual, the process by which the DeviceView Configurator
sets the baud rate automatically.
CAN chip
The Controller Area Network chip. When enabled, it allows a device
to become active on a DeviceNet network.
Configurator
A device or system that can configure devices on a network. The
configurator discussed in this manual is the DeviceNet Hand-Held
Configurator.
Device
A hardware component that can send and receive data. In this
manual, device refers specifically to a DeviceNet device that may be
connected to and configured by the DeviceView Configurator.
DeviceNet network
A system that provides connections among devices of many kinds.
High-level devices such as controllers can send and receive
information from low-level devices such as sensors and actuators.
The trunkline of the network contains both signal and power lines.
DeviceView
The product name of the DeviceNet Hand-Held Configurator. In this
manual it is referred to as either DeviceView Configurator or
configurator.
Download
To transfer information from a computer to a device.
DUP MAC ID Check
A check that a device’s address is unique on the DeviceNet network.
(MAC = Media Access Control). In this manual, a check performed
by the DeviceView Configurator on its own address.
G–2
EDS file
An Electronic Data Sheet supplied by the device manufacturer. It
contains information used to configure the device.
Image
In this manual, the RAM–based data associated with the current
configuration session. The image is volatile, but may be stored in the
device or in a file in the configurator’s flash memory.
Instance
In a DeviceNet system, a particular occurrence of a class within a
device. A device may have a number of instances of the same object
class.
Object Class
In a DeviceNet system, a group of related data specified by a
number.
OffLine
The state in which the DeviceView Configurator is not intended to
communicate over the DeviceNet network or with an individual
device.
OnLine
The state in which the configurator is assumed to be physically
connected to a DeviceNet network or to an individual device, and is
expected to communicate with a specific device.
Operating system (OS)
A master control program that allows an operator to control what the
device does.
Index
/2 /).%*)- * ! 4 "%'!- .!,(%).%)#
,!-%-.*,
-% * ! 4 *((/)%.%*)*))!.%*) %#,(- 4 +*,. *(+/.!, *))!.%*) %#,(-
*)"%#/,%)# !0%!- !0%!!. )!.1*,& $))!' *))!.%*) %#,(- -!'!. !0%! -% * ! -!'!. !0%! * ! %-+'3 *)0!).%*)- %-+'3 1%) *1 '!)%)# *1)'* !, -*".1,!
%)-.''.%*) -/((,3 *1)'* %)#
"%'!- "%'!-/((,3 "%'!- '!,%)# ",*( *)"%#/,.*, *1)'* 4 ! %.%)# 4 -!'!.%)# 4 )$)! * ! 4 "/).%*)- -/((,3 $!'+ +!,-*)' *(+/.!, !3+ (%) (!)/ -/((,3 (!(*,3
"'-$ (* !(%) (!)/ -/((,3 !.1*,& !0%!!. )!.1*,&
* ! *((%--%*) * ! 4
I–2
Index
#$ )
" & !#! "% " # % &!
# !" ) !# "$! ( "% # "'" " ' #!# !""#! #!$"# %$ " # % Rockwell Automation helps its customers receive a superior return on their investment by bringing
together leading brands in industrial automation, creating a broad spectrum of easy-to-integrate
products. These are supported by local technical resources available worldwide, a global network
of system solutions providers, and the advanced technology resources of Rockwell.
Worldwide representation.
Argentina • Australia • Austria • Bahrain • Belgium • Bolivia • Brazil • Bulgaria • Canada • Chile • China, People’s Republic of • Colombia • Costa Rica • Croatia • Cyprus
Czech Republic • Denmark • Dominican Republic • Ecuador • Egypt • El Salvador • Finland • France • Germany • Ghana • Greece • Guatemala • Honduras • Hong Kong
Hungary • Iceland • India • Indonesia • Iran • Ireland • Israel • Italy • Jamaica • Japan • Jordan • Korea • Kuwait • Lebanon • Macau • Malaysia • Malta • Mexico • Morocco
The Netherlands • New Zealand • Nigeria • Norway • Oman • Pakistan • Panama • Peru • Philippines • Poland • Portugal • Puerto Rico • Qatar • Romania • Russia • Saudi
Arabia • Singapore • Slovakia • Slovenia • South Africa, Republic of • Spain • Sweden • Switzerland • Taiwan • Thailand • Trinidad • Tunisia • Turkey • United Arab Emirates
United Kingdom • United States • Uruguay • Venezuela
Rockwell Automation Headquarters, 1201 South Second Street, Milwaukee, WI 53204-2496 USA, Tel: (1) 414 382-2000 Fax: (1) 414 382-4444
Rockwell Automation European Headquarters, Avenue Hermann Debroux, 46, 1160 Brussels, Belgium, Tel: (32) 2 663 06 00, Fax: (32) 2 663 06 40
Rockwell Automation Asia Pacific Headquarters, 27/F Citicorp Centre, 18 Whitfield Road, Causeway Bay, Hong Kong, Tel: (852) 2887 4788, Fax: (852) 2508 1846
World Wide Web: http://www.ab.com
Publication 2707-806 – December 1995
40061–309–01(A)
Copyright 1995 Allen-Bradley Company, Inc. Printed in USA