1
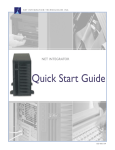
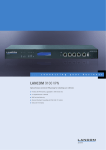
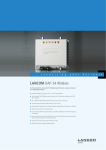
N E T I N T E G R AT I O N T E C H N O L O G I E S I N C .
NET INTEGRATOR
Quick
Start Guide
602-001-02
N E T I N T E G R AT I O N T E C H N O L O G I E S I N C .
Meet Your Net Integrator
Lite, Mark I, Mark II models
Display panel
Control panel
Direction arrows
Enter button
Cancel button
Power button
2
Quick Start Guide
Front View
N E T I N T E G R AT I O N T E C H N O L O G I E S I N C .
Back View
Main power switch
(note the Power Slide Switch below: 115 North America/230 Europe)
Power Socket
Ethernet Port 0
Ethernet Port 1
Ethernet Port 2
Quick Start Guide
3
N E T I N T E G R AT I O N T E C H N O L O G I E S I N C .
Meet Your Net Integrator
Mark IIIR model
Front View
Control panel
Display panel
Enter button
Cancel button
Direction arrows
Power button
4
Quick Start Guide
N E T I N T E G R AT I O N T E C H N O L O G I E S I N C .
Back View
Power Socket
Ethernet Port 1
Ethernet Port 2
Ethernet Port 0
Quick Start Guide
5
N E T I N T E G R AT I O N T E C H N O L O G I E S I N C .
Step 1
CHECKING YOUR
NET INTEGRATOR COMPONENTS
Your Net Integrator package should contain the following:
1.
2.
3.
4.
Net Integrator
Power cord
Category 5 Ethernet cables (3)
Hard Disk Keys (2) - Lite/Mark I/ Mark II
or Face Plate Keys (2) - Mark IIIR
5. Rails (2) - Mark IIIR only
6. Net Integrator User Manual CD
7. Quick Start Guide
6
Quick Start Guide
N E T I N T E G R AT I O N T E C H N O L O G I E S I N C .
Step 2
A
CONNECTING YOUR
NET INTEGRATOR
Skip (D) and (E) if your office is already connected to the Internet.
Ensure that the Net Integrator has adequate ventilation.
Place the back of the unit at least one to two feet (12”-24”) away from the wall.
B
To plug in the Net Integrator:
i. Connect one end of the power
cord into the power socket
(located on the back of the Net
Integrator).
ii. Connect the other end of the
power cord into a standard
115 Volt AC (North America) or
220/240 Volt AC (Europe)
power outlet.
C
To connect to your Local Area Network (LAN):
i. Connect one end of a category 5 or higher Ethernet cable into Ethernet Port 0
(located on the back of the Net Integrator).
ii. Connect the other end of the cable into your Ethernet hub.
Quick Start Guide
7
N E T I N T E G R AT I O N T E C H N O L O G I E S I N C .
Skip (D) and (E) if your office is already connected to the Internet.
D
If you are using a high-speed cable modem or a DSL
modem:
i. Connect one end of a 10baseT Ethernet cable into
Ethernet Port 1 (located on the back of the Net
Integrator).
ii. Connect the other end of the cable into your cable
modem or DSL modem.
E
F
Turn on the main power switch (located on the back of Lite, Mark I and Mark II Net
Integrator models, and on the front of the Mark IIIR Net Integrator model).
Wait two or three minutes as the Net Integrator discovers its surroundings and
autoconfigures an IP address. You now have three options:
• If an automatically assigned IP address (e.g. 192.168.0.1) appears on the display panel and
you wish to accept this IP address, proceed to Step 4 in this guide.
• If an automatically assigned IP address appears on the display panel and you wish to change
this IP address, proceed to Step 3 in this guide.
• If, after 3 minutes, the display panel continues to read Choosing Address, this means the Net
Integrator is unable to automatically select an IP address. Go directly to Step 3 in this guide.
8
Quick Start Guide
N E T I N T E G R AT I O N T E C H N O L O G I E S I N C .
Step 3
MANUALLY ASSIGNING AN IP ADDRESS
Proceed to Step 4 if you do not need to manually assign an IP address.
Follow these instructions if:
• the Net Integrator is unable to automatically select an IP address.
• you want to manually change the chosen IP address.
A
Press the Enter button on the front control
panel. The following menu appears on the
display panel:
MENU [Net] Info
Dialer System
B
C
E
Using the direction arrows, navigate to
[Netmask]. Press Enter. The default
Netmask (255.255.255.0) displays.
F
To change the value of the Netmask*:
[Net] is already selected. Press the Enter
button. The following menu displays:
i. Use the Left and Right arrows to move
the cursor from digit to digit.
NETWORK [IP addr]
Netmask DHCP
ii. Use the Up and Down arrows to increase
or decrease the value of a digit.
[IP addr] is already selected. Press the Enter
button.
iii. Press the Enter button. The new Netmask
is saved.
The current IP address (e.g. 192.168.0.1)
displays. If the Net Integrator was unable to
select an IP address, 0.0.0.0 displays.
D
To change the value of the IP address*:
*Please Note: In most circumstances, you do not need
to change the default Netmask number.
G
Return to the standard front panel display
by pressing the Cancel button twice.
i. Use the Left and Right direction arrows to
move the cursor from digit to digit.
ii. Use the Up and Down direction arrows to
increase or decrease a digit's value.
iii. Press the Enter button. The new IP address
is saved.
*Important: Consult your System Administrator for the correct
IP address. If configuring your Internet connection for the
first time, enter the following IP address: 192.168.0.1
Quick Start Guide
9
N E T I N T E G R AT I O N T E C H N O L O G I E S I N C .
Step 4
A
CONFIGURING YOUR DESKTOP
Note: Desktop displays may vary according to Windows version and operating system.
iii. Select Microsoft in the Manufacturers
section of the screen. Select TCP/IP in the
Network Protocols section of the screen.
Click on the OK button. TCP/IP should
now display on the Network screen.
In Windows (on your workstation), select
Start > Settings > Control Panel.
B
Select Network from the list.
The Network screen displays:
D
Select TCP/IP from the installed
components list on the Network screen.
Click on the Properties button.The TCP/IP
Properties screen displays.
E
Click on the IP Address tab. Select Obtain
an IP address automatically.
F
To configure DNS settings:
i. Click on the DNS tab. Select Enable DNS.
ii. Select all entries in the DNS Server Search
Order section of the screen and click on
the Remove button.
iii. Select all entries in the Domain Suffix
Search Order section of the screen and
click on the Remove button.
iv. Select Disable DNS.
C
If TCP/IP does not display in the installed
components list:
G
Click on the Gateway tab. Select any
entries in the Installed gateways section of
the screen and click on the Remove button.
H
Click on the WINS Configuration tab. Select
all entries in the WINS Server Search Order
section of the screen and click on the
Remove button. Select Use DHCP for WINS
Resolution.
I
Click on the OK button.
J
Reboot your computer.
i. Click on the Add button. The Select Network
Component Type screen displays.
ii. Select Protocol from the list. Click on the Add
button. The Select Network Protocol screen
displays.
10
Quick Start Guide
N E T I N T E G R AT I O N T E C H N O L O G I E S I N C .
Step 5
CONNECTING TO WEBCONFIG
A
Open an Internet browser on your workstation.
Newer versions of Netscape or Microsoft browsers
are recommended.
B
Read the IP address on the Net Integrator’s
display panel. For demonstration purposes, we will
use the following IP address: 192.168.0.1
C
D
Type http://192.168.0.1:8042 into the browser's
address bar. Press Enter on your keyboard. The
Create Administrator Account page displays:
E
Select Yes if want to reserve a disk for idb
backup. Select No if you want to use all
available disks for a RAID array. Refer to
Chapter 21: Disk Management in the manual for
more information.
F
Click on the Save Changes button.The
Administrator Account Created page displays.
G
Click on the Log in button.
H
The Enter Network Password window displays.
Enter your username and password. Click on
the OK button. WebConfig’s System Status page
displays:
Type in the following information:
i. a User ID. The default User ID is root - you can use
this name or you can create a new User ID by
typing over the existing text.
ii. the administrator's full name.
iii. a password. Retype the password to ensure it was
typed properly.
iv. your organization's registered Internet domain
name (e.g. example.com). If you do not have a
registered domain name, leave the default domain
name.
Quick Start Guide
11
N E T I N T E G R AT I O N T E C H N O L O G I E S I N C .
Step 6
CONFIGURING YOUR INTERNET CONNECTION
If the Internet Status option on the
System Status page has a green light,
you do not have to perform these
steps.
I.
CABLE MODEM or DSL MODEM (not requiring PPPoE protocol)
If your cable modem or DSL modem does not configure automatically (i.e. the Internet Status option does
not have a green light), refer to Advanced Network Settings in Chapter 3 of the Net Integrator User Manual
for information on how to set up an IP address and default gateway using data provided by your Internet
Service Provider (ISP).
II.
LEASED LINE CONNECTION
Please refer to Configuring a Leased Line Connection in Chapter 3 of the Net Integrator User Manual for full
instructions.
III.
DSL MODEM (requiring PPPoE protocol)
A
From the Network Setup menu on the System Status page, select Dial-up.
B
The Dial-up Networking Setup page displays. Click on the appropriate ADSL Action button.
C
On the screen that displays:
i. type in your account user name (provided by your ISP).
ii. type in your account password. Retype this password to ensure it was typed properly.
iii. select Yes to enable the DSL connection.
D
Click the Save Changes button.
For further details, please consult your User Manual.
12
Quick Start Guide
N E T I N T E G R AT I O N T E C H N O L O G I E S I N C .
Net Integrator Technical Support
Net Integration Technologies’ toll-free technical support line:
1-86-NET-ITECH (1-866-384-8324)
Outside of North America call 905-946-1777
Hours of operation: 8:30 am to 5:30 pm EST, Monday to Friday
Email support questions to [email protected].
Quick Start Guide
13