Transcript
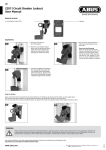
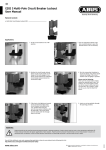
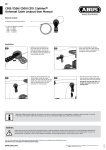
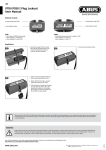
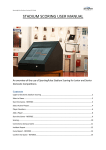
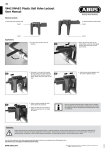
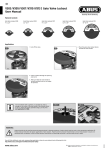
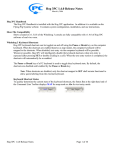
B835 | SAFETY REDBOX™
User Manual
Material Content:
a. SAFETY REDBOX™ B835
b. Wall Bracket
Application:
1. Open the cover using the push
button on the left side.
1.
3. Close the cover. Make sure that
it locks into place. Each employee
involved in the maintenance then
hangs his own personal padlock in
one of the openings provided for this
purpose in the cover and locks it.
All enclosed keys are now securely
locked until the last employee
involved in the maintenance
removes his personal padlock
again.
3.
2. Safely isolate the individual power
sources and collect the appropriate
keys inside the SAFETY REDBOX™.
2.
4.If other power sources have to be
isolated after the maintenance work
has started, you can subsequently
insert the keys for them in the key
slot in the cover. The specially shaped
key slot enables you to insert them
with the key ring and keychain if
necessary.
4.
5. After completion of the work and
removal of all personal padlocks,
the SAFETY REDBOX™ can be opened
and the keys to unlock the power
sources can be removed.
Avoid the time-consuming search for required lockout supplies! Hang one Safety Redbox™ stuffed with the padlocks needed for the lockout
in the location where the procedure takes place. Safety where you want it, when you need it.
When not in use, Safety Redbox™ can be used to store safety locks and other small devices needed for lockout/tagout procedures.
Wall bracket
Combine the advantages of the fixed
reference point with mobile use
of the SAFETY REDBOX™ thanks to the
wall bracket. Attach the wall bracket to
the wall using the enclosed screws and
dowels. Hang the box with its back on
the wall bracket and remove it at any
time if necessary. The box can also be
locked to the wall bracket using the
internal quick-release button. When
the button is in the locked position,
the box cannot be removed from the
wall bracket when closed. Slide the
quick-release button to the left to
lock it or to the right to open it.
Fixed wall mounting
The SAFETY REDBOX™ can be screwed
firmly to the wall via the two holes
in the rear panel. The handle can
be unscrewed if necessary for this
purpose.
WARNING:
Product should only be used by personnel properly trained in lockout procedures. Product should only be used on the appropriate application (s).
Follow product instructions for proper application of each product. Properly trained personnel should check to ensure that product is secure and
equipment will not operate. Failure to follow product instructions and warnings may result in serious bodily inury or death.
www.abus.com
Subject to technical alterations. No liability for mistakes and printing errors.
ABUS | D 58292 Wetter | Germany
©
07/2015
You will find additional notes and corresponding application videos to every lockout device following the link:
http://www.abus.com/eng/Service/Videos/Industrial-safety