1
Maestro Overview
Maestro 8.0
Overview
Schrödinger Press
Copyright © 2007 Schrödinger, LLC. All rights reserved. CombiGlide, Epik, Glide,
Impact, Jaguar, Liaison, LigPrep, Maestro, Phase, Prime, PrimeX, QikProp, QikFit,
QikSim, QSite, SiteMap, and Strike are trademarks of Schrödinger, LLC.
Schrödinger and MacroModel are registered trademarks of Schrödinger, LLC.
MCPRO is a trademark of William L. Jorgensen.
To the maximum extent permitted by applicable law, this publication is provided “as
is” without warranty of any kind. This publication may contain trademarks of other
companies.
Please note that any third party programs (“Third Party Programs”) or third party
Web sites (“Linked Sites”) referred to in this document may be subject to third
party license agreements and fees. Schrödinger, LLC and its affiliates have no
responsibility or liability, directly or indirectly, for the Third Party Programs or for
the Linked Sites or for any damage or loss alleged to be caused by or in connection
with use of or reliance thereon. Any warranties that we make regarding our own
products and services do not apply to the Third Party Programs or Linked Sites, or
to the interaction between, or interoperability of, our products and services and the
Third Party Programs. Referrals and links to Third Party Programs and Linked Sites
do not constitute an endorsement of such Third Party Programs or Linked Sites.
The Schrödinger software distribution includes third-party products. For details of
third-party software copyrights, terms, and conditions, see the Legal Notices for
Third-Party Software, at $SCHRODINGER/docs/html/third_party_legal.html.
August 2007
Document Conventions
In addition to the use of italics for names of documents, the font conventions that are used in
this document are summarized in the table below.
Font
Example
Use
Sans serif
Project Table
Names of GUI features, such as panels, menus,
menu items, buttons, and labels
Monospace
$SCHRODINGER/maestro
File names, directory names, commands, environment variables, and screen output
Italic
filename
Text that the user must replace with a value
Sans serif
uppercase
CTRL+H
Keyboard keys
In descriptions of command syntax, the following UNIX conventions are used: braces { }
enclose a choice of required items, square brackets [ ] enclose optional items, and the bar
symbol | separates items in a list from which one item must be chosen. Lines of command
syntax that wrap should be interpreted as a single command.
File names and paths are generally represented with the UNIX conventions. If you are running
on Windows, replace the forward slash character / with the backslash character \.
In this document, to type text means to type the required text in the specified location, and to
enter text means to type the required text, then press the ENTER key.
References to literature sources are given in square brackets, like this: [10].
Maestro 8.0 Overview
3
4
Maestro 8.0 Overview
Maestro Overview
Maestro Overview
Maestro is the graphical user interface for all of Schrödinger’s products: CombiGlide™, Epik™,
Glide™, Impact™, Jaguar™, Liaison™, LigPrep™, MacroModel®, Phase™, Prime™, PrimeX™,
QikProp™, QSite™, SiteMap™, and Strike™. It contains tools for building, displaying, and
manipulating chemical structures; for organizing, loading, and storing these structures and
associated data; and for setting up, monitoring, and visualizing the results of calculations on
these structures. This chapter provides a brief introduction to Maestro and some of its capabilities. For more information on any of the topics in this chapter, see the Maestro User Manual.
General Interface Behavior
Most Maestro panels are amodal: more than one panel can be open at a time, and a panel need
not be closed for an action to be carried out. Each Maestro panel has a Close button so you can
hide the panel from view. Maestro also uses dialog boxes, which are modal: other panels
cannot be used until the dialog box is dismissed. Some dialog boxes permit interaction with the
Workspace, so that you can select atoms and manipulate the structure.
Maestro supports the mouse functions common to many graphical user interfaces. The left
button is used for choosing menu items, clicking buttons, and selecting objects by clicking or
dragging. This button is also used for resizing and moving panels. The right button displays a
shortcut menu. Other common mouse functions are supported, such as using the mouse in
combination with the SHIFT or CTRL keys to select a range of items in a list and select or deselect a single item without affecting other items. The mouse wheel is supported for scrolling
vertically in tables, lists, and text areas, and can be used in combination with the SHIFT key for
larger movements. The wheel is also used for zooming in the Workspace and other special
functions. See Table 1 on page 12 and Table 3 on page 19 for summaries of mouse operations.
In addition, the mouse buttons are used for special functions described later in this chapter.
These functions assume that you have a three-button mouse. If you have a two-button mouse,
ensure that it is configured for three-button mouse simulation (the middle mouse button is
simulated by pressing or holding down both buttons simultaneously).
Maestro 8.0 Overview
5
Starting Maestro
The mechanism for starting Maestro is different for UNIX and Windows hosts. This mechanism is described for each of these host types in the following subsections.
Starting Maestro on a Windows Host
To start Maestro, double-click the Maestro icon on the desktop, or use the Start menu. Maestro
is in the Schrödinger submenu. This submenu can also be used to open the release notes and
the documentation index in your browser.
To start Maestro with a specific project, double-click the zipped project. Zipped projects have a
.prjzip extension, and are read-only. To replace the zipped project, you must first save it,
then zip it, then copy it over the old project. Zipped projects can also be linked to a web page:
clicking on the link to project in your browser opens the project in Maestro.
Starting Maestro on a UNIX Host
Before starting Maestro, you must first set the SCHRODINGER environment variable to point to
the installation directory. To set this variable, enter the following command at a shell prompt:
csh/tcsh:
setenv SCHRODINGER installation-directory
bash/ksh:
export SCHRODINGER=installation-directory
You might also need to set the DISPLAY environment variable, if it is not set automatically
when you log in. To determine if you need to set this variable, enter the command:
echo $DISPLAY
If the response is a blank line, set the variable by entering the following command:
csh/tcsh:
setenv DISPLAY display-machine-name:0.0
bash/ksh:
export DISPLAY=display-machine-name:0.0
For local display, you should omit display-machine-name.
After you set the SCHRODINGER and DISPLAY environment variables, you can start Maestro
using the command:
$SCHRODINGER/maestro options
If you add the $SCHRODINGER directory to your path, you only need to enter the command
maestro. Options for this command are given in Section 2.1 of the Maestro User Manual.
6
Maestro 8.0 Overview
The Maestro Main Window
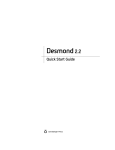
The Maestro main window is shown in Figure 1. The main window components are listed
below.
The following components are always visible:
• Title bar—displays the Maestro version, the project name (if there is one) and the current
working directory.
• Auto-Help—automatically displays context-sensitive help.
Figure 1. The Maestro main window.
Maestro 8.0 Overview
7
• Menu bar—provides access to panels.
• Workspace—displays molecular structures and other 3D graphical objects.
The following components can be displayed or hidden by choosing the component from the
Display menu. Your choice of which main window components are displayed is persistent
between Maestro sessions.
• Toolbar—contains buttons for many common tasks and provides tools for displaying and
manipulating structures, as well as organizing the Workspace.
• Status bar—displays information about a particular atom, or about structures in the
Workspace, depending on where the pointer pauses (see Section 2.5 of the Maestro User
Manual for details):
• Clipping planes window—displays a small, top view of the Workspace and shows the
clipping planes and viewing volume indicators.
• Sequence viewer—shows the sequences for proteins displayed in the Workspace. See
Section 2.6 of the Maestro User Manual for details.
• Command input area—provides a place to enter Maestro commands.
When a distinction between components in the main window and those in other panels is
needed, the term main is applied to the main window components (e.g., main toolbar).
You can expand the Workspace to occupy the full screen, by pressing CTRL+=. All other
components and panels are hidden. To return to the previous display, press CTRL+= again.
The Menu Bar
The menus on the main menu bar provide access to panels, allow you to execute commands,
and control the appearance of the Workspace. The main menus are as follows:
• Maestro—save or print Workspace images, set preferences, change directories, enter system commands, save or load a panel layout, set up Maestro command aliases, and quit
Maestro.
• Project—open and close projects, import and export structures, make a snapshot, and
annotate a project. These actions can also be performed from the Project Table panel. For
more information, see page 14.
• Edit—undo actions, build and modify structures, define command scripts and macros,
and find atoms in the Workspace.
• Display—control the display of the contents of the Workspace, arrange panels, and display or hide main window components.
8
Maestro 8.0 Overview
• Tools—group atoms; measure, align, and superimpose structures; assign structural features; and view and visualize data.
• Applications—set up, submit, and monitor jobs for Schrödinger’s computational programs. Some products have a submenu from which you can choose a specific task.
• Workflows—set up, submit, and monitor jobs for workflows (also known as “solutions”).
These workflows generally use more than one product.
• Scripts—manage and install Python scripts that come with the distribution and scripts
that you create yourself. (See Chapter 13 of the Maestro User Manual for details.)
• Help—display various kinds of documentation, including online help, Balloon Help
(tooltips), manuals, FAQs, information about Maestro and other Schrödinger products.
The Toolbar
The main toolbar contains three kinds of buttons for performing common tasks:
Action—Perform a simple task, like clearing the Workspace.
Display—Open or close a panel or open a dialog box, such as the
Project Table panel.
Menu—Display a button menu. These buttons have a triangle in the
lower right corner.
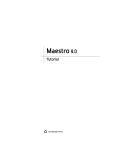
There are four types of items on button menus, and all four types can be on the same menu (see
Figure 2):
• Action—Perform an action immediately.
• Display—Open a panel or dialog box.
• Object types for selection—Choose Atoms, Bonds, Residues, Chains, Molecules, or
Entries, then click on an atom in the Workspace to perform the action on all the atoms in
that structural unit.
The object type is marked on the menu with a red diamond and the button is indented to
indicate the action to be performed.
• Other setting—Set a state, choose an attribute, or choose a parameter and click on atoms
in the Workspace to display or change that parameter.
Maestro 8.0 Overview
9
other setting:
parameter type
object type
action
display
Figure 2. Examples of button menus.
The toolbar buttons are described below. Some descriptions refer to features not described in
this document. See the Maestro User Manual for a fuller description of these features.
10
Workspace selection
– Choose an object type for selecting
– Open the Atom Selection dialog box
Undo/Redo
Undo or redo the last action. Same as
Undo on the Edit menu. Changes to an
arrow pointing in the opposite direction
when an Undo has been performed, indicating that its next action is Redo.
Open a project
Open the Open Project dialog box.
Import structures
Open the Import panel.
Open/Close Project Table
Open the Project Table panel or close it if
it is open.
Save as
Open the Save Project As dialog box, to
save the project with a new name.
Create entry from Workspace
Open a dialog box in which you can create
an entry in the current project using the
contents of the Workspace.
Delete
– Choose an object type for deleting
– Delete hydrogens and waters
– Open the Atom Selection dialog box
– Delete other items associated with the
structures in the Workspace
– Double-click to delete all atoms
Open/Close Build panel
Open the Build panel or close it if it is
open.
Add hydrogens
– Choose an object type for applying a
hydrogen treatment
– Open the Atom Selection dialog box
– Double-click to add hydrogens to all
structures in the Workspace
Local transformation
– Choose an object type for transforming
– Open the Advanced Transformations
panel
Adjust distances, angles, dihedrals,
chiralities, torsions, or rotamers
– Choose a parameter for adjusting
– Display contacts
– Delete adjustments
– Open the Rotamers dialog box
Maestro 8.0 Overview
Fit to screen
Scale the displayed structure or selected
atoms to fit into the Workspace and reset
the center of rotation.
Clear Workspace
Clear all atoms from the Workspace
Set fog display state
Choose a fog state. Automatic means fog
is on when there are more than 40 atoms in
the Workspace, off otherwise.
Enhance depth cues
Optimize fogging and other depth cues
based on what is in the Workspace.
Rotate around X axis by 90 degrees
Rotate the Workspace contents around the
X axis by 90 degrees.
Rotate around Y axis by 90 degrees
Rotate the Workspace contents around the
Y axis by 90 degrees.
Tile entries
Arrange entries in a rectangular grid in the
Workspace.
Reset Workspace
Reset the rotation, translation, and zoom of
the Workspace to the default state.
Save view
Save the current view of the Workspace:
orientation, location, and zoom.
Restore view
Restore the last saved view of the Workspace: orientation, location, and zoom.
Display only selected atoms
– Choose an object type for displaying
– Double-click to display all atoms
Display only
– Choose a predefined atom category
– Open the Atom Selection dialog box
Also display
– Choose a predefined atom category
– Open the Atom Selection dialog box
Undisplay
– Choose a predefined atom category
– Open the Atom Selection dialog box
Display residues within N angstroms of
currently displayed atoms
– Choose a radius
– Open a dialog box to set a value
Show, hide, or color ribbons
– Choose show or hide ribbons
– Choose a color scheme for coloring ribbons
Draw bonds in wire
– Choose an object type for drawing bonds
in wire representation
– Open the Atom Selection dialog box
– Double-click to apply to all atoms
Draw atoms in CPK
– Choose an object type for drawing bonds
in CPK representation
– Open the Atom Selection dialog box
– Double-click to apply to all atoms
Draw atoms in Ball & Stick
– Choose an object type for drawing bonds
in Ball & Stick representation
– Open the Atom Selection dialog box
– Double-click to apply to all atoms
Draw bonds in tube
– Choose an object type for drawing bonds
in tube representation
– Open the Atom Selection dialog box
– Double-click to apply to all atoms
Color all atoms by scheme
Choose a predefined color scheme
Color residue by constant color
– Choose a color for applying to residues
– Double-click to color all atoms
Maestro 8.0 Overview
11
Label atoms
– Choose a predefined label type
– Delete labels
Label picked atoms
– Choose an object type for labeling atoms
– Open the Atom Selection dialog box
– Open the Composition tab of the Atom
Labels panel
– Delete labels
Display H-bonds
– Choose bond type:
intra—displays H-bonds within the molecule you select
inter—displays H-bonds between the molecule you select and all other atoms in
the Workspace.
– Delete H-bonds
Measure distances, angles, dihedrals,
or coupling
– Choose a parameter for displaying measurements
– Delete measurements
Mouse Functions in the Workspace
The left mouse button is used for selecting objects. You can either click on a single atom or
bond, or you can drag to select multiple objects. The right mouse button opens shortcut menus,
which are described in Section 2.7 of the Maestro User Manual.
The middle and right mouse buttons can be used on their own and in combination with the
SHIFT and CTRL keys to perform common operations, such as rotating, translating, centering,
adjusting, and zooming.
Table 1. Mapping of Workspace operations to mouse actions.
Mouse Button
Motion
Action
Left
click, drag
Select
Left
drag
Quick Torsion adjustment and adjustment of distance, angle, dihedral
click, drag
Toggle the selection
drag
Rotate about X and Y axes
Left
Keyboard
SHIFT
Middle
Middle
SHIFT
drag vertically
Rotate about X axis
Middle
SHIFT
drag horizontally
Rotate about Y axis
Middle
CTRL
drag horizontally
Rotate about Z axis
Middle
SHIFT + CTRL
drag horizontally
Zoom
click
Spot-center on selection
Toggle selection
Right
12
Maestro 8.0 Overview
Table 1. Mapping of Workspace operations to mouse actions. (Continued)
Mouse Button
Keyboard
Motion
Action
Right
click and hold
Display shortcut menu
Right
drag
Translate in the X-Y plane
Right
SHIFT
drag vertically
Translate along the X axis
Right
SHIFT
drag horizontally
Translate along the Y axis
Right
CTRL
drag horizontally
Translate along the Z axis
Middle & Right
drag horizontally
Zoom
Wheel
scroll
Zoom
In any adjust mode, do adjustment
Wheel
CTRL
scroll
Adjust isovalue of electron density
map (PrimeX)
In clipping planes window, move
clipping planes in opposite directions
Wheel
SHIFT
scroll
In clipping planes window, move
clipping planes in the same direction
Shortcut Key Combinations
Some frequently used operations have been assigned shortcut key combinations. The shortcuts
available in the main window are described in Table 2.
Table 2. Shortcut keys in the Maestro main window.
Keys
Action
Equivalent Menu Choices
CTRL+B
Open Build panel
Edit > Build
CTRL+C
Create entry
Project > Create Entry From Workspace
CTRL+E
Open Command Script Editor panel
Edit > Command Script Editor
CTRL+F
Open Find Atoms panel
Edit > Find
CTRL+H
Open Help panel
Help > Help
CTRL+I
Open Import panel
Project > Import Structures
CTRL+M
Open Measurements panel
Tools > Measurements
CTRL+N
Create new project
Project > New
CTRL+O
Open project
Project > Open
Maestro 8.0 Overview
13
Table 2. Shortcut keys in the Maestro main window. (Continued)
Keys
Action
Equivalent Menu Choices
CTRL+P
Print
Maestro > Print
CTRL+Q
Quit
Maestro > Quit
CTRL+S
Open Sets panel
Tools > Sets
CTRL+T
Open Project Table panel
Project > Show Table
CTRL+W
Close project
Project > Close
CTRL+Z
Undo/Redo last command
Edit > Undo/Redo
CTRL+=
Enter and exit full screen mode (Workspace
occupies full screen)
None
Maestro Projects
All the work you do in Maestro is done within a project. A project consists of a set of entries,
each of which contains one or more chemical structures and their associated data. In any
Maestro session, there can be only one Maestro project open. If you do not specify a project
when you start Maestro, a scratch project is created. You can work in a scratch project without
saving it, but you must save it in order to use it in future sessions. When you save or close a
project, all the view transformations (rotation, translation, and zoom) are saved with it. When
you close a project, a new scratch project is automatically created.
Likewise, if there is no entry displayed in the Workspace, Maestro creates a scratch entry.
Structures that you build in the Workspace constitute a scratch entry until you save the structures as project entries. The scratch entry is not saved with the project unless you explicitly add
it to the project. However, you can use a scratch entry as input for some calculations.
To add a scratch entry to a project, do one of the following:
• Click the Create entry from Workspace button:
• Choose Create Entry from Workspace from the Project menu.
• Press CTRL+C.
In the dialog box, enter a name and a title for the entry. The entry name is used internally to
identify the entry and can be modified by Maestro. The title can be set or changed by the user,
but is not otherwise modified by Maestro.
14
Maestro 8.0 Overview
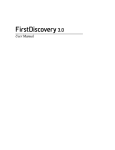
Figure 3. The Project Table panel.
Once an entry has been incorporated into the project, its structures and their data are represented by a row in the Project Table. Each row contains the row number, an icon indicating
whether the entry is displayed in the Workspace (the In column), the entry title, a button to
open the Surfaces panel if the entry has surfaces, the entry name, and any entry properties. The
row number is not a property of the entry.
Entries can be collected into groups, and the members of the group can be displayed or hidden.
Most additions of multiple entries to the Project Table are done as entry groups.
You can use entries as input for all of the computational programs—Glide, Impact, Jaguar,
Liaison, LigPrep, MacroModel, Phase, Prime, QikProp, QSite, and Strike. You can select
entries as input for the ePlayer, which displays the selected structures in sequence. You can
also duplicate, combine, rename, and sort entries; create properties; import structures as
entries; and export structures and properties from entries in various formats.
To open the Project Table panel, do one of the following:
• Click the Open/Close Project Table button on the toolbar
• Choose Show Table from the Project menu
• Press CTRL+T.
The Project Table panel contains a menu bar, a toolbar, and the table itself.
Maestro 8.0 Overview
15
The Project Table Toolbar
The Project Table toolbar contains two groups of buttons and a status display. The first set of
buttons opens various panels that allow you to perform functions on the entries in the Project
Table. The second set of buttons controls the ePlayer, which “plays through” the selected structures: each structure is displayed in the Workspace in sequence, at a given time interval. See
page 9 for a description of the types of toolbar buttons. The buttons are described below.
Find
Open the Find panel for locating alphanumeric text in any column of the Project Table, except
for the row number.
Sort
Open the Sort panel for sorting entries by up to three properties.
Plot
Open the Plot panel for plotting entry properties.
Import Structure
Open the Import panel for importing structures into the project.
Export Structure
Open the Export panel for exporting structures to a file.
Columns
Choose an option for adjusting the column widths.
Select only
Open the Entry Selection dialog box for selecting entries based on criteria for entry properties.
Go to start
Display the first selected structure.
Previous
Display the previous structure in the list of selected structures.
Play backward
Display the selected structures in sequence, moving toward the first.
Stop
Stop the ePlayer.
Play forward
Display the selected structures in sequence, moving toward the last.
16
Maestro 8.0 Overview
Next
Display the next structure in the list of selected structures.
Go to end
Display the last selected structure.
Loop
Choose an option for repeating the display of the structures. Single Direction displays structures in a single direction, then repeats. Oscillate reverses direction each time the beginning or
end of the list is reached.
The status display, to the right of the toolbar buttons, shows the number of selected entries.
When you pause the cursor over the status display, the Balloon Help shows the total number of
entries, the number shown in the table, the number selected, and the number included in the
Workspace.
The Project Table Menus
• Table—find text, sort entries, plot properties, import and export structures, and configure
the Project Table.
• Select—select all entries, none, invert your selection, or select classes of entries using the
Entry Selection dialog box and the Filter panel.
• Entry—include or exclude entries from the Workspace, display or hide entries in the
Project Table, and perform various operations on the selected entries.
• Property—display and manipulate entry properties in the Project Table.
• ePlayer—view entries in succession, stop, reverse, and set the ePlayer options.
Selecting Entries
Many operations in Maestro are performed on the entries selected in the Project Table. The
Project Table functions much like any other table: select rows by clicking, shift-clicking, and
control-clicking. However, because clicking in an editable cell of a selected row enters edit
mode, you should click in the Row column to select entries. See Section on page 19 for more
information on mouse actions in the Project Table. There are shortcuts for selecting classes of
entries on the Select menu.
In addition to selecting entries manually, you can select entries that meet a combination of
conditions on their properties. Such combinations of conditions are called filters. Filters are
Entry Selection Language (ESL) expressions and are evaluated at the time they are applied. For
example, if you want to set up a Glide job that uses ligands with a low molecular weight (say,
Maestro 8.0 Overview
17
less than 300) and that has certain QikProp properties, you can set up a filter and use it to select
entries for the job. If you save the filter, you can use it again on a different set of ligands that
meet the same selection criteria.
To create a filter:
1. Do one of the following:
• Choose Only, Add, or Deselect from the Select menu.
• Click the Entry selection button on the toolbar.
2. In the Properties tab, select a property from the property list, then select a condition.
3. Combine this selection with the current filter by clicking Add, Subtract, or Intersect.
These buttons perform the Boolean operations OR, AND NOT, and AND on the corresponding ESL expressions.
4. To save the filter for future use click Create Filter, enter a name, and click OK.
5. Click OK to apply the filter immediately.
Including Entries in the Workspace
In addition to selecting entries, you can also use the Project Table to control which entries are
displayed in the Workspace. An entry that is displayed in the Workspace is included in the
Workspace; likewise, an entry that is not displayed is excluded. Included entries are marked by
an X in the diamond in the In column; excluded entries are marked by an empty diamond.
Entry inclusion is completely independent of entry selection.
To include or exclude entries, click, shift-click, or control-click in the In column of the entries,
or select entries and choose Include or Exclude from the Entry menu. Inclusion with the mouse
works just like selection: when you include an entry by clicking, all other entries are excluded.
It is sometimes useful to keep one entry in the Workspace and include others one by one: for
example, a receptor and a set of ligands. You can fix the receptor in the Workspace by selecting
it in the Project Table and choosing Fix from the Entry menu or by pressing CTRL+F. A
padlock icon replaces the diamond in the In column to denote a fixed entry. To remove a fixed
entry from the Workspace, you must exclude it explicitly (CTRL+X). It is not affected by the
inclusion or exclusion of other entries. Fixing an entry affects only its inclusion; you can still
rotate, translate, or modify the structure.
18
Maestro 8.0 Overview
Mouse Functions in the Project Table
The Project Table supports the standard use of shift-click and control-click to select objects.
This behavior applies to the selection of entries and the inclusion of entries in the Workspace.
You can also drag to resize rows and columns and to move rows. You can scroll vertically
through the Project Table using the mouse wheel.
You can drag a set of non-contiguous entries to reposition them in the Project Table. When you
release the mouse button, the entries are placed after the first unselected entry that precedes the
entry on which the cursor is resting. For example, if you select entries 2, 4, and 6, and release
the mouse button on entry 3, these three entries are placed after entry 1, because entry 1 is the
first unselected entry that precedes entry 3. To move entries to the top of the table, drag them
above the top of the table; to move entries to the end of the table, drag them below the end of
the table.
A summary of mouse functions in the Project Table is provided in Table 3.
Table 3. Mouse operations in the Project Table.
Task
Mouse Operation
Change a Boolean property value
Click repeatedly in a cell to cycle through the possible values (On, Off, Clear)
Display the Entry menu for an entry
Right-click anywhere in the entry. If the entry is not
selected, it becomes the selected entry. If the entry is
selected, the action is applied to all selected entries.
Display a version of the Property menu
for a property
Right-click in the column header
Edit the text or the value in a table cell
Click in the cell and edit the text or value
Include an entry in the Workspace,
exclude all others
Click the In column of the entry
Move selected entries
Drag the entries
Paste text into a table cell
Middle-click
Resize rows or columns
Drag the boundary with the middle mouse button
Select an entry, deselect all others
For an unselected entry, click anywhere in the row except
the In column; for a selected entry, click the row number.
Select or include multiple entries
Click the first entry then shift-click the last entry
Toggle the selection or inclusion state
Control-click the entry or the In column
Scroll through the entries
Use the wheel to scroll one entry at a time; hold down
SHIFT and use the wheel to scroll a page at a time.
Maestro 8.0 Overview
19
Project Table Shortcut Keys
Some frequently used project operations have been assigned shortcut key combinations. The
shortcuts, their functions, and their menu equivalents are listed in Table 4.
Table 4. Shortcut keys in the Project Table.
Keys
Action
Equivalent Menu Choices
CTRL+A
Select all entries
Select > All
CTRL+F
Fix entry in Workspace
Entry > Fix
CTRL+I
Open Import panel
Table > Import Structures
CTRL+N
Include only selected entries
Entry > Include Only
CTRL+U
Deselect all entries
Select > None
CTRL+X
Exclude selected entries
Entry > Exclude
CTRL+Z
Undo/Redo last command
Edit > Undo/Redo in main window
In addition to these shortcut keys that can be used in the Project Table, there is a range of keys
that can be used both in the Project Table and the Workspace for project navigation and operations. These keys are summarized in Table 5.
Table 5. Project Table navigation and operation keys
20
Key
Description
UP ARROW
Scroll the Project Table up one row.
DOWN ARROW
Scroll the Project Table down one row.
RIGHT ARROW
ePlayer step forward (include next selected entry).
LEFT ARROW
ePlayer step backwards (include previous selected entry).
HOME
Scroll the Project Table to the top.
END
Scroll the Project Table to the bottom.
PAGE UP
Scroll the Project Table up one page.
PAGE DOWN
Scroll the Project Table down one page.
SHIFT+UP ARROW
Scroll the Project Table up by one group.
SHIFT+DOWN ARROW
Scroll the Project Table down by one group.
CTRL + UP ARROW
Scroll the Project Table up by one group, expand the group and collapse
all other groups.
Maestro 8.0 Overview
Table 5. Project Table navigation and operation keys (Continued)
Key
Description
CTRL + DOWN ARROW
Scroll the Project Table down by one group, expand the group and collapse all other groups.
CTRL + LEFT ARROW
ePlayer Go to Start (include first selected entry)
CTRL + RIGHT ARROW
ePlayer Go to End (include last selected entry)
M
Mark or clear mark for the current entry. If the Mark property does not
exist, create it and set the value for the entry to true (marked).
S
Display or undisplay entry information in the Workspace. This option is
subject to a preference for display of single-entry feedback (see
page 185).
Building a Structure
After you start Maestro, the first task is usually to create or import a structure. You can open
existing Maestro projects or import structures from other sources to obtain a structure, or you
can build your own. To open the Build panel, do one of the following:
• Click the Open/Close Build panel button in the toolbar:
• Choose Build from the Edit menu.
• Press CTRL+B.
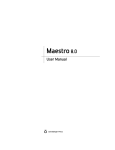
The Build panel allows you to create structures by drawing or placing atoms or fragments in the
Workspace and connecting them into a larger structure, to adjust atom positions and bond
orders, and to change atom properties. This panel contains a toolbar and three tabs.
Placing and Connecting Fragments
The Build panel provides several tools for creating structures in the Workspace. You can place
and connect fragments, or you can draw a structure freehand.
To place a fragment in the Workspace:
1. Select Place.
2. Choose a fragment library from the Fragments menu.
3. Click a fragment.
Maestro 8.0 Overview
21
Figure 4. The Build panel.
4. Click in the Workspace where you want the fragment to be placed.
To connect fragments in the Workspace, do one of the following:
• Place another fragment and connect them using the Connect & Fuse panel, which you
open from the Edit menu on the main menu bar or with the Display Connect & Fuse panel
on the Build toolbar.
• Replace one or more atoms in the existing fragment with another fragment by selecting a
fragment and clicking in the Workspace on the main atom to be replaced.
• Grow another fragment by selecting Grow in the Build panel and clicking the fragment
you want to add in the Fragments tab.
Grow mode uses predefined rules to connect a fragment to the grow bond. The grow bond is
marked by a green arrow. The new fragment replaces the atom at the head of the arrow on the
22
Maestro 8.0 Overview
grow bond and all atoms attached to it. To change the grow bond, choose Bonds from the Pick
option menu in the Build panel and click on the desired grow bond in the Workspace. The
arrow points to the atom nearest to where you clicked.
To draw a structure freehand:
1. Choose an element from the Draw button menu on the Build panel toolbar:
2. Click in the Workspace to place an atom of that element.
3. Click again to place another atom and connect it to the previous atom.
4. Continue this process until you have drawn the structure.
5. Click the active atom again to finish drawing.
Adjusting Properties
In the Atom Properties tab, you can change the properties of the atoms in the Workspace. For
each item on the Property option menu—Element, Atom Type (MacroModel), Partial Charge,
PDB Atom Name, Grow Name, and Atom Name—there is a set of tools you can use to change
the atom properties. For example, the Element tools consist of a periodic table from which you
can choose an element and select an atom to change it to an atom of the selected element.
Similarly, the Residue Properties tab provides tools for changing the properties of residues: the
Residue Number, the Residue Name, and the Chain Name.
To adjust bond lengths, bond angles, dihedral angles, and chiralities during or after building a
structure, use the Adjust distances, angles or dihedrals button on the main toolbar:
You can also open the Adjust panel from this button menu, from the Display Adjust panel button
on the Build panel toolbar (which has the same appearance as the above button) or from the Edit
menu in the main window.
The Build Panel Toolbar
The toolbar of the Build panel provides quick access to tools for drawing and modifying structures and labeling atoms. See page 9 for a description of the types of toolbar buttons. The
toolbar buttons and their use are described below.
Maestro 8.0 Overview
23
Free-hand drawing
Choose an element for drawing structures freehand in the Workspace (default C). Each click
in the Workspace places an atom and connects it to the previous atom.
Delete
Choose an object for deleting. Same as the Delete button on the main toolbar, see page 10.
Set element
Choose an element for changing atoms in the Workspace (default C). Click an atom to change
it to the selected element.
Increment bond order
Select a bond to increase its bond order by one, to a maximum of 3.
Decrement bond order
Select a bond to decrease its bond order by one, to a minimum of 0.
Increment formal charge
Select an atom to increase its formal charge by one.
Decrement formal charge
Select an atom to decrease its formal charge by one.
Move
Choose a direction for moving atoms, then click the atom to be moved. Moves in the XY plane
are made by clicking the new location. Moves in the Z direction are made in 0.5 Å increments.
Label
Apply heteroatom labels as you build a structure. The label consists of the element name and
formal charge, and is applied to atoms other than C and H.
Display Connect & Fuse panel
Open the Connect & Fuse panel so you can connect structures (create bonds between structures) or fuse structures (replace atoms of one structure with those of another).
Display Adjust panel
Open the Adjust panel so you can change bond lengths, bond angles, dihedral angles, or atom
chiralities.
Add hydrogens
Choose an atom type for applying the current hydrogen treatment. Same as the Add hydrogens button on the main toolbar, see page 10.
Geometry Symmetrizer
Open the Geometry Symmetrizer panel for symmetrizing the geometry of the structure in
the Workspace.
Geometry Cleanup
Clean up the geometry of the structure in the Workspace.
24
Maestro 8.0 Overview
Selecting Atoms
Maestro has a powerful set of tools for selecting atoms in a structure: toolbar buttons, picking
tools in panels, and the Atom Selection dialog box. These tools allow you to select atoms in
two ways:
• Select atoms first and apply an action to them
• Choose an action first and then select atoms for that action
Toolbar Buttons
The small triangle in the lower right corner of a toolbar button indicates that the button
contains a menu. Many of these buttons allow you to choose an object type for selecting:
choose Atoms, Bonds, Residues, Chains, Molecules, or Entries, then click on an atom in the
Workspace to perform the action on all the atoms in that structural unit.
For example, to select atoms with the Workspace selection toolbar button:
1. Choose Residues from the Workspace selection button menu:
The button changes to:
2. Click on an atom in a residue in the Workspace to select all the atoms in that residue.
Picking Tools
The picking tools are embedded in each panel in which you need to select atoms to apply an
operation. The picking tools in a panel can include one or more of the following:
• Pick option menu—Allows you to choose Atoms, Bonds, Residues, Chains, Molecules,
or Entries, then click on an atom in the Workspace to perform the action on all the atoms
in that structural unit.
The Pick option menu varies from panel to panel, because not all object types are appropriate for a given operation. For example, some panels have only Atoms and Bonds in the
Pick option menu.
• All button—Performs the action on all atoms in the Workspace.
• Selection button—Performs the action on any atoms already selected in the Workspace.
Maestro 8.0 Overview
25
• Previous button—Performs the action on the most recent atom selection defined in the
Atom Selection dialog box.
• Select button—Opens the Atom Selection dialog box.
• ASL text box—Allows you to type in an ASL expression for selecting atoms.
ASL stands for Atom Specification Language, and is described in detail in the Maestro
Command Reference Manual.
• Clear button—Clears the current selection
• Show markers option—Marks the selected atoms in the Workspace.
For example, to label atoms with the Label Atoms panel:
1. Choose Atom Labels from the Display menu.
2. In the Composition tab, select Element and Atom Number.
3. In the picking tools section at the top of the panel, you could do one of the following:
• Click Selection to apply labels to the atoms already selected in the Workspace (from
the previous example).
• Choose Residues from the Pick option menu and click on an atom in a different residue to label all the atoms in that residue.
The Atom Selection Dialog Box
If you wish to select atoms based on more complex criteria, you can use the Atom Selection
dialog box. To open this dialog box, choose Select from a button menu or click the Select
button in a panel. See Section 5.3 of the Maestro User Manual for detailed instructions on how
to use the Atom Selection dialog box.
Scripting in Maestro
Although you can perform nearly all Maestro-supported operations through menus and panels,
you can also perform operations using Maestro commands, or compilations of these
commands, called scripts. Scripts can be used to automate lengthy procedures or repetitive
tasks and can be created in several ways. These are summarized below.
26
Maestro 8.0 Overview
Python Scripts
Python is a full-featured scripting language that has been embedded in Maestro to extend its
scripting facilities. The Python capabilities within Maestro include access to Maestro functionality for dealing with chemical structures, projects, and Maestro files.
The two main Python commands used in Maestro are:
• pythonrun—runs a Python module. (You can also use the alias pyrun.) The syntax is:
pythonrun module.function
• pythonimport—rereads a Python file so that the next time you use the pythonrun command, it uses the updated version of the module. (You can also use the alias pyimp.)
From the Maestro Scripts menu you can install, manage, and run Python scripts. For more
information on the Scripts menu, see Section 13.1 of the Maestro User Manual. A variety of
Python scripts is available from the Script Center on the Schrödinger web site.
For more information on using Python with Maestro, see Scripting with Python.
Command Scripts
All Maestro commands are logged and displayed in the Command Script Editor panel. This
means you can create a command script by performing the operations with the GUI controls,
copying the logged commands from the Command History list into the Script text area of the
panel, then saving the list of copied commands as a script.
To run an existing command script:
1. Open the Command Script Editor panel from the Edit menu in the main window.
2. Click Open Local and navigate to the directory containing the desired script.
3. Select a script in the Files list and click Open.
The script is loaded into the Script window of the Command Script Editor panel.
4. Click Run Script.
Command scripts cannot be used for Prime operations.
Maestro 8.0 Overview
27
Figure 5. The Command Script Editor panel.
Macros
There are two kinds of macros you can create: named macros and macros assigned to function
keys F1 through F12.
To create and run a named macro:
1. Open the Macros panel from the Edit menu in the main window.
2. Click New, enter a name for the macro, and click OK.
3. In the Definition text box, type the commands for the macro.
4. Click Update to update the macro definition.
5. To run the macro, enter the following in the command input area in the main window:
macrorun macro-name
If the command input area is not visible, choose Command Input Area from the Display
menu.
28
Maestro 8.0 Overview
To create and run a function key macro:
1. Open the Function Key Macros panel from the Edit menu in the main window.
2. From the Macro Key option, select a function key (F1 through F12) to which to assign the
macro.
3. In the text box, type the commands for the macro.
4. Click Run to test the macro or click Save to save it.
5. To run the macro from the main window, press the assigned function key.
For more information on macros, see Section 13.5 of the Maestro User Manual.
Specifying a Maestro Working Directory
Maestro’s current working directory is defined differently on UNIX and on Windows. On
UNIX, it is the directory from which you started Maestro. On Windows it is the user profile
directory, which is usually C:\Documents and Settings\username. All data files are
written to and read from this directory unless otherwise specified (see below). You can change
directories by choosing Change Directory from the Maestro menu and navigating to the desired
directory, or by entering the following command in the command input area (see page 8) of the
main window:
cd directory-name
where directory-name is either a full path or a relative path.
When you use Maestro to launch jobs, Maestro writes job output to the directory specified in
the Directory tab of the Preferences panel. By default, this directory (the file I/O directory or
job submission directory) is Maestro’s current working directory.
To change the Maestro working directory:
1. Open the Preferences panel from the Maestro menu.
2. Click the Directory tab.
3. Select the directory you want to use for reading and writing files.
You can also set other preferences in the Preferences panel. See Section 12.2 of the Maestro
User Manual for details.
Maestro 8.0 Overview
29
Figure 6. The Directory tab of the Preferences panel.
Undoing an Operation
To undo a single operation, click the Undo button in the toolbar, choose Undo from the Edit
menu, or press CTRL+Z. The word Undo in the menu is followed by text that describes the
operation to undo. Not all operations can be undone: for example, global rotations and translations are not undoable operations. For such operations you can use the Save view and Restore
view buttons in the toolbar, which save and restore a molecular orientation.
Running and Monitoring Jobs
Maestro has panels for each product for preparing and submitting jobs. To use these panels,
choose the appropriate product and task from the Applications menu and its submenus. Set the
appropriate options in the panel, then click Start to open the Start dialog box and set options
for running the job. For a complete description of the Start dialog box associated with your
computational program, see your product’s User Manual. When you have finished setting the
options, click Start to launch the job and open the Monitor panel.
30
Maestro 8.0 Overview
The Monitor panel is the control panel for monitoring the progress of jobs and for pausing,
resuming, or killing jobs. All jobs that belong to you can be displayed in the Monitor panel,
whether or not they were started from Maestro. Subjobs are indented under their parent in the
job list. The File tab shows output information from the monitored job, such as the contents of
the log file. The Monitor panel opens automatically when you start a job. If it is not open, you
can open it by choosing Monitor from the Applications menu in the Maestro main window.
While jobs are running, the Detach, Pause, Resume, Stop, Kill, and Update buttons are active.
When there are no jobs currently running, only the Monitor and Delete buttons are active. These
buttons act on the selected job. By default, only jobs started from the current project are shown.
To show other jobs, choose All jobs or Active jobs only from the Show option menu.
When a job ends, the results are incorporated into the project according to the settings used to
launch the job. The point at which the incorporation occurs depends on the preference set in
the Jobs tab of the Preferences panel: only when monitored (the default), when approved, or
automatically. Jobs are incorporated only if they are part of the current project. You can
monitor jobs that are not part of the current project, but their results are not incorporated. To
add their results to a project, you must open the project and import the results.
Further information on job control, including configuring your site, monitoring jobs, running
jobs, and job incorporation, can be found in the Job Control Guide and the Installation Guide.
Getting Help
Maestro comes with automatic, context-sensitive help (Auto-Help), Balloon Help (tooltips), an
online help facility, and a user manual. To get help, follow the steps below:
• Check the Auto-Help text box at the bottom of the main window. If help is available for
the task you are performing, it is automatically displayed there. It describes what actions
are needed to perform the task.
• If your question concerns a GUI element, such as a button or option, there may be Balloon Help for the item. Pause the cursor over the element. If the Balloon Help does not
appear, check that Show Balloon Help is selected in the Help menu of the main window. If
there is Balloon Help for the element, it appears within a few seconds.
• If you do not find the help you need using either of the steps above, click the Help button
in the lower right corner of the appropriate panel. A browser is displayed with a relevant
help topic.
• Use the Help menu to open the online help, display manuals, or visit the FAQ pages on
the Schrödinger web site.
Maestro 8.0 Overview
31
If you do not find the information you need in the Maestro help system, check the following
sources:
• The Maestro User Manual
• The Frequently Asked Questions page on the Schrödinger Support Center.
You can also contact Schrödinger by e-mail or phone for help:
• E-mail: [email protected]
• Phone: (503) 299-1150
Ending a Maestro Session
To end a Maestro session, choose Quit from the Maestro menu. To save a log file with a record
of all operations performed in the current session, click Quit, save log file in the Quit panel.
This information can be useful to Schrödinger support staff when responding to any problem
you report.
32
Maestro 8.0 Overview
120 West 45th Street
101 SW Main Street
3655 Nobel Drive
Dynamostraße 13
29th Floor
Suite 1300
Suite 430
68165 Mannheim
QuatroHouse, Frimley Road
Camberley GU16 7ER
New York, NY 10036
Portland, OR 97204
San Diego, CA 92122
Germany
United Kingdom
SCHRÖDINGER
®