1
Jaguar Quick Start Guide
Jaguar 7.6
Quick Start Guide
Schrödinger Press
Jaguar Quick Start Guide Copyright © 2009 Schrödinger, LLC. All rights reserved.
While care has been taken in the preparation of this publication, Schrödinger
assumes no responsibility for errors or omissions, or for damages resulting from
the use of the information contained herein.
Canvas, CombiGlide, ConfGen, Epik, Glide, Impact, Jaguar, Liaison, LigPrep,
Maestro, Phase, Prime, PrimeX, QikProp, QikFit, QikSim, QSite, SiteMap, Strike, and
WaterMap are trademarks of Schrödinger, LLC. Schrödinger and MacroModel are
registered trademarks of Schrödinger, LLC. MCPRO is a trademark of William L.
Jorgensen. Desmond is a trademark of D. E. Shaw Research. Desmond is used with
the permission of D. E. Shaw Research. All rights reserved. This publication may
contain the trademarks of other companies.
Schrödinger software includes software and libraries provided by third parties. For
details of the copyrights, and terms and conditions associated with such included
third party software, see the Legal Notices for Third-Party Software in your product
installation at $SCHRODINGER/docs/html/third_party_legal.html (Linux OS) or
%SCHRODINGER%\docs\html\third_party_legal.html (Windows OS).
This publication may refer to other third party software not included in or with
Schrödinger software ("such other third party software"), and provide links to third
party Web sites ("linked sites"). References to such other third party software or
linked sites do not constitute an endorsement by Schrödinger, LLC. Use of such
other third party software and linked sites may be subject to third party license
agreements and fees. Schrödinger, LLC and its affiliates have no responsibility or
liability, directly or indirectly, for such other third party software and linked sites,
or for damage resulting from the use thereof. Any warranties that we make
regarding Schrödinger products and services do not apply to such other third party
software or linked sites, or to the interaction between, or interoperability of,
Schrödinger products and services and such other third party software.
Revision A, October 2009
Contents
Document Conventions ...................................................................................................... v
Chapter 1: Getting Started ............................................................................................... 1
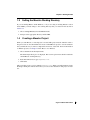
1.1 Creating a Working Directory .................................................................................. 1
1.2 Starting Maestro ........................................................................................................ 2
1.3 Setting the Maestro Working Directory ................................................................. 3
1.4 Creating a Maestro Project ...................................................................................... 3
Chapter 2: Building Small Molecules In Maestro ............................................. 5
2.1 Building a Structure by Placing Fragments ......................................................... 5
2.2 Adjusting a Dihedral Angle...................................................................................... 6
2.3 Saving Workspace Contents as a Project Entry .................................................. 7
2.4 Duplicating Project Entries...................................................................................... 7
2.5 Converting the Acetaldehyde Structure Into Vinyl Alcohol............................... 8
2.6 Cleaning Up the Geometry ...................................................................................... 9
2.7 Building a Structure by Growing Fragments...................................................... 10
2.8 Building a Structure by Drawing .......................................................................... 11
2.9 Adjusting Bond Orders and Adding Hydrogens................................................ 12
2.10 Symmetrizing a Structure .................................................................................... 13
Chapter 3: Running Jaguar Calculations ............................................................. 15
3.1 Single Point Calculation ......................................................................................... 15
3.2 Geometry Optimization With DFT ........................................................................ 16
3.3 Localized MP2 Energy Calculation ...................................................................... 18
3.4 Displaying Orbitals in Maestro.............................................................................. 19
3.5 Transition State Search .......................................................................................... 23
3.6 Vibrational Frequencies ......................................................................................... 25
Jaguar 7.6 Quick Start Guide
iii
Contents
3.7 Intrinsic Reaction Coordinate Calculation.......................................................... 27
3.8 Prediction of pKa Values ........................................................................................ 29
Getting Help ............................................................................................................................. 31
iv
Jaguar 7.6 Quick Start Guide
Document Conventions
In addition to the use of italics for names of documents, the font conventions that are used in
this document are summarized in the table below.
Font
Example
Use
Sans serif
Project Table
Names of GUI features, such as panels, menus,
menu items, buttons, and labels
Monospace
$SCHRODINGER/maestro
File names, directory names, commands, environment variables, and screen output
Italic
filename
Text that the user must replace with a value
Sans serif
uppercase
CTRL+H
Keyboard keys
Links to other locations in the current document or to other PDF documents are colored like
this: Document Conventions.
In descriptions of command syntax, the following UNIX conventions are used: braces { }
enclose a choice of required items, square brackets [ ] enclose optional items, and the bar
symbol | separates items in a list from which one item must be chosen. Lines of command
syntax that wrap should be interpreted as a single command.
File name, path, and environment variable syntax is generally given with the UNIX conventions. To obtain the Windows conventions, replace the forward slash / with the backslash \ in
path or directory names, and replace the $ at the beginning of an environment variable with a
% at each end. For example, $SCHRODINGER/maestro becomes %SCHRODINGER%\maestro.
In this document, to type text means to type the required text in the specified location, and to
enter text means to type the required text, then press the ENTER key.
References to literature sources are given in square brackets, like this: [10].
Jaguar 7.6 Quick Start Guide
v
vi
Jaguar 7.6 Quick Start Guide
Jaguar Quick Start Guide
Chapter 1
Chapter 1:
Getting Started
This manual contains exercises designed to help you learn the basic tasks you will need to
prepare and initiate Jaguar calculations from Maestro. For more information about Jaguar
features, see the Jaguar User Manual.
This chapter contains instructions for setting up the tutorial.
Chapter 2 contains exercises on building new molecular structures, which are used in the
calculations in the next chapter.
Chapter 3 provides a set of exercises that show you how to run various Jaguar calculations:
single-point energies with both DFT and LMP2 theory, geometry optimizations, transition
state searches, intrinsic reaction coordinate calculations, frequency calculations, orbital plotting, and pKa prediction.
Help for each of the Jaguar tasks is available in the Maestro online help.
To do the exercises, you must have access to an installed version of Maestro 9.0 and Jaguar 7.6.
For installation instructions, see the Installation Guide. The directory in which the software is
installed will be referred to as the installation directory.
The preparations that must be made for the exercises are to create a working directory to keep
all your input and output files, start Maestro, ensure that this directory is Maestro’s current
working directory, and create a project. These tasks are described in the following sections.
1.1
Creating a Working Directory
The first task to be done in preparation for the tutorial is to create a working directory to keep
all your input and output files.
UNIX:
1. Change to a directory in which you have write permission.
cd mydir
2. Create a directory by entering the command:
mkdir directory-name
Jaguar 7.6 Quick Start Guide
1
Chapter 1: Getting Started
Windows:
1. Open the folder in which you want to create the folder that serves as your working directory.
The default working directory used by Maestro is your user profile, which is usually set
to C:\Documents and Settings\username on Windows XP and 2000, and to
C:\Users\username on Vista. To open this folder, do the following:
a. Choose Run from the Start menu.
b. Enter %USERPROFILE% in the Open text box and click OK.
2. Click Make a new folder under File and Folder Tasks.
You can also choose Folder from the New submenu of the File menu.
3. Enter a name for the folder.
If you want to create a folder inside this folder, repeat this procedure.
1.2
Starting Maestro
Once you have created the working directory you can start Maestro.
UNIX:
1. Set the SCHRODINGER environment variable to the installation directory:
csh/tcsh:
setenv SCHRODINGER installation_path
bash/ksh:
export SCHRODINGER=installation_path
This environment variable is also required to run Jaguar jobs.
2. Change to the desired working directory.
cd directory-name
3. Enter the command:
$SCHRODINGER/maestro &
The Maestro main window is displayed, and the working directory is Maestro’s current
working directory.
Windows:
• Double-click the Maestro icon on the desktop.
You can also use the Start menu. Maestro is in the Schrödinger submenu.
2
Jaguar 7.6 Quick Start Guide
Chapter 1: Getting Started
1.3
Setting the Maestro Working Directory
If you are running Maestro under Windows, or if you are using an existing Maestro session
under UNIX, you must change to the working directory that you created for the tutorial in
Section 1.1.
1. Choose Change Directory from the Maestro menu.
2. Navigate to the appropriate directory and click OK.
1.4
Creating a Maestro Project
When you start Maestro, a scratch project is created. This project must be named in order to
keep it for later use. You should therefore create a named Maestro project to save the structures
that you build, in case you want to complete the exercises at a later time. For more information
on Maestro projects, see Chapter 8 of the Maestro User Manual.
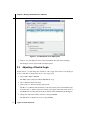
1. Choose Save As from the Project menu.
The Save Project dialog box is displayed. The Look in option menu should contain the
current Maestro working directory.
2. In the File name text box, type JaguarTutorial.
3. Click Save.
This procedure creates a project named JaguarTutorial. When you build structures in the
Workspace during the exercises that follow, you can save the structures in this project for later
use.
Jaguar 7.6 Quick Start Guide
3
4
Jaguar 7.6 Quick Start Guide
Jaguar Quick Start Guide
Chapter 2
Chapter 2:
Building Small Molecules In Maestro
This chapter contains exercises on building new molecular structures from fragments and from
individual atoms. You will use the structures you build in these exercises in the next chapter, to
run various Jaguar calculations. For more detailed information about the Maestro Build panel
tools, see Chapter 4 of the Maestro User Manual.
Before starting, you should ensure that the Default representation in the Settings tab of the
Molecular Representation panel is Wire. You can open this panel from the Display menu.
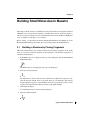
2.1
Building a Structure by Placing Fragments
This exercise demonstrates how to build a structure from fragments, using Place mode. In this
mode you can place molecular fragments in the Workspace, and substitute fragments in a
structure in the Workspace.
1. If the Build toolbar is not displayed at the top of the Workspace, click the Show/Hide the
build toolbar button.
The Build toolbar is now displayed at the top of the Workspace.
2. Select the carbonyl fragment.
The fragments are shown as full molecules, with H atoms added to the fragment to complete the molecule. The H atoms are replaced when you join fragments. The carbonyl
fragment therefore appears as a formaldehyde molecule. If you pause the pointer over the
fragment, the fragment name is displayed in the tooltip (Balloon Help).
3. Click in the Workspace.
A formaldehyde molecule is placed in the Workspace.
4. Select the methyl fragment.
Jaguar 7.6 Quick Start Guide
5
Chapter 2: Building Small Molecules In Maestro
Figure 2.1. The Dihedral tab in the Adjust panel.
5. Click on one of the hydrogen atoms of the formaldehyde molecule in the Workspace.
The hydrogen atom is replaced with a methyl fragment.
2.2
Adjusting a Dihedral Angle
In this exercise, you will change the orientation of the oxygen atom relative to the hydrogen
atoms, so that there is a hydrogen atom cis to the oxygen atom.
1. Choose Edit > Adjust > Dihedral.
The Adjust panel is displayed with the Dihedral tab on top.
2. Choose Bonds from the Pick menu.
3. Click on the C–C bond towards the carbonyl end.
The H–C–C–O dihedral with the H trans to the O should be selected; the dihedral angle
should be 180° (to within a sign). The selected atoms appear in the table in the center of
the Dihedral tab. A broken line and an arrow mark the selected dihedral in the Workspace.
4. Change the value in the Current column to 0 and press ENTER.
The dihedral is not adjusted if you do not press ENTER.
6
Jaguar 7.6 Quick Start Guide
Chapter 2: Building Small Molecules In Maestro
5. Click the Delete button to remove the defined dihedral from the list.
The dihedral marker in the Workspace is removed.
6. Close the Adjust panel.
2.3
Saving Workspace Contents as a Project Entry
To model the interconversion between acetaldehyde and vinyl alcohol, you will need to convert
the acetaldehyde structure to vinyl alcohol. Before proceeding, save the aldehyde molecule as a
Project Table entry. This allows you to store the aldehyde structure while you construct the
alcohol. The Project Table entries are also used to select reactant and product structures for
transition state searches and IRC scans.
1. Click the Create entry from Workspace button on the main toolbar.
The Create Entry From Workspace dialog box is displayed.
2. Type aldehyde in the Title text field and click Create.
3. Click the Open/Close project table button on the toolbar.
The Project Table panel is displayed with the new entry as the first entry.
2.4
Duplicating Project Entries
In this exercise, you will copy the acetaldehyde entry you have generated to create a new entry
for vinyl alcohol.
1. In the Project Table panel, ensure that the aldehyde entry is selected.
2. Type CTRL+D.
A copy of the aldehyde entry is made. The new entry is automatically selected.
3. Click the title of the new entry to edit it.
4. Change the title to alcohol and press ENTER.
5. Change the entry name of the new entry to alcohol using the same procedure.
If the entry name is not displayed, choose Property > Show Entry Name.
Jaguar 7.6 Quick Start Guide
7
Chapter 2: Building Small Molecules In Maestro
2.5
Converting the Acetaldehyde Structure Into Vinyl
Alcohol
In this exercise, you will convert the copy of the acetaldehyde structure into vinyl alcohol by
breaking the C–H bond, changing the bond orders, and then connecting the unattached
hydrogen to the oxygen atom. Converting structures is especially useful for transition state
searches when a reactant and a product structure is given, because the search relies on a consistent atom numbering scheme.
1. In the Project Table panel, click the In box of the alcohol entry.
The alcohol entry is included in the Workspace and the aldehyde entry is excluded
from the Workspace. Since the two entries are identical, there is no visible change in the
Workspace.
2. Choose Bonds from the Delete button menu on the toolbar.
3. In the Workspace, click on the C–H bond cis to the C=O bond.
The bond disappears and the H atom is represented by an asterisk.
4. Click the Decrement bond order button on the Build toolbar.
5. In the Workspace, click on the C=O bond.
The bond should now be represented by a single line, indicating a single bond.
6. Click the Increment bond order button on the Build toolbar.
7. In the Workspace, click on the C−C bond.
The bond should now be represented by a double line, indicating that the bond order has
changed to double.
8. Click the Draw structures button on the Build toolbar.
8
Jaguar 7.6 Quick Start Guide
Chapter 2: Building Small Molecules In Maestro
9. In the Workspace, click on the oxygen atom, then click twice on the unbonded hydrogen.
A bond is drawn between the two atoms.
2.6
Cleaning Up the Geometry
In this exercise, you will clean up the geometry by performing a force-field calculation that
provides good estimates of the bond lengths and angles.
• Click the Clean up geometry Build toolbar button.
A dialog box is displayed that shows cleanup progress.
You should always clean up structures before optimizing them. If the molecule has symmetry,
always symmetrize the molecule before cleaning up the geometry, to guarantee perfect point
group symmetry and to speed up the Jaguar calculation. In this exercise, the structure already
has Cs symmetry, so it is not necessary to symmetrize it. To symmetrize a molecule, choose
Edit > Symmetrize Workspace in the main window.
The changes to this structure should be automatically saved in the project. If your project preferences (Project tab, Preferences panel) are not set to synchronize Workspace changes automatically, you should see a red exclamation point in the status bar of the main window. Click
this icon to save the changes, and reset your preferences to automatic synchronization.
Figure 2.2. The completed vinyl alcohol structure.
Jaguar 7.6 Quick Start Guide
9
Chapter 2: Building Small Molecules In Maestro
2.7
Building a Structure by Growing Fragments
In this exercise, you will use fragments to build a structure as you did in the previous exercise.
However, this time you will build in Grow mode. In this mode, selected fragments are
combined using predefined grow bonds. The grow bond is the bond that is replaced when
another fragment is selected in Grow mode. The fragment is added in an orientation that is
determined by the choices made from the Grow direction and Joining geometry option menus.
1. Click the Clear Workspace button on the toolbar.
2. From the Show/hide the build toolbar button menu on the toolbar, choose Fragments.
The Build panel is displayed, with the Fragments tab on top and the organic fragments
library displayed (see Figure 2.3).
Figure 2.3. The Build panel, showing the Fragments tab.
10
Jaguar 7.6 Quick Start Guide
Chapter 2: Building Small Molecules In Maestro
Figure 2.4. The methylamine molecule showing the grow bond.
3. Select Grow.
4. In the Organic library, click the Amine fragment.
An amine group is placed in the Workspace. The green arrow marks the grow bond.
5. Click the Methyl fragment.
A methyl group is attached to the amine group.
6. Create a Project Table entry named methylamine.
See Section 2.3 on page 7 if you unsure of how to do this.
2.8
Building a Structure by Drawing
In this exercise, you will draw a benzene molecule in the Workspace. Although drawing
benzene is not necessary because there is a benzene fragment in the organic fragment library,
drawing structures can be useful when it is difficult to build them from fragments, such as
structures with multiple fused rings.
1. Clear the Workspace.
2. Click the Draw structures button on the Build toolbar.
The button is indented to indicate that Draw mode is active.The default atom selected for
drawing is carbon. If you want to choose a different atom, click and hold on the button
and select an element from the menu that is displayed.
Jaguar 7.6 Quick Start Guide
11
Chapter 2: Building Small Molecules In Maestro
3. Click once in the Workspace.
An asterisk appears enclosed in a purple cube. This cube marks the active drawing atom.
When there is an active drawing atom, clicking again in the Workspace while in Draw
mode places another atom and bonds it to the original atom. Clicking a second time on
the active drawing atom makes it inactive.
4. Draw a six-membered ring by clicking in the Workspace five more times in the proper
configuration, then clicking on the first atom.
As you move the mouse, a yellow line connects the pointer to the active atom. The atoms
are all placed in the same plane.
5. Click the first atom a second time to end the draw operation.
2.9
Adjusting Bond Orders and Adding Hydrogens
In this exercise, you will adjust the C–C bond orders and add hydrogen atoms to the skeleton
structure that you drew. You could also create the double bonds and add the hydrogens using
Draw mode.
1. Click the Increment bond order button on the Build toolbar.
The “B” below the cursor box indicates that the current selection state is Bonds.
2. Click a bond in the structure you just drew.
The line representing the bond on which you clicked should now appear as a double line.
3. Click two more bonds to create a structure with alternating double bonds.
4. Double-click the Add hydrogens button.
The double-click applies the selected hydrogen treatment to all atoms. The default treatment is All-atom with No-Lp. You can select the treatment in the Hydrogen Treatment
panel, which you open from the Edit menu.
12
Jaguar 7.6 Quick Start Guide
Chapter 2: Building Small Molecules In Maestro
Figure 2.5. The Symmetrize Workspace dialog box.
2.10 Symmetrizing a Structure
The molecule you drew is planar, but is likely to have no other symmetry. In this exercise you
will symmetrize the structure so that it has full D6h symmetry, then clean up the structure.
1. From the Edit menu, choose Symmetrize Workspace.
The Symmetrize Workspace panel is displayed. The symmetry is likely to be Cs. The Find
Point Group button is dimmed, because the structure actually has the symmetry displayed.
2. If the point group is not D6h, increase the tolerance and click Find Point Group until the
correct symmetry is located.
3. Click Symmetrize.
The structure takes on the correct symmetry.
4. Clean up the structure (use the Clean up geometry toolbar button).
5. Check in the Symmetrize Workspace panel that the point group symmetry is still D6h. If
not, click Symmetrize.
This second symmetrization may be necessary because the geometry cleanup perturbs the
structure away from its symmetry to ensure that a minimum is found.
6. Close the Symmetrize Workspace panel.
7. Create a Project Table entry named benzene (see Section 2.3 on page 7).
Jaguar 7.6 Quick Start Guide
13
14
Jaguar 7.6 Quick Start Guide
Jaguar Quick Start Guide
Chapter 3
Chapter 3:
Running Jaguar Calculations
This chapter is designed to introduce you to the main capabilities of Jaguar 7.6 and its interface
with Maestro 9.0.
3.1
Single Point Calculation
The default single-point energy calculation set up in Maestro is a density-functional calculation with the B3LYP functional and a 6-31G** basis set. The molecule is assumed to be singlet
and uncharged. To run a default calculation, you can build or include a molecule in the Workspace and submit the job with no special options. In this exercise, you will use the molecule
that you built in Section 2.8 on page 11. If you have not done this exercise, do so now.
1. In the Project Table panel, click the In column for the benzene entry.
The benzene entry is included in the Workspace and all others are excluded.
2. From the Applications menu, choose Jaguar > Single Point Energy.
The Jaguar panel is displayed, set up for a single-point energy calculation. The default
structure, as shown in the Use structures from option menu, is the one in the Workspace.
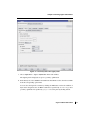
3. Click the Start button.
The Jaguar - Start dialog box opens. This dialog box provides controls for the running of
the job and the incorporation of the results into Maestro. By default, the job name is the
entry name and the job is run on the local host (the host on which you are running Maestro).
4. In the Output section, choose Incorporate > Append new entries individually.
The incorporation mode is persistent, so the next time you run a job, the mode selected is
the last mode that you used.
5. (optional) In the Job section, choose a host from the Host option menu.
6. Click Start.
The Monitor panel is displayed, allowing you to monitor the progress of the job. This job
should take only a few seconds.
Jaguar 7.6 Quick Start Guide
15
Chapter 3: Running Jaguar Calculations
Figure 3.1. The Jaguar - Start dialog box.
7. When the job finishes, close the Monitor panel.
The results of the job are incorporated into Maestro, and a new entry named benzene
appears in the Project Table.
3.2
Geometry Optimization With DFT
In this exercise, you will optimize the geometry of the output structure from the previous exercise, at the BLYP/6-31G** level.
1. In the Jaguar panel, click Read (at the bottom of the panel).
The Jaguar Read file chooser is displayed. If you do not have the Jaguar panel open,
choose Applications > Jaguar > Single Point Energy in the main window.
2. Navigate to and select the Jaguar restart file, benzene.01.in.
The restart file contains the geometry and wave function for the single point calculation
performed in the last exercise.
3. Ensure that Read As is set to Geometry and settings.
4. Click Open.
In the Project Table a new entry, benzene.01, has appeared and has been included automatically in the Workspace.
You can view the input file information by clicking the Edit button in the Jaguar panel.
Do not change any of the settings, but notice that in the guess section there is now a converged wave function. Close the panel by clicking Cancel.
16
Jaguar 7.6 Quick Start Guide
Chapter 3: Running Jaguar Calculations
Figure 3.2. The Theory tab of the Jaguar panel.
5. Choose Applications > Jaguar > Optimization in the main window.
The Jaguar panel is displayed, set up for a geometry optimization.
6. In the Theory tab, select Gradient-corrected in the Functionals section, then choose BLYP
from the corresponding option menu.
You can view the input file contents by clicking the Edit button. Notice the addition of
keywords in the gen section. A BLYP calculation is specified by dftname=blyp and a
geometry optimization is specified by igeopt=1. Close the panel by clicking Cancel.
Jaguar 7.6 Quick Start Guide
17
Chapter 3: Running Jaguar Calculations
7. Click Start.
The Start dialog box opens.
8. (optional) In the Job section, choose a host from the Host option menu.
9. Type benzene_dft in the Name text box, and click Start.
The Monitor panel is displayed and shows the job’s progress. This job takes a few minutes to
finish. When it has finished, close the Monitor panel. A new entry named benzene.01 appears
in the project table.
3.3
Localized MP2 Energy Calculation
In this exercise, you will determine the MP2 energy of benzene at the DFT geometry.
1. Read the restart file benzene_dft.01.in, as Geometry and settings.
This file contains the optimized geometry of benzene from the previous exercise. See
page 16 for instructions about reading files. A new project entry is created.
2. Choose Applications > Jaguar > Single Point Energy in the main window.
3. In the Theory tab, choose LMP2 (local MP2) from the Level of theory option menu.
Since benzene is aromatic, you should use a special form of LMP2, which allows all the electron pairs of the ring to be excited into an expanded virtual space (a semi-delocalized LMP2).
This can be achieved automatically by adding keywords directly to the input file.
4. Click Edit.
The Edit Job panel is displayed.
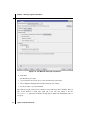
5. In the &gen section, add idelocv=1 and ireson=1.
6. Click OK.
7. In the Jaguar panel, click Start.
The Start dialog box opens.
8. (optional) In the Job section, choose a host from the Host option menu.
9. Type benzene_mp2 in the Name text box, and click Start.
This LMP2 job takes several minutes. When the job has finished, close the Monitor panel.
10. Examine the output file, benzene_mp2.out, using a text editor.
18
Jaguar 7.6 Quick Start Guide
Chapter 3: Running Jaguar Calculations
Figure 3.3. The Edit Job panel showing the new gen section contents.
3.4
Displaying Orbitals in Maestro
Maestro can display surfaces, including orbital and density plots generated by Jaguar. In this
exercise, you will see how to produce and display orbital plots. You will use the output from
the DFT calculation you ran earlier to generate and display a surface plot of the HOMO and
LUMO of benzene.
The generation of surfaces require a wave function. For this exercise the wave function is
obtained from the restart file, but surfaces can be generated at the end of any job. However, no
SCF iterations are needed, so an initial guess calculation is sufficient to generate the surfaces.
1. Read the restart file, benzene_dft.01.in, as Geometry and settings.
A new project entry is created and included in the Workspace.
2. From the menu, choose Jaguar > Initial Guess Only.
3. In the Theory tab, check that the level of theory is DFT.
Jaguar 7.6 Quick Start Guide
19
Chapter 3: Running Jaguar Calculations
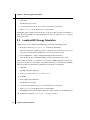
Figure 3.4. The Properties tab.
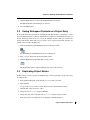
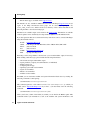
4. In the Properties tab, select the check box in the Surfaces row.
Controls for the selection of surfaces are displayed in the lower part of the tab. If you
have a wave function, these controls include a list of orbitals with their occupation number and eigenvalue. If you do not have a wave function, the controls allow you to specify
the range of orbitals to plot relative to the HOMO and the LUMO.
5. Select Molecular Orbitals.
6. From the Alpha list, select orbitals 20 through 23 (click 20, shift-click 23).
20
Jaguar 7.6 Quick Start Guide
Chapter 3: Running Jaguar Calculations
7. Click Start.
The Start dialog box opens.
8. (optional) In the Job section, choose a host from the Host option menu.
9. Type benzene_mo in the Name text box, choose Replace existing entries from the Incorporate option menu, then click Start.
10. When the job has finished, close the Monitor panel.
The job takes about one minute. The results are automatically incorporated and the first
surface (the HOMO) is displayed in the Workspace. Since both the HOMO and the
LUMO are degenerate orbitals, the orbital displayed could be either of the degenerate
pair.
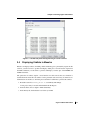
11. If the Project Table panel is not open, click the Open/Close project table button on the
toolbar.
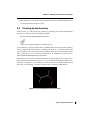
12. In the Project Table, click the S button in the Aux column for the benzene entry.
The Manage Surfaces panel is displayed. The Surface Table shows all the surfaces generated by the Jaguar job.
13. Click the V column for orbital 21.
Orbital 21 replaces orbital 20 in the Workspace.
Figure 3.5. The Manage Surfaces panel.
Jaguar 7.6 Quick Start Guide
21
Chapter 3: Running Jaguar Calculations
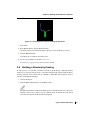
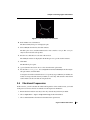
Figure 3.6. The degenerate benzene HOMO molecular orbitals
14. Move the Isovalue slider.
The volume occupied by the orbital changes with the isovalue.
15. Reset the isovalue to –0.05.
16. Click Display Options.
The Display Options dialog box is displayed. This dialog box has controls for the style,
transparency, and color scheme.
17. Experiment with changing the transparency, the style, and the colors of the positive and
negative lobes.
For this manual, the colors of the surfaces were changed for better grayscale printing.
18. Display the remaining two orbitals.
To save images of the Workspace like those shown in Figure 3.6, choose Maestro > Save
Image, then make settings and supply a filename in the Save Image panel.
22
Jaguar 7.6 Quick Start Guide
Chapter 3: Running Jaguar Calculations
Figure 3.7. The Display Options dialog box.
3.5
Transition State Search
In this exercise, you will model the interconversion between acetaldehyde and vinyl alcohol,
which involves the transfer of a proton from the methyl group to the carbonyl oxygen. You will
use the vinyl alcohol and acetaldehyde molecules that you built in Chapter 2 as the starting and
ending structures. If you have not yet built these structures, build them now.
1. In the Project Table panel, shift-click to select the alcohol and aldehyde entries, and click
the In box of the alcohol entry.
2. Choose Applications > Jaguar > Transition State Search in the main window.
3. Click Reset.
4. In the Molecule tab, check that the basis set is 6-31G**.
5. Choose Off from the Symmetry option menu.
6. In the Theory tab, make selections for a BLYP DFT calculation.
BLYP is in the Gradient-corrected option menu.
Jaguar 7.6 Quick Start Guide
23
Chapter 3: Running Jaguar Calculations
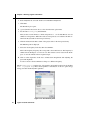
Figure 3.8. The Transition State tab.
7. In the Transition state tab (see Figure 3.8), under Search method, select LST.
The Reactant and Product rows in the Structures section are now available.
8. In the Reactant row, click Choose.
The Choose Entry dialog box is displayed.
9. Select alcohol from the list, then click Choose.
The dialog box closes, and the Reactant text box now contains alcohol. The alcohol
entry has been selected as the reactant.
24
Jaguar 7.6 Quick Start Guide
Chapter 3: Running Jaguar Calculations
Figure 3.9. The transition state structure.
10. In the Product row, click Choose.
The Choose Entry dialog box is displayed again.
11. Select aldehyde from the list, then click Choose.
The dialog box closes, and the Product text box now contains aldehyde. The aldehyde
entry has been selected as the product.
12. In both rows, click the box to the left of the text box.
The aldehyde structure is displayed in the Workspace on top of the alcohol structure.
13. Click Start.
The Start dialog box opens.
14. (optional) In the Job section, choose a host from the Host option menu.
15. Set the name to trans_state, choose Append new entries individually from the Incorporate option menu, and click Start.
Convergence should be reached in about 13-15 geometry steps. When the job finishes, the
results are incorporated into the Project Table as a new entry. The structure shows the H
atom bonded to the O atom with an elongated bond.
3.6
Vibrational Frequencies
In this exercise, you will calculate the vibrational frequencies of the transition state you found
in the previous exercise and view an animation of the frequencies in Maestro.
1. Ensure that the transition state entry is the only selected entry in the Project Table.
2. Choose Applications > Jaguar > Single Point Energy in the main window.
3. Choose Selected entries from the Use structures from option menu.
Jaguar 7.6 Quick Start Guide
25
Chapter 3: Running Jaguar Calculations
4. In the Properties tab, select the check box for Vibrational frequencies.
5. Click Start.
The Start dialog box opens.
6. (optional) In the Job section, choose a host from the Host option menu.
7. Set the name to trans_freq and click Start.
This job takes several minutes to finish, and generates a .vib file that Maestro uses for
animation of frequencies. When the results are incorporated, a V is added to the Aux column in the Project Table for the incorporated entry.
8. Click the V button in the Aux column of the project table for the incorporated entry.
The Vibration panel is displayed.
9. Select the first frequency in the list, then select Animate.
This is the imaginary frequency that corresponds to the transition state. The frequency is
animated in the Workspace as if it were real. The structure can be rotated in the Workspace to view the animation from an optimal angle.
10. Click on other frequencies in the list to animate them. Experiment with adjusting the
speed and amplitude.
You do not need to deselect Animate to change to a different frequency.
The file trans_freq.out contains a list of frequencies and normal modes below the heading
start of program freq. Below the frequencies is information on the zero point energy,
entropy, and other thermodynamic quantities.
Figure 3.10. The Vibration panel.
26
Jaguar 7.6 Quick Start Guide
Chapter 3: Running Jaguar Calculations
3.7
Intrinsic Reaction Coordinate Calculation
In this exercise you will use the results of the transition state search and frequency calculation
from the previous exercises to perform an intrinsic reaction coordinate scan, and visualize the
reaction in Maestro with the ePlayer.
1. In the Jaguar panel, click Read.
The Jaguar Read dialog box is displayed.
2. Select Geometry and settings from the Read As option menu.
3. Read the restart file trans_freq.01.in from the previous exercise.
The transition state structure is displayed in the Workspace and incorporated into the
Project Table. The hydrogen atom is located, as expected, about halfway between its
starting and ending position.
To perform an IRC scan, you must read or generate a Hessian. In this case the Hessian is
read from the restart file, trans_freq.01.in.
4. In the Project Table, click to select the transition state structure.
5. Choose Applications > Jaguar > Reaction Coordinate in the main window.
You must choose the task after reading the input file because reading an input file with its
settings sets the Jaguar task to the task defined by the gen section of the input file.
6. In the Properties tab, clear the Vibrational frequencies check box.
7. In the IRC tab, click Choose in the Transition state row of the Structures section.
The Choose Entry dialog box is displayed.
8. Select the structure you just read in.
9. Click Choose in the Reactant row of the Structures section, and select the original alcohol entry.
If the alcohol structure is not listed in the Choose Entry panel, then select All from the
Choose entry from menu.
10. Click Choose in the Product row, and select the original aldehyde entry.
11. Click Start.
The Start dialog box opens.
12. (optional) In the Job section, choose a host from the Host option menu.
Jaguar 7.6 Quick Start Guide
27
Chapter 3: Running Jaguar Calculations
13. Set the name to irc, choose Append new entries as a new group from the Incorporate
option menu, and click Start.
The job takes a few minutes. When the job finishes, 13 new entries are incorporated into the
Project Table as an entry group named irc, and are selected. The first entry corresponds to the
transition state structure, the next six are the geometries found moving in the forward direction,
from the transition state to the alcohol, and the last six are from the backward direction,
moving toward the aldehyde structure. To view the reaction in the ePlayer, the entries must first
be sorted. It is also useful to display the structures in Ball & Stick representation.
1. In the Project Table, include all 13 output structures in the Workspace. (To do this, click
the In column for the first entry and shift-click the last entry.)
2. Double-click the Draw atoms in ball and stick button on the main toolbar.
3. Clear the Workspace.
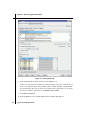
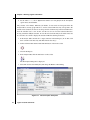
4. In the Project Table, click the Sort button on the toolbar.
The Sort Project Table panel is displayed.
5. Select Rxn coord as the Primary Key and change the Order to Descending.
Figure 3.11. The Sort Project Table panel.
28
Jaguar 7.6 Quick Start Guide
Chapter 3: Running Jaguar Calculations
6. Click Sort Selected Rows, then click Close.
7. Click the Play forward button on the toolbar to start cycling through the entries.
The hydrogen atom moves away from the oxygen and the double bond rotates.
8. From the Loop button menu on the toolbar, choose Oscillate.
9. Click the Play forward button.
10. The sequence of structures is played in the forward direction, then the reverse direction,
and continues this pattern.
11. Click the Stop button.
You can change the speed of the ePlayer and set other options in the ePlayer Options panel,
which you open from the ePlayer menu.
3.8
Prediction of pKa Values
In this exercise, you will calculate the pKa of methylamine, using the structure you built in an
earlier exercise.
1. Include the methylamine molecule in the Workspace.
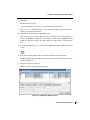
2. From the Applications menu, choose Jaguar > pKa.
The Jaguar panel opens with the Molecule tab displayed. The controls in this tab are simplified. In the lower section, you can specify the pKa atom. Use this atom is selected by
default.
3. In the pKa atom section, select Pick.
4. Click on the nitrogen atom in the Workspace.
The nitrogen atom is marked and its label is displayed in the text box.
5. Select Workspace from the Use structures from option menu.
Jaguar 7.6 Quick Start Guide
29
Chapter 3: Running Jaguar Calculations
Figure 3.12. The Molecule tab for pKa calculations.
6. Click Start.
The Start dialog box opens.
7. (optional) In the Job section, choose a host from the Host option menu.
8. Choose Replace existing entries from the Incorporate option menu.
9. Set the job name to pka and click Start.
The calculation of pKa values involves a number of steps and can be time-consuming. This job
takes several minutes to finish. The output pKa is the only data written to the file
methylamine.out. When the job finishes, the pKa value is added to the methylamine entry as
a property.
30
Jaguar 7.6 Quick Start Guide
Jaguar Quick Start Guide
Getting Help
Schrödinger software is distributed with documentation in PDF format. If the documentation is
not installed in $SCHRODINGER/docs on a computer that you have access to, you should install
it or ask your system administrator to install it.
For help installing and setting up licenses for Schrödinger software and installing documentation, see the Installation Guide. For information on running jobs, see the Job Control Guide.
Maestro has automatic, context-sensitive help (Auto-Help and Balloon Help, or tooltips), and
an online help system. To get help, follow the steps below.
• Check the Auto-Help text box, which is located at the foot of the main window. If help is
available for the task you are performing, it is automatically displayed there. Auto-Help
contains a single line of information. For more detailed information, use the online help.
• If you want information about a GUI element, such as a button or option, there may be
Balloon Help for the item. Pause the cursor over the element. If the Balloon Help does
not appear, check that Show Balloon Help is selected in the Maestro menu of the main
window. If there is Balloon Help for the element, it appears within a few seconds.
• For information about a panel or the tab that is displayed in a panel, click the Help button
in the panel, or press F1. The help topic is displayed in your browser.
• For other information in the online help, open the default help topic by choosing Online
Help from the Help menu on the main menu bar or by pressing CTRL+H. This topic is displayed in your browser. You can navigate to topics in the navigation bar.
The Help menu also provides access to the manuals (including a full text search), the FAQ
pages, the New Features pages, and several other topics.
If you do not find the information you need in the Maestro help system, check the following
sources:
•
•
•
•
•
•
Maestro User Manual, for detailed information on using Maestro
Maestro Command Reference Manual, for information on Maestro commands
Maestro Overview, for an overview of the main features of Maestro
Maestro Tutorial, for a tutorial introduction to basic Maestro features
Jaguar User Manual, for detailed information on using Jaguar
Jaguar Frequently Asked Questions pages, at
https://www.schrodinger.com/Jaguar_FAQ.html
Jaguar 7.6 Quick Start Guide
31
Getting Help
• Known Issues pages, available on the Support Center.
The manuals are also available in PDF format from the Schrödinger Support Center. Local
copies of the FAQs and Known Issues pages can be viewed by opening the file
Suite_2009_Index.html, which is in the docs directory of the software installation, and
following the links to the relevant index pages.
Information on available scripts can be found on the Script Center. Information on available
software updates can be obtained by choosing Check for Updates from the Maestro menu.
If you have questions that are not answered from any of the above sources, contact Schrödinger
using the information below.
E-mail:
USPS:
Phone:
Fax:
WWW:
FTP:
[email protected]
Schrödinger, 101 SW Main Street, Suite 1300, Portland, OR 97204
(503) 299-1150
(503) 299-4532
http://www.schrodinger.com
ftp://ftp.schrodinger.com
Generally, e-mail correspondence is best because you can send machine output, if necessary.
When sending e-mail messages, please include the following information:
•
•
•
•
•
•
•
•
All relevant user input and machine output
Jaguar purchaser (company, research institution, or individual)
Primary Jaguar user
Computer platform type
Operating system with version number
Jaguar version number
Maestro version number
mmshare version number
On UNIX you can obtain the machine and system information listed above by entering the
following command at a shell prompt:
$SCHRODINGER/utilities/postmortem
This command generates a file named username-host-schrodinger.tar.gz, which you
should send to [email protected]. If you have a job that failed, enter the following
command:
$SCHRODINGER/utilities/postmortem jobid
where jobid is the job ID of the failed job, which you can find in the Monitor panel. This
command archives job information as well as the machine and system information, and
32
Jaguar 7.6 Quick Start Guide
Getting Help
includes input and output files (but not structure files). If you have sensitive data in the job
launch directory, you should move those files to another location first. The archive is named
jobid-archive.tar.gz, and should be sent to [email protected] instead.
If Maestro fails, an error report that contains the relevant information is written to the current
working directory. The report is named maestro_error.txt, and should be sent to
[email protected]. A message giving the location of this file is written to the terminal
window.
More information on the postmortem command can be found in Appendix A of the Job
Control Guide.
On Windows, machine and system information is stored on your desktop in the file
schrodinger_machid.txt. If you have installed software versions for more than one
release, there will be multiple copies of this file, named schrodinger_machid-N.txt,
where N is a number. In this case you should check that you send the correct version of the file
(which will usually be the latest version).
If Maestro fails to start, send email to [email protected] describing the circumstances,
and attach the file maestro_error.txt. If Maestro fails after startup, attach this file and the
file maestro.EXE.dmp. These files can be found in the following directory:
%LOCALAPPDATA%\Schrodinger\appcrash
On Windows XP and Windows 2000, %LOCALAPPDATA% is not set by default, but should
correspond to %USERPROFILE%\Local Settings\Application Data.
Jaguar 7.6 Quick Start Guide
33
34
Jaguar 7.6 Quick Start Guide
120 West 45th Street, 17th Floor
101 SW Main Street, Suite 1300
8910 University Center Lane, Suite 270
New York, NY 10036
Portland, OR 97204
San Diego, CA 92122
Zeppelinstraße 13
Dynamostraße 13
Quatro House, Frimley Road
81669 München, Germany
68165 Mannheim, Germany
Camberley GU16 7ER, United Kingdom
SCHRÖDINGER
®