1
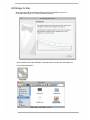
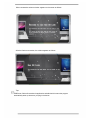
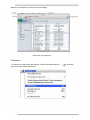
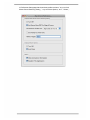
XC-4949
USB 2.0 Smart Transfer
Cable
Table of Contents
Overview ............................................................................................................................... 3
System Requirements................................................................................................... 3
Features ........................................................................................................................ 3
Support Language......................................................................................................... 3
Getting Started ...................................................................................................................... 4
Changing the Settings .......................................................................................................... 6
Keyboard & Mouse Control Switching Settings ......................................................... 6
Clipboard Share Options .............................................................................................. 8
Event Notifications........................................................................................................ 8
Other Settings................................................................................................................ 8
Sharing Keyboard and Mouse............................................................................................ 10
Clipboard Sharing................................................................................................................ 11
File Transferring.................................................................................................................. 12
GO! Bridge for File transferring ........................................................................................ 13
GO! Bridge for Windows:............................................................................................ 13
GO! Bridge for Mac ..................................................................................................... 15
Android Online Step.................................................................................................... 14
Dock Introduction........................................................................................................ 16
File Transfer................................................................................................................. 17
Technical Support ............................................................................................................... 17
Overview
Nowadays, more and more people own more than two computers. Due to space
limitations, most people choose Windows Notebooks, Android Tablet PCs or Mac as their
second computer.This Cable provides a simple a n d e a s y s o l u t i o n w h i c h l e t s y o u s h a r e
the keyboard and mouse usage with another computer or different operating systems.
In addition, GO! Bridge is a user-friendly and simple data transmission (Windows to Mac
or Mac to Mac or Android) application via a USB transfer cable to connect two computers.
It combines high speed transmission and non-technical requirement which help easily
transfer and share data between two computers.
System Requirements
l
PC running Microsoft Windows 2000 SP3 / Win XP / Vista / Win 7 (32-bit or 64-bit)/
Win 8 (Windows 8 RT Excepted)/ Mac OS X 10.5 or later/ Google Android 2.2/3.0/3.1
later(*)
l
Intel Pentium II Processor or later / PowerPC G4 processor or later
l
256MB RAM or higher
l
Hard disk space requirement of at least 50MB
l
Built-in USB port 1.1 or 2.0
* You have to install the driver: Mass storage class driver /Human Interface Device
driver (keyboard and mouse) in android system.
Features
l
No installation CD is required, simply plug-and-play.
l
Keyboard and mouse sharing.
l
Single cable solution for files transfer.
l
Clipboard sharing.
l
Drag-and-drop user-friendly interface.
Support Language
This product supports a total of 11 languages—Simplified Chinese, Traditional Chinese,
English, Korean, Japanese, Portuguese, Spanish, German, French, Russian, and Italian.
The application will display the appropriate language interface according to your operating
system’s language settings.
Getting Started
With simple plug-and-play feature, you can easily connect the two computers via the USB
port.
Follow these steps to configure USB2.0 Data Transmission + KM Sharing Cable
connection and start with its application:
1.
Connect one end of the USB Smart Cable to a USB port on one of the two
computers you are connecting.
2.
Connect the other end of the USB Smart Cable to a USB port on the second computer.
Wait until Windows have finished installing the device driver software on both
computers.
4.
Windows may ask you to select Autoplay options. Click on the option “Run
SKLoader.exe”.
Getting Started
5.
If the “User Account Control” window appears on the screen, click Yes to continue.
6.
You are now ready to operate the USB Smart Cable application. A pop-up message
appears at the bottom right of the screen.
Troubleshooting:
If the USB Smart Cable application fails to start automatically:
• Check that each connector on the USB cable is correctly inserted on your two
computers.
• Go to My Computer and double-click the USB Smart Cable icon to start the application.
Changing the Settings
Changing the Settings
To customize the USB Smart Cable settings, click the USB Smart Cable icon
at the bottom
right of the screen. Select Preference
The Preferences Setup screen is displayed.
Keyboard & Mouse Control Switching Settings
This option allows you to switch the control of keyboard and mouse from one computer to
another.
Select one of the following options:
• Turn Off
Disable keyboard and mouse switch.
• Use Mouse Middle Button (Win is as control side)
Click the middle button of the mouse to switch the keyboard and mouse control from
one computer to another.
Changing the Settings
• Use Mouse Move Off the Edge of Screen (Not supported by Win to Android or
Mac to Android )
Select this option to switch the control of keyboard and mouse from one computer to
another by moving the mouse off the edge of the screen.
Select the desired position. Click on the pull-down menu to see more options
Tips:
You can also change this setting on the pop-up menu that appears on the screen when
you click the USB Sharing Cable icon ( ). Select The Position of Other PC, and then
select one of the options.
• Hotkey
Press both [Alt+S] buttons on the keyboard to activate the control switching.
Changing the Settings
Clipboard Share Options
This option allows you to enable or disable the clipboard sharing. With clipboard sharing
feature, you can easily copy or paste clipboard contents between the two computers.
• Turn Off
Disable keyboard and mouse switch.
• Auto Share
Enable the automatic sharing between the two computers.
Event Notifications
This option allows you to set the type of notification when receiving/sending clipboard data
or switching the keyboard or mouse control to another computer. You can set either to play
sound or to display a pop-up balloon tip.
For example, a pop-up balloon tip appears when you copy data from the first computer and
paste the data to the second computer.
Other Settings
You can set the following for three settings:
•
If you check “Resident This Application”, the program automatically starts up after
you plug in the device.
•
To temporarily disable clipboard sharing and KM (keyboard and mouse)
control functions by double-clicking the USB Sharing Cable icon ( ) at the bottom right of
the screen, check “Double Clicking System Tray Icon to Turn On/Off Sharing
Temporarily”.
Tips:
When the above function is enabled, you can double-click the USB sharing Cable icon ( )
to temporarily disable clipboard sharing and KM (keyboard and mouse) control
functions.
Double-click the USB Sharing Cable icon (
) again to enable the two functions.
• Alternative keys option for the [Ctrl-Alt-Del] command for another computer.
Sharing Keyboard and Mouse
Sharing Keyboard and Mouse
After you have configured the settings on the previous section, now you can start using
your computers.
To switch the cursor location to another computer:
This action depends on the prior setting that you have chosen on the “Keyboard & Mouse
Control Switching Settings” on page 6.
If you set Use Mouse Move Off the Edge of Screen > Left Side of this PC, move the
mouse until the edge of the left side screen. The cursor is now at your second computer
and you can start using your second computer with the mouse.
To switch the keyboard usage to another computer:
1.
Move the cursor to your second computer.
2.
Open any editing software such as WORD, EXCEL, Power Point, etc.
3.
Use your first computer keyboard to enter the text on the file.
Note: The USB Smart Cable icon varies depending on the function. For example, when
switching the keyboard or mouse control to another computer, the icon
appears at the bottom right of the screen.
Clipboard Sharing
Clipboard Sharing
With the clipboard sharing feature, you can easily edit, copy or paste clipboard contents
between the two computers.
For example, to copy an image file on PPT(Power Point) file to another PPT file on the
other computer:
1.
Open the “source” file and right-click on the image that you want to copy, and select
Copy.
2.
Move the cursor to the other computer, and open the “destination” file.
3.
Move the cursor to the location that you want to place the picture, and right-click, then
select Paste.
Paste
Copy
Note:
• You can also do the same as above to copy text or files.
• The USB Smart Cable icon varies depending on the function. For example
• When you receive the clipboard data from master computer, the icon of the client
computer will change to (
time, the icon changes to (
), once the client computer is under controll at same
) to indicate the double state of current operation.
• If you copy the data from the client computer, the icon will change to (
double state appears.
• Will not allow sharing of photos or pictures from Win to Android or Mac to Android.
), no more the
File Transferring
File Transferring
With the keyboard and mouse sharing function, it is easy to manage files between the two
computers. Simply drag and drop the file or folder between the two computers to transfer
files. (Drag and drop is not supported in Android device )
Besides using the drag and drop method, you can also do the following to transfer files
between the two computers:
• Copy & Paste:
1. Right-click on the file that you want to copy, and select Copy.
2. Move the cursor to the other computer.
3. Move the cursor to the location that you want to place the file, and right-click, then
select Paste.
• Keyboard’s hotkeys:
1. Click on the file that you want to copy, and press the [Ctrl+C] buttons.
2. Move the cursor to the other computer.
3. Move the cursor to the location that you want to place the file, and press the [Ctrl+V]
buttons to paste the copied file to another computer.
GO! Bridge for File transferring
GO! Bridge for Windows:
Please click the USB Sharing Cable icon (
) at the bottom right of the screen. Select GO! Bridge.
Figure1
The initial Window Mode of GO! Bridge is as below.
Figure2 Window Mode
Device Icon
When GO! Bridge is launched, it shows the other PC’s desktop of Device Icon on
Windows Mode of your PC.
Active Information
, the active information shows the space
available of the other PC.
Option
Left click on the
icon, a pull-down menu will pop up for users to select.
Figure 3 The menu of Option on GO! Bridge
About GO! Bridge
Click once for information including the revision of GO! Bridge will be shown as
Figure 4.
Figure 4 The version of GO! Bridge
Always on top
If selected, Window Mode will be always on top of the window. To cancel this option;
please click "Disable Always on Top" on the pop-up menu on Window Mode.
GO! Bridge for Mac
When using the USB Smart Cable to MAC computer for the first time, there will be
an assistant window pop up, close this window to continue.
Open the USB Smart Cable CDROM on desktop and then double click GO! Bridge icon
to execute the application.
When connected a welcome window appears on the screen as follows:
After the first time connection, the window appears as follows:
Tips:
USB Smart Cable will remember its application as default which means the program
automatically starts up whenever you plug in the device.
Below is the introduction of each function of GO! Bridge.
Window Mode of GO! Bridge Mac
Preferences
To customize the USB Smart Cable settings, click the USB Smart Cable icon
right of the screen. Select Preferences.
(
)at the bottom
In Preferences Setup page that shows three preference items「Keyboard And
Mouse Control Switching Setting¸「Clipboard Share Options」and 「Others」:
Android Online Step
Before you start using Tablet bridge, please make sure the Windroid Linker has been
installed and launching properly.
First Windroid Linker Installation
1. Click installation.htm
2. Connected
3. Click HTML Viewer
4.Click here
5.
(1) Find the App with the keywords”Windroid Linker” on the Android Market,install it
to enable the functions.
(2) Copy and install the Windroid Linker APK from a thumb drive or memory card.
(3) Download the Windroid Linker APK then install it on the system.
The Windroid Linker indicates its state by means of following UI changes:
Offline or in initial stage:
Connected (Standby):
Android is ready:
6.After you have installed Windroid Linker you just press the icon below in Android APP list
then it will auto run the GO! Bridge transfer software.
Dock Introduction
You can collect files on Dock and then drag all the files to the destination.
Therefore, it's not necessary to copy a single file every time and then wait for the file
transfer. It's very convenient for two computers to work together.
Dock Area:
1.
On Window mode, click
to open Dock area .Right click the files on the file list
and select “Add to Dock”, the files will be added on the Dock area.
2.
Right click the file on Dock area to copy,remove from Dock and select all items on
Dock which help users easily manage file transfer between two computers.
3.
Drag and drop files to Dock area and paste batch files once between two
computers.
4.
Press” Clear” button to remove all items on Dock.
Add a new folder:
Click
to quickly add a new folder on the file list.
File List:
Right click on the file of the file list to open, add to Dock, Rename, copy, paste, and
move to trash the files selected on the file list.
Settings:
Settings of GO! Bridge can be also be edited and selected under the function menu on
the top of the window; from left to right are GO! Bridge, File, Edit, View, Window and
Help. Below is the quick introduction of each menu.
Ø
Click GO! Bridge, the drop down menu shows “About GO! Bridge”(the version of
GO! Bridge), Preferences (you can select “Keep icon mode on top of the other
window” or “Show warning before deleting items), Services”, “Hide GO! Bridge”,
“Hide Others”, “Show All” and “Quit GO! Bridge”.
Ø
Select File, you can create a new folder or execute “Open”, “Close” or “Move to
Trash” of the selected file on the drop down menu.
Ø
Click Edit, the drop down menu will show “Cut”, “Copy”, “Paste”, “Select All” and
“Special Characters” to edit the selected files.
Ø
Choose View option, you can select “Refresh the window”, “Show/Hide Path
Bar”, ”Hide Status Bar”, ”Hide Toolbar”
, “Customize Toolbar” and “Show View Options” on the pull-down menu.
Ø
Select Window option, the pull-down menu shows Minimize, Zoom, GO! Bridge
Main Window and Show Dock. Select Help option to search for the help from Mac.
Wallpaper of the other computer:
The wallpaper of the other computer displays on the top left corner of window mode for users
to recognize the computer they are use now.
File Transfer
There are three ways to transfer files on GO! Bridge Mac.
1. GO! Bridge allows user to transfer files via the dock area.
2. You can transfer files directly via copying the file from the source to the destination you
wish to paste on the file list on Window Mode of the other PC.
3. User can simply drag the file and drop it on Icon Mode of the other PC; however, it only
allows you to transfer the file to the desktop of the other PC. A progress Information window
will pop up to notice you that the file transfer is in progress; press "Cancel" if you wish to
abort the file transfer.
Note:
When you use Go-Bridge windows link to Android , the windows side is control master.
When you use Go-Bridge Mac link to Android , the Mac side is control master.