1
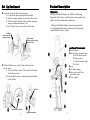
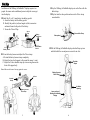
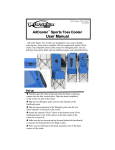
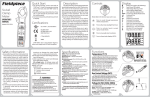
Factory Service Ad Inflatable displays have a one-year, limited warranty (see page 1) covering defective materials or workmanship. Should your display need service or maintenance performed at the factory, please contact your Pioneer® Line representative. UPIC: Pioneer / PPAI 113823 ASI 78200 SAGE 56460 A Return Authorization Number is required and can be obtained from your Pioneer Line representative. You must provide the serial number of your Walking Ad Inflatable display (located on the battery harness and on an inside tag located near the zipper). Trouble Shooting Walking Ad Inflatable Display Walking Ad Inflatable display is not fully inflating: Œ Ensure the air duct is properly inserted in the air intake opening. • Ensure all zippers are completely closed. Ž Ensure the battery is fully charged. (The battery lasts approximately 45 minutes. As the battery weakens, thepressure in the Walking Ad Inflatable display is reduced, and the battery should be recharged.) • Check for holes or tears in display fabric. User Manual Blower motor is not working: Œ Ensure that the blower motor switch (located next to the battery pocket) is turned on. • Ensure that the positive (red) and the negative (blue) connectors are properly attached to the battery. Velcro is a registered trademark of Velcro Industries, B.V.Limited Liability Co., Amsterdam, the Netherlands. 7 USA 2006 PBC HK Each Walking Ad Inflatable display comes complete with a motor with blower, an ergonomically designed battery harness, two 12-volt batteries, and a charger. A carrying case is included for easy transport and storage. ! CAUTION: Be careful when opening the carrying case. DO NOT OPEN UPSIDE DOWN to prevent the motor assembly from being dropped. Handle Walking Ad Inflatable displays with care. Please read entire manual carefully and follow instructions to ensure proper use. Installation Requirements Œ Depending on the product confirguration, Walking Ad Inflatable displays generally require a wearer who is between 5 and 6 in height. • People suffering from asthma, epilepsy, or claustrophobia should not wear the Walking Ad Inflatable display. Ž Wearer should be dressed in lightweight, comfortable clothing and shoes. Maintenance Storage Make sure the Walking Ad Inflatable display is completely dry before storing. DO NOT STORE WET OR DAMP. Storing the inflatable wet or damp will cause odors and mildew, and may void the warranty. To store, pack the battery harness in the bottom of the carrying case. Loosely roll the display, place in the carrying case, and zip the carrying case closed. NOTE: Batteries and charger should be packed separately from the battery harness and Walking Ad Inflatable display to protect the display against damage. Cleaning • Batteries should be fully charged prior to use. If necessary, gentle cleaning can be done with a mild liquid soap and a clean cloth or sponge. DO NOT SCRUB FABRIC. Take special care when cleaning graphic areas. • Exhibition area should be free of sharp objects and obstacles. Repair Patches ‘ Installation of the Walking Ad Inflatable display requires two people: the wearer and an additional person to help the wearer get into the display. Self-adhesive patches are provided. Cut a patch that is at least larger than the size of the opening to be repaired. This allows the patch to overlap the opening. Peel the paper from the patch and carefully place it on the inside fabric of the Walking Ad Inflatable display. Lay a piece of clean cloth on top of the fabric and iron using medium heat. For larger openings, repeat the procedure on the outside fabric. CAUTION: Once the wearer is secure inside the Walking Ad Inflatable display, an additional person may be needed to guide the wearer while mobile, as the wearer’s vision may be limited. Warranty The Pioneer Line warrants this product against defects due to faulty material or workmanship for a period of one year from the original date of purchase. The Pioneer Line, at its discretion, will repair or replace the product covered by the warranty. This warranty does not cover damage to the product resulting from accident, misuse, improper care, or self-repairs. All returns must be authorized and a Return Authorization Number is required. Shipping costs on warranty repairs are the responsibility of the purchaser. This warranty gives you specific legal rights. You may also have other rights which vary from state to state. Charging the Battery Batteries last approximately 45 minutes each. Please refer to the manufacturer’s instructions (which are enclosed with the batteries and charger) for operating and charging the battery. NOTE: The warranty on the battery charger and the two 12-volt batteries is only an extension of the manufacturer's warranty. The Pioneer Line does not warranty those items. 1 6 Product Description Set Up Continued Materials ’ Secure the air duct in the air intake opening. A. Locate the air intake opening on the inflatable. B. Slip the air intake opening over the end of the air duct. C. Pull the air duct to the end of the air intake opening to ensure an unobstructed intake of air. D. Use Velcro strap to secure the air duct in place. Walking Ad Inflatable displays are skillfully crafted using high-quality fabric that is wrinkle-resistant, water-repellent and suitable for indoor and moderate outdoor use. Walking Ad Inflatable displays include an ergonomically safe, lightweight battery harness (backpack style) designed to comfortably fit the wearer’s body. Air Duct (Coming from the battery harness) Velcro Strap (Connecting the display to the Air Duct ) 1 6 “ Pull the inflatable over wearer’s head, and activate the blower motor. A. Turn on the blower motor. (The switch is located next to the battery pocket.) B. Once the blower motor is running zip up the inflatable to fully inflate. Location of Components Œ Body of fabric • Battery harness (complete unit) A. Electric blower motor B. Battery pocket C. Velcro shoulder straps D. Air duct Ž Legs • Air intake opening • Shoe pockets and Velcro adjustment straps ‘ View window 2 2A 2C 2D 2B Air Duct 4 3 8A Blower Motor Switch 8B Zipper on backside 5 5 2 Set Up Installation of the Walking Ad Inflatable display requires two people: the wearer and an additional person to help the wearer get into the display. Œ Install the 12-volt, 7-amp battery into battery pocket. A. Insert the battery into the battery pocket. B. Identify the postitive (red) and negative (blue) connectors and insert them in both poles of the battery. C. Secure the Velcro flap. 1A 1C Velcro Flap Battery Connectors Ž Lay the Walking Ad Inflatable display out on the floor with the backside up. • Slip feet into the shoe pockets and secure the Velcro straps around ankles. Velcro Ankle Strap Shoe pocket 1B Blower Motor Switch Battery Pocket • Pull the Walking Ad Inflatable display about halfway up torso and hold while the second person secures the air duct. • Put on the battery harness and adjust the Velcro straps. A. Extend the battery harness straps completely. B. Adjust the lower belt support to fit around the wearer’s waist. C. Adjust the Velcro shoulder straps by crisscrossing them on the front of the upper body. Shoulder Straps Note: Make sure the harness fits snug against the wearer. Battery Harness Waist Strap 2A Air Duct Shoulder Straps Air Intake Opening Battery Harness Waist Strap Lower portion of Walking Ad Inflatable Display 2B 2C 3 4