1
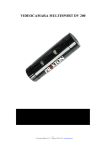
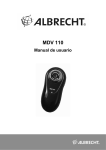
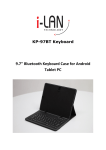
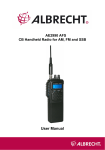
DV 100 WP Manual
Mini Waterproof Video Camera
Introduction
The DV 100 WP is a compact video camera which is especially suited to record videos
in an outdoor environment. Because the camera is very handy and waterproof it is the
ideal companion for activities like swimming, surfing, climbing, cycling and many
more.
Delivery content
Mini Waterproof
Video Camera
User Manual
USB Cable
Bandage
Velcro
Parts introduction
1.Mini Camera
2.LED Indicator
3.On/Off /Record
Button
4.Reset Button
5.Screw Thread Lid
6.Mic
7.USB Slot
8.Bandage Slot
Installing description:
1.
Please unscrew the USB lid before use, and make sure whether the waterproof
rubber is inserted. If not, please use the rubber we provide for you. (refer to the
picture below)
2.
Please screw the USB lid tight with 1kg force to 0.3-0.4 mm slit width.
3.
This are some examples how to use the camera.
With a bandage
With swim goggles
With ski goggles
With helmet
With elastic bandage
Features:
1.Built-in 4GB memory for approx 2hours video recording.
2.One of the smallest waterproof video recorder of the world ( Dia 19mm * L 68mm).
3.Easy connection with PC/Laptops no driver needed.
4.Sleek and elegant design.
5.User friendly operation button for easy control.
6.Real recording time display, never let memorable moments sneak away from life.
7.Two choices:
Use this lid to record audio and video. This lid is constructed to withstand a
Not use it for diving or swimming!
pressure of 4 bar. This corresponds a water
depth of 30 meter. Please note that by
jumping into the water very high pressures
are temporarily created.
Degree of protection: IP68
Battery
A) If the device fails to start, the battery is low on power and needs to be recharged.
For the initial 3 times please charge it for at least 12 hours, but not longer than 24
hours. This way you are ensuring the best performance in the future.
B) You can charge the device via the USB cable we are providing, or with a USB
compatible AC adaptor. Usually it needs 1.5-2 hours to be charged completely.
C) When recharging, both red and green LED indicators are bright. When finished, the
green LED indicator is still bright while the red one goes off.
D) If the device has not been used for a long time, we suggest you recharge the battery
first before you use it again.
E) It is better to charge the battery in power - off mode for fast recharge and best
protection of the device.
PC/Laptop connection
A)
1.
2.
3.
4.
System Requirement
CPU must be at least 1GHz or above
Operating system: Windows 98 / ME / XP / 2000 / Vista / 7
USB 2.0 slot
Minimum 512MB memory
B) Connecting PC or Laptop
1. Unscrew the lid, plug the USB cable into the device and connect it to the PC or
Laptop.
2. The computer will recognize the device as a new added disk. A new window will
pop up, where you can find a folder named “Video”. There the video files you
recorded are located.
3. Remove and save the video files to your computer.
4. When finished, click the disk icon to safely remove your hardware, then pull out
the USB cable and switch the device off.
Operation
A) Set time
1. Connect the device to a PC or Laptop ,then you can find a newly added “Disk(X)”
symbol in “My computer”, “X” means disk name, like ”DISK H” etc.
2. Open the directory of “Disk X”, then create a new text document by clicking File>New->Text file. It is important that the file is created in the “Disk X” folder and
not in the “Video” folder.
3.
Rename the new Text document to “setdate.txt”.
4.
Open the new Text document, input the local true time according to the following
set form. For example: The present time in Germany is: 13:59:01, 17th, November,
2009, so the text we have to insert into the file looks like this: 20091117135901
5.
Now save the text document and unplug the USB cable. Then record a video and
reconnect the camera to the PC. Check if the video displays the correct time, if not
repeat steps 3 and 4.
B) Switch on/ Recording
1. Switch On:
Press On/Off/Record button for about 1 second,
then both the green and the blue LED indicators turn on, the device is started. First
it will start an initialization procedure for about 3-4 seconds.
2. Recording:
After 3-4 seconds initialization procedure, the green LED indicator flashes for one
time and the device starts to record, after that the blue LED indicator flashes every
second.
C Stop recording / Save / Switch off:
During recording, press the On/Off/Record button for 2-3 seconds, both the green and
blue LED indicators turn off and the device switches off. During 2-3 seconds button
press time, the device will execute 3 commands: Stop recording, Saving, Switching off.
Specification
Product Size
Physical weight
Speed
USB
Power supply
Power duration
Power Consumption
Memory
Resolution
Video Format
Recording Speed
Working temp
Storage temp
Pixels
Player
Operating System
Dia 19 mm * L 68 mm
22g
Read > 1200kbs, write > 1000kbs
2.0 HS
Embedded 280mAh Li-polymer Battery
1.5-2 hours
<0.8W
Built-in 4GB
736*480
AVI
30fps
-5 - 40
-20 - 80
Max 3 mega
Windows Media Player, VLC Player, Quicktime etc
Windows 98 / ME / XP / 2000 / Vista / 7
Troubleshooting
Symptom
Fails to start
Auto shut-off
Green LED flash
Device is not recognized
when connected with
PC/Laptop
Data not saving
Auto power off after start
Possible reason
Battery run down
Device dead
Battery run down
Solution
Recharge battery
Reset, then start again
Recharge battery
USB Cable failure
PC Bios disabled
Main board does not
support USB port
Memory is full
Low battery
Memory is full
Replace new cable
Set USB enabled
Update mainboard driver
Remove video files
Recharge
Remove video files
Warning
•
•
•
•
•
Application: Please strictly abide relevant regulations and laws. This
product should not be used for any illegal purposes. The user is fully
responsible for its using purpose.
Battery: If you do not use this device for a long time, please charged it fully
before using.
File security: This product is not a professional storage device. It does not
guarantee the integrity and security of saved files. Please back up your
important documents on the computer or other storage devices.
Video quality: This product is not a professional video recording device. So
it is not guaranteed that the quality of the video is professional.
Operating temperature: -20°C - 80°C. To increase the durability of the
device it is best to use it at room temperature.
CE Conformity: This device corresponds to the relevant
European EU Directives and Technical harmonized
standards. It is marked with the CE symbol. Technical
documents and the latest Declaration of Conformity are
available any time from our public download server http://service.alan-electronics.de
Recycling: The European WEEE Directive does not any more allow to dispose any
used electronic items via household trash bins. The local communities will provide
containers for disposal of electronic waste. Please use these facilities, it will be your
contribution to proper recycling of electronic material, and it is free of charge for you!
European 2 years warranty:
The distributor, dealer or retail shop warrants to the original retail purchaser of this
product that should this product or any part of it, under normal use and conditions, be
proven defective in material or workmanship within 2 years from the date of original
purchase, such defect(s) will be repaired or replaced with new or reconditioned product
(at the company's option) without charge for parts and repair labor. To obtain repair or
replacement within the terms of this warranty, the product is to be delivered with proof
of warranty coverage (e.g. a copy of your bill of sale), specification of defect(s), to the
distributor, dealer or his authorized repair center. The warranty does not apply to any
product or part there of which, in the opinion of the company, has suffered or been
damaged through alteration, improper installation, mishandling, misuse, neglect,
accident, or by removal or defacement of the factory serial number/bar code label(s).
The warranty does not apply to accessory parts or problems caused through not
authorized or not recommended accessories like external power supplies and over
voltage caused through external power supplies, LED's or light bulbs, broken or
damaged acrylic glass windows and cabinet parts. Please contact the person where you
have purchased the camera or contact our service partner directly.
Service address for products sold in England:
ALAN UK LTD.
Unit 2
Callenders
Paddington Drive
Swindon, Wiltshire
SN5 7YW
Service address for products sold in Germany:
PST professional support technologies GmbH
Breitscheider Weg 117a
40885 Ratingen
Our service hotline can be reached in Germany under 01805-012204 (14 Cent p.
Minute, higher costs may be charged from mobile networks) or via e-mail under
[email protected]
© 2010 - Alan Electronics GmbH
Daimlerstr. 1 k – D-63303 Dreieich
www.alan-electronics.de - www.albrecht-online.de