1
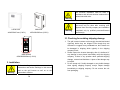
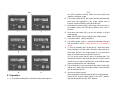
GRID-TIE INVERTER ST1000WG Quick Setup 1) Connect solar array to unit's solar terminal 2) Turn on solar switch and press On at LCD area to inspect solar input ratings. Turn off solar switch 3) Connect 3-wire AC cable to unit's grid terminal, correctly 4) Turn on solar switch, turn on AC switch to activate system, wait 5) Ignore LCD's On and Off switches, use On for cycling through LCD readings only ST-SERIES BY SOLARTORRENT This following user guide is a generic manual for our series of grid-tie inverters. This page provides updated information specific to the 1KW ST1000WG inverter that overrides information in the rest of this generic user manual. Electrical specifications on this page overrides those in the following generic user manual Notes 1) Battery: optional, not recommended, and separate solar regulator is needed. Battery terminals' voltage = solar panel's. 2) Load terminals are powered by solar/wind, not grid. Load terminals usable only when unit attains Standby or Operation mode. Warning Input to ST1000WG, 24V (battery) model a. Solar array 20 – 44V DC, 50A max b. Wind turbine 20-44VDC, must use regulator (not included) c. Battery 24V DC (e.g., use two 12V in series) (a) and (b) charges battery, excess energy then go to grid. Use (c) only if (a) or (b) power rating in watts exceeds inverter's (1,000 watts); this will absolves excess energy (of a/b) and prevent damage to inverter. When a/b is less than 1KW (e.g., at nights), battery discharges (charges) the grid. Output: 120VAC, 60Hz, auto-match grid’s Precaution 1. Keep inverter out of the sun to avoid unnecessary overheating leading to automatic shutdown of unit. Keep out of rain. 2. Paste electrical tape over unit's terminals to prevent human contact leading to electrical shock/electrocution 3. Always use a voltmeter to reaffirm official ratings before (re)connecting d 1. Troubleshooting Fan cycles on and off every 2 seconds or display garbled Solar array's amperes insufficient, check volts as well Panels in full sun (max. power) but unit still shutdown Unit overheated, move unit to shade and let it cools IMPORTANT SAFETY INSTRUCTIONS This manual contains important instructions that shall be followed during installation and maintenance of the inverter. To reduce the risk of electrical shock, and to ensure the safe installation and operation of the inverter, the following safety symbols are used to indicate dangerous conditions and important safety instructions. This indicates a factor feature very important for the safety of the user and/or which can cause serious hardware damage, if not applied appropriately. Use extreme caution when performing this task. Warning Note instructions and caution markings in this manual and on the inverter unit ad well as PV modules. Connection of the inverter to the electric utility grid must be done after receiving prior approval from the utility company and performed only by qualified personnel. Completely over the surface of all PV arrays with opaque (dark) material before wiring them or use other methods ensure safety from shock hazard. PV arrays produce electrical energy when exposed to light and could create a hazardous condition. This indicates a feature that is important either for optimal and efficient use or optimal system operation. This indicates an example. Example 2. SAVE THESE INSTRUCTIONS All electrical installations shall be done in accordance with the local and national electrical codes. The grid inverter contains no user serviceable parts. Do not open the inverter cause as this will damage the IP 65 seal. Please contact authorized system installer for maintenance. Before installing or using the grid inverter, please read all P1 P2 1. Introduction Table of contents 1) 1. Introduction---------------------------------------3 2) 2. Technical structure of the grid inverter-----5 3. Installation-----------------------------------------8 3) 4. Technical specification------------------------14 5. AC and DC (PV) connection----------------15 4) 6. Warranty information and liability----------20 The grid inverter is a residential/commercial single phase, grid-connected PV inverter designed to be inter-connected to the electric utility grid. With this manual. The grid inverter can be installed and operated safety. This installation guide is used as reference for the commissioning and as a guide line on how to use the inverter most effectively. Feeding power into the grid involves conversion of the DC-voltage from the PV arrays to grid compatible AC voltage by inverting” DC to AC. This unit feed power into a standard 225VAC single-phase 50Hz, commercial, industrial or institutional facility’s electrical system which is connected to the electrical grid. If the PV system and inverter are providing the same amount of electrical power that the facility is using then no power is taken from or fed into the utility grid. If the facility is using more power than the PV system is providing, then utility grid provides the balance of power. If the facility is using less power than the PV system is generating, then the excess is fed into the utility grid. Be sure to look into local regulations regarding net metering/inter-connection in your local area. Note that some utility need to change their revenue KWh meter for proper net metering measurement and billing. 1.1 Electrical connection and connection to P3 electrical utility grid P4 1.2 The string PV concept The use of string PV concept significantly reduces the cabling costs on a photovoltaic system. The use of just one, two( or in some cases 3) parallel strings of PV modules in series has proven advantageous by delivering a high operating voltage to the solar inverter. This advantage is primarily reflected in a higher efficiency of the inverter. Careful optimization of overall system cost and efficiency lead to the choice of a 450V DC maximum voltage system. 1.3 Date acquisition, display and communication The integrated data acquisition, display and communication capability of the grid inverter allows very powerful tracking of data and understanding of system performance. All error messages and operating conditions of the grid inverter or the PV system can be called up and shown on the display. Downing data from the grid inverter for analysis on a PC is also possible over the data interfaces (RS 485) These functions allow complete and continuous monitoring of the photovoltaic system.. Read out of data over the integrated interface and its display is only possible when the solar system is in operation. 2. Technical structure of the grid inverter P5 There is a switching bridge circuit in the inverter. And there is an isolation transformer between the photovoltaic system and the building’ AC power (and utility power grid). The PV voltage and P6 current are optimized in such a way that fluctuations which are caused by differing sunlight strengths and PV module temperatures can still end up producing the maximum possible power. Internal regulation of the grid inverter is achieved using microcontrollers, which control the function of MPP (maximum power point) tracking. The input PV voltage is designed to cover a range of 300V to 450V from the PV arrays. This means that many combinations of modules and strings from different manufacturers can be used. The inverter has a little standby power consumption/night-time losses. The control circuit power use of the inverter is reduced to a minimum, which helps give the inverter high operational efficiency. The housing and heat sink for the grid inverter is made out of aluminum with anti-corrosion finish. The housing is designed to IP65 to be dustproof and resistant to water spray. The heat sink is designed in such a way that operation of the inverter is possible at ambient temperature of -25℃to 50℃. grid monitoring is done by microcontrollers set up to meet the requirements of IEEE929-2000 and UL 1741. This includes grid voltage or frequency fluctuations outside of the required limits, anti-islanding and other limitations and requirements, which ensure that the inverter shuts down immediately if the grid goes down, or surge, sags, changes frequency or otherwise shows signs of instability. If this happens, the inverter will check, and reconnect to the grid 5 minutes after the grid is back to normal. Disconnecting from the grid is important to protect the electrical and utility line workers who may be working to restore the grid ¾ AC grid voltage The grid voltage must not go outside the range of +10/-12% of the nominal 115 AC grid voltage. The inverter will isolate itself from the power grid within 0.2 seconds if these limits are exceeded either way. ¾ AC grid frequency The power grid frequency can be within a range of ±0.2Hz either side of the nominal 50Hz grid frequency. The inverter will isolate itself from the power grid within 0.2 seconds if these permitted limits are exceeded either way. The heat sink serves to conduct away heat generated from energy losses in the power electronics. Internal temperatures regulation provides protection against excessively high temperatures inside the grid inverter. The maximum power processed from the PV arrays is automatically reduced to limit excessive inverter temperature. Another important safety feature is galvanic isolation of the utility grid and the PV array as well as ground fault detection and interrupt (GFDI) of the PV array. The PV array negative is grounded inside the inverter (and must not be grounded at any other point). The grid inverter will only operate in parallel with the utility grid. AC P7 P8 The electrical installation shall be done in accordance with all local electrical codes and the national electrical code. Warning 0.3KW-1KW 440X350X95 mm (L*W*H) 2KW-5KW 497X450X205mm (L*W*H) Warning Connecting the grid inverter to the electric utility grid must only be done after receiving prior approval from the utility company and installation completed only by qualified personnel/licensed electrician(s) 3.1 Checking for avoiding shipping damage 2200 800 0 60 10KW-200KW 800X600X2200mm (L*W*H) 3. Installation Warning Before installing the grid inverter, read all instructions and caution markings in this manual and on the grid inverter as well as on the photovoltaic modules P9 The grid inverter inverters are thoroughly checked and tested rigorously before they are shipped. Even though they are delivered in a rugged, heavy cardboard box, the inverters can be damaged in shipping which typically is the shipping company’s fault. Please inspect the inverter thoroughly after it is delivered. If any damage is seen please immediately notify the shipping company. If there is any question about potential shipping damage, contact local distributor. A photo of the damage may be helpful. Do not accept unit if visibly damaged or note visible damage when signing shipping company receipt. Report damage immediately to shipping company. Do not remove the unit from packaging. P10 3.2 Inverter mounting The inverter is made up of a sealed IP 65 corrosion resistant aluminum enclosure containing all electrical and electrical and electronic components. If the grid inverter can not be mounted outside. Since the AC and DC connections are wired to the disconnects and or junction box(es) only, there is no need to open the inverter enclosure during hook-up. The inverter enclosure is factory sealed and must not Note be opened at any time in the field or the IP65 seal may be compromised. P11 Although not required, installation at eye-height allows easy reading of the indicator LED display. For optimal inverter life and performance, do not mount the inverter in hot climates, although the inverter is designed to function at full power continuously in up to 122°F (50℃) ambient temperatures. Following these guidelines can help prevent the unit from going automatic into de-rating due to excessively high inverter care temperature. The housing and heat sink can reach 70℃ (158°F) and must be mounted on an appropriate material for this temperature. The inverter should not be mounted where people are likely to touch the case or heat sink due to the high potential temperature. 3.3 Notes regarding mounting and placement of the inverter criteria for device mounting: Because the inverter is in a IP65 sealed enclosure, the inverter should be mounted indoors. The very longest life for the inverter can be achieved by mounting it in a clean, dry and cool location even given the unit’s robust construction and design for efficient cooling For optimal electrical efficiency, use the shortest possible AC and DC cables and use the maximum allowable cable size. Avoid installation in close proximity to people or animals, as there is a small amount of high-frequency switching noise. Install the inverter in an accessible location following loacal codes. Please follow these guidelines. Caution 4. Introduction LCD display 2KW-5KW P12 1) 2) 3) 4) 5) 6) 0.3KW-1KW ON/CHK: Manual turn on/parameter inquire button. Knob down the button about 3 seconds. The inverter will be turn on. Each time when you knob down the button about 0.5 seconds, you can get the inverter parameters which display on the LCD. OFF The inverter manually turns off button. When knob down the button about 3 seconds, the inverter will be turn off. Power switch Only this switch turn to the “ON” position, can the inverter be operated. When the switch is on the “OFF” position, all operations to the inverter will not be accepted. City power input breaker This switch is for the connection to electrical utility grid. When the switch position is “ON”,the power can send the electrical utility grid via the inverter. When the switch position is “OFF”, the inverter wil disconnect the grid and turn to the off grid working mode. City power input This terminal used for connecting with the electrical grid. Before the connection the “City power input”(NO. 4) switch should be on “OFF” Load This terminal used for connecting with the user appliances. For example light and fan etc. when this appliances work in off P13 grid working mode, the working situation will depend on the sunlight situation. 7) Solar connecter Terminal used for connecting with solar panel. The DC input range to this model inverter is 0-102VDC. The starting voltage of this inverter is 48VDC and can not work when the voltage below 40VDC. Please pay attention to the positive (+) and negative(-) connection of the solar panel. 8) Solar DC input breaker Controller for the solar input. Only the switch in “ON” position, can the solar DC power connect to the inverter 9) The red led indication Failure: always lighting means the utility grid is unusually, and the inverter is working in the off grid mode, it can only supply the loads in this situation. Standby: flashes once every 5 seconds. That means the inverter is on standby mode. Waiting for knob down the ON/CHK button to turn the inverter on or turn on the inverter by software control. Fault: flashes once every 1 second. That means the inverter is fault, and need to turn off all control switches and repaired by the professional persons. 10) Operation This LED is lighting means the machine is working on the grid connected mode. 11) Battery input This terminal used for connection to battery. 12) Input breaker P14 B. C. D. E. 2) 3) 4) 5) 4.1 Operation: 1) A. Turn off the switch (NO.8), connect the solar panel output to P15 the (NO.7) position correctly. Make sure the positive and negative connection is right. Turn on the switch (NO.3), the inverter will start automatically, knob down the button(NO.1), the output voltage can be inquired, and the LED(NO.9) will light all the time. Knob down the button (NO.2), the inverter will turn to work in the standby mode, the LED (NO.9) flashes once every 5 seconds. Knob down the button (NO.1) to turn the inverter in off grid working mode. Note : the LED (NO.10) will not flash in the off grid mode. Turn off the switch (NO.8) and (NO.3) Turn off the switch(NO.4) ,connect the electrical utility grid and the terminal(NO.5). Make sure the L, N, G polarity is correct. (1) Turn on the switch (NO. 8) and (NO.3) , when the inverter works normally in off grid mode. Check the output power by knob down the NO.1, the output power is very small when there are no loads connect to the NO.7 terminal. (2) Turn on the switch (NO.4), about 15 seconds later. The inverter will connect to the utility grid (the NO. 9 LED is off and the NO.10 is on). About 2 seconds later, in the LCD the output power increases to the max. rated power The terminal (NO.6) can connected to the simple loads ( light and fan etc.), when connects to above loads, it also need the turn off the switch (NO.3) How to turn off the inverter? Disconnected the loads with terminal (NO.6), knob down the button (NO.2), turn the switch (NO.4) to the “OFF” position, then the switch (NO.8) to the “OFF” position. P16 P17 5. Technical specification Model(ST-) Rated Power(KW) MPPT Range(VDC) Maximum Power Of Solar Module Array (KWp) 6. AC and DC (PV) connections ST- ST- ST- ST- ST- ST- 300w 500w 1kw 3kw 5kw 10kw 0.3 0.5 5 10 1 46-75 0.36 3 82-128 0.6 180-420 1.2 3.3 5.5 Maximum Input Current Of Array Max 20A Maximum Open Circuit Voltage Of Array 450VDC (see correct V, p. 1) Maximum Efficiency 94% MPPT Intensity 99% Ripple Of DC Voltage VPP<10 % Allowed Voltage 180-260VAC Range Of Grid Allowed Frequency 50/60Hz±1% AC Range Of Grid Output Wave Form THD<3 % Loss At Night <0.5W Power Coefficient >0.99 Maximum(kw) 11 0.33 0.55 1.1 3.3 6.1 AC voltages: 5.5 11 Protection Against Over load, Short-Circuit, Over Protective Functions Heat, Isolated Island Efficiency, Joint-Reversed Insulated Strength Choose the inverter location keeping in mind where the disconnections, and/or junction boxes and kWh meter (if needed) will be located. It is best to mark on the wall or a diagram where all the components will be located. The inverter is set up with pre-wired AC and DC Note connection to make it very easy and quick to connect to DC disconnect to the left of the inverter and an AC disconnect to the right. The grid inverter are pre-wired with 36’(0.9 meters) cables for the DC (PV) input and the AC connection to the building/grid. This design allows installation and wiring of the inverter to be done without opening the inverter. The inverter should not be opened at any time. The unit is sealed at the factory and its CE listing will no longer be valid if opened as the seal cannot be guaranteed. Caution 2500VAC,1 Minute Environment Temperature -25℃~+55℃ Environment Humidity 0-95% ,Non Condensable Communication Interface RS485,RS232 Protective Class IP20 Polarity The range of AC input voltage within 200V and 235V. it is suitable for 225V 50Hz AC grid-connecting use. 6.2 Multiple units: The grid inverter units can be used at the local building codes and area utility guidelines. If multiple units are used, each inverter should have its own dedicated circuit breaker, and a generator string must only be wired to one inverter (although multiple PV strings can be used on each inverter up to unit ratings and power levels). P18 It is recommended that the PV system AC and DC disconnects be located beside the inverter if possible but must conform to code for your installation. This placement will make the best use of the “pre-wired” inverter feature and save installation time, material and effort as well as making a simple, reliable system. If local code requirements call for the AC and/or DC disconnect(s) to be mounted in another location, you can consider relocating the inverter also to the required location or add a small junction box or termination box to connect the PVI cables to building wiring going to disconnect location(s). Fig. 4 shows a typical installation with the AC and DC disconnects located on either side of the inverter. junction box is close enough to the inverter so that the inverter P19 cable will reach the disconnection or junction box via a conduit and so that an adequate length of cable will be available inside disconnect or junction box to make the connections/terminations to the L, N and ground point.) Measure and cut the metallic or non-metallic flexible conduit to go between the inverter AC conduit fitting and the disconnection or junction box. Next, install conduit fitting on disconnect or junction box. Thread inverter’s AC cable through conduit and into disconnect or junction box conduit fitting. Fit conduit into conduit fitting on inverter and disconnect or junction box and tighten. If needed, cut off the inverter AC cable to correct length inside the disconnection or junction box. Finally, terminate inverter cable leads in disconnect or junction box. Black leads are L and N, green/yellow lead is ground. If you cut off the cable, it is recommended to use a crimped-on ferrule or other approved method on the stripped, fine-stranded inverter wire when terminated in a screw terminal.( The inverter is shipped with a ferial in the wire.) 6.5 Connecting the AC inverter cable: 6.6 Connection wiring to electrical utility grid 6.3 AC circuit breakers: A dedicated AC circuit beaker in the home or building circuit panel is required for the PV inverter. For grid inverter, a 50Amp, 255VAC rated 2-circuit breaker is required. 6.4 AC and DC disconnects: Caution The wiring of the PV inverter’s AC and DC cables must only be done with the building AC circuit breaker off and the PV array disconnected or covered with an opaque material. Both AC and DC disconnects should be off If the connection of the AC cable that is provided on the inverter is to be made to an AC disconnect or junction box, mount the disconnection or junction box (make sure the disconnection or and gird impedance: The inverter must be connected to the grid with 2 conductors and a ground wire. The grid impedance value at the connection point should be as low as possible to avoid an increase of the AC voltage to non-permissible values while the inverter feeds to the grid. Minimizing wiring impedance also results in higher system efficiency. Example P20 The impedance is the sum of the electricity grid impedance at building distribution and all impedance values of conductors and connections. Single conductor impedance values are: Approximately 10.40 for a 100 feet (76.2m) 12AWG conductors Approximately 0.24. for a 100 feet (76.2m) 10AWG conductors Approximately 0.15. for a 100 feet (76.2m) 8AWG conductors Conductor impedance of <0.40. is recommended . The total impedance phase to phase of the grid plus the interconnecting AC conductors should be less than 1.2Ω given the very large DC voltage range with in which the inverter can operate. P21 6.9 Connecting the DC (PV) inverter cable: Caution Caution 6.7 Suggested DC disconnects: The inverters are not capable of back feeding currents into the PV array from the AC source including into short circuit(s) or fault(s) in the PV array or string(s). This allows some flexibility regarding PV string configurations including parallel strings with and without string fusing. No separate fused generator combination is required. There are many one and two string configurations that do not need fusing. 6.8 PV string configurations: There a huge number of combinations of PV module string combinations that will work well with the grid-connect inverter PV module manufacturer’s directions. PV arrays produce electrical energy when exposed to light and could create a hazardous condition.(One method used to assure safety from shock is to completely cover the surface of all PV-arrays with opaque/dark material before wiring them. Before connecting the connectors of the PV panel to the DC disconnect enclosure and before connecting the DC inverter cable, check the correct polarity and admissible PV panel voltage between the (+) and the (-) cable connectors of the PV panel. The PV panel open circuit voltage must be below 450VDC (Vpv<450VDC) under all conditions Caution Caution Even when in the off position, the DC disconnect will remain live on the PV side “line” when the PV modules are in daylight If the connection of the DC (PV) cable provided on the inverter is to be made to a DC disconnect or junction box, mount the disconnection or junction box. (Make sure the disconnection or junction box is close enough to the inverter that the inverter’s DC cable will reach the disconnection or junction box via a conduit and that an adequate length of cable will be available inside the disconnection or junction box to make connections/termination to P22 positive(+) switch terminal, negative(-) PV lead, and ground bar. It may be convenient to use a neutral kit for terminating multiple PV negatives.) Make sure and cut the 3/4 “metallic or non-metallic flexible conduit to go between the inverter’s DC conduit fitting and the disconnection or junction box. Next, install a conduit fitting in the disconnection or junction box. Thread inverter’s DC cable to correct length inside the disconnection or junction box. Finally, terminate inverter cable in disconnect or junction box. Black or red lead is positive (+) , white lead is negative (-) and green/yellow lead is ground. It is recommended to use a crimpled-on ferrel (sp/other approval method) on the stripped, fine-stranded inverter wire when terminated in a screw terminal. A ferril is provided on the cable as shipped. . 6.10 Commissioning the inverter and PV system Make sure all tools, parts etc. are removed from the vicinity of the inverter before turning on Note Make a final check for correctness of all AC and DC wiring to the inverter and in the system. Caution Note With the PV modules connected and inverter disconnects still off, it is a good final precaution to check PV polarity once more simply by carefully using a 600V, DC rated digital voltmeter and probing the positive (+) and negative (-) PV connections in the disconnect. P23 6.11 Turning on the inverter: Turn on the dedicated 2-circuit 225VAC circuit breaker on the home/building electrical panel. Turn on the DC disconnection Turn on the SC disconnection Watch the LED and LCD indicators for initialization Watch for blinking green LED and high frequency switching sound (inverter on-line and beginning to feed power into the AC circuit) inverter is operating normally. Last, look for a steady green LED indicating the inverter has stabilized at maximum power point 7. Warranty information and liability 7.1 Warranty The warranty period is 48 months from the date of purchasing the device by the end user (see Seller’s period override), whichever is shorter, and includes all defects all defects caused by poor material or workmanship. The guaranty period for warranty repairs or replacement units is 6 months after delivery, but runs at least until the expiration of the original warranty period for the delivered item. 7.2 Evidence Manufacturer will only render warranty services if the inverter is returned to manufacturer with the inverter invoice from the installer as issued for the consumer. The nameplate on the inverter must be legible. If these conditions are not met, SolarTorrent reserves the right to refuse warranty services. P24 violation, are excluded insofar as not otherwise stated by law. 7.5 Input (DC) from PV array: Maximum open circuit voltage of PV array: 250VDC 7.3 Conditions P25 The installer must calculate the maximum number of PV modules allowed for a maximum inverter open circuit voltage (OCV) of 450VDC in extreme cold temperatures for the installation. The device will be repaired at manufacturer’s facilities without invoicing material and labor, or a replacement inverter will be delivered. The rejected device is to be sent back to manufacturer in the original packing, or in a shipping package of equal quality. The customer needs to allow manufacturer a reasonable time period to repair the unit.(there is no reimbursement of lost energy production.) Caution 7.4 Exclusion of liability Because, PV modules also have a reduction in voltage at high cell temperature, you must make sure the MPP voltage of the strings will not drop below the minimum inverter DC input voltage of 450VDC in very hot temperature conditions, including wire losses/voltage drop. Excluded are any warranty claims and liabilities fo direct or consequential damages due to: Shipping damage Improper installation or commissioning Improper alterations, modification or attempted repair Inappropriate use or operation Insufficient air supply to the device or use in ambient temperatures over 50℃ Any installation and operation beyond the scope covered by relevant safety regulations Acts of nature (lighting, surge voltage, storm, fire) We reserve the right to make alterations, which may improve the performance or reliability of the device. Further claims for direct or indirect damages, including claims for damages from contract Note The open circuit voltage of PV modules depends on the cell temperature and the solar irradiation. The highest open circuit voltage occurs when the PV modules are at the coldest temperature and in bright sun Bothe the maximum open circuit voltage (OCV) shen at cold extreme and minimum MPP voltage when at hot extreme can be calculated for a PV module using its specification sheet. PV modules string sizing can then be used to determine how many modules should be used in a string. P26