1
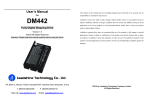
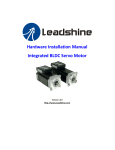
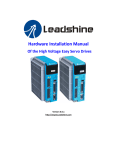
Software Operational Manual
Digital Stepper Drive DM1182
www.leadshine.com
SM-DM-R20120401
ii
Leadshine reserves the right to make changes without further notice to any products
herein to improve reliability, function or design. Leadshine does not assume any
liability arising out of the application or use of any product or circuit described
herein; neither does it convey any license under its patent rights of others.
Leadshine’s general policy does not recommend the use of its products in life
support or aircraft applications wherein a failure or malfunction of the product may
directly threaten life or injury. According to Leadshine’s terms and conditions of
sales, the user of Leadshine’s products in life support or aircraft applications
assumes all risks of such use and indemnifies Leadshine against all damages.
©2012 by Leadshine Technology, All Rights Reserved
Change Log
SM-DM-R20120401
Revision Date
Changes
Version
2012-04-01
Original Create
SM-DM-R20120401
iii
Table of Contents
Table of Contents.......................................................................................................................................................... iii
Introduction ..................................................................................................................................................................... 1
Workspace....................................................................................................................................................................... 1
Menus and Toolbar.................................................................................................................................................. 1
Using the Software.......................................................................................................................................................... 2
Connecting Drive .................................................................................................................................................... 2
Current Loop Tuning Window ................................................................................................................................ 3
Configurations Window .......................................................................................................................................... 4
Input/Output Settings tab ................................................................................................................................ 5
Anti-resonance Settings tab............................................................................................................................. 6
Built-in Controller for Self-test ....................................................................................................................... 8
Configuring the Drive ..................................................................................................................................................... 9
Configure Input/Output Settings ............................................................................................................................. 9
Current Loop Tuning............................................................................................................................................. 10
Anti-resonance Tuning .......................................................................................................................................... 16
Adjusting Electronic Damping.............................................................................................................................. 17
Contact Us..................................................................................................................................................................... 18
SM-DM-R20120401
Digital Stepper Drive DM1182 Software Operational Manual
Introduction
The ProTuner is a software tool designed to configure and tune the Leadshine digital stepper drive DM1182. The user can configure the
drive’s output current, micro step, command type, tune the current loop and adjust the anti-resonance parameters in this software.
Workspace
Menu
Toolbar
Configuration
Window
Menus and Toolbar
Menus and toolbars are at the top of the workspace. You can click menu bar to view the pull-down menu. The toolbar below offers the
most frequency used commands.
SM-DM-R20120401
1
Digital Stepper Drive DM1182 Software Operational Manual
Menu
Communication
Pull Down
Toolbar
Function
Connect to Drive
-
Open the serial port and connect to drive
Exit
-
Exit from ProTuner
->
Tune the current loop parameter to make the
Current Loop
drive match to the stepper motor
Set the command type, active edge/level of the
Configurations
I/O signal, micro step resolution, idle-current and
Drive ->
About->
adjust the anti-resonance parameters.
Download data to the drive’s nonvolatile
Download to Drive
-
Reset
-
Restore all factory parameters
User Manual on Web
-
Click to view DM1182 user manual
Software Manual on Web
-
Click to view DM1182 operational manual
-
Software information
About Leadshine ProTuner…
memory
Using the Software
Connecting Drive
Connect to Drive window appears every time you open ProTuner. You can also open it by clicking Conmmunication>Connect To
Drive when the software is open. Select the serial port and click on the Connect button. The software will try to connect to the drive and
read the settings. It may take several minutes. Please wait.
SM-DM-R20120401
2
Digital Stepper Drive DM1182 Software Operational Manual
Before connecting the drive, please make sure:
!
Notice
1) The RS232 cable .has been connected between the drive and PC serial port.
2) Power has been applied to the drive and the green LED is turned on.
The motor is no need to connect to the drive if you just want to change the parameters but not tuning.
!
Do not connect or disconnect serial cable when drive is powered. The drive’s communication circuit may be damaged.
Caution
Current Loop Tuning Window
Red Curve:
Target Current of Step Test
Green Curve:
Actual Current of Step Test
Click Drive->Current Loop to open the current loop tuning window. You can adjust the Kp (proportional gain) and Ki (integral gain) in
this window. These parameters should be tuned before normal operation.
Item
Description
Range
Increase Kp to make current rise fast. Proportional Gain determines the
response of the drive to current setting command. Low Proportional
Kp
Gain provides a stable system (doesn’t oscillate), has low stiffness, and
(Proportional Gain)
large current error, causing poor performances in tracking current
1 – 65535
setting command in each step. Too large Proportional Gain values will
cause oscillations and unstable systems.
SM-DM-R20120401
3
Digital Stepper Drive DM1182 Software Operational Manual
Adjust Ki to reduce the steady error. Integral Gain helps the drive to
Ki
(Integral Gain)
overcome static current errors. A low or zero value for the Integral Gain
may have current errors at rest. Increasing the Integral Gain can reduce
1 – 65535
the error. If the Integral Gain is too large, the systems may “hunt”
(oscillate) about the desired position.
Test Current
The current amplitude for the step response. Let this value not exceed
the maximum output current of the drive.
0.5 – 5.0A
Enter Kp and Ki and click this button to activate the test. A target curve
Manual Tuning
(red) and an actual curve (green) will be displayed on the screen for user
-
analysis.
Auto-configuration
Click this button to activate auto-configuration. The Kp and Ki will be
tuned automatically.
-
Configurations Window
SM-DM-R20120401
4
Digital Stepper Drive DM1182 Software Operational Manual
Click Drive->Configurations to open the Configuration window. This window includes Built-in Motion Controller for self-test, the
Input/Output Settings tab and the Anti-resonance Settings tab. You can make the motor move by the built-in motion controller. In the
Input/Output Settings Tab, you can set Output Current, Micro Step, Idle Current, Electronic Damping, Command Type and active
level/edge of I/O signals. In the Anti-resonance Settings tab, you can adjust the anti-resonance parameters to reduce the motor
vibration/noise.
Input/Output Settings tab
You can set Output Current, Micro Step, Idle Current, Electronic Damping, Command Type and active level/edge of I/O signals.
!
Notice
1.
DIP switch must be in Default mode (SW1=off, SW2=off, SW3=off) to allow current change.
2.
DIP switch must be in Default mode (SW4=on, SW5=on, SW6=on, SW7=on) to allow Micro Step change.
Item
Description
Range
Drive’s output current for the motor. It should be less than 1.4 times
of the motor’s related current.
Out Current
Note: The DIP switch setting must be in default mode as follows to
0.5-7.8A
allow current change.
SW1 = off, SW2 = off, SW3 = off
Drive’s Micro Step setting for the motor.
Micro Step
Note: The DIP switch setting must be in Default mode as follows to
allow Micro Step change.
1-512
SW4 = on, SW5 = on, SW6 = on, SW7 = on
Idle current percentage when there is no pulse sent to the drive.
Idle Current
It is only active when SW4 is OFF. When SW4 is on, the motor
10%-100%
current keep as Out Current after motor stop.
Idle Start Time
Electronic Damping
The time when there is no pulse applied to the drive. The drive goes
into idle state after this time. Ignore it if SW4 is on.
Adjust this parameter to improve the drive’s high speed performance.
The optimal value depends on the system.
Command type or pulse input mode of control signal. PUL/DIR
Input Mode
means pulse and direction mode; CW/CCW means double pulses
mode.
Active Edge
SM-DM-R20120401
1-5S
1-6000
PUL/DIR
CW/CCW
Pulse active edge. The motor shaft moves one micro step for each
Rising
active edge.
/Falling
5
Digital Stepper Drive DM1182 Software Operational Manual
Change the motor direction. It is only active in PUL/DIR command
Direction Change
mode. Please note that the actual direction is also related to the
motor coil connection.
Set active impedance for the alarm (fault) signal. Active High means
Alarm Signal
high output impedance and Active Low means low output
impedance.
(High)Positive
/(Low)Negative
Active Low
/Active High
Anti-resonance Settings tab
You can adjust the anti-resonance parameters in this window. The built-in controller can be assist anti-resonance tuning and self test.
Item
Anti-Resonance Area 1
SM-DM-R20120401
Description
It is usually between 0.6 to 1.2 RPS.
Range
-
6
Digital Stepper Drive DM1182 Software Operational Manual
Amplitude adjustment for the 1 st anti-resonance area. The user can enter a
Amplitude 1
value directly in the text box or move the slider bar back and forth to get
0 – 3500
an optimum value.
Phase adjustment for the 1 st anti-resonance area. The user can enter a
Phase 1
value directly in the text box or move the slider bar back and forth to get
0 – 1608
an optimum value.
Anti-Resonance Area 2
It is usually between 1.2 to 2.4 RPS.
-
Amplitude adjustment for the 2 nd anti-resonance area. The user can enter a
Amplitude 2
value directly in the text box or move the slider bar back and forth to get
0 – 3500
an optimum value.
Phase adjustment for the 2 nd anti-resonance area. The user can enter a
Phase 2
value directly in the text box or move the slider bar back and forth to get
0 – 1608
an optimum value.
Anti-Resonance Area 3
It is usually between 2.4 to 4.8 RPS.
-
Amplitude adjustment for the 3 rd anti-resonance area. The user can enter a
Amplitude 3
value directly in the text box or move the slider bar back and forth to get
0 – 256
an optimum value.
Phase adjustment for the 3 rd anti-resonance area. The user can enter a
Phase 3
value directly in the text box or move the slider bar back and forth to get
0 – 256
an optimum value.
SM-DM-R20120401
7
Digital Stepper Drive DM1182 Software Operational Manual
Built-in Controller for Self-test
If there is no pulse generator or motion controller in hand, you can use the built-in controller to make the motor move. Note that it can
only offer simple motion and does not represent the actual performance of using a motion controller.
Item
Speed
Acceleration
Distance
Interval Time
Repeat
Description
Display the current speed when you move the slider.
Range
0-20 RPS
Acceleration of Built-in Controller. Unit: Revolution / S2
1-500
Moving distance. Unit: Revolution
1-655
Interval between the positive and negative move. Unit: millisecond
1-10000
Repeat times.
1-65535
If it is positive, the motor moves only in positive direction. If it is
Motor Moving Direction
positive and negative, the motor moves in both positive and negative
-
direction.
Start
SM-DM-R20120401
Click to start the motion.
8
Digital Stepper Drive DM1182 Software Operational Manual
Configuring the Drive
If it is the first time setup, you can follow the steps below to configure the drive.
1)
Configure Input/Output settings like output current, micro step and input mode according to the motor and application.
2)
Tune the current loop parameters Kp (proportional gain) and Ki (integral gain) with the connected motor.
3)
Tune the anti-resonance parameters to reduce motor vibration/noise if necessary.
4)
Adjust the electronic damping when the high speed performance is not good.
!
The motor must be connected to the drive before trying to configure the drive.
Notice
Configure Input/Output Settings
Click Drive->Configuration to open the Configuration window. You can configure the input and output settings in the Input/Output
Setting tab.
In most application, it is only required to the output current, micro step and input mode. Usually, the motor manufacturer states the RMS
(root mean square) current in datasheet. Please refer to the hardware installation manual for how to set the output current.
!
Notice
1.
DIP switch must be in Default mode (SW1=off, SW2=off, SW3=off) to allow current change.
2.
DIP switch must be in Default mode (SW4=on, SW5=on, SW6=on, SW7=on) to allow Micro Step change.
High resolution Micro Step makes the motor move more smoothly. Low Micro Step resolution reduces the high frequency requirement
to the controller. See the DM drives hardware installation manual for more information for how to select the Micro Step.
SM-DM-R20120401
9
Digital Stepper Drive DM1182 Software Operational Manual
Current Loop Tuning
The current loop of DM1182 needs to be tuned for the best performance of DM1182r. The factory value may not suitable for the driven
motor. Incorrect value may cause low motor torque or motor stall or high motor noise. Below is the tuning procedure based a 8.5Nm
motor with 110VAC power input.
!
Before trying to tune the current loop parameters, don’t forget connect the motor to the drive.
Notice
Step 1: Set Test Current 1 and start the tuning with small Kp and “zero” Ki. Here we set Kp=300 and Ki=1.
Initial Value
Kp = 300
Ki =1
Step 2: Click the Manual Tuning button and the plot window will show two curves. The red curve is target current and the green curve
is actual current. There is large gap between them in the scope. It indicates that a large Kp needs to be introduced.
Start Test:
Kp = 500
Ki = 1
SM-DM-R20120401
10
Digital Stepper Drive DM1182 Software Operational Manual
Step 3 : Increase Kp to 700 and click Manual Tuning. The gap between target value and actual value is smaller but a higher Kp is still
needed.
↑ Proportional Gain:
Kp = 700
Ki = 1
Step 3: Give Kp 900, 1100, 1300 and click Manual Tuning, respectively. The green curve is getting more and more close to the red
curve. Over-shoot is obvious when we increase Kp to 1300. It indicates that you need to stop increasing Kp and back off. Our purpose is
to make the green curve (the actual current) a little higher than the red curve (the target). So we decrease Kp to 1200 until the actual
value is exactly over the target value.
↑ Proportional Gain:
Kp =900
Ki = 1
SM-DM-R20120401
11
Digital Stepper Drive DM1182 Software Operational Manual
↑ Proportional Gain:
Kp = 1100
Ki = 1
↑ Proportional Gain:
Over-Shoot
SM-DM-R20120401
Kp =1300
Ki = 1
12
Digital Stepper Drive DM1182 Software Operational Manual
↓ Proportional Gain:
Kp =1200
Ki = 1
Step 4: Now the Kp is relatively good enough. But there is still gap between the green curve and the red curve when we use the mouse
to zoom in the green curve. So we need to introduce Ki to reduce the “gap” or steady error at the constant part. It follows the same
procedure as Kp. High Ki causes big vibration, system lag and makes the performance worse. The following figures show how to tune
the integral gain.
Drag a rectangle to zoom in
SM-DM-R20120401
13
Digital Stepper Drive DM1182 Software Operational Manual
Zero Integral Gain:
Kp =1200
Ki = 1
↑Integral Gain:
Kp =1200
Ki = 100
↑Integral Gain:
Kp =1200
Ki = 150
SM-DM-R20120401
14
Digital Stepper Drive DM1182 Software Operational Manual
Step 5: The current loop tuning is basically finished. You can continue to adjust Kp and Ki for better performance. Now the updated
Kp and Ki is just stored in the driver’s RAM. They will be lost when we power off the driver. Don’t forget to click Drive->Download
To Drive to store the changed value to the drive’s nonvolatile memory.
Further Adjustment:
Kp =1250
Ki = 200
Save all the changes to the drive’s
non-violated nonvolatile memory.
SM-DM-R20120401
15
Digital Stepper Drive DM1182 Software Operational Manual
Anti-resonance Tuning
Stepper motors are highly resonant, which results in vibration and ringing. The ringing utilizes a large fraction of the motor's available
torque – thereby wasting performance. Furthermore, at mid-range velocities, the resonance can become so severe that the motor looses
synchronization and stalls. The EM drive provides robust anti-resonance control to stop the vibrations and maintain equilibrium. This
feature requires that the drive be configured with respect to the total inertia in the system. If set improperly, the effectiveness of the
feature may be diminished.
1.
!
Notice
For most of the application, it is not needed to tune anti-resonance parameters. We only recommend the advance user
to use this function as it is a boring process.
2.
In most of the case, only the tuning of the anti-resonance area 1 and 2 has obvious effect.
Step 1: Start the motion test by clicking Start/Stop button. Find a resonance speed by slightly moving the slider bar of internal pulse
generator back and forth. You can also use the arrow keys to adjust the speed precisely.
Step 2: Run the motor at the resonance speed and verify the motor smoothness. You may find a better smoothing value by slightly
moving the slider bars of Amplitude and Phase back and forth.
It is very important to make the Amplitude and Phase adjustments at the proper test speeds with an unloaded motor. Running at an
incorrect test speed will not excite the motor at its peak resonance, making it more difficult to find proper adjustment values. Optimum
SM-DM-R20120401
16
Digital Stepper Drive DM1182 Software Operational Manual
Amplitude and Phase values may be a little different between running the tests with an unloaded motor and a load motor.
Step 3: Keep the motor running at the resonance speed and verify the motor smoothness. You may find a better smoothing value by
slightly moving the slider bars of Amplitude and Phase back and forth. If the motor speed is 0.6-1.2RPS, you should tune the Amplitude
and Phase at the resonance area 1. The resonance area 2 is 1.2-2.4 RPS and the resonance area 3 is 2.4 4.8 RPS.
For example, we find a resonance speed at 0.98 rps. We begin to move the Amplitude 1 slider forth and the motor vibration and noise
became lower and lower. Finally we find the move is the smoothest when Amplitude 1 is 3300. The motor vibration and noise increase if
Amplitude 1 exceeds 3300. Then we follow the same procedure to search the best point for Phase 1. See Figure 26. Anti-resonance
tuning is done.
Step 4 : Click Drive->Download To Drive to save all the parameters to nonvolatile memory.
Adjusting Electronic Damping
The factory setting for the electronic damping is 300. If the motor is easily stalled and generates odd noise at middle speed, you can try
other values such as 500, 1500, 2000, 2500.
SM-DM-R20120401
17
Digital Stepper Drive DM1182 Software Operational Manual
Contact Us
China Headquarters
Address: 3/F, Block 2, Nanyou Tianan Industrial Park, Nanshan District Shenzhen, China
Web: http://www.leadshine.com
Sales Hot Line:
Tel: 86-755-2641-7674 (for Asia, Australia, Africa areas)
86-755-2640-9254 (for Europe areas)
86-755-2641-7617 (for America areas)
Fax: 86-755-2640-2718
Email: [email protected].
Technical Support:
Tel: 86-755-2641-8447, 86-755-2641-8774, 86-755-2641-0546
Fax: 86-755-2640-2718
Email: [email protected](for All)
Leadshine U.S.A
Address: 25 Mauchly, Suite 318 Irvine, California 92618
Tel: 1-949-608-7270
Fax: 1-949-608-7298
Web: http://www.leadshineUSA.com
Email: [email protected] and [email protected].
SM-DM-R20120401
18