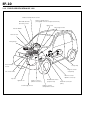
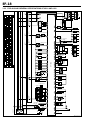
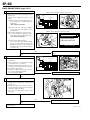
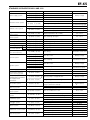
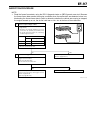
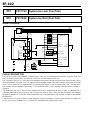
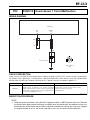
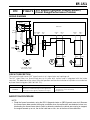
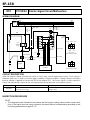
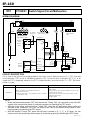
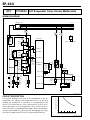
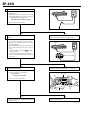
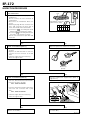
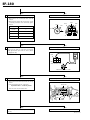
1
TO INDEX EF EFI SYSTEM 1. GENERAL PRECAUTIONARY MEASURES .................................................... EF– 2 1.1 INSTRUCTIONS ON USE OF THIS SERVICE MANUAL ................................ EF– 2 1.2 HANDLING INSTRUCTIONS ON CATALYTIC CONVERTEREQUIPPED VEHICLES ............................ EF– 3 1.3 ITEMS TO BE OBSERVED WHEN MOBILE COMMUNICATION SYSTEM IS MOUNTED ........................... EF– 3 1.4 IMMOBILIZER SYSTEMEQUIPPED VEHICLES ............................ EF– 4 1.5 ITEMS TO BE OBSERVED DURING SYSTEM CIRCUIT CHECK ..................... EF– 4 1.6 ITEMS TO BE OBSERVED WHEN USING OBD II GENERIC SCAN TOOL OR DS-21 DIAGNOSIS TESTER ............ EF– 6 1.7 HANDLING INSTRUCTIONS ON ENGINE CONTROL SYSTEM ................. EF– 6 2. CONNECTING PROCEDURE FOR SST (EFI COMPUTER CHECK SUBHARNESS) ...................................................... EF– 8 3. SYSTEM DESCRIPTION ................................ EF– 9 3.1 LOCATION OF ELECTRONIC CONTROL PARTS .................................. EF– 9 3.2 SYSTEM DIAGRAM ................................ EF–14 3.3 WIRING DIAGRAM ................................. EF–17 3.4 ARRANGEMENT OF EFI ECU TERMINAL .............................................. EF–20 4. GENERAL PRECAUTIONARY MEASURES IN ENGINE DIAGNOSIS ........... EF–23 4. 1 PRECAUTIONARY MEASURES FOR REPAIRS OF FUEL SYSTEMS ...... EF–23 4. 2 FUEL PRESSURE RELIEVING PROCEDURE ..................................... EF– 25 4. 3 FUEL LEAK CHECK ........................... EF– 25 4. 4 PRECAUTIONARY MEASURES DURING TROUBLE-SHOOTING ........ EF– 25 5. ENGINE DIAGNOSIS ................................... EF– 26 5. 1 GENERAL INFORMATION ................. EF– 26 5. 2 HOW TO PROCEED WITH TROUBLE-SHOOTING ....................... EF– 32 5. 3 INQUIRY SHEET ................................ EF– 40 5. 4 DTC CHART SPECIFICATIONS FOR M101 AND J102 ......................... EF– 41 5. 5 FAIL-SAFE FUNCTION FOR M101 AND J102.......................... EF– 45 5. 6 MATRIX TABLE FOR TROUBLESHOOTING ACCORDING TO MALFUNCTIONING PHENOMENA .... EF– 47 5. 7 CHECKING PROCEDURE FOR COMMON ITEMS IN CHART ............. EF– 48 5. 8 CHECKING PROCEDURE FOR DTC .................................................... EF– 52 5. 9 ERASING PROCEDURE FOR DTC .... EF– 57 5.10 BASIC ENGINE CHECK FLOW CHART ............................................... EF– 59 5.11 SCAN TOOL DATA (ECU DATA) ....... EF– 62 5.12 CHECK OF ECU AND ITS CIRCUIT ............................................. EF– 64 5.13 INSPECTION PROCEDURE FOR FUEL SYSTEM .................................... EF– 67 5.14 CIRCUIT INSPECTION ....................... EF– 71 5.15 UNIT CHECK ...................................... EF–184 5.16 SST (Special Service Tools) ............... EF–189 JEF00001-00000 EF–2 1. GENERAL PRECAUTIONARY MEASURES 1.1 INSTRUCTIONS ON USE OF THIS SERVICE MANUAL This service manual has been compiled in such a way that the manual may be used both in regions where the type certification is implemented based on the EC exhaust emission approval, and other regions. Hence, with regard to the assignment, reading, erasing of trouble codes and those steps of checks, repairs and confirmation, the service manual contains the procedures for both cases; One is a procedure that uses the DS-21 diagnosis tester or the OBD II generic scan tool, and the other is a procedure that does not use this tester or tool. Therefore, the following instructions given below must be observed. 1. About Use of DS-21 Diagnosis Tester or OBD II Generic Scan Tool • Regions where type certification is implemented based on EC exhaust emission approval Make sure to use the DS-21 diagnosis tester or the OBD II generic scan tool. • Other regions You may use or not use the DS-21 diagnosis tester or the OBD II generic scan tool. You may perform the operation, employing whichever method that will be easier to you. 2. Instructions To Be Followed Concerning Trouble Codes Trouble codes, such as P0105/31 (4-digit code/2-digit code) are posted additionally. • Regions where type certification is implemented based on EC exhaust emission approval Make sure to use only 4-digit trouble codes (e.g. P0105) which have been assigned according to the ISO regulations. • Other regions You may perform the operation using the 4-digit code, employing the DS-21 diagnosis tester or the OBD II generic scan tool. Or you may perform the operation using the 2-digit codes (e.g. 31), without the use of the tester or tool. You may perform the operation, employing whichever method that will be easier to you. NOTE: • The OBD II generic scan tool means a scan tool complying with the ISO 14230 (KWP2000) format. • In cases where the OBD II generic scan tool is employed, not all malfunction codes (4-digit codes) can be read out. It should be noted that only those trouble codes in which “zero” follows after “P”, for example, P0XXX, can be read out. • The accuracy of the 2-digit codes in diagnosing malfunctioning components is slightly inferior to that of the 4-digit codes. • Hereinafter, those regions where the type certification is implemented based on the EC exhaust emission approval, is referred to as the “EU specifications.” JEF00337-00000 EF–3 1.2 HANDLING INSTRUCTIONS ON CATALYTIC CONVERTER-EQUIPPED VEHICLES WARNING: • When a great amount of unburnt gas is admitted into the catalytic converter, overheating is prone to occur, resulting in a fire hazard. To avoid such trouble in advance, be certain to observe the following precautions. Also, be sure to explain such precautions to your customers. 1. Use only unleaded gasoline to catalytic converter-equipped vehicles. 2. Avoid idling the engine for a prolonged length of time. Do not run the engine continuously at idle speed for more than 20 minutes. WARNING: • Immediately check and repair the vehicle if the fast idle speed or idle speed is unstable or the system exhibits malfunction. Failure to observe this warning may result in a fire hazard. 3. Be sure to observe the following points when performing the spark jump tests. (1) The spark jump test must be limited to cases where such test is absolutely necessary. Also, be sure to finish the test in the shortest possible time. (2) Never race the engine during the test. (3) Be sure to shut off the fuel supply when performing the spark jump test in advance. 4. Do not run the engine when the fuel tank becomes nearly empty. Failure to observe this caution will cause misfiring. Also, it will apply excessive load to the catalytic converter, even leading to catalyst damage. 5. Be sure to avoid coasting with the ignition switch turned OFF. Moreover, be certain to avoid applying the brake for a prolonged period of time. 6. Do not dispose of the waste catalyst along with parts contaminated with gasoline or oil. JEF00002-00000 1.3 ITEMS TO BE OBSERVED WHEN MOBILE COMMUNICATION SYSTEM IS MOUNTED For those motor vehicles equipped with a mobile communication system, such as a bidirectional wireless telephone and cellular phone, be sure to observe the following precautionary measures. 1. Install the antenna as far away as possible from the ECU and sensors of the electronically-controlled system of the vehicle. 2. The wire of the antenna should be routed at least 30 cm away from the ECU and sensors of the electronically-controlled system of the vehicle. For details concerning the arrangement of the ECU and sensors, refer to the arrangement diagram of the components in the relevant section. 3. Do not wind the antenna feeder line together with other wires. Avoid routing the antenna feeder in parallel with other harnesses whenever possible. 4. The antenna and feeder line should be properly adjusted. 5. Never install a strong mobile communication system. JEF00003-00000 EF–4 1.4 IMMOBILIZER SYSTEM-EQUIPPED VEHICLES 1. The immobilizer system is formed by communication between the Immobilizer ECU and the EFI ECU by means of the rolling code. The rolling code will be automatically retained both in the immobilizer ECU and in the EFI ECU when the engine is started once with the key of the immobilizer system. The engine will not start if the rolling code in the immobilizer ECU and EFI ECU are not identical. Therefore, the engine will not start when using the EFI ECU which was mounted before on another vehicle with the immobilizer system without resetting the rolling code. 2. When the EFI ECU of a vehicle equipped with the immobilizer system was replaced, based on the results of the trouble shooting, and related troubles have been remedied, it is impossible, due to its construction, to confirm that the malfunction was caused by the former EFI ECU by installing the EFI ECU again. Incidentally, this confirmation is possible in the case of vehicles without the immobilizer system. Therefore, it is not necessary to install the former EFI ECU again to carry out the reconfirmation. In the case of vehicles without the immobilizer system, be sure to carry out this re-installation and reconfirmation. 3. In the case of vehicles equipped with the immobilizer system, once the engine is started for the confirmation test, etc. after the malfunction has been remedied, that EFI ECU can not be used for other vehicles with the immobilizer system, unless a measure is taken. NOTE: • When you would like to use each ECU of the vehicle concerned on vehicles equipped with other immobilizer system, initialize the ECU, using the diagnosis tester (DS-21), before removing the ECU from the vehicle. Then, remove the ECU and install it on another vehicle. If you perform the key registration, using the master key of this vehicle, each ECU can be used separately or as a set. • When the EFI ECU is to be replaced with a new one, it is possible to start the engine by using the master key with the terminal T for immobilizer ECU (ECU-T) of the data link connector grounded with a jump wire. • Please refer to Section BE of the service manual. JEF00004-00000 1.5 ITEMS TO BE OBSERVED DURING SYSTEM CIRCUIT CHECK 1. Before connecting and disconnecting the connectors and terminals, be sure to turn OFF the ignition switch or disconnect the negative (–) terminal from the battery. Otherwise, the harness is judged to have an open wire, and the fail-safe function will be applied. On the other hand, when the negative (–) terminal of the battery is disconnected, the diagnosis code will be erased. Therefore, if it is necessary to confirm the diagnosis code, be sure to perform the confirmation in advance. 2. When disconnecting the connector, never pull the harness. Rather, hold the connector properly with the connector unlocked and pull it. When connecting the connector, be sure to positively insert the connector, until you hear a clicking sound when the lock is engaged. IG “OFF” JEF00005-00001 JEF00006-00002 EF–5 3. Do not directly touch the terminals of parts which incorporate a microcomputer. 4. When a test probe is applied to the terminal to which a voltage is applied, care must be exercised so that two test probes may not come in contact with each other, so that short circuit may not take place. JEF00007-00003 5. When the connector is connected to the ECU, never connect an ohmmeter between the ECU connector and the sensor or actuator. Failure to observe this caution may damage the ECU or sensor or actuator. Ω JEF00008-00004 6. When a test probe is applied to the connector, be sure to bring it from the rear side (harness side) of the connector. In the case of connectors where it is impossible to apply a test probe from the rear side, such as water-proof connectors, apply the test probe from the connector side. At this time, be very careful not to bend the male terminal of the connector or open the female terminal. JEF00009-00005 7. Be sure to use a voltmeter/ohmmeter whose internal impedance is at least 10 kΩ/V. When a voltmeter/ohmmeter whose internal impedance is less than 10 kΩ/V is used, it may cause the ECU to malfunction or give a wrong evaluation. 8. When checking the terminal for the connecting condition, be sure to check the male terminal for a bend and the female terminal for an excessive opening. Furthermore, check both terminals for locking (looseness), rust formation, dust adhesion, etc. 0 00 Ω 100 70 20 15 10 5 20 5 OC V A 50 40 30 0 0 0 AC V BTEST 50 10 2 100 20 4 150 30 5 200 40 8 0 Ω 25 5 0 OC V A 10 0 AC V BTEST 20 KΩ/V DC 10 KΩ/V AC JEF00010-00006 9. Prior to the measurement of the voltage of each terminal, make sure that the battery voltage is 11 V or more. If the terminal voltage is checked with a low battery voltage, it may lead to a wrong diagnosis. V JEF00011-00007 EF–6 1.6 ITEMS TO BE OBSERVED WHEN USING OBD II GENERIC SCAN TOOL OR DS-21 DIAGNOSIS TESTER CAUTION: For enhanced safety, be sure to observe the following points: • Before using the OBD II generic scan tool or the DS-21 diagnosis tester, be sure to thoroughly read the instruction manual of the OBD II generic scan tool or the instruction manual of the DS-21 diagnosis tester. • When driving the vehicle with the OBD II generic scan tool or the DS-21 diagnosis tester connected to the vehicle, route the cables in such a way that they may not interfere with the driving. (That is to say, the cables should be routed away from the feet, pedals, steering wheel and shift lever.) • When performing the test driving, using the OBD II generic scan tool or the DS-21 diagnosis tester, two persons are needed. One person drives the vehicle, while the other person operates the OBD II generic scan tool or the DS-21 diagnosis tester. JEF00012-00000 1.7 HANDLING INSTRUCTIONS ON ENGINE CONTROL SYSTEM 1. The ECU, sensors, etc. are precision parts. Be very careful not to give strong impacts to those parts during the installation and removal. Never use those parts to which impacts have been given (for example, in cases where the parts were dropped on the floor). 2. When the test is carried out on a rainy day or the vehicle is washed, care must be exercised so that no water may be admitted and the ECU, connectors, sensors, actuators, etc. may not get wet. 3. Never disconnect the connector from the battery terminal while the engine is running. At the moment when the connector is disconnected from the battery terminal, a great counter electromotive force (approx. 100 V) may be generated, thus damaging the ECU. 4. Never connect the connectors to the wrong terminals of the battery. Failure to observe this caution may break the inside of the battery instantly. JEF00013-00000 5. Never remove the cover from the ECU proper or the bracket on the ECU proper side. Furthermore, do not touch the attaching screws. JEF00014-00009 EF–7 6. In cases where the ECU was judged to be malfunctioning and the vehicle has been remedied by replacing it, install the removed ECU (which has been judged to be malfunctioning) again to confirm that the original malfunction is reproduced. Then, the ECU can be finally judged to have been malfunctioning. JEF00015-00000 7. Tachometer connection Connect the tachometer probe to the measuring terminal of the SST connecter. CAUTION: • This does not apply if your tachometer is a pick-up type. • Never allow the tachometer probe to touch the ground, for it could result in damage to the ignitor and/or ignition coil. • Some kinds of tachometers may not be suited for the ignition system of the vehicle. Therefore, ensure that your tachometer is compatible with the ignition system of the vehicle. SST: 09991-87404-000 SST connector Tacho-meter terminal SST Earth JEF00016-00010 EF–8 2. CONNECTING PROCEDURE FOR SST (EFI COMPUTER CHECK SUBHARNESS) When the ECU terminal voltage is measured with the ECU connector connected to the engine ECU, connect the SST, following the procedure given below. NOTE: • The terminal number of the SST connector is the same as the ECU connector (page EF–20). JEF00017-00000 1. Turn OFF the ignition switch. Or, disconnect the battery ground cable from the negative (–) terminal of the battery with the ignition switch turned OFF. Disconnect the battery ground cable from the negative (–) terminal of the battery. CAUTION: • Be sure to memorize the malfunction code before disconnecting the battery cable. Otherwise the malfunction code(s) will be erased by disconnecting the battery cable. IG “OFF” JEF00018-00011 2. Remove the glove compartment sub assembly. Push Pull Push Pull JEF00019-00012 3. Disconnect the wire harness connectors from the EFI ECU connectors at the cowl side of the passenger seat. 4. Connect the following SST between the wire harness connectors and the EFI ECU connectors. SST: 09842-97203-000 5. Reconnect the battery ground cable to the negative (–) terminal of the battery. CAUTION: • When disconnecting or reconnecting the EFI ECU connectors, be sure to disconnect the battery ground cable from the negative (–) terminal of the battery with the ignition switch and all accessory switches in the off state. • When installing a new battery, care must be exercised not to mistake the battery polarity. Failure to observe this caution could cause ECU malfunction. • Before using the SST, be sure to check to see if short or open wire exists between the terminals of the SST. EFI ECU Wire harness Top SST qwe !2!3!4 o!0!1 @0@1@2 @3@4@5 #4#5#6 #1#2#3 $2$3$4 $5$6$7 %6%7%8 %3%4%5 ^4^5^6 ^7^8^9 &8&9*0 &5&6&7 *6*7*8 *9(0(1 Arrow A SST connector <Viewed from arrow A> JEF00020-00013 EF–9 3. SYSTEM DESCRIPTION 3.1 LOCATION OF ELECTRONIC CONTROL PARTS 3.1.1 FOR EU SPECIFICATIONS OF M101 Data link connector Valve for ISC Manifold absolute pressure sensor Linear throttle sensor Ignition coil Front O2 sensor (Bank 1 sensor 1) Fuel pump Engine control unit (ECU) Crank angle sensor Relay block Injector Intake air temperature sensor Engine coolant temperature sensor VSV for EVAP Neutral start switch (Only for A/T) Rear O2 sensor (Bank 1 sensor 2) Ignitor unit Cam angle sensor JEF00021-00014 EF–10 3.1.2 FOR EU SPECIFICATIONS OF J102 Intake air temperature sensor Vehicle speed sensor (Low-grade vehicles except A/T vehicle) Manifold absolute pressure sensor Ignitor unit Cam angle sensor VSV for EVAP Valve for ISC Relay block Linear throttle sensor Fuel pump Engine control unit (ECU) Oil control valve Rear O2 sensor (Bank 1 sensor 2) Injector Ignition coil Front O2 sensor (Bank 1 sensor 1) Crank angle sensor Neutral start switch (Only for A/T) Data link connector (DLC) Engine coolant temperature sensor JEF00022-00015 EF–11 3.1.3 FOR AUS AND GENERAL SPECIFICATIONS OF M101 Data link connector Valve for ISC Manifold absolute pressure sensor Linear throttle sensor Ignition coil O2 sensor Fuel pump Engine control unit (ECU) Crank angle sensor Relay block Intake air temperature sensor Injector VSV for EVAP Engine coolant temperature sensor Cam angle sensor Neutral start switch (Only for A/T) Knock sensor JEF00023-00016 EF–12 3.1.4 FOR AUS AND GENERAL SPECIFICATIONS OF J102 Intake air temperature sensor Vehicle speed sensor (Low-grade vehicles except A/T vehicle) Manifold absolute pressure sensor Cam angle sensor VSV for EVAP Valve for ISC Relay block Linear throttle sensor Fuel pump Engine control unit (ECU) Oil control valve Neutral start switch (Only for A/T) Injector Ignition coil Data link connector (DLC) O2 sensor Crank angle sensor Engine coolant temperature sensor Knock sensor JEF00024-00017 EF–13 3.1.5 FOR LEADED SPECIFICATIONS OF J102 Intake air temperature sensor Manifold absolute pressure sensor Vehicle speed sensor (Low-grade vehicles except A/T vehicle) VSV for EVAP Valve for ISC Engine control unit (ECU) Linear throttle sensor Fuel pump Oil control valve Relay block Injector A/F adjuster Neutral start switch (Only for A/T) Ignition coil Crank angle sensor Cam angle sensor Knock sensor Data link connector (DLC) Engine coolant temperature sensor JEF00025-00018 EF–14 3.2 SYSTEM DIAGRAM 3.2.1 FOR EU SPECIFICATIONS OF M101 and J102 Air cleaner Intake air temp. sensor Linear throttle sensor Throttle body Valve for ISC Manifold absolute pressure sensor Ignition coil VSV for purge Ignitor unit (With ion current detection) Surge tank PCV valve EFI ECU (Atmospheric pressure sensor built-in) IMB ECU Data link connector Vehicle speed sensor Charcoal canister A/T ECU Oil control valve Cam angle sensor +B Injector Malfunction indicator lamp Neutral start switch (Only for A/T) Front O2 sensor heater Front O2 sensor (Bank 1 sensor 1) Rear O2 sensor heater Rear O2 sensor (Bank 1 sensor 2) DVVT controller (Dynamic variable valve timing controller) Engine coolant temperature sensor Crank angle sensor Three-way catalyst JEF00029-00020 EF–15 3.2.2 FOR AUS AND GENERAL SPECIFICATIONS OF M101 and J102 Air cleaner Intake air temp. sensor Linear throttle sensor Throttle body Valve for ISC Manifold absolute pressure sensor Ignition coil VSV for purge (In case of M101) Surge tank PCV valve (In case of J102) Charcoal canister A/T ECU EFI ECU IMB ECU Data link connector Vehicle speed sensor Oil control valve Cam angle sensor +B Malfunction indicator lamp Injector Knock sensor Neutral start switch (Only for A/T) DVVT controller (Dynamic variable valve timing controller) Engine coolant temperature sensor O2 sensor Crank angle sensor Three-way catalyst JEF00030-00021 EF–16 3.2.3 FOR LEADED SPECIFICATIONS OF J102 Air cleaner Intake air temp. sensor Linear throttle sensor Throttle body Valve for ISC Manifold absolute pressure sensor Ignition coil VSV for purge Surge tank PCV valve Charcoal canister A/T ECU EFI ECU IMB ECU Data link connector Vehicle speed sensor Oil control valve Cam angle sensor A/F adjuster +B Malfunction indicator lamp Injector Knock sensor Neutral start switch (Only for A/T) DVVT controller (Dynamic variable valve timing controller) Engine coolant temperature sensor Crank angle sensor JEF00031-00022 EF–17 3.3 WIRING DIAGRAM 35 Heater blower switch Heater resistor blower motor A/C switch IG1 IG1 Gauge back Heater 10 A 20 A E 39 M Heater D Defogger Tail 15 A 40 A BATT IG1 E Stop lamp R Stop 10 A D 5 SIO2 Immobilizer ECU Stop lamp L 31 Tail 10 A R Meter illumination lamp L 28 61 Malfunction indicator lamp Door control ECU 3 9 34 8 Radiator fan relay Water temperature switch Stop lamp switch Tail lamp switch Data link connector 13 M 71 40 Radiator fan motor 78 Defogger High-mount stop lamp Magnet clutch relay Radiator fan 30 A BATT 77 76 75 74 Defogger switch Compressor magnet clutch 12 AC 20 A or A/C 10 A BATT RENG A/T ECU Gas pressure switch 10 71 70 69 73 72 COM1 38 33 4 32 63 62 68 67 66 65 64 E1 COM0 Tachometer Speedometer Clearance lamp 2 Resistance for switching constant value 41 72 –+ M 76 17 Intake air temperature sensor 45 7 36 A Ignition coils 1 Main relay To spark plugs C1 C2 I/C B2 C3 C4 74 50 16 44 Engine coolant temp. sensor (high-precision type) Rear O2 sensor A F 14 Front O2 sensor heater 75 20 F Engine 10 A 43 B1 S1 S2 S3 S4 I/O G2 G1 Ignitor unit Linear throttle sensor Rear O2 sensor heater A ECU IG 10 A EFI 15 A BATT IG2 Pressure sensor F/P motor IG1 L 78 37 29 (Equipped with immobilizer) F/P relay A/C evaporator temperature sensor 47 Injector (Not equipped with immobilizer) Tail lamp P/S hydraulic pressure switch 15 #1 EFI ECU #2 27 26 25 24 #3 30 #4 Vehicle speed sensor 46 VSV for purge 79 80 79 Rotary ISC 81 54 B R Oil control valve 82 51 21 59 F 58 F 57 Front O2 sensor B 22 BATT Body Engine earth earth Cam angle sensor (G sensor) (M/T only) F STA 10 A Starter 70 82 23 ACC IG1 IG2 ST (A/T only) (J102 only) 68 P, N range switch (A/T only) (M/T only) AM 60 A Crank angle sensor 52 11 60 F ST Starter relay (A/T only) IG switch 1 2 3 4 5 6 7 8 42 41 40 39 38 37 13 12 11 10 9 15 14 49 48 47 46 45 44 43 GSW2 A/B ECU 50 20 19 18 17 16 22 21 23 60 59 58 57 56 55 54 53 52 51 61 28 27 26 25 24 36 35 34 33 32 31 30 29 3.3.1 FOR EU SPECIFICATIONS OF M101 AND J102 Map constant switch signal JEF00034-00025 EF–18 E 10 Defogger switch SIO2 Stop lamp L 54 29 R Resistance for switching constant value 41 72 47 –+ 15 EFI ECU 76 17 Pressure sensor Intake air temperature sensor 45 7 36 Main relay A/C evaporator temperature sensor 46 30 2 M 1 Engine coolant temp. sensor 16 44 ECU IG 10 A F/P motor EFI 15 A BATT IG2 27 26 25 24 VSV for purge (Not equipped Injector with immobilizer) (Equipped with F/P relay immobilizer) R L P/S hydraulic pressure switch 79 81 Tail lamp 78 B 80 79 Vehicle speed sensor Rotary ISC #1 Clearance lamp Tachometer Speedometer 37 31 28 61 Malfunction indication lamp Oil control valve Meter illumination L 3 Door control ECU Radiator fan relay Stop lamp switch Tail lamp switch Data link connector 13 M Radiator fan motor Stop 10 A D 9 34 8 71 40 Radiator fan 30 A BATT 78 Stop lamp R Immobilizer ECU Tail 10 A 5 12 Magnet clutch relay #2 Defogger High-mount stop lamp Compressor magnet clutch #4 Heater blower switch A/C switch 38 35 Gas pressure switch A/B ECU A/C 10 A BATT 73 72 GSW2 77 76 75 74 Heater blower motor Heater resistor M 39 D E 33 4 32 IG1 IG1 Gauge, back Heater Defogger Tail 10 A 20 A 15 A 40 A IG1 63 62 68 67 66 65 64 71 70 69 RENG A/T ECU 82 To ignition plugs Linear throttle sensor 57 75 Ignition coil 4 Front O 2 sensor Ignition coil 2 53 58 Ignition coil 3 82 23 B 22 11 Body Engine earth earth BATT 68 STA 10 A Starter Cam angle sensor (G sensor) 70 ST (A/T only) (J102 only) ST IG2 IG1 ACC P, N range switch (A/T only) AM 60 A 52 B Crank angle sensor Starter relay (A/T only) (M/T only) 21 51 Ignition coil 1 60 IG1 Engine 10 A 59 Knock sensor (resonance) IG switch 1 2 3 4 5 6 7 8 42 41 40 39 38 37 13 12 11 10 9 15 14 49 48 47 46 45 44 43 COM1 50 20 19 18 17 16 22 21 60 59 58 57 56 55 54 53 52 51 23 E1 COM0 #3 61 28 27 26 25 24 36 35 34 33 32 31 30 29 BATT 3.3.2 FOR AUS AND GENERAL SPECIFICATIONS OF M101 AND J102 (M/T only) JEF00035-00026 EF–19 10 Heater blower switch Defogger switch Defogger Stop lamp R Stop 10 A D Magnet clutch relay Stop lamp L Tail 10 A R Meter illumination lamp L Malfunction indicator lamp Door control ECU 71 40 9 34 8 31 Stop lamp switch Tail lamp switch Data link connector 13 3 28 61 Radiator fan Radiator fan relay 78 SIO2 Immobilizer ECU 5 12 High-mount stop lamp M Radiator fan 30 A BATT E Gas pressure switch Compressor magnet clutch A/C 10 A BATT 73 72 Heater resistor 38 35 71 70 69 GSW2 A/B ECU 77 76 75 74 blower motor A/C switch 4 32 33 IG1 BATT Gauge back Heater 10 A 20 A E 39 M Heater D Defogger Tail 15 A 40 A BATT IG1 63 62 68 67 66 65 64 COM1 RENG Speedometer Clearance lamp R Tachometer Vehicle speed sensor Rotary ISC Resistance for switching constant value 29 41 72 A/F adjuster Main relay –+ 15 46 36 7 1 47 M ECU IG 10 A (Equipped with immobilizer) F/P motor EFI 15 A BATT IG2 F/P relay 62 73 26 25 24 Injector (Not equipped with immobilizer) 27 #1 30 #2 Tail lamp P/S hydraulic pressure switch 2 #3 EFI ECU 79 81 VSV for purge #4 L 78 37 54 B 80 79 Oil control valve 82 76 17 Pressure sensor Ignition coil 4 45 57 Intake air temperature sensor Ignition coil 3 Ignition coil 1 53 59 Linear throttle sensor Knock sensor (resonance) 21 22 (M/T only) F Engine earth Cam angle sensor Map constant switch signal Body earth AM 60 A BATT (M/T only) 68 ACC IG1 IG2 ST STA 10 A Starter B P, N range switch (A/T only) (A/T only) (J102 only) Crank angle sensor 70 82 23 ST Starter relay (A/T only) 52 11 B 51 60 IG1 Engine 10 A 16 44 58 Engine coolant temp. sensor (high-precision type) Ignition coil 2 IG switch 1 2 3 4 5 6 7 8 42 41 40 39 38 37 13 12 11 10 9 15 14 49 48 47 46 45 44 43 E1 COM0 A/T ECU 50 20 19 18 17 16 22 21 23 60 59 58 57 56 55 54 53 52 51 61 28 27 26 25 24 36 35 34 33 32 31 30 29 3.3.3 FOR LEADED SPECIFICATIONS OF J102 JEF00036-00027 EF–20 3.4 ARRANGEMENT OF EFI ECU TERMINAL 3.4.1 FOR EU SPECIFICATIONS OF M101 AND J102 28 27 26 25 24 61 23 22 21 60 59 58 57 56 55 54 53 52 51 82 81 20 19 18 17 16 50 13 12 11 10 9 49 48 47 46 45 44 43 80 79 Connector A (31 - pole) 15 14 78 77 76 75 74 Connector B (24 - pole) 8 7 6 5 4 3 2 1 42 41 40 39 38 37 36 35 34 33 32 31 30 29 73 72 68 67 66 65 64 71 70 69 Connector C (17 - pole) 63 62 Connector D (22 - pole) JEF00037-00028 CONNECTOR A No. 21 N1+ 22 N2+ E1 23 #40 24 #30 25 #20 26 #10 27 28 OCV+ N1– 51 N2– 52 53 KNK ISC 54 Contents of connection Crank angle sensor (+) Cam angle sensor (+) Sensor system ground Injector (#4 cylinder) Injector (#3 cylinder) Injector (#2 cylinder) Injector (#1 cylinder) Oil control valve (+) Crank angle sensor (–) Cam angle sensor (–) — Rotary ISC No. 55 ALTC 56 VSV2 IG4 57 IG3 58 IG2 59 IG1 60 61 OCV– 79 PRG 80 VSV1 ALT 81 E01 82 Contents of connection — — Ignition signal (#4 cylinder) Ignition signal (#3 cylinder) Ignition signal (#2 cylinder) Ignition signal (#1 cylinder) Oil control valve (–) Purge control VSV — — Power supply system ground JEF00038-00000 CONNECTOR B No. 14 ICMB PIM 15 VC 16 E2 17 18 FCCP VFP 19 20 OXH1 IE 43 VTH 44 45 THW Contents of connection Ignitor unit (With ion current detection) Pressure sensor signal Linear throttle sensor power supply Sensor ground — — Front oxygen sensor heater Ion current sensor ground Linear throttle sensor Engine coolant temperature sensor No. 46 47 48 49 50 74 75 76 77 78 VCPM E2PM ACLK ACEN OXH2 OX2 OX1 THA ACVR PST Contents of connection Pressure sensor power supply Pressure sensor ground — — Rear oxygen sensor heater Rear oxygen sensor Front oxygen sensor Intake air temperature sensor — P/S Pressure switch JEF00039-00000 CONNECTOR C No. SIO1 8 T 9 DEF 10 A/T 11 12 MGC 13 FAN1 37 SPD 38 ACSW 39 BLW Contents of connection Diagnosis tester Test terminal Defogger switch Neutral start switch (Only for A/T) A/C Magnet clutch relay Radiator fan relay (Without 2-step control) Vehicle speed sensor A/C Switch Heater blower switch No. STP 40 41 AUX 42 FAN2 69 SEL2 70 SEL1 H/L 71 72 ACEV 73 OX3 Contents of connection Stop lamp switch — — — Map constant switch signal (Only for M/T) Tail lamp switch A/C Evaporator temp. sensor — JEF00040-00000 CONNECTOR D No. BAT 1 FC1 2 W 3 ATTX 4 SIO2 5 6 TRRQ +B1 7 E21 29 FC2 30 REV 31 32 ATRX Contents of connection Memory back-up supply Fuel pump relay (With IMB) Malfunction indicator lamp Serial data transmission to A/T ECU Serial port for IMB — Power supply A/C Evaporator temp. sensor ground Fuel pump relay (Without IMB) Engine speed signal Serial data reception from A/T ECU No. 33 34 35 36 62 63 64 65 66 67 68 ATNE VF FPOF +B2 VCO VTHO IDLO FCO TRPR ACT STA Contents of connection Engine speed signal to A/T ECU VF monitor terminal Fuel pump relay OFF Power supply — — — — — — Starter signal JEF00041-00000 EF–21 3.4.2 FOR AUS AND GENERAL SPECIFICATIONS OF M101 AND J102 28 27 26 25 24 61 23 22 21 60 59 58 57 56 55 54 53 52 51 82 81 20 19 18 17 16 50 13 12 11 10 9 49 48 47 46 45 44 43 80 79 Connector A (31 - pole) 15 14 78 77 76 75 74 Connector B (24 - pole) 8 7 6 5 4 3 2 1 42 41 40 39 38 37 36 35 34 33 32 31 30 29 73 72 68 67 66 65 64 71 70 69 Connector C (17 - pole) 63 62 Connector D (22 - pole) JEF00042-00029 CONNECTOR A No. 21 N1+ 22 N2+ E1 23 #40 24 #30 25 #20 26 #10 27 28 OCV+ N1– 51 N2– 52 53 KNK ISC 54 Contents of connection Crank angle sensor (+) Cam angle sensor (+) Sensor system ground Injector (#4 cylinder) Injector (#3 cylinder) Injector (#2 cylinder) Injector (#1 cylinder) Oil control valve (+) Crank angle sensor (–) Cam angle sensor (–) Knock sensor Rotary ISC No. 55 ALTC 56 VSV2 IG4 57 IG3 58 IG2 59 IG1 60 61 OCV– 79 PRG 80 VSV1 ALT 81 E01 82 Contents of connection — — Ignition signal (#4 cylinder) Ignition signal (#3 cylinder) Ignition signal (#2 cylinder) Ignition signal (#1 cylinder) Oil control valve (–) Purge control VSV — — Power supply system ground JEF00043-00000 CONNECTOR B No. 14 ICMB PIM 15 VC 16 E2 17 18 FCCP VFP 19 20 OXH1 IE 43 VTH 44 45 THW Contents of connection — Pressure sensor signal Linear throttle sensor power supply Sensor ground — — — — Linear throttle sensor Engine coolant temperature sensor No. 46 47 48 49 50 74 75 76 77 78 VCPM E2PM ACLK ACEN OXH2 OX2 OX1 THA ACVR PST Contents of connection Pressure sensor power supply Pressure sensor ground — — — — Oxygen sensor Intake air temperature sensor — P/S Pressure switch JEF00044-00000 CONNECTOR C No. 8 SIO1 9 T 10 DEF 11 A/T 12 MGC 13 FAN1 37 SPD 38 ACSW 39 BLW Contents of connection Diagnosis tester Test terminal Defogger switch Neutral start switch (Only for A/T) A/C Magnet clutch relay Radiator fan relay (Without 2-step control) Vehicle speed sensor A/C Switch Heater blower switch No. STP 40 41 AUX 42 FAN2 69 SEL2 70 SEL1 H/L 71 72 ACEV 73 OX3 Contents of connection Stop lamp switch — — — Map constant switch signal (Only for M/T) Tail lamp switch A/C Evaporator temp. sensor — JEF00045-00000 CONNECTOR D No. BAT 1 FC1 2 W 3 ATTX 4 SIO2 5 6 TRRQ +B1 7 E21 29 FC2 30 REV 31 32 ATRX Contents of connection Memory back-up supply Fuel pump relay (With IMB) Malfunction indicator lamp Serial data transmission to A/T ECU Serial port for IMB — Power supply A/C Evaporator temp. sensor ground Fuel pump relay (Without IMB) Engine speed signal Serial data reception from A/T ECU No. 33 34 35 36 62 63 64 65 66 67 68 ATNE VF FPOF +B2 VCO VTHO IDLO FCO TRPR ACT STA Contents of connection Engine speed signal to A/T ECU VF monitor terminal Fuel pump relay OFF Power supply — — — — — — Starter signal JEF00046-00000 EF–22 3.4.3 FOR LEADED SPECIFICATIONS OF J102 28 27 26 25 24 61 23 22 21 60 59 58 57 56 55 54 53 52 51 82 81 20 19 18 17 16 50 13 12 11 10 9 49 48 47 46 45 44 43 80 79 Connector A (31 - pole) 15 14 78 77 76 75 74 Connector B (24 - pole) 8 7 6 5 4 3 2 1 42 41 40 39 38 37 36 35 34 33 32 31 30 29 73 72 68 67 66 65 64 71 70 69 Connector C (17 - pole) 63 62 Connector D (22 - pole) JEF00047-00030 CONNECTOR A No. 21 N1+ 22 N2+ E1 23 #40 24 #30 25 #20 26 #10 27 28 OCV+ N1– 51 N2– 52 53 KNK ISC 54 Contents of connection Crank angle sensor (+) Cam angle sensor (+) Sensor system ground Injector (#4 cylinder) Injector (#3 cylinder) Injector (#2 cylinder) Injector (#1 cylinder) Oil control valve (+) Crank angle sensor (–) Cam angle sensor (–) Knock sensor Rotary ISC No. 55 ALTC 56 VSV2 IG4 57 IG3 58 IG2 59 IG1 60 61 OCV– 79 PRG 80 VSV1 ALT 81 E01 82 Contents of connection — — Ignition signal (#4 cylinder) Ignition signal (#3 cylinder) Ignition signal (#2 cylinder) Ignition signal (#1 cylinder) Oil control valve (–) Purge control VSV — — Power supply system ground JEF00048-00000 CONNECTOR B No. 14 ICMB PIM 15 VC 16 E2 17 18 FCCP VFP 19 20 OXH1 IE 43 VTH 44 45 THW Contents of connection — Pressure sensor signal Linear throttle sensor power supply Sensor ground — — — — Linear throttle sensor Engine coolant temperature sensor No. 46 47 48 49 50 74 75 76 77 78 VCPM E2PM ACLK ACEN OXH2 OX2 OX1 THA ACVR PST Contents of connection Pressure sensor power supply Pressure sensor ground — — — — — Intake air temperature sensor — P/S Pressure switch JEF00049-00000 CONNECTOR C No. 8 SIO1 9 T 10 DEF 11 A/T 12 MGC 13 FAN1 37 SPD 38 ACSW 39 BLW Contents of connection Diagnosis tester Test terminal Defogger switch Neutral start switch (Only for A/T) A/C Magnet clutch relay Radiator fan relay (Without 2-step control) Vehicle speed sensor A/C Switch Heater blower switch No. STP 40 41 AUX 42 FAN2 69 SEL2 70 SEL1 H/L 71 72 ACEV 73 OX3 Contents of connection Stop lamp switch — — — Map constant switch signal (Only for M/T) Tail lamp switch A/C Evaporator temp. sensor A/F adjuster JEF00050-00000 CONNECTOR D No. BAT 1 FC1 2 W 3 ATTX 4 SIO2 5 6 TRRQ +B1 7 E21 29 FC2 30 REV 31 32 ATRX Contents of connection Memory back-up supply Fuel pump relay (With IMB) Malfunction indicator lamp Serial data transmission to A/T ECU Serial port for IMB — Power supply A/C Evaporator temp. sensor ground Fuel pump relay (Without IMB) Engine speed signal Serial data reception from A/T ECU No. 33 34 35 36 62 63 64 65 66 67 68 ATNE VF FPOF +B2 VCO VTHO IDLO FCO TRPR ACT STA Contents of connection Engine speed signal to A/T ECU VF monitor terminal Fuel pump relay OFF Power supply A/F adjuster power supply — — — — — Starter signal JEF00051-00000 EF–23 4. GENERAL PRECAUTIONARY MEASURES IN ENGINE DIAGNOSIS 4.1 PRECAUTIONARY MEASURES FOR REPAIRS OF FUEL SYSTEMS 1. Prior to performing operations of the fuel system, remove the cable of the negative (–) terminal from the battery. NOTE: • When the cable of the negative terminal is removed, the memories concerning the diagnosis codes and radio will be simultaneously erased. Therefore, before removing the cable of the negative terminal from the battery, the diagnosis codes should be outputted and checked. Also, the channels memorized in the radio should be recorded, if necessary. 2. Be sure not to smoke when performing operations of the fuel system. Also never carry out any operations near naked flame. 3. The fuel supply line (between the fuel pump and fuel delivery pipe) is still pressurized even if the engine has been turned off. Therefore, before loosening or removing the fuel supply line, be sure to relieve the fuel pressure, following the “Fuel pressure relieving procedure.” Even if the fuel pressure has been relieved, a small amount of fuel will spill when the fuel supply line is disconnected. Hence, before removing, cover the portion to be removed with a cloth to prevent the fuel from splashing. JEF00059-00032 4. The connection method of fuel hoses or evaporative emission hoses differs, depending upon the type of the pipe. When connecting the fuel hoses or evaporative emission hoses again, be sure to correctly connect and clamp them by referring to the figure on the right. Ensure that no twist nor fault is present after connecting. (1) Fuel hose q Hose insertion length Insert the hose in such a way that L1 becomes 0 2 mm. w Clip position Clamp the hose in such a way that L2 becomes 2 5 mm. (The clip shall not be placed at the bulge or spool of the pipe. Also the clip shall not go beyond the hose end.) L2 L1 In case of bulge spool (Double spool) L2 L1 In case where stopper is provided (Stopper differs, depending upon location) JEF00060-00033 EF–24 (2) Vacuum hose q Hose insertion length Insert the hose in such a way as the figure on the right shows. w Clip position The clip end position is about 2 mm away from the hose end. 3 mm or less In case where stopper is provided (Stopper differs, depending upon location) Radius ends 3 mm or less In case of round shape JEF00061-00034 (3) Purge hose q Hose insertion length Insert the hose in such a way that L1 becomes 0 3 mm. w Clip position Clamp the hose in such a way that L2 becomes 2 7 mm. L1 L2 In case where stopper is provided (Stopper differs, depending upon location) L1 L2 Radius ends In case of round shape JEF00062-00035 5. When installing the fuel filter union bolt to the fuel filter, use a new gasket and tighten to the specified torque. 6. When installing the injector, fuel supply pipe, fuel pressure regulator or pulsation damper, use a new “O” ring or gasket. Apply gasoline or silicone oil to the “O” ring before assembling. JEF00063-00000 EF–25 4.2 FUEL PRESSURE RELIEVING PROCEDURE CAUTION: • Never perform this operation while the engine is still hot. Failure to observe this caution may damage the catalyst. After confirming that the engine is cold, relieve the fuel pressure, following the procedure given below. 1. Place the shift lever of the transmission in the “N” position. In the case of automatic transmission vehicles, place the shift lever in the “P” position. Apply the parking brake and place chocks at the wheels. JEF00064-00000 2. Remove the relay block cover. 3. Remove the fuel pump relay from the relay block. 4. Start the engine. Leave the engine running, until it stops due to running-out of the fuel. 5. Install the fuel pump relay. Install the relay block cover. Fuel pump relay JEF00065-00036 4.3 FUEL LEAK CHECK After the fuel system has been repaired, perform the following check in order to ensure that no fuel leakage is present. 1. Turn ON the ignition switch for three seconds. Then turn it OFF. Repeat this operation three or four times so as to apply fuel pressure to the fuel system. 2. Under this state, ensure that the fuel system exhibits no fuel leakage at any point. JEF00066-00000 4.4 PRECAUTIONARY MEASURES DURING TROUBLE-SHOOTING 1. Before the diagnosis information memorized in the ECU memory is confirmed, never disconnect the connector from the ECU, the battery cable from the battery, the ECU earth wire from the engine, or the main fuse. 2. The diagnosis information memorized in the ECU memory can be erased by using the DS-21 diagnosis tester or the OBD-II generic scan tool in the same way as the check. Therefore, before using the tester, read its instruction manual so as to understand the functions furnished and how to use it. 3. Priority in trouble-shooting If the priority in trouble-shooting for a number of diagnosis codes is given in the concerned DTC flow chart, make sure to follow the priority. If not given, follow the priority given below and perform the trouble-shooting for each diagnosis trouble code (DTC). (1) DTC’s other than DTC P0171/25, DTC P0172/26 (too lean/too rich in fuel system), and DTC 0300/17, DTC P0301-P0304/17, DTC P0314/-(misfire found) (2) DTC P0171/25, DTC P0172/26 (too lean/too rich in fuel system) (3) DTC 0300/17, DTC P0301-P0304/17, DTC P0314/-(misfire found) 4. Before conducting checks, be sure to read the “Precautionary measures in checking system circuit.” Carry out the diagnosis, while paying utmost attention to those points requiring such attention. JEF00067-00000 EF–26 5. ENGINE DIAGNOSIS 5.1 GENERAL INFORMATION The engine and engine control system of this vehicle are controlled by the ECU. Furthermore, the vehicle is provided with the on-board diagnosis system. Therefore, when any abnormality takes place in the input/output systems (sensors, actuators, harnesses, connectors, etc.) of the engine control system, the ECU memorizes the system concerned and informs the driver by making the malfunction indicator lamp (MIL, warning lamp) illuminate or flash. Also the malfunction is informed to the operator by means of the data link connector (DLC, diagnosis connector). When trouble-shooting the engine, it is imperative for you to get the general idea of the onboard diagnostic system, and fully understand the precautionary measures in trouble-shooting, the items to be observed and how to use testers. Then, conduct the trouble-shooting, following the flow chart that indicates the correct procedure for the engine trouble-shooting. JEF00068-00000 5.1.1 ON-BOARD DIAGNOSTIC SYSTEM OF VEHICLES FOR EUROPE The vehicles for Europe have the following functions that comply with the 1999/102/EC (generally called EURO-OBD) standards. 1. When the ignition switch is turned ON, the malfunction indicator lamp (MIL) goes on. When no malfunction has been detected, the lamp will go out after the engine has started. (Check for a blown bulb) 50 60 H 40 30 C 80 100 60 40 20 F 20 10 0 E 2 0 km/h 3 D4 JEF00069-00037 2. While the engine is running, if the ECU detects any malfunction in the emission control system/components that will affect the emissions from the vehicle, or in the power train control components, or if any malfunction is detected in the ECU itself, the ECU illuminates or flashes the MIL (only when misfire is detected which will damage the catalyst). Then, the ECU memorizes the malfunction area (DTC by ISO15031-6/SAEJ2012). If that malfunction will not occur in three successive runnings, the MIL is automatically turned off. However, the DTC will be recorded in the ECU memory. NOTE: • The MIL is illuminated only by the malfunction that affects the emissions from the vehicle. (Only items bearing a circle (“O” mark) in the MIL column on page EF–41) Malfunction evaluation method MIL P0105/31 Manifold pressure pressure 1 trip ! P0110/43 Intake air malfunction 1 trip ! P0115/42 Engine co malfunction 1 trip ! P0116/42 Engine coo circuit mance 2 trip ! P0120/41 Throttle/P switch “A” 1 trip ! DTC No. De JEF00070-00038 EF–27 3. It is possible to read out various data from the engine ECU by connecting the OBD II generic scan tool which complies with the ISO 14230 format or DS-21 diagnosis tester to the DLC of the vehicle. You can perform trouble-shooting efficiently by checking these data (DTC, freeze-frame data, current data, O2 sensor monitor data, etc.). DLC JEF00071-00039 4. The DTC is composed of the ISO standard code (specified by ISO 15031-6) and the manufacturer’s designation code. The ISO standard code should be set pursuant to the ISO. On the other hand, the manufacturer’s designation code can be freely set forth by the manufacturer within a specified limit. Diagnostic trouble code P 0 1 1 6 (Power train) B: C: P: U: Body Chassis Power train Net work Designation trouble code Vehicle’s system 0: Regulation 1: Maker 1 & 2: Fuel and air metering 3. : Ignition system or misfire .. 7 & 8: Transmission JEF00072-00040 5. Many DTC’s have a 2 trip detection logic which assures avoidance of wrong detection and functions only when a malfunction is surely occurring. However, another diagnosis mode is provided, in which only a one-time final confirmation test is necessary for a service mechanic to confirm that the malfunction has been completely remedied after the repair. The mode can be switched on with the OBD II generic scan tool or the DS-21 diagnosis tester. (In the case of the DS-21 diagnosis tester, the “Continuous monitoring results” of “Vehicle communication in CARB mode” must be selected. Malfunction evaluation method MIL P0141/24 Oxygen sensor malfunction 2 trip ! P0171/25 Fuel trim (Air-fuel malfunction 2 trip ! P0172/26 Fuel trim (Air-fuel malfunction DTC No. De 2 trip ! JEF00073-00041 Vehicle communication Indication of malfunction code Erasing of malfunction code Data display for freeze frame data Indication of current data Front O2 sensor test results Rear O2 sensor test results Continuous monitoring results Mode 01 select function JEF00000-00042 6. When a malfunction is detected, the engine and running conditions at that moment are memorized as a freezeframe data in the ECU memory. 7. 2 trip detection logic When a malfunction is detected for the first time, that malfunction is temporarily memorized in the engine ECU memory. (First running). If the same malfunction is detected again during the second running, the MIL is illuminated and the DTC is determined. (Second running). (However, the ignition switch should be turned off between the first running and the second running.) JEF00075-00043 EF–28 8. Freeze-frame data When a malfunction is detected for the first time, the engine and running conditions at that moment are memorized in the memory. The engine and running conditions are recorded at the moment when the malfunction was found (fuel system, calculated load, engine coolant temperature, fuel trim, engine revolution speed, vehicle speed, etc.). Therefore, the freeze-frame data is useful during the trouble-shooting to determine whether the vehicle was running or stopped, the engine was hot or not, the air-to-fuel ratio was lean or rich when the malfunction occurred. (a) CARB mode Data display FSYS ECT LONG RPM 02 23°C 0.0 % 0 rpm LOAD SHRT MAP VS 0.0 % 0.0 % 146 kPa 0 Km/h Malfunction code: P0105 Press “F1” key. (b) DAIHATSU mode Data display ECT RPM ITA –30°C 0.0 rpm –1.0° MAP VS TAU 146 kPa 0 Km/h 0.00 mS Malfunction code: P0105 Press “F1” key. JEF00076-00104 9. Updating freeze-frame data Since the ECU is able to memorize the freeze-frame data for a single malfunction, the freeze-frame data shown in Item “1” below has priority when data is memorized. If the freeze-frame data shown in Item “1” below is detected when the freeze-frame data shown in Item “2” below has already been memorized, the freeze-frame data “2” is replaced by the freeze-frame data “1”. PRIORITY FREEZE FRAME DATA 1 Freeze frame data at initial detection of malfunction among misfire detected (P0300-P0304 and P0314), fuel system too lean (P0171) and fuel system too rich (P0172) 2 Freeze frame data when a malfunction other than those in “1” above is detected NOTE: • If the malfunction which occurs later has a lower priority or the same priority as the former one, the data is not updated. 10. Erasing of MIL-related malfunction code (DTC) In the case of electronically-controlled automatic transmission-equipped vehicles of EU spec. only, selecting “Erasing of DTC (Only EU spec. AT)” will erase all the DTC’s on the EFI ECU side, MIL-related DTC’s on the A/T ECU side (items with a circle in the MIL column on page EF–41) and freeze-frame data. JEF00077-00000 Vehicle communication Indication of malfunction code Erasing of DTC (Only EU spec. AT) Erasing of DTC (Others) Indication of freeze frame data Indication of current data Indication of parts ECU No. Actuator driving Trace record for malfunction Security access select function JEF00078-00044 EF–29 11. Erasing of freeze-frame data The freeze-frame data is erased simultaneously when the DTC is erased. In the case of except for electrically-controlled automatic transmission-equipped vehicles, the freeze-frame data can be erased simultaneously by erasing the DTC through selection of the “Erasing of DTC (Others)” Vehicle communication Indication of malfunction code Erasing of DTC (Only EU spec. AT) Erasing of DTC (Others) Indication of freeze frame data Indication of current data Indication of parts ECU No. Actuator driving Trace record for malfunction Security access select function JEF00079-00045 5.1.2 ON-BOARD DIAGNOSTIC SYSTEM OF VEHICLES OTHER THAN THOSE FOR EUROPE 1. When the ignition switch is turned ON, the MIL goes on. When no malfunction has been detected, the lamp will go out after the engine has started. (Check for a blown bulb) 50 60 H 40 30 C 80 100 60 40 20 F 20 10 0 E 2 0 km/h 3 D4 JEF00080-00046 2. While the engine is running, if the ECU detects any malfunction in the engine control system/components, or if any malfunction is detected in the ECU itself, the ECU illuminates the MIL. In addition to the illumination of the MIL, the corresponding diagnostic trouble code (DTC) is memorized in the engine ECU memory. When the malfunction has been remedied or the system returns to its normal state, the MIL automatically goes out. However, the DTC remains memorized in the engine ECU memory. Abnormal Normal Memorized Illuminated Extinguished Extinguished 5 sec. JEF00081-00047 3. It is possible to read out various data from the engine ECU by connecting the DS-21 diagnosis tester to the DLC of the vehicle. You can perform trouble-shooting accurately and efficiently by checking these data (DTC, freeze-frame data, current data, O2 sensor monitor data, etc.). (Only when DS-21 diagnosis tester is used) DLC JEF00082-00048 4. The DTC (diagnostic trouble code) is set to a four-digit code in accordance with ISO standard. Furthermore, the conventional two-digit code is also provided. The four-digit code can be read out by the DS-21 diagnosis tester. The two-digit code has been set forth by the DMC itself. This code can be read by observing the flashing pattern of the MIL. (For details, see page EF–53.) DTC No. Detection item 4-digit code 2-digit code P0105/31 Manifold absolute pressure/barometric pressure circuit malfunction P0110/43 Intake air temp. circuit malfunc. JEF00083-00049 EF–30 5. Some DTC’s have a 2 trip detection logic which assures avoidance of wrong detection and functions only when a malfunction is surely taking place. 6. When a malfunction is detected, the engine and running conditions at that moment are memorized as a freezeframe data in the ECU memory. Malfunction evaluation method MIL P0141/24 Oxygen sensor malfunction 2 trip ! P0171/25 Fuel trim (Air-fuel malfunction 2 trip ! P0172/26 Fuel trim (Air-fuel malfunction DTC No. De 2 trip ! JEF00084-00050 7. 2 trip detection logic When a malfunction is initially detected, that malfunction is temporarily memorized in the engine ECU memory. (First running) If the same malfunction is detected again during the second running, the MIL is illuminated and the DTC is determined. (Second running) (However, the ignition switch should be turned off between the first running and the second running.) JEF00085-00000 8. Freeze-frame data The ECU memorizes the engine and running conditions in its memory at the moment when the ECU detects a malfunction for the first time. (The figure on the right shows an example.) Therefore, it is possible to know the engine and running conditions when the malfunction was detected (such as whether the engine was hot or not, the vehicle was running or stopped, the air-to-fuel ratio was lean or rich) by checking the freeze-frame data. By utilizing the freezeframe data, it is possible to proceed with the troubleshooting efficiently. The freeze-frame data can be read out only by using the DS-21 diagnosis tester. DAIHATSU mode Data display ECT RPM ITA –30°C 0.0 rpm –1.0° MAP VS TAU 146 kPa 0 Km/h 0.00 mS Malfunction code: P0105 Press “F1” key. JEF00086-00105 EF–31 9. Updating freeze-frame data Since the ECU is able to memorize the freeze-frame data for a single malfunction, the freeze-frame data shown in Item “1” below has priority when the data is memorized. If the freeze-frame data shown in Item “1” below is detected when the freeze-frame data shown in Item “2” below has already been memorized, the freeze-frame data “2” is replaced by the freeze-frame data “1”. PRIORITY FREEZE FRAME DATA 1 Freeze frame data at initial detection of malfunction among fuel system too lean (P0171) and fuel system too rich (P0172) 2 Freeze frame data when a malfunction other than those in “1” above is detected NOTE: • If the malfunction which occurs later has lower priority or the same priority as the former one, the data is not updated. 10. Erasing of freeze-frame data The freeze-frame data is erased simultaneously when the DTC is erased. (1) When the DS-21 diagnosis tester is used: Select “Erasing of DTC (Others)” of the “Vehicle communication.” Press the execution key (F1 key). (2) When the DS-21 diagnosis tester is not used: See page EF–58. JEF00087-00000 Vehicle communication Indication of malfunction code Erasing of DTC (Only EU spec. AT) Erasing of DTC (Others) Indication of freeze frame data Indication of current data Indication of parts ECU No. Actuator driving Trace record for malfunction select function JEF00088-00051 5.1.3 DATA LINK CONNECTOR (DLC, COMMON DESTINATIONS) The vehicle engine ECU uses the ISO14230 (Euro-OBD) protocol. As regards the position, connector shape and pin arrangement, the DLC is in accordance with the ISO 15031-3 (SAEJ1962) and has complied with the ISO14230 format. The OBD II serial data line (K line of ISO14230) is used for the OBD II generic scan tool or the DS-21 diagnosis tester in order to communicate with the ECU. Terminal No. Connection/voltage or resistance +B ECU-T REV EFI-T 16 15 14 13 12 11 10 9 8 7 6 5 4 3 2 DLC 1 Body ground ECU ground OBD II serial data line (K line of ISO 14230) Condition 7 Bus + line/pulse generation During transmission 4 Chassis ground/↔ Body ground 10 Ω or less Always 16 Battery positive/↔ Body ground 9 - 14 V Always DLC JEF00089-00052 EF–32 NOTE: • With the cable of the DS-21 diagnosis tester connected to the DLC through the SST, turn ON the ignition switch. If the power indicator of the tester will not go on, conduct the following checks and repair any malfunctioning parts. SST: 09991-87404-000 Power indicator (switch section) JEF00090-00053 Connect the DS-21 diagnosis tester to another vehicle. Turn ON the ignition switch. When Power indicator of DS-21 diagnosis tester goes on: Malfunction on vehicle side Check DLC, +B and earth • Voltage check of BAT terminal • Continuity check between terminal E and body When Power indicator of DS-21 diagnosis tester will not go on: Malfunction of DS-21 diagnosis tester proper JEF00091-00000 5.2 HOW TO PROCEED WITH TROUBLE-SHOOTING The engine control system is equipped with diagnosis functions which are capable of diagnosing malfunctioning sections. These functions give important clues in trouble-shooting. The flow chart on the next page shows how to proceed with trouble-shooting by using these diagnosis functions. The flow chart shows how the diagnostic trouble code check can be used effectively. Moreover, when its results are fully reviewed, you can determine whether you are going to do the trouble-shooting according to diagnosis trouble codes or the trouble-shooting according to malfunctioning phenomena. The diagnosis of this system is equipped with a battery back-up function (a function which supplies power for diagnosis memory even if the ignition switch is turned OFF.) NOTE: • When no DS-21 diagnosis tester or OBD-II generic scan tool is used, the DTC or freeze-frame data in the flow chart can not be read out. JEF00092-00000 EF–33 5.2.1 ENGINE DIAGNOSIS FLOW CHART NOTE: • For details of each step, refer to the next page. Bring in malfunctioning vehicle Obtain full information about conditions and environment where malfunction occurred. Inquiry with customer Check and making record of DTC/freeze-frame data Erasing of DTC/freeze-frame data ∗ Confirm phenomenon and grasp malfunctioning situation. (If phenomenon can not be reproduced, use information obtained through inquiry and malfunction reproducing method.) Confirmation of reproduction of malfunctioning phenomenon Malfunctioning phenomenon exists. No malfunctioning phenomenon exists. Confirmation by malfunction reproducing simulation method Recheck and record of DTC/freeze-frame data No DTC indicated. Malfunctioning phenomenon exists. DTC indicated. Malfunctioning phenomenon exists. Basic check Check and repair by means of chart according to DTC ∗ Trouble-shooting according to malfunctioning phenomena NO Final confirmation (DTC confirmation) test Is vehicle restored to its normal state? No DTC indicated. No malfunctioning phenomenon exists. Visual check Narrow down malfunctioning systems. Check and repair for malfunction which occurs intermittently. Confirm that the malfunctioning phenomenon that customer spoke about has been remedied completely. YES Finish System is normal. There is a strong likelihood that a malfunction occurred in the past in the wire harness or connector of the system which was indicated at time of initial DTC check. Hence, check the wire harness or connector concerned. JEF00093-00000 EF–34 5.2.2 INQUIRY WITH CUSTOMER In your attempt to remove the causes for a malfunction of the vehicle, you will not able to remove the causes unless you actually confirm the malfunctioning phenomenon. No matter how long you continue operations, the vehicle may not resume the normal state unless you confirm the malfunctioning phenomenon. The inquiry with the customer is a vital information collecting activity which is to be conducted previous to the confirmation of malfunctioning phenomenon. This inquiry will provide you with an important clue in an effort to reproduce the malfunctioning phenomenon. Furthermore, the information obtained by the inquiry can be referred to during the trouble-shooting. Hence, instead of making general questions, it is necessary to focus your questions on the items related to the malfunction. The following five main points of the inquiry given below are the most important points in analyzing the malfunction. In some cases, the information about malfunctions which took place in the past and about the history of previous repairs, which seem to have nothing to do with the current malfunction, may prove to be helpful in solving the malfunction. Hence, it is important to obtain as much information as possible and keep them accurately in mind as reference information when trouble-shooting the malfunctioning phenomenon. Main points in analysis of malfunction told by customer • What? ............................... Vehicle model, name of system • When? .............................. Date, time, frequency of occurrence • Where? ............................. Condition of road • Under what conditions? ... Running conditions, driving conditions, weather conditions • What happened? ............. How customer felt about malfunctioning phenomenon JEF00094-00000 5.2.3 CHECK, RECORD AND ERASING OF DTC/FREEZE-FRAME DATA When the DTC of the diagnosis is indicated, it is necessary to confirm whether that a system malfunction took place in the past or is still taking place, and confirm how the malfunction is related with the reproduced malfunction. To confirm this, you have to indicate the DTC/freeze-frame data twice. That is to say, you indicate the DTC/freeze-frame data, erase the data, and confirm the malfunctioning phenomenon. Then, you indicate the DTC/freeze-frame data again. Please check the DTC’s (including unidentified DTC’s) by referring to the “DTC checking procedure” section. When any DTC’s are indicated, print or write down the DTC and freeze-frame data. Then, erase them by referring to the “DTC erasing procedure.” If you fail to erase the DTC at this time, you may make a wrong diagnosis, conclude that the normal circuit is malfunctioning, or face difficulty in trouble-shooting. JEF00095-00000 EF–35 5.2.4 CONFIRMATION OF REPRODUCTION OF MALFUNCTIONING PHENOMENA In the course of trouble-shooting, the operator can not pinpoint the cause for the malfunction unless he confirms the phenomenon. For this purpose, it is indispensable to reproduce the malfunctioning phenomenon by creating conditions and environments that are similar to those where the malfunction occurred, based on the information obtained through the inquiry with the customer. As for phenomena which can not be reproduced easily, it is necessary to produce running conditions that are similar to those when the malfunction occurred (road surface condition, weather condition, driving condition). For this end, it is of great importance to try to reproduce the malfunction persistently by applying external factors, such as vibration (moving wire harnesses and relays by hand), heat (applying hot air) and water (applying moisture). Vibration, heat or moisture can constitute causes for malfunction that are difficult to reproduce. Therefore, with the vehicle in a stationary state, you can perform the following malfunction reproduction simulation tests given below. Moreover, if you presume a section (part) which can cause a malfunction and connect a tester, etc. to that section so as to confirm the malfunctioning phenomenon, you can also achieve a function evaluation of that section (part). JEF00096-00000 MALFUNCTION REPRODUCTION SIMULATION TEST METHODS 1. Vibration method: When vibration is thought to be the main cause (1) Connector Lightly shake the connector vertically and laterally. JEF00097-00054 (2) Wire harness Lightly shake the wire harness vertically and laterally. The points to be checked are connector joints, the vibrating point and the section where the wire harness is passing through the body. Shake lightly JEF00098-00055 (3) Parts, sensors With your finger, apply light vibrations to a part of the sensor which is presumed to be the cause for the malfunction. Check to see if the malfunction is reproduced. NOTE: • Be careful not to apply too strong vibration to a relay, for it can cause an open wire in the relay. JEF00099-00056 EF–36 2. Cool/hot method: When a suspected section is likely causing the malfunction when it is cold or hot Heat a component which is presumed to be causing the malfunction by using a dryer or the like. Check to see if the malfunction occurs. CAUTION: • Do not heat the section beyond 60°C. (Temperature limit to assure that no damage be made to the component.) • Do not directly heat the parts inside the ECU. Cooling agent Dryer Malfunction JEF00100-00057 3. Water applying method: When the malfunction is believed to occur on rainy days or under humid conditions Apply water to the vehicle. Check to see if the malfunction occurs. NOTE: • Never apply water directly to the engine compartment. By applying water to the front of the radiator, you can indirectly change the temperature and humidity. • Never apply water directly to the electronic parts. • If rain leaks into the vehicle compartment, rain may get into the inside of the ECU through the wire harnesses. If the vehicle has experienced any rain leakage before, utmost attention must be paid in respect to this point. 4. Others: When the malfunction is believed to occur when a heavy electric load is applied Turn ON all electric loads, including the heater blower, headlights, rear window defogger, etc. Check to see if the malfunction occurs. JEF00101-00058 ON JEF00102-00059 EF–37 5.2.5 RECHECK AND MAKING RECORD OF DTC/FREEZE-FRAME DATA By checking the DTC/freeze-frame data after confirming the reproduction of the malfunctioning phenomenon, it is possible to judge whether the system related to the DTC that was indicated before confirmation of the reproduction is now functioning properly or not. Then, you are to proceed to one of the following three steps. 1. When a DTC was indicated at the time of checking the DTC and the same DTC is indicated after the confirmation of reproduction of the malfunction, it indicates that the malfunction is still persisting in the diagnosis circuit. Proceed to the trouble-shooting according codes. 2. When no abnormal code is indicated, although the occurrence of malfunction was observed during the confirmation of reproduction of malfunction, a malfunction other than those related to the diagnosis system is likely taking place. Proceed to the trouble-shooting according to malfunctioning phenomena. 3. When no malfunction is observed during the confirmation of reproduction of malfunction, and the normal code is indicated at the check of the DTC, it is presumed that an abnormality, such as poor contacts at the harnesses and connectors, occurred in the past, but now they are functioning properly. Check the harnesses and connectors of those systems related to the DTC that was indicated before the confirmation of reproduction of the malfunctioning phenomenon. JEF00103-00000 5.2.6 BASIC CHECK It is possible to narrow down the malfunctioning sections by performing the basic engine check, following the “basic engine check flow chart.” JEF00104-00000 5.2.7 VISUAL INSPECTION Check the wire harnesses and connectors of the systems that were indicated at the initial DTC check, following the procedure of the “visual and contact pressure checks.” JEF00105-00000 EF–38 5.2.8 CHECK AND REPAIR BY CHART ACCORDING TO DTC’S The following table shows the checking procedure. You can perform efficient and accurate trouble-shooting by utilizing the DTC indicated at the time of rechecking the DTC. Perform the trouble-shooting by following the checking procedure shown in the flow corresponding to each DTC. The following shows an example of the engine DTC chart. • DTC No. This shows the diagnosis trouble code “4-digit code/2-digit code.” The 4-digit code is in accordance with the ISO/SAE Regulations. The 2-digit code is set forth by the DMC itself. • Trouble area This shows areas where malfunctions are likely occurring. • MIL (malfunction indicator lamp) ! : MIL is illuminated. — : MIL will not go on. • Malfunction evaluation method This indicates whether the 1 trip detection logic or 2 trip detection logic is employed to evaluate a malfunction. • Detection item This item indicates a malfunctioning system or contents of malfunction. DTC (specified by ISO/SAE regulations) chart NOTE: • Vehicles for some destinations do not have certain DTC numbers that are listed in the chart. Malfunction evaluation method MIL • Open wire or short in absolute pressure sensor circuit • Manifold absolute pressure sensor • Engine ECU 1 trip ! P0110/43 Intake air temperature circuit malfunction • Open wire or short in intake air temperature sensor circuit • Intake air temperature sensor • Engine ECU 1 trip ! P0115/42 Engine coolant temperature circuit malfunction • Open wire or short in water temperature sensor circuit • Engine coolant temperature sensor • Engine ECU 1 trip ! P0116/42 Engine coolant temperature circuit range/performance problem • Engine coolant temperature sensor • Cooling system 2 trip ! DTC No. Detection item P0105/31 Manifold absolute pressure/ barometric pressure circuit malfunction Trouble area • Open wire or short in throttle position sensor circuit • Throttle position sensor JEF00106-00061 EF–39 5.2.9 CHECK AND REPAIR BY MATRIX TABLE FOR TROUBLESHOOTING ACCORDING TO MALFUNCTIONING PHENOMENA This table can be used when trouble-shooting a malfunction which persists although the normal code is indicated at time of the DTC recheck. However, before performing trouble-shooting, carry out the basic check to narrow down possible causes for the malfunction. For example, if the spark check of the basic check proves that there is no problem, it can be presumed that the ignition system is normal. Also, you can narrow down further possible causes based on the information obtained through inquiry to the customer. NOTE: • If any malfunction can not be detected by the diagnosis system although the malfunctioning phenomenon exists, that malfunction is not covered by the detection range of the diagnosis system or the malfunction exists in a system other than the diagnosis-related systems. JEF00107-00000 5.2.10 CHECK OF MALFUNCTIONS WHICH OCCUR INTERMITTENTLY Check parts where malfunctions occur intermittently, such as wire harnesses and connectors, by following the section “Check of malfunctions which occur intermittently and poor contacts.” At that time, focus checks on the circuits related to the systems of the DTC’s that were indicated at the time of initial DTC check. JEF00108-00000 5.2.11 FINAL CONFIRMATION TEST Confirm that the malfunctioning phenomenon pinpointed by the customer has been completely eliminated. If the remedied parts are related to the DTC, erase the DTC once and carry out the DTC confirmation test. Ensure that no DTC is indicated. At this time, for improved efficiency of operations, use the “continuous monitoring results” function. (In the case of the DS-21 diagnosis tester, select the “Continuous monitoring results” of the vehicle communication in CARB mode.) Vehicle communication Indication of malfunction code Erasing of malfunction code Data display for freeze frame data Indication of current data Front O2 sensor test results Rear O2 sensor test results Continuous monitoring results Mode 01 select function JEF00109-00062 EF–40 5.3 INQUIRY SHEET If you make an inquiry sheet in advance, as shown in the example below, you can completely make all necessary inquiries. The following shows a standard form. This should be altered according to the characteristic of conditions of each market. [INQUIRY SHEET] Name of customer Frame No. Vehicle model Registration date Inquiry sheet Engine - N/A, T/C, S/C, carburetor, EFI, LPG . . . . Date of malfunction Transmission - 4M/T, 5M/T, 2WD, 4WD 2A/T, 3A/T, 4A/T Running distance km Details Equipment: of vehicle [Sex] of customer (driver) [Age] [Occupation] [Places where vehicle is mainly used] [Parking place] Urban district/suburb/seacoast/mountain/others Outdoor/indoor Female Approx. • Explosion is incomplete although initial explosion takes place. • No initial explosion takes place. • Hard starting (cold engine, hot engine, always) • No cranking takes place. Poor starting • Other ( ) • Idling speed too low • Fast idling ineffective • Idling unstable (cold engine, hot engine, always) • Idling speed too high Faulty idling • Other ( ) Symptom • Hesitation (during start, during acceleration, during deceleration, during a certain period) • Knocking • Backfire • Lack of power • Poor acceleration • Poor blow Poor drive-ability • Other ( ) • During idling (during warming up, after warming up) • At time of starting • During running ( ) • Immediately after vehicle stops (Re-start possible, Re-start impossible) • Under loaded state (Air conditioner, electric load, power steering) Engine stall • Other ( ) • Recently ( since what year/ month ) From when malfunction has started? • Since vehicle was purchased as a new car • Under a certain condition ( ) • Sometimes Frequency of occurrence • At all times • At all times Meteorological • Fine • Cloudy • Rain • Snow • Other ( ) Weather conditions °C) (Spring, summer, autumn, winter) Temperature • Temperature (about • When cold • After warming-up • During warming-up (Water temperature about °C) Engine condition • Urban district • Suburb • Highway • Mountainous road (Uphill, downhill) Road • No relation • During racing under no load • During running (Vehicle speed: km/h, Engine speed: rpm, MT Which gear?) Driving conditions • During turn (right curve, left curve) Male Other situations State of malfunction indicator lamp (MIL) Indication of DTC • Reading out by using OBD II generic scan tool or DS-21 diagnosis tester • Reading-out of MIL flashing pattern by shorting terminal T • Illuminated or flashing at all times • Illuminated or flashing sometimes During checking • Normal • Malfunction code ( 2nd time • Normal • Malfunction code ( • Will not go on. ) ) JEF00110-00063 EF–41 5.4 DTC CHART SPECIFICATIONS FOR M101 AND J102 The parameters indicated in the table may vary, depending upon the system types and specifications. This applies to vehicles for all destinations. For details of the checking of each code, refer to the DTC chart for each code. JEF00111-00000 5.4.1 DTC CHART SPECIFICATIONS 1. Codes specified by ISO/SAE DTC No. Detection item Trouble area Malfunction evaluation method MIL P0105/31 Manifold absolute pressure/ barometric pressure circuit malfunction • Open wire or short in manifold absolute pressure sensor circuit • Manifold absolute pressure sensor • Engine ECU 1 trip ! P0110/43 Intake air temp. circuit malfunction • Open wire or short in intake air temp. sensor circuit • Intake air temp. sensor • Engine ECU 1 trip ! P0115/42 Engine coolant temp. circuit malfunction • Open wire or short in water temp. sensor circuit • Engine coolant temperature sensor • Engine ECU 1 trip ! P0116/42*1 Engine coolant temp. circuit range/performance problem • Engine coolant temp. sensor • Cooling system 2 trip ! P0120/41 Throttle/pedal position sensor/switch “A” circuit malfunction • Open wire or short in throttle position sensor circuit • Throttle position sensor • Engine ECU 1 trip ! P0130/21 • Air induction system • Fuel pressure Oxygen sensor circuit malfunction (Bank 1 sensor 1) • Injector injection • Open wire or short in heated oxygen sensor circuit • Heated oxygen sensor 2 trip ! 2 trip ! P0133/21*1 Oxygen sensor circuit slow response (Bank 1 sensor 1) • Air induction system • Fuel pressure • Injector injection • Open wire or short in heated oxygen sensor circuit • Heated oxygen sensor • Engine ECU P0135/23*1 Oxygen sensor heater circuit malfunction (Bank 1 sensor 1) • Open wire or short in heater circuit of oxygen sensor • Oxygen sensor heater • Engine ECU 2 trip ! P0136/22*1 • Open wire or short in heater circuit of oxygen sensor Oxygen sensor circuit • Oxygen sensor malfunction (Bank 1 sensor 2) • Engine ECU 2 trip ! P0141/24*1 Oxygen sensor heater circuit malfunction (Bank 1 sensor 2) • Same as DTC No. P0135/23 2 trip ! 2 trip ! 2 trip ! P0171/25 Fuel trim system too lean (Air-fuel ratio lean malfunction, bank 1) P0172/26 Fuel trim system too rich (Air-fuel ratio rich malfunction, bank 1) • Air intake (hose loose) • Fuel line pressure • Injector blockage or leakage • Open wire or short in oxygen sensor circuit • Oxygen sensor • Manifold absolute pressure sensor • Engine coolant temperature sensor • Gas leakage on exhaust system • Purge VSV for EVAP • Engine ECU EF–42 DTC No. P0300/17*1 P0301/17*1 P0302/17*1 P0303/17*1 P0304/17*1 Detection item Random/multiple cylinder misfire detected Misfire detected -Cylinder 1 -Cylinder 2 -Cylinder 3 -Cylinder 4 Trouble area Malfunction evaluation method • Ignition system • Injector • Fuel pressure • Compression pressure • Valve clearance • Valve timing • Ion current sensor • Engine coolant temperature sensor • Open wire or short in engine wire • Connector connection • Manifold absolute pressure sensor • Engine ECU 2 trip MIL MIL flashing during misfire detection P0314/—*1 Single cylinder misfire (Cylinder not specified) (EU regulation) P0325/18*4 Knock sensor 1 circuit malfunction • Open wire or short in knock sensor 1 circuit • Knock sensor 1 (looseness) • Engine ECU 1 trip ! P0335/13 Crankshaft position sensor “A” circuit malfunction • Open wire or short in crank angle sensor circuit • Crank angle sensor • Signal rotor • Engine ECU 1 trip ! P0340/14 Camshaft position sensor circuit malfunction • Open wire or short in cam angle sensor circuit • Cam angle sensor • Engine ECU 1 trip ! P0420/27*1 Catalyst system efficiency below threshold • Three-way catalytic converter • Open wire or short in (heated) oxygen sensor circuit • (Heated) oxyger sensor 2 trip ! Evaporative emission control system purge control valve circuit malfunction • Open wire or short in VSV circuit for EVAP • VSV for EVAP • Engine ECU 2 trip ! Vehicle speed sensor malfunction • Open wire or short in vehicle speed sensor circuit • Combination meter • Vehicle speed sensor • Engine ECU 2 trip ! P0500/52 Vehicle speed sensor malfunction • Combination meter • Open wire or short in signal line from A/T ECU or ABS ECU or vehicle speed sensor • Engine ECU or A/T ECU or ABS ECU • Vehicle speed sensor 2 trip ! P0505/71 Idle control system malfunction • Open wire or short in ISC valve circuit • Engine ECU 1 trip ! P0443/76 P0500/52*6 ! P0710/38*3 Transmission fluid temperature sensor circuit malfunction 1 trip ! P0711/38*3 Transmission fluid temperature sensor circuit range/performance 2 trip ! P0715/37*3 Turbiue speed sensor circuit malfunction 1 trip ! P0720/42*3 Output speed sensor circuit malfunction 2 trip ! P0725/86*3 Engine speed input circuit malfunction 2 trip ! P0753/61*3 Solenoid No. 1 1 trip ! P0758/62*3 Solenoid No. 2 1 trip ! P0763/63*3 Solenoid No. 3 1 trip ! P0768/64*3 Duty solenoid 1 trip ! P0773/65*3 Lock up solenoid circuit malfunction 1 trip ! Refer to the AT section JEF00114-00000 EF–43 2. Codes specified by DMC Malfunction evaluation method MIL • Engine ECU 1 trip — A/F adjuster circuit malfunction • Open wire or short in A/F adjuster circuit malfunction • A/F adjuster • Engine ECU 1 trip — Ion system malfunction • Open wire or short in Ion system circuit • Ignitor unit • Ignition coil (All cylinders) • Spark plug (All cylinders) • Engine ECU 2 trip ! P1346/75 VVT sensor circuit range/ performance problem • Mechanical system (Skipping teeth of timing chain, wrong installation of timing chain and chain tensioner) • Engine ECU 2 trip ! P1349/73 VVT system malfunction • Valve timing • OCV • VVT controller assembly • Engine ECU 2 trip ! P1510/54 Starter signal circuit malfunction • Open wire in starter signal circuit • Engine ECU 2 trip ! P1520/51 Switch signal circuit malfunction • Open wire or short in A/C switch circuit • A/C switch • Open wire or short in linear throttle sensor circuit • Linear throttle sensor • Open wire or short in neutral start switch circuit • Neutral start switch 1 trip — P1530/44 A/C evaporator temp. sensor circuit malfunction • Open wire or short in A/C evaporator temp. sensor circuit • A/C evaporator temp. sensor • Engine ECU 1 trip — P1560/61 ECU back up power source circuit malfunction • Open wire in back up power source circuit • Engine ECU 1 trip ! P1600/83*2 Immobilizer signal malfunction • Engine ECU 1 trip — P1601/81*2 Immobilizer signal circuit malfunction • Open wire or short in immobiliger signal circuit • Immobilizer ECU • Engine ECU 1 trip — P1602/82*3 Serial communication problem between EFI ECU and A/T ECU • Open wire or short in serial communication circuit • A/T ECU • Engine ECU 1 trip ! OCV circuit malfunction • Open wire or short in OCV circuit • OCV • Engine ECU 1 trip ! 2 trip ! 1 trip ! DTC No. Detection item P1105/32*1 Barometric pressure sensor circuit malfunction P1130/29*5 P1300/36*1 P1656/74 P1703/72*3 Lock-up clutch status malfunction P1780/66*3 Switch solenoid Trouble area Refer to AT section EF–44 NOTE: • MIL ..... Malfunction indicator lamp. However, in the case of A/T vehicles of M101, the 2-digit codes of DTC No. can be read out through the flashing pattern of the D range lamp. In the other hand, in case of A/T vehicles of J102, the 2-digit codes of DTC No. can be read out through the flashing pattern of the O/D OFF lamp. • When the “O” mark is shown in the MIL column, the lamp will go on for that DTC No., but when the “—” mark is shown, the lamp will not go on for that DTC No. However, the data other than the switch signal system (P1520/51) are memorized in the backup memory. Therefore, it is possible to read out the DTC No. by using the diagnosis tester DS-21. • DTC No. with *1 mark ..... Only for European specifications But, only in the case of DTC No. P0314, it is possible to read out this DTC No. by means of the “continuos monitoring results” function of the CARB mode. • DTC No. with *2 mark ..... Only for vehicles with immobilizer • DTC No. with *3 mark ..... Only for vehicles with electronically-controlled A/T • DTC No. with *4 mark ..... Not provided only for European specifications • DTC No. with *5 mark ..... Only for leaded specifications of J102 • DTC No. with *6 mark ..... Low-grade vehicles of J102 except for A/T vehicle JEF00115-00000 EF–45 5.5 FAIL-SAFE FUNCTION FOR M101 AND J102 When any of the following DTC’s has been detected, the ECU enters the fail-safe mode in order to make it possible for the vehicle to drive for evacuation and to ensure safety. When the malfunction is remedied to a normal condition, the fail-safe control will be released. However, the diagnosis results will remain memorized. Hence, it is necessary to determine whether the malfunction still persists or not. JEF00116-00000 5.5.2 FAIL-SAFE SPECIFICATIONS DTC No. Detected item Fail-safe operation • The signal from the intake manifold pressure sensor is set to the value determined from the throttle opening angle, engine revolution speed and ISC opening angle. • The ignition timing is changed to the control based on the pressure determined from the engine revolution speed and the above value. • The fuel will be cut when the throttle opening angle and engine revolution speed exceeds the respective set values. P0105/31 When the signal from the intake manifold pressure sensor exhibits an open wire or short circuit P0110/43 When the signal from the intake air • The signal from the water temperature sensor is set to a constant temperature sensor exhibits an open value. wire or short circuit P0115/42 When the signal from the engine coolant temperature sensor becomes open or shorted. • The signal from the engine coolant temperature sensor becomes a constant value. • At this time, the radiator fan is turned on. (Except for EU spec.) P0120/41 When the signal from the throttle position sensor exhibits an open wire or short circuit • The signal from the throttle position sensor is set to a constant value. P0136/22*1 • The feedback of the rear O2 sensor is stopped When an abnormality is encountered • The correction coefficient of the feedback of the rear O2 sensor is set to the value determined from the engine revolution speed and in the signal from the rear O2 sensor pressure. P0325/18*3 When the signal from the knock sensor becomes open or shorted. P1105/32*1 When the signal from the • The signal from the atmospheric pressure sensor is set to a atmospheric pressure sensor constant value. exhibits an open wire or short circuit P1300/36*1 When the Ion current signal from the • The ignition timing is retarded. ignitor unit becomes open or shorted. • The ignition timing is retarded. P1349/73 • The learning of the most retard timing is prohibited. When an abnormality is encountered • The control of air-to-fuel ratio learning is prohibited. in the valve timing control • The idle speed control is changed. P1530/44 When the signal from the evaporator temperature sensor exhibits an open • The air conditioner will be cut. wire or short circuit for more than a certain length of time P1600/83*2 P1601/81*2 When abnormality occurs in writing and reading-out of the rolling codes into/from the E2 PROM during the immobilizer communication When the rolling codes cannot be exchanged between the EFI ECU and the immobilizer ECU or the rolling codes are not matched • The injection and ignition are prohibited. (Only for vehicles with the EU, Israel, AUS and Saudi Arabian specifications) EF–46 DTC No. Detected item Fail-safe operation P1602/82 When the signal from A/T ECU or from the EFI ECU becomes open or shorted. P1656/74 When an abnormality is encountered in the control voltage of the oil control valve for more than a certain • The continuity control of the oil control valve is prohibited. length of time • The signal from the A/T ECU or from the EFI ECU becomes a constant value. NOTE: • DTC No. with *1 mark ..... Only for vehicles with European specifications • DTC No. with *2 mark ..... Only for vehicles equipped with immobilizer • DTC No. with *3 mark ..... Except for vehicles with European specifications JEF00118-00000 EF–47 5.6 MATRIX TABLE FOR TROUBLE-SHOOTING ACCORDING TO MALFUNCTIONING PHENOMENA Refer to EC section Refer to AT section EF–134 PCV valve A/T faulty ISC valve circuit – EF–185 Spark plug Hose, etc., disconnected EF–145 Ignition coil (W/Ignitor) circuit – Fuel filter/Fuel line EF–181 Fuel pump control circuit Malfunction phenomena – EF–178 ECU power source circuit Suspect area Injector circuit EF–158 See page Starter and starter relay In cases where no malfunction code was detected during the DTC check and no malfunction can be still confirmed during the basic check, perform the trouble-shooting, referring to the following table. Poor starting Engine does not crank (Does not start) Engine cranks normally (Difficult to start) No initial combustion takes place Although initial combustion takes place, combustion is not complete Hard starting (during cold period) Hard starting (during hot period) Poor idling Fast idle is not effective Idle revolution speed is too low Idle revolution speed is too high Unstable/Rough idling Hunting during idling Engine stalling Engine stalls when accelerator pedal is depressed Engine stalls when accelerator pedal is released Engine stalls during idling Engine stalls when A/C switch is turned on Engine stalls when shifting from N to D Poor running Hesitation during acceleration period Hunting during running Lack of output Knocking Back fire/After fire JEF00119-00000 EF–48 5.7 CHECKING PROCEDURE FOR COMMON ITEMS IN CHART 1. For proper trouble-shooting, the detailed checking procedure for each circuit in the chart according to the DTC chart or the chart according to malfunctioning phenomena is provided later on. 2. If the trouble-shooting for all components, wire harnesses and connectors, except for the ECU, reveals that no malfunction is occurring, most likely the ECU is malfunctioning. Therefore, if the diagnosis has been carried out without any malfunction, then the ECU will be checked and eventually replaced even though no malfunction has been found in the ECU. Hence, make sure that any malfunctioning phenomenon is occurring. Or, in cases where no malfunction is occurring, be sure to proceed with the checks, using the malfunction reproduction simulation test method. 3. Each of the procedures “Check of Wire Harnesses and Connectors,” “Check of Malfunction which Occurs Intermittently” and “Check and Replacement of ECU” appearing in the checking procedure is an element operation common in each system check (checking procedure) and can apply to various systems. Hence, the checks should be conducted, following these procedures as summarized below. JEF00120-00000 5.7.1 CHECK OF WIRE HARNESSES AND CONNECTORS Malfunctions of the wire harness and connectors are caused by an open wire or short circuit. Open Wire: This is caused by detached wire harness, poor contact inside the connector, detached connector terminal, and so forth. Loosen JEF00121-00064 NOTE: • The wires are rarely cut at the center. In most cases, an open wire occurs at the connectors. Particularly, the connectors of the sensor and actuator should be checked very carefully. • Poor contact is caused by rust formation at the connector terminal, foreign substances adhered to the terminal, or drop in the contact pressure between the male and female terminals of the connector. Simply disconnect the connector once, and then, reconnect it. It may change the contacting condition, thus returning to the normal operation. Hence, if no abnormality was found when the wire harness and connector were checked during the troubleshooting, and if the malfunction ceases to exist after completion of the checks, then the wire harness or connector was most likely causing the malfunction. Tension JEF00122-00065 EF–49 Short Circuit: This is caused by a short circuit between the wire harness and the body ground or by an internal short circuit of the switches, etc. NOTE: • If a short circuit is present between the wire harness and the body ground, thoroughly check to see if the wire harness is caught in the body, if the wire is rubbed and the insulator section is ruptured, thus contacting other parts, and if the wire is clamped properly. Continuity check (check for open wire) 1. Disconnect the connector on both sides of the ECU and sensor. JEF00123-00066 ECU side Sensor side JEF00124-00067 2. Measure the resistance between the relevant terminals of the connector. Resistance: 10 Ω or less JEF00125-00068 NOTE: • Lightly shake the wire harness in a longitudinal direction as well as in a horizontal direction when the resistance is measured. • In the case of non-waterproof connectors, the test probe should be inserted into the connector from each wire harness side. Tester probes JEF00126-00069 • In cases where the waterproof connector is checked without removing the waterproof rubber, be very careful not to deform the connector terminal when applying the test probes. ECU side Sensor side Ω JEF00128-00071 EF–50 Check of resistance (check for short circuit) 1. Disconnect the connector on both sides. 2. Measure the resistance between the relevant terminal of the connector and the body ground. Moreover, be sure to check for the connectors on both sides. Resistance: 1 MΩ or more ECU side Sensor side Ω JEF00129-00072 NOTE: • Lightly shake the wire harness in a longitudinal direction as well as in a horizontal direction when the resistance is measured. JEF00130-00073 5.7.2 VISUAL INSPECTION AND CONTACT PRESSURE CHECK 1. Disconnect the connectors on both sides of the relevant harness. 2. Visually check that no rust formation is present at the connector terminal section. Also, check that no foreign substance is admitted. 3. Check the staked section for looseness and damage. Moreover, check that the terminal will not be detached by lightly pulling the wire harness from the connector. Pull lightly Looseness of staked section JEF00131-00074 4. Prepare the same male terminal as that of the connector terminal. Insert it into the female terminal and check the pulling force. The terminal having a smaller pulling force, compared with other terminals, may cause poor contact. NOTE: • In cases where rust formation is present at the terminal section, foreign substances have been admitted, or the contact pressure has dropped between the male terminal and the female terminal, the contact condition may change by disconnecting and reconnecting the connector once, thus resulting in “No malfunction.” Therefore, if the check results of the wire harness and connector reveal that there is no malfunction, confirm the malfunctioning phenomenon. At this time, if no malfunctioning phenomena is reproduced, most likely the poor contact between the male terminal and the female terminal was causing the malfunction. Male terminal for check JEF00132-00075 EF–51 5.7.3 CHECK FOR MALFUNCTION WHICH OCCURS INTERMITTENTLY AND POOR CONTACT Occasionally the relay or solenoid becomes seized. However, most malfunctions which occur intermittently are temporary open wires caused by a poor connection or wrong wiring inside the circuit. Therefore, perform the check, observing the following points. 1. Check the connector and terminal. Perform the check for the items related to open wire under “Check of Wire Harness and Connector” on page EF–48. 2. Visual Inspection and Contact Pressure Check Perform the check, following the items under “Visual Inspection and Contact Pressure Check” on page EF–50. JEF00133-00000 5.7.4 CHECK AND REPLACEMENT OF ECU First, check the ground circuit of the ECU. If any malfunction is found, repair the ground circuit. If no malfunction is found, replace the ECU. 1. Disconnect the ECU connector. Check the ground terminals E1 and E2 on the ECU side and wire harness side for bending. Also, check the contact pressure. ECU side Ground Wire harness side JEF00134-00076 2. Measure the resistance between each of the ECU ground terminals E1 and E2 (harness side) and the body ground. Moreover, measure the voltage across the power supply terminal (harness side) and the body ground. Resistance: 10 Ω or less Voltage: Battery voltage NOTE: • When the ECU ground circuit is checked, there are cases where the contact condition of the terminal may change by disconnecting and reconnecting the connector, thus resulting in “No malfunction.” Therefore, if the check results of the ECU ground circuit reveal that there is “no malfunction,” again connect the ECU connector to confirm that the malfunction occurs. Then, you can judge that the ECU unit is faulty. Wire harness side Ω Ground JEF00135-00077 EF–52 5.8 CHECKING PROCEDURE FOR DTC Prior to the check, check the malfunction indicator lamp (MIL), following the procedure given below. 50 60 H 40 30 5.8.1 CHECK OF MALFUNCTION INDICATOR LAMP 1. Ensure that the malfunction indicator lamp goes on when the ignition switch is turned ON, but with the engine not running. NOTE: • If the malfunction indicator lamp (MIL) fails to go on, perform the trouble-shooting for the combination meter. 2 Ensure that the malfunction indicator lamp goes out when the engine starts. If the lamp remains illuminated or is flashing, the diagnosis system is detecting a malfunction. Therefore, a DTC is memorized in the ECU. If no DTC is memorized in the ECU, perform the troubleshooting for the malfunction indicator lamp circuit. C 80 100 60 40 20 F 20 10 0 E 2 0 km/h 3 D4 JEF00136-00078 400 rpm Extinguished Illuminated 200 rpm Hysteresis JEF00137-00079 5.8.2 CHECK OF DTC, USING DS-21 DIAGNOSIS TESTER OR OBD II GENERIC SCAN TOOL 1. Prepare the DS-21 diagnosis tester or OBD II generic scan tool. 2. With the ignition switch turned OFF, connect the DS-21 diagnosis tester or the OBD II generic tester to the data link connector (DLC) located at the lower section of the instrument panel on the driver’s seat side. At this time, the DS21 tester should be connected to the DLC with the following SST interposed, and the OBD II generic tester should be connected directly. SST: 09991-87404-000 DLC JEF00138-00080 3. Turn ON the ignition switch and turn ON the main switch of the tester. 4. Check the DTC and freeze-frame data. Print them out or write them down. (For the operating procedure, refer to the instruction manual of the tester.) In cases where the OBD II generic scan tool is used, it is possible to take a reading of only the DTC’s provided for in the ISO/SAE. It is, however, impossible to take a reading of the DTC’s specified by the DMC. Vehicle communication Indication of malfunction code Erasing of malfunction code Erasing of DTC (Only EU spec. AT) Erasing of DTC (Other) Indication of freeze frame data Indication of current data Indication of parts ECU No. Actuator driving Trace record for malfunction select function JEF00139-00081 EF–53 (1) Furthermore, as regards the check of unidentified twotrip DTC (DTC that has been detected only once), select the “Continuous monitoring results” of the “vehicle communication” in CARB mode and press “F1” key. If any DTC has been detected, it will be indicated. Vehicle communication Indication of malfunction code Erasing of malfunction code Data display for freeze frame Indication of current data Front O2 sensor test results Rear O2 sensor test results Continuous monitoring results Mode 01 select function JEF00140-00082 (2) In this case, too, the OBD II generic scan tool will indicate only the DTC’s provided for in the ISO/SAE. It is impossible to take a reading of DTC’s specified by the DMC. DTC indication sample Indication of code P0105 Pressure sensor P0110 Intake air temperature sensor P0115 Press “F1” key. Freeze frame data indication sample Data display ECT RPM ITA –30°C 0.0 rpm –1.0° MAP VS TAU 146 kPa 0 Km/h 0.00 mS Malfunction code: P0105 Press “F1” key. JEF00141-00083 5. After completion of the check, turn OFF the main switch of the tester and ignition switch. Disconnect the SST from the data link connector. Then, disconnect the tester from the SST. 5.8.3 CHECK OF DTC WITHOUT USING DS-21 DIAGNOSIS TESTER OR OBD II GENERIC SCAN TOOL 1. With the ignition switch turned OFF, connect the following SST to the data link connector (DLC) located at the lower section of the instrument panel on the driver’s seat side. SST: 09991-87404-000 JEF00142-00000 Data link connector (DLC) SST connector SST JEF00143-00084 EF–54 2. Connect the terminal between the EFI test terminal and the earth terminal of the SST connector with a jump wire as indicated in the illustration. SST: 09991-87403-000 3. Turn the ignition switch to the “ON” position. At this time, Be careful not to start the engine. EFI test terminal Earth terminal SST connector SST JEF00144-00085 4. Read out the diagnostic trouble code (DTC) by observing the flashing number of the malfunction indicator lamp. JEF00145-00086 5. The illustration shows an example of the flashing pattern of the normal code. The engine check lamp glows for 0.25 second, right after the ignition switch has been turned ON. After a lapse of 0.25 second, the check engine lamp again glows for 0.25 second. Then, this pattern will be repeated. 0.25 Sec. Glowing Extinguished 0.25 Sec. JEF00146-00087 6. The illustration shows an example of the flashing pattern of the code No. 21. The diagnosis code is composed of two digits. These two numbers are indicated by blinking of the check engine lamp. Four seconds after the ignition switch has been turned ON, the check lamp indicates first the number of the tens digit of the diagnosis code by glowing the same times as the number. The lamp glows for 0.5 second each time and then it is extinguished for 0.5 second. After a pause of 1.5 seconds, the check lamp indicates the number of the units digit of the diagnosis code by glowing the same times as the number. The lamp glows for 0.5 second each time and then it is extinguished for 0.5 second. Then, this pattern will be repeated after a pause of 4 seconds. In case of malfunction code number 21 0.5 Sec. 0.5 Sec. 0.5 Sec. Glowing Extinguished 4 Sec. 1.5 Sec. JEF00147-00088 EF–55 7. The illustration shows an example of the flashing pattern of the codes No. 21 and 31. In cases where plural malfunction codes have been detected, the two-digit diagnosis codes are indicated in the sequence of the code number, starting from a smaller number. Each diagnosis code is indicated in the above described pattern. A pause of 2.5 seconds occurs between the outputs of respective diagnosis codes, thus separating one from the others. After all of the plural diagnosis codes that have been detected are indicated, the check engine lamp is extinguished for four seconds. Then, the detected plural diagnosis codes will be indicated again. In case of malfunction code number 21 and 31 Glowing Extinguished 2.5 Sec. 4 Sec. JEF00148-00089 8. For the details of malfunctions, refer to the DTC chart. 9. After completion of the check, disconnect the jump wire and turn OFF the ignition switch. Then, disconnect the SST from the DLC. NOTE: • In cases where plural malfunction codes have been detected, the indication will be made progressively, starting from the smaller number to the larger number. • In cases where the DS-21 diagnosis tester or the OBD II generic scan tool is not used, it is impossible to take a reading of unidentified two-trip DTC from the SST connector. JEF00149-00000 EF–56 NOTE: • When malfunctioning phenomena are to be reproduced without using the DS-21 diagnosis tester or OBD II generic scan tool, follow the procedure given below to detect the DTC. (1) It is assumed that 2 trip detection logic is used for the DTC detection. (2) Therefore, after a malfunctioning phenomenon is first reproduced, turn OFF the ignition switch. (3) Then, repeat the same reproduction procedure once again. (4) When the malfunction is reproduced again, the malfunction indicator lamp goes on and the DTC is memorized in the engine ECU. For reading out of the DTC, refer to page EF–53. JEF00150-00000 NOTE: • When malfunctioning phenomena are to be reproduced with the DS-21 diagnosis tester or OBD II generic scan tool connected to the DLC, the “Continuous monitoring results” function can be used. (In the case of the DS-21 diagnosis tester, select the “Continuous monitoring results” of the “Vehicle communication” in CARB mode.) This function makes it possible to indicate the DTC when the malfunctioning phenomenon is first reproduced. (Request of onboard monitoring test results of ISO 15031-5 Continuous monitoring system) Vehicle communication Indication of malfunction code Erasing of malfunction code Data display for freeze frame Indication of current data Front O2 sensor test results Rear O2 sensor test results Continuous monitoring results Mode 01 select function JEF00151-00090 EF–57 5.9 ERASING PROCEDURE FOR DTC The DTC and freeze-frame data can be erased through the following methods. 1. The DS-21 diagnosis tester or OBD II generic scan tool is used to erase the DTC. (For the operating procedure, refer to the instruction manual.) 2. The power supply to the ECU is shut off to erase the DTC without using the DS-21 diagnosis tester or OBD II generic scan tool. (Disconnect the negative (–) terminal from the battery or detach the EFI fuse.) JEF00152-00000 5.9.1 WHEN DS-21 DIAGNOSIS TESTER OR OBD II GENERIC SCAN TOOL IS USED: 1. In the same way as the check of DTC, connect the DS-21 diagnosis tester to the data link connector (DLC) with the following SST interposed. Or, connect the OBD II generic scan tool directly. SST: 09991-87404-000 DLC JEF00153-00091 2. Turn ON the ignition switch. Then, turn ON the main switch of the tester. 3. In the case of the DS-21 diagnosis tester, erase the DTC by using the “Erasing of DTC (Only EU spec. AT) (Electronically-controlled A/T vehicles for EU spec. only) or Erasing of DTC (Others) (Except for electronically-controlled A/T vehicles for EU spec.) of the “Vehicle communication” in DAIHATSU mode.” 4. After completion of the erasing, turn OFF the main switch of the tester and ignition switch. Disconnect the SST from the data link connector and disconnect the DS-21 diagnosis tester from the SST. Or, disconnect the OBD II generic scan tool. Vehicle communication Indication of malfunction code Erasing of DTC (Only EU spec. AT) Erasing of DTC (Others) Indication of freeze frame data Indication of current data Indication of parts ECU No. Actuator driving Trace record for malfunction select function JEF00154-00092 EF–58 EFI (A/C) 20 A 15 A HORN•HAZ EFI 10 A BACK UP FUEL PUMP 15 A 10 A NOTE: • It is possible to complete this erasing for approximately 30 seconds. In some cases, however, it may take longer. Furthermore, the erasing can be made by disconnecting the circuit, such as the battery power supply and fusible link. In cases where the battery terminal is to be disconnected, record the radio channels in advance. After completion of the operation, set the radio channels the same as before. • In cases where the same malfunction (DTC) cannot be detected again during the 40 cycles of the engine warming-up, the DTC and freeze-frame data will be automatically erased from the ECU memory. (Only in the case of vehicles with EU specifications) • Warming-up cycle The warming-up cycle refers to a driving cycle that sufficiently allows the water temperature to rise by at least 22°C above the temperature at the time of engine starting and to reach at least 70°C. • Driving cycle The driving cycle consists of the engine starting and engine stopping. HEAD 5.9.2 WHEN DS-21 DIAGNOSIS TESTER OR OBD II GENERIC SCAN TOOL IS NOT USED: Erasure by disconnecting EFI fuse To erase the diagnostic trouble codes (DTCs) memorized in the ECU after malfunctions have been repaired, disconnect the EFI fuse from the relay block for at least 30 seconds with the ignition switch turned OFF. [When ambient temperature is about 20°C.] (MGC) (ST) NOTICE • •USE THE DESIGNATED FUSES ONLY. RAD AM 60 A (ABS) 50 A TAIL 40 A HEAD 30 A RAD 30 A JEF00155-00093 EF–59 5.10 BASIC ENGINE CHECK FLOW CHART When the ECU is detecting no DTC during the reproduction test of malfunctioning phenomena and when no abnormality is found by the visual inspection, it is necessary to progressively perform the trouble-shooting for circuits which are most likely causing the malfunctions. In many cases, sections causing malfunctions can be narrowed down quickly and effectively by performing the basic engine check indicated in the following flow chart. Therefore, it is very important to perform this check for the engine trouble-shooting. 5.10.1 BASIC ENGINE CHECK (page 1 of 3) 1 Is the battery voltage 11 V or more with the engine in a stopped state? NO Charge the battery or replace it. YES 2 Does the engine crank? NO Go to “Matrix Table for Trouble-Shooting According to Malfunctioning Phenomena” on page EF–47. YES 3 NO Does the engine start? Go to Step 6. YES 4 • When DS-21 diagnosis tester or OBD II generic scan tool is not used: Check the engine idle speed 1. Warm up the engine, until the engine coolant temperature reaches 90°C or more. 2. Turn OFF all electric load switches (including A/C switch). 3. In the case of M/T vehicles, set the transmission to neutral. (In the case of A/T vehicles, set the shift lever to the “P” position.) 4. Connect the DS-21 tester to the DLC with the SST interposed, or connect the OBD II generic scan tool to the DLC directly. Then, check the idle speed. SST: 09991-87404-000 Tachometer (REV) terminal SST Earth NO Go to “Matrix Table for Trouble-Shooting According to Malfunctioning Phenomena” on page EF–47. 5. When the DS-21 tester or OBD II generic scan tool is not used, connect a tachometer to the REV terminal. Spec.: 650 - 750 rpm (M/T & A/T vehicles) • When DS-21 diagnosis tester is not used: YES 5 Test Check the ignition timing SST 1. When the DS-21 diagnosis tester is not used, connect the terminal T of the SST connector to the earth terminal, using a jump wire. SST: 09991-87403-000 When the DS-21 diagnosis tester is used, select the “T terminal ON” of the actuator driving so as to short the terminal T. 2. Attach the clip of the timing light to the wire harness for timing light connection. 3. Is the timing mark of the crankshaft within a range of the indicator for ignition timing check provided on the timing chain cover? Spec.: 6 ± 2° (BTDC) NOTE: • After checking, release the shorting of the terminal T by using the “Actuator driving” function. YES SST Earth • When DS-21 diagnosis tester is used: Timing mark 6 ± 2° Actuator driving T terminal ON T terminal OFF T terminal released select function NO Check the timing chain for wrong assembling. Also, check the plunger protruding amount of the tensioner. Go to “Matrix Table for Trouble-Shooting According to Malfunctioning Phenomena” on page EF–47. JEF00160-00097 EF–60 BASIC ENGINE CHECK (page 2 of 3) • When DS-21 diagnosis tester is not used: Fuel pressure check (simple check) Jump wire EFI 10 A 15 A 15 A (MGO) HORN-HAZ EFI NOTICE AM 60 A USE THE DESIGNATED FUSES ONLY. A2 [DEFG] [HEAD] [ST] EFI STOP 30 A 10 A 15 A BACK UP FUEL PUMP 15 A Relay block (DGEF) 1. Ensure that the fuel tank is filled with sufficient fuel. 2. When DS-21 diagnosis tester is not used: (1) Remove the fuel pump relay and connect a jump wire, as indicated in the illustration. SST: 09991-87403-000 (POWER) 6 RAD [MGC] (ABS) (EPS) TAIL HEAD RAD 50 A 30 A 40 A 30 A 30 A 82661-97218 (2) Check that the pulsation damper screw rises when the ignition switch is turned ON. 3. When DS-21 diagnosis tester is used: (1) Connect the DS-21 diagnosis tester to the DLC with the SST interposed. SST: 09991-87404-000 • When DS-21 diagnosis tester is used: Actuator driving Fuel pump driving Fuel pump stopped Fuel pump released (2) Turn ON the ignition switch. Then, select the “Fuel pump driving” of the actuator driving among the individual functions so as to drive the fuel pump. Does the pulsation damper screw rise? select function NO Go to “Check of Fuel Pump and F/P Regulator”. YES Spark check EFI EFI USE THE DESIGNATED FUSES ONLY. NO AM 60 A 10 A 15 A 15 A HORN-HAZ (MGO) [HEAD] [ST] NOTICE A2 STOP 10 A BACK UP 15 A EFI 30 A FUEL PUMP 15 A Relay block (DGEF) 1. Remove the fuel pump relay from the relay block. 2. Remove the IG coils and spark plugs (all cylinders #1, 2, 3 and 4). 3. Install the spark plug to the IG coil. Connect the IG coil connector to the IG coil. 4. Ground the spark plug. 5. Crank the engine. At this time, check to see if each spark plug sparks. Is it in a good condition? (POWER) 7 [DEFG] RAD [MGC] (ABS) (EPS) TAIL HEAD RAD 50 A 30 A 40 A 30 A 30 A 82661-97218 Go to “Check of Ignition System.” YES 8 Confirmation of operation of fuel injector 1. Install the spark plugs, IG coils and fuel pump relay. Connect the connector of the IG coil. 2. Using a sound scope, check each injector for operation sound while the engine is being cranked or idling. Can you hear operation sound of all injectors? NO Go to “Check of Fuel Injector Circuit”. YES Go to Step 9. JEF00161-00098 EF–61 BASIC ENGINE CHECK (page 3 of 3) 9 Inspection of compression pressure 1. Warm up the engine. 2. With the IG switch turned OFF, remove all of the IG coils and spark plugs. 3. Temporarily remove the main relay and fuel pump relay. 4. Insert a compression gauge into the spark plug hole. 5. Depress the accelerator pedal fully. 6. While cranking the engine, measure the compression pressure. 7. Repeat the steps 4, 5 and 6 to perform the measurement for all cylinders. K3-VE engine Specified Value: 1471 kPa Limited Value: 1079 kPa (330 rpm. difference between cylinders is less than 147 kPa) K3-VE2 engine Specified Value: 1285 kPa Limited Value: 892 kPa (300 rpm. difference between cylinders is less than 147 kPa) Main relay Fuel pump relay NOTE: • Be sure to use a fully-charged battery. Also the measurement should be performed in the shortest possible length of time. NO Perform the checks, referring to the section EM. YES 10 Inspection of idle CO and HC concentrations (only for leaded spec.) 1. Warm up the engine completely. NOTE: • Warm up the engine, until the fan motor starts to operate. 2. Measure CO and HC concentrations at idle speed. Specified Value: CO concentration: 1 ± 0.5 % HC concentration: Not to exceed 700 rpm NO Tester Measurement of CO and HC Perform the checks, referring to the section EM. YES Go to “Matrix Table for Trouble-Shooting According to Malfunctioning Phenomena” on page EF–47. JEF00162-00099 EF–62 5.11 SCAN TOOL DATA (ECU DATA) The following data values given below are representative values obtained under the “normal condition,” using the scan tool. Please refer to these values. However, there are cases where the system is functioning normally even if the measured value is different from the values listed here. Therefore, no judgment as to whether any malfunction is occurring or not should be made only on the basis of these data under the “normal condition.” NOTE: • The data monitor value may vary significantly, depending on slight difference in the measurement, difference in the measurement environment, deterioration due to passage of time in the vehicle, and so forth. Therefore, it is difficult to indicate the definite reference values. Hence, there are cases where malfunctions are occurring even when the measured value is within the reference value. • With regard to minor phenomenon, such as hesitation and rough idling, it is necessary to make total evaluation, based on all the data monitor items, by sampling the data of the vehicle of the same type under the same conditions and comparing them. • In the case of the OBD II generic scan tool, it is possible to take a reading of the values with an asterisk mark in the following table. • When checking the data under a condition where the engine is “idling” or “racing,” the shift lever should be placed in the “N” or “P” range, the A/C switch should be turned OFF, and all accessory switches should be turned OFF. JEF00163-00000 5.11.1 SCAN TOOL DATA FOR K3-VE/K3VE2 1. Items specified by CARB DS-21 diagnosis tester display ✩ FUEL SYSTEM (Fuel system status) ✩ CALC LOAD (Calculated load value) Signal name FSYS Reference values under normal condition Vehicle condition At idle speed after warming up At idle speed with no load after warming up LOAD At 2500 r/min. with no load after warming up O2 (Closed loop) K3-VE2 1.5 - 2.0 % K3-VE 1.7 - 2.2 % K3-VE2 5.0 - 6.3 % K3-VE 5.9 - 7.3 % Value should be rising gradually. Cold start ~ Warming-up running COOLANT TEMP ✩ (Engine coolant temperature) ECT When engine has warmed up completely 80 - 100°C During fail-safe function (At time of starting) 20°C During fail-safe function (After starting) 80°C ✩ SHORT FT (Short term fuel trim) SHRT At idle speed after warming up –20 - +20 % ✩ LONG FT (Long term fuel trim) LONG At idle speed after warming up –16 - +16 % When engine is running at a constant speed ✩ ENGINE SPEED RPM At idle speed with no load after warming-up M/T Sirion Terios A/T All ✩ VEHICLE SPEED VS At idle speed with no load after warming up IGN ADVANCE (Ignition timing ✩ advance for No. 1 cylinder) ITA ✩ INTAKE AIR TEMP IAT MANI ABS PRESS ✩ (Intake manifold absolute pressure) During running (Compared with speedometer) 650 - 750 rpm 650 - 750 rpm There should be no remarkable difference, Km/h –2 - 8° When idle switch is OFF Changes should be made according to running conditions, ° When engine is running Changes should be made according to running conditions. °C When ignition switch is ON (Vacuum hose is released to atmosphere) MAP There should be no remarkable variation, rpm When idling (After warming-up, with no load) Around 100 kPa K3-VE2 63 - 72 kPa K3-VE 65 - 73 kPa EF–63 DS-21 diagnosis tester display MANI ABS PRESS ✩ (Intake manifold absolute pressure) Signal name M/T MAP THROTTLE POS (Absolute throttle position) TP ✩ OXYGEN SENSOR S1 (Heated oxygen sensor 1) O2FP O2FV ✩ OXYGEN SENSOR S2* (Heated oxygen sensor 2) O2RP MIL ON RUN DIST (Distance since actwiation of MIL) During fail-safe function A/T ✩ ✩ Reference values under normal condition Vehicle condition K3-VE2 34 - 72 kPa K3-VE 35 - 73 kPa K3-VE2 32 - 70 kPa K3-VE 33 - 71 kPa When accelerator pedal is operated At idle speed after warming up O2RV When engine is running at 2000 r/min., for 3 min. or longer after warming up. DWM When there is no DTC Sirion, Terios Changes should be made according to pedal operation. % –5 - 5 % 0.05 - 0.95 V 20 - 77 % 0.05 - 0.95 V 0 Km JEF00166-00000 2. Items specified by DMC DS-21 diagnosis tester display Signal name Vehicle condition Reference values under normal condition BATTERY VOLTAGE BAT When engine is running at 5000 rpm (25°C) Approx. 14 V ELECTRIC LOAD DSW When light, heater blower, defogger or radiator fan switch is ON “OFF”→“ON” AIR CONDITIONING (If equipped) AC When air conditioner switch is set to “ECON” or “A/C” “OFF”→“ON” CTP SWITCH (Closed throttle position switch) IDL When throttle valve is switched from fully closed state to opened stale “ON”→“OFF” INJ PULSE WIDTH (Fuel injection pulse width) TAU Cold start ~ Warming-up running When idling (After warming-up, with no load) When ignition switch is ON Cold start ~ Warming-up running ISC DUTY RATIO ISC ACTUAL DISP ANGLE OF IN CAM (Actual displacement angle of intake cam) VT TARGET DISP ANGLE OF IN CAM (Target displacement angle of intake cam) VTT Value should be decreasing gradually. 1 - 3 ms 0% Value should be decreasing gradually When idling (After warming-up, with no load) 5 - 15 % When air conditioner switch is set to “ON” 18 - 45 % When automatic transmission in shifted from ˆ range to Î range 9 - 22 % When light, heater or defogger switch is ON 7 - 19 % When idling (After warming-up, with no load) 0 - 2 °CA During vehicle running When idling (After warming-up, with no load) During vehicle running The value changes, depending on the driving conditions. °CA 0 °CA The value changes, depending on the driving conditions. °CA NOTE: • The items with an asterisk (*) mark is provided only for the EU specifications. Therefore, in the case of the non-EU specification vehicles, no indication will be made. JEF00167-00000 EF–64 5.12 CHECK OF ECU AND ITS CIRCUIT The ECU and its circuit can be checked by measuring the voltage and resistance at the ECU connector. In order to narrow down the cause further after the cause has been decided to a certain system, it is imperative to measure the voltage and resistance of the external route of the ECU. The measurement of the voltage and resistance is conducted during the system check, following the procedure given below. JEF00168-00000 CAUTION: • The ECU cannot be checked by itself. Never connect a voltmeter or an ohmmeter to the ECU with the connector disconnected from the ECU. • When conducting the continuity test or measuring the resistance, turn OFF the ignition switch once. Then, disconnect the connector at the ECU. EFI ECU Wire harness Disconnect the ECU connector JEF00169-00100 5.12.1 VOLTAGE CHECK 1. Installation of SST First, install the SST between the engine ECU and the vehicle harness. For the installation procedure, refer to the section under “Connecting Procedure for SST” on page EF–8. 2. Measure the voltages between the respective terminals of the SST connectors. 3. Check to see if the measured values conform to the specification in accordance with the following table “Characteristics of ECU Output.” NOTE: • Make sure that the battery voltage is 11 V or more with the ignition switch turned ON, for each terminal voltage is affected by the battery voltage. EFI ECU SST connector Wire harness SST V JEF00170-00101 EF–65 STANDARD VOLTAGES FOR M101 AND J102 System to be checked Power supply system Pressure sensor system Terminals u (+B1) - @3 (E1) #6 (+B2) - @3 (E1) q (BAT) - @3 (E1) $6 (VCPM) - $7 (E2PM) !5 (PIM) - $7 (E2PM) !6 (VC) - !7 (E2) Throttle sensor system Engine coolant temperature sensor system Intake air temperature sensor system Vehicle speed sensor system Knock sensor system Cam angle sensor system Crank angle sensor system Front O2 sensor system Rear Ignitor unit system (Ion current sensor) Injector system Ignition system ISC driving signal system $4 (VTH) - !7 (E2) $5 (THW) - !7 (E2) &6 (THA) - !7 (E2) Measurement conditions When IG is “ON” When IG is “ON” At all times When IG is “ON” Sensor released to atmosphere After engine starting When IG is “ON” Throttle valve fully closed Throttle valve fully opened When warming up engine (Water temperature: 60 - 120°C) When warming up engine Battery voltage 4.5 - 5.5 V 2.2 - 3.1 V Value changes, according to accelerator opening angle 4.5 - 5.5 V 0.4 - 0.8 V 3.2 - 5.0 V 0.2 - 1.0 V 0.1 - 4.8 V #7 (SPD) - @3 (E1) %3 (KNK) - @3 (E1) @2 (N2+) - %2 (N2–) @1 (N1+) - %1 (N1–) &5 (OX1) - !7 (E2) &4 (OX2) - !7 (E2) Driving wheels are turned slowly 0=5V When idling, racing Generation of wave form When idling Generation of wave form When idling Generation of wave form 0.05 - 0.95 V After engine speed is held at 3000 rpm for four minutes 0.05 - 0.95 V After engine speed is held at 3000 rpm for four minutes !4 (ICMB) - $3 (IE) When idling @7 @6 @5 @4 ^0 %9 %8 %7 %4 (#10) - @3 (#20) - @3 (#30) - @3 (#40) - @3 (IG1) - @3 (IG2) - @3 (IG3) - @3 (IG4) - @3 (ISC) - @3 (E1) (E1) (E1) (E1) (E1) (E1) (E1) (E1) (E1) When IG is “ON” When cranking When IG is “ON” With fuel pump in a stopped state #0 (FC2) - @3 (E1) During idling (or when cranking) !1 (A/T) - @3 (E1) Evaporator temperature sensor system &2 (ACEV) - @9 (E21) Air conditioner input signal system #8 (ACSW) - @3 (E1) Headlamp system &1 (H/L) - @3 (E1) Defogger system !0 (DEF) - @3 (E1) Blower system #9 (BLW) - @3 (E1) Radiator fan control system !3 (RFAN) - @3 (E1) $0 (STP) - @3 (E1) Battery voltage Generation of pulse 0 - 0.5 V Battery voltage w (FC1) - @3 (E1) ∏, ˆ range signal detecting system Generation of pulse During idling Oil pressure switch “ON” Oil pressure switch “OFF” Fuel pump system Equipped with immobilizer/ Not equipped with immobilizer #4 (VF) - @3 (E1) Battery voltage Generation of pulse &8 (PST) - @3 (E1) VF monitor system Generation of wave form When cranking Oil pressure switch for power steering system Stop lamp system Reference values After engine speed is held at 3000 rpm for four minutes (Terminal T shorted) ∏, ˆ range Other than ∏, ˆ range When air conditioner is “ON” When air conditioner is operating When air conditioner is not operating Tail lamp illuminated Tail lamp extinguished When defogger switch is “ON” When defogger switch is “OFF” When heater blower switch is “ON” When heater blower switch is “OFF” When water temperature switch is “ON” When water temperature switch is “OFF” When stop lamp switch is “ON” When stop lamp switch is “OFF” Battery voltage 2 V or less 0 = 5 V (Pulse) 0 - 0.5 V Approx. 10 V 0.15 - 4.8 V Battery voltage 0 - 0.5 V Battery voltage 0 - 0.5 V Battery voltage 0 - 0.5 V 0 - 0.5 V Battery voltage 1 V or less Battery voltage Battery voltage 0 - 0.5 V EF–66 System to be checked Variable valve timing Terminals @8 (OCV+) - ^1 (OCV–) Evaporator purge control system &9 (PRG) - @3 (E1) Magnet clutch control system !2 (MGC) - @3 (E1) Engine revolution output system Communication signal control system Fuel pump OFF system Measurement conditions When idling When idling When racing (3000 rpm) When air conditioner is operating (Air conditioner switch and heater blower switch are ON.) When air conditioner is not operating Reference values 4 V or less Battery voltage Generation of pulse #1 (REV) - @3 (E1) When idling Generation of pulse i (SIO1) - @3 (E1) When idling Generation of pulse #5 (FPOF) - @3 (E1) 1 V or less Battery voltage When ignition switch is “ON” during normal operation 5V Stopping of driving of fuel pump, when encountered with emergency A/F adjuster ^2 (VCO) - @9 (E21) When ignition switch is “ON” &3 (OX3) - @9 (E21) When rotor is rotated in R direction and L direction with ignition switch turned “ON” Generation of pulse 4.5 - 5.5 V Voltage should change. JEF00172-00000 5.12.2 RESISTANCE CHECK 1. Installation of SST First, install the SST between the engine ECU and the vehicle harness. However, the SST connector at the ECU side should not be connected. For the installation procedure, refer to the section under “Connecting Procedure for SST” on page EF–8. EFI ECU Wire harness The SST connector should not be connected Ω JEF00176-00103 2. Measure the resistances between the respective terminals. 3. Check to see if the measured resistances conform to the specification in accordance with the following table “Standard Resistances for M101 and J102.” NOTE: • Make sure that the ignition switch is turned OFF during the measurement. • The following table shows the resistance at the time when the temperature of parts is 20°C. JEF00177-00000 EF–67 STANDARD RESISTANCES FOR M101 AND J102 System Terminals Circuit Standard resistance Front O2 sensor system @0 (OXH1) - u (+B1) Front O2 sensor heater and main relay 11.7 - 14.5 Ω Rear O2 sensor system %0 (OXH2) - u (+B1) Rear O2 sensor heater and main relay 11.7 - 14.5 Ω Cam angle sensor system @2 (N2+) - %2 (N2–) Camshaft angle sensor 1850 - 2450 Ω Crank angle sensor system @2 (N1+) - %1 (N1–) Crankshaft angle sensor 1850 - 2450 Ω No. 1 - 4 Fuel injector 13.4 - 14.2 Ω @7 (#10) - u (+B1) Injector system @6 (#20) - u (+B1) @5 (#30) - u (+B1) @4 (#40) - u (+B1) Variable valve timing system @3 (OCV+) - ^1 (OCV–) Oil control valve 6.9 - 7.9 Ω 30 - 34 Ω Purge VSV system &9 (PRG) - u (+B1) Purge control VSV A/F adjuster ^2 (VCO) - @9 (E21) A/F adjuster 3500 - 6500 Ω @3 (E1) - Body ground Ground system !7 (E2) - Body ground $7 (E2PM) - Body ground Ground @9 (E21) - Body ground 10 Ω or less JEF00178-00000 5.13 INSPECTION PROCEDURE FOR FUEL SYSTEM CAUTION: • Before you start the check, be sure to conduct the fuel pressure eliminating operation according to the “fuel pressure relieving procedure” at page EF–25. Furthermore, after completion of the check operation, ensure that no fuel leakage is present by performing the check according to the “fuel leak check” at page EF–25. JEF00179-00000 5.13.1 INSPECTION OF FUEL FLOW 1. Loosen the hose band at the fuel pipe. Then remove the fuel hose from the fuel pipe. 2. Connect a suitable fuel hose (about 2 meter long) to the fuel pipe. JEF00180-000106 3. Insert one end of the fuel hose in a measuring cylinder. CAUTION: • Even after the fuel pressure has been released, the fuel line still has a slight residual pressure. Hence, be sure to gradually remove the pipe so as to prevent fuel from splashing. • Since the fuel will flow out, be certain to place a suitable container or cloth under the fuel pipe so that no fuel may get to the resin or rubber parts of the vehicle. JEF00181-000107 EF–68 4. Temporarily remove the fuel pump relay. Then, connect the terminal with a jump wire as illustration. 5. Turn the ignition switch to the “ON” position for 10 seconds. Then, turn off the ignition switch. 6. Measure the amount of fuel collected in the measuring cylinder. Specified Amount of Fuel: 190 ml or more NOTE: • Check to see if leakage is present at the fuel lines. Also, check the fuel lines for deformation or choking. EFI EFI [ST] NOTICE USE THE DESIGNATED FUSES ONLY. A2 HORN-HAZ 15 A FUEL PUMP (DGEF) 15 A (POWER) 30 A EFI 15 A BACK UP 10 A STOP 15 A (MGO) 10 A Relay block [DEFG] [HEAD] RAD [MGC] AM (ABS) (EPS) TAIL HEAD RAD 60 A 50 A 30 A 40 A 30 A 30 A 82661-97218 JEF00182-000108 5.13.2 INSPECTION OF FUEL PRESSURE 1. Install a fuel pressure gauge between the delivery pipe and the main pipe. 2. Turn the ignition switch to the “ON” position. 3. Check to see if the fuel pressure conforms to the specified pressure. Specified Value: 324 ± 5 kPa NOTE: • If the fuel pressure is less than the specification, check the fuel pump. 5.13.3 INSPECTION OF FUEL INJECTORS 1. Using a sound scope, check to see if each injector emits an operating sound when the engine is being started or cranked. NOTE: • If a sound scope is not available, apply a screwdriver or the like to the injector. So you can feel an operating vibration. • If the injector emits no operating sound, check the wiring or connectors.Then, perform the following procedure. Pressure gauge JEF00183-000109 JEF00184-00110 EF–69 2. Disconnect the injector connector of the engine wire. 3. Remove the fuel delivery pipe. Then, remove the injectors. CAUTION: • Even after the fuel pressure has been released, the fuel line still has a slight residual pressure. Therefore, make sure to put a cloth or the like to prevent fuel from splashing. Ω 4. Measure the resistance between the terminals of each injector. Specified Resistance: 13.4 - 14.2 (at 20°C) JEF00185-00111 NOTE: • If the resistance is not within the specification, replace the injector. • If the resistance will conform to the specification, perform the following procedure. 5. Remove the fuel pump relay. 6. Using a test lamp (12 V 6 W), check to see if the lamp will illuminate as illustration when the engine is being cranked. If not, check the wiring harness and ECU output. 7. Turn the ignition switch to the “OFF” position. JEF00186-00112 8. Using a suitable string or wire, connect the injector and the fuel delivery pipe, as indicated in the figure. 9. Connect a jump wire across the terminals, as indicated in Step 4 of Paragraph 5.13.1. 10. Insert the injector into the measuring cylinder. 11. Turn the ignition switch to the “ON” position. 12. Connect the SST wire to the battery terminal for 15 seconds. Hose band String Injector SST (09268-87702) JEF00187-00113 WARNING: • Be sure to use hose bands at the joint section between hoses and pipes, etc. so that the hose may not be disconnected unexpectedly. • Utmost care must be exercised so that no spark may be emitted when connecting the SST to the battery. Furthermore, be sure to place the battery on the windward side and as far away as possible from the measuring cylinder. Moreover, never conduct this operation in a tightly-closed room. SST(09268-87702) SST(09842-30070) Battery JEF00188-00114 EF–70 13. Measure the amount of fuel collected in the measuring cylinder. Specified Amount of Fuel Variation Between Injectors Approx. 40 - 54 ml 5 ml or less NOTE: • Attach a suitable vinyl hose to the tip-end of the injector so as to prevent fuel from splashing. • Conduct the measurement two or three times for each injector. • Before the injector is pulled out, make certain to turn off the ignition switch. • When removing the injector, use a suitable cloth or the like so as to prevent fuel from splashing. • Prior to the test, perform air bleeding for the fuel hose. JEF00189-00115 14. Check to see if any fuel leakage is present from the injector nozzle, when the SST wire is removed from the battery terminal. Specification: Less than one drop of fuel per minute NOTE: • If the leakage exceeds the specified value, replace the injector. JEF00190-00116 15. Turn OFF the ignition switch. 16. Install the injector grommet and O-ring to the injectors. NOTE: • Install a new O-ring to the O-ring seal section. JEF00191-00117 17. Install the injectors and the fuel delivery pipe. NOTE: • After completion of the assembling, ensure that the injector can be turned smoothly by your hand, although there is a slight resistance due to friction. • Make sure that the connector of the injector is located at the inside of the engine and is directed in a upward direction. Fuel delivery pipe Cylinder lead Insulator O-ring JEF00192-00118 EF–71 5.14 CIRCUIT INSPECTION DTC P0105/31 Manifold Absolute Pressure/Barometric Pressure Circuit Malfunction WIRING DIAGRAM EFI ECU (PIM) (VCPM) 15 46 X45 (E2PM) 47 X46 Manifold absolute pressure sensor X44 X45 X46 X44 Wire harness side JEF00193-00119 CIRCUIT DESCRIPTION The manifold absolute pressure sensor detects the intake manifold pressure as a voltage. Since the manifold absolute pressure sensor does not use the atmospheric pressure as a criterion, but senses the absolute pressure inside the intake manifold (the pressure in proportion to the present absolute vacuum 0), it is not influenced by fluctuations in the atmospheric pressure due to high altitude and other factors. This permits it to control the air-fuel ratio at the proper level under all conditions. V 5 PIM VCPM = 5 V 4.2 4 3 2 1 13.3 120 100 900 mmHg kPa Manifold absolute pressure JEF00194-00120 DTC No. P0105/31 DTC Detecting condition Open or short manifold absolute pressure sensor circuit Trouble area • Open wire or short in manifold absolute pressure sensor circuit • Manifold absolute pressure sensor • Engine ECU If the ECU detects DTC P0105/31, it operates the fail-safe function, keeping the ignition timing and injection volume constant and making it possible to drive the vehicle. NOTE: • After confirming DTC P0105/31, use the OBD II generic scan tool or DS-21 diagnosis tester to confirm the manifold absolute pressure from “CURRENT DATA” Manifold absolute pressure Trouble area 0 kPa PIM circuit short 130 kPa or more VCPM circuit open or short PIM circuit open E2PM circuit open EF–72 INSPECTION PROCEDURE When using DS-21 diagnosis tester or OBD II generic scan tool: 1 Check of output value of MAP sensor 1. With the IG switch turned OFF, connect the DS-21 diagnosis tester to DLC through the SST or connect the OBD II generic scan tool directly to DLC. SST: 09991-87404-000 SST 2. After turning ON the IG switch, turn ON the main switch of the tester. Read the intake manifold absolute pressure value of the DS-21 diagnosis tester or OBD II generic scan tool. Is the measured value the same as the atmospheric pressure (approx. 100 kPa)? NO 2 Check of power supply voltage of MAP sensor 1. After turning OFF the main switch of the tester, turn OFF the IG switch. 2. Connect the SST between the ECU connectors and the wire harness connectors. SST: 09842-97203-000 3. Ensure that the voltage between the SST terminals 46 and 47 is within the specified valve when the ignition switch is turnef to the ON position. Specified Value: 4.5 - 5.5 V YES Check malfunction that occurs intermittently or poor contact. (Refer to page EF–51.) V SST 53 54 55 49 50 51 52 45 46 47 48 63 64 65 66 62 61 60 56 57 58 59 Is the voltage within the specified value? NOTE: • If no voltage appears, check the ECU power supply circuit. YES 3 Check of MAP sensor 1. With the IG switch turned OFF, disconnect the vacuum hose at the surge tank side. 2. After turning ON the IG switch, turn ON the main switch of the tester. 3. Apply a negative pressure to the vacuum hose, using a MityVac. 4. Check the manifold absolute pressure value under following conditions. Applying Vacuum Displayed Value on Scan Tool 0 Approx. 100 kPa (Approx. 760 mmHg) NO Check or replace the ECU. (Refer to page EF–51.) 27 kPa (200 mmHg) Approx. 73 kPa (Approx. 560 mmHg) 67 kPa (500 mmHg) Approx. 33 kPa (Approx. 260 mmHg) Is the measured value the same as that shown above? NO YES EF–73 4 Check for intermittent trouble caused by freeze in the vacuum passage, wire harness or connector. (Refer to EF–48.) Check of harness between MAP sensor and ECU 1. After turning OFF the main switch of the tester, turn OFF the IG switch. 2. Disconnect the harness from the MAP sensor. 3. Disconnect the SST connectors at the ECU side. Connector X44 at sensor side-Connector $7 at ECU side (E2PM). Connector X45 at sensor side-Connector !5 at ECU side (PIM). Connector X46 at sensor side-Connector $6 at ECU side (VCPM). Are the check results for open wire and short OK? V YES SST Check and replacement of vacuum hose and MAP sensor If the vacuum hose has restriction or rapture, replace the vacuum hose. If the vacuum hose does not have it, replace the MAP sensor. 53 54 55 49 50 51 52 45 46 47 48 65 66 61 62 63 64 60 59 58 56 57 X44 X45 X46 Wire harness side NO Repair or replace the harness or connector. JEF00195-00121 When not using DS-21 diagnosis tester or OBD II generic scan tool: 1 Check of ECU input signal PIM SST V 1. Set the SST (sub-harness). (Refer to page EF–8.) SST: 09842-97203-000 8 9 10 11 4 5 6 7 22 18 19 20 21 17 16 15 12 13 14 1 2. With the IG switch turned ON, measure the voltage between the SST terminals !5 and $7 (PIM-E2PM). Specified Value: 3.3 - 4.0 V 2 3 53 54 55 49 50 51 52 45 46 47 48 64 65 66 60 61 62 63 56 57 58 59 Is the measured value within the specified value? YES Check malfunction that occurs intermittently or poor contact. (Refer to page EF–51.) NO 2 Check of power supply voltage of MAP sensor V 1. Next, ensure that the voltage between the SST terminals $6 and $7 is within the specified value. Specified Value: 4.5 - 5.5 V Is the measured value within the specified value? NOTE: • If no voltage appears, check the ECU power supply circuit. SST 53 54 55 49 50 51 52 45 46 47 48 64 65 66 60 61 62 63 59 58 57 56 EF–74 NO Check or replace the ECU. (Refer to page EF–51.) YES 3 Check of MAP sensor 1. With the harness connected, disconnect the vacuum hose at the surge tank side. 2. Apply a negative pressure to the vacuum hose, using a MityVac. 3. Ensure that the voltage between the SST terminals !5 and $7 is within the following specified voltage under the following conditions. Applying Vacuum Displayed Value on voltage meter 0 3.3 - 4.0 V 27 kPa (200 mmHg) 2.6 - 3.1 V 67 kPa (500 mmHg) 1.1 - 1.4 V SST V Is the measured value within the values in the table above? 11 7 8 9 10 3 4 5 6 21 22 17 18 19 20 16 15 14 12 13 1 2 53 54 55 49 50 51 52 45 46 47 48 63 64 65 66 62 61 60 56 57 58 59 YES Check for intermittent trouble caused by freeze in vacuum passage, wire harness or connector. (Refer to EF–48.) NO 4 Check of harness between MAP sensor and ECU 1. Turn OFF the IG switch. 2. Disconnect the harness from the MAP sensor. 3. Disconnect the SST connectors at the ECU side. 4. Connector X44 at sensor side-Connector $7 at ECU side (E2PM). Connector X45 at sensor side-Connector !5 at ECU side (PIM). Connector X46 at sensor side-Connector $6 at ECU side (VCPM). Are the check results for open wire and short OK? Ω SST YES 53 54 55 49 50 51 52 45 46 47 48 64 65 66 60 61 62 63 56 57 58 59 Check and replacement of vacuum hose and MAP sensor If the vacuum hose has restriction or rapture, replace the vacuum hose. If the vacuum hose does not have it, replace the MAP sensor. X44 X45 X46 NO Repair or replace of harness or connector. JEF00196-00122 EF–75 DTC P0110/43 Intake Air Temp. Circuit Malfunction WIRING DIAGRAM EFI ECU (THA) 76 (E2) 17 X33 X33 X34 X34 Wire harness side JEF00197-00123 Resistance Low The intake air temperature sensor, which detects the intake air temperature, is located at the air cleaner. A thermistor built in the sensor changes the resistance value according to the intake air temperature. The lower the intake air temperature, the greater the thermistor resistance value, and the higher the intake air temperature, the lower the thermistor resistance value. When the resistance value of the intake air temp. sensor changes in accordance with changes in the intake air temperature, the potential at terminal THA also changes. Based on this signal, the engine ECU increases the fuel injection volume to improve driveability during cold engine operation. High CIRCUIT DESCRIPTION Low High Temperature HINT: JEF00198-00124 DTC No. DTC Detecting condition Trouble area P0110/43 Open wire or short in intake air temp. sensor circuit • Open wire or short in intake air temp. sensor circuit • intake air temp. sensor • Engine ECU After confirming DTC P0110/43, use the DS-21 diagnosis tester or OBD II generic scan tool to confirm the intake air temperature from the CURRENT DATA. Temperature displayed Malfunction –40°C Open circuit 140°C or more Short circuit EF–76 INSPECTION PROCEDURE NOTE: • If DTC P0110/43 (Intake Air Temp. Circuit Malfunction), P0115/42 (Engine Coolant Temp. Circuit Malfunction), are P0120/41 (Throttle/Pedal Position Sensor/Switch “A” Malfunction) are outputted simultaneously, E2 (Sensor Ground) may be open. • Read the freeze frame data, using the DS-21 diagnosis tester or OBD II generic scan tool. Because the freeze frame data records the engine conditions when the malfunction was detected, when troubleshooting the freeze frame data is useful to determine whether the vehicle was running or stopped, the engine warmed up or not, the air-fuel ratio lean or rich, etc. at the time of the malfunction. When using DS-21 diagnosis tester or OBD II generic scan tool: 1 1. With the IG switch turned OFF, connect the DS-21 diagnosis tester to DLC through the SST or connect the OBD II generic scan tool directly to DLC. SST: 09991-87404-000 SST 2. After turning ON the IG switch, turn ON the main switch of the tester. Read the intake air temperature value of the DS-21 diagnosis tester or OBD II generic scan tool. Is the measured value the same as the actual intake air temperature? NO YES Check malfunction that occurs intermittently or poor contact. (Refer to page EF–51.) 2 –40°C ……………… Go to Step 2 140°C or more ……. Go to Step 4 Check of open wire in harness or inside engine ECU (1) 1. After turning OFF the main switch of the tester, turn OFF the IG switch. 2. Disconnect the connector of the intake air temperature (IAT) sensor. 3. Connect a jump wire between the harness terminals X33 and X34 of the IAT sensor. SST: 09991-87403-000 SST 4. After turning ON the IG switch, turn ON the main switch of the tester. Read the intake air temperature value of the DS-21 diagnosis tester or OBD II generic scan tool. Is the measured value 140°C or above? NO Go to Step 3. YES Check the IAT sensor connector or terminal for connecting condition. If they are satisfactory, replace the IAT sensor. EF–77 3 Check of open wire in harness or inside engine ECU (2) 1. After turning OFF the main switch of the tester, turn OFF the IG switch. 2. Set the SST (sub-harness). (Refer to page EF–8.) SST: 09842-97203-000 3. Disconnect the jump wire from the IAT sensor connector. 4. Next, connect the jump wire between the SST connector terminals &6 and !7. 5. After turning ON the IG switch, turn ON the main switch of the tester. Read the intake air temperature value of the DS-21 diagnosis tester or OBD II generic scan tool. Is the measured value 140°C or above? SST 10 11 6 7 8 9 2 3 4 5 20 21 22 16 17 18 19 15 14 13 12 1 75 76 77 71 72 73 74 67 68 69 70 88 84 85 86 87 83 82 81 78 79 80 NO YES The harness between the IAT sensor and the ECU is open. Repair or replace the harness. 4 Check the ECU connector or terminal for connecting condition. If they are satisfactory, replace the engine ECU. Check of short in harness or inside engine ECU (1) 1. After turning OFF the main switch of the tester, turn OFF the IG switch. 2. Disconnect the connector of the intake air temperature (IAT) sensor. 3. After turning ON the IG switch, turn ON the main switch of the tester. Read the intake air temperature value of the DS-21 diagnosis tester or OBD II generic scan tool. Is the measured value –40°C? YES NO 5 Check of short in harness or inside engine ECU (2) 1. After turning OFF the main switch of the tester, turn OFF the IG switch. 2. Disconnect the connector B of the SST from the ECU connector. 3. After turning ON the IG switch, turn ON the main switch of the tester. Read the intake air temperature value of the DS-21 diagnosis tester or OBD II generic scan tool. Is the measured value –40°C? Replace the IAT sensor. EFI ECU Wire harness Disconnect the connector B only. SST Connector B NO Check or replace the engine ECU. (Refer to page EF–51.) YES Repair or replace the harness or connector. JEF00199-00125 EF–78 When not using DS-21 diagnosis tester or OBD II generic scan tool: 1 Check of ECU input signal THA 1. Set the SST (sub-harness). (Refer to page EF–8.) 2. With the IG switch turned ON, measure the voltage between the SST connectors &6 and !7 (THA-E2) under the following condition given below. Intake air temp. °C Specified value 20 1.8 - 2.9 V 60 0.6 - 1.2 V SST V 8 9 10 11 4 5 6 7 22 18 19 20 21 17 16 15 12 13 14 1 2 3 75 76 77 71 72 73 74 67 68 69 70 86 87 88 82 83 84 85 78 79 80 81 Is the measured value within the specified value? NO 2 Check of harness between IAT sensor and ECU 1. Turn OFF the IG switch. 2. Disconnect the harness from the IAT sensor. 3. Disconnect the SST connectors at the ECU side. 4. Referring to page EF–48, check the harness and connector for open wire or short. Connector X33 at sensor side-Connector &6 at ECU side (THA). Connector X34 at sensor side-Connector !7 at ECU side (E2). Are the check results for open wire and short OK? YES Check malfunction that occurs intermittently or poor contact. (Refer to page EF–51.) Ω SST 8 9 10 11 4 5 6 7 22 18 19 20 21 17 16 15 12 13 14 1 2 3 X33 X34 Wire harness side YES 3 NO Repair or replace the harness or connector. Check of IAT sensor Unit check of IAT sensor (Refer to page EF–184.) Are the unit check results OK? YES Check or replace the engine ECU. (Refer to page EF–51.) NO Replace the IAT sensor. JEF00200-00126 EF–79 DTC P0115/42 Engine Coolant Temp. Circuit Malfunction WIRING DIAGRAM EFI ECU (THW) 45 (E2) 17 To combination meter X30 – + X30 H21 Engine coolant temperature sensor X31 H21 X31 Wire harness side BNDR JEF00201-00127 CIRCUIT DESCRIPTION A thermistor built into the engine coolant temp. sensor changes the resistance valve according to the engine coolant temperature. The structure of the sensor and connection to the engine ECU is the same as in the DTC P0110/43 (Intake Air Temp. Circuit Malfunction). DTC No. P0115/42 DTC Detecting condition Open wire or short in engine coolant temp. sensor circuit Trouble area • Open wire or short in engine coolant temp. sensor circuit • Engine coolant temp. sensor • Engine ECU NOTE: • After confirming DTC P0115/42 use the OBD II generic scan tool or DS-21 diagnosis tester to confirm the engine coolant temperature from CURRENT DATA. Temperature displayed Malfunction –40°C Open circuit 140°C or more Short circuit JEF00202-00000 INSPECTION PROCEDURE NOTE: • If DTC P0110/43 (Intake Air Temp. Circuit Malfunction), P0115/42 (Engine Coolant Temp. Circuit Malfunction), P0120/41 (Throttle/Pedal Position Sensor/Switch “A” Malfunction) are output simultaneously, E2 (Sensor Ground) may be open. • Read freeze frame data using DS-21 diagnosis tester or OBD II generic scan tool. Because freeze frame records the engine conditions when the malfunction is detected, when troubleshooting it is useful for determining whether the vehicle was running or stopped, the engine warmed up or not, the air-fuel ratio lean or rich, etc. at the time of the malfunction. EF–80 When using DS-21 diagnosis tester or OBD II generic scan tool: 1 1. With the IG switch turned OFF, connect the DS-21 diagnosis tester to DLC through the SST or connect the OBD II generic scan tool directly to DLC. SST: 09991-87404-000 SST 2. After turning ON the IG switch, turn ON the main switch of the tester. Read the engine coolant temperature of the DS-21 diagnosis tester or OBD II generic scan tool. Is the measured value the same as the actual water temperature? NO YES Check malfunction that occurs intermittently or poor contact. (Refer to page EF–51.) 2 –40°C ……………… Go to Step 2 140°C or more ……. Go to Step 4 Check of open wire in harness or inside engine ECU (1) 1. After turning OFF the main switch of the tester, turn OFF the IG switch. 2. Disconnect the connector of the engine coolant temperature (ECT) sensor. 3. Connect a jump wire between the harness terminals X30 and X31 of the ECT sensor. SST: 09991-87403-000 SST 4. After turning ON the IG switch, turn ON the main switch of the tester. Read the engine coolant temperature value of the DS-21 diagnosis tester or OBD II generic scan tool. Is the measured value 140°C or above? YES NO Go to Step 3. 3 Check of open wire in harness or inside engine ECU (2) 1. After turning OFF the main switch of the tester, turn OFF the IG switch. 2. Set the SST (sub-harness). (Refer to page EF–8.) SST: 09842-97203-000 3. Disconnect the jump wire from the ECT sensor connector. 4. Next, connect the jump wire between the SST connector terminals $6 and u. 5. After turning ON the IG switch, turn ON the main switch of the tester. Read the engine coolant temperature value of the DS-21 diagnosis tester or OBD II generic scan tool. Is the measured value 140°C or above? Check the ECT sensor connector or terminal for connecting condition. If they are satisfactory, replace the ECT sensor. SST 10 11 6 7 8 9 2 3 4 5 20 21 22 16 17 18 19 15 14 13 12 1 53 54 55 49 50 51 52 45 46 47 48 65 66 61 62 63 64 60 59 58 56 57 EF–81 YES The harness between the ECT sensor and the ECU is open. Repair or replace the harness. 4 NO Check the ECU connector and terminal for connecting condition. If they are satisfactory, replace the engine ECU. Check of short in harness or inside engine ECU (1) 1. After turning OFF the main switch of the tester, turn OFF the IG switch. 2. Disconnect the connector of the engine coolant temperature (ECT) sensor. 3. After turning ON the IG switch, turn ON the main switch of the tester. Read the coolant temperature value of the DS-21 diagnosis tester or OBD II generic scan tool. Is the measured value –40°C? YES Replace the ECT sensor. NO 5 Check of short in harness or inside engine ECU (2) 1. After turning OFF the main switch of the tester, turn OFF the IG switch. 2. Disconnect the connector B of the SST from the ECU connector. 3. After turning ON the IG switch, turn ON the main switch of the tester. Read the engine coolant temperature value of the DS-21 diagnosis tester or OBD II generic scan tool. Is the measured value –40°C? NO Check or replace the engine ECU. (Refer to page EF–51.) EFI ECU Wire harness Disconnect the connector B only. SST Connector B YES Repair or replace the harness or connector. JEF00203-00128 EF–82 When not using DS-21 diagnosis tester or OBD II generic scan tool: 1 Check of ECU input signal THW 1. Set the SST (sub-harness). (Refer to page EF–8.) 2. With the IG switch turned ON, measure the voltage between the SST terminals $5 and !7 (THW-E2) under the following condition given below. Intake air temp. °C Specified value 20 1.8 - 2.9 V 60 0.5 - 1.2 V SST V 8 9 10 11 4 5 6 7 22 18 19 20 21 17 16 15 12 13 14 1 2 3 53 54 55 49 50 51 52 45 46 47 48 63 64 65 66 62 61 60 56 57 58 59 Is the measured value within the specified value? NO 2 Check of harness between ECT sensor and ECU 1. Turn OFF the IG switch. 2. Disconnect the harness from the IAT sensor. 3. Disconnect the SST connectors at the ECU side. 4. Referring to page EF–48, check the harness and connector for open wire or short. Connector X30 at sensor side-Connector $5 at ECU side (THW). Connector X31 at sensor side-Connector !7 at ECU side (E2). Are the check results for open wire and short OK? YES 3 Unit check of ECT sensor YES Check malfunction that occurs intermittently or poor contact. (Refer to page EF–51.) Ω SST 10 11 6 7 8 9 2 3 4 5 20 21 22 16 17 18 19 15 14 13 12 1 X30 X31 H21 Wire harness side NO Repair or replace the harness or connector. (Refer to page EF–184.) Are the unit check results OK? YES 4 Check or replace the engine ECU. NO Replace the ECT sensor. (Refer to page EF–51.) JEF00204-00129 EF–83 DTC P0116/42 Engine Coolant Temp. Circuit Range/ Performance Problem WIRING DIAGRAM Refer to Section DTC P0115/42. JEF00205-00000 CIRCUIT DESCRIPTION Refer to Engine Coolant Temp. Circuit Malfunction. DTC No. DTC Detecting condition Trouble area P0116/42 When the engine starts, the engine coolant temp. is between –7.5°C or more and less than 40°C. And 5 min. or more after the engine starts, engine coolant temp. sensor value is 40°C or less. (2 trip detection logic) • Engine coolant temp. sensor • Cooling system JEF00206-00000 INSPECTION PROCEDURE NOTE: • If DTC “P0115/42” (Engine Coolant Temp. Circuit Malfunction) and “P0116/42” (Engine Coolant Temp. Circuit Range/Performance Problem) are output simultaneously, engine coolant temp. sensor circuit may be open. Perform troubleshooting of DTC P0115/42 first. • Read the freeze frame data, using the DS-21 diagnosis tester or OBD II generic scan tool. Because the freeze frame data records the engine conditions when the malfunction was detected, when troubleshooting the freeze frame data is useful to determine whether the vehicle was running or stopped, the engine warmed up or not, the air-fuel ratio lean or rich, etc. at the time of the malfunction. • In the troubleshooting for the water temperature sensor system, only the use of DS-21 diagnosis tester or OBD II generic scan tool will be able to determine whether open wire, short (P0115) or functional malfunction (P0116). 1 Are codes other than DTC P0116/42 outputted? NO 2 Check of thermostat YES Go to applicable DTC flow chart. (Conduct the check of thermostat in Section CO.) Are the check results OK? YES Replace the engine coolant temperature (ECT) sensor. NO Replace the thermostat. JEF00207-00000 EF–84 DTC P0120/41 Throttle/Pedal Position Sensor/Switch “A” Circuit Malfunction WIRING DIAGRAM EFI ECU (VC) 16 X99 X99 XT1 XT0 (VTH) 44 (E2) 17 XT0 XT1 Full opened Full closed Linear throttle sensor Wire harness side BNDR JEF00208-00130 CIRCUIT DESCRIPTION The linear throttle sensor is mounted in the throttle body and detects the throttle valve opening angle. When the throttle valve is fully closed, a voltage of approximately 0.4 - 0.8 V is applied to terminal VTH of the engine ECU. The voltage applied to the terminals VTH of the engine ECU increases in proportion to the opening angle of the throttle valve and becomes approximately 3.5 - 5.0 V when the throttle valve is fully opened. The engine ECU judges the vehicle driving conditions from these signals input from terminal VTH, uses them as one of the conditions for deciding the airfuel ratio correction, power increase correction and fuel-cut control etc. DTC No. DTC Detecting condition P0120/41 Condition (1) or (2) continues with more than 0.6 sec: 1. VTH < 0.2 V 2. VTH > 4.8 V Engine ECU Linear throttle sensor VC 5V VTH E2 JEF00209-00131 Trouble area • Open wire or short in linear throttle sensor circuit • Linear throttle sensor • Engine ECU NOTE: • After confirming “DTC P0120/41”, use the DS-21 diagnosis tester or OBD II generic scan tool to confirm the throttle valve opening percentage and closed throttle position switch condition. Throttle valve opening position expressed as percentage Trouble area Throttle valve fully closed Throttle valve fully open 0% 0% VC line open VTH line open wire or short Approx. 100 % Approx. 100 % E2 line open EF–85 INSPECTION PROCEDURE NOTE: • If DTC P0110/43 (Intake Air Temp. Circuit Malfunction), P0115/42 (Engine Coolant Temp. Circuit Malfunction, P0120/41 (Throttle/Pedal Position Sensor/Switch “A” Malfunction) are output simultaneously, E2 (Sensor Ground) may be open. • Read the freeze frame data, using the DS-21 diagnosis tester or OBD II generic scan tool. Because the freeze frame data records the engine conditions when the malfunction was detected, when troubleshooting the freeze frame data is useful to determine whether the vehicle was running or stopped, the engine warmed up or not, the air-fuel ratio lean or rich, etc. at the time of the malfunction. When using DS-21 diagnosis tester or OBD II generic scan tool: 1 Check of output value of liner throttle sensor 1. With the IG switch turned OFF, connect the DS-21 diagnosis tester to DLC through the SST or connect the OBD II generic scan tool directly to DLC. SST: 09991-87404-000 SST 2. After turning ON the IG switch, turn ON the main switch of the tester. Read the throttle valve opening value of the DS-21 diagnosis tester or OBD II generic scan tool. Throttle valve Throttle valve opening % Fully closed 0.0 Fully open 100.0 Are the check results OK? YES Check malfunction that occurs intermittently or poor contact. (Refer to page EF–51.) NO 2 Check of power supply voltage at linear throttle sensor harness side 1. After turning OFF the main switch of the tester, turn OFF the IG switch. 2. Disconnect the connector of the linear throttle sensor. 3. Measure the voltage between the terminals X99 of wire harness connector and body ground when the ignition switch is turned to the ON position. Specified Value: 4.5 - 5.5 V Wire harness side V X99 XT1 XT0 Is the voltage within the specified value? NO YES Go to Step 5. EF–86 3 Check of linear throttle sensor 1. Turn OFF the IG switch. 2. Measure the resistance between the respective terminals. Terminal Condition A XT0 XT1 X99 Standard value kΩ X99 - XT1 2.5 - 6.0 XT1 - XT0 Throttle valve fully closed 0.1 - 1.3 XT1 - XT0 Throttle valve fully opened 1.7 - 4.2 As viewed from arrow A Linear throttle sensor Are the check results OK? YES 4 Check of ECU input signal VTH 1. Set the SST (sub-harness). (Refer to page EF–8.) 2. With the IG switch turned ON, measure the voltage between the SST connector $4 and !7 (VTH-E2) under the following condition given below. Fhrottle value Specified value Fully closed 0.4 - 0.8 V Fully open 3.5 - 5.0 V NO Replace the linear throttle sensor. SST V 10 11 6 7 8 9 2 3 4 5 20 21 22 16 17 18 19 15 14 13 12 1 31 32 33 27 28 29 30 23 24 25 26 43 44 39 40 41 42 38 37 36 34 35 Is the measured value within the specified value? YES Check or replace the engine ECU. (Refer to page EF–51.) 5 NO Check the harness and connector between the engine ECU and the linear throttle sensor (VTH line) for open wire or short. (Refer to page EF–48.) Check of power supply voltage at linear throttle sensor ECU side 1. Turn OFF the IG switch. 2. Set the SST (sub-harness). (Refer to page EF–8.) 3. With the IG switch turned ON, measure the voltage between the SST connectors !6 and !7 (VTH-E2). Specified Value: 4.5 - 5.5 V V SST 8 9 10 11 4 5 6 7 22 18 19 20 21 17 16 15 12 13 14 1 2 3 Is the measured value within the specified value? NOTE: • If no voltage appears, check the ECU power supply circuit. YES Check the harness and connector between the engine ECU and the linear throttle sensor (VC line) for open wire or short. (Refer to page EF–48.) NO Check or replace the engine ECU. (Refer to page EF–51.) JEF00210-00132 EF–87 When not using DS-21 diagnosis tester or OBD II generic scan tool: 1 Check of ECU input signal VTH V 1. Set the SST (sub-harness). (Refer to page EF–8.) 2. With the IG switch turned ON, measure the voltage between the SST connectors $4 and !7 (VTH-E2) under the following condition given below. Throttle valve Specified value Fully closed 0.4 - 0.8 V Fully open 3.5 - 5.0 V 11 7 8 9 10 3 4 5 6 21 22 17 18 19 20 16 15 14 12 13 1 2 31 32 33 27 28 29 30 23 24 25 26 41 42 43 44 40 39 38 34 35 36 37 Is the measured value within the specified value? YES NO 2 Check malfunction that occurs intermittently or poor contact. (Refer to page EF–51.) Check of linear throttle sensor 1. Turn OFF the IG switch. 2. Disconnect the linear throttle sensor. Terminal Condition A X99 - XT1 2.5 - 6.0 XT1 - XT0 Throttle valve fully closed 0.1 - 1.3 XT1 - XT0 Throttle valve fully opened 1.7 - 4.2 As viewed from arrow A Linear throttle sensor Are the check results OK? YES 3 XT0 XT1 X99 Standard value kΩ NO Replace the linear throttle sensor. Check the harness and connector between the engine ECU and the linear throttle sensor (VC, VTH, E2 line) for open wire or short. (Refer to page EF–48.) YES Check or replace the engine ECU. (Refer to page EF–51.) NO Repair or replace the harness or connector. JEF00211-00133 EF–88 DTC Oxygen Sensor Circuit Malfunction (Bank 1 Sensor 1) P0130/21 WIRING DIAGRAM IG SW ACC ACC IG1 IG2 ST IG No. 1 IG No. 2 ST 10 A ECU IG EFI ECU 23 (E1) R/B 1 F/L 60 A 15 A EFI 13 Front O2 sensor X28 #UL 75 (OX1) #UJ 20 (OXH1) #UK Front O2 sensor heater Rear O2 sensor XJ5 ZK0 #JZ #JY Main relay 4 Fuel pump relay 50 (OXH2) Rear O2 sensor heater 17 (E2) 2 (FC1, W/IMB) 30 (FC2, L/IMB) 6 3 74 (OX2) 5 J/C Fuel pump 7 (+B1) 36 (+B2) #UK #UJ #JY #JZ X28 #UL XJ5 ZK0 Front Rear Wire harness side JEF00212-00134 CIRCUIT DESCRIPTION DTC No. DTC Detecting condition P0130/21 When the following conditions (a) and (b) continue for more than a certain length of time: (a) After engine warming-up, the signal from the oxygen sensor continuously remains in the non-rich state, not becoming rich even once. (b) Voltage output of oxygen sensor remains at 0.3 V or more, or 0.6 V or less, during idling after engine is warmed up. (2 trip detection logic) Output voltage Stoichometric ratio The front oxygen sensor (bank 1, sensor 1) detects the concentration of oxygen contained in the exhaust gas according to the magnitude of the electromotive force that is being generated in itself. When the air-to-fuel ratio becomes richer than the stoichometric ratio, a greater electromotive force (approx. 1 volt) is applied to the ECU. Conversely, when the ratio becomes leaner than the stoichometric ratio, a smaller electromotive force (approx. 0 volt) is applied to the ECU. In this way, the ECU determines whether the air-to-fuel ratio is rich or lean. Based on this evaluation, the injection time is controlled. Richer-air fuel ratio-leaner JEF00213-00135 Trouble area • Air induction system • Fuel pressure • Injector injection • Open or short in heated oxygen sensor circuit • Heated oxygen sensor • Engine ECU EF–89 NOTE: • “Sensor 1” means a sensor which is located near the engine block. • Using the DS-21 diagnosis tester or OBD II generic scan tool, confirm the output voltage of the oxygen sensor (bank 1, sensor 1) from the current data. If the output voltage of the oxygen sensor (bank 1, sensor 1) is 0.1 V or less, most likely the circuit of the oxygen sensor (bank 1, sensor 1) is open or shorted. CONFIRMATION ENGINE RACING PATTERN Engine speed e 2,500 - 3,000 rpm Idling IG SW OFF r w q Time Warmed up 3 min. or so q With the IG switch turned OFF, connect the DS-21 diagnosis tester to DLC through the SST. Turn ON the IG switch and the main switch of the tester. Set the tester to the “Continuos monitoring results” of the CARB mode. w Start the engine. Keep on warming the engine for more than five minutes until the engine cooling water temperature reaches 90°C or above. e Race the engine for about three minutes at 2500 to 3000 rpm. r After one minute of idling, press the F1 key of the tester. Check to see if the DTC P0130 is outputted. JEF00214-00136 CAUTION: • If the condition in this test is not strictly followed, detection of the malfunction will not be possible. • If you do not have the DS-21 diagnosis tester, turn the ignition switch OFF after performing steps w to r, then perform steps w to r again. EF–90 INSPECTION PROCEDURE NOTE: • Read the freeze frame data, using the DS-21 diagnosis tester or OBD II generic scan tool. Because the freeze frame data records the engine conditions when the malfunction was detected, when troubleshooting the freeze frame data is useful to determine whether the vehicle was running or stopped, the engine warmed up or not, the air-fuel ratio lean or rich, etc. at the time of the malfunction. 1 Are other codes (those other than DTC P0130/21) outputted? NO 2 YES Check of harness between oxygen sensor and ECU Go to the relative DTC chart. 1. With the IG switch turned OFF, set the SST (sub-harness). (Refer to page EF–8.) However, the SST connectors at the ECU side should remain disconnected. 2. Disconnect the oxygen sensor connector. 3. Referring to page EF–48, check the harness and connector for open wire or short. Are the check results for open wire and short between the connector X28 of the oxygen sensor at the harness side and the SST terminal &5 OK? SST 75 76 77 71 72 73 74 67 68 69 70 86 87 88 82 83 84 85 81 80 79 78 Wire harness side #UK #UJ X28 #UL YES 3 Ω NO Repair or replace the harness or connector. Check of output voltage of oxygen sensor during idling 1. Connect the oxygen sensor and SST connectors, respectively. 2. Connect the DS-21 diagnosis tester to DLC through the SST. SST: 09991-87404-000 3. Warm up the engine at 2500 rpm for about 90 seconds. 4. Turn ON the main switch of the tester to read the output voltage of oxygen sensor during idling. Specified Value: The voltage varies repeatedly between a range from a voltage below 0.3 V and to a voltage above 0.6 V. (See the diagram below.) OK 1 V 0.6 V 0.3 V 0 V NG NG NG EF–91 YES NO 4 Check of misfire Go to Step 10. Check to see if any misfire is occurring by monitoring the DTC and data list. Are the check results OK? NO YES 5 Check of air induction system Check the following items given below: • Check of the engine oil level gauge, oil filler cap and PCV hose for disconnection. • Check of parts of the air induction system between the cylinder head and the throttle body for disconnection, looseness, or cracks. Perform troubleshooting for misfire. (Go to troubleshooting of DTC P0300/17, P0301-304/17.) NO YES 6 Check of fuel pressure Repair or replace the induction system. (Refer to page EF–68.) Are the check results OK? NO YES 7 Check of injector injection (Refer to page EF–68.) Are the check results OK? Check and repair fuel pump, fuel pipe line and filter. NO YES 8 Check of gas leakage of exhaust system Replace the injector. Are the check results OK? NO YES 9 Check of output voltage of oxygen sensor unit 1. Warm up engine completely 2. Disconnect the connector of the oxygen sensor with IG switch OFF 3. Connect a voltmeter to the connector terminal of oxygen sensor 4. Hold the engine racing speed for 3 minutes at 2000 rpm. at this time, ensure that the reading of the volt meter is within the specified value. Specified Value: Does the voltmeter exhibit an output voltage of 0.2 V or more at least one time? Are the check results OK? Repair or replace. V +B HT E1 OX Oxygen sensor EF–92 NO Replace the oxygen sensor (Bank 1, sensor 1) YES Check or replace the engine ECU. (Refer to page EF–51.) 10 Perform confirmation engine racing pattern. 11 Is there DTC P0130/21 being output again? NO 12 Did the vehicle run out of fuel in the past? YES DTC P0130/21 is caused by running out of fuel. YES Check or replace the engine ECU. (Refer to page EF–51.) NO Check malfunction that occurs intermittently or poor contact. (Refer to page EF–51.) JEF00215-00137 EF–93 DTC P0133/21 Oxygen Sensor Circuit Slow Response (Bank 1 Sensor 1) WIRING DIAGRAM Refer to DTC P0130/21 (Oxygen sensor circuit malfunction (Bank 1 sensor 1)) JEF00216-00000 CIRCUIT DESCRIPTION Refer to DTC P0130/21 (Oxygen sensor circuit malfunction (Bank 1 sensor 1)) DTC No. P0133/21 DTC Detecting condition Trouble area • Air induction system • Fuel pressure • Injector injection • Open or short in heated oxygen sensor circuit • Heated oxygen sensor • Engine ECU Response time for heated oxygen sensor voltage output to change from rich to lean, or form lean to rich, is more than a certain length of time during idling after engine is warmed up. (2 trip detection logic) NOTE: • Sensor 1 refers to the sensor closer to the engine block. JEF00217-00000 INSPECTION PROCEDURE NOTE: • Read the freeze frame data, using the DS-21 diagnosis tester or OBD II generic scan tool. Because the freeze frame data records the engine conditions when the malfunction was detected, when troubleshooting the freeze frame data is useful to determine whether the vehicle was running or stopped, the engine warmed up or not, the air-fuel ratio lean or rich, etc. at the time of the malfunction. 1 Are other codes (those other than DTC P0130/21) outputted? NO 2 Check of harness between oxygen sensor and ECU 1. With the IG switch turned OFF, set the SST (sub-harness). (Refer to page EF–8.) However, the SST connectors at the ECU side disconnected. 2. Disconnect the oxygen sensor connector. 3. Referring to page EF–48, check the harness and connector for open wire or short. • Are the check results for open wire and short between the connector X28 of the oxygen sensor at the harness side and the SST terminal &5 OK? YES Go to the relative DTC chart. SST Ω 75 76 77 71 72 73 74 67 68 69 70 88 84 85 86 87 83 82 81 78 79 80 Wire harness side #UK #UJ X28 #UL EF–94 YES 3 NO Check of output voltage of oxygen sensor during idling Repair or replace the harness or connector. 1. Connect the oxygen sensor and SST connectors, respectively. 2. Connect the DS-21 diagnosis tester to DLC through the SST. SST: 09991-87404-000 3. Turn OFF all accessory switches. Warm up the engine at 2500 rpm, until the radiator fan makes one turn. 4. Turn ON the main switch of the tester. Read the output voltage of the oxygen sensor when the engine is idling and the radiator fan is not operating. Specified Value: The voltage varies repeatedly between a range from a voltage below 0.32 V and to a voltage above 0.58 V. (See the diagram below.) NG OK 1 NG NG NG V 0.58 V 0.32 V 0 V 3 sec. or more NO 4 Check of air induction system YES Go to Step 8. Check the following items given below: • Check of the engine oil level gauge, oil filler cap and PCV hose for disconnection. • Check of parts of the air induction system between the cylinder head and the throttle body for disconnection, looseness, or cracks. YES 5 NO Repair or replace induction system. Check of fuel pressure (Refer to page EF–68.) Are the check results OK? YES 6 Check of injector injection (Refer to page EF–68.) Are the check results OK? NO Check and repair fuel pump, fuel pipe line and filter. EF–95 NO YES 7 Check of output voltage of oxygen sensor unit 1. Warm up engine completely 2. Disconnect the connector of the oxygen sensor with IG switch OFF 3. Connect a voltmeter to the connector terminal of oxygen sensor 4. Hold the engine racing speed for 3 minutes at 2000 rpm. at this time, ensure that the reading of the volt meter is within the specified value. Specified Value: Does the voltmeter exhibit an output voltage of 0.2 V or more at least one time? Replace the injector. V +B HT E1 OX Oxygen sensor Are the check results OK? NO Replace the oxygen sensor. (Bank 1, sensor 1) 8 YES Check or replace the engine ECU. (Refer to page EF–51.) Perform confirmation engine racing pattern. (Refer to DTC P0130/21 chart) 9 Is there DTC P0133/21 being output again? YES Check or replace ECU. (Refer to page EF–51.) NO Check malfunction that occurs intermittently or poor contact. (Refer to page EF–51.) JEF00218-00138 EF–96 DTC P0135/23 Oxygen Sensor Heater Circuit Malfunction (Bank 1 Sensor 1) DTC P0141/24 Oxygen Sensor Heater Circuit Malfunction (Bank 1 Sensor 2) WIRING DIAGRAM ACC IG No. 1 IG No. 2 ST ACC IG1 IG2 ST EFI ECU 10 A ECU IG IG SW R/B 13 Front O2 sensor #UL F/L 60 A 15 A EFI 1 23 (E1) X28 75 (OX1) #UK #UJ Front O2 sensor heater Rear O2 sensor XJ5 ZK0 Main relay 4 #JZ Fuel pump relay #JY 74 (OX2) 50 (OXH2) Rear O2 sensor heater 17 (E2) 2 (FC1, W/IMB) 6 3 20 (OXH1) 5 30 (FC2, L/IMB) J/C 7 (+B1) 36 (+B2) Fuel pump #UK #UJ #JY #JZ X28 #UL XJ5 ZK0 Front Rear Wire harness side JEF00219-00139 CIRCUIT DESCRIPTION Refer to DTC P0130/21 (Oxygen sensor circuit malfunction (Bank 1 sensor 1)) DTC No. P0135/23 P0141/24 DTC Detecting condition When the battery voltage is above 7.5 V and the heater terminal voltage of the ECU is above 1.0 V when the heater is operating or below 7.5 V when the heater is not operating: (2 trip detection logic) Trouble area • Open wire or short in heater circuit of oxygen sensor • Oxygen sensor heater • Engine ECU JEF00220-00000 EF–97 INSPECTION PROCEDURE NOTE: • Read the freeze frame data, using the DS-21 diagnosis tester or OBD II generic scan tool. Because the freeze frame data records the engine conditions when the malfunction was detected, when troubleshooting the freeze frame data is useful to determine whether the vehicle was running or stopped, the engine warmed up or not, the air-fuel ratio lean or rich, etc. at the time of the malfunction. 1 Check of output voltage of ECU SST V 1. Set the SST (sub-harness). (Refer to page EF–8.) 2. Measure the voltage between the SST connectors @0 (OXH1), %0 (OXH2) and the body ground under the following conditions given below. Measurement conditions IG switch ON 10 11 9 5 6 7 8 1 2 3 4 20 21 22 16 17 18 19 12 13 14 15 53 54 55 49 50 51 52 45 46 47 48 64 65 66 60 61 62 63 56 57 58 59 After engine started Front oxygen sensor Battery voltage Below 1.0 V/Immediately after Rear oxygen sensor Battery voltage Below 1.0 V/After more than 3 minutes Are the check results OK? NO 2 Unit check of oxygen sensor Check the resistance of the front and rear oxygen sensor heaters. (Refer to page EF–188.) Are the unit check results OK? YES Check and repair the harness or connector between the main relay and oxygen sensor and the engine ECU. (Refer to page EF–48.) YES Check or replace the engine ECU. (Refer to page EF–51.) NO Replace the oxygen sensor. JEF00221-00140 EF–98 DTC Oxygen Sensor Circuit Malfunction (Bank 1 Sensor 2) P0136/22 WIRING DIAGRAM ACC IG No. 1 IG No. 2 ST ACC IG1 IG2 ST EFI ECU 10 A ECU IG IG SW R/B 13 Front O2 sensor #UL F/L 60 A 15 A EFI 1 23 (E1) X28 75 (OX1) #UK #UJ Front O2 sensor heater Rear O2 sensor XJ5 ZK0 Main relay 4 #JZ Fuel pump relay #JY 74 (OX2) 50 (OXH2) Rear O2 sensor heater 17 (E2) 2 (FC1, W/IMB) 6 3 20 (OXH1) 5 30 (FC2, L/IMB) J/C 7 (+B1) 36 (+B2) Fuel pump #UK #UJ #JY #JZ X28 #UL XJ5 ZK0 Front Rear Wire harness side JEF00222-00141 CIRCUIT DESCRIPTION Refer to DTC P0130/21 (Oxygen sensor circuit malfunction (Bank 1 sensor 1)) DTC No. DTC Detecting condition Trouble area P0136/22 Voltage output of heated oxygen sensor remains at 0.4 V or more or 0.5 V or less when vehicle is driven at 100 km/h or more after engine is warmed up (2 trip detection logic) • Open wire or short in heated oxygen sensor circuit • Oxygen sensor • Engine ECU HINT: Sensor 2 refers to the sensor farther away from the engine block. JEF00223-00000 EF–99 CONFIRMATION DRIVING PATTERN 40 sec. or more Vehicle speed e 50 km/h Idling IG SW OFF q w Warmed up r t q With the IG switch turned OFF, connect the DS-21 diagnosis tester to DLC through the SST. Turn ON the IG switch and the main switch of the tester. Set the tester to the “Continuos monitoring results” of the CARB mode. w Start the engine. With all switch turned OFF, keep on warming the engine until the engine coolant temperature reaches 90°C or above. e Accelerate the vehicle until the vehicle speed reaches 50 km/h or more in the ™ range in the case of automatic transmission vehicles; in the 1st → 2nd gear in the case of manual transmission vehicles. Keep on running the vehicle at that speed for at least 40 seconds. r Under this condition, release the foot off from the accelerator pedal so as to decelerate the vehicle. Maintain the idling state. t After one minute of idling, press the F1 key of the tester. Check to see if the DTC P0130 is outputted. CAUTION: • If the conditions in this test are not strictly followed, detection of the malfunction will not be possible. • If you do not have DS-21 diagnosis tester, turn the ignition switch OFF after performing steps w to t, then perform steps w to t again. WARNING: • Be sure to conduct the confirmation test, while observing the instructions at page EF–6. JEF00224-00142 INSPECTION PROCEDURE NOTE: • Read the freeze frame data, using the DS-21 diagnosis tester or OBD II generic scan tool. Because the freeze frame data records the engine conditions when the malfunction was detected, when troubleshooting the freeze frame data is useful to determine whether the vehicle was running or stopped, the engine warmed up or not, the air-fuel ratio lean or rich, etc. at the time of the malfunction. EF–100 1 Are other codes (those other than DTC P0136/22) outputted? NO 2 Check of harness between oxygen sensor and ECU 1. With the IG switch turned OFF, set the SST (sub-harness). (Refer to page EF–8.) However, the SST connectors at the ECU side should remain disconnected. 2. Disconnect the oxygen sensor connector. 3. Referring to page EF–48, check the harness and connector for open wire or short. Are the check results for open wire and short between the connector XJ5 of the oxygen sensor at the harness side and the SST terminal &4 OK? YES 3 Check of output voltage of oxygen sensor during idling 1. Connect the oxygen sensor and SST connectors, respectively. 2. Connect the DS-21 diagnosis tester to DLC through the SST. SST: 09991-87404-000 3. Warm up the engine. 4. Turn ON the main switch of the tester. Race the engine at 4000 rpm for three minutes by depressing the accelerator pedal. 5. Under the condition of Step 4, release the foot off from the accelerator pedal so as to allow the engine to idle. 6. Read the output voltage of the oxygen sensor between Steps 4 to 5. Specified Value: The voltage should become 0.4 V or below and 0.55 V or more, respectively, at least one time. Are the check results OK? YES Go to the relative DTC chart. SST Ω 75 76 77 71 72 73 74 67 68 69 70 85 86 87 88 84 83 82 78 79 80 81 #JY XJ5 ZKO Wire harness side NO Repair or replace the harness or connector. EF–101 YES NO 4 Check of output voltage of oxygen sensor unit 1. Warm up engine completely 2. Disconnect the connector of the oxygen sensor with IG switch OFF 3. Connect a voltmeter to the connector terminal of oxygen sensor 4. Hold the engine racing speed for 3 minutes at 2000 rpm. at this time, ensure that the reading of the volt meter is within the specified value. Specified Value: Does the voltmeter exhibit an output voltage of 0.2 V or more at least one time? Check malfunction that occurs intermittently ently or poor contact. (Refer to page EF–51) V +B HT E1 OX Oxygen sensor Are the check results OK? NO Replace the oxygen sensor. (Bank 1, sensor 2) YES Check or replace the engine ECU. (Refer to page EF–51.) JEF00225-00143 EF–102 DTC P0171/25 System too Lean (Fuel Trim) DTC P0172/26 System too Rich (Fuel Trim) WIRING DIAGRAM IG SW ACC ACC IG1 IG2 ST IG No. 1 IG No. 2 ST 10 A ECU IG Injector R/B #2 13 F/L 60 A EFI ECU #3 15 A EFI 1 #1 #4 23 (E1) Main relay 17 (E2) Front O2 sensor 4 X28 75 (OX1) Fuel pump relay #UK Front O2 sensor heater 6 3 82 (E01) 20 (OXH2) 2 (FC1, W/IMB) 5 30 (FC2, L/IMB) J/C Fuel pump #UK #UJ 7 (+B1) 36 (+B2) X28 #UL Wire harness side JEF00226-00144 CIRCUIT DESCRIPTION The fuel trim means the feedback compensation value that will compensate the basic injection time. The fuel trim comes in two kinds: the short-term fuel trim and the long-term fuel trim. The short-term fuel trim is a short-term fuel compensation to be carried out to maintain the air-to-fuel ratio at the stoichometric air-to-fuel ratio. The signal from the oxygen sensor indicates whether the current air-to-fuel ratio is rich or lean than the stoichometric air-to-fuel ratio. Hence, if the air-to-fuel ratio is rich, the fuel injection amount will be reduced. Conversely, if the air-to-fuel ratio is lean, the fuel injection amount will be increased. The long-term fuel trim is overall fuel compensation over a long period of time in order to compensate a continuos deviation of the short-term fuel trim from the central value, which will be caused by the engine’s inherent characteristics, the wear due to operation over a long period of time and the change in operational environment. If the sum of the short-term fuel trim and long-term fuel trim exceeds a certain value and proves to be lean or rich, the system will detect it as a malfunction, thereby illuminating the MIL lamp. EF–103 DTC No. P0171/25 P0172/26 DTC Detecting condition Trouble area • Air intake (hose loose) • Fuel line pressure • Injector blockage or leakage • Open wire or short in oxygen sensor circuit • Oxygen sensor malfunction • Manifold absolute pressure sensor • Engine coolant temp. sensor • Gas leakage on exhaust system • Purge VSV for EVAP • Engine ECU When the following conditions given below occur while the air-to-fuel feedback after the engine warming-up is being executed: • The air-to-fuel is too lean: (The total fuel trim (the sum of the short-term fuel trim and long-term fuel trim) exceeds the set value.) • The air-to-fuel is too rich: (The total fuel trim is less than the set value.) (2 trip detection logic) NOTE: • If the vehicle has experienced any run out of fuel, the air-to-fuel ratio becomes lean, thus recording the DTC P0171/25. JEF00227-00000 CONFIRMATION ENGINE DRIVING PATTERN e 70 Km/h Idling IG SW OFF w r q Time Warmed up 5 min. or so q With the IG switch turned OFF, connect the DS-21 diagnosis tester to DLC through the SST. Turn ON the IG switch and the main switch of the tester. Set the tester to the “Continuos monitoring results” of the CARB mode. w Start the engine. Keep on warming the engine for more than five minutes until the engine cooling water temperature reaches 90°C or above. e Run the vehicle for more than five minutes at a speed of 70 km/h with the gear selected to the 5th gear or the D range. r After one minute of idling, press the F1 key of the tester. Check to see if the DTC P0171/0172 is detected. CAUTION • If the conditions in this test are not strictly followed, detection of the malfunction will not be possible. • If you do not have DS-21 diagnosis tester, turn the ignition switch OFF after performing steps w to r, then perform steps w to r again. WARNING: • Be sure to conduct the confirmation test, while observing the instructions at page EF–6. JEF00228-00145 EF–104 INSPECTION PROCEDURE NOTE: • Read the freeze frame data, using the DS-21 diagnosis tester or OBD II generic scan tool. Because the freeze frame data records the engine conditions when the malfunction was detected, when troubleshooting the freeze frame data is useful to determine whether the vehicle was running or stopped, the engine warmed up or not, the air-fuel ratio lean or rich, etc. at the time of the malfunction. When using DS-21 diagnosis tester or OBD II generic scan tool: 1 Are other codes (those other than DTC P0171/25 or P0172/26) outputted? YES NO 2 Check of air induction system Go to the relative DTC chart. Check the following items given below: • Check of the engine oil level gauge, oil filler cap and PCV hose for disconnection. • Check of parts of the air induction system between the cylinder head and the throttle body for disconnection, looseness, or cracks. NO YES 3 Check of injector injection Repair or replace the induction system. (Refer to page EF–68.) Are the check results OK? NO YES 4 Check of purge VSV for EVAP Replace the injector. (Go to trouble-shooting of DTC P0443/76.) Are the check results OK? YES 5 Performance check of engine water temperature sensor NO Replace the purge VSV for EVAP (Go to trouble-shooting of DTC P0116/42.) Are the check results OK? YES 6 Check of MAP sensor NO Replace the engine coolant temp. sensor. (Go to trouble-shooting of DTC P0105/31.) Are the check results OK? YES 7 Check of fuel pressure (Refer to page EF–68.) Are the check results OK? NO Replace the MAP sensor. EF–105 YES 8 NO Check and repair fuel pump, fuel pipe line and filter. Check of gas leakage of exhaust system Are the check results OK? YES 9 NO Check of harness between oxygen sensor and ECU Repair or replate. 1. With the IG switch turned OFF, set the SST (sub-harness). (Refer to page EF–8.) However, the SST connectors at the ECU side should remain disconnected. 2. Disconnect the oxygen sensor connector. 3. Referring to page EF–48, check the harness and connector for open wire or short. Are the check results for open wire and short between the connector X28 of the oxygen sensor at the harness side and the SST terminal &5 OK? SST 75 76 77 71 72 73 74 67 68 69 70 88 84 85 86 87 83 82 81 78 79 80 Wire harness side #UK #UJ X28 #UL YES 10 Ω NO Repair or replace the harness or connector. Check of output voltage of oxygen sensor during idling 1. Connect the oxygen sensor and SST connectors, respectively. 2. Connect the DS-21 diagnosis tester to DLC through the SST. SST: 09991-87404-000 3. Warm up the engine at 2500 rpm for about 90 seconds. 4. Turn ON the main switch of the tester to read the output voltage of oxygen sensor during idling. Specified Value: The voltage varies repeatedly between a range from a voltage below 0.3 V and to a voltage above 0.6 V. (See the diagram below.) OK 1 V 0.6 V 0.3 V 0 V NG NG NG EF–106 YES NO 11 Check of output voltage of oxygen sensor unit 1. Warm up engine completely 2. Disconnect the connector of the oxygen sensor with IG switch OFF 3. Connect a voltmeter to the connector terminal of oxygen sensor 4. Hold the engine racing speed for 3 minutes at 2000 rpm. at this time, ensure that the reading of the volt meter is within the specified value. Specified Value: Does the voltmeter exhibit an output voltage of 0.2 V or more at least one time? Go to Step 12. V +B HT E1 OX Oxygen sensor Are the check results OK? NO Replace the oxygen sensor. (Bank 1, sensor 1) YES Check or replace the engine ECU. (Refer to page EF–51.) 12 Perform confirmation driving pattern. 13 Is there DTC P0171/25 or P0172/26 being output again? NO 14 Did vehicle run out of fuel in the past? YES DTC P0171/25 is caused by running out of fuel. YES Check or replace the engine ECU (Refer to page EF–51.) NO Check malfunction that occurs intermittently or poor contact. (Refer to page EF–51.) JEF00229-00146 EF–107 When not using DS-21 diagnosis tester or OBD II generic scan tool: 1 Are other codes (those other than DTC P0171/25 or P0172/26) outputted? NO 2 Check of air induction system YES Go to the relative DTC chart. Check the following items given below: • Check of the engine oil level gauge, oil filler cap and PCV hose for disconnection. • Check of parts of the air induction sys tem between the cylinder head and the throttle body for disconnection, looseness or cracks. YES 3 Check of fuel pressure NO Repair or replace. (Refer to page EF–68.) Are the check results OK? YES 4 Check of injector injection (Refer to page EF–68.) Are the check results OK? NO Check and repair the fuel pump, fuel pipe line and filter. YES 5 Performance check of engine water temperature sensor NO Replace the injector. (Go to trouble-shooting of DTC P0116/42.) Are the check results OK? YES 6 NO Replace the engine coolant temp. sensor Check of MAP sensor (Go to trouble-shooting of DTC P0105/31.) Are the check results OK? YES 7 After installing a satisfactory oxygen sensor (bank 1, sensor 1), perform the confirmation driving pattern. Is the code (DTC P0171/25 or P0172/26) outputted? YES Check or replace the engine ECU (Refer to page EF–51.) NO Replace the MAP sensor. NO Replace the oxygen sensor (bank 1, sensor 1) that was mounted originally on the vehicle. JEF00230-00000 EF–108 DTC P0314/— Single Cylinder Misfire (Cylinder not Specified) DTC P0300/17 Random/Multiple Cylinder Misfire Detected DTC P0301/17 Cylinder 1 Misfire Detected DTC P0302/17 Cylinder 2 Misfire Detected DTC P0303/17 Cylinder 3 Misfire Detected DTC P0304/17 Cylinder 4 Misfire Detected WIRING DIAGRAM ACC IG1 IG2 ST R/B 1 Injector F/L 60 A 15 A EFI 13 EFI ECU #1 #2 Ignitor unit B1 B2 C1 G1 27 (#10) 26 (#20) S1 (IG1) 60 (IG2) 59 #4 (ICMB) 14 24 (#40) #3 Main relay 25 (#30) S2 I/O S3 S4 G2 (IG3) 58 4 (IG4) 57 Fuel pump relay IG coil #1 C2 #2 C3 #3 C4 #4 Spark plug I/C (E01) 82 (E1) 23 6 3 10 A Engine ACC IG No. 1 IG No. 2 ST 10 A ECU IG IG SW 5 7 (+B1) J/C (IE) 43 36 (+B2) Engine earth + Fuel pump – X50 X51 #1 + – X52 X53 + – X54 X55 #2 #3 Fuel injector wire harness side + – X97 X98 #4 JEF00231-00147 EF–109 CIRCUIT DESCRIPTION MISFIRE: • The ignitor unit detects the ion current that flows in proportion to the combustion pressure. This ion current is converted into a voltage, which will be inputted to the ECU. If the voltage value is below a certain value, the ECU evaluate it as a misfire and counts its occurrence numbers. When the misfire rate becomes or exceeds a number that indicates deteriorated engine conditions, this state will cause the malfunction indicator lamp (MIL) to be illuminated. If such a misfire is occurring whose misfire rate is high enough that the driving condition will most likely cause the catalyst to be overheated, the malfunction indicator lamp (MIL) will flash. DTC No. P0314/— P0300/17 P0301/17 P0302/17 P0303/17 P0304/17 DTC Detecting condition Misfiring of random/multiple cylinders is detected during any particular 400 or 2,000 ignitions. For any particular 400 ignitions for engine, misfiring is detected which can cause catalyst overheating (This causes MIL to blink) (2 trip detection logic) For any particular 2,000 ignitions for engine, misfiring is detected which causes a deterioration in emissions (2 trip detection logic) Trouble area • Ignition system (Igniter unit etc.) • Iion system (Igniter unit etc.) • Injector • Fuel pressure • Valve clearance • Valve timing • In Mani abs. pressure sensor • Engine coolant temp. sensor • Open wire or short in engine wire • Connector connection • Compression pressure • Engine ECU NOTE: • When the 2 or more codes for a misfiring cylinder are recorded repeatedly but no random/multiply cylinder misfire code is recorded, it indicates that the misfire were detected and recorded at different times. • When any one or any two or more of P0301 through P0304/17 codes are outputted, the code P0314 is memorized without fail. However, only when the function “Continuos monitoring results” of the CARB mode is used, it is possible to read this code P0314. JEF00232-00000 CONFIRMATION DRIVING PATTERN 1. 2. 3. 4. Connect the DS-21 diagnosis tester or OBD II generic scan tool with IG switch OFF. Record DTC and the freeze frame data with IG switch ON. Erase the DTC. Use the DS-21 diagnosis tester or OBD II generic scan tool to set to “Continuous monitoring results” in CARB mode. 5. Drive the vehicle several times with the engine speed, load and its surrounding range shown with ENGINE RPM. CALC LOAD in the freeze frame data or MISFIRE RPM, MISFIRE LOAD in the data list. If any malfunction is detected, the code P0314 will be outputted. (When F1 key is pressed:) If you have no DS-21 diagnosis tester, turn the ignition switch OFF after the symptom is simulated the first time. Then repeat the simulation process again. NOTE: • In order to memorize DTC of misfire, it is necessary to drive around MISFIRE RPM, MISFIRE LOAD in the data list for the following period of time. Engine speed Time Idling 3 minutes 30 seconds or more 1000 rpm 3 minutes or more 2000 rpm 1 minutes 30 seconds or more 3000 rpm 1 minutes or more EF–110 6. Check whether there is misfire or not by monitoring DTC and the freeze frame data. After that, record them. 7. Turn ignition switch OFF after least 5 seconds. WARNING: • Be sure to conduct the confirmation test, while observing the instructions at page EF–6. JEF00233-00000 INSPECTION PROCEDURE NOTE: • If it is the case that any DTC besides misfire is memorized simultaneously, first perform the troubleshooting for them. • Read the freeze frame data, using the DS-21 diagnosis tester or OBD II generic scan tool. Because the freeze frame data records the engine conditions when the malfunction was detected, when troubleshooting the freeze frame data is useful to determine whether the vehicle was running or stopped, the engine warmed up or not, the air-fuel ratio lean or rich, etc. at the time of the malfunction. • When the vehicle is brought to the workshop and the misfire is not occurred, misfire can be confirmed by reproducing the condition of freeze frame data. Also, after finishing the repair, confirm that there is no misfire. (See the confirmation driving pattern) • When either of SHORT FT, LONG FT in the freeze frame data is besides the range of ±20 %, there is a possibility that the air-fuel ratio is inclining either to RICH (–20 % or less) or LEAN (+20 % or more). • When COOLANT TEMP in the freeze frame data is less than 80°C (176°F), there is a possibility of misfire only during warning up. • In the case that misfire cannot be reproduced, the reason may be because of the driving with lack of fuel, the use of improper fuel, a stain of spark plug, and etc. • If an open wire exists in the ion signal input line between the ignitor unit and the EFI ECU, it may be detected as misfire. 1 Visual check of inside of engine compartment • Check the connecting conditions of the wire harnesses and connectors. • Check the vacuum hoses, purge hoses, fuel hoses and pipes for disconnection and breakage. Are the check results OK? NO YES EFI EFI 82661-97218 AM 60 A 10 A 15 A 15 A HORN-HAZ EFI USE THE DESIGNATED FUSES ONLY. (MGO) [HEAD] [ST] NOTICE A2 STOP 30 A 10 A 15 A BACK UP FUEL PUMP 15 A Relay block (DGEF) 1. Remove the fuel pump relay from the relay block. 2. Remove the IG coils and spark plugs (misfire cylinders) 3. Install the spark plug to the IG coil. Connect the IG coil connector to the IG coil. 4. Ground the spark 5. Crank the engine at this time, check to see if the spark plug sparks. 6. If no spark occurs, conduct the check according to the check procedure for spark plug (at page EF–185). (POWER) 2 Repair or replace, then confirm that there is no misfire. (See confirmation driving pattern) Check of spark plug and spark of misfiring cylinder [DEFG] RAD [MGC] (ABS) (EPS) TAIL HEAD RAD 50 A 30 A 40 A 30 A 30 A EF–111 YES 3 Check of ECU output signal of injector of misfiring cylinder 1. With the IG switch twrned OFF, perform 2. restoration. Set the SST (sub-harness). (Refer to page EF–8.) 3. With the IG switch turned ON, measure the voltage between the SST connector terminal of an injector in which misfire is taking place among the SST connectors @7 through @4 and the body ground. Specified Value: Battery voltage NO Replace the spark plug or check the ignition system and ion system. (Go to trouble-shooting of DTC P1300/36.) CAUTION: • Do not use any spark plugs other than those designated. [Reference] 4. Observation of injector waveform with oscilloscope (reference) Check voltage waveform between the SST connectors @7 through @4 and *2 (E01) while engine is idling. Are the check results OK? When an oscilloscope is used, the injector control signal produces such waveforms, as shown in the diagram below. (The frequency or injection time can not be specified.) YES NO 4 Unit check of injector of misfiring cylinder Go to Step 6. 1. Turn OFF the IG switch. 2. Disconnect the injector connector of the misfiring cylinder. 3. Measure the resistance between the injector terminals. Specified Value: 13.4 to 14.2 Ω at 20°C Ω Are the unit check results OK? Ohmmeter NO YES 5 Check of harness between injector and ECU 1. Disconnect the SST connectors from the EFI ECU (with the IG switch turned OFF). 2. Referring to page EF–48, check the harness and connector for open wire or short. • Connector X51 of #1 injector at harness side - SST connector @7 • Connector X53 of #2 injector at harness side - SST connector @6 • Connector X55 of #3 injector at harness side - SST connector @5 • Connector X98 of #4 injector at harness side - SST connector @4 Are the check results for open wire and short OK? Replace the injector. Ω SST 31 32 33 27 28 29 30 23 24 25 26 42 43 44 38 39 40 41 34 35 36 37 X50 X51 #1 Fuel injector Wire harness side EF–112 NO YES Check malfunction that occurs intermittently or poor contact. (Refer to page EF–51.) 6 Repair or replace the harness or connector. Check of ion system (Go to troubleshooting of DTC P1300/36.) Are the check results OK? NO YES 7 Repair or replace. Check of fuel pressure (Refer to page EF–68.) Are the check results OK? NO YES 8 Check of injector injection (Refer to page EF–68.) Are the check results OK? Check and repair the fuel pump, pressure regulator, fuel pipe line and filter. NO YES 9 Check of manifold absolute pressure sensor Replace injector (Go to trouble-shooting of DTC P0105/31.) Are the check results OK? YES 10 Performance check of engine water temperature sensor NO Replace the manifold absolute pressure sensor (Go to trouble-shooting of DTC P0116/42.) Are the check results OK? YES Check compression pressure, valve clearance and valve timing NO Replace the engine coolant temp. sensor JEF00234-00148 EF–113 DTC Knock Sensor 1 Circuit Malfunction P0325/18 WIRING DIAGRAM EFI ECU (KNK) 53 (E1) 23 #1b J/C XN5 XN5 Knock sensor Wire harness side JEF00235-00149 CIRCUIT DESCRIPTION Knock sensor are fitted to the cylinder block to detect engine knocking. This sensor contains a piezoelectric element which generates a voltage when it becomes deformed, which occurs when the cylinder block vibrates due to knocking. If engine knocking occurs, ignition timing is retarded to suppress it. DTC No. DTC Detecting condition P0325/18 When the signal from the knock sensor exceeds the voltage preset according to the engine revolution speed continuous by for more than a certain length of time while accelerating at a certain engine revolution speed of 2000 rpm or more. Trouble area • Open wire or short in knock sensor circuit • Knock sensor (Looseness) • Engine ECU JEF00236-00000 INSPECTION PROCEDURE NOTE: • Read the freeze frame data, using the DS-21 diagnosis tester or OBD II generic scan tool. Because the freeze frame data records the engine conditions when the malfunction was detected, when troubleshooting the freeze frame data is useful to determine whether the vehicle was running or stopped, the engine warmed up or not, the air-fuel ratio lean or rich, etc. at the time of the malfunction. EF–114 1 Check of continuity of knock sensor circuit 1. Set the SST (sub-harness). (Refer to page EF–8.) However, the SST connector “A” should remain disconnected from the ECU connector. 2. With the IG switch turned OFF, measure the resistance between the SST connector %3 and the body ground. Specified Value: 1 MΩ or higher EFI ECU Wire harness Are the unit check results OK? [Reference] Check by oscilloscope 1. Connect the SST connector “A” to the ECU. 2. Start the engine and keep it idling. 3. Connect the positive : and negative ; probes of an oscilloscope to the SST connector terminals ^4 and @3, respectively. 4. When the waveforms as shown in the right figure are observed, the knock sensor circuit is functioning properly. (The measurement can be conducted using the oscilloscope function of the DS-21 diagnosis tester.) NOTE: • The waveform at the time of racing becomes greater than that at the time of idling. Disconnect the connector A only. Connector A SST 53 54 55 49 50 51 52 45 46 47 48 64 65 66 60 61 62 63 56 57 58 59 + – 31 32 33 27 28 29 30 23 24 25 26 42 43 44 38 39 40 41 37 36 35 34 When an oscilloscope is used, the signal of the knock sensor will become as indicated in the figure above. (The waveform cannot be specified.) YES NO 2 Check of knock sensor Go to Step 3. 1. Disconnect the connector of the knock sensor with ignition switch OFF 2. Remove the knock sensor from the cylinder block. 3. Using an ohmmeter, check the resistance between the terminal and body. Specified Value: 1 MΩ or higher Are the check results OK? Lead wire SST EF–115 YES 3 Check the harness and connector between the engine ECU and the knock sensor for open wire or short. (Refer to page EF–48.) 4 Check the knock sensor for installing condition (e.g. looseness). Are the check results OK? YES YES Check or replace the engine ECU. (Refer to page EF–51.) NO Replace the knock sensor. NO Repair or replace the harness or connector. NO Tighten the knock sensor. JEF00237-00150 EF–116 DTC Crankshaft Position Sensor “A” Circuit Malfunction P0335/13 WIRING DIAGRAM IG switch ACC IG1 IG2 ST EFI ECU ST AM 60 A P.N range switch Starter Engine earth (A/T only) BATT Body earth (E1) 23 (N1+) 21 (N1–) 51 (N2+) 22 (N2–) 52 Starter relay (A/T only) (M/T only) (A/T) (STA) 11 68 J/C XAQ N1+ XAR N66 N74 N1– XAQ XAR Wire harness side Crank angle sensor Cam angle sensor JEF00241-00153 CIRCUIT DESCRIPTION The crankshaft angle sensor (NE signal) consists of a signal rotor and a pickup coil. The NE signal rotor has 34 teeth and is mounted on the crankshaft. The NE sensor generates 34 signals of every engine revolution. The engine ECU detects the standard crankshaft angle based on the N2+ signals, the actual crankshaft angle and the engine speed by the NE signals. DTC No. P0335/13 DTC Detecting condition No crankshaft angle sensor signal to engine ECU during cranking Trouble area • Open wire or short in crankshaft angle sensor circuit • Crankshaft angle sensor • Signal rotor • Starter • Engine ECU JEF00242-00000 INSPECTION PROCEDURE NOTE: • Read the freeze frame data, using the DS-21 diagnosis tester or OBD II generic scan tool. Because the freeze frame data records the engine conditions when the malfunction was detected, when troubleshooting the freeze frame data is useful to determine whether the vehicle was running or stopped, the engine warmed up or not, the air-fuel ratio lean or rich, etc. at the time of the malfunction. EF–117 1 Check of resistance of crank angle sensor circuit EFI ECU Wire harness 1. Set the SST (sub-harness). (Refer to page EF–8.) However, the SST connector “A” should remain disconnected from the ECU connector. 2. With the IG switch turned OFF, measure resistance between the SST terminals @1 - %1 (N1+ - N1–). Specified Value: 1850 to 2450 Ω at 20°C Disconnect the connector A only. SST Connector A Are the check results OK? [Reference] Check by oscilloscope 1. Connect the SST connector “A” to the ECU. 2. Start the engine and keep it idling. 3. Connect the positive : and negative ; probes of an oscilloscope to the SST connector terminals between @1 and @3 and between @2 and @3, respectively. 4. When the waveforms as shown in the right figure are observed, the crank angle sensor circuit is functioning properly. NOTE: • The waveform at the time of racing becomes greater than that at the time of idling. SST 8 9 10 11 4 5 6 7 22 18 19 20 21 17 16 15 12 13 14 1 2 + + – – 3 31 32 33 27 28 29 30 23 24 25 26 42 43 44 38 39 40 41 34 35 36 37 Cam angle sensor Crank angle sensor When an oscilloscope is used, the signal of the cam/crank angle sensor will become as indicated in the figure above. (The waveform cannot be specified.) YES NO 2 Unit check of crank angle sensor 1. Remove the engine under cover RH. 2. While sliding the connector lock, remove the connector. 3. Using an ohmmeter, measure the resistance between the terminals Specified Value: 1850 - 2450 Ω at 20°C Are the check results OK? Go to Step 4. Ω EF–118 NO YES 3 Check the harness and connector between the engine ECU and the crank angle sensor for open wire or short. (Refer to page EF–48.) Are the check results OK? Replace the crank angle sensor. NO YES Check malfunction that occurs intermittently or poor contact. (Refer to page EF–51.) 4 Repair or replace the harness or connector. Check the sensor for installing condition and the signal rotor for tooth condition. (Check for the air gap, sensor for looseness, tooth distortion, adhesion of rust, foreign matter, etc. Refer to Section IG.) Are the check results OK? NO YES 5 Tighten the sensor. Replace the signal rotor. Check of starter signal 1. Connect the SST connector “A” to the ECU. 2. Measure the voltage between the SST connector terminals ^8 and @3 (STA E1) while the engine is being cranked. Specified Value: Battery voltage SST V 31 32 33 27 28 29 30 23 24 25 26 42 43 44 38 39 40 41 34 35 36 37 Are the check results OK? 75 76 77 71 72 73 74 67 68 69 70 86 87 88 82 83 84 85 78 79 80 81 YES Check or replace the ECU. (Refer to page EF–51.) NO Repair or replace the harness or connector (M/T: between engine ECU - IG switch, A/T: between engine ECU - starter). JEF00243-00154 EF–119 DTC Camshaft Position Sensor Circuit Malfunction P0340/14 WIRING DIAGRAM IG switch ACC IG1 IG2 ST EFI ECU ST AM 60 A P.N range switch Starter Engine earth (A/T only) BATT Body earth (E1) 23 (N1+) 21 (N1–) 51 (N2+) 22 (N2–) 52 Starter relay (A/T only) (M/T only) (A/T) (STA) 11 68 J/C XAQ N2+ XAR N66 N74 N2– N66 N74 Cam angle sensor wire harness side Crank angle sensor Cam angle sensor JEF00247-00157 CIRCUIT DESCRIPTION The camshaft angle sensor (N2+ signal) consists of a signal rotor and a pickup coil. The N2+ signal rotor has three timing pins on its outer disk surface and is integrated with the intake camshaft. The detection of the actual camshaft position and the discrimination of cylinders are carried out by these three timing pins (360-180-180° CA). DTC No. P0340/14 DTC Detecting condition No camshaft angle sensor signal to engine ECU during cranking Open in N2 circuit Trouble area • Open wire or short in camshaft angle sensor circuit • Camshaft angle sensor • Starter • Engine ECU JEF00248-00000 INSPECTION PROCEDURE NOTE: • Read the freeze frame data, using the DS-21 diagnosis tester or OBD II generic scan tool. Because the freeze frame data records the engine conditions when the malfunction was detected, when troubleshooting the freeze frame data is useful to determine whether the vehicle was running or stopped, the engine warmed up or not, the air-fuel ratio lean or rich, etc. at the time of the malfunction. EF–120 1 Check of resistance of cam angle sensor circuit EFI ECU Wire harness 1. Set the SST (sub-harness). (Refer to page EF–8.) However, the SST connector “A” should remain disconnected from the ECU connector. 2. With the IG switch turned OFF, measure resistance between the SST terminals @2 - %2 (N2+ - N2–). Specified Value: 1850 to 2450 Ω Disconnect the connector A only. SST Connector A Are the check results OK? [Reference] Check by oscilloscope 1. Connect the SST connector “A” to the ECU. 2. Start the engine and keep it idling. 3. Connect the positive : and negative ; probes of an oscilloscope to the SST connector terminals between @2 and @3 and between @1 and @3, respectively. 4. When the waveforms as shown in the right figure are observed, the cam angle sensor circuit is functioning properly. NOTE: • The waveform at the time of racing becomes greater than that at the time of idling. 11 7 8 9 10 20 21 22 16 17 18 19 12 13 14 15 1 2 3 4 5 6 + + – – 31 32 33 27 28 29 30 23 24 25 26 42 43 44 38 39 40 41 37 36 35 34 Cam angle sensor Crank angle sensor When an oscilloscope is used, the signal of the cam/crank angle sensor will become as indicated in the figure above. (The waveform cannot be specified.) YES NO 2 Unit check of cam angle sensor 1. Remove the air intake chamber. 2. Dis connect the camshaft angle sensor connector. 3. Using an ohmmeter, measure the resistance between the terminals Specified Value: 1850 - 2450 Ω at 20°C Are the check results OK? Go to Step 4. Ω EF–121 NO YES 3 Check the harness and connector between the engine ECU and the cam angle sensor for open wire or short. (Refer to page EF–48.) Are the check results OK? Replace the cam angle sensor. Ω SST 53 54 55 49 50 51 52 45 46 47 48 64 65 66 60 61 62 63 56 57 58 59 N66 N74 Wire harness side YES Check malfunction that occurs intermittently or poor contact. (Refer to page EF–51.) NO 4 Check the sensor for installing condition and the timing rotor pins for condition. (Check for the air gap, sensor for looseness, pin distortion, adhesion of rust, foreign matter, etc. Refer to Section EM.) Are the check results OK? 5 Check of starter signal Repair or replace the harness or connector. YES NO Tighten the sensor. Repair the timing rotor pins. 1. Connect the SST connector “A” to the ECU connector. 2. Measure the voltage between the SST connector terminals ^8 and @3 (STA E1) while the engine is being cranked. Specified Value: Battery voltage SST V 31 32 33 27 28 29 30 23 24 25 26 44 40 41 42 43 39 38 37 34 35 36 Are the check results OK? 75 76 77 71 72 73 74 67 68 69 70 85 86 87 88 84 83 82 78 79 80 81 YES Check or replace the ECU. (Refer to page EF–51.) NO Repair or replace the harness or connector (M/T: between engine ECU - IG switch, A/T: between engine ECU - starter). JEF00249-00158 EF–122 DTC P0420/27 Catalyst System Efficiency Below Threshold WIRING DIAGRAM IG SW ACC ACC IG1 IG2 ST 10 A ECU IG IG No. 1 IG No. 2 ST R/B 13 Front O2 sensor X28 #UL F/L 60 A 15 A EFI 1 EFI ECU 23 (E1) #UJ Front O2 sensor heater Rear O2 sensor XJ5 ZK0 Main relay 4 #JZ Fuel pump relay #JY 75 (OX1) 20 (OXH1) 74 (OX2) 50 (OXH2) Rear O2 sensor heater 17 (E2) 2 (FC1, W/IMB) 6 5 3 #UK 30 (FC2, L/IMB) J/C Fuel pump #UK #UJ #JY #JZ X28 #UL XJ5 ZK0 7 (+B1) 36 (+B2) Front Rear Wire harness side JEF00250-00159 CIRCUIT DESCRIPTION The ECU monitors the concentration of oxygen in the exhaust gas that is flowing through the three-way catalytic converter, using the rear oxygen sensor. When the catalyst is functioning properly, the varying cycle of the output voltage of the rear oxygen sensor is slower than that of the output voltage of the front oxygen sensor. However, if both the output waveforms of the front and rear sensors are varying at the same rate, it indicates that the catalyst performance has deteriorated. DTC No. DTC Detecting condition P0420/27 When both the waveforms of the front and rear oxygen sensors indicate the same frequency when the vehicle is running at a predetermined speed with the engine revolutional speed within a predetermined range: (2 trip detection logic) Trouble area • Three-way catalyst • Open wire or short in oxygen sensor circuit • Oxygen sensor JEF00251-00000 EF–123 CONFIRMATION DRIVING PATTERN Vehicle speed e 50 km/h Idling IG SW OFF w r q Time Warmed up 5 min. or so q With the IG switch turned OFF, connect the DS-21 diagnosis tester to DLC through the SST. Turn on the IG switch and the main switch of the tester. Set the tester to the “continuous monitoring results” of the CARB mode. w Start the engine. With all switch turned OFF, keep on warming the engine until the engine coolant temperature reaches 90°C or above. e Run at a constant speed of 50 km/h for about five minutes (in the 4th gear in the case of manual transmission vehicles; in Î range in the case of automatic transmission vehicles). r After one minute of idling, press the F1 key of the tester. Check to see if the DTC P0420 in out putted. JEF00252-00160 CAUTION • If the conditions in this test are not strictly followed, detection of the malfunction will not be possible. • If you do not have DS-21 diagnosis tester, turn the ignition switch OFF after performing steps w to r, then perform steps w to r again. WARNING: • Be sure to conduct the confirmation test, while observing the instructions at page EF–6. JEF00253-00161 INSPECTION PROCEDURE NOTE: • Read the freeze frame data, using the DS-21 diagnosis tester or OBD II generic scan tool. Because the freeze frame data records the engine conditions when the malfunction was detected, when troubleshooting the freeze frame data is useful to determine whether the vehicle was running or stopped, the engine warmed up or not, the air-fuel ratio lean or rich, etc. at the time of the malfunction. EF–124 1 Are other codes (those other than DTC P0420/27) outputted? YES NO 2 Check of front oxygen sensor (bank 1, sensor 1) Go to the relative DTC chart. (Go to trouble-shooting of DTC P0130/21.) Are the unit check results OK? NO YES 3 Check of rear oxygen sensor (bank 1, sensor 2) Repair or replace. (Go to trouble-shooting of DTC P0136/22.) Are the unit check results OK? NO YES 4 Perform the confirmation driving pattern. 5 Is DTC P0420/27 being outputted again? YES Replace the three-way catalytic converter. Repair or replace. NO Check malfunction that occurs intermittently or poor contact. (Refer to page EF–51.) JEF00254-00000 EF–125 DTC Evaporative Emission Control System Purge Control Valve Circuit Malfunction P0443/76 WIRING DIAGRAM IG SW ACC ACC IG1 IG2 ST IG No. 1 IG No. 2 ST 10 A ECU IG Injector R/B F/L 60 A EFI ECU #2 13 #3 15 A EFI 1 #1 #4 (E01) 82 Main relay #7M #7N 4 79 (PRG) 6 2 (FC1, W/IMB) Fuel pump relay 3 5 30 (FC2, L/IMB) J/C Fuel pump + – 7 (+B1) 36 (+B2) #7M #7N Wire harness side JEF00255-00162 CIRCUIT DESCRIPTION When the execution conditions for the evaporative emission purging are met, the ECU performs the duty control for the VSV for evaporative emission purging and purges the evaporative emissions into the combustion chamber. Throttle body ECU VSV for EVAP Atmosphere Combustion chamber Charcoal canister Fuel tank JEF00256-00163 DTC No. P0443/76 DTC Detecting condition When open wire or short takes place in VSV circuit for EVAP while the execution conditions for the evaporative emission purging are being met: (2 trip detection logic) Trouble area • Open wire or short in VSV circuit for EVAP • VSV for EVAP • Engine ECU EF–126 INSPECTION PROCEDURE NOTE: • Read the freeze frame data, using the DS-21 diagnosis tester or OBD II generic scan tool. Because the freeze frame data records the engine conditions when the malfunction was detected, when troubleshooting the freeze frame data is useful to determine whether the vehicle was running or stopped, the engine warmed up or not, the air-fuel ratio lean or rich, etc. at the time of the malfunction. When using DS-21 diagnosis tester: 1 Operation check of EVAP purge control system 1. With the IG switch turned OFF, connect the DS-21 diagnosis tester to the DLC through the SST. SST: 09991-87404-000 SST 2. Disconnect the hose going to the VSV from the charcoal canister. 3. Turn ON the IG switch, and turn ON the main switch of the tester. Erase the DTC. Select the “Purge VSV” of the “Actuator driving.” 4. When executing “ON” and “OFF”, check the operation of the VSV for purging. VSV “OFF” ... No air continuity should exist when air is blown into the hose. VSV “ON” .... Air continuity should exist when air is blown into the hose. Are the check results OK? Atmospheric port Tank side Blow air YES NO 2 Check of purge hose and passage 1. Execute the VSV “Release” so as to return the VSV for purging to the original operating state. 2. Start the engine and keep the engine racing. 3. Disconnect the hose going from the VSV for purging to the intake manifold. 4. Apply your finger to the disconnected hose. Ensure that a negative pressure is applied. Specification: Negative pressure should be applied. 5. Check the hose for connecting state, leakage, restriction, bending and deterioration. Are the check results OK? Purging side Check malfunction that occurs intermittently and poor contact. (Refer to page EF–51.) VSV for EVAP Purge hose Throttle body Charcoal canister Purge hose EF–127 NO YES 3 Check of power supply voltage of VSV for purging 1. Turn OFF the main switch of the tester. Turn OFF the IG switch. 2. Disconnect the VSV connector. 3. With the IG switch turned ON, measure the voltage between the harness side connector #7M of VSV and the body earth. Specified Value: Battery voltage Clean, repair or replace. V #7M #7N Wire harness side Are the check results OK? NO YES 4 Check of harness between ECU and VSV for purging 1. With the IG switch turned OFF, connect the SST (sub-harness). (Refer to page EF–8.) Do not connect the SST connector to the ECU. 2. Referring to page EF–48, check the harness and connector for open wire or short. Connector #7N at VSV harness side connector &9 at ECU side (PRG) Are the check results for open wire and short OK? Check the harness and connector between the VSV for purging and the battery, and the main relay for open wire or short. Repair or replace, as required. (Refer to page EF–48.) SST Ω 75 76 77 71 72 73 74 67 68 69 70 86 87 88 82 83 84 85 81 80 79 78 #7M #7N YES 5 Unit check of VSV for purging (Refer to page EF–184.) Are the unit check results OK? Wire harness side NO Repair or replace the harness or connector. EF–128 NO YES 6 Check of ECU output signal 1. Connect the connector to VSV for purging. Connect the SST connector to the EFI ECU. Connect the hoses that have been disconnected to the original places. 2. When the engine is cold, with the engine idling, measure the voltage between the SST connector &9 and *2 (PRG - E01). Specified Value: Battery voltage Replace the VSV for purging. V SST 75 76 77 71 72 73 74 67 68 69 70 87 88 83 84 85 86 82 81 80 78 79 3. After warming up the engine (after the radiator fan has operated at least one time), measure the voltage between the SST connectors &9 and *2 (PRG - E01) for more than two minutes with the accelerator pedal depressed. Specified Value: The voltage should become 0 to 1 V within the two minutes. Are the check results OK? NO YES Check malfunction that occurs intermittently and poor contact. (Refer to page EF–51.) Check or replace the ECU. (Refer to page EF–51.) JEF00258-00164 When not using DS-21 diagnosis tester: 1 Check of ECU output signal V 1. Set the SST (sub-harness). (Refer to page EF–8.) 2. When the engine is cold, with the engine idling, measure the voltage between the SST connectors &9 and *2 (PRG - E01). Specified Value: Battery voltage 3. After warming up the engine (after the radiator fan has operated at least one time), measure the voltage between the SST connectors &9 and *2 (PRG - E01) for more than two minutes with the accelerator pedal depressed. Specified Value: The voltage should become 0 to 1 V within the two minutes. Are the check results OK? SST 75 76 77 71 72 73 74 67 68 69 70 86 87 88 82 83 84 85 78 79 80 81 EF–129 NO YES 2 Check of power supply voltage of VSV for purging 1. Turn OFF the IG switch. 2. Disconnect the VSV connector. 3. With the IG switch turned ON, measure the voltage between the harness side connector #7M of VSV and the body earth. Specified Value: Battery voltage Check or replace the engine ECU. (Refer to page EF–51.) V #7M #7N Wire harness side Are the check results OK? NO YES 3 Check of harness between ECU and VSV for purging 1. With the IG switch turned OFF, connect the SST (sub-harness). (Refer to page EF–8.) Do not connect the SST connector to the ECU. 2. Referring to page EF–48, check the harness and connector for open wire or short. Connector #7N at VSV harness side connector &9 (PRG) at ECU side Are the check results for open wire and short OK? Check the harness and connector between the VSV for purging and the battery, and the main relay for open wire and short. Repair or replace, as required. (Refer to page EF–48.) SST Ω 75 76 77 71 72 73 74 67 68 69 70 86 87 88 82 83 84 85 81 80 79 78 #7M #7N YES 4 Unit check of VSV for purging Wire harness side NO Repair or replace the harness or connector. (Refer to page EF–184.) Are the unit check results OK? YES Check malfunction that occurs intermittently and poor contact. (Refer to page EF–51.) NO Replace the VSV for purging. JEF00258-00165 EF–130 DTC P0500/52 Vehicle Speed Sensor Malfunction WIRING DIAGRAM EFI ECU (E2) 17 (SPD) 37 J/C X03 (B11) Combination meter S Vehicle speed sensor N N S Speedometer cable Z83 (B10) J/C C21 F19 X03 Z83 H20 H22 H61 T37 WB0 H05 X01 Wire harness side JEF00338-00233 CIRCUIT DESCRIPTION This sensor is mounted in the combination meter. It contains a magnet which is rotated by the speedometer cable. The reed switch is turned ON and OFF four times for every revolution of the speedometer. It is then transmitted to the ECU. The ECU determines the vehicle speed based on the frequency of these pulse signals. 4-pulse ECU Transaxle Cable Combination meter JEF00339-00234 DTC No. P0500/52 DTC Detecting condition No signal is inputted from the speed sensor to the ECU for a certain length of time when the fuel cut operation is performed during deceleration. (2 trip detection logic) Trouble area • Combination meter • Open wire or short in vehicle speed sensor circuit • Vehicle speed sensor • Engine ECU EF–131 1 Operation check of speedometer 1. Run the vehicle. Does the speedometer indicate the vehicle speed correctly? NOTE: • If the speedometer indication is normal, the speedometer system is functioning normally. NO YES 2 Check of input signal of speed sensor to ECU 1. Set the SST (sub-harness) (Refer to page EF–8.) 2. Check that the voltage between the SST terminals #7 and !7 is within the following specified value when the vehicle is moving with the ignition switch turned ON. Specified Value: 0 ↔ 4.5 to 5.5 V for pulse signal Check the speedometer circuit and combination meter (including speedometer gear & meter cable) SST V 11 7 8 9 10 3 4 5 6 21 22 17 18 19 20 16 15 14 12 13 1 2 31 32 33 27 28 29 30 23 24 25 26 44 40 41 42 43 39 38 37 34 35 36 NO 3 Check of speed sensor (reed switch) 1. Turn OFF the IG switch. 2. Remove the combination meter. 3. Ensure that continuity occurs four times at the terminals B10 and B11 of the combination meter while the speedometer drive shaft completes a turn. Specification: Continuity should occur four times per turn of speedometer drive shaft. YES 4 Check for open and short in harness and connector between the engine ECU and vehicle speed sensor. (Refer to page EF–48.) YES Check malfunction that occurs intermittently and poor contact. (Refer to page EF–51.) YES Check or replace the engine ECU. (Refer to page EF–51.) Speedometer drive shaft B10 B11 NO Replace the speed sensor (combination meter). NO Repair or replace the harness or connector. JEF00340-00235 EF–132 DTC P0500/52 Vehicle Speed Sensor Malfunction WIRING DIAGRAM EFI ECU (E2) 17 (SPD) 37 J/C X03 (SPSR) Combination meter A/T ECU or H83 ABS ECU or Vehicle speed sensor Z83 (E) J/C H82 C21 G06 O20 H05 H80 X01 Z83 H61 H83 X03 N58 H22 H20 H56 F19 A10 Z08 Wire harness side JEF00259-00166 CIRCUIT DESCRIPTION A vehicle speed sensor driven by a microcomputer is used. Signals driven by the microcomputer in the combination meter are inputted into the EFI ECU, based on the signals from the A/T ECU in the case of automatic transmission vehicles; from ABS ECU in the case of ABS-equipped vehicles; from the vehicle speed sensor mounted on the transaxle in the case of other vehicles. The EFI ECU determines the vehicle speed based on the frequency of these pulse signals. A/T ECU 4-pulse ECU or ABS ECU or Transaxle Combination meter Vehicle speed sensor JEF00260-00167 DTC No. P0500/52 DTC Detecting condition No signal from the speed sensor is inputted into the ECU for a certain length of time during the fuel cut operation at time of deceleration. (2 trip detection logic) Trouble area • Combination meter • Open wire or short in signal line from A/T ECU or ABS ECU • Vehicle speed sensor • Engine ECU or A/T ECU or ABS ECU EF–133 1 Operation check of speedometer 1. Run the vehicle. Does the speedometer indicate the vehicle speed properly? NOTE: • If the speedometer indication is normal, the speedometer system is functioning properly. NO YES 2 Check of input signal to EFI ECU 1. Set the SST (sub-harness) (Refer to page EF–8.) 2. Check that the voltage between the SST terminals #7 and !7 is within the following specified value when the vehicle moves and the ignition switch is turned to the ON position. Specified Value: 0 ↔ 4.5 to 5.5 V for pulse signal Check of A/T ECU, ABS ECU or vehicle speed sensor circuit, and combination meter (Refer to sections A/T, BE and BR.) SST V 11 7 8 9 10 3 4 5 6 21 22 17 18 19 20 16 15 14 12 13 1 2 31 32 33 27 28 29 30 23 24 25 26 44 40 41 42 43 39 38 37 34 35 36 YES NO 3 Check of harness between EFI ECU and combination meter 1. Turn OFF the IG switch. Disconnect the SST connector at the ECU side. 2. Remove the combination meter. 3. Disconnect the harness from the combination meter. 4. Referring to page EF–48, check the harness and connector for open wire or short. • SST connector #7 - Harness side connector X03 of combination meter • Harness side connector Z83 of combination meter - Body ground Are the check results for open wire and short OK? YES Replace the combination meter. Check or replace the engine ECU. (Refer to page EF–51.) SST Ω 31 32 33 27 28 29 30 23 24 25 26 44 40 41 42 43 39 38 37 34 35 36 H82 C21 G06 O20 H05 H80 X01 Z83 H61 H83 X03 N58 H22 H20 H56 F19 A10 Z08 NO Repair or replace the harness or connector. JEF00261-00168 EF–134 DTC P0505/71 Idle Control System Malfunction WIRING DIAGRAM ACC IG1 IG2 ST Starter relay coil R/B P F/L 60 A Wire harness side N Main relay 2 (PST) 78 L (ACSW) 38 4 Neutral start SW Fuel pump relay To radiator fun relay (RFAN) 13 D 6 3 XU1 XU3 XU2 EFI ECU 11 (A/T) (E01) 82 13 15 A EFI 1 J/C 10 A GAUGE BACK ACC IG No. 1 IG No. 2 ST 10 A ECU IG IG SW 5 Meter To P/S oil pressure SW To A/C SW To heater blower SW (BLW) 39 (DEF) 2 10 (W/IMB.) (H/L) 71 30 (L/IMB.) (ISC) 54 To defogger SW To tail lamp SW XU1 7 J/C 36 XU2 (E1) 23 XU3 ISC Valve J/C Fuel pump JEF00262-00169 CIRCUIT DESCRIPTION The rotary solenoid type ISC valve is located in front of the intake manifold and the intake air bypassing the throttle valve is directed to the ISC valve through a passage. In this way the intake air volume bypassing the throttle valve is regulated, controlling the engine speed. The engine ECU operates only the ISC valve to perform idleup and provide feedback for the target idling speed. From air cleaner To intakemanifold Auxiliary air port Magnet Valve Coil JEF00263-00170 DTC No. P0505/71 DTC Detecting condition Open wire or short in ISC valve circuit Trouble area • Open wire or short in ISC valve circuit • ISC valve • Engine ECU EF–135 INSPECTION PROCEDURE NOTE: • Read the freeze frame data, using the DS-21 diagnosis tester. Because the freeze frame data records the engine conditions when the malfunction was detected, when troubleshooting the freeze frame data is useful to determine whether the vehicle was running or stopped, the engine warmed up or not, the air-fuel ratio lean or rich, etc. at the time of the malfunction. When using DS-21 diagnosis tester: 1 Operation check of ISC valve 1. With the IG switch turned OFF, connect the DS-21 diagnosis tester to the DLC through the SST. SST: 09991-87404-000 SST 2. Warm up the engine fully. 3. Turn ON the main switch of the DS-21 diagnosis tester. 4. With the engine idling, select the “ISC” in the “Actuator driving.” Execute the “5 % open” and “50 % open”, respectively. Does the engine speed increase or decrease in accordance with the change in the ISC duty ratio (5 %, 50 %)? YES NO 2 Check of power supply voltage of ISC valve 1. Turn OFF the main switch of the tester. Turn OFF the IG switch. 2. Disconnect the connector of the ISC valve. 3. Measure the voltage between the terminals XU3 of the wire harness connector and the body ground when the ignition switch is turned to the ON position. Specified Value: Battery voltage Is the measured value the specified value? Check malfunction that occurs intermittently and poor contact. (Refer to page EF–51.) Wire harness side XU1 XU3 XU2 V EF–136 NO YES 3 Check of input signal of ISC valve 1. After warming up the engine fully, turn ON the main switch of the DS-21 diagnosis tester. 2. With the engine idling, select the “ISC” in the “Actuator driving.” Execute the “5 % open” and “50 % open”, respectively. Measure the voltage between XU1 and XU2. Does the voltage increase or decrease in accordance with the change in the ISC duty ratio (5 %, 50 %)? Check the harness and connector between the ISC valve and the battery, and main relay for open wire and short. (Refer to page EF–48.) V XU1 XU3 XU2 Wire harness side [Reference] Check by oscilloscope Duty ratio: 5 % Duty ratio: 50 % When an oscilloscope is used, the ISC control signal becomes the waveform as indicated in the figure above. YES NO 4 Check of output signal of ISC valve of ECU 1. Turn OFF the main switch of the tester. Turn OFF the IG switch. 2. Connect the SST between the ECU connectors and the wire harness connectors. SST: 09842-97203-000 3. Warm up the engine. With the engine idling, select the “ISC” in the “Actuator driving.” Execute the “5 % open” and “50 % open”, respectively. Measure the voltage between the SST terminals %4 and @3 (ISC - E1). Does the voltage increase or decrease in accordance with the change in the ISC duty ratio (5 %, 50 %)? Replace the ISC valve. SST V 31 32 33 27 28 29 30 23 24 25 26 44 40 41 42 43 39 38 37 34 35 36 53 54 55 49 50 51 52 45 46 47 48 63 64 65 66 62 61 60 56 57 58 59 EF–137 NO YES 5 Check of harness between ISC valve and ECU 1. Turn OFF the main switch of the tester. Turn OFF the IG switch. 2. Disconnect the SST connector at the ECU side. 3. Referring to page EF–48, check the harness and connector for open wire or short. • ISC valve connector XU1 - SST terminal %4 (ISC) • ISC valve connector XU2 - SST terminal @3 (E1) Are the check results for open wire and short OK? Check or replace the engine ECU. (Refer to page EF–51.) Ω SST 31 32 33 27 28 29 30 23 24 25 26 43 44 39 40 41 42 38 37 36 34 35 XU1 XU3 XU2 NO YES Check malfunction that occurs intermittently and poor contact. (Refer to page EF–51.) Wire harness side Repair or replace the harness or connector. JEF00264-00171 When not using DS-21 diagnosis tester: 1 Operation check of ISC valve Ensure that the engine revolution speed is high during the cold period. Also, ensure that the engine revolution speed drops as the engine warms up and that the idle speed is maintained. Are the check results OK? Tachometer terminal Earth EF–138 YES NO 2 Check of power supply voltage of ISC valve 1. Turn OFF the IG switch. 2. Disconnect the connector of the ISC valve. 3. Measure the voltage between the terminals XU3 of the wire harness connector and the body ground when the ignition switch is turned to the ON position. Specified Value: Battery voltage Check malfunction that occurs intermittently and poor contact. (Refer to page EF–51.) Wire harness side V XU1 XU3 XU2 Is the measured value the specified value? NO YES 3 Check of input signal of ISC valve 1. Warming up the engine fully. 2. With the engine idling (with the ISC valve connector disconnected), measure the voltage between XU1 and XU2 at the harness connector side. Specification: The voltage should be stable at a constant value. (The value of the voltage can not be specified.) Check the harness and connector between the ISC valve and the battery, and main relay for open wire and short. (Refer to page EF–48.) V XU1 XU3 XU2 Wire harness side [Reference] Check by oscilloscope Idling condition (Electrical load “OFF”) (Electrical load “ON”) When an oscilloscope is used, the ISC control signal becomes the waveform as indicated in the figure above. (The duty ratio cannot be specified.) EF–139 YES NO 4 Check of output signal of ISC valve of ECU 1. Turn OFF the IG switch. 2. Connect the SST between the ECU connectors and the wire harness connectors. SST: 09842-97203-000 3. Warm up the engine. With the engine idling (with the ISC valve connector disconnected), measure the voltage between the SST terminals %4 and @3 (ISC E1). Specification: The voltage should be stable at a constant value. (The value of the voltage can not be specified.) Replace the ISC valve. SST V 31 32 33 27 28 29 30 23 24 25 26 44 40 41 42 43 39 38 37 34 35 36 53 54 55 49 50 51 52 45 46 47 48 63 64 65 66 62 61 60 56 57 58 59 Are the check results OK? NO YES 5 Check of harness between ISC valve and ECU 1. Turn OFF the IG switch. 2. Disconnect the SST connector at the ECU side. 3. Referring to page EF–63, check the harness and connector for open wire or short. • ISC valve connector XU1 - SST terminal %4 (ISC) • ISC valve connector XU2 - SST terminal @3 (E1) Are the check results for open wire and short OK? YES Check malfunction that occurs intermittently and poor contact. (Refer to page EF–51.) Check or replace the engine ECU. (Refer to page EF–51.) Ω SST 31 32 33 27 28 29 30 23 24 25 26 41 42 43 44 40 39 38 34 35 36 37 XU1 XU3 XU2 Wire harness side NO Repair or replace the harness or connector. JEF00265-00172 EF–140 DTC P1105/32 Barometric Pressure Sensor Circuit Malfunction WIRING DIAGRAM/CIRCUIT DESCRIPTION An atmospheric sensor of the same construction as that of the MAP sensor is mounted in the ECU. Therefore, the wiring diagram for the atmospheric sensor is omitted here. DTC No. DTC Detecting condition P1105/32 When the following conditions 1 and 2 are met for a certain length of time: 1. The AD conversion value of atmospheric sensor is less than 1.6 V. 2. The AD conversion value of atmospheric sensor is 4.7 V or more. Trouble area • Engine ECU JEF00266-00000 INSPECTION PROCEDURE NOTE: • Read the freeze frame data, using the DS-21 diagnosis tester or OBD II generic scan tool. Because the freeze frame data records the engine conditions when the malfunction was detected, when troubleshooting the freeze frame data is useful to determine whether the vehicle was running or stopped, the engine warmed up or not, the air-fuel ratio lean or rich, etc. at the time of the malfunction. When using DS-21 diagnosis tester: 1 Re-confirmation of DTC 1. With the IG switch turned OFF, connect the DS-21 diagnosis tester to the DLC through the SST. SST: 09991-87404-000 SST 2. Turn ON the IG switch, and turn ON the main switch of the tester. Erase the DTC. (As for the operation, follow the instruction manual of the DS-21 diagnosis tester.) 3. Turn OFF the main switch of the tester. Turn OFF the IG switch. 4. Turn ON the IG switch. Turn ON the main switch of the tester. 5. Check the DTC. Is P1105 indicated? YES Replace the ECU. NO Check or replace the ECU. (Refer to page EF–51.) JEF00267-00173 EF–141 When not using DS-21 diagnosis tester: 1 Re-confirmation of DTC 1. With the IG switch turned OFF, connect the DS-21 diagnosis tester to the DLC through the SST. SST: 09991-87404-000 2. Connect the terminal T and the earth terminal of the SST connector with a jump wire. SST: 09991-87403-000 3. Remove the EFI fuse. Erase the DTC. (As for the erasing method, refer to page EF–58.) 4. Set the EFI fuse to the original position. 5. Turn ON the IG switch. 6. Check the DTC. (Read out the flashing pattern of the MIL.) Is “32” indicated? YES Replace the ECU. SST (2) Test SST (1) Earth NO Check or replace the ECU. (Refer to page EF–51.) JEF00268-00174 EF–142 DTC P1130/29 A/F Adjuster Circuit Malfunction WIRING DIAGRAM EFI ECU (VCO) (OX3) (E21) 62 73 29 #YS #YT R #YU L (ACEV) 72 VCC E2 #YS #YU #YT VAF Wire harness side JEF00341-00236 CIRCUIT DESCRIPTION The variable resistor is mounted at the left side of the engine compartment at the body side. This is a variable resister to adjust the air-to-fuel ratio while the engine is idling (after the engine has warmed up). The idle CO value is adjusted to the specified value by rotating the rotor. The letters “R” and “L” are embossed at the root of the connector. Higher Output voltage Lower Rotor rotating range (Lean side) L R (Rich side) JEF00342-00237 DTC No. P1130/29 DTC Detecting condition Trouble area Condition (1) or (2) continues with more than a certain length of time • Open wire or short in A/F adjuster circuit 1. OX3 < 0.2 V • A/F adjuster 2. OX3 > 4.8 V • Engine ECU EF–143 INSPECTION PROCEDURE NOTE: • If DTC P1530/44 (A/C Evaporator Temp. Sensor Malfunction), P1130/29 (A/F Adjuster Circuit Malfunction) are output simultaneously, E21 (Sensor Ground) may be open. • Read freeze frame data using DS-21 diagnosis tester or OBD ΙΙ generic scan tool. Because freeze frame data records the engine condition when the malfunction is detected, when troubleshooting it is useful for determining whether the vehicle was running or stopped, the engine warmed up or not, the air-fuel ratio lean or rich, etc. at the time of the malfunction. 1 Check of input voltage of A/F adjuster to ECU 1) Set the SST (sub-harness). (Refer to page EF–8.) 2) Turn ON the IG switch. 3) Turn the rotor clockwise and counterclockwise. Check to see if the voltage measured between the SST connectors &3 and @9 (OX3 - E21) varies. Specified Value: 0.2 V or more, but less than 4.8 V SST @9 V 31 32 33 27 28 29 30 23 24 25 26 42 43 44 38 39 40 41 37 36 35 34 75 76 77 71 72 73 74 67 68 69 70 88 84 85 86 87 83 82 81 78 79 80 &3 Are the check results OK? YES NO 2 Check of harness between EFI ECU and ignitor unit 1) Ensure that the voltage between the SST terminals ^2 (VCO) and @9 (E21) is within the specified value when the ignition switch is turned to the ON position. Specified value: 4.5 - 5.5 V Are the check results OK? Check malfunction that occurs intermittently or poor contact. (Refer to page EF–51.) SST @9 V 31 32 33 27 28 29 30 23 24 25 26 43 44 39 40 41 42 38 37 36 34 35 ^2 53 54 55 49 50 51 52 45 46 47 48 64 65 66 60 61 62 63 56 57 58 59 JEF00343-00238 EF–144 NO YES 3 Unit check of A/F adjuster 1) Turn off the ignition switch. 2) Disconnect the connector of the A/F adjuster. 3) Check the resistance between the terminals below. Specified Value: Terminal Resistance kΩ #YS - #YU 5 ± 1.5 (25°C) #YT - #YU The resistance should increase in proportion to the turning of the rotor in a direction from L to R. Check and replacement of ECU page EF–51.) #YT NO YES 4 Check of harness between A/F adjuster and ECU 1) Turn OFF the IG switch. 2) Disconnect the SST terminals from the EFI ECU. 3) Referring to page EF-48, check the harness and connector for open wire or short, as follows: • Connector of A/F adjuster #YS at harness side - SST connector ^2 • Connector of A/F adjuster #YT at harness side - SST connector &3 • Connector of A/F adjuster #YU at harness side - SST connector @2 Are the check results for open wire and short OK? YES Check malfunction that occurs intermittently or poor contact. (Refer to page EF–51.) #YS #YU Ω (Refer to Replace the A/F adjuster. SST Ω ^2 53 54 55 49 50 51 52 45 46 47 48 65 66 61 62 63 64 60 59 58 56 57 #YS #YU #YT NO Repair or replace the harness or connector. JEF00344-00239 EF–145 DTC Ion System Malfunction P1300/36 WIRING DIAGRAM ACC IG1 IG2 ST R/B 1 EFI ECU IG COIL B1 G1 S1 F/L 60 A 15 A EFI 13 10 A ENGINE ACC IG No. 1 IG No. 2 ST 10 A ECU IG IG SW (IG1) 60 (IG2) 59 (ICMB) 14 Main relay I/O S3 S4 G2 (IG3) 58 4 (IG4) 57 Fuel pump relay N80 N07 N05 #1 C2 N81 N54 N53 #2 C3 N82 N85 N84 #3 C4 N85 N84 N83 #4 Spark plug I/C (E01) 82 (E1) 23 6 3 S2 B2 C1 5 7 (+B1) J/C Fuel pump 36 (+B2) 43 (IE) To injector #4 #3 #2 #1 N85 N84 N83 N82 N85 N84 N81 N54 N53 N80 N07 N05 IG COIL wire harness side B1 G1 S1 S2 I/O S3 S4 G2 Igniter unit wire harness side (ECU side) I/C C4 C3 C2 C1 Igniter unit wire harness side (IG coil side) IG2 IG1 ACC N30 N01 R01 O12 M01 AM ST IG switch wire harness side JEF00269-00175 CIRCUIT DESCRIPTION This system detects any misfire of the engine by using an ion current which has the same waveforms as those of the combustion pressure. When any misfire takes place, no ion current is produced. Therefore, if the input voltage at the ECU side is below a certain value, it is judged that a misfire took place. Since the detected ion current is very weak, it is amplified in the ignitor unit. In addition, a vibration waveform appears in the ion current waveform when knocking takes place. Hence, knocking control is also performed by detecting vibration waveforms. This applies only to vehicles mounted with Type K3 engine with EU specifications. EF–146 DTC No. P1300/36 DTC Detecting condition Trouble area • Open wire or short in Ion system circuit • Ignitor unit • Ignition coil (All cylinders) • Spark plug (All cylinders) • Engine ECU No ion current signal is inputted to the engine ECU during engine cranking or engine running. JEF00270-00000 INSPECTION PROCEDURE NOTE: • Read the freeze frame data, using the DS-21 diagnosis tester. Because the freeze frame data records the engine conditions when the malfunction was detected, when troubleshooting the freeze frame data is useful to determine whether the vehicle was running or stopped, the engine warmed up or not, the air-fuel ratio lean or rich, etc. at the time of the malfunction. • This diagnostic chart is based on the premise that the engine is being cranked under normal conditions. If the engine does no crank, proceed to the matrix table for troubleshooting according to malfunctioning phenomena on page EF–47. • When P1300/36 (ion system malfunction) is outputted, both P0300/17 (random/multiple cylinder misfire detected) and P0301/17 - P0304/17 (cylinders 1 to 4 misfire detected) may be outputted simultaneously. Spark check 2 EFI EFI 10 A 15 A 15 A (MGO) HORN-HAZ EFI STOP 30 A 15 A USE THE DESIGNATED FUSES ONLY. 10 A [HEAD] [ST] NOTICE A2 BACK UP FUEL PUMP 15 A Relay block (DGEF) 1. Remove the fuel pump relay from the relay block 2. Remove the IG coils and spark plugs (all cylinders #1, 2, 3 and 4) 3. Install the spark plug to the IG coil. connect the IG coil connector to the IG coil. 4. Ground the spark plug. 5. Crank the engine. at this time, check to see if each spark plug sparks. WARNING: • Sparks will take place. Care must be exercised to the surrounding combustible objects. (POWER) 1 [DEFG] RAD [MGC] AM (ABS) (EPS) TAIL HEAD RAD 50 A 30 A 40 A 30 A 30 A 60 A 82661-97218 No spark takes place in all cylinders. No spark takes place in some cylinders. Sparks take place in all cylinders. Unit check of spark plug Perform the unit check of the spark plug for the cylinders where no spark takes place. (Refer to page EF–185.) Are the unit check results OK? Go to Step 5. (Refer to page EF–185.) Are the unit check results OK? EF–147 NO Replace the spark plug. Perform the spark check again. No spark takes place. ... Go to Step 3. Sparks take place. ........ Go to Step 5. CAUTION: • Never use spark plugs other than those designated. YES 3 Check of power supply voltage of IG coil 1. With the IG switch turned OFF, disconnect the connector of the IG coil of each cylinder. 2. With the IG switch turned ON, measure the voltage between the body earth and each of the harness-side connectors N05, N53, N54 and N83 of each IG coil. Specified Value: Battery voltage V N05 IG coil wire harness side Are the check results OK? NO 4 Check of power supply voltage of IG coil Check the harness, connector and fuse for open wire and short by referring to page EF–48. 1. Turn OFF the IG switch. 2. Disconnect the connectors at the ECU side of the IG switch and ignitor unit. • Between IG switch and ignitor unit terminal B1 • Between IG switch and each of N05, N53, N54 and N83 of each IG coil. Are the check results for open wire and short OK? YES Replace the IG switch. YES Go to Step 5. Ω IG2 IG1 N30 N01 R01 O12 M01 IG switch wire harness side N05 IG coil wire harness side NO Repair or replace the harness or connector. Or replace the fuse. EF–148 5 Check of ignition signal and ion signal 9 10 11 5 6 7 8 1 2 3 4 20 21 22 16 17 18 19 12 13 14 15 Check that the ignition signal and ion signal are outputted from the ECU and inputted by using an oscilloscope. 1. With the IG switch turned OFF, perform the restoration. 2. Set the SST (sub-harness). (Refer to page EF–8.) SST: 09842-97203-000 Oscilloscope 31 32 33 27 28 29 30 23 24 25 26 42 43 44 38 39 40 41 34 35 36 37 + – 53 54 55 49 50 51 52 45 46 47 48 65 66 61 62 63 64 60 59 58 56 57 3. Warm up the engine. (only when the engine can start) 4. With the engine idling or cranking, connect the probe ; of the oscilloscope to the SST terminal *2; the probe : to each of the SST terminals ^0, %9, %8 and %7, respectively. Check the ignition signal for all cylinders. Specification: Pulse waveforms should be confirmed. 75 76 77 71 72 73 74 67 68 69 70 87 88 83 84 85 86 82 81 80 78 79 (4) Ignition signal wave form 5. As has been done in Step 4), connect the probes : and ; of the oscilloscope to the SST terminals !4 (ICMB) and $3 (IE), respectively, and check the ion signal. Specification: Waveforms as shown in the right figure should be observed without any waveform missing. Indication for one cylinder (5) Ion signal wave form Indication for all cylinders The circuit is normal when signal waveforms shown above are observed. Are the ignition signal and ion signal observed? When sparks take place and the ignition signal waveform is observed, is the ion signal waveform observed? When no spark takes place and the ignition signal waveform is observed, and no ion signal waveform is observed: When no spark takes place and no ignition signal waveform is observed, and no ion signal waveform is observed: Go to Step 10. NO 6 Check of harness between ECU and ignitor unit 1. Turn OFF IG switch. 2. Disconnect the SST connector of the EFI ECU. 3. Disconnect the ECU side connector of the ignitor unit. 4. Referring to page EF–63, check the harness and connector for open wire or short. • SST terminal !4 - Harness side I/O terminal of ignitor unit Are the check results for open wire and short OK? YES Check malfunction that occurs intermittently and poor contact. (Refer to page EF–51.) Check or replace the ECU. (Refer to page EF–51.) EF–149 NO YES 7 Check of harness between ignitor unit and IG coil Referring to page EF–48, check the harness and connector for open wire or short. 1. Disconnect the IG coil side connector of the ignitor unit. 2. Disconnect the connector of each IG coil. • Between harness side terminal I/C of ignitor unit - Harness side terminals N80, N81, N82 and N85 of each IG coil Are the check results for open wire and short OK? Repair or replace the harness or connector. Ω I/C C4 C3 C2 C1 Ignitor unit wire harness side N80 IG coil wire harness side NO YES 8 Unit check of ignitor unit Repair or replace the harness or connector. (Refer to page EF–188.) Are the check results OK? NO YES 9 Check of earth circuit of ignitor unit Replace the ignitor unit. 1. Measure the continuity between the engine earth and each of harness side terminals G1 and G2 of the ignitor unit. Specified Value: Continuity exists. Are the check results OK? Ω B1 G1 S1 S2 I/0 S3 S4 G2 Ignitor unit wire harness side Engine earth YES Replace the IG coil. (All cylinders) NO Repair or replace the harness or connector. EF–150 10 Check of harness between ignitor unit and IG coil Referring to page EF–48, check the harness and connector for open wire or short. 1. Turn OFF the IG switch. 2. Disconnect each IG coil and the IG coil side connector of the ignitor unit. • Between harness side terminals N07, N54, N65 and N84 of each IG coil and harness side terminals C1, C2, C3 and C4 of ignitor unit Are the check results for open wire and short OK? Ω I/C C4 C3 C2 C1 Ignitor unit wire harness side N07 IG coil wire harness side NO YES 11 Check of harness between EFI ECU and ignitor unit Referring to page EF–48, check the harness and connector for open wire or short. 1. Disconnect the SST connector from the EFI ECU. 2. Disconnect the ECU side connector of the ignitor unit. Harness side terminals S1, S2, S3, S4 and I/O of ignitor unit - SST connector terminals ^0, %9, %8, %7 and !4 Are the check results for open wire and short OK? Repair or replace the harness or connector. SST 53 54 55 49 50 51 52 45 46 47 48 66 62 63 64 65 61 60 59 56 57 58 Ignitor unit wire harness side B1 G1 S1 S2 YES Go to Step 7. Ω I/0 S3 S4 G2 NO Repair or replace the harness or connector. JEF00271-00176 EF–151 DTC VVT Sensor (Camshaft Position Sensor) Circuit Range/Performance Problem P1346/75 WIRING DIAGRAM IG SW ACC IG1 IG2 ST EFI ECU ST AM 60 A Starter relay (A/T only) (M/T only) (A/T) (STA) 11 68 (N1+) 21 (N2+) 22 (N2–) 52 J/C XAQ N2+ (N1–) 51 P.N range switch Engine earth Starter Body earth (A/T only) BATT (E1) 23 XAR N66 N74 N2– N66 N74 Cam angle sensor wire harness side Crank angle sensor Cam angle sensor JEF00272-00177 CIRCUIT DESCRIPTION The camshaft angle sensor (N2+ signal) consists of a signal rotor and a pickup coil. The N2+ signal rotor has three timing pins on its outer disk surface and is integrated with the intake camshaft. The detection of the actual camshaft position and the discrimination of cylinders are carried out by these three timing pins (360-180-180° CA). DTC No. P1346/75 DTC Detecting condition Deviation in crankshaft angle sensor signal and cam angle sensor signal (2 trip detection logic) Trouble area • Mechanical system malfunction (Skipping teeth of timing chain, chain stretched) • Engine ECU JEF00273-00000 INSPECTION PROCEDURE NOTE: • Read the freeze frame data, using the DS-21 diagnosis tester or OBD II generic scan tool. Because the freeze frame data records the engine conditions when the malfunction was detected, when troubleshooting the freeze frame data is useful to determine whether the vehicle was running or stopped, the engine warmed up or not, the air-fuel ratio lean or rich, etc. at the time of the malfunction. EF–152 1 Check of valve timing (a) Check the timing belt for looseness and missing teeth. (For details, refer to EM section.) 1. Set the No. 1 cylinder to the top dead center under compression stroke by turning the crankshaft in the normal direction. (Align the punch mark of the camshaft timing pulley with the mating mark of the camshaft bearing cap.) 2. Check that the punch mark of the crankshaft timing pulley is aligned with the mating mark of the oil pump as shown in the right illustration. (b) 3. Ensure that the applying load at the time when the timing belt is pushed 5 mm is within the specified value. (c) Specified Value: 19.6 - 29.4 N (2.0 - 3.0 kgf) Timing mark (b) Point marks Are the check results OK? NOTE: • If the crankshaft was turned in the reverse direction, redo the check. (c) 19.5 mm or less YES Check or replace the engine ECU. (Refer to page EF–51.) NO Adjustment of valve timing (Adjustment or replacement of timing belt or tensioner) For details, refer to EM section. JEF00274-00178 EF–153 DTC P1349/73 VVT System Malfunction WIRING DIAGRAM EFI ECU (E1) 23 + (OCV+) 28 (OCV–) 61 – XAN XAP XAN Wire harness side XAP Oil control valve JEF00275-00179 CIRCUIT DESCRIPTION The DVVT system controls the intake valve timing to a proper timing in response to the driving conditions. The engine ECU controls the OCV (Oil Control Valve) to make the intake valve timing proper. The oil pressure controlled by the OCV is supplied to the DVVT controller, and then, the DVVT controller changes the relative position between the camshaft and the crankshaft. DTC No. P1349/73 DTC Detecting condition Condition (a) or (b) continues after the engine has warmed up and when the engine speed is 400 to 4000 rpm. (a) Valve timing does not change from the current valve timing. (b) Current valve timing is fixed. (2 trip detection logic) Trouble area • Valve timing • Oil control valve • DVVT controller assembly • Engine ECU JEF00276-00000 INSPECTION PROCEDURE NOTE: • Read the freeze frame data, using the DS-21 diagnosis tester or OBD II generic scan tool. Because the freeze frame data records the engine conditions when the malfunction was detected, when troubleshooting the freeze frame data is useful to determine whether the vehicle was running or stopped, the engine warmed up or not, the air-fuel ratio lean or rich, etc. at the time of the malfunction. EF–154 1 Check of valve timing (a) Check the timing chain for looseness and missing teeth. (For details, refer to EM section.) 1. Set the No. 1 cylinder to the top dead center under compression stroke by turning the crankshaft in the normal direction. (a) (Align the groove of the crankshaft pulley with the timing mark of the timing chain cover as shown in the illustration.) 2. Check that the point marks of the camshaft timing sprockets are in straight line on the timing chain cover surface as shown in the illustration. (b) 3. Check of protruding amount of chain tensioner (c) Specified Value: Not to exceed 19.5 mm Timing mark Point marks (b) 4. Check of chain tensioner arm and chain guide for wear Specified Value: The thickness of arm and guide should be 0.5 mm or more. Are the check results OK? (c) 19.5 mm or less NO YES 2 Operation check of oil control valve (OCV) 1. Set the SST (sub-harness). (Refer to page EF–8.) 2. Start the engine. Warm it up fully. 3. Disconnect the OCV connector. 4. Apply the battery voltage between the terminals of the OCV connector. 5. Check the engine idling condition. Specification: Rough idling or engine stall should take place. Are the check results OK? NOTE: • Be careful not to mistake the polarity. • Pay attention not to make short during operation. • The energizing time should be limited to within one minute. Repair and adjustment of valve timing (Repair or replace the timing chain or tensioner, arm, guide, etc.) For details, refer to EM section. ; side : side OCV connector B EF–155 NO YES 3 Check of output voltage of ECU Go to Step 5. 1. With the IG switch turned ON (the engine stopped), measure the voltage between the SST connector terminals @8 (OCV+) and ^1 (OCV–). Specified Value: 4.0 V or less SST V 31 32 33 27 28 29 30 23 24 25 26 43 44 39 40 41 42 38 37 36 34 35 Is the measured value the specified value? 53 54 55 49 50 51 52 45 46 47 48 66 62 63 64 65 61 60 59 56 57 58 [Reference] Check by oscilloscope 1. Warm up the engine completely. Keep the engine idling. 2. Connect the : and ; probes of the oscilloscope to the SST connector terminals @8 and ^1, respectively. SST 31 32 33 27 28 29 30 23 24 25 26 43 44 39 40 41 42 38 37 36 34 35 53 54 55 49 50 51 52 45 46 47 48 63 64 65 66 62 61 60 56 57 58 59 3. If the waveform shown in the right figure is observed, the OCV circuit is functioning normally. OCV Signal waveform GND + – EF–156 NO YES 4 Check of harness between OCV and ECU 1. Turn OFF the IG switch. 2. Disconnect the SST connector from the ECU. 3. Referring to page EF–48, check the harness and connector for open wire or short. • Harness side connector XAN of valve SST connector @8 (OCV+) • Harness side connector XAP of valve SST connector ^1 (OCV–) Are the check results for open wire and short OK? Check or replace the engine ECU. (Refer to page EF–51) SST Ω 53 54 55 49 50 51 52 45 46 47 48 64 65 66 60 61 62 63 59 58 57 56 XAN XAP YES Check malfunction that occurs intermittently and poor contact. (Refer to page EF–51.) 5 Wire harness side NO Repair or replace the harness or connector. Unit check of OCV (Refer to page EF–185.) YES 6 Unit check of DVVT controller NO Replace the OCV and go to Step 6. (Refer to Section EM.) Are the unit check results OK? YES 7 Check of oil passage (including OCV) (Refer to section EM.) Specification: There should be no restricted passage nor oil leakage. Are the check results OK? NO Replace the intake camshaft. EF–157 NO YES 8 Repair the faulty parts of the oil passage. Checking whether DTC 1349/73 is memorized or not 1. Restore to the original state. 2. With the IG switch turned OFF, connect the SST. SST: 09991-87404-000 SST 3. Erase the DTC. (Refer to page EF–58.) 4. Perform the simulation test. 5. Check to see if DTC 1349/73 is displayed.*1 Is DTC 1349/73 displayed? YES NO 2 The VVT system is functioning properly.* Check or replace the ECU. (Refer to page EF–51.) *1: In the case of vehicles with EU specifications, confirmation can be made by one-trip by using the “Continuous monitoring results” function of the CARB mode. On vehicles other than those with EU specifications, conduct the simulation test twice. At this time, turn OFF the IG switch after the first test. (2 trip) *2: DTCs P1349/73 are also outputted after foreign objects in the engine oil have been caught in some parts of the system, and the system returns to the normal state in a short time. As the engine ECU controls so that the foreign objects are ejected, there is no problem about the VVT. There is also no problem since the oil filter will get the foreign objects in the engine oil. JEF00277-00180 EF–158 DTC Starter Signal Circuit Malfunction P1510/54 WIRING DIAGRAM ACC IG No. 1 IG No. 2 ST ACC IG1 IG2 ST M01 M/T only 10 A ECU IG J/C 1 R/B 23 11 (A/T) P F/L 60 A 10 A gauge back IG SW 82 (E01) N D A/T Starter relay IG2 IG1 ACC 2 N30 NO1 R01 L O12 M01 22 21 Neutral start SW M14 Meter EFI ECU AM ST IG switch wire harness side J/C BNDR1 (A/T) 68 (STA) BNDR1 (M/T) KE2 Starter L34 M15 M07 M14 A/T ECU Relay block wire harness side JEF00281-00183 CIRCUIT DESCRIPTION When the engine is being cranked, the intake air flow is slow, so fuel vaporization is poor. A rich mixture is therefore necessary in order to achieve good startability. While the engine is being cranked, the battery positive voltage is applied to the terminal STA of the engine ECU. The starter signal is mainly used to increase the fuel injection volume for the starting injection control and after-start injection control. DTC No. P1510/54 DTC Detecting condition Open wire or short in starter signal circuit (2 trip detection logic) Trouble area • Open wire or short in starter signal circuit • Engine ECU JEF00282-00000 INSPECTION PROCEDURE NOTE: • This diagnostic chart is based on the premise that the engine is being cranked under normal conditions. If the engine does not crank, proceed to the matrix table for troubleshooting according to malfunctioning phenomena on page EF–47. EF–159 1 Check of ECU input signal STA V 1. Set the SST (sub-harness). (Refer to page EF–8.) 2. Measure the voltage between the SST connectors ^8 and *2 (STA - E01) under the following conditions. Condition Specified value Engine being cranked 6 - 10 V After engine has started 0V SST 75 76 77 71 72 73 74 67 68 69 70 86 87 88 82 83 84 85 78 79 80 81 Is the measured value the specified value? YES NO 2 Check of harnesses between IG switch and ECU (M/T vehicles) and between relay block and ECU (A/T vehicles) 1. Turn OFF the IG switch. 2. Disconnect the connector of the IG switch. 3. Disconnect the SST connector at ECU side. 4. M/T vehicles: Connector M01 at IG switch side - Connector ^8 (STA) at ECU side A/T vehicles: Connector M14 at relay block side Connector ^8 (STA) at ECU side Are the check results for open wire and short (according to page EF–48) OK? YES Check or replace the engine ECU. (Refer to page EF–51.) Check malfunction that occurs intermittently and poor contact. (Refer to page EF–51.) Ω SST 75 76 77 71 72 73 74 67 68 69 70 86 87 88 82 83 84 85 78 79 80 81 M01 M/T M14 A/T NO Repair or replace the harness or connector. JEF00283-00184 EF–160 DTC P1520/51 Switch Signal Circuit Malfunction WIRING DIAGRAM F/L 60 A Neutral start SW wire harness side Heater EFI ECU H66 Neutral P start switch N (A/T) Linear throttle sensor wire harness side KC6 KV2 K99 A/C SW wire harness side 11 (A/T) 23 (E1) H65 9 (T) Z53 KC6 Blower motor H65 Z53 G02 H62 To starter relay coil 20 A X99 XT1 XT0 G03 H63 H64 H66 Gauge back 1 ACC IG1 IG2 ST MAIN 10 A R/B ACC IG No. 1 IG No. 2 ST Main A/C SW IG SW K99 KV2 Resister XT0 XT1 16 (VC) 44 (VTH) (ACSW) 38 17 (E2) J/C H M L Blower switch Linear throttle sensor Dual pressure SW (BLW) 39 X99 JEF00284-00185 CIRCUIT DESCRIPTION This is used as the normal state judging code for the switch system. While the terminal T is “ON”, if the idle switch becomes “OFF” or the air conditioner becomes “ON”, or the shift lever is placed in Î, ™, Ò, or  range, the DTC is outputted. However, the DTC is diagnosed only when the terminal T is “ON”. No memorization is made. DTC No. P1520/51 DTC Detecting condition When conditions 1 and 2 below are met: 1. Terminal T is “ON”. 2. Idle switch “OFF”, air conditioner “ON” or neutral start switch “ON” Trouble area • Open wire or short in A/C switch circuit • A/C switch • Open wire or short in linear throttle sensor circuit • Linear throttle sensor • Open wire or short in neutral start switch circuit • Neutral start switch • Engine ECU NOTE: • When the idle switch becomes “OFF” with the terminal T being “ON”, you can check to see if the IDL system of the linear throttle sensor is functioning properly by examining the DTC output. • With the engine idling, and the terminal T being “ON”, when the A/C and heater blower switch are switched on (air conditioner “ON”), you can check to see if the air conditioner switch system is functioning properly by examining the DTC output. • With the terminal T being “ON”, when the shift lever is placed in Î, ™, Ò, or  range, you can check to see if the neutral start switch system is functioning properly by examining the DTC output. JEF00285-00000 EF–161 INSPECTION PROCEDURE NOTE: • If DTC P0110/43 (Intake Air Temp. Circuit Malfunction), P0115/42 (Engine Coolant Temp. Circuit Malfunction), P0120/41 (Throttle/Pedal Position Sensor/Switch “A” Malfunction) are outputted simultaneously, E2 (Sensor Ground) may be open. When using DS-21 diagnosis tester: 1 Check of input signal by A/C switch and idle switch to ECU 1. Turn OFF the IG switch. Connect the DS-21 diagnosis tester to the DLC through the SST. SST: 09991-87404-000 SST 2. Turn ON the IG switch. Turn ON the main switch of the tester. Check the signals of the A/C switch and idle switch. (As for the operation, refer to the instruction manual of the DS-21 diagnosis tester.) A/C switch A/C signal indication OFF OFF ON ON Throttle valve IDL signal indication Fully closed ON Fully opened OFF Are the check results OK? YES NO 2 Check of harnesses between A/C switch and ECU and between linear throttle sensor and ECU 1. Turn OFF the main switch of the tester. Turn OFF the IG switch. 2. Set the SST (sub-harness). (Refer to page EF–8.) Do not connect the SST connector to the ECU. 3. Referring to page EF–48, check the harness and connector for open wire or short. • A/C switch Switch side connector K99 - ECU side connector #8 (ACSW) • Linear throttle sensor Sensor side connector XT1 - ECU side connector !7 (E2) Sensor side connector XT0 - ECU side connector $4 (VTH) Sensor side connector X99 - ECU side connector !6 (VC) Are the check results for open wire and short OK? Check malfunction that occurs intermittently and poor contact. (Refer to page EF–51.) SST Ω 31 32 33 27 28 29 30 23 24 25 26 42 43 44 38 39 40 41 34 35 36 37 Linear throttle sensor wire harness side X99 XT1 XT0 KC6 KV2 K99 A/C SW wire harness side EF–162 NO YES 3 Unit check of A/C switch and liner throttle sensor Repair or replace the harness or connector. (Refer to page EF–186.) Are the unit check results OK? NO YES Check or replace the engine ECU. (Refer to page EF–51.) Replace the A/C switch or liner throttle sensor. JEF00286-00186 When not using DS-21 diagnosis tester: 1 Check of ECU input signal SST V 1. Set the SST (sub-harness). (Refer to page EF–8.) 2. With the IG switch turned ON, measure the voltage between SST !6 and !7 (VC and E2), between $4 and !7 (VTH and E2), between #8 and @3 (ACSW and E1), and between !1 and @3 (A/T and E1). Specified Value: • !6 and !7 (VC and E2): 4.5 - 5.5 V • $4 and !7 (VTH and E2): When throttle lever is changed from full close state to full open state, voltage should increase proportionally from 0 to 4.8 V. • #8 and @3 (ACSW and E1): Battery voltage (when A/C switch is ON) 0 - 0.5 V (When A/C switch is OFF) • !1 and @3 (A/T and E1): 0 - 0.5 V (P or N range) Around 10 V (other than ranges above) 8 9 10 11 4 5 6 7 22 18 19 20 21 17 16 15 12 13 14 1 2 3 31 32 33 27 28 29 30 23 24 25 26 42 43 44 38 39 40 41 34 35 36 37 EF–163 YES NO 2 Check of harness between neutral start switch and ECU (As for the A/C switch and linear throttle sensor system, go to Step ™ on previous page.) 1. Turn OFF the IG switch. Disconnect the SST connector from the ECU. 2. Referring to page EF–48, check the harness and connector for open wire or short. • Switch side connector H66 (P range) ECU !1 (A/T) • Switch side connector H65 (N range) ECU !1 (A/T) Are the check results for open wire and short OK? YES 3 Unit check of neutral start switch Check malfunction that occurs intermittently and poor contact. (Refer to page EF–51.) SST Ω 9 10 11 5 6 7 8 19 20 21 22 18 17 16 12 13 14 15 1 2 3 4 G03 H63 H64 H66 H65 Z53 G02 H62 Neutral start SW wire harness side NO Repair or replace the harness or connector. (Refer to page EF–186.) Are the unit check results OK? YES Check or replace the engine ECU. (Refer to page EF–51.) NO Replace the neutral start switch. JEF00287-00187 EF–164 DTC A/C Evaporator Temp. Sensor Malfunction P1530/44 WIRING DIAGRAM IG SW ACC ACC IG1 IG2 ST MAIN F/L 60 A 15 A EFI Heater 20 A 13 Gauge back R/B 1 10 A 10 A ECU IG IG No. 1 IG No. 2 ST MAIN KP5 EFI ECU KK4 Main relay Wire harness side 4 7 (+B1) J/C 13 (FAN1) CDS fan relay (E21) 29 KK4 Resister J/C (BLW) 39 Dual pressure SW J/C Blower switch Condenser fan motor 20 Magnet clutch A/T ECU 12 J/C Radiator fan motor 17 KP5 Blower motor RAD THERMO (ACEV) 72 SW 11 12 (MGC) MGC relay A/C SW 18 Evaporator temperature sensor 30 A 36 (+B2) RAD fan relay A/C 20 A Radiator fan 3 (ACSW) 38 JEF00288-00188 This circuit, located at the rear of the evaporator of the air conditioner unit, detects the temperature of the air passing through the evaporator. A thermistor is incorporated in the sensor. This thermistor has such characteristics that its resistance decreases as the temperature rises, while the resistance increases as the temperature drops. When the temperature becomes about 0°C, the thermistor disengages the magnet clutch through the MGC relay, thus preventing frosting. Resistance [kΩ] CIRCUIT DESCRIPTION 4 2 0 –10 0 10 20 A/C evaporator temperature [°C] JEF00289-00189 EF–165 DTC No. P1530/44 DTC Detecting condition Open wire or short in evaporator temperature circuit Trouble area • Open wire or short in evaporator temp. circuit • Evaporator temperature sensor • Engine ECU INSPECTION PROCEDURE NOTE: • Read the freeze frame data, using the DS-21 diagnosis tester or OBD II generic scan tool. Because the freeze frame data records the engine conditions when the malfunction was detected, when troubleshooting the freeze frame data is useful to determine whether the vehicle was running or stopped, the engine warmed up or not, the air-fuel ratio lean or rich, etc. at the time of the malfunction. 1 Check of ECU output voltage SST V 1. Set the SST (sub-harness). (Refer to page EF–8.) 2. With the IG switch turned “ON”, measure the voltage between the SST connector &2 (ACEV) and @9 (E21). Specified Value: 0.1 - 4.8 V (Varies, depending upon the temperature.) (Reference: 1.8 - 2.9 V at 20°C) 31 32 33 27 28 29 30 23 24 25 26 42 43 44 38 39 40 41 34 35 36 37 75 76 77 71 72 73 74 67 68 69 70 86 87 88 82 83 84 85 78 79 80 81 Are the check results OK? YES NO 2 Check of harness between evaporator temperature sensor and ECU 1. With the IG switch turned OFF, disconnect the SST connector from the ECU. 2. Referring to page EF–48, check the harness and connector for open wire or short. • Harness side connector KP5 of sensor - ECU &2 (ACEV) • Harness side connector KK4 of sensor - ECU @9 (E21) Are the check results for open wire and short OK? Check malfunction that occurs intermittently and poor contact. (Refer to page EF–61.) SST Ω 75 76 77 71 72 73 74 67 68 69 70 86 87 88 82 83 84 85 78 79 80 81 KP5 KK4 YES 3 Unit check of evaporator temperature sensor (Refer to page EF–186.) Are the unit check results OK? Wire harness side NO Repair or replace the harness or connector. EF–166 YES Check or replace the engine ECU. (Refer to page EF–51.) NO Replace the evaporator temperature sensor JEF00290-00190 EF–167 DTC ECU Back-up Power Source Circuit Malfunction P1560/61 WIRING DIAGRAM IG SW ACC ACC IG1 IG2 ST 10 A ECU IG IG No. 1 IG No. 2 ST R/B EFI ECU 13 L35 XM6 KN6 C90 PD7 E45 OC9 ZS7 15 A EFI O31 F/L 60 A 1 24 XM6 1 (BAT) R/B wire harness side Main relay 4 ZS7 30 (W/O IMB) (FC2) Fuel pump relay 2 (W/IMB) (FC1) 6 3 5 PD7 7 (+B1) J/C 36 (+B2) Fuel pump To Injector JEF00291-00191 CIRCUIT DESCRIPTION The battery positive voltage is supplied to the terminal BAT of the engine ECU even when the ignition switch is OFF for use by the DTC memory and air-fuel ratio adaptive control value memory, etc. DTC No. P1560/61 DTC Detecting condition Open wire in back-up power source circuit Trouble area • Open wire in back-up power source circuit • Engine ECU HINT: If DTC P1560/61 appears, the engine ECU does not store another DTC. JEF00292-00000 INSPECTION PROCEDURE NOTE: • Read the freeze frame data, using the DS-21 diagnosis tester or OBD II generic scan tool. Because the freeze frame data records the engine conditions when the malfunction was detected, when troubleshooting the freeze frame data is useful to determine whether the vehicle was running or stopped, the engine warmed up or not, the air-fuel ratio lean or rich, etc. at the time of the malfunction. EF–168 1 Check of ECU backup power supply voltage 1. Set the SST (sub-harness). (Refer to page EF–8.) 2. With the IG switch turned OFF, measure the voltage between the SST connector q (BAT) and the body ground. Specified Value: Battery voltage SST V 10 11 9 5 6 7 8 1 2 3 4 20 21 22 16 17 18 19 12 13 14 15 Are the check results OK? YES NO 2 Check of harness between relay block and ECU 1. With the IG switch turned OFF, disconnect the SST connector from the ECU. 2. Remove the harness from the terminal : of the battery. Referring to page EF–48, check the harness and connector for open wire or short. • Harness side connector XM6 of R/B ECU q (BAT) • Stud bolt of R/B - Battery terminal : Are the check results for open wire and short OK? Check malfunction that occurs intermittently and poor contact. (Refer to page EF–51.) SST Ω 9 10 11 5 6 7 8 1 2 3 4 20 21 22 16 17 18 19 12 13 14 15 L35 XM6 KN6 C90 PD7 E45 OC9 ZS7 NO YES 3 Wire harness side Repair or replace the harness or connector. Unit check of EFI fuse 1. Remove the EFI fuse from the R/B. 2. Check continuity of the EFI fuse. Specification: Continuity should exist. EFI Fuse Are the check results OK? YES Check or replace the engine ECU. (Refer to page EF–51.) NO Replace the EFI fuse. JEF00293-00192 EF–169 DTC Immobilizer Signal Malfunction P1600/83 WIRING DIAGRAM +B EFI ECU (E1) 23 J/C (SIO2) 5 QA2 +B KEY SW #FZ (T) 9 #J3 J/C SIO2 T KEY IMMOBILIZER ECU GND COIL(+) J/C QA8 A/T ECU etc ECU-T QA6 (SIO1) 8 EFI-T COIL(–) SIO1 QA4 QA5 DLC QA3 SIO1 SG CG A/T ECU etc J/C Antenna (IG key) +B KEY COL+ GND QA2 #FZ QA4 QA6 IG T SIO2 SIO1 COL– IND QA0 QA8 #J3 QA3 QA5 QA7 IMMOBI ECU wire harness side JEF00294-00193 CIRCUIT DESCRIPTION This circuit performs collation and updating of the rolling code in the communication between the immobilizer ECU and the EFI ECU. The engine can start only when the collation and updating of the rolling code can be done. The rolling code is collated and updated by reading out or writing to non volatile memory (E2PROM) of both ECUs. DTC No. P1600/83 DTC Detecting condition In immobilizer communication, • When writing of rolling code to E2PROM is abnormal: or • When reading out rolling code from E2PROM is abnormal: Trouble area • Engine ECU JEF00295-00000 EF–170 INSPECTION PROCEDURE When using DS-21 diagnosis tester: 1 Re-confirmation of DTC 1. With the IG switch turned OFF, connect the DS-21 diagnosis tester to the DLC through the SST. SST: 09991-87404-000 SST 2. Turn ON the IG switch, and turn ON the main switch of the tester. Erase the DTC. (As for the operation, follow the instruction manual of the DS-21 diagnosis tester.) 3. Turn OFF the main switch of the tester. Turn OFF the IG switch. 4. Turn ON the IG switch. Turn ON the main switch of the tester. 5. Check the DTC. Is P1600 indicated? NO YES Check or replace the ECU. (Refer to page EF–51.) Replace the ECU. JEF00296-00194 When not using DS-21 diagnosis tester: 1 Re-confirmation of DTC 1. With the IG switch turned OFF, connect the DS-21 diagnosis tester to the DLC through the SST. SST: 09991-87404-000 2. Connect the terminal T and the earth terminal of the SST connector with a jump wire. SST (2): 09991-87403-000 3. Remove the EFI fuse. Erase the DTC. (As for the erasing method, refer to page EF–58.) 4. Set the EFI fuse to the original position. 5. Turn ON the IG switch. 6. Check the DTC. (Read out the flashing pattern of the MIL.) Is “83” indicated? YES Replace the ECU. SST (2) Test SST (1) Earth NO Check or replace the ECU. (Refer to page EF–51.) JEF00297-00195 EF–171 DTC Immobilizer Signal Circuit Malfunction P1601/81 WIRING DIAGRAM +B EFI ECU (E1) 23 J/C (SIO2) 5 QA2 +B KEY SW #FZ J/C (T) 9 #J3 J/C SIO2 T KEY IMMOBILIZER ECU GND COIL(+) QA8 A/T ECU etc ECU-T QA6 (SIO1) 8 EFI-T COIL(–) SIO1 QA4 QA5 DLC QA3 SIO1 SG CG A/T ECU etc J/C Antenna (IG key) +B KEY COL+ GND QA2 #FZ QA4 QA6 IG T SIO2 SIO1 COL– IND QA0 QA8 #J3 QA3 QA5 QA7 IMMOBI ECU wire harness side JEF00298-00196 CIRCUIT DESCRIPTION When the IG switch is turned ON, communication starts between the immobilizer ECU and the EFI ECU. The engine can start only when the communication between the two ECUs is possible and the rolling codes are matched. In other cases, fuel injection and ignition are prohibited, thus making engine starting impossible. DTC No. P1601/81 DTC Detecting condition When any of the following items takes place in the communication between the immobilizer ECU and EFI ECU, with the IG switch turned ON: • Communication error with immobilizer ECU occurs. • The rolling codes are not matched. Trouble area • Open wire or short in immobiliger signal circuit • Immobiliger ECU • Engine ECU JEF00299-00000 EF–172 INSPECTION PROCEDURE 1 Check of harness between immobilizer ECU and EFI ECU 1. Set the SST (sub-harness). (Refer to page EF–8.) Do not connect the SST connector to the EFI ECU. 2. Disconnect the immobilizer ECU connector. 3. Referring to page EF–48, check the harness and connector for open wire or short, with the IG switch turned OFF. • Connector QA3 at immobilizer ECU harness side- SST terminal i (SIO1) • Connector #J3 at immobilizer ECU harness side - SST terminal t (SIO2) Are the check results for open wire and short OK? 9 10 11 5 6 7 8 19 20 21 22 18 17 16 12 13 14 15 1 Check of immobilizer system (1) 2 3 4 Immobilizer connector (Wire harness side) #J3 QA3 NO YES 2 Ω SST Repair or replace the harness or connector. 1. Connect the connector of the immobilizer ECU. 2. Replace the EFI ECU with a new one. Connect the SST connector to the EFI ECU. 3. Start the engine with the master key. Does the engine start? Master key (black) YES NO 3 Check of immobilizer system (2) 1. Replace the immobilizer ECU with a new one, with the IG switch turned OFF. 2. Connect the SST to the DLC. SST: 09991-87404-000 Check or replace the engine ECU. (Refer to page EF–51.) 3. Connect the ECU-T and the earth terminal of the SST connector with a jump wire. SST: 09991-87403-000 ECU-T 4. Start the engine with the master key. Does the engine start? Earth NO Check the IG key, antenna coil, etc. (Refer to section BE.) YES Check or replace the immobilizer ECU. (Refer to section BE.) JEF00300-00197 EF–173 DTC P1602/82 Serial Communication Problem Between EFI and A/T ECU WIRING DIAGRAM A +B 7 (+B1) (SIO2) 5 Main relay 36 (+B2) IG2 EFI ECU 82 (E01) (VF) 34 (SIO1) (ATTX) (ATRX) (ATNE) 8 4 32 33 (T) 9 J/C IG ECU-T EFI-T Serial data line VF SIO1 J/C CG SG Data Link Connector (DLC) T COM1COM0 SIO1 A A/T ECU J/C IG2 +B1 T SIO2 IMMOBILIZER ECU RENG +B2 J/C T SIO1 +B2 +B1 COM0 COM1 SIO1 A/T ECU connector wire harness side JEF00301-00198 CIRCUIT DESCRIPTION The two serial data lines are pulled up to about 12 V by means of the EFI ECU and A/T ECU. Those EFI ECU and A/T ECU send data (to A/T ECU and EFI ECU, respectively) by controlling their grounds. As long as the IG switch is ON, the A/T ECU keeps sending to the EFI ECU the data concerning whether or not all detectable DTCs have been checked and whether or not any abnormality has been found by the check. DTC No. DTC Detecting condition P1602/82 With IG switch turned ON when any of the followings takes place: • Serial communication is abnormal at receiving side (A/T → EFI) • Serial communication is abnormal at sending side (EFI → A/T) Trouble area • Open wire or short in serial communication link circuit • Open wire in power or ground circuit of A/T ECU • A/T ECU • EFI ECU JEF00302-00000 EF–174 INSPECTION PROCEDURE NOTE: • Read the freeze frame data, using the DS-21 diagnosis tester or OBD II generic scan tool. Because the freeze frame data records the engine conditions when the malfunction was detected, when troubleshooting the freeze frame data is useful to determine whether the vehicle was running or stopped, the engine warmed up or not, the air-fuel ratio lean or rich, etc. at the time of the malfunction. 1 Check of signal voltage (1) SST 1. Set the SST (sub-harness). (Refer to page EF–8.) 2. With the IG switch turned ON, measure the voltage between the SST connector #2 (ATRX) and the body ground. Specification: The voltage should be stable at a constant value. (The value of the voltage can not be specified.) V 31 32 33 27 28 29 30 23 24 25 26 42 43 44 38 39 40 41 34 35 36 37 Is the voltage stable at a certain value (other than 0 v or 12 V)? YES NO Check malfunction that occurs intermittently and poor contact. (Refer to page EF–51.) 2 About 0 V Change between about 0 - 12 V About 12 V Check of signal circuit Check of malfunction that occurs intermittently or check of A/T ECU or EFI ECU Referring to page EF–51, check the malfunction that occurs intermittently and poor contact. Are the check results OK? 1. Turn OFF the IG switch. Disconnect the connector of the A/T ECU. 2. Turn ON the IG switch. Measure the voltage between the A/T ECU connector terminal COM0 and the body ground. Is the measured voltage about 0 V? 1. Turn OFF the IG switch. Disconnect the connector of the A/T ECU. 2. Turn ON the IG switch. Measure the voltage between the A/T ECU connector terminal COM0 and the body ground. Is the measured voltage about 12 V (battery voltage)? YES NO YES Check the A/T ECU power supply and check the earth circuit for short. Check the harness between the EFI and the A/T ECU for short to ground or check the EFI ECU for faulty connectors. Check or repair the A/T ECU or EFI ECU. (Refer to page EF–51.) Repair or replace the harness or connector. NO Repair or replace the harness or connector. YES Check the harness between the EFI and the A/T ECU for open wire or check the A/T ECU for faulty connectors. Repair or replace the harness or connector. NO Check or replace A/T ECU. EF–175 3 Check of signal voltage (2) V 1. Set the SST (sub-harness). (Refer to page EF–8.) 2. With the IG switch turned ON, measure the voltage between the A/T ECU connector (COM1) and the body ground. Specification: The voltage should be stable at a constant value. (The value of the voltage can not be specified.) S101 COM1 COM0 Is the voltage stable at a certain value (other than 0 V or 12 V)? NOTE: • When applying a probe to the terminal (COM1), apply it from the harness side with the connector connected to the A/T ECU. YES NO Check malfunction that occurs intermittently and poor contact. (Refer to page EF–51.) 4 About 0 V Change between about 0 - 12 V About 12 V Check of signal circuit Check of malfunction that occurs intermittently or check of A/T ECU or EFI ECU Referring to page EF–51, check the malfunction that occurs intermittently and poor contact. Are the check results OK? 1. Turn OFF the IG switch. Disconnect the SST connector from the EFI ECU. 2. Turn ON the IG switch. Measure the voltage between the SST connector terminal r (ATTX) and the body ground. Is the measured voltage about 0 V? 1. Turn OFF the IG switch. Disconnect the SST connector from the EFI ECU. 2. Turn ON the IG switch. Measure the voltage between the SST connector terminal r (ATTX) and the body ground. Is the measured voltage about 12 V (battery voltage)? YES NO YES Check the EFI ECU power supply and check the earth circuit for short. Check the harness between the EFI and the A/T ECU for short to ground or check the A/T ECU for faulty connectors. Check or repair the EFI ECU or A/T ECU. (Refer to page EF–51.) Repair or replace the harness or connector. NO Repair or replace the harness or connector. YES Check the harness between the EFI and the A/T ECU for open wire or check the EFI ECU for faulty connectors. NO Check or replace EFI ECU. Repair or replace the harness or connector. JEF00303-00199 EF–176 DTC P1656/74 OCV Circuit Malfunction WIRING DIAGRAM EFI ECU (E1) 23 + (OCV+) 28 (OCV–) 61 – XAN XAP Wire harness side XAN XAP Oil control valve JEF00304-00200 CIRCUIT DESCRIPTION This circuit operates the spool valve by means of the duty signal from the engine control computer so as to switch the oil passages at the advanced side and retarded side to the DVVT controller. In this way, the valve timing is always controlled at the optimum one. When the engine is stopped, the camshaft timing oil control valve is set to the most retarded state. Sleeve Spool valve Oil Drain Pressure Drain Spring (Advanced (Retard side) side) Coil Plunger JEF00305-00201 DTC No. P1656/74 DTC Detecting condition Open wire or short in oil control valve circuit Trouble area • Open wire or short in oil control valve circuit • Oil control valve • Engine ECU INSPECTION PROCEDURE NOTE: • Read the freeze frame data, using the DS-21 diagnosis tester or OBD II generic scan tool. Because the freeze frame data records the engine conditions when the malfunction was detected, when troubleshooting the freeze frame data is useful to determine whether the vehicle was running or stopped, the engine warmed up or not, the air-fuel ratio lean or rich, etc. at the time of the malfunction. EF–177 1 Operation check of oil control valve 1. Set the SST (sub-harness). (Refer to page EF–8.) 2. Start the engine and fully warm it up. 3. Disconnect the connector of the oil control valve (OCV). 4. Apply the battery voltage to between the terminals of the OCV connector. 5. Check the engine running condition. Does rough idling or engine stall take place? B NO YES 2 Check of ECU output voltage 1. With the engine idling, measure the voltage between the SST connector terminals @8 (OCV+) and ^1 (OCV–). Specified Value: 4.0 V or less Is the measured value the specified value? Replace the OCV. SST V 31 32 33 27 28 29 30 23 24 25 26 43 44 39 40 41 42 38 37 36 34 35 53 54 55 49 50 51 52 45 46 47 48 63 64 65 66 62 61 60 56 57 58 59 NO YES 3 Check of harness between OCV and ECU 1. Turn OFF the IG switch. 2. Disconnect the SST connector from the ECU. 3. Referring to page EF–48, check the harness and connector for open wire or short. • Valve harness side connector XAN SST connector @8 (OCV+) • Valve harness side connector XAP SST connector ^1 (OCV–) Are the check results for open wire and short OK? Check or replace the ECU. (Refer to page EF–51.) SST Ω 53 54 55 49 50 51 52 45 46 47 48 64 65 66 60 61 62 63 56 57 58 59 XAN XAP YES Check malfunction that occurs intermittently and poor contact. (Refer to page EF–51.) Wire harness side NO Repair or replace the harness or connector. JEF00306-00202 EF–178 ECU Power Source Circuit WIRING DIAGRAM IG SW ACC IG1 IG2 ST 10 A ECU IG ACC IG No. 1 IG No. 2 ST R/B 13 OC8 EFI ECU L35 XM6 KN6 C90 PD7 E45 OC9 ZS7 15 A EFI O31 F/L 60 A 1 24 XM6 1 (BAT) R/B 2 wire harness side Main relay KN8 PD6 4 Fuel pump relay 6 3 30 (W/O IMB) (FC2) ZS7 2 (W/IMB) (FC1) 23 (E1) PD7 82 (E01) 5 OC9 PD6 J/C F69 OC8 R/B 6 wire harness side IG2 ACC N30 N01 R01 7 (+B1) 36 (+B2) IG1 AM O12 M01 ST IG switch wire harness side Fuel pump To Injector JEF00307-00203 CIRCUIT DESCRIPTION When the ignition switch is turned ON, battery positive voltage is applied to the coil, closing the contacts of the EFI main relay and supplying power to the terminals +B1 and +B2 of the engine ECU. JEF00308-00000 EF–179 INSPECTION PROCEDURE 1 Check of power supply voltage of ECU SST V 1. Set the SST (sub-harness). (Refer to page EF–8.) 2. With the IG switch turned ON, measure the voltage between the SST connectors u, #6 through *2 (E01). Specified Value: Battery voltage Are the check results OK? 9 10 11 5 6 7 8 1 2 3 4 20 21 22 16 17 18 19 12 13 14 15 75 76 77 71 72 73 74 67 68 69 70 86 87 88 82 83 84 85 78 79 80 81 YES NO 2 Check of harness between relay block and ECU 1. With the IG switch turned OFF, disconnect the SST connector from the ECU. 2. Disconnect the harness from the positive : terminal of the battery. 3. Referring to page EF–48, check the harness and connector for open wire or short. • Connector PD7 of the relay block at the harness side and the SST terminal u and #6 • Stand bolt of the relay block and the positive : terminal of the battery Are the check results for open wire and short OK? YES 3 Unit check of EFI main relay 1. Disconnect the EFI main relay from the relay block. 2. Referring to page EF–187, perform the check. Are the check results OK? Check malfunction that occurs intermittently or poor contact. (Refer to page EF–51.) SST 5 6 7 8 9 Ω 10 11 1 2 3 4 20 21 22 16 17 18 19 12 13 14 15 31 32 33 27 28 29 30 23 24 25 26 44 40 41 42 43 39 38 37 34 35 36 L35 XM6 KN6 C90 PD7 E45 OC9 ZS7 Wire harness side NO Repair or replace the harness or connector. EF–180 NO YES 4 Replace the EFI main replay. Unit check of IG switch 1. Disconnect the connector from the IG switch. 2. With the IG switch disconnected, check continuity between the terminals given below: IG1 ACC ACC 3-4 ON 1-2-3-4 START 1-2-4-5 CK 3 5 ACC O ST ART ACC LOCK N — LO Switch position Terminal No. to continuity LOCK IG2 ON 2 4 1 START ST AM Are the check results OK? NO YES 5 Check the harness and connector between the IG switch, relay block and the body ground for open wire or short. (Refer to page EF–48.) Replace the ignition switch Ω IG2 N30 N01 R01 O12 M01 IG switch wire harness side OC8 R/B 6 wire harness side NO YES 6 Repair or replace the harness or connector. Unit check of EFI fuse 1. Disconnect the EFI fuse from the relay block. 2. Check the EFI fuse for continuity. Specified Value: Continuity exists. EFI Fuse Are the unit check results OK? NO YES Check or replace the ECU. (Refer to page EF–51.) Replace the EFI fuse. JEF00309-00204 EF–181 Fuel Pump Control Circuit WIRING DIAGRAM IG SW ACC IG1 IG2 ST 10 A ECU IG 10 A AIR BAG ACC IG No. 1 IG No. 2 ST R/B 13 OC8 EFI ECU 15 A EFI O31 F/L 60 A 1 Main relay 8 (SIO1) 4 30 (W/O IMB) (FC2) ZS7 6 2 (W/IMB) (FC1) 23 (E1) PD7 R/B 2 wire harness side 82 (E01) 5 OC9 L35 XM6 KN6 C90 PD7 E45 OC9 ZS7 Fuel pump relay 3 Data link J/C connector (DLC) 9 (T) PD6 J/C 7 (+B1) 36 (+B2) KN8 PD6 Fuel pump F69 OC8 To Injector R/B 6 wire harness side JEF00310-00205 INSPECTION PROCEDURE 1 Operation check of fuel pump 1. With the IG switch turned OFF, connect the DS-21 diagnosis tester to DLC through the SST. 2. After turning ON the IG switch, turn ON the main switch of the tester. Select the actuator driving. 3. Select the fuel pump ON so as to actuate the fuel pump. If the DS-21 diagnosis tester is not available, connect a jump wire between the terminal T of the DLC and the earth terminal. 4. Ensure that the screw of the pulsation damper rises in Step 3. Are the check results OK? Pulsation damper EF–182 NO YES 2 Check of power supply circuit of engine ECU Check malfunction that occurs intermittently or poor contact. (Refer to page EF–51.) Perform the check according to the trouble-shooting of the ECU power source circuit. (Refer to page EF–178.) Are the check results OK? NO YES Repair or replace. 1. With the IG switch turned OFF, disconnect the fuel pump relay from the relay block. 2. Referring to page EF–187, perform the check. Are the check results OK? EFI [ST] EFI NOTICE USE THE DESIGNATED FUSES ONLY. A2 Check of voltage at the terminal FC1 or FC2 of engine ECU 1. Set the SST (sub-harness). (Refer to page EF–8.) 2. Turn ON the IG switch. 3. Measure the voltage between the SST connector w (W/IMB) or #0 (W/O IMB) the body ground. Specified Value: Battery voltage 10 A 15 A 15 A HORN-HAZ 10 A [DEFG] [HEAD] RAD [MGC] AM (ABS) (EPS) TAIL HEAD RAD 50 A 30 A 40 A 30 A 30 A 60 A 82661-97218 NO YES 4 (MGO) EFI 30 A 15 A 15 A (DGEF) FUEL PUMP (POWER) Relay block STOP Unit check of fuel pump relay BACK UP 3 Replace the fuel pump relay. SST 7 8 9 V 10 11 5 6 1 2 3 4 20 21 22 16 17 18 19 12 13 14 15 31 32 33 27 28 29 30 23 24 25 26 42 43 44 38 39 40 41 34 35 36 37 Are the check results OK? YES 5 Unit check of fuel pump (Refer to page EF–187.) Are the check results OK? NO Check the harness and connector between the relay block and the engine ECU for open wire or short. EF–183 YES 6 Check of harness between relay block and fuel pump NO Repair or replace the fuel pump. Referring to page EF–48, check the harness and connector for open wire or short. • Relay block - Fuel pump • Fuel pump - Body earth Are the check results for open wire and short OK? YES Check or replace the ECU. (Refer to page EF–51.) NO Repair or replace the harness or connector. JEF00311-00206 EF–184 5.15 UNIT CHECK 5.15.1 INTAKE AIR TEMPERATURE SENSOR 1. Measure the resistance between the terminals. The figures in ( ) denote reference values. Temperature (°C) Resistance (kΩ) –30 –20 20 80 120 (28.6) (16.2) 2.45 0.33 0.18 JEF00324-00219 5.15.2 ENGINE COOLANT TEMPERATURE SENSOR 1. Measure the resistance between the terminals. The figures in ( ) denote reference values. Temperature (°C) Resistance (kΩ) –20 20 80 110 15.06 2.44 0.32 0.14 A B C A C B Thermistor for EFI Thermistor for water temperature meter JEF00325-00220 5.15.3 VSV FOR EVAPORATIVE EMISSION PURGING 1. Perform continuity check between ports. Specification: No continuity should exist. [M101] 2. With a voltage applied to the VSV connector terminals, perform continuity check between ports. Specification: Continuity should exist. 3. Measure the resistance value between the terminals. Specified Value: 30 to 34 Ω at 20°C JEF00326-00232 [J100] VSV for purge JEF00000-00221 EF–185 5.15.4 SPARK PLUG WARNING: • The spark plug may be still very hot. Special care must be exercised to avoid getting a burn. 1. Check the spark plug for fouling or being too burning. 2. Check the spark plug for plug gap, using a spark plug gauge. Specified Value: EU spec. JEF00327-00222 Others Denso (mm) 0.9 - 1.0 0.7 - 0.8 NGK (mm) 0.9 - 1.0 1.0 - 1.1 3. Check the internal resistance value of the spark plug. Specified Value: 3.0 - 7.5 kΩ 5.15.5 OIL CONTROL VALVE (Only for EU specifications) 1. With the battery voltage applied to the oil control valve terminals, visually check the operation of the valve. Specification: When the battery voltage is applied, the valve should operate. NOTE: • The right figure indicates the correct polarity (+ or –) when applying the voltage. • Never apply the battery voltage in excess of one minute. Negative ; side Positive : side <As viewed from A> 2. Measure the resistance between the terminals. Specified Value: 6.9 to 7.5 Ω at 20°C A Valve operating direction JEF00328-00223 EF–186 5.15.6 LINEAR THROTTLE SENSOR 1. Measure the resistance between the VC and the E2. Specified Value: 2.5 to 5.0 kΩ A 2. Measure the change in resistance between the VTH and the E2. Specification: The resistance value should increase in proportion to the opening degree of the throttle lever. VTH E2 VC As viewed from arrow A Linear throttle sensor REFERENCE: • When the throttle lever is fully closed, the resistance value should be about 0.4 kΩ. • When the throttle lever is fully opened, the resistance value should be about 3.4 kΩ. JEF00329-00224 5.15.7 NEUTRAL START SWITCH 1. Check continuity between terminals given below. : Continuity exists. Terminal Position P N D 2 L E P N P D 2 E N L D 2 L JEF00330-00225 5.15.8 EVAPORATOR TEMPERATURE SENSOR 1. Measure the resistance between the connector terminals. 2. Connect the connectors. Turn ON the air conditioner and keep on the operation for five minutes. 3. With the air conditioner turned OFF, measure the resistance between the connector terminals. Specification: The resistance value should vary between times, before and after the operation. REFERENCE: • As the temperature drops, the resistance value will rise. 1 2 JEF00331-00226 EF–187 5.15.9 MAIN RELAY & FUEL PUMP RELAY 1. Turn ON the IG switch. Check to see if the relay is functioning through sound and vibration. NOTE: • The relay may be very hot through its operation. Do not touch it with your hand. 2. Measure the resistance between the terminals q and w. Specified Value: 86 to 148 Ω NOTE: • The measurement should be conducted after the relay unit has been soaked at least one hour in an ambient temperature of 0°C to 40 hour°C. 3. Ensure that no continuity exists except between terminals q and w. 4. Apply the battery voltage to between the terminals q and w. Ensure that continuity exists between terminals e and t. Fuel pump relay w Main relay t NO e 3 5 1 2 q JEF00332-00227 5.15.10 FUEL PUMP WARNING: • Fire is prohibited strictly during the operation. 1. Turn ON the IG switch. 2. Using the SST, short between terminals T and E of the DLC. Check to see if the relay emits an operating sound. SST: 09991-87404-000 09991-87403-000 3. Turn OFF the IG switch. 4. Pull out the connector located at the top of fuel tank. Measure the resistance between the terminals of the fuel pump. Specified Value: 0.2 to 3.0 Ω Pump positive : terminal Gauge positive : terminal Pump negative ; terminal Gauge negative ; terminal JEF00333-00228 EF–188 B1 G1 ∞ B1 G2 ∞ B2 G1 ∞ B2 G2 ∞ C1 G1 ∞ C1 G2 ∞ C2 G1 ∞ C2 G2 ∞ C3 G1 ∞ C3 G2 ∞ C4 G1 ∞ C4 G2 ∞ I/C G1 ∞ I/C G2 ∞ S1 G1 ∞ S1 G2 3.7 - 4.1 kΩ S2 G1 ∞ S2 G2 3.7 - 4.1 kΩ I/O G1 1.9 - 2.1 kΩ I/O G2 ∞ S3 G1 ∞ S3 G2 3.7 - 4.1 kΩ S4 G1 ∞ S4 G2 3.7 - 4.1 kΩ G2 G1 ∞ G1 G2 ∞ B1 G1 S1 S2 I/O S3 S4 G2 Between terminals Resistance value IGNITOR UNIT Between terminals Resistance value B2 C1 C2 C3 C4 I/C B2 C1 C2 C3 C4 I/C 5.15.11 IGNITOR UNIT (Only for EU specifications) 1. Measure the resistance between the connector terminals given below. Specified Value: Refer to the table below. B1 G1 S1 S2 I/O S3 S4 G2 JEF00334-00229 5.15.12 FRONT AND REAR OXYGEN SENSORS WITH HEATER (Only for EU specifications) 1. Measure the resistance between the connector terminals +B and HT. Specified Value: 11.7 to 14.5 Ω at 20°C A +B HT E1 0X <As viewed from A> JEF00335-00230 EF–189 5.16. SST (Special Service Tools) Shape Parts number & Name 09268-87701-000 EFI fuel pressure gauge 09842-30070-000 EFI inspection wire 09268-87702-000 Inspection measuring tool set Purpose Inspection of fuel pressure Inspection of fuel injector Inspection of fuel pressure Inspection of fuel injector 09842-97203-000 EFI computer check subharness Inspection of computer input/output voltage 09991-87404-000 Engine control system inspection wire Diagnosis code check 09991-87402-000 Tacho-pluse pick-up wire Measurement of engine revolution speed 09991-87403-000 Shorting terminal T Diagnosis check wire 09243-87201-000 Idle adjusting wrench Adjustment and check of variable resister D S -2 1 09991-87301-000 D A IH A T S U Diagnosis tester set U S P 0 00 N 10 PA 20 02 JA 87 10 SO 0- N 17 DE 95 ON IP N 5- 96 T A H I A D 09 09965-97215-000 (English) 09965-97216-000 (German) 09965-97217-000 (Dutch ) 09965-97218-000 (French) Trouble-shooting program card Reading of diagnosis codes Erasing of diagnosis codes Reading of diagnosis codes Erasing of diagnosis codes JEF00336-00231 TO INDEX TO NEXT SECTION