1
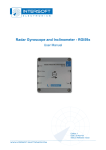
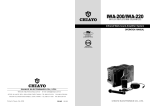
BUILT-IN (BI) SERIES
CONDENSED
ELECTRONIC CONTROL
INFORMATION BOOKLET
NOTE: If more detailed information on the
electronic control is needed, referenced the
complete Service Manual.
Part #7013338 - Rev. A - March, 2009
TABLE OF CONTENTS
PAGE
Table of Contents ......................................................................... 2
Basic Input Operations ................................................................ 3
Unit ON/OFF - Adjust Set-Points - IM ON/OFF - Max
Ice ON/OFF - Door Alarm ON/OFF - Air Purification
ON/OFF - Accent Lighting ON/OFF
Unique Input Operations ............................................................. 4
Temp Units Selection Mode - Contrast Adjust Mode Tone Adjust Mode - Showroom Mode - Sabbath Mode
- Zone Disable Mode - Manual Defrost
Instruction and Fault Indicators ................................................... 6
Service Input Operations ............................................................. 8
Diagnostic Mode ...................................................................... 8
Fault Code Recall Mode ........................................................ 10
Temperature Log Recall Mode ...............................................13
Model Configuration Mode ..................................................... 14
Manual Component Activation ............................................... 16
Self-Test Mode ....................................................................... 18
PAGE 2
BUILT-IN SERIES
Basic Input Operations
• Unit ON/OFF
- Press POWER key.
• Adjusting Set-Point (Temperature Adjust)
- Press COLDER or WARMER key of desired compartment
NOTE: Actual temperature is displayed 10 seconds after
last keystroke.
• Icemaker System ON/OFF
- Press ICE key.
• Maximum Ice Production Feature ON/OFF
- Press MAX ICE key.
NOTE: Automatically converts to normal operation after
24 hours.
• Door Ajar Alarm ON/OFF
- Press ALARM key.
• Air Purification Feature ON/OFF
- Press PURE AIR key.
• Accent Lighting System ON/OFF
- Press LIGHTS key.
PAGE 3
BUILT-IN SERIES
Unique Input Operations
• Temperature Units Selection Mode (°F or °C Display)
- Within first minute of switching unit on, press ALARM key
and POWER key simultaneously for 5 seconds.
NOTE: Mode will end 10 seconds after last keystroke.
• Contrast Adjust Mode (LCD Contrast Level)
1. Within first minute of switching unit on, press COLDER,
WARMER and POWER keys simultaneously for 5 seconds.
(“c” appears at small digit, with “1”, “2”, “3”, “4” or “5” at right)
2. Press Colder or WARMER key to toggle
NOTE: Mode will end 10 seconds after last keystroke.
• Tone Adjust Mode (Audible Chime Tone)
1. Within first minute of switching unit on, press COLDER,
WARMER and POWER keys simultaneously for 5 seconds
2. Press POWER key.
(“s” appears at small digit, with “HI” or “nO” or “Lo” at right)
3. Press Colder or WARMER key to toggle.
NOTE: Mode will end 10 seconds after last keystroke.
PAGE 4
BUILT-IN SERIES
• Showroom Mode (Disables all cooling functions)
1. Switch unit off with POWER key.
2. Press COLDER, WARMER & POWER keys simultaneously
NOTE: To return to normal operation, repeat steps above.
• Sabbath Mode (Disables all but cooling functions)
1. Switch unit off with POWER key.
2. Press POWER key for 10 seconds.
NOTE: To exit Sabbath Mode, press POWER key.
• Zone Disable Mode (Disables cooling functions in 1 zone)
1. Switch unit off with POWER key.
2. Press desired WARMER & POWER keys simultaneously
NOTE: To return to normal operation, repeat steps above.
• Manual Defrost
- Press & hold ICE key for 5 seconds.
PAGE 5
BUILT-IN SERIES
Possible Instruction & Fault Indicators
NOTE: Temperatures shown are for reference only, actual temperatures may vary.
Replace Air Filter
NOTE: Press PURE AIR Key for 5 seconds to reset timer.
Replace Water Filter
NOTE: Press filter reset button for 5 seconds to reset counters.
Freezer Compartment Thermistor Fault
Refrigerator Compartment Thermistor Fault
PAGE 6
BUILT-IN SERIES
Icemaker System Problem; Icemaker System Disabled
Minor Fault Code Logged
Major Fault Code Logged
(Flashing w/Alarm Beeping)
Major Fault Code Logged Needing Immediate Attention
NOTES:
> All Fault Codes will reappear after repairs unless ALARM key is
pressed for 15 seconds.
> To suspend a Fault Code for 24 hours, press and hold ALARM
then POWER keys simultaneously for less than 5 seconds.
PAGE 7
BUILT-IN SERIES
Service Input Operations
• Diagnostic Mode (Observe Current Thermistor Temperatures)
NOTE: Keystrokes for Diagnostic Mode and Fault Code Recall
Mode are the same.
1. Press COLDER and POWER simultaneously, then release.
If no Fault codes observed, temperature appears at left with
location code at right.
2. Press Colder or WARMER key to toggle.
THERMISTOR LOCATION CODE TABLE
CODE
LOCATION
Refrigerator Compartment
Refrigerator Evaporator
Freezer Compartment
Freezer Evaporator
Refrigerator Drawers (Not Active)
Condenser (Not Active)
Ambient
PAGE 8
BUILT-IN SERIES
DIAGNOSTIC MODE NOTES:
> Mode will end 20 seconds after last keystroke.
> Pressing and holding COLDER and POWER keys for 10
seconds will initiate Manual Zone Disable Mode.
> If “Sh” and “r” appear when initiating Diagnostic Mode, unit is
in Showroom Mode.
> If “EE” appears when in Diagnostic Mode, thermistor in that
location is defective.
> There is no thermistor in the drawers, so “EE” will appear at
left of the “dr”.
> There is no thermistors on the condenser, so “EE” will
appear at left of the “Cn”.
> The ambient thermistor is part of the control board. It is not
a separate component.
PAGE 9
BUILT-IN SERIES
Service Input Operations
• Fault Code Recall Mode (Observe Stored Fault Codes)
NOTE: Keystrokes for Fault Code Recall Mode and Diagnostic
Mode are the same.
1. Press COLDER and POWER simultaneously, then release.
2. Press Colder or WARMER key to toggle.
NOTES:
> Mode will end 10 seconds after last keystroke.
> Pressing and holding COLDER and POWER keys for 10
seconds will initiate Manual Zone Disable Mode.
> If “Sh” and “r” appear when initiating Fault Code Recall
Mode, unit is in Showroom Mode.
> To clear fault codes, press ALARM key for 15 seconds.
> If Fault Codes are present but the desire is to view current
temperature readings from thermistors (Diagnostic Mode),
then press ALARM key; this will shift electronic control
system into Diagnostic Mode.
PAGE 10
FAULT CODE TABLE WITH LCD CORRELATION DIAGRAM ( PAGE 1 of 2 )
LIGHTS
10
15
20
30
35
40
44
45
50
60
90
95
98
ICE MAKER
MAX ICE
COLDER
Thermistor Faults
Relay Faults
Defrost Heater Faults
Ice/Water/Accessory Faults
Fan Faults
Runtime Faults
Glass Heater Faults
Lighting Faults
Flow Meter
Load/Component Faults
Control Faults
Diagnostics
Power Faults
WARMER
0
1
2
3
4
5
6
7
8
9
A
d
F
H
L
r
U
COLDER
Misc
Refrigerator
Freezer
Condenser
Defrost System
Control System
Compressors
Ambient
Icemaker
Dispenser
Air Purifier
TC Drawer
Freezer Evaporator
High Voltage System
Lighting
Refrigerator Evaporator
Water Systems
NOTE: These Columns are repeated on next page
00
01
02
05
06
07
09
10
11
12
20
21
22
25
30
33
34
35
36
37
38
39
40
42
43
44
45
46
WARMER
PURE AIR
ALARM
Open
Short/Closed
Unstable
Miswire normal temps
Miswire overheat
Bad Ohms
Too Warm/Large Temp Differential
Second Device Open
Second Device Short/Closed
Second Device Unstable
Third Device Open
Third Device Short/Closed
Third Device Unstable
Diagnostics Failure
Valve Enabled Too Long
Speed Setting too Low
Speed Setting too High
Fan speed error
Fan current too low
Fan current too high
Fan Power Output Fault
DC Fan Output Fault
Excessive runtime
Primary Heater Fault
Secondary Heater Fault
Door Heater Output Fault
Burned out Light
No Position/State Detect
NOTE: This Column is
continued on next page
PAGE 11
POWER
FAULT CODE TABLE WITH LCD CORRELATION DIAGRAM ( PAGE 2 of 2 )
LIGHTS
10
15
20
30
35
40
44
45
50
60
90
95
98
ICE MAKER
MAX ICE
COLDER
Thermistor Faults
Relay Faults
Defrost Heater Faults
Ice/Water/Accessory Faults
Fan Faults
Runtime Faults
Glass Heater Faults
Lighting Faults
Flow Meter
Load/Component Faults
Control Faults
Diagnostics
Power Faults
WARMER
0
1
2
3
4
5
6
7
8
9
A
d
F
H
L
r
U
COLDER
Misc
Refrigerator
Freezer
Condenser
Defrost System
Control System
Compressors
Ambient
Icemaker
Dispenser
Air Purifier
TC Drawer
Freezer Evaporator
High Voltage System
Lighting
Refrigerator Evaporator
Water Systems
NOTE: These Columns are repeated from last page
50
55
56
60
65
66
70
71
72
73
74
75
80
81
82
83
84
85
86
87
90
92
93
95
96
97
98
99
WARMER
PURE AIR
ALARM
Open Heater
Triac Open
Triac Short
No Load/Load Open
Stuck at Dispenser Water Valve Out
Stuck at Ice Water Valve Out
Bad Flash Write
Flash Initialized
Flash Memory Bad
Invalid Log Fault Checksum
Invalid E2 Checksum
Invalid Model E2 Checksum
No Communication
Communications Time-out
Partial Communications
Bad Micro Communication
Micro Initialization
Display Failure
Too Slow
No Flow
Framing Errors
Excessive Collisions
Data Overrun
FMEA Error
Calibration or Low Signal Error
Quantum SPI
Brownout
Other
NOTE: This Column is
continued from last page
PAGE 12
POWER
BUILT-IN SERIES
Service Input Operations
• Temperature Log Recall Mode (Observe Average Temp Data)
1. Initiate Diagnostic Mode by pressing COLDER and POWER
simultaneously, then release. If fault codes are observed,
press ALARM key.
2. Press COLDER or WARMER key to toggle to desired thermistor.
3. Press and hold POWER key, then WARMER key, then
release.
a. Temperature appears at left; index at right.
b. Location code will flash at 3 second intervals.
NOTES:
> Mode ends 20 seconds after the last key stroke.
> “bL” at left = blank, no temperature data.
> Service icon = POWER key pressed during that index.
> Alarm bell icon = power failure during that index.
> If Manual Compartment Disable Mode was activated,
average temperatures will be logged, but no event indicator.
> If unit was in Showroom Mode, average temperatures
will be logged, but no event indicator.
> If the unit was switched OFF, average temperatures will
be logged and service indicator would be present.
PAGE 13
BUILT-IN SERIES
Service Input Operations
• Model Configuration Mode (Apply Appropriate Model Batch
Files to E-Control)
1. Initiate Diagnostic Mode by pressing COLDER and POWER
simultaneously, then release. If fault codes are observed,
press ALARM key.
2. Press and hold POWER key for 10 seconds.
3. Press COLDER or WARMER key to toggle through model
codes; stop when appropriate code is displayed.
4. Press POWER key, “Pr g” appears.
5. Press POWER key again within 5 seconds.
NOTES:
> Second press of POWER key must occur w/in 5 seconds.
> With no keys pressed, mode automatically ends 30 seconds
after last key stroke.
> If the ALARM key is pressed, or if WARMER and COLDER keys are pressed during Model Configuration Mode,
mode is exited.
> Model code sequence is as shown in tables on next page.
PAGE 14
BUILT-IN SERIES
MODEL CODE SEQUENCE TABLE
36
48
48
36
36
30
U
SD
S
R
F
U
42
42
36
36
36
30
S
SD
S
UG
RG
UG
36
48
48
36
36
30
UI
SDI
SI
RI
FI
UI
42
42
36
36
36
30
SI
SDI
SI
UGI
RGI
UGI
NOTE: The main control board is used in domestic and international units. An “I” at end of the model code indicates an
International model code. Currently only 4 digits can be displayed, so if code is 5 digits long (Ex: 30UGI, 36UGI, 36RGI,
42SDI & 48SDI), 5th digit will not appear. Until this is addressed,
stopping when appropriate model code is first observed (domestic
only) should result in proper operation.
PAGE 15
BUILT-IN SERIES
Service Input Operations
• Manual Component Activation Mode (Individual Component
Activation)
1. Initiate Diagnostic Mode by pressing COLDER and POWER
simultaneously, then release. If fault codes are observed,
press ALARM key.
2. Press and hold desired zone’s COLDER key for 10 seconds.
(Chosen zone’s components can forced to ON for five (5)
minutes, or OFF using WARMER or COLDER keys)
3. Press WARMER key to activate next component; press
COLDER key to activate previous component.
NOTES:
> All temperatures displayed are current, without weighted
averaging or offsets.
> With no keys pressed, mode automatically ends 5 minutes
after last key stroke.
> Pressing any key (other than POWER or ALARM) during
this mode restarts the 5 minute timer.
> Pressing ALARM key during this mode will end the mode.
> Pressing POWER key during this mode will force control
into Diagnostic Mode.
>“-84F” or “-64c” will appear in place of temperature if thermistor is open or missing.
PAGE 16
REFRIGERATOR ZONE MANUAL COMPONENT ACTIVATION TABLE
STEP
FUNCTIONS / COMPONENT(S)
LCD VIEW
COMMENTS
1
All Components OFF; All Lights OFF
OFF Displayed; All Lights OFF
2
Ref Compressor ON
Zone Temp & r Displayed; Actual temps will vary
3
Ref Evaporator Fan ON (Comp stays ON)
Alternate Evap Temp & rE / Zone Temp & rC Display at
5 second intervals; Actual temps will vary
4
Condenser Fan ON (Comp/Evap fan stays ON)
Zone Temp & Cd Displayed; Actual temps will vary
5
Drawer Fan(s) ON (Comp/Evap/Cond fan
switch OFF)
Alternate -84 (-64 if set Celsius) & dr / Evap Temp & rE
Display at 5 second intervals; Actual temps will vary
6
Drawer Fan(s) OFF
OFF Displayed; All Lights ON
7
Air Purifier Light & Fan ON
Ar & Ft Displayed
8
Everything OFF (Light relay ON/Lights OFF)
OFF Displayed; All Lights OFF
9
Main Lights ON
LS & On Displayed; Main Lights ON; All else OFF
10
Accent/Display Lights ON
AC & Lt Displayed; All Lights ON
EXIT Normal ON Mode
Press POWER to exit, or let time out
FREEZER ZONE MANUAL COMPONENT ACTIVATION TABLE
STEP
FUNCTIONS / COMPONENT(S)
LCD VIEW
COMMENTS
1
All Components OFF; All Lights OFF
OFF Displayed; All Lights OFF
2
Fre Compressor ON
Zone Temp & F Displayed; Actual temps will vary
3
Fre Evap Fan ON (Comp stays ON)
Alternate Evap Temp & FE / Zone Temp & FC Display
at 5 second intervals; Actual temps will vary
4
Condenser Fan ON (Comp/Evap fan stays ON)
Zone Temp & Cd Displayed; Actual temps will vary
5
Defrost Heater ON
Evap Temp & Et Displayed; Actual temps will vary
6
Defrost Heater ON; Evap Fan ON
Evap Temp & dE Displayed; Actual temps will vary
7
All Components OFF; All Lights OFF
OFF Displayed; All Lights OFF
8
All Lights ON
LS & On Displayed; All Lights ON
EXIT Normal ON Mode
Press POWER to exit, or let time out
PAGE 17
BUILT-IN SERIES
Service Input Operations
• Self-Test Mode (Forced E-Control Cycling)
1. Initiate Diagnostic Mode by pressing COLDER and POWER
simultaneously, then release. If fault codes are observed,
press ALARM key.
2. Press and hold COLDER, WARMER and POWER key, then
release.
NOTES:
> Self-test lasts approximately 5 seconds.
> After running Self Test Mode, Fault Code Recall Mode
must be initiated to view any fault codes that may have
been logged during the self test.
PAGE 18