1
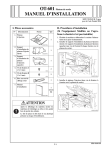
22. Attach the image controller to the back of the
machine, and then slide the controller to the
right.
Note:
During installation, be careful that the image controller is not dropped.
19. Reinstall the lower rear cover that has been
removed in step 3 (seven screws).
9J05IXC018DA
20. Unhook two tab, and remove the wiring cover.
9J05IXC001DB
23. Secure the image controller (four screw A’s furnished with the Video Interface Kit).
9J05IXC019DA
21. Install the Metal Blanking A and B (two screw B’s
for each side and two screw C’s furnished with
the Video Interface Kit).
9J05IXE023DA
24. Connect the machine and the Image Controller
using the Image transmission cable furnished
with the Image Controller.
Screw B
Screw C
9J05IXE021DA
9J05IXE025DB
E-5