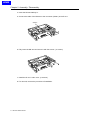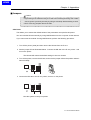
1
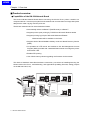
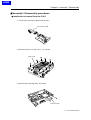
HOME
SERVICE MANUAL
Model
KN-304
FEBRUARY 2000
CSM-KN304
KONICA BUSINESS TECHNOLOGIES, INC.
HOME
HOME
KN-304
SERVICE MANUAL
FEBRUARY 2000
Used on Konica Model
7020
HOME
IMPORTANT NOTICE
Because of the possible hazards to an inexperienced
person servicing this equipment, as well as the risk of
damage to the equipment, Konica Business Technologies strongly recommends that all servicing be performed by Konica-trained service technicians only.
Changes may have been made to this equipment to
improve its performance after this service manual was
printed. Accordingly, Konica Business Technologies,
Inc., makes no representations or warranties, either
expressed or implied, that the information contained in
this service manual is complete or accurate. It is understood that the user of this manual must assume all risks
or personal injury and/or damage to the equipment while
servicing the equipment for which this service manual
is intended.
Corporate Publications Department
© 2000, KONICA BUSINESS TECHNOLOGIES, INC.
All rights reserved.
Printed in U.S.A.
HOME
Contents
CONTENTS
1. Overview .................................................................................................... 1-1
■ Product specifications ................................................................................ 1-3
● KN-304 network board .................................................................................................... 1-3
■ Product overview ........................................................................................ 1-4
● Capabilities of the KN-304 Network Board ..................................................................... 1-4
2. Assembly / Disassembly ............................................................................ 2-1
■ Assembly / Disassembly procedures.......................................................... 2-3
● Installation to/removal from the IP-011 ........................................................................... 2-3
3. Troubleshooting .......................................................................................... 3-1
■ LED Status Indicator .................................................................................. 3-3
■ Status Page ................................................................................................ 3-4
■ Resetting the KN-304 to Factory Default .................................................... 3-6
■ How to Diagnose Problems ........................................................................ 3-7
● Troubleshooting Network Hardware Connections ........................................................... 3-8
● Troubleshooting NetWare Protocol ................................................................................. 3-8
● NetWare Checklist .......................................................................................................... 3-8
● File Server Checklist ....................................................................................................... 3-9
● Workstation Checklist ..................................................................................................... 3-9
● Print Server Card Configuration Checklist ...................................................................... 3-9
● Printer Server/File Server/Printer Checklist .................................................................. 3-10
● Workstation to Print Server Card Connection Checklist ............................................... 3-10
● KN-304 Loses Its File Server Connection ..................................................................... 3-10
● Unable to Print from a Different Context ....................................................................... 3-10
4. Appendices................................................................................................. 4-1
■ Rewriting the firmware ................................................................................ 4-3
● Preparation ..................................................................................................................... 4-3
● Procedure of rewriting the firmware ................................................................................ 4-3
■ Functions of parts mounted on the board. ................................................. 4-4
■ Jumpers ...................................................................................................... 4-5
iii KN-304 Network Board
HOME
Blank page
HOME
SAFETY PRECAUTIONS
effect may be caused by altering any aspect of the
machine’s design. Such changes have the potential
of degrading product performance and reducing
safety margins.
Installation Environment
Safety considerations usually are directed toward
machine design and the possibility of human error. In
addition, the environment in which a machine is operated must not be overlooked as a potential safety
hazard.
For these reasons, installation of any modification not
specifically authorized by Konica Business Machines
U.S.A., Inc., is strictly prohibited.
Most electrical equipment is safe when installed in a
normal environment. However, if the environment is
different from what most people consider to be normal, it is conceivable that the combination of the
machine and the room air could present a hazardous
combination. This is because heat (such as from
fusing units) and electrical arcs (which can occur
inside switches) have the ability to ignite flammable
substances, including air.
The following list of prohibited actions is not all-inclusive, but demonstrates the intent of this policy.
When installing a machine, check to see if there
is anything nearby which suggests that a potential hazard might exist. For example, a laboratory
might use organic compounds which, when they
evaporate, make the room air volatile. Potentially dangerous conditions might be seen or smelled. The
presence of substances such as cleaners, paint thinners, gasoline, alcohol, solvents, explosives, or similar items should be cause for concern.
If conditions such as these exist, take appropriate
action, such as one of the following suggestions.
•
Determine that the environment is controlled
(such as through the use of an exhaust hood) so
that an offending substance or its fumes cannot
reach the machine.
•
Using an extension cord or any unauthorized
power cord adapter.
•
Installing any fuse whose rating and physical size
differs from that originally installed.
•
Using wire, paper clips, solder, etc., to replace or
eliminate any fuse (including temperature fuses).
•
Removing (except for replacement) any air filter.
•
Defeating the operation of relays by any means
(such as wedging paper between contacts).
•
Causing the machine to operate in a fashion other
than as it was designed.
•
Making any change which might have a chance
of defeating built-in safety features.
•
Using any unspecified replacement parts.
General Safety Guidelines
The specific remedy will vary from site to site, but the
principles remain the same. To avoid the risk of injury
or damage, be alert for changes in the environment
when performing subsequent service on any machine, and take appropriate action.
This copier has been examined in accordance with
the laws pertaining to various product safety regulations prior to leaving the manufacturing facility to
protect the operators and service personnel from
injury. However, as with any operating device, components will break down through the wear-and-tear of
everyday use, as will additional safety discrepancies
be discovered. For this reason, it is important that the
technician periodically performs safety checks on the
copier to maintain optimum reliability and safety.
Unauthorized Modifications
The following checks, not all-inclusive, should be
made during each service call:
•
Remove the offending substance.
•
Install the machine in a different location.
CAUTION: Avoid injury. Ensure that the copier is
disconnected from its power source before continuing.
Konica copiers have gained a reputation for being
reliable products. This has been attained by a combination of outstanding design and a knowledgeable
service force.
The design of the copier is extremely important. It is
the design process that determines tolerances and
safety margins for mechanical, electrical, and electronic aspects. It is not reasonable to expect individuals not involved in product engineering to know what
v
•
Look for sharp edges, burrs, and damage on all
external covers and copier frame.
•
Inspect all cover hinges for wear (loose or broken).
•
Inspect cables for wear, frays, or pinched areas.
HOME
•
Ensure that the power cord insulation is not damaged (no exposed electrical conductors).
•
Ensure that the power cord is properly mounted
to the frame by cord clamps.
•
Check the continuity from the round lug (GND) of
the power cord to the frame of the copier -- ensure
continuity. An improperly grounded machine can
cause an electrically-charged machine frame.
Applying Isopropyl Alcohol
Care should be exercised when using isopropyl alcohol, due to its flammability. When using alcohol to
clean parts, observe the following precautions:
Safeguards During Service Calls
Confirm that all screws, parts, and wiring which are
removed during maintenance are installed in their
original positions.
•
When disconnecting connectors, do not pull the
wiring, particularly on AC line wiring and high
voltage parts.
•
Do not route the power cord where it is likely to
be stepped on or crushed.
•
Carefully remove all toner and dirt adhering to any
electrical units or electrodes.
•
After part replacement or repair work, route the
wiring in such a way that it does not contact any
burrs or sharp edges.
•
Do not make any adjustments outside of the
specified range.
•
Remove power from the equipment.
•
Use alcohol in small quantities to avoid spillage
or puddling. Any spillage should be cleaned up
with rags and disposed of properly.
•
Be sure that there is adequate ventilation.
•
Allow a surface which has been in contact with
alcohol to dry for a few minutes to ensure that the
alcohol has evaporated completely before applying power or installing covers.
Summary
It is the responsibility of every technician to use professional skills when servicing Konica products. There
are no short cuts to high-quality service. Each copier
must be thoroughly inspected with respect to safety
considerations as part of every routine service call.
The operability of the copier, and more importantly,
the safety of those who operate or service the copier,
are directly dependent upon the conscientious effort
of each and every technician.
Remember...when performing service calls, use good
judgement (have a watchful eye) to identify safety
hazards or potential safety hazards that may be present, and correct these problem areas as they are
identified -- the safety of those who operate the copier
as well as those who service the copier depend on it!
vi
HOME
1
Overview
HOME
HOME
Chapter 1 Overview
■ Product specifications
● KN-304 network board
Type:
Built in Konica IP-011 printer controller
Card:
Network controller card x1
Network interface: Ethernet (100Base-T/10Base-T)
Protocols:
IPX/SPX (NetWare), LPD/LPR (TCP/IP),
peer-to-peer (TCP/IP)
Host computer:
DOS/V computers, NEC PC-98 series
Dimensions:
123.7 mm (W) x 95 mm (H)
Weight:
Approx. 227 g
Power source:
5 VDC (5-% to +5%,), 0.5A
Note:
Specifications are subject to change for improvement without prior notice.
1-1 KN-304 Network Board
HOME
Chapter 1 Overview
■ Product overview
● Capabilities of the KN-304 Network Board
The Konica KN-304 Network Board allows connecting the Konica IP-011 printer controller to a
computer network. It receives print jobs from the network and converts them into image data (video
data) that the 7020 copying machine prints out.
The KN-304 network board is characterized as follows.
• Automatically selects 100Base-T (Fast Ethernet) or 10Base-T.
• Supports peer-to-peer printing by TCP/IP from Microsoft Windows 95/98.
• Supports printing by lpr/lpd of Microsoft Windows NT/2000*.
*Windows 2000 will be available in the future.
• Supports both of Novell NetWare bindery mode and Novell Directory Service
(NDS).
• Incorporates an HTTP server and enables to link the Management Access
Program (MAP) provided with a standard Web browser to manage the printer
and network card.
• Enables FTP printing.
• Use of flash memory allows upgrading the firmware via the network.
This Service Handbook describes hardware construction, procedures of installing/removing the
KN-304 to/from the IP-011, troubleshooting, and appendixes (installing firmware, setting jumpers
on the KN-304 board, etc).
KN-304
(OPTION)
IP-011
1-2 KN-304 Network Board
HOME
2
Assembly / Disassembly
HOME
HOME
Chapter 2 Assembly / Disassembly
■ Assembly / Disassembly procedures
● Installation to/removal from the IP-011
1. Connect the connection cable to the KN-304.
connection cable
2. Remove the IP-011’s main cover. (11 screws)
main cover
3. Remove the screening plate. (2 screws)
screening plate
2-1 KN-304 Network Board
HOME
Chapter 2 Assembly / Disassembly
4. Insert the KN-304 halfway in.
5. Connect the cable of the KN-304 to the connector (CN501) of the IP-011.
CN501
6. Fully insert the KN-304 and secure it with the screws. (2 screws)
7. Install the IP-011’s main cover. (11screws)
8. For removal, reverse the procedure of installation.
2-2 KN-304 Network Board
HOME
3
Troubleshooting
HOME
HOME
Chapter 3 Troubleshooting
■ LED Status Indicator
The KN-304 has two LED status indicators: amber and green. The amber LED generally indicates
job activity; it flashes when a print job is being communicated to the Print Server Card; it is off when
no activity is occurring.
The green LED indicates the operating condition of the KN-304 when it is powered on during normal operation. The following table provides the conditions that this LED may indicate.
LED Patterns
And the printer is...
THEN THE KN-304...
Operating
Condition
Action
Green LED is ON
solid.
First powered on.
Is performing self-tests.
Normal
None.
Awaiting print jobs.
Is functioning properly.
Normal
None.
Green LED blinks 3 times and
stays on.
Finished with self-tests.
Prints out status report
Normal
None.
Green LED
blinks rapidly.
Performing self-tests.
Detects bad RAM chip.
Green LED
blinks rapidly 4
times then pauses.
Performing self-tests.
Failed the Ethernet
hardware self-test.
Check the network.
Amber LED
blinks short for
10 seconds.
Amber LED goes
off and the Green
LED blinks continuously.
Performing flash
memory self-tests
Green LED
blinks slowly.
Awaiting print jobs
sometime after
power-on completes.
Some printer interface
error.
Green LED
blinks rapidly.
Awaiting print jobs.
Has lost its NetWare
connection to file
server.
Green LED
alternately blinks
with amber indicator.
Finished with power-on
sequence.
Did not pass the checksum test. Unit automatically goes into
download mode and
awaits flash update.
Has been reset to factory defaults.
Error
Replace the KN-304.
Error
Check the network.
Error
Execute flash update.
Error
Check connection
between the KN-304
and IP-011.
Error
Check NetWare
settings.
Error
Power off
and move jumper to
OFF position.
3-1 KN-304 Network Board
HOME
Chapter 3 Troubleshooting
■ Status Page
The Status/page report is sent as a print job to the printer when the KN-304 is powered on. For
example, the report on the next page shows the configuration of the KN-304 immediately before the
report is printed. Konica 7020 printer also allows you to use a command from the LCD panel that will
produce a status report.
It is strongly recommended that you review this report immediately after installation and any time
the setup has been changed. If the report does not include a protocol that was configured, check
that the procedure was done properly.
3-2 KN-304 Network Board
HOME
Chapter 3 Troubleshooting
An example of network setup list
---------------------------------------------------------------------------------------------------------------------------------Unit Serial No: 995289
Version: 09.00
Network Address: 00:40:af:78:d9:b8
Network Topology: Ethernet Connector: RJ45
Network Speed: 100 Megabits
Novell Network Information enabled
Print Server Name: KON_260121
Password Defined: no
Preferred File Server not defined
Directory Services Context not defined
Frame Type: 802.2 On 802.3
Peer-to-Peer Information
enabled
Frame Type: 802.2 On 802.3
Network ID: 0
TCP/IP Network Information enabled
Frame Type: Ethernet II
Protocol Address: 192.102.51.100
Subnet Mask: 255.255.255.0
IPP Network Information
Default Gateway: 0.0.0.0
enabled
Internet Printing Protocol
AppleTalk Network Information
http://192.102.51.100:631/Print
enabled
Frame Type: 802.2 SNAP On 802.3
Preferred AppleTalk Zone: *
Default Zone
---------------------------------------------------------------------------------------------------------------------------------Novell Connection Information
Printer Name: Printer 0
File Server: PS280
Queue: 3500_NIC
Priority: 1 Attached: Yes
No Notify Defined
File Server: 55SX
Queue: 3500_NIC
Priority: 1 Attached: Yes
Notify (Job Owner)
First: 60 Repeat: 60
Peer-to-Peer Connection Information
Printer Name: KON_260121
AppleTalk Connection Information
AppleTalk Printer Name: KON_260121
TCP/IP Connection Information
Port Number : 10001
----------------------------------------------------------------------------------------------------------------------------------
The KN-304 does not support Apple Talk.
3-3 KN-304 Network Board
HOME
Chapter 3 Troubleshooting
■ Resetting the KN-304 to Factory Default
You can cause the KN-304 to restore all parameters to factory default values, so the Print Server
Card appears just as it came from the factory. You may choose to do this when the Print Server Card
is moved to a new location where the environment (NetWare file servers, IP subnets, and so on) is
different.
This process is called “Reset to Factory”. It can be done with MAP or a Web Browser. However, if
network access is not possible, the following method may be used.
Resetting to factory default means that the print server loses all data such as
names and IP addresses. It does not lose its serial number or MAC address.
3-4 KN-304 Network Board
HOME
Chapter 3 Troubleshooting
■ How to Diagnose Problems
Use the following list to determine the cause of printing problems:
1. Verify that the printer is functioning properly.
• Is the printer printing? Make sure the printer is operating properly by causing it to generate a
test page. See your printer’s owner’s manual for instructions on generating a test page.
• Is the printer on-line (green LED should light)*? Verify that the printer is on-line or else nothing
will print. *Status at about 2 minutes after power-on.
• Does the LCD panel of Konica 7020 display an error message? Review Konica 7020 manual.
• Did you get a KN-304 status page? On power-up, the KN-304 sends a status page which may
contain information that can be useful for troubleshooting. Keep the status page available until
a problem is resolved.
2.Check the KN-304’s LED status indicator to ensure that there is no error condition. See LED
Status Indicator, for more information.
3.Check the status report to see what protocols are enabled and active. See the appropriate chapter to confirm that you have installed and configured your network protocol correctly for the KN304. See Status Page for an example of the status page.
4.Determine if other users can print. If they can’t and they are all on the same NOS, go to the
troubleshooting section for that NOS.
5.When you have determined the nature of the problem, use the checklists in the next section.
3-5 KN-304 Network Board
HOME
Chapter 3 Troubleshooting
● Troubleshooting Network Hardware Connections
• For 100BaseT or 10BaseT, check that the network connector is plugged into the RJ connector on
the KN-304.
• Try another cable to make sure you do not have a bad cable.
● Troubleshooting NetWare Protocol
It is recommended you use MAP to get the NetWare setup and parameter values. If you have not
resolved the problem after running MAP, go through the checklists in this section.
● NetWare Checklist
• Is the print server name entered correctly? The factor-default name is KON_serial number. The
serial number is located on the card.
• Did you assign print queues to the printer? It is recommended you assign each print queue to
only one Print Server Card-connected printer. If print queues are assigned to other network printers, the print jobs may be going to an other network printer.
• Did you assign the printer to the type Remote Other /Unknown?
• If the PCONSOLE settings are correct, the connection between the printer and network may have
been broken. Turn the printer off and, using PCONSOLE, wait for the status message Not Connected. Turn the printer on and the status should change to Waiting for Job.
3-6 KN-304 Network Board
HOME
Chapter 3 Troubleshooting
● File Server Checklist
• Is there enough disk space on the file server and is it running?
• Is the correct file server associated with the printer? Use PCONSOLE to check this.
• Did you have the proper rights to configure the printer? (supervisor or administrator)
• Are the File Server and the KN-304 communicating? Run NetWare’s COMCHECK utility from any
network workstation to check this.
• Are there enough user positions on the File Server? The Print Server function logs on as a user.
● Workstation Checklist
• Is the network loaded onto the workstation? See the NetWare documentation.
• Is the application set up to print to the printer? For instance, are you using the correct driver?
• Is the workstation connected to the correct print queue? Print a file and verify that the file goes to
the queue.
• Are the print queues assigned to the KN-304-connected printer also assigned to another network
printer? If they are, the print jobs may be going to that printer.
• From PCONSOLE, enter a sample print job directly into an assigned queue. Does the job become Active? Is job printed?
• Is AUTO ENDCAP enabled? Auto Endcap lets you send data to a network printer. Use PRINTCON
to check. If not, enable it.
● Print Server Card Configuration Checklist
If all your hardware connections are correct, check the following:
• Use MAP to check the status of the print server. The Unit Status screen shows the status for the
selected network interface card. This report includes a status of file servers and queues assigned to a printer along with a description of any problems.
• The printer may not be assigned to the correct print queues. Use PCONSOLE to direct print jobs
to the correct queues, then check to see if the print job is in the queue.
• If devices were added or changed, use PCONSOLE to make sure you configured the new devices correctly.
• Make sure the KN-304’s name has been entered correctly. If you changed the name in MAP, you
must
3-7 KN-304 Network Board
HOME
Chapter 3 Troubleshooting
● Printer Server/File Server/Printer Checklist
Check the following to see if:
• The KN-304 Print Server can log into the file server, and can service jobs from a File Server.
• The KN-304 Print Server name is listed on that File Server.
• The password assigned to the Print Server Card through PCONSOLE matches the password
assigned through MAP. Use MAP to update the password stored in the network Print Server’s
memory.
• The print job is in the print queue and waiting to be printed. Use PCONSOLE to check if the print
jobs are being sent to the printer.
● Workstation to Print Server Card Connection Checklist
To make sure the workstation is communicating with the Print Server Card, check the following:
• Print a file from the workstation and make sure the print job gets to the print queue using PCONSOLE.
If the print job does get to the queue, the problem is not with the workstation/print server connection.
• Use CAPTURE to send data to the printer from a workstation software application. See your NetWare
print server manual for information.
• Make sure another printer is not taking the print jobs from the queues BEFORE the Print Server
Card can service the job. To do this, disable the other printer until you can verify the Print Server
Card-connected printer setup.
● KN-304 Loses Its File Server Connection
If the KN-304 loses its connection to the file server, it can take approximately 5 to 10 minutes to
reconnect. If the connection is not made after a reasonable amount of time, check the error conditions to troubleshoot the problem.
● Unable to Print from a Different Context
The KN-304 does not support printing from a context different from the context you are installed
upon. If you want to do this, you must create an alias queue. See your NetWare Manual for more
information.
3-8 KN-304 Network Board
HOME
4
Appendices
HOME
HOME
Chapter 4 Appendices
■ Rewriting the firmware
As the KN-304 uses flash ROM, it is possible to rewrite the firmware via the network.
To rewrite the firmware, you use the utility program FTP Download (for TCP/IP) by the procedure
described below.
● Preparation
• Set up the following components for the environment of TCP/IP.
• Computer used to upgrade the firmware
• KN-304
• Install the KN-304 properly and connect it’s Ethernet port with a network cable so that the KN-304
can be accessed from the network computer.
• The following utility should be installed.
• FTP Download
• Prepare the replacing firmware in the hard disk of the computer or in a CD-ROM.
● Procedure of rewriting the firmware
1. Make sure of the current firmware version.
You can get the information from the status page.
2. Start FTP Download and select the firmware file (.upd file) to download from [File] menu.
<Example> g15900a.upd
You will then be urged to enter the IP address and password.
3. Enter the printer’s IP address (e.g. 192.102.51.100) and the password “sysadm” and click
the OK button.
File transfer starts.
4. When a message “Unit Updated” appears on the computer screen, click the OK button.
5. Power off/on the printer.
Caution:
Never turn off the copying machine while updating is going on.
4-1 KN-304 Network Board
HOME
Chapter 4 Appendices
JP2
■ Functions of parts mounted on the board.
ON
ON
OP7
OP5
OP4
OP3
OP2
BYPASS
TEST
4-2 KN-304 Network Board
OP6
OP1
DL1
DL2
HOME
Chapter 4 Appendices
■ Jumpers
Caution:
• If grounding is not made securely, the cards can be damaged during work. Make
sure to ground your body securely by using a wrist strap before starting to work.
• Don’t move any jumpers other than OP2.
OP2: Reset
This allows you to restore the default values of the parameters set up before shipment.
You can reset the KN-304 normally by using MAP/browser from the computer via the network.
If you cannot use the method of using MAP/browser, perform the following procedure.
1. Turn off the printer (7020) and then remove the KN-304 from the IP-011.
2. Set the jumper OP2 as illustrated below. Connect the KN-304 to the IP-011 printer. And
turn on the printer.
The KN-304 will restore the default settings in about 5 minutes.
3. Turn off the printer, remove the KN-304, and move the jumper OP2 to the position where it
was set initially.
ON
ON
OP7
OP5
OP4
OP3
OP2
BYPASS
TEST
DL1
DL2
OP6
OP1
4. Connect the KN-304 to the IP-011 printer, and turn on the printer.
ON
ON
OP7
OP5
OP4
OP3
OP2
BYPASS
TEST
DL1
DL2
OP6
OP1
Now the system is ready to operate.
4-3 KN-304 Network Board
HOME
Chapter 4 Appendices
OP3: Bus handshake
Don’t move this jumper.
This is set depending on the signals of the printer.
OP3 pin number 1-2: ACK/RDY signals
OP3 pin number 2-3: WAIT signal
The handshake signal is normally set at WAIT (pins 3-4).
4-4 KN-304 Network Board