1
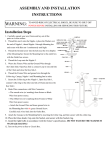
Integrator Spring Clip Replacement
Instruction Sheet
The following instructions outline how to replace the Integrator Spring Clips on the Integrator Rod Assembly
to prevent ‘thermal walking” of the rod out of the holder.
SAFETY PRECAUTIONS
ELECTRICAL SHOCK HAZARD! Always turn off, disconnect, and disengage all power
sources to the projector before servicing. Failure to comply results in death or
serious injury.
Only Christie accredited service technicians are permitted to open any enclosure
on the projector and only if the AC power has been fully disconnected. Failure to
comply could result in minor or moderate injury.
KITS REQUIRED
ASSY Spring Clip Integrator (P/N: 003-003438-02)
a. Pair of Nitrile gloves (P/N: 33-001433-01P)
b. Integrator Spring Clip – sharp dimple (P/N: 011-103661-02) QTY 1
c. Integrator Spring Clip – round dimple (P/N: 011-103662-02) QTY 1
d. 2mm hex key
e. M3 screw (P/N: 012-100612-01) QTY 4
Figure 1 Spring Clip Integrator Service Kit Parts
Integrator Spring Instruction Sheet
020-100616-03 Rev. 1 (02-2014)
1 of 4
INSTRUCTIONS
UV goggles are required when operating the projector with the covers removed.
NOTICE! The main optical component in the Integrator Rod Assembly is a sensitive quartz rod that is
easily damaged or contaminated with dirt and finger print oil. This is especially true of the output end
(black) where a tiny spec of dust or corner chip will show up as an artifact on the image screen.
Always wear the Nitrile gloves provided in the service kit whenever handling the integrator.
1. Remove the integrator rod assembly from the projector.
a. Unlock the front top lid using the low security key. Lift the lid up
and remove.
b. Remove the two, 3mm hex screws securing the retaining clip to
the rear end of the integrator (Figure 2). NOTICE! Perform this step
with caution to avoid damaging the temperature sensor mounted
nearby.
c. Remove the hex screw securing the snood and remove (Figure 1).
d. Carefully remove the integrator assembly and set aside in a clean
area where it cannot be damaged.
2. Carefully remove the black aluminum cover to expose the two
Integrator Spring Clips (Figure 3).
Figure 2 Integrator
Assembly
Figure 3 Remove Cover
3. Place the assembly on a clean work surface in front of you so it cannot roll away. Position the black
output end to the left.
2 of 4
Integrator Spring Instruction Sheet
020-100616-03 Rev. 1 (02-2014)
4. Carefully remove the left spring by first removing the screw nearest you (Figure 4/A). Next, remove the
upper screw (Figure 4/B). Discard the original springs and screws.
Figure 4 Remove Existing Springs
5. Carefully place the new spring clip (P/N: 001-103661-02) with the sharp dimples in place (Figure 5). Use
the hex key provided with the service kit to insert the upper screw first. Do not fully tighten the screws
at this point; tighten only enough that the spring starts to exert light pressure.
Figure 5 New Spring Clips
Integrator Spring Instruction Sheet
020-100616-03 Rev. 1 (02-2014)
3 of 4
6. Carefully remove the right hand spring (Figure 4/C&D) and discard.
7. Ensure the quartz integrator rod is visually flush at both ends (Figure 6). If it has moved and is sticking
out at the input end (right-side) very carefully and slowly push it back to flush using a clean rounded
plastic rod, such as a clean pen top. Only touch the rod in the center. CAUTION! Only touch the
integrator rod on the input end (right-side). DO NOT push beyond flush position. Never touch the
integrator rod on the left-side (output end).
Figure 6 Ensure Integrator Rod is Flush
8. Add the right spring with the round dimples (P/N: 011-103662-01), again by starting with tightening the
upper screw (Figure 4/C) first and then adding the bottom screw (Figure 4/D).
9. With both clips in place tighten the top screws (Figure 4/B&C) using the long arm of the hex key
(Figure 7) until they are snug and the spring clip is fully seated against the rod holder.
10. Repeat Step 8 for the bottom screws (Figure 4/A&D).
Figure 7 Secure Replacement Clips
8. When reinstalling, repeat Steps 1-3 in reverse. After powering up the projector, adjust the integrator and
fold mirror, as required for proper aperture alignment. For detailed instructions refer to the projector
Service Manual.
4 of 4
Integrator Spring Instruction Sheet
020-100616-03 Rev. 1 (02-2014)