Transcript
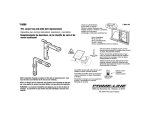
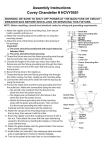
ASSEMBLY AND INSTALLATION
INSTRUCTIONS
WARNING:
TO AVOID RISK OF ELECTRICAL SHOCK, BE SURE TO SHUT OFF
POWER BEFORE INSTALLING OR SERVICING THIS FIXTURE.
Installation Steps
1. Carefully unpack your new fixture and lay out all the
parts on a clear surface.
2. Thread Hex nut-2 onto the Nipple-1, place the Washer over
the end of Nipple-1, thread Nipple-1 through Mounting bar
and secure with Hex nut-1 continuously until tight.
3. Thread the Ground screw into the hole near the two dimples
of the Mounting bar. Secure the Mounting bar to the outlet box
with the Outlet box screws.
4. Thread the Loop onto the Nipple-2.
5. Weave the Fixture Wire and the Ground Wire through
the Chain links. Open Key link-2, connect Loop to one end link
of the Chain and close the Key link-2.
6. Thread the Fixture Wire and ground wire through the
Collar ring, Canopy, Nipple-1 and Mounting bar in order.
7. Secure the Collar ring to the Nipple-1, Open Key link-1,
connect Collar ring to the other one link of Chain and close the
Key link-1.
8. Make Wire connections with Wire Connector:
---The smooth wire (w/ marking) from fixture to Black
Wire from power source.
---The ribbed wire (w/o marking) from Fixture to White
Wire from power source.
---Attach the Ground Wire and house ground wire to
the Mounting bar with the green Ground Screw.
Carefully tuck wires back into the Outlet Box.
9. Attach the Canopy to the Mounting bar by inserting the Collar ring, and then secure with the collar ring.
10. Place the Glass shade, Cup onto the Socket, and secure with the Socket ring.
11. Install the light bulbs in accordance with the fixture’s specifications. DO NOT EXCEED THE MAXIMUM
WATTAGE RATING!
12. Turn on the power at fuse or Circuit Box.