Transcript
Transom Top
Installation Instructions
Step 1
NOTE: Only the 14 3/4" Transom Top contains the Transom Clips.
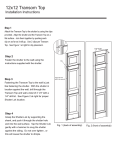
Attach the Transom Top to the shutter by using the clips
provided. Align the shutter and the Transom Top on a
flat surface. Join them together by pushing each
clip on as far as it will go. Use 2 clips per Transom
Top. See Figure 1 at right for clip placement.
Transom Clip Installation
A Transom Clip will also need to be installed in
addition to the 2 clips. Start by pushing one
end of the Transom Clip onto the shutter,
clamping the shutter to the Transom Top. Work
the Transom Clip down until the entire clip is
fastened to the shutter. Be sure the Transom
Clip is pushed on as far as it will go. See
Figure 1 at right.
1/4" hole
Clip
Transom Clip
Note: Some shutters contain support ribs at
the top. This will need to be removed using a
support rib will
need to be removed
Step 2
Fasten the shutter to the wall using the
instructions supplied with the shutter.
Step 3
Fastening the Transom Top to the wall is just
like fastening the shutter. With the shutter in
location against the wall, drill through the
Transom Top and wall a total of 3 1/4" with a
1/4" drill bit. See Figure 2 at right for proper
Shutter Lok location.
Step 4
Grasp the Shutter-Lok by supporting the
shank, and push it through the shutter hole
and into the wall surface. Tap the Shutter Lok
gently with a hammer to snug the shutter
against the siding. Do not over tighten , or
this will cause the shutter to dimple.
Fig. 1 (back of assembly)
Transom Top
Shutter
Fig. 2 (front of assembly)
Transom Clip
6-23-06
PAPC9605
I-0084