1
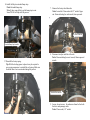
16. Install the Daystar extended bump stop.
Parts: Extended bump stop.
Note: It takes some effort to get the bump stop to seat.
Some WD-40 will help with the process.
7. Remove the factory shock absorber.
Tools: Lower bolt: 21mm socket & 1/2” ratchet. Upper
nut: 18mm ratcheting box end wrench, 8mm open end.
Shock Removed
Extended Bump Stop Installed
17. Reinstall the factory spring.
Tip: With the leveling spacer in place it may be required to
use a spring compressor to reinstall the coil spring. Make sure
the brake lines is not overextended during this process.
8. Disconnect sway bar end link at the axle.
Tools: 21mm ratcheting box end wrench, 10mm open end
wrench.
End link Disconnected
9. Loosen, do not remove, the radius arm frame bolt on both
the driver and passenger sides.
Tools: 27mm socket, 1/2” ratchet.
8