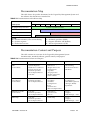
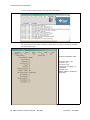
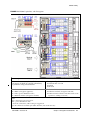
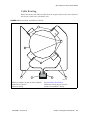
1
Sun StorageTek™ Crypto
Key Management System
Version 2.0
Installation and Service Manual
Part Number: 316194902
Revision: B
Crypto Key Management System
Version 2.0
Installation and Service Manual
Sun Microsystems, Inc.
www.sun.com
Part Number: 316194902
May 2008
Revision: B
Copyright © 2008 Sun Microsystems, Inc., 4150 Network Circle, Santa Clara, California 95054, U.S.A. All rights reserved.
Sun Microsystems, Inc. has intellectual property rights relating to technology embodied in the product that is described in this
document.In particular, and without limitation, these intellectual property rights may include one or more of the U.S. patents listed at
http://www.sun.com/patents and one or more additional patents or pending patent applications in the U.S. and in other countries.
THIS PRODUCT CONTAINS CONFIDENTIAL INFORMATION AND TRADE SECRETS OF SUN MICROSYSTEMS, INC. USE,
DISCLOSURE OR REPRODUCTION IS PROHIBITED WITHOUT THE PRIOR EXPRESS WRITTEN PERMISSION OF SUN
MICROSYSTEMS, INC.
Use is subject to license terms. This distribution may include materials developed by third parties.This distribution may include
materials developed by third parties.Parts of the product may be derived from Berkeley BSD systems, licensed from the University of
California.
UNIX is a registered trademark in the U.S. and in other countries, exclusively licensed through X/Open Company, Ltd.Sun, Sun
Microsystems, the Sun logo, Solaris, Sun StorageTek Crypto Key Management Station, StorageTek and the StorageTek logo are
trademarks or registered trademarks of Sun Microsystems, Inc. in the U.S. and other countries.
Products covered by and information contained in this service manual are controlled by U.S. Export Control laws and may be subject
to the export or import laws in other countries. Nuclear, missile, chemical biological weapons or nuclear maritime end uses or end
users, whether direct or indirect, are strictly prohibited. Export or reexport to countries subject to U.S. embargo or to entities identified
on U.S. export exclusion lists, including, but not limited to, the denied persons and specially designated nationals lists is strictly
prohibited. Use of any spare or replacement CPUs is limited to repair or one-for-one replacement of CPUs in products exported in
compliance with U.S. export laws. Use of CPUs as product upgrades unless authorized by the U.S. Government is strictly prohibited.
DOCUMENTATION IS PROVIDED “AS IS” AND ALL EXPRESS OR IMPLIED CONDITIONS, REPRESENTATIONS AND
WARRANTIES, INCLUDING ANY IMPLIED WARRANTY OF MERCHANTABILITY, FITNESS FOR A PARTICULAR PURPOSE OR
NON-INFRINGEMENT, ARE DISCLAIMED, EXCEPT TO THE EXTENT THAT SUCH DISCLAIMERS ARE HELD TO BE LEGALLY
INVALID.
Copyright © 2008 Sun Microsystems, Inc., 4150 Network Circle, Santa Clara, California 95054, Etats-Unis. Tous droits réservés.
Sun Microsystems, Inc. détient les droits de propriété intellectuels relatifs à la technologie incorporée dans le produit qui est décrit
dans ce document.
En particulier, et ce sans limitation, ces droits de propriété intellectuelle peuvent inclure un ou plus des brevets américains listés à
l'adresse http://www.sun.com/patents et un ou les brevets supplémentaires ou les applications de brevet en attente aux Etats - Unis
et dans les autres pays.
CE PRODUIT CONTIENT DES INFORMATIONS CONFIDENTIELLES ET DES SECRETS COMMERCIAUX DE SUN
MICROSYSTEMS, INC. SON UTILISATION, SA DIVULGATION ET SA REPRODUCTION SONT INTERDITES SANS L
AUTORISATION EXPRESSE, ECRITE ET PREALABLE DE SUN MICROSYSTEMS, INC.
L'utilisation est soumise aux termes de la Licence.Cette distribution peut comprendre des composants développés par des tierces
parties.Cette distribution peut comprendre des composants développés par des tierces parties.Des parties de ce produit pourront être
dérivées des systèmes Berkeley BSD licenciés par l'Université de Californie.
UNIX est une marque déposée aux Etats-Unis et dans d'autres pays et licenciée exclusivement par X/Open Company, Ltd.Sun, Sun
Microsystems, le logo Sun, Solaris, Sun StorageTek Crypto Key Management Station, StorageTek et le logo StorageTek sont des
marques de fabrique ou des marques déposées de Sun Microsystems, Inc. aux Etats-Unis et dans d'autres pays.
Ce produit est soumis à la législation américaine en matière de contrôle des exportations et peut être soumis à la règlementation en
vigueur dans d'autres pays dans le domaine des exportations et importations. Les utilisations, ou utilisateurs finaux, pour des armes
nucléaires, des missiles, des armes biologiques et chimiques ou du nucléaire maritime, directement ou indirectement, sont strictement
interdites. Les exportations ou reexportations vers les pays sous embargo américain, ou vers des entités figurant sur les listes
d'exclusion d'exportation américaines, y compris, mais de manière non exhaustive, la liste de personnes qui font objet d'un ordre de ne
pas participer, d'une façon directe ou indirecte, aux exportations des produits ou des services qui sont régis par la législation
américaine en matière de contrôle des exportations et la liste de ressortissants spécifiquement désignés, sont rigoureusement
interdites. L'utilisation de pièces détachées ou d'unités centrales de remplacement est limitée aux réparations ou à l'échange standard
d'unités centrales pour les produits exportés, conformément à la législation américaine en matière d'exportation. Sauf autorisation par
les autorités des Etats-Unis, l'utilisation d'unités centrales pour procéder à des mises à jour de produits est rigoureusement interdite.
LA DOCUMENTATION EST FOURNIE “EN L'ETAT” ET TOUTES AUTRES CONDITIONS, DECLARATIONS ET GARANTIES
EXPRESSES OU TACITES SONT FORMELLEMENT EXCLUES, DANS LA MESURE AUTORISEE PAR LA LOI APPLICABLE, Y
COMPRIS NOTAMMENT TOUTE GARANTIE IMPLICITE RELATIVE A LA QUALITE MARCHANDE, A L'APTITUDE A UNE
UTILISATION PARTICULIERE OU A L'ABSENCE DE CONTREFACON.
We welcome your feedback. Use the OpinionLab [+] feedback system on the documentation Web site or Send your comments to:
Sun Learning Services
Sun Microsystems, Inc.
500 Eldorado Blvd.
Mailstop: UBRM06-307
Broomfield, CO 80021-6307
USA
Please include the publication name, part number, and edition number in your correspondence if they are available.
This will expedite our response.
Please
Recycle
Summary of Changes
EC Number
Date
EC000227
February 2008
A
Initial release.
May 2008
B
This revision includes:
■ New documentation feedback system
■ Additional Information on page xvi
■ Obtain the Drive Data on page 36
■ Support for the T9840D tape drive (throughout)
■ Reader’s comments
EC000496
Revision
Description
Note – Change bars are included in this revision.
316194902 • Revision: B
iii
iv KMA: Installation and Service Manual • May 2008
Revision: B • 316194902
Contents
Summary of Changes
Contents
v
Figures
Tables
iii
ix
xi
Preface
xiii
Organization
xiii
Related Information
xiv
Documentation Map
xv
Documentation Content and Purpose
Additional Information
xv
xvi
Sun’s External Web Site
xvi
Documentation and Download Web Sites
Partners Site
1.
Introduction
Planning
xvi
1
1
Administrator Guide
Before Beginning
Required Tools
1
2
2
Unpack and Inventory the Contents
2.
Key Management Appliances
Overview
2
3
3
Front and Rear Views
Specifications
316194902 • Revision: B
xvi
5
6
v
Installation
7
Configure the ELOM IP Address
8
Start the embedded Lights Out Manager
Alternate Method
10
Using a Network Connection
QuickStart Program
Tips and Notes
14
QuickStart Wizard
15
21
Change the ELOM Password
Add KMAs to the Cluster
27
28
Run the QuickStart Wizard
Tape Drives
10
13
Configuration Checklist
3.
29
31
Before Beginning
32
Required Tools
Tape Drive LEDs
32
33
Service Representative Work Sheet
Customer Work Sheet
Obtain the Drive Data
36
License and Enroll the Tape Drives
License the Tape Drives
45
46
SL8500 Accessory Racks
Encryption Hardware
Drive Tray
48
49
49
External Rack Installations
SL500 Library
39
41
Encryption Hardware Kits
SL3000 Library
38
39
Enroll the Tape Drives
SL8500 Library
34
35
Create a Drive Data File Structure
4.
9
50
51
52
9310 Library and 9741e Drive Cabinet
External Rack Installation
vi KMA: Installation and Service Manual • May 2008
53
53
Revision: B • 316194902
Drive Cabinet Ethernet Switch
Cable Routing
L-Series Libraries
54
55
56
L-Series Library Rack Space
56
L700/L1400 Library Encryption Hardware
L180 Library Encryption Hardware
Rackmount
Service
60
61
Field Replaceable Units
Account Log
62
63
Obtaining Support
64
Replacing or Adding a New KMA
System Upgrade
System Dump
Tape Drives
68
69
70
Switch Encryption On and Off
KMS Version 1.x Support
Work Sheets
72
74
Initial Configuration Work Sheet
User Roles Work Sheet
Tape Drives Work Sheet
Migration Instructions
77
Description
82
Stage 1
82
Stage 2
82
Stage 3
82
316194902 • Revision: B
78
81
81
Basic Steps
Instructions
75
76
Drive Enrollment Work Sheet
Prerequisites
71
73
Obtaining Support
B.
65
67
Restore From Backup
A.
58
59
Service Delivery Platform
5.
57
82
83
Contents vii
viii
KMA: Installation and Service Manual • May 2008
Revision: B • 316194902
Figures
FIGURE 2-1
Key Management Appliance—Front Panel
FIGURE 2-2
Key Management Appliance—Rear Panel
FIGURE 2-3
embedded Lights Out Manager Login Screen
FIGURE 2-4
Power Control
11
FIGURE 2-5
Power Control
12
FIGURE 2-6
ELOM Password Reset
FIGURE 2-7
KMA Replacement—Joining a Existing Cluster
29
FIGURE 2-8
KMA Replacement—Joining a Existing Cluster
29
FIGURE 3-1
Tape Drive Serial Number—VOP
FIGURE 3-2
Request an Encryption Key Application
FIGURE 3-3
Encryption File Request for Drive Data
37
FIGURE 3-4
Encryption File Request for Drive Data
37
FIGURE 3-5
Drive Data File Structure 38
FIGURE 4-1
SL8500 Accessory Rack Guidelines
FIGURE 4-2
SL8500 Capabilities with Encryption
FIGURE 4-3
T10000 Drive Tray
FIGURE 4-4
External Rack Installation
FIGURE 4-5
SL3000 Library
FIGURE 4-6
SL500 Library
FIGURE 4-7
9310–PowderHorn–Library
FIGURE 4-8
Drive Cabinet Ethernet Switch Installation 54
FIGURE 4-9
External Rack and Ethernet Cabling 55
FIGURE 4-10
L-Series Libraries
56
FIGURE 4-11
L-Series Libraries
57
316194902 • Revision: B
5
5
10
27
36
36
46
47
49
50
51
52
53
ix
FIGURE 4-12
L-Series Libraries
58
FIGURE 4-13
Rackmount Assembly 59
FIGURE 4-14
Rackmount Instructions
FIGURE 4-15
Systems Delivery Platform
FIGURE 5-1
KMA Replacement—Joining a Existing Cluster
65
FIGURE 5-2
KMA Replacement—Joining a Existing Cluster
66
FIGURE 5-3
System Upgrade
FIGURE 5-4
Restore Backup
FIGURE 5-5
System Dump
FIGURE 5-6
Switch Encryption On and Off
71
FIGURE 5-7
Switch Encryption On and Off
72
FIGURE B-1
Import Keys
59
60
67
68
69
83
x KMA: Installation and Service Manual • May 2008
Revision: B • 316194902
Tables
TABLE P-1
Documentation and Audience Map
TABLE P-2
Documentation Content and Purpose
TABLE 2-1
Initial Configuration Settings
4
TABLE 2-2
Sun Fire X2100 Specifications
6
TABLE 2-3
KMA LAN Connections
TABLE 2-4
Compatible Web Browser and Java Versions
TABLE 2-5
Initial Configuration Checklist
TABLE 3-1
Tape Drive Support
TABLE 3-2
Tape Drive Encryption LED
TABLE 3-3
Drive Data Work Sheet
TABLE 3-4
Enrollment Data Work Sheet
TABLE 4-1
SL8500 Accessory Rack Guidelines
TABLE 4-2
SL3000 Module Types
TABLE 5-1
FRU Listing
TABLE 5-2
Keyboard Monitor Kit
TABLE 5-3
KMA Account Log
63
TABLE 5-4
Obtaining Support
64
TABLE 0-1
Obtaining Support
74
TABLE A-1
Initial Configuration Settings—Customer 75
TABLE A-2
User Roles Work Sheet—Customer
TABLE A-3
Tape Drive Work Sheet—Service Representative
TABLE A-4
Enrollment Data Work Sheet—Customer
316194902 • Revision: B
xv
xv
8
9
21
31
33
34
35
48
51
62
62
76
77
78
Tables xi
xii KMA: Installation and Service Manual • May 2008
Revision: B • 316194902
Preface
This installation and service manual is intended for Sun StorageTekTM service
representatives, qualified partners, representatives, and customers doing the installation
and initial configuration of the Crypto Key Management System Version 2.0.
The installation is a Multi-Step process that requires collaboration between the
installers and the customer to complete.
Organization
This guide has the following organization:
Chapter
Use this chapter to:
Chapter 1, “Introduction”
Prepare for the installation
Chapter 2, “Key Management Appliances”
Install the Crypto Key Management Appliance
(KMA)—a Sun Fire X2100M2 server.
Chapter 3, “Tape Drives”
■
■
■
■
Create Agent IDs and passphrases
Obtain the Drive Data—PC Key
License the Tape Drives
Enroll the Tape Drives
Chapter 4, “Encryption Hardware Kits”
Install the additional encryption hardware in
supported configurations.
Chapter 5, “Service”
This chapter contains procedures to help maintain the
Key Management System Version 2.0.
Appendix A, “Work Sheets”
Help prepare for the installation by completing the
work sheets.
Appendix B, “Migration Instructions”
Migrate keys:
■ From a Version 1.x KMS
■ To a Version 2.0 KMA
316194902 • Revision: B
xiii
Related Information
Related Information
These publications contain the additional information mentioned in this guide:
Publication Description
Part Number
Important Safety Information for Sun Hardware Systems
Sun: 816-7190-10
Sun SunFire X2100 Server Installation Guide
Sun: 819-6589-10
These publications are for Sun StorageTek personnel or authorized third parties who
install StorageTek brand tape and library products.
Publication Description
Part Number
T10000 Tape Drive Installation Manual
StorageTek: 96173
T10000 Service Manual
StorageTek: 96175
Virtual Operator Panel—Service
StorageTek: 96180
Virtual Operator Panel—Customer
StorageTek: 96179
T9x40 Tape Drive Installation Manual
StorageTek: 95879
T9x40 Service Manual
StorageTek: 95740
SL8500 Modular Library System Installation Manual
StorageTek: 96138
SL3000 Modular Library System Installation Manual
StorageTek: 316194201
SL500 Modular Library System Installation Manual
StorageTek: 96114
L700/1400 Library Installation Manual
StorageTek: 95843
L180 Library Installation Manual
StorageTek: 95896
9310 PowderHorn Library Installation Manual
StorageTek: 9314
These publications are related to the key management system:
Publication Description
Part Number
Crypto Key Management System Administrator Guide
StorageTek: 316195101
When planning to support data encryption, the following documents are available to
help identify and define encryption:
xiv
■
Federal Information Processing Standards Publication FIPS PUB 46-3
Data Encryption Standard
■
Federal Information Processing Standards Publication FIPS PUB 140-2
Security Requirements for Cryptographic Modules
■
Federal Information Processing Standards Publication FIPS PUB 171
Key Management
■
National Institute of Standards and Technology NIST Publication 800-57
Recommendation for Key Management Parts 1 and 2
■
International Standard Organization ISO/IEC 1779
Security Techniques—Code of Practice for Information Security Management
KMA: Installation and Service Manual • May 2008
Revision: B • 316194902
Related Information
Documentation Map
This table shows the specific documents for the Crypto Key Management System and
the audience that document is intended for.
TABLE P-1 Documentation and Audience Map
Documentation & Audience
Task/Purpose
AE
SE
PS
Site Preparation/Pre-sales
TS
T3
SR
Partner/OEM
Customer
Systems Assurance Guide
Installation & Service
Installation & Service Manual
User / Operation
Administrator Guide
Online Help
Online Help
Legend:
AE = Account executive, sales and marketing
SE = Systems engineer
PS = Professional services
TS = Technical specialists (NSSE)
T3 = Support (Frontline and Backline)
SR = Service representative (CSE)
Documentation Content and Purpose
This table contains an overview of the Crypto Key Management System
documentation, intended audience, general content, and purpose.
TABLE P-2 Documentation Content and Purpose
Document
Audience
Systems Assurance
Guide
(PN 316194801)
■
■
■
■
■
■
■
Marketing & Sales
Systems Engineers
Installation Coordinators
Professional Services
Technical Specialists
Service Representatives
Customer
General Content
Product description
Dimensions
Weights & measures
Configurations
Capacities
Site preparation
Models and features
Order numbers
■
Installation:
■ Procedures
■ Checklists
■ Configurations
Service:
■ Fault isolation
■ Removal/Replacement
■
■
■
■
■
■
■
■
■
Installation and
Service Manual
(PN 316194901)
Administrator Guide
(PN 316195101)
■
■
■
■
■
■
Online Help
■
■
■
316194902 • Revision: B
Installation Coordinators
Technical Specialists
Service Representatives
Purpose
Customer
Technical Specialists
Service Representatives
■
Customer
Technical Specialists
Service Representatives
■
■
■
■
■
■
■
■
Introduction
Operator Roles
How to...
■
Online help
■
■
■
■
■
■
Pre-Sales
Site Planning
Product introduction
Readiness
Installation
Configuration
embedded Lights Out
Manager (ELOM)
QuickStart
Usage
Support
KMS Manager / GUI
Usage
Support
KMS Manager / GUI
Preface
xv
Additional Information
Additional Information
Sun Microsystems, Inc. (Sun) offers several methods to obtain additional information.
Sun’s External Web Site
Sun’s external Web site provides marketing, product, event, corporate, and service
information. The external Web site is accessible to anyone with a Web browser and an
Internet connection.
The URL for the external Web site is: http://www.sun.com
The URL for StorageTek™ brand-specific information is:
http://www.sun.com/storagetek/
Documentation and Download Web Sites
Web sites that enable customers, members, and employees to search for technical
documentation, downloads, patches, features, and articles include:
■
Documentation: http://docs.sun.com/app/docs (customers)
■
Internal access: http://docs.sfbay.sun.com/app/docs (internal)
■
Sun Download Center: http://www.sun.com/download/index.jsp (customers)
■
Sun Partner Exchange: https://spe.sun.com/spx/control/Login (partners)
■
Uniform Software Repository: http://dlrequest.sfbay.sun.com:88/usr/login
(internal)
If your customer does not already have a Sun Online Account they will need to
register. For a new account, go to: https://reg.sun.com/register
For more information about Sun StorageTek products, got to:
http://sunsolve.sun.com/handbook_pub/validateUser.do?target=STK/STK_index
Partners Site
The Sun StorageTek Partners site is a Web site for partners with a StorageTek Partner
Agreement. This site provides information about products, services, customer support,
upcoming events, training programs, and sales tools to support StorageTek Partners.
Access to this site, beyond the Partners Login page, is restricted. On the Partners Login
page, employees and current partners who do not have access can request a login ID
and password and prospective partners can apply to become StorageTek resellers.
The URL for partners with a Sun Partner Agreement is:
http://www.sun.com/partners/
xvi KMA: Installation and Service Manual • May 2008
Revision: B • 316194902
CHAPTER
1
Introduction
Encryption is based on the science of cryptography and is one of the most effective
ways to achieve data security. To read an encrypted file, you must have access to the
key that will enable you to decipher the file.
Planning
Planning and the use of the Systems Assurance Guide should have occurred before any
equipment arrives on site.
The system assurance process is the exchange of information among team members to
ensure that no aspects of the sale, order, installation and implementation are
overlooked. Information from this guide includes:
❏ Installation planning checklist
❏ Conceptual drawings
❏ Site preparation checklist
❏ Work Sheets
This information can help promote an error-free installation and contribute to the
overall customer satisfaction.
Administrator Guide
Make sure you download and give the customer copies of the
Crypto Key Management System Administrator Guide PN: 316195101.
The customer requires this guide to complete the configuration, assign roles, and
perform daily tasks and functions.
This guide and all KMS Version 2.0 documentation can be downloaded from:
docs.sun.com
316194902 • Revision: B
1
Before Beginning
Before Beginning
Before beginning, survey the installation site and make sure there is:
■
Sufficient space to install and maintain the servers.
■
Trained representatives to install the equipment. More than one person might be
required to install equipment into the rack or to remove equipment from the rack.
■
Consider the total weight when you place equipment into the rack. To prevent an
unbalanced situation:
■
Load equipment in a rack from the bottom to the top.
■
Install the heaviest equipment on the bottom and the lightest on the top.
■
Install an anti-tilt bar to provide additional stability.
Failure to do so might cause an unstable condition.
■
Adequate cooling for the servers.
Ensure that the temperature in the rack does not exceed the maximum ambient rated
temperatures for all of the equipment installed in the rack.
Ensure that there is adequate cooling to support all of the equipment in the rack.
■
Proper power connections and ground.
■
■
If installing the servers to support power redundancy, make sure there are two
separate branch circuits available. Should a power supply or circuit fail, the other
server can continue operations until the problem is fixed.
If removing power from the servers, the other rack equipment is not affected.
Required Tools
The required tools to install and initially configure the server are:
■
Standard field service tool kit, including both standard and Phillips screwdrivers,
Torx driver and bits, and side cutters; tools necessary to mount the servers in a rack.
■
Serial or null modem cable (PN: 24100134) with DB-9 connector
Adapter (PN: 10402019)
Straight Ethernet cable (PN: 24100216) 10-ft
Cross-over Ethernet cable (PN: 24100163) 10-ft
Service laptop (or personal computer)
Virtual Operator Panel, Version 1.0.11 or higher (service and customer versions)
■
■
■
■
■
Unpack and Inventory the Contents
To begin the installation, unpack and inventory the contents, which includes:
■
■
■
■
■
■
Sun Fire X2100 server
Server accessory kit
Rack mount kits
Power cables
Tape drives
Additional encryption hardware kits
Make sure there is no physical damage or loose parts.
2 KMA: Installation and Service Manual • May 2008
Revision: B • 316194902
CHAPTER
2
Key Management Appliances
This chapter describes how to install and initially configure the Crypto Key
Management Appliance (KMA)—a Sun Fire X2100M2 server.
Overview
The initial setup of a KMA uses a console connection that can be done using a:
■
Monitor and keyboard directly connected to the KMA or
■
Laptop with the embedded Lights Out Manager (ELOM)
The ELOM remote console function requires a network connection, labeled
“ELOM Network” in the diagram on page 5.
The ELOM's IP address must be configured as described later in this document in
order to use the remote console function.
Servers must be installed in pairs called a cluster. Clusters perform backups of each
appliance; therefore, no external hard drives are required.
Each key management appliance has the capability of three network connections that
may be used—only one connection is required (LAN 0). These connections are:
■
■
■
LAN 0 = Management network
LAN 1 = embedded Lights Out Manager (ELOM) network
LAN 2 = Service network
Each of these connections (if made) requires an IP address / hostname.
TABLE 2-1 on page 4 provides space to record these connections and initial customer
settings. This information is necessary to:
■
“Configure the ELOM IP Address” on page 8
■
Run “QuickStart Program” on page 13
Note – The customer does not need to record the actual passphrases; this just serves as
a reminder of the upcoming requirements.
316194902 • Revision: B
3
4 KMA: Installation and Service Manual • May 2008
Login:
Passphrase:
Login:
Passphrase:
Login:
Passphrase:
Security Officer
Root account
Passphrase
ELOM Passphrase
Login:
Passphrase:
Login:
Passphrase:
Login:
Passphrase:
2. Autonomous Unlocking allows the KMA to enter a fully operational state after a hard or soft reset without requiring the entry of a quorum of passphrases
using the KMS Manager. This information should not be written down and should be entered by the person to which they belong.
These entries can be changed in the KMS Manager; so it may be desirable to enter something simple during the configuration,
then change it later using the KMS GUI immediately after the KMA is configured.
Note:
1. Addresses assigned using DHCP must be static. The system cannot handle the DHCP server changing the IP addresses once assigned.
Keyboard Type
See the list on page 15
Autonomous
Unlocking 2
Key Split Credentials
Hostname:
IP address:
DNS Server
Gateway
KMA Name
Hostname:
IP address:
Yes ❏ No ❏
Yes ❏ No ❏
LAN 2 = Service
LAN 3 = Reserved
Yes ❏ No ❏
DHCP?1
Yes ❏ No ❏
IP Address / Netmask
LAN 1 = ELOM
Hostname
Yes ❏ No ❏
DHCP?1
Yes ❏ No ❏
IP Address / Netmask
Second KMA
LAN 0 = Management
Hostname
First KMA
TABLE 2-1 provides space to record information for use with the“QuickStart Program” on page 13.
TABLE 2-1 Initial Configuration Settings
Overview
Revision: B • 316194902
Overview
Front and Rear Views
■
FIGURE 2-1 is an example for the front of the appliance
■
FIGURE 2-2 is an example for the rear of the appliance
Note: The rear of the appliance is where all of the cable connections are made.
FIGURE 2-1 Key Management Appliance—Front Panel
1
2
3
4
6
5
7
5. USB 2.0 connectors (2)
6. CD/DVD drive (not available)
7. Hard drives (one only)
1. System identification button/LED
2. Fault LED
3. Power/OK LED
4. Power button
FIGURE 2-2 Key Management Appliance—Rear Panel
1
2
3
4
5
9
1. Power connector
2. Ethernet connectors (2)
Top = Web browser (LAN 0)
Bottom = embedded Lights Out Manager (ELOM)
3. Fault LED
4. Power LED
5. Ethernet connections (2)
7
6
8
6. Serial port (ELOM connection)
7. PCIe slots
Top = SCA6000 random number generator
Bottom = Blank (empty)
8. VGA connector (if using a monitor and keyboard
for the initial configuration)
9. USB 2.0 ports (4)
Left = SDP connection (LAN 2)
Right = Reserved (LAN 3)
Note – The ELOM IP address is most easily configured using a serial connection
(callout #6) by connecting a DB9-to-DB9 serial null modem cable from a PC serial port
to the serial port on the server.
This is a one time connection and one time configuration requirement.
316194902 • Revision: B
Chapter 2 Key Management Appliances
5
Overview
Specifications
TABLE 2-2 lists the specifications for the SunFire X2100 server.
TABLE 2-2 Sun Fire X2100 Specifications
Processor
■
■
■
Memory
■
■
IPMI 2.0
■
■
One dual-core AMD Operton processor
Processor frequencies: 2.2 GHz
Up to 1 MB level 2 cache
Four DIMM slots (up to 4 gigabytes)
Unbuffered ECC memory
Service processor standard
embedded Lights Out Manager
Mass storage
One SATA disk drive
PCI Slots
Two PCI-Express slots (PCIe)
PCIe-0 contains the Sun Crypto Accelerator 6000 (SCA6000)
Networking
■
■
■
■
Four USB 2.0 connectors on the rear panel
Two USB 2.0 connectors on the front panel
Two ports: Serial port with DB-9; VGA with DB-15 connectors
Four 10/100/1000 Base-T Ethernet ports
Dimensions:
Height
43 mm (1.7 in.)
Width
425.5mm (16.8 in.)
Depth
633.7 mm (25 in.)
Weight (maximum)
10.7 kg (23.45 lb)
Mounting options
19-inch rackmount kit; Compact 1 rack-unit (1.75 in.) form factor
Environmental parameters:
Temperature
5°C to 35°C (41°F to 95°F)
Relative humidity
27°C (80°F) max wet bulb
Altitude
Up to 3,000 m (9,000 ft)
Power supply
One 6.5 Amps at 345 Watts
Heat output is about 850 BTU/hour
Regulations meets or exceeds the following requirements:
Acoustic Noise Emissions declared in accordance with ISO 9296
Safety IEC 60950, UL/CSA60950, EN60950, CB scheme
RFI/EMI FCC Class A, Part 15 47 CFR, EN55022, CISPR 22,
EN300-386:v1.31, ICES-003
Immunity: EN55024, EN300-386:v1.3.2
Certifications: Safety CE Mark, GOST, GS Mark, cULus Mark, CB scheme, CCC, S Mark
EMC CE Mark, Emissions and Immunity Class A Emissions Levels:
FCC, C-Tick, MIC, CCC, GOST, BSMI, ESTI, DOC, S Mark
6 KMA: Installation and Service Manual • May 2008
Revision: B • 316194902
Installation
Installation
Install the servers in a standard 483-mm (19-in.) rack. The rack contains units of
measurement called rack units (Us) that equal 44.5 mm (1.75 in.). Become familiar with
the rack and look to see how the rack units patterns are separated.
The top cover of the server contains instructions to install the servers in a four post
rack or cabinet—two-post racks are not compatible.
The slide rails are compatible with a wide range of racks, meets the following
standards, and requires:
■
Horizontal opening and unit vertical pitch conforming to ANSI/EIA 310-D-1992
or IEC 60927 standards.
■
Distance between front and rear mounting planes between 610 mm and 915 mm
(24 in. to 36 in.)
■
Clearance depth to a front cabinet door must be at least 25.4 mm (1 in.)
■
Clearance depth to a rear cabinet door at least 800 mm (31.5 in.) to incorporate cable
management or 700 mm (27.5 in.) without cable management.
■
Clearance width between structural supports and cable troughs and between front
and rear mounting planes is at least 456 mm (18 in.)
Refer to the Sun Fire X2100 Server Installation Guide for additional information.
This guide is included with the server accessory kit.
1. Install both servers in the rack.
316194902 • Revision: B
Chapter 2 Key Management Appliances
7
Installation
Configure the ELOM IP Address
To initially configure the ELOM IP address for LAN 1:
1. Using TABLE 2-1 and FIGURE 2-2, connect all cables as required.
Note – Wait until instructed to connect the power cable.
TABLE 2-3 KMA LAN Connections
LAN 0
Callout 2, top connector is required.
This network is called the “management network” and connects to the Key
Management System (KMS), graphical user interface (GUI), and is used for
encryption key management.
This connection is also used to replicate information between KMAs in a KMS
Cluster. All KMAs in a KMS Cluster must be connected to each other's LAN
0 interface.
The gateway supplied during the QuickStart program should be reachable
using the LAN 0 connection.
Tape drives may also be connected on the LAN 0 management network, but
may also be connected to the LAN 2 service network.
LAN 1
Callout 2, bottom connector is optional.
This connection is called the “NET MGT ELOM” and provides a network
connection for the embedded Lights Out Manager.
LAN 2
Callout 6 left connector is optional.
This network is called the “service network” and the connection goes to the
Service Delivery Platform—SDP—if installed.
Tape drives normally connect to this network, which is supplied by Ethernet
switches in accessory kits purchased with the KMAs.
LAN 3
Callout 6 right connector is reserved and requires no connection.
2. Connect a null modem, serial cable to the DB-9 connector (callout 7).
Connect the other end to a laptop (PC) serial port.
A connection to the LAN 1 NET MGT interface is required to initially configure the
servers using the QuickStart program.
3. Start a HyperTerminal session on the laptop.
4. Verify the default settings are:
■
8-bits, No Parity, and 1 stop-bit
■
9600 baud rate
■
Disable both hardware (CTS/RTS) and software (XON/XOFF) flow control
5. Connect the server to the power source (FIGURE 2-2 callout 1).
Do not power-on the server.
The ELOM starts as soon as power is connected, even if the server is powered-off.
The boot process can be observed if connected with the HyperTerminal session.
Once the boot completes, the ELOM login prompt will be displayed.
a. Press [Enter] a few times to get the ELOM login prompt.
b. Log in using:
Userid = root
Password = changeme
8 KMA: Installation and Service Manual • May 2008
Revision: B • 316194902
Installation
6. Using TABLE 2-1 on page 4 as a reference, configure the ELOM IP address:
Note – These commands are case sensitive.
Enter:
set /SP/AgentInfo DhcpConfigured=disable
set /SP/AgentInfo IpAddress=ipaddress
set /SP/AgentInfo NetMask=netmask
set /SP/AgentInfo Gateway=gateway
reset
An informational command you can use is:
show /SP/SystemInfo/CtrlInfo
7. Log off of the ELOM and exit.
■
If you are going to use the network connection (LAN 1 NET MGT ELOM),
disconnect and remove the serial cable (recommended).
■
The alternative to using the network connection to the ELOM is to use a keyboard
and monitor connected to a USB port (keyboard) and the VGA port (monitor.)
Note: The serial connection to the ELOM cannot be used for the QuickStart program.
Note – The ELOM is sensitive to Web browser and Java versions.
The following is a list of supported versions.
TABLE 2-4 Compatible Web Browser and Java Versions
Java Runtime Environment
Including Java Web Start
Client OS
■
Microsoft Windows XP
Microsoft Windows 2003
Microsoft Windows Vista
■
Red Hat Linux 3.0 and 4.0
■
■
JRE 1.5
(Java 5.0 Update 7 or later)
Web Browsers
■
■
■
■
■
■
■
■
Solaris 9
Solaris 10
Solaris Sparc
SUSE Linux 9.2
■
Internet Explorer 6.0 and later
Mozilla 1.7.5 or later
Mozilla Firefox 1.0
Mozilla 1.7.5 or later
Mozilla Firefox 1.0
Mozilla 1.7.5
You can download the Java 1.5 runtime environment at: http://java.com
The current version of the ELOM guide is located at: http://dlc.sun.com/
Start the embedded Lights Out Manager
The embedded Lights Out Manager (ELOM) contains a separate processor from the
main server. As soon as power is applied (plugged-in), and after a one or two minute
boot period, ELOM provides a remote connection to the console allowing you to
perform server functions, such as the QuickStart program.
Note – This manual has some basic ELOM commands to configure the server.
Refer to the embedded Lights Out Manager Administration Guide for more information.
Connect to the KMA through the embedded Lights Out Manager using either:
■
Network connection—LAN 1 NET MGT ELOM interface—(suggested) or
■
Keyboard and monitor attached to the KMAs—(alternate method)
316194902 • Revision: B
Chapter 2 Key Management Appliances
9
Installation
Popup blockers will prevent windows from launching in the following procedures.
Disable the popup blockers before beginning.
If the window appears, but a console window does not, the Web browser or Java
version is incompatible with the ELOM. Upgrade to the latest versions of the
browser and Java. See TABLE 2-4 on page 9 for a list of compatible versions.
Alternate Method
Using FIGURE 2-2 on page 5 as a reference, the alternate method to using the network
connection is to use a monitor (connected to the VGA connector callout 8) and
keyboard (connected to one of the USB ports in callout 9).
An accessory kit is available: XCRYPTO-KEYBD-MONZ Monitor/Keyboard and rack
mount accessory kit, or part number 315496601.
Then follow the same procedure as the network connection.
Using a Network Connection
1. Using another workstation on the network, launch a Web browser.
2. Connect to the KMA ELOM using the IP Address or hostname of
LAN 1 (NET MGT)—the address just configured.
Note: Because the certificate in the ELOM will not match the assigned name or IP,
you will receive one or more warnings from your web browser.
3. Click OK or Yes to bypass these warnings.
Once past the warnings, you will receive the ELOM login prompt.
FIGURE 2-3 embedded Lights Out Manager Login Screen
10 KMA: Installation and Service Manual • May 2008
Revision: B • 316194902
Installation
4. Log in using:
Userid = root
Password = changeme
The next screen is the Manager Screen. If the server has just been connected to
power, and it has not been powered on, it will not have completed a system boot.
5. Check the power status by clicking on the “System Monitoring” tab.
The power status is shown in the table.
6. If the Power Status shows “power off,”
Click on the “Remote Control” tab to the far right of the upper row of tabs.
7. Click on the “Remote Power Control” tab in the second row of tabs.
8. In the “Select Action” drop-down choose “Power On” and click the “Save” button.
The KMA will begin powering up. This will take a few minutes; however, you can
continue with the KMA configuration.
FIGURE 2-4 Power Control
316194902 • Revision: B
Chapter 2 Key Management Appliances
11
Installation
9. Click on the “Remote Control” tab in the first row of tabs.
10. Click on the “Redirection” tab in the second row of tabs
11. Click on the “Launch Redirection” button.
This launches the remote console screen in a new window.
FIGURE 2-5 Power Control
12 KMA: Installation and Service Manual • May 2008
Revision: B • 316194902
QuickStart Program
QuickStart Program
When a new Key Management Appliance with the factory-default settings is poweredon for the first time, a Configuration Menu called QuickStart is automatically executed.
QuickStart collects the initial, minimal configuration required to initialize the KMA.
Because of critical security parameters that are established by the QuickStart program,
only a Security Officer or qualified representative should execute this program. Once
the QuickStart program has been successfully completed, it cannot be re-executed.
The only way to access this program again is to use the KMA reset command.
Note – A reset is performed by typing reset at the ELOM prompt after the
“set /SP/Agent...” commands are complete and the DHCP and network address
settings have been entered.
Also, at any point during the QuickStart program, entering [Ctrl+C] will abort the
program clearing the settings and requires you to restart the program.
Use the Crypto Key Management System Administration Guide (PN: 316195101)
for specific information and instructions about the QuickStart program and Wizard.
This guide provides configuration and administration information for the Sun Crypto
Key Management System software.
This guide is intended for storage administrators, system programmers and operators
responsible for configuring and maintaining the KMS software at their site.
The following information is needed before beginning the QuickStart program.
The customer may want to keep the User IDs, Passphrases, and Key Split Credentials
defined during the QuickStart program—secret.
Use TABLE 2-1 on page 4 to help record and use this information.
1. Type of keyboard attached to the KMA (select from list).
2. Hostname, IP address, and netmask for the management network (LAN 0) and
service network (LAN 2) if connected; DHCP can be used for both if desired.
3. The gateway should be accessible through the management network connection.
This address is required if there is a router between the KMA and the KMS Manager.
4. DNS server IP address, if desired (optional).
5. Key split credentials, including the total number of splits, threshold number of
splits, plus the userid and passphrase for each of the splits.
■
■
■
■
We recommend keeping this simple.
This information cannot be recovered from the system if it is lost.
Backups cannot be restored without this information.
Loss of this information will result in unrecoverable data.
6. Autonomous unlocking selection.
■
■
If yes, the KMA will automatically unlock after a reboot.
If no, the KMA will remain locked until manually unlocked.
Unlocking requires a quorum.
316194902 • Revision: B
Chapter 2 Key Management Appliances
13
QuickStart Program
Tips and Notes
Knowing the following tips and notes will help during the QuickStart program and
initial configuration.
■
Be patient. It may take one or two minutes for the IP address settings to take effect.
■
■
■
The Key Management Systems Manager GUI (graphical user interfaces) uses a
customer created network and IP address—this is called the Management
Network. The KMS manager interfaces with the KMAs using this interface.
The KMAs interface with the tape drives using the Service Network (in general)
using the Ethernet switches from the accessory kits. The IP address range for the
KMAs use: 172.18.18.2 through 172.18.18.59
■
If a Service Delivery Platform is installed, that IP address is 172.18.18.1
■
The default tape drive IP address is: 10.0.0.1
Use a simple set-up to start.
When entering information such as the key split size, split threshold, and quorum,
keep it simple and use initial values such as “1 of 1.” Once the structure of the
KMAs and the KMS Cluster are complete, this information can be changed to the
production values at a later time using the KMS manager.
This can help with and speed up the installation and configuration of the Key
Management System.
For example: All users may not be available at the same time to enter in their IDs
and Passphrases.
■
The userids and passphrases should be enter by the appropriate person to keep
them secure; they can also be changed later after the QuickStart program.
■
The user names are arbitrary; however, use the conventions defined by security
polices or practices.
■
The length of the passphrases can be changed in the KMS Manager. The default is
eight characters using three of the four styles: Small case, UPPER case, numbers, and
special characters.
■
KMAs in a Cluster must keep their clocks synchronized. Internally, all KMAs use
UTC time (coordinated universal time).
If the customer prefers, there is an option in the KMS Manager that allows date and
times to be adjusted to local time when displayed.
When the customer is not using an NTP server, the clocks on the KMAs may drift.
As a best practices, customers can check and re-sync the clocks at least once a year.
Important:
Do not perform a “Core Security Backup” when using simple settings.
Wait until all user’s have entered their credentials, passphrases, production settings,
and quorum details before creating a Core Security Backup for the first time.
14 KMA: Installation and Service Manual • May 2008
Revision: B • 316194902
QuickStart Program
QuickStart Wizard
The following section shows examples of the QuickStart program for configuring the
first KMA in a KMS Cluster.
■
■
■
■
■
■
Response areas are shown in bold.
The KMA names use KMA-x (where x is a number for that KMA, [x of x]).
The KMA IP address range is: 172.18.18.x—the default network for the SDP.
The SDP site unit is 172.18.18.1—KMAs share addresses 172.18.18.2 through 59.
The subnet mask for SDP is 255.255.254.0
The KMS management network uses a hostname of: KMSmgr
The KMS management network uses an IP address range of: 129.80.123.xxx
The exact prompts shown may differ from this example.
Welcome to QuickStart!
The QuickStart program will guide you through
the necessary steps for configuring the KMA.
You may enter Ctrl-c at any time to abort; however,
it is necessary to successfully complete all steps in this initialization
program to enable the KMA.
Press Enter to continue:
Set Keyboard Layout
___________________________________________________________
Press Ctrl-c to abort.
You may change the keyboard layout here.
Available keyboard layouts:
( 1) Albanian
( 2) Belarusian
( 3) Belgian
( 4) Bulgarian
( 5) Croatian
( 6) Danish
( 7) Dutch
( 8) Finnish
( 9) French
(10) German
(11) Icelandic
(12) Italian
(13) Japanese-type6
(14) Japanese
(15) Korean
(16) Malta_UK
(17) Malta_US
(18) Norwegian
(19) Portuguese
(20) Russian
(21) Serbia-And-Montenegro
(22) Slovenian
(23) Slovakian
(24) Spanish
(25) Swedish
(26) Swiss-French
(27) Swiss-German
(28) Taiwanese
(29) TurkishQ
(30) TurkishF
(31) UK-English
(32) US-English
The current layout is US-English.
Please enter the number for the keyboard layout : 32
The keyboard layout has been applied successfully.
Press Enter to continue:
316194902 • Revision: B
Chapter 2 Key Management Appliances
15
QuickStart Program
1. Set the KMA IP addresses:
Note: It may take one or two minutes for these IP address settings to take effect.
A static IP Address configuration must be set in order for the KMA
to communicate with other KMAs, Agents, or Users in your system.
Please enter the Management Network Hostname: KMSmgr
Do you want to use DHCP to configure the Management Network
interface? [y/n]: n
Please enter the Management Network IP Address: 129.80.123.32
Please enter the Management Network Subnet Mask: 255.255.254.0
Please enter the Service Network Hostname: SDP
Do you want to use DHCP to configure the Service Network
interface? [y/n]: n
Please enter the Service Network IP Address: 172.18.18.1
Please enter the Service Network Subnet Mask: 255.255.254.0
Please enter the Gateway IP Address (optional but necessary
if this KMA is to communicate with an entity on a
different IP Subnet): 129.80.123.254
Please enter the Primary DNS Server IP Address (optional):
129.80.0.4
Please enter the DNS Domain: my.customer.com
Applying network settings...
Done.
The Network Configuration has been updated.
Press Enter to continue:
Press Ctrl-c to abort.
16 KMA: Installation and Service Manual • May 2008
Revision: B • 316194902
QuickStart Program
2. Initialize the KMA.
The KMA Name is a unique identifier for your KMA. This name should
not be the same as the KMA Name for any other KMA in your cluster.
It also should not be the same as any User Names or Agent IDs in
your system.
Please enter the KMA Name: KMA-1
Press Enter to continue:
3. Configure the Cluster.
You can now use this KMA to create a new Cluster, or you can have
this KMA join an existing Cluster. You can also restore a backup
to this KMA or change the KMA Version.
Please choose one of the following:
(1)
(2)
(3)
Create New Cluster
Join Existing Cluster
Restore Cluster from Backup
Please enter your choice: 1
Create New Cluster
316194902 • Revision: B
Chapter 2 Key Management Appliances
17
QuickStart Program
4. Enter Key Split Credentials
Notes:
■
■
The key split size and split threshold be changed at a later time using the KMS
manager. This allows a setting for “1 of 1.”
The userids and passphrases should be enter by the appropriate person to keep
them secure; or they can also be changed later after the QuickStart program.
The Key Split credentials are used to wrap splits of the Core
Security Key Material which protects Data Unit Keys.
When Autonomous Unlocking is not enabled, a quorum of Key Splits
must be entered in order to unlock the KMA and allow access to
Data Unit Keys.
A Key Split credential, consisting of a unique User Name and
Passphrase, is required for each Key Split.
The Key Split Size is the total number of splits that will
be generated.
This number must be greater than 0 and can be at most 10.
Please enter the Key Split Size: 1
The Key Split Threshold is the number of Key Splits required to
obtain a quorum.
Please enter the Key Split Threshold: 1
Please enter the Key Split User Name #1: user1
Passphrases must be at least 8 characters and at most 64
characters in length.
Passphrases must not contain the User's User Name.
Passphrases must contain characters from 3 of 4 character classes
(uppercase, lowercase, numeric, other).
Please enter Key Split Passphrase #1: ********
Please re-enter Key Split Passphrase #1: ********
Press Enter to continue:
Press Ctrl-c to abort.
18 KMA: Installation and Service Manual • May 2008
Revision: B • 316194902
QuickStart Program
5. Enter Initial Security Officer User Credentials
The user names are arbitrary; however, use the conventions defined by security
polices or practices.
The Initial Security Officer User is the first User that can connect
to the KMA via the KMS Manager. This User can subsequently create
additional Users and administer the system.
Please enter a Security Officer User Name: SecOfficer
A Passphrase is used to authenticate to the KMA when a connection
is made via the KMS Manager.
Passphrases must be at least 8 characters and at most 64 characters
in length.
Passphrases must not contain the User's User Name.
Passphrases must contain characters from 3 of 4 character classes
(uppercase, lowercase, numeric, other).
Please enter the Security Officer Passphrase: ********
Please re-enter the Security Officer Passphrase: ********
Press Enter to continue:
Press Ctrl-c to abort.
6. Enter Autonomous Unlocking Preference
When Autonomous Unlocking is DISABLED, it is necessary to
UNLOCK the KMA using a quorum of Key Split Credentials
EACH TIME the KMA starts before normal operation of the
system can continue. Agents may NOT register Data Units
with or retrieve Data Unit Keys from a locked KMA.
When Autonomous Unlocking is ENABLED, the KMA will
automatically enter the UNLOCKED state each time the
KMA starts, allowing it to immediately service Agent requests.
Do you wish to enable Autonomous Unlocking? [y/n]: y
316194902 • Revision: B
Chapter 2 Key Management Appliances
19
QuickStart Program
7. Set Time Information.
KMAs in a Cluster must keep their clocks synchronized. Internally, all KMAs use
UTC time (coordinated universal time).
If the customer prefers, there is an option in the KMS Manager that allows date and
times to be adjusted to local time when displayed.
KMAs in a Cluster must keep their clocks synchronized. Specify an
NTP server if one is available in your network. Otherwise, specify
the date and time to which the local clock should be set.
Please enter the NTP Server Hostname or IP Address (optional):
ntp.example.com
Press Enter to continue:
Initializing new cluster...
New KMS cluster has been created.
Press Enter to continue:
Key Management System Version Build 321
___________________________________________________________
KMA initialization complete!
You may now connect to the KMA via the KMS Manager in order to
continue with KMS configuration.
Press Enter to exit:
Key Management System Version Build 321 (KMA-1)
___________________________________________________________
Please enter your User Name:
8. Install the KMS Manager.
20 KMA: Installation and Service Manual • May 2008
Revision: B • 316194902
Configuration Checklist
Configuration Checklist
The following is a list of tasks the customer or user would do to configure and use
the Sun Crypto Key Management System Version 2.0.
They are listed here as a checklist to assist the user with the initial configuration and
familiarization of the KMS Manager.
Make sure the customer or user has a copy of the:
Crypto Key Management System Administration Guide (PN: 316195101) for
specific information and instructions about how to configure the KMA Cluster.
TABLE 2-5 Initial Configuration Checklist
✓
Task
Guidelines
❏
Install the KMS Manager
In order to continue with KMA setup, the KMS Manager GUI
must be installed. Currently, only Windows XP, Solaris 10
Update 3x86 and Update 4x86 versions are supported.
Windows Vista and Solaris 9 are not supported.
Initially, the KMS Manager will be blank until there is a
KMA Cluster in which to connect.
Note: The first time trying to connect you may get a message stating that the:
Web Site Certified By Unknown Authority
and offer selections to choose from. Select either Accept Temporary or Accept Permanent.
Click on one of these options and then click OK. This is a normal message.
❏
Create a KMA Cluster
1. Click on the Connect button in the upper left corner.
2. Click on New Cluster Profile...
3. Enter a name for the cluster
4. Enter the IP address or hostname or any KMA in the cluster
5. Click OK
❏
Log in as the Security Officer
■
■
316194902 • Revision: B
Use the Security Officer login from the QuickStart program.
Enter the cluster name created above.
The Main GUI screen is displayed.
Chapter 2 Key Management Appliances
21
Configuration Checklist
TABLE 2-5 Initial Configuration Checklist
✓
Task
Guidelines
❏
Create additional users
From the Main Screen, in the left pane:
1. Select: System Management ➪ User List
2. Click Create and complete the necessary information
3. Click Save
User IDs and Passphrases will be needed for the following roles.
If all users are not available at the time of this initial configuration, they can add their names
and passphrases afterwards.
However, do not create a Core Security Backup until this has been completed.
Auditors
Names:
Backup Operators
Names:
Compliance Officers
Names:
Operators
Names:
Security Officers
Names:
22 KMA: Installation and Service Manual • May 2008
Revision: B • 316194902
Configuration Checklist
TABLE 2-5 Initial Configuration Checklist
✓
Task
Guidelines
❏
Create Key Policies and
Key Group Configurations
You need to create at least:
■ One key policy
■ One key group
Then:
■ Assign the key group to the key policy
❏
Enroll Agents
This is a two step process:
■ One Step is performed at the KMS Manager.
■ Use TABLE 3-4 on page 35 to record the information
■ Agent ID and passphrase
■ IP address
At the KMS Manager, navigate to the agent list:
Secure Information Management ➪ Agents ➪ Agent List
■
❏
Assign Agents to the
Key Groups
The other Step is performed at the Tape Drives
■ Use TABLE 3-3 on page 34 record the information
■ Drive serial number
■ IP address
■ Location
At the KMS Manager, navigate to: Secure Information
Management ➪ Agents ➪ Key Group Assignment
1. Click the Agent in the list to display its key group
permissions
2. Select the key group
3. Click “Default Key Group” button to move this to the key
group.
316194902 • Revision: B
Chapter 2 Key Management Appliances
23
Configuration Checklist
TABLE 2-5 Initial Configuration Checklist
✓
Task
Guidelines
❏
Configure the Agent
1. Set the IP address of the drive
2. Provide the Drive ID, Passphrase, and the IP address of one
of the KMA's in the cluster. The details are device specific.
3. Once this process has been successfully completed, the agent
will show as “enrolled” in the agent details screen.
24 KMA: Installation and Service Manual • May 2008
Revision: B • 316194902
Configuration Checklist
TABLE 2-5 Initial Configuration Checklist
✓
Task
Guidelines
❏
Preform the Initial Backup
The steps to perform a backup are not necessary for a
multi-KMA cluster. They certainly can be done, but they are
not required.
This is a 2-step process that
creates three files:
■ Core Security file
■ Backup Key file
■ Backup file
Before keys can be created and delivered, backups must be
performed to ensure they are protected. When the KMA is first
brought up, it begins generating keys; Initially 1000 keys.
To verify this, from the Main Screen, in the left pane:
1. Select: System Management ➪ KMA List
2. Double click on the KMA or click the “Details...” button
■ “Ready Keys” should be 0.
■ “Generated Keys” should be 1000.
Later on in the process, this will change (reverse).
316194902 • Revision: B
Chapter 2 Key Management Appliances
25
Configuration Checklist
TABLE 2-5 Initial Configuration Checklist
✓
Task
Guidelines
❏
Backup: First Step
The initial Backup is a two step process.
First step of the backup is to create a Core Security Backup.
1. As the Security Officer, select:
System Management ➪ Security ➪ Core Security ➪
Backup Core Security
2. Choose a file and click Start. Using the default name is
recommended, but any directory can be selected.
This creates a Core Security Backup file on the system where
the KMS Manager is being used.
3. Navigate to the backup list from the Main Screen, select:
Secure Information Management ➪ Backup List
❏
Backup: Second Step
Second step of the backup is to:
1. Login using a Backup Operator role.
2. Click the Create Backup... button.
3. Choose files for the two outputs.
4. Use of the defaults for filenames is recommended, but these
can be placed in any desired directory.
5. Click Start
Note: Now the system will show:
■ “Ready Keys” 1000.
■ “Generated Keys” 0.
Note: The frequency for performing backups depends on the number of tape mounts and key
usage—how fast are the keys being used? Each KMA starts with 1000 keys—as mounts occur,
the keys are used. The systems tracks key usage and adjusts the supply of keys. As a best
practices, backups should be taken weekly; however, again, this all depends on key usage.
26 KMA: Installation and Service Manual • May 2008
Revision: B • 316194902
Change the ELOM Password
Change the ELOM Password
For security, at some point, the customer needs to change the ELOM password.
ELOM provides functionality that can be used to perform a network boot of the KMA.
This functionality could be exploited and provide access to key material on the KMA
hard drive. Because of this potential, the user should change and secure the root
password of the ELOM.
A good time to do this is after completing the QuickStart program.
To change the ELOM password:
1. Access the ELOM network (LAN 1).
2. Select: User Management ➪ User Account to bring up the account list.
3. Click on the Change Password on the root user name.
4. Enter the Old Password (the default is “changeme”)
5. Enter a new Password and Confirm the password.
6. Click Submit.
FIGURE 2-6 ELOM Password Reset
316194902 • Revision: B
Chapter 2 Key Management Appliances
27
Add KMAs to the Cluster
Add KMAs to the Cluster
Servers must be installed in pairs called a cluster. Clusters perform backups of each
appliance; therefore, no external hard drives are required.
■
Adding another KMA to the first one created above requires some steps inside the
existing cluster using the KMS Manager (GUI).
■
Then, during the QuickStart program for the next KMA, select:
(2) Join Existing Cluster
■
After that, the QuickStart program prompts for the Passphrase and IP address of
that existing cluster.
To create and add another KMA to the cluster:
1. Log in to the KMS manager.
2. Select System Management ➪ KMA List ➪ Create button.
The Create KMA dialog box is displayed, with the General tab active.
3. Complete the following parameters:
■
■
■
KMA Name: Type a value that uniquely identifies the KMA in a cluster.
This value can be between 1 and 64 (inclusive) characters.
Description Type: A value that uniquely describes the KMA.
This value can be between 1 and 64 (inclusive) characters.
Site ID Click the down-arrow and select the site to which the KMA belongs.
This field is optional.
4. Open the Passphrase tab.
5. Enter the Passphrase. Enter from 8 to 64 characters. The default value is 8 characters.
6. Confirm Passphrase. Retype the same value that you entered in the Passphrase field.
7. The KMA record is added to the database and the entry is displayed in the KMA
List screen.
8. Add all other KMAs belonging to the Cluster.
9. You must now run the QuickStart program on the KMA(s) you just created so that
they can join the Cluster. See “QuickStart Program” on page 13 for information.
Remember to select Option 2 to Join an Existing Cluster.
10. After completing the QuickStart, the KMA will be locked. You must reconnect to
the new KMA (you may need to do a “refresh”) to unlock it.
28 KMA: Installation and Service Manual • May 2008
Revision: B • 316194902
Add KMAs to the Cluster
Run the QuickStart Wizard
1. You must now run the QuickStart program on the KMA you just created so that they
can join the Cluster.
■
■
See “QuickStart Program” on page 13 for information.
Remember to select Option 2 to Join an Existing Cluster.
The KMA being added checks the firmware version against the existing versions in the
cluster.
If it is not compatible, the new KMA displays an error and gives the user the option of
upgrading or downgrading.
FIGURE 2-7 KMA Replacement—Joining a Existing Cluster
2. If the user selects “Yes”, then the KMA being added:
■
■
■
Grabs the code from the existing KMA in the cluster,
Downloads the code for its own, and
Installs the code.
This process takes about 25 to 30 minutes to complete.
FIGURE 2-8 KMA Replacement—Joining a Existing Cluster
316194902 • Revision: B
Chapter 2 Key Management Appliances
29
Add KMAs to the Cluster
3. Once this process completes, the User needs to reboot the KMA.
4. After the KMA comes back online from the reboot, you need to continue with
the QuickStart program.
5. Check that the new KMA is in service, select: System Management ➪ KMA List.
Once all the KMAs are in the KMA List, go to:
■
“Configuration Checklist” on page 21 to continue with the initial configuration.
This is a list of “user” tasks that the must customer perform. The checklist is
provided to assist the service representative and customer as they go through the
initial configuration.
Make sure the KMS Administrator Guide is available for use.
■
Chapter 3, “Tape Drives” to license and enroll the tape drives.
This chapter requires both service representative and user tasks to complete.
■
Chapter 4, “Encryption Hardware Kits” to install the additional hardware in the
customer-select solution. This chapter requires just the service representative to
install the additional hardware (such as Ethernet switches and cables).
30 KMA: Installation and Service Manual • May 2008
Revision: B • 316194902
CHAPTER
3
Tape Drives
Currently, the Crypto Key Management Station Version 2.0 supports:
TABLE 3-1 Tape Drive Support
Tape Drive Type
Interface Type
T10000 A
■
■
T9840D
■
■
Firmware Version
Configuration Notes
Fibre Channel
FICON
1.37.108
■
Not supported in an
SL500 library
FICON
ESCON
1.42.104
■
Not supported in an
SL500 library
1.37.114
■
This chapter contains information about how to:
■
Obtain the Drive Data—PC Key
■
License the Tape Drives
■
Enroll the Tape Drives—called Agents—on the Key Management Appliances
For specific information about how to install the tape drives in the appropriate
configuration, refer to:
T10000 Tape Drive Installation Manual
StorageTek: 96173
T10000 Service Manual
StorageTek: 96175
Virtual Operator Panel—Service
StorageTek: 96180
Virtual Operator Panel—Customer
StorageTek: 96179
T9x40 Tape Drive Installation Manual
StorageTek: 95879
T9x40 Service Manual
StorageTek: 95740
HP LTO4 Documentation
HP Online Site
If the manuals are not on hand, go to the Product Documentation Web site at:
http://docs.sun.com/app/docs
316194902 • Revision: B
31
Before Beginning
Before Beginning
Important:
1. The tape drives should be installed and tested in the appropriate configuration
before adding the encryption capability to them.
2. To enable and enroll the tape drives requires multiple steps and the collaboration
between the service representative and the customer to complete.
Responsibility
Steps
Customer
1. Create Agent IDs and passphrases in the KMAs
Service Representative
1. Request the PC Keys from the Web site
Service Representative
2. Download the PC Keys to the tape drives
3. License the tape drives
Customer
4. Enroll the tape drives
6. Assign the tape drives to a Key Group
■
The service representatives will need to create a file on a laptop and use the Virtual
Operator Panel (VOP) to transfer the PC Keys to license the tape drives.
Record the information in TABLE 3-3 on page 34
■
The customer will need to use the Virtual Operator Panel (VOP) to provide an
Agent ID and Pass Phrase to enroll the tape drives on the key management
appliance (KMA). Gather and record the enrollment data in TABLE 3-4 on page 35
■
Make copies as necessary.
Required Tools
The required tools to obtain the drive data, license and enroll the tape drives is:
■
Straight Ethernet cable, 10 ft (PN: 24100216)
if using an Ethernet switch to connect to the tape drives
■
Cross-over Ethernet cable, 10 ft (PN: 24100163)
if connecting directly to the tape drives
■
Service laptop (or personal computer)
■
Virtual Operator Panel, Version 1.0.11 or higher (service and customer versions)
32 KMA: Installation and Service Manual • May 2008
Revision: B • 316194902
Tape Drive LEDs
Tape Drive LEDs
Each encryption-capable tape drive has an LED status light on the rear of the drive
and/or drive tray.
TABLE 3-2 Tape Drive Encryption LED
Encryption Status LED:
Green:
■ Solid—Safe, encryption is not enabled
■ Flashing—Reset, encryption was enabled, now
it needs keys
Amber (orange):
■ Solid—Needs media keys (install the OKT)
■ Flashing—Needs device keys
(install the EKT). This also indicates a IP address
mismatch on the token/drive network.
Red:
■ Solid—Armed, ready to encrypt
■ Flashing—Encrypting, reading and writing in
encrypted mode.
Cycling:
The LED is cycling through all colors. This
indicates the tape drive is “zeroed,” unusable, and
must be returned.
Encryption LED
1
2
T105_011
1. Encryption LED
2. Ethernet Port
Note: Where there is no cartridge in the tape drive, the drive has no encryption keys stored in memory
316194902 • Revision: B
Chapter 3 Tape Drives
33
34
KMA: Installation and Service Manual • May 2008
20.
19.
18.
17.
16.
15.
14.
13.
12.
11.
10.
9.
8.
7.
6.
5.
4.
3.
2.
1.
Drive IP Address
Serial Number / DMOD
(Last 8 digits)
Crypto Serial Number
(6 hexadecimal characters)
File Pathname:
SDP IP Address:
TABLE 3-3 Drive Data Work Sheet
Service Representative Work Sheet
Location:
Service Representative Work Sheet
Revision: B • 316194902
Permanent?
Yes ❏ No ❏
Yes ❏ No ❏
Yes ❏ No ❏
Yes ❏ No ❏
Yes ❏ No ❏
Yes ❏ No ❏
Yes ❏ No ❏
Yes ❏ No ❏
Yes ❏ No ❏
Yes ❏ No ❏
Yes ❏ No ❏
Yes ❏ No ❏
Yes ❏ No ❏
Yes ❏ No ❏
Yes ❏ No ❏
Yes ❏ No ❏
Yes ❏ No ❏
Yes ❏ No ❏
Yes ❏ No ❏
Yes ❏ No ❏
Tokens? (KMS 1.x)
Yes ❏ No ❏
Yes ❏ No ❏
Yes ❏ No ❏
Yes ❏ No ❏
Yes ❏ No ❏
Yes ❏ No ❏
Yes ❏ No ❏
Yes ❏ No ❏
Yes ❏ No ❏
Yes ❏ No ❏
Yes ❏ No ❏
Yes ❏ No ❏
Yes ❏ No ❏
Yes ❏ No ❏
Yes ❏ No ❏
Yes ❏ No ❏
Yes ❏ No ❏
Yes ❏ No ❏
Yes ❏ No ❏
Yes ❏ No ❏
1.
2.
3.
4.
5.
6.
7.
8.
9.
10.
11.
12.
13.
14.
15.
16.
17.
18.
19.
20.
Passphrase
Drive Address
Agent ID
KMA IP Address:
KMA IP Address:
Drive IP Address
KMA Hostname:
KMA Hostname:
TABLE 3-4 Enrollment Data Work Sheet
Customer Work Sheet
Customer Work Sheet
316194902 • Revision: B
Chapter 3 Tape Drives 35
Obtain the Drive Data
Obtain the Drive Data
To obtain the drive data for each tape drive:
1. Using the Virtual Operator Panel, connect to each tape drive and record the last eight
digits of the tape drive serial number.
■
Select: File ➪ Connect to Drive
■
Select: Retrieve ➪ View Drive Data ➪ Manufacturing
FIGURE 3-1 Tape Drive Serial Number—VOP
➪
2. Use TABLE 3-3 on page 34 to build information about the tape drives.
You will find this information helpful during the installation, licensing, and
enrollment process for the tape drives (agents).
3. Request an Encryption Key File:
a. Log in to the Applications Web site at: http://crcapplications/keyswebapp/
b. Select Request an Encryption key.
FIGURE 3-2 Request an Encryption Key Application
Access is Limited: You must be a Sun employee, have completed the training
courses, and have your name included on the list to access this link.
36 KMA: Installation and Service Manual • May 2008
Revision: B • 316194902
Obtain the Drive Data
4. Complete the Encryption Request form.
a. First name, last name, and e-mail address are automatically included.
b. Provide a site ID and order number.
c. Select the tape drive type (T10000A, T10000B, or T9840D).
d. Complete the serial number for the selected tape drive.
e. Add any optional remarks and click Request Key File.
After submitting the Encryption File Request you will be prompted to download
the file. This file contains the drive data you need to enable and enroll the drive.
FIGURE 3-3 Encryption File Request for Drive Data
Family serial numbers start with:
T10000A = 5310 xxxxxxxx
T10000B = 5720 xxxxxxxx
T9840D = 5700 xxxxxxxx
When you select the drive family-type,
these are automatically filled in.
5. Continue with this process until you obtain all the drive data files for each tape
drive you are going to enable.
If you open the drive data file, using WordPad for example, you can see and verify the
drive serial number, PCKey, and crypto serial number (CSN).
FIGURE 3-4 Encryption File Request for Drive Data
316194902 • Revision: B
Chapter 3 Tape Drives
37
Obtain the Drive Data
Create a Drive Data File Structure
When enabling multiple drives, it is best to create a file structure where each tape drive
has its own folder. For example:
1. FIGURE 3-5 uses a top-level folder name of crypto_drvs placed on the Desktop.
(This is only for grouping of the other folders.)
2. Under crypto_drvs are the folders for each tape drive using the serial numbers.
3. In each serial number folder is the drive data file for that specific tape drive.
FIGURE 3-5 Drive Data File Structure
When licensing the tape drives, the VOP requests a download location.
4. Complete TABLE 3-4 on page 35 to help with the licensing and enrollment of the tape
drives. What you need to know before beginning:
■
What is the drive number (serial or system) and IP address?
■
What are the Agent IDs and Passphrases?
■
Is this drive going to use tokens (KMS Version 1.x) to get media keys (OKT)?
Or use the appliance (KMA Version 2.x) to get the encryption keys?
■
Does the customer want this drive to remain in encryption mode?
Or do they want the ability to switch encryption on and off?
5. Make copies of this page as necessary.
Notes:
■ Agent names (IDs) cannot be changed; however, an agent can be deleted and
re-enrolled it with a different name.
■ If you replace the agent, you can reuse the name; however, passphrases can only be
used once, you will need to give the agent a new passphrase.
■ Which means, the replacement drive will need to be enrolled using the existing name
and a new passphrase.
38 KMA: Installation and Service Manual • May 2008
Revision: B • 316194902
License and Enroll the Tape Drives
License and Enroll the Tape Drives
Once the drive data is downloaded for all the tape drives, use the Virtual Operator
Panel (VOP) to license and enable encryption on the tape drives.
The following procedures assume you know how to connect to and use the VOP on the
T10000 tape drives. If not, refer to the Virtual Operator Panel documentation for help.
The following procedure requires both the:
■
■
Service representative: To download the drive data (PC Key) and the
Customer: To enroll the Agent (ID and Pass Phrase)
License the Tape Drives
For the service representative:
1. Configure and connect the laptop with the drive data file structure to the:
■
■
Tape drive network using an Ethernet cable and switch
(using the assigned IP addresses for the drives)
Tape drive using a cross-over Ethernet cable
(using the default IP address 10.0.0.1)
2. Launch VOP and connect to a specific tape drive.
3. On the VOP main screen:
■
Take the drive offline.
■
Pull down the Configure menu.
■
Select Drive Data.
316194902 • Revision: B
Chapter 3 Tape Drives
39
License and Enroll the Tape Drives
4. Press the License button and a File Open screen appears.
5. Navigate to the drive data file structure and select the folder for that tape drive.
The drive validates the license number:
■
■
If it is not correct licensing will fail and VOP will show an error message.
If the license number is correct, the drive will reboot.
Depending on the number of tape drives to license, the service representative may
want to license all drives before the customer enrolls them.
Depending on the number of tape drives, this can take time to license and enroll all the
drives—called Agents.
40 KMA: Installation and Service Manual • May 2008
Revision: B • 316194902
License and Enroll the Tape Drives
Enroll the Tape Drives
For the service representative:
1. After the drive reboots, on the VOP main screen:
■
Take the drive offline.
■
Pull down the Configure menu.
■
Select Drive Data.
The Configure Drive Parameters screen appears (notice the License button is gone).
For the customer:
2. Select if this drive is going to use tokens:
Yes ❏, using tokens (KMS Version 1.x)
No ❏, not using tokens (KMA Version 2.x)
3. Select if this drive is going a permanently encrypting tape drive:
Yes ❏, permanent
No ❏, switchable
4. Enter both the:
Agent ID:
Pass Phrase:
KMS IP address of the appliance:
316194902 • Revision: B
Chapter 3 Tape Drives
41
License and Enroll the Tape Drives
5. Click on the Commit button. The tape drive will reboot.
The Configuration menu Drive Settings screen shows the drive is licensed, enrolled,
and needs media keys.
Crypto Serial Number (CSN)
Encryption active = Yes
Licensed = Yes
Use tokens = No
Permanently encrypting = no
(switchable)
Agent ID = jute
KMA IP address: 10.80.44.57
Needs keys
42 KMA: Installation and Service Manual • May 2008
Revision: B • 316194902
License and Enroll the Tape Drives
The VOP main screen now shows that the drive is Online and that the Media will be
encrypted (Red LED by the Media icon).
6. In the KMS Manager, assign the tape drives (agents) to the Key Groups.
316194902 • Revision: B
Chapter 3 Tape Drives
43
License and Enroll the Tape Drives
44 KMA: Installation and Service Manual • May 2008
Revision: B • 316194902
CHAPTER
4
Encryption Hardware Kits
This chapter contains information and instructions for the additional hardware kits.
For specific instructions about how to install the selected configuration, refer to:
T10000 Tape Drive Installation Manual
StorageTek: 96173
SL8500 Modular Library System Installation Manual
StorageTek: 96138
SL3000 Modular Library System Installation Manual
StorageTek: 316194201
SL500 Modular Library System Installation Manual
StorageTek: 96114
L700/1400 Library Installation Manual
StorageTek: 95843
L180 Library Installation Manual
StorageTek: 95896
9310 PowderHorn Library Installation Manual
StorageTek: 9314
If the manuals are not on hand, go to the Product Documentation Web site at:
http://docs.sun.com/app/docs
The information in this chapter includes:
■
“SL8500 Library” on page 46
■
“External Rack Installations” on page 50
■
“SL3000 Library” on page 51
■
“SL500 Library” on page 52
■
“9310 Library and 9741e Drive Cabinet” on page 53
■
“L-Series Libraries” on page 56
■
“Rackmount” on page 59
316194902 • Revision: B
45
SL8500 Library
SL8500 Library
Encryption-capable tape drives adds another element to the design for content
management in an SL8500 library installation. Some considerations include:
■
You may need to order multiple kits or additional Ethernet switches to support all of
the encryption-capable tape drives in an SL8500 library or a library complex.
■
A single SL8500 library can support up to 64 tape drives in 4 groups of 16 drives.
■
An SL8500 Library Complex with multiple libraries joined together using
pass-thru-ports can have a capacity of several hundred tape drives.
■
The SL8500 can provide AC and DC power redundancy with the proper features.
■
The SL8500 library contains internal accessory racks to install the key management
appliances (KMAs) and additional hardware. These racks are an optional feature,
and if the customer wants power redundancy, a minimum of two racks is required.
■
The SL8500 supports all versions of the encryption-capable tape drives within the
same library or library complex.
■
The SL8500 supports partitioning, with up to four partitions using rail boundaries.
■
The SL8500 supports multiple operating systems with multiple host connections.
See FIGURE 4-2 on page 47 as an example.
This section contains information to install the encryption hardware in an
SL8500 library.
FIGURE 4-1 SL8500 Accessory Rack Guidelines
The SL8500 library encryption hardware kit is: CRYPTO-2X-SL8500-Z
Verify that all components are available.
Note – For power redundancy, APC Switches PN: XSL8500-AC-SW-Z are required.
Make sure these are available if the customer has ordered the power redundancy
feature.
Also, if installing this in the internal racks, a 2N power configuration is required.
46 KMA: Installation and Service Manual • May 2008
Revision: B • 316194902
SL8500 Library
FIGURE 4-2 SL8500 Capabilities with Encryption
This example shows an SL8500 library with:
■
■
■
4 internal accessory racks installed
2N power for both AC and DC redundancy
4 partitions using rail boundaries
■
Encryption Tape Drives:
■
■
■
■
Racks 2 and 3 contain:
■
■
■
2 KMAs (encryption appliances)
2 APCs (power distribution units)
2 Ethernet switches (encryption and SDP)
■
T10000 models A and B
T9840D
HP LTO4
Racks 1 and 4 contain:
■
■
2 Ethernet switches (encryption and SDP)
2 Fibre Channel switches for the Data Paths to the
tape drives (cabling not shown)
Notes:
APC = American Power Conversion.
PDU = power distribution units.
To show the connections, cable routing is exaggerated.
Tape drive interfaces are fiber-optic (Fibre Channel, 2 Gb and 4 Gb rates).
316194902 • Revision: B
Chapter 4 Encryption Hardware Kits
47
SL8500 Library
SL8500 Accessory Racks
The SL8500 library provides space where up to four standard RETMA1 19-inch racks
can be installed. These racks are oriented so the components mount vertically instead of
horizontally. Each rack can hold up to 6 units—called Us2—of equipment, such as the
key management appliances and the 24-port Ethernet switches.
Each rack has a six-connector power distribution unit (PDU) that provides AC power,
and two cooling fans that provides additional air flow, for the equipment in the rack.
Because of the numerous types of equipment, Sun StorageTek cannot mandate what
the customer installs in these racks; therefore, certain guidelines should be followed.
Table 4-1 lists these guidelines.
TABLE 4-1 SL8500 Accessory Rack Guidelines
Guideline
Descriptions
Rack numbering
Rack numbering is top-down from 1 to 4.
Rack 1 is on the top; Rack 4 is on the bottom.
Rack mounting
Components must be able to function in a vertical orientation.
Heavy components (such as Fibre Channel switches) must have threaded
holes in the sides to attach rack slides. Light weight components (such as the
Ethernet switches) may be mounted with a bracket.
Dimensional
restrictions
Rack module depth is 72 cm (28 in.).
Recommended safe length is 66 cm (26 in.).
Equipment weight
The accessory rack itself is mounted on slides rated for 80 kg (175 lb).
The recommended safe load is 64 kg (140 lb).
The KMA is 10.7 kg (23.45 lb), the Ethernet switch is 1.5 kg (3.1 lb)
Power consumption
Per rack module is 4 Amps (maximum).
Per outlet strip is 200–240 VAC, 50 to 60 Hz.
The KMA is 185 W, the Ethernet Switch is 20 W.
Power cord
Power plug to connect to the rack PDU is: IEC320 C13 shrouded male plug.
Minimum cord length is component plus 46 cm (18 in.) for a service loop.
Thermal requirements
Maximum power dissipation is 880 watts (3,000 Btu/hr) per rack module.
Air flow
Generally from non-port end to port end of component. Maximum volume
per 6U rack module is 241 scfm (standard cubic feet per minute) at 0 inches
of water static pressure to a minimum of 0 scfm at 0.60 inches of water static
pressure depending upon the devices and equipment installed blocking the
fan air flow.
Regulatory
compliance
Minimum requirements are: Safety—UL or CSA certification and
Electromagnetic—Class A certification from agencies such as FCC or BSMI.
Important:
When planning to install encryption hardware in an accessory rack, remember:
■
Two of the racks (2 and 4) receive power from the primary N+1 AC power grid.
■
The other two racks (1 and 3) require the 2N power configuration.
1. RETMA = Radio Electronics Television Manufacturers Association.
2. U stands for rack units. One unit is equal to 4.4 cm (1.75 in.).
48 KMA: Installation and Service Manual • May 2008
Revision: B • 316194902
SL8500 Library
Encryption Hardware
To install the encryption hardware in an accessory rack:
1. Attach the mounting brackets to the KMAs and Ethernet switches.
Hardware is provided with each unit and in the hardware kit.
2. Install the rack module rails and slides.
3. Install the:
■
Ethernet switch to the right of the bay, connections facing out
■
KMA to the left of the Ethernet switch, connections facing out
■
If installing power distribution units, place them next to the rack power units
4. Using FIGURE 4-2 on page 47 as an example:
a. Connect the power cords.
Important: See Chapter 2, “Key Management Appliances” and “Configure the
ELOM IP Address” on page 8 before you plug power cables into the KMAs.
b. Connect the Ethernet cables from the dedicated customer network—with access to
the Key Management System (KMS)—to each KMA and the Ethernet switches.
c. Connect the Ethernet cables from the switch to the tape drives.
Drive Tray
The drive tray for the T10000 in an SL8500 library provides:
■
Dual port interface connections
■
Ethernet connection
■
Drive status indicators:
■
Status (activity)
■
Maint (Maintenance switch)
■
Crypt (Encryption-capability)
■
PWR (Power)
■
Fault
FIGURE 4-3 T10000 Drive Tray
316194902 • Revision: B
Chapter 4 Encryption Hardware Kits
49
External Rack Installations
External Rack Installations
FIGURE 4-4 External Rack Installation
Because some configurations may have limited
rack space, an external rack is available to
install the encryption hardware.
Note – The 9310 / 9741e Drive Cabinets will
require an external rack installation.
Tape drives:
Depending on the number of tape drives, you
may need more than one Ethernet switch. Each
tape drive needs an Ethernet connection. More
than one Ethernet switch can also be used to
provide redundancy.
Kit: CRYPTO-20U-Z is a half-high rack.
This external rack is:
■
■
20-units high (approximately 3 ft)
19-inches wide
Power redundancy:
APC Switch PN: XSL8500-AC-SW-Z
Callouts:
1. Service Network (KMA to drives)
2. KMS Manager and the Management Network
To install the encryption hardware in an external rack:
1. Attach the mounting brackets to the KMAs, Ethernet switches, and PDUs.
Hardware is provided with each unit and in the hardware kit.
2. Install the rack module rails and slides.
3. Install the equipment in this order:
■
PDU on the bottom of the rack.
■
KMAs above the PDUs.
■
Ethernet switch on the top of the rack.
4. Using FIGURE 4-4 as an example, connect the following cables:
■
PDU power cords to the customer branch circuits (for redundancy).
■
Internal equipment power cords to the PDU.
■
Ethernet cables from the Management Network to the KMAs.
■
Ethernet cables from the KMAs to the switch. From the switch to the tape drives.
50 KMA: Installation and Service Manual • May 2008
Revision: B • 316194902
SL3000 Library
SL3000 Library
This section contains information to install the encryption hardware in an
SL3000 library.
FIGURE 4-5 SL3000 Library
The SL3000 library maintains the fundamentals of a modular design using four types of
modules; two of them that can have tape drives.
TABLE 4-2 SL3000 Module Types
Module Type
Quantity
Per Library
Capacity
Slots1
Tape Drives2
Base Module (required)
One only
205 or more
24
Drive Expansion Module
(increases drive and cartridge capacity)
One only
Left of Base
153 or more
32
Cartridge Expansion Module
(increases cartridge capacity)
Variable
438 or more
—
Parking Expansion Module
(dual-robotics requirement)
Two only
(optional)
620 for both
—
1) Slots = Minimum capacity listed.
2) Tape Drives = Maximum capacity listed. From 1 to 56.
There are elements that you need to consider to design for content management and
encryption in an SL3000 library. Some considerations include:
■
Because the SL3000 library has limited rack space, an external rack may be required
to install the encryption hardware.
■
The SL3000 supports all versions of the encryption-capable tape drives.
The SL3000 supports partitioning.
The SL3000 supports multiple operating systems with multiple host connections.
■
■
316194902 • Revision: B
Chapter 4 Encryption Hardware Kits
51
SL500 Library
SL500 Library
This section contains information to install the encryption hardware for an
SL500 library.
FIGURE 4-6 SL500 Library
The SL500 library is a rack-installed, modular design
that consists of one required base module (shown above).
To a total configuration of five modules, by adding up to
four optional drive and cartridge expansion modules
(shown to the right).
A customer configuration that includes an SL500 library
plus the encryption hardware would be:
■
■
■
One base module
Up to three expansion modules
Encryption hardware
If a fourth expansion module is installed, and external
rack will be required for the encryption hardware.
There are elements that you need to consider to design for content management and
encryption in an SL500 library. Some considerations include:
■
Because the SL500 library is a rack-installed library, there may be limited space to
install the additional hardware, an external rack may be required to install the
encryption hardware.
■
The SL500 supports:
■
■
■
■
■
Only LTO-type tape drives (HP LTO4 encryption-capable)
SCSI-direct attachments to the tape drives
From 1 to 18 tape drives
Partitioning
Open Systems platforms
The encryption hardware kits are:
■
■
CRYPTO-2X-SL500B-Z (for the base module)
CRYPTO-2X-SL500X-Z (one for each drive expansion module)
Verify that all components are available.
52 KMA: Installation and Service Manual • May 2008
Revision: B • 316194902
9310 Library and 9741e Drive Cabinet
9310 Library and 9741e Drive Cabinet
The 9310—PowderHorn—automated cartridge system (ACS) is an enterprise-class
library that offers up to 6,000 data cartridges. Each library storage module (LSM) can
have up to four drive cabinets that contain up to 20 drives per cabinet (80 drives total).
This section contains information to install the encryption hardware in a 9741e Drive
Cabinet for a 9310 library.
Because the 9310 library and the 9741e Drive Cabinet have no additional rack space, an
external rack is required to install the encryption hardware. Use a customer provide
rack or an external rack kit. See “External Rack Installations” on page 50.
FIGURE 4-7 9310–PowderHorn–Library
The encryption hardware kits are:
■
■
CRYPTO-2X-9310-Z (for the first 9741e Drive Cabinet)
CRYPTO-2X-9741E-Z (for each additional drive cabinet)
Verify that all components are available.
External Rack Installation
The 9310 and 9741e Drive cabinet will require an external rack.
See “External Rack Installations” on page 50 for more information.
316194902 • Revision: B
Chapter 4 Encryption Hardware Kits
53
9310 Library and 9741e Drive Cabinet
Drive Cabinet Ethernet Switch
FIGURE 4-8 Drive Cabinet Ethernet Switch Installation
Ethernet switch and mounting shelf
Callouts:
1
1. Mounting bracket
2. Screws
3. Ethernet switch
The Ethernet switch is installed in the lower right
corner of the drive cabinet.
These switches are ready-to-use, unmanaged, auto
negotiating switches that require no configurations.
2
3
T105_018
1
To install the Ethernet switch:
2
1. Release the door latches on the 9741e cabinet and
open the door.
2. Using one screw, install the mounting shelf in the
drive cabinet. This screw mounts in the lower
portion of the shelf to the floor of the drive cabinet.
3. Install the mounting brackets on the switch
4. Install the switch in the mounting shelf.
5. Connect one end of the Ethernet cables to the
T10000 encryption-capable tape drives.
6. Connect the other end of the cables to the switch.
7. Connect the ferrite bead to the Ethernet cable
between the cutout in the drive column wall and
the cutout in the cabinet floor.
8. Route and connect this Ethernet cable from the
24-port switch in the drive cabinet to the 16-port
switch in the standalone rack.
9. Close and latch the cabinet door.
3
9741E Drive Cabinet
2
T105_021
2
Callouts:
4
1. Tape drives (up to 20 drives per cabinet)
2. Ethernet cabling (to each encryption-capable drive)
3. Ethernet switch (24-port) (one per drive cabinet)
4. Ferrite bead
54 KMA: Installation and Service Manual • May 2008
Revision: B • 316194902
9310 Library and 9741e Drive Cabinet
Cable Routing
Route and connect one Ethernet cable from the 24-port switch in the drive cabinet to
the 16-port switch in the standalone rack.
FIGURE 4-9 External Rack and Ethernet Cabling
1
2
6
1
3
5
4
3
T105_013
1. Ethernet switches (24-port in drive cabinets)
2. 9741e Drive Cabinets
3. Ethernet cabling
316194902 • Revision: B
4. External Rack Installations
5. Ethernet switch (16-port in rack)
6. 9310—PowderHorn—library
Chapter 4 Encryption Hardware Kits
55
L-Series Libraries
L-Series Libraries
The Sun StorageTek L-Series libraries offer low-end, enterprise-class and mid-range,
automated tape solutions that fit a variety of customer needs.
This section contains information to install the encryption hardware in an
L-Series library.
FIGURE 4-10 L-Series Libraries
The encryption hardware kit is:
■ CRYPTO-2X-L7/14-Z (Ethernet switch and cables)
Verify that all components are available.
L-Series Library Rack Space
The L-Series libraries come equipped with internal rack space that can be used to
install the encryption hardware.
Cooling considerations should be made based upon the power dissipation within the
rack space, as well as the external library room ambient conditions.
Additional cooling is recommended for high power dissipation components such as
multi-processor servers; however, additional cooling it should not be required for the
encryption hardware kits.
56 KMA: Installation and Service Manual • May 2008
Revision: B • 316194902
L-Series Libraries
L700/L1400 Library Encryption Hardware
The L700 and L1400 libraries have an internal, 13-unit, rack “area” accessible from
behind the right front door or the left rear door of the library. The encryption hardware
can be installed from either the front or the rear; however, a rear installation offers
more space for cabling.
Rack area requirements:
■ Total maximum weight in this location cannot exceed 136 kg (300 lb).
■ Power cable space is provided in the cutout area of the rear door.
■ Ventilation openings in the rear of the cabinet must have at least 100 mm (4 in.)
clearance for proper air flow.
FIGURE 4-11 L-Series Libraries
Callouts:
1. KMAs (2)
2. Ethernet switch
3. PDU
4. Ethernet to
Drive cables
1
2
3
5
KMA
KMA
4
To install the encryption hardware in the L700/L1400 internal rack area:
1. Attach the mounting brackets to the KMAs, Ethernet switch, and PDU.
Hardware is provided with each unit and in the hardware kit.
2. Install the rack module rails and slides.
3. Install the equipment in this order:
■
KMAs on top.
■
Ethernet switch above the PDUs.
■
PDU on the bottom of the rack area.
4. Connect the power cords.
Important: See Chapter 2, “Key Management Appliances” and “Configure the
ELOM IP Address” on page 8 before you plug power cables into the KMAs.
5. Connect the Ethernet cables from the dedicated customer network—with access to
the Key Management System Manager—to each KMA and the Ethernet switch.
6. Connect the Ethernet cables from the switch to the tape drives.
Note – Because the Ethernet switch was previously installed in this configuration, the
KMAs are installed above the switch.
316194902 • Revision: B
Chapter 4 Encryption Hardware Kits
57
L-Series Libraries
L180 Library Encryption Hardware
The L180 libraries have an internal, 6-unit, rack “area” accessible from behind the right
front door of the library.
FIGURE 4-12 L-Series Libraries
Callouts:
2
1. Ethernet connections
2. KMAs (2)
3. Ethernet Switch
4. Ethernet to Drive
cables
5. Tape Drives
6. PDU
3
1
6
4
5
To install the encryption hardware in the L180 internal rack area:
1. Install the equipment in this order:
■
KMAs on top.
■
Ethernet switch above the PDUs.
■
PDU on the bottom of the rack area.
2. Connect the PDU power cables to the customer’s power source.
3. Connect the power cords.
Important: See Chapter 2, “Key Management Appliances” and “Configure the
ELOM IP Address” on page 8 before you plug power cables into the KMAs.
4. Connect an Ethernet cable from the dedicated customer network—with access to the
KMS Manager—to each KMA and the Ethernet switch.
5. Connect the Ethernet cables between the switch and the tape drives.
6. Connect the Ethernet cables between the switch and the KMAs.
Note – Because the Ethernet switch was previously installed in this configuration,
the KMAs are installed above the switch.
58 KMA: Installation and Service Manual • May 2008
Revision: B • 316194902
Rackmount
Rackmount
This section contains information to install the encryption hardware for rack-mounted
tape drives.
FIGURE 4-13 Rackmount Assembly
The encryption hardware kits CRYPTO-2X-RACK-Z includes:
■ Rack-mounting hardware
■ Ethernet switch and cables
Verify that all components are available.
To install the encryption hardware:
FIGURE 4-14 Rackmount Instructions
Locate the Ethernet switch.
1. Locate the mounting brackets and screws.
2. Place the switch and the KMAs on a flat surface.
3. Install the mounting brackets on each side.
4. Install the Ethernet switch in the rack space.
Cabling
1. Connect the Ethernet switch to a power source.
2. Connect the Ethernet cables between the switch and the
tape drives.
3. Connect the Ethernet cables between the switch and the
KMAs.
1
2
3
Callouts:
T105_007
316194902 • Revision: B
1. T10000 encryption-capable tape drives
2. Key management appliances (2 KMAs)
3. Ethernet switch (16-port)
Chapter 4 Encryption Hardware Kits
59
Service Delivery Platform
Service Delivery Platform
The Service Delivery Platform (SDP) is a support solution for Sun StorageTek libraries
and tape drives that consists of a smart appliance and dedicated network.
The Key Management Appliance includes a specific Ethernet connection (LAN 2 port)
for connection to this network.
The SDP appliance uses the Dynamic Host Configuration Protocol (DHCP) to automate
the assignment of IP addresses for device connections. When incorporating the KMAs
into an SDP network, it is best to use the established addresses provided by the SDP;
the IP address range is 172.18.18.xxx.
FIGURE 4-15 shows an example of an SDP network with connection to a KMA cluster.
FIGURE 4-15 Systems Delivery Platform
In this figure, the KMS Manager
interfaces with the KMAs using a
customer created network and IP
addresses of 129.80.123.xxx.
Each KMA connects to this network
using LAN 0.
The KMA interfaces with the tape
drives using the Service Network.
SDP IP addresses = 172.18.18.1.
Each KMA connects to this network
using LAN 2. The IP address range is:
172.18.18.2 through 172.18.18.59.
The tape drives connect to the Service
Network using an assigned IP
address from the SDP.
The SDP will likely come with an
Ethernet switch that connects to the
KMA service network (for example).
The default tape drive IP address is
10.0.0.1 and must be changed in any
connection scheme.
Note:
The SDP polls the tape drives about
every 6 minutes.
To improve performance, you may
want to change this parameter to
20 to 30 minutes.
For more information, go to: http://csa-wiki.central.sun.com/display/SDP
60 KMA: Installation and Service Manual • May 2008
Revision: B • 316194902
CHAPTER
5
Service
This chapter describes the service tasks for the components in the Key Management
System Version 2.0, which includes:
■
“Field Replaceable Units” on page 62
■
“Obtaining Support” on page 64
■
“System Upgrade” on page 67
■
“Restore From Backup” on page 68
■
“System Dump” on page 69
■
“Tape Drives” on page 70
■
“Switch Encryption On and Off” on page 71
■
“KMS Version 1.x Support” on page 72
316194902 • Revision: B
61
Field Replaceable Units
Field Replaceable Units
Currently, the only field replaceable units (FRUs) are the:
■
Key Management Appliance (KMA) PN: #3154936-Z
If the KMA fails, replace the entire server and for security reasons, scrap onsite.
■
Tape drive (Agents).
If a tape drive fails, replace the tape drive using the drive service manual.
■
Ethernet switch.
If an Ethernet switch fails, replace the switch.
TABLE 5-1 FRU Listing
Vendor
Sun
Part
Number
KMA 2.0
Description
#3154936-Z
CRYPTO-KMA-2-Z FRU,
KEY MANAGEMENT APPLIANCE
3-Com
16-port Switch
3C16470
260800489
CRYPTO-X-16PT ETHERNET SWITCH,
16 Port, RJ-45, 10B-T/100B-TX
3-Com
24-port Switch
3C16471
0800492
CRYPTO-X-24PT ETHERNET SWITCH
24 Port, RJ-45, 10B-T/100B-TX
A Keyboard and Monitor is available and consists of these part numbers:
TABLE 5-2 Keyboard Monitor Kit
315497101
Monitor/Keyboard, Rack Mount, US
315497201
Slide Kit, Monitor/Keyboard, Rack Mount
315497301
Cable, Monitor, Rack Mount
315497401
Cable, keyboard, rack mount
62 KMA: Installation and Service Manual • May 2008
Revision: B • 316194902
Account Log
Account Log
TABLE 5-3 KMA Account Log
Account Name:
KMA
Site Location:
KMA S/N:
KMA Name:
KMA Firmware Level:
KMA IP Address:
Service Network IP:
KMS Manager IP:
ELOM IP:
NTP | ❏ Yes ❏ No:
DHCP | ❏ Yes ❏ No:
Gateway | ❏ Yes ❏ No:
DNS | ❏ Yes ❏ No:
KMA Number:
Number of KMAs in Cluster:
KMA Location:
KMS Manager Location:
Configuration Types:
❏
❏
❏
❏
❏
❏
SL8500 library
SL3000 library
SL500 library
9310 library
L700/1400 library
L180 library
Location:
Tape Drive Types:
❏
❏
❏
❏
T10000A tape drive
T10000B tape drive
T9840D tape drive
LTO4 tape drive
Location:
KMA
Site Location:
KMA S/N:
KMA Name:
KMA Firmware Level:
KMA IP Address:
Service Network IP:
KMS Manager IP:
ELOM IP:
NTP | ❏ Yes ❏ No:
DHCP | ❏ Yes ❏ No:
Gateway | ❏ Yes ❏ No:
DNS | ❏ Yes ❏ No:
KMA Number:
Number of KMAs in Cluster:
KMA Location:
KMS Manager Location:
Configuration Types:
Location:
316194902 • Revision: B
❏
❏
❏
❏
❏
❏
SL8500 library
SL3000 library
SL500 library
9310 library
L700/1400 library
L180 library
Tape Drive Types:
❏
❏
❏
❏
T10000A tape drive
T10000B tape drive
T9840D tape drive
LTO4 tape drive
Location:
Chapter 5 Service
63
Obtaining Support
Obtaining Support
Technical support is available 24 hours a day, seven days a week and begins with a
telephone call from you to Sun Microsystems StorageTek Support. You will receive
immediate attention from qualified personnel, who record problem information and
respond with the appropriate level of support.
To contact Sun Microsystems—StorageTek Support about a problem:
1. Use the telephone and call:
■
■
800.525.0369 (inside the United States) or
Contact any of Sun’s worldwide offices to discuss support solutions for your
organization. You can find address and telephone number information at:
http://www.sun.com/worldwide/
2. Describe the problem to the call taker. The call taker will ask several questions then:
■
■
Route your call to the appropriate level of support
or
Dispatch a service representative.
If you have the following information when you place a service call, the process will be
much easier. Complete as much information as possible—if known.
TABLE 5-4 Obtaining Support
Account name
Site location number
Contact name
Telephone number
Equipment model number
❏ KMA (Appliance)
❏ KMS Manager (GUI)
❏ SL8500 library
❏ SL3000 library
❏
❏
❏
❏
SL500 library
9310 library
L700/1400 library
L180 library
❏ T10000A tape drive
❏ T10000B tape drive
❏ T9840D tape drive
❏ LTO4 tape drive
❏ Network
Device address
Urgency of problem
Fault symptom code (FSC)
or Error Code
Problem description
64 KMA: Installation and Service Manual • May 2008
Revision: B • 316194902
Replacing or Adding a New KMA
Replacing or Adding a New KMA
■
When replacing a replacement KMA (or adding another KMA to the cluster) some
initial steps are required using the KMS Manager (GUI).
■
Then, during the QuickStart program for the next KMA, select:
(2) Join Existing Cluster
■
After that, the QuickStart program for the new KMA prompts for the Passphrase
and IP address of that existing cluster.
To replace or add a KMA:
1. Log in to the KMS manager.
2. Select: System Management ➪ KMA List ➪ Create button.
The Create KMA dialog box is displayed, with the General tab active.
3. Complete the following parameters:
■
■
■
KMA Name: Type a value that uniquely identifies the KMA in a cluster.
This value can be between 1 and 64 (inclusive) characters.
Description Type: A value that uniquely describes the KMA.
This value can be between 1 and 64 (inclusive) characters.
Site ID Click the down-arrow and select the site to which the KMA belongs.
This field is optional.
4. Open the Passphrase tab.
5. Enter the Passphrase and Confirm the Passphrase.
Enter from 8 to 64 characters. The default value is 8 characters.
The KMA record is added to the database and displayed in the KMA List screen.
6. You must now run the QuickStart program on the KMA you just created so that they
can join the Cluster.
See “QuickStart Program” on page 13 for information. Remember to select Option 2
to Join an Existing Cluster.
The KMA being replaced or added checks the firmware version against the existing
versions in the cluster.
If it is not compatible, the new KMA displays an error and gives the user the option of
upgrading or downgrading.
FIGURE 5-1 KMA Replacement—Joining a Existing Cluster
316194902 • Revision: B
Chapter 5 Service
65
Replacing or Adding a New KMA
7. If the user selects “Yes”, then the KMA being added:
■
Grabs the code from the existing KMA in the cluster,
■
Downloads the code for its own, and
■
Installs the code.
This process takes about 25 to 30 minutes to complete.
FIGURE 5-2 KMA Replacement—Joining a Existing Cluster
8. Once this process completes, the User needs to reboot the KMA.
9. After the KMA comes back online from the reboot, you need to continue with
the QuickStart program.
10. Check that the new KMA is in service, select: System Management ➪ KMA List.
66 KMA: Installation and Service Manual • May 2008
Revision: B • 316194902
System Upgrade
System Upgrade
To upgrade the KMA firmware, refer to the KMS Administrator Guide and:
1. Download the new firmware from (location not determined yet) onto a laptop.
Refer to the instructions or Release Notes that come with the new firmware.
2. From the KMS Manager GUI, select:
System Management ➪ Local Configuration ➪ Software Upgrade.
FIGURE 5-3 System Upgrade
3. Click the Browse button to bring up a Choose File dialog.
4. Navigate to the new file, select it, and click OK.
5. Click the Upload and Apply button.
This begins the upload process. When the upload and apply is complete, the new
version will show up in the version list.
6. Select the new version and click the Activate button.
The system will now reboot and start the new version.
Note – Most upgrades are going to require a new version of the KMS Manager GUI.
Download and install the new GUI version.
You will need to reconnect to the system using the new version of the GUI.
316194902 • Revision: B
Chapter 5 Service
67
Restore From Backup
Restore From Backup
Restoring the system from a backup requires the use of a quorum.
Make sure the required number of users are available. The quorum must enter their
user names and passphrases to authenticate the operation.
Note – Backup files are created and restored on the KMA.
To restore the system from a backup, refer to the KMS Administrator Guide and:
1. Select: Secure Information Management ➪ Backup List.
This allows you to view the history and details of the backup files.
To identify the restore you want to use, double-click the Backup entry.
The Backup Details dialog box is displayed for review.
2. From the Backup List screen, highlight the Backup you want to restore from.
3. Click on the Restore button. The Restore Backup dialog box is displayed.
FIGURE 5-4 Restore Backup
4. Click on the Start button.
When the upload completes, the Key Split Quorum Authentication dialog box
appears. The quorum must type their user names and passphrases to authenticate
the operation.
5. Click on the OK button.
A progress display of the restore is indicated.
68 KMA: Installation and Service Manual • May 2008
Revision: B • 316194902
System Dump
System Dump
A system dump is a user-invoke operation that results in a snapshot of all relevant data
collected into a single file. You may be asked to provide a system dump to aide
engineering in the analysis of a problem.
Note – A system dump does not contain any keys or key material.
To obtain a system dump:
1. From the KMS Manager GUI, select:
System Management ➪ System Dump.
2. Provide a system dump file location and name.
3. Click on the Start button.
FIGURE 5-5 System Dump
316194902 • Revision: B
Chapter 5 Service
69
Tape Drives
Tape Drives
For specific information about how to service the tape drives, refer to:
T10000 Tape Drive Installation Manual
StorageTek: 96173
T10000 Service Manual
StorageTek: 96175
Virtual Operator Panel—Service
StorageTek: 96180
Virtual Operator Panel—Customer
StorageTek: 96179
T9x40 Tape Drive Installation Manual
StorageTek: 95879
T9x40 Service Manual
StorageTek: 95740
HP LTO4 Documentation
HP Online Site
If the manuals are not on hand, go to the StorageTek Customer Resource Center (CRC).
70 KMA: Installation and Service Manual • May 2008
Revision: B • 316194902
Tape Drives
Switch Encryption On and Off
With Version 2.0, the customer is capable of selecting which version and configuration,
to permanently encrypt or not, and to switch encryption on and off per tape drive.
During tape drive enrollment, the customer can choose if they want the tape drives to
have the capability of switching between encryption-capable and non-encryption.
If the customer selected “No” for Permanently Encrypting, they can switch the tape
drives to non-encryption at a later date.
This is very beneficial and extremely cost-effective for disaster recovery sites that
provide their customers with a choice of encryption and non-encryption.
To turn encryption off:
FIGURE 5-6 Switch Encryption On and Off
1. Using the Virtual Operator Panel,
connect to the desired tape drive.
2. Select: Drive Operations ➪ Reset
Drive. Reply “Yes” to the Are You
Sure? dialog box.
The drive must be in the RESET
state to turn encryption off.
3. For the Turn encryption off:
Parameter Value, click “Yes.”
4. Click Commit.
The tape drive will reboot and be
non-encrypting.
You can turn encryption back on
from the Configuration menu.
316194902 • Revision: B
Chapter 5 Service
71
Tape Drives
KMS Version 1.x Support
With Version 2.0, the customer is capable of selecting which version of the KMS to
support—Version 2.0 or Version 1.x.
During tape drive enrollment, the customer can choose if they want the tape drives to
support KMS Version 1.x and the use of Tokens to transfer the encryption keys.
FIGURE 5-7 Switch Encryption On and Off
1. Using the Virtual Operator Panel,
connect to the desired tape drive.
2. Select: Configure ➪ Drive Data.
3. For the Use tokens: Parameter
Value, click “Yes.”
4. Click Commit.
72 KMA: Installation and Service Manual • May 2008
Revision: B • 316194902
APPENDIX
A
Work Sheets
The following pages contain work sheets that can help prepare for the installation of a
Sun StorageTek encryption solution.
These work sheets include:
■
“Obtaining Support” on page 74
■
“Initial Configuration Work Sheet” on page 75
■
“User Roles Work Sheet” on page 76
■
“Tape Drives Work Sheet” on page 77
■
“Drive Enrollment Work Sheet” on page 78
Make copies as necessary.
316194902 • Revision: B
73
Obtaining Support
Obtaining Support
Technical support is available 24 hours a day, seven days a week and begins with a
telephone call from you to Sun Microsystems StorageTek Support. You will receive
immediate attention from qualified personnel, who record problem information and
respond with the appropriate level of support.
To contact Sun Microsystems—StorageTek Support about a problem:
1. Use the telephone and call:
■
■
800.525.0369 (inside the United States) or
Contact any of Sun’s worldwide offices to discuss support solutions for your
organization. You can find address and telephone number information at:
http://www.sun.com/worldwide/
2. Describe the problem to the call taker. The call taker will ask several questions then:
■
■
Route your call to the appropriate level of support
or
Dispatch a service representative.
If you have the following information when you place a service call, the process will be
much easier. Complete as much information as possible—if known.
TABLE 0-1 Obtaining Support
Account name
Site location number
Contact name
Telephone number
Equipment model number
❏ KMA (Appliance)
❏ KMS Manager (GUI)
❏ SL8500 library
❏ SL3000 library
❏
❏
❏
❏
SL500 library
9310 library
L700/1400 library
L180 library
❏ T10000A tape drive
❏ T10000B tape drive
❏ T9840D tape drive
❏ LTO4 tape drive
❏ Network
Device address
Urgency of problem
Fault symptom code (FSC)
or Error Code
Problem description
74 KMA: Installation and Service Manual • May 2008
Revision: B • 316194902
316194902 • Revision: B
Login:
Passphrase:
Security Officer
Login:
Passphrase:
2. Autonomous Unlocking allows the KMA to enter a fully operational state after a hard or soft reset without requiring the entry of a quorum of passphrases
using the KMS Manager. This information should not be written down and should be entered by the person to which they belong.
These entries can be changed in the KMS Manager; so it may be desirable to enter something simple during the configuration,
then change it later using the KMS GUI immediately after the KMA is configured.
Note:
1. Addresses assigned using DHCP must be static. The system cannot handle the DHCP server changing the IP addresses once assigned.
Keyboard Type
Autonomous
Unlocking 2
Key Split Credentials
ELOM Passphrase
Root account
Passphrase
Hostname:
IP address:
DNS Server
Gateway
KMA Name
Hostname:
IP address:
Yes ❏ No ❏
Yes ❏ No ❏
LAN 2 = Service
LAN 3 = Reserved
Yes ❏ No ❏
DHCP?1
Yes ❏ No ❏
IP Address / Netmask
LAN 1 = ELOM
Hostname
Yes ❏ No ❏
DHCP?1
Yes ❏ No ❏
IP Address / Netmask
KMA ____
LAN 0 = Management
Hostname
KMA ____
TABLE A-1 Initial Configuration Settings—Customer
Initial Configuration Work Sheet
Initial Configuration Work Sheet
Appendix A Work Sheets 75
76
KMA: Installation and Service Manual • May 2008
Description
Passphrase
(Confidential password)
Security
Officer
Compliance
Officer
Operator
Roles
Backup
Operator
Auditor
Note: The Passphrase should not be recorded here for security reasons. This column is provided as a reminder that as User IDs are enter,
the person with that ID will be required to enter a passphrase.
User ID
TABLE A-2 User Roles Work Sheet—Customer
User Roles Work Sheet
User Roles Work Sheet
Revision: B • 316194902
316194902 • Revision: B
20.
19.
18.
17.
16.
15.
14.
13.
12.
11.
10.
9.
8.
7.
6.
5.
4.
3.
2.
1.
Drive IP Address
Crypto Serial Number
(6 hexadecimal characters)
Serial Number / DMOD
(Last 8 digits)
Drive Type
File Pathname:
SDP IP Address:
TABLE A-3 Tape Drive Work Sheet—Service Representative
Tape Drives Work Sheet
Location
Location:
Tape Drives Work Sheet
Appendix A Work Sheets 77
78
Permanent?
Yes ❏ No ❏
Yes ❏ No ❏
Yes ❏ No ❏
Yes ❏ No ❏
Yes ❏ No ❏
Yes ❏ No ❏
Yes ❏ No ❏
Yes ❏ No ❏
Yes ❏ No ❏
Yes ❏ No ❏
Yes ❏ No ❏
Yes ❏ No ❏
Yes ❏ No ❏
Yes ❏ No ❏
Yes ❏ No ❏
Yes ❏ No ❏
Yes ❏ No ❏
Yes ❏ No ❏
Yes ❏ No ❏
Yes ❏ No ❏
Tokens? (KMS 1.x)
Yes ❏ No ❏
Yes ❏ No ❏
Yes ❏ No ❏
Yes ❏ No ❏
Yes ❏ No ❏
Yes ❏ No ❏
Yes ❏ No ❏
Yes ❏ No ❏
Yes ❏ No ❏
Yes ❏ No ❏
Yes ❏ No ❏
Yes ❏ No ❏
Yes ❏ No ❏
Yes ❏ No ❏
Yes ❏ No ❏
Yes ❏ No ❏
Yes ❏ No ❏
Yes ❏ No ❏
Yes ❏ No ❏
Yes ❏ No ❏
1.
2.
3.
4.
5.
6.
7.
8.
9.
10.
11.
12.
13.
14.
15.
16.
17.
18.
19.
20.
Passphrase
Agent ID
Drive Address
Drive IP Address
KMA IP Address:
KMA IP Address:
Drive Type
KMA Hostname:
KMA Hostname:
TABLE A-4 Enrollment Data Work Sheet—Customer
Drive Enrollment Work Sheet
Drive Enrollment Work Sheet
KMA: Installation and Service Manual • May 2008
Revision: B • 316194902
APPENDIX
B
Migration Instructions
This appendix contains instructions to migrate keys:
■
From a: Key Management Station Version 1.x
■
To a: Key Management System Version 2.0 system
Prerequisites
A file of key data exported from a KMS 1.2 or later version database.
This can be on any media, such as a CD-Rom, memory stick, or external hard drive.
Note – The Key Management Appliance (KMA) does not have a functioning CD– or
DVD–drive. If exporting keys, make sure there is a system (PC or workstation)
available that can connect to the Encryption Management Network, the KMS Manager,
and the Key Management Appliances.
Input File Format:
A KMS 1.x file containing exported keys will have the following format:
<Key ID>,<Key Value>[,<Description>]
Where:
■
Key ID = A 64 character (hexadecimal) value that uniquely identifies each key;
■
Key Value = A 64 character (hexadecimal) value that is the cypher value of the key;
■
Description = An optional word or sentence used to describe each key.
T10000 A tape drive firmware must be at 1.37.108 or higher to support
KMS Version 2.0.
To upgrade the firmware in a T10000 tape drive, refer to:
T10000 Service Manual
StorageTek: 96175
Virtual Operator Panel—Service
StorageTek: 96180
316194902 • Revision: B
81
Description
Basic Steps
❏ Export Keys from 1.0 KMS
❏ Do not create any new keys in 1.0 system after this
Note: Keys are cleartext, protect them appropriately
❏ Import Keys into 2.0 KMS Cluster
❏ Upgrade Drive firmware
❏ Enroll drives with KMS Version 2.0 Cluster
❏ Agent configuration and VOP
❏ Drives begin using KMS Version 2.0
❏ Ensure that tapes written in 2.0 drives do not get loaded into 1.0 drives
Description
The process is performed in three stage.
Stage 1
The entire file is read and each line checked to ensure that the Key ID and Key Value
are the appropriate length and format.
The first 4 characters of the Key ID are stripped off, as the KMS 2.0 Key ID is 30 bytes
rather than the 32 bytes in the KMS 1.2 format. In addition, the Key ID is checked
against the KMS 2.0 database to ensure it is unique.
■
If the Key ID is not unique, the Key Value is checked against the KMS 2.0 Keystore
for that Key ID.
■
If a key exists in the KMS 2.0 database with the same Key ID and Key Value, that
Key ID is noted and processing continues. When importing the keys has completed,
the number of duplicate keys is returned.
■
If a key exists in the KMS 2.0 database with the same Key ID but a different Key
Value, then the operation is aborted and an error is returned immediately on the
assumption that the KMS 1.2 file may be corrupt.
Stage 2
The list of keys are processed, wrapping and adding the Key Value to the Keystore,
and the Key data to the database.
Any errors in this stage result in the termination and proceed directly to Stage 3.
Stage 3
This stage is only performed if there were any errors in Stage 2.
This stage removes the Key Values from the Keystore and rolls back the transaction to
insert the Key data into the database.
In addition, an error message is returned to the GUI.
82 KMA: Installation and Service Manual • May 2008
Revision: B • 316194902
Instructions
Instructions
1. Mount the media containing the exported keys.
2. From the KMS Manager, select Import 1.0 Keys.
3. Enter the Key Group ID that these keys will be associated with.
4. Enter the path and file name for the key file.
The status will be displayed upon completion.
FIGURE B-1 Import Keys
316194902 • Revision: B
Appendix B Migration Instructions
83
Instructions
84 KMA: Installation and Service Manual • May 2008
Revision: B • 316194902
Index
Numerics
buttons, 5
10000 rack kit, 59
1400 library kit, 57
180 library kit, 58
3000 library kit, 51
500 library kit, 52
700 library kit, 57
8500 library kit, 46
9310 library kit, 53
9741e drive cabinet kit, 53
C
A
accessory racks, 48
adapter, serial cable, 2
adding
to a cluster, 28, 65
users, 22
administrator guide, download site, 1
agents
assign, 23
configure, 24
enroll, 23
altitude, 6
amber LED, 33
APC switch, 50
assign agents, 23
auditors, 22
autonomous unlocking preference, 19
B
backup, 25
core security, 26
operators, 22
restore from, 68
before beginning, 2
316194902 • Revision: B
cabinet
9741e, 53
specifications, 7
cable adapter, 2
call center, 64, 74
checklists
configuration, 21
enrollment, 35
preparation, 1
tape drives, 34
cluster
adding to, 28, 65
how to create, 17
compliance officers, 22
conceptual drawings, 1
configuration checklist, 21
configure agents, 24
connectors, 5
core security backup, 26
create a cluster, 17
creating users, 22
cross-over cable, 2
cryptography, 1
Customer Resource Center (CRC), xvi
customer, satisfaction, 1
customer-initiated maintenance, 64, 74
cycling LEDs, 33
D
depth, 6
DHCP, 60
dimensions, KMA, 6
disable encryption, 71
85
dispatch, 64, 74
drawings, 1
drive data, 36
drive file structure, 38
drive tray example, 49
dump, system, 69
Dynamic Host Configuration Protocol, 60
E
ELOM
change password, 27
commands, 9
how to start, 9
IP address, 8
log in, 10
network connection, 8, 9
power control, 11
QuickStart, 13
redirection, 12
remote control, 12
start, 9
embedded Lights Out Manager See ELOM
encryption, 1
encryption LED, 33
enroll agents, 23
enrollment
checklist, 35
work sheet, 78
environmental parameters, 6
error-free installation, 1
Ethernet cable, 2
Ethernet connectors, 5
external rack installation, 50
F
Fault LED, 5
Federal Information Processing Standards
Publications, xiv
field replaceable units, 62
firmware upgrade, 67
front panel, 5
G
graphical user interface, 8
green LED, 33
GUI
installation, 21
86
KMA: Installation and Service Manual • May 2008
LAN connection, 8
guides, xiv
H
hardware kits, 45
heat output, 6
height, 6
help center, 64, 74
HyperTerminal session, 8
I
indicators, tape drive, 33
initial configuration work sheet, 4, 36, 75
initial settings, 18
installation planning checklist, 1
IP addresses
ELOM, 8
initial set-up, 15
KMS Manager, 16
SDP, 60
tape drives, 39
J
Java, supported versions, 9
join a cluster, 17
K
key groups, 23
Key Management Appliance See KMA
key migration, 81
key policies, 23
key split credentials, how to create, 18
keyboard, 10
keyboard entry, 15
KMA
autonomous unlocking, 19
backups, 25
clusters, how to create/join, 17
dimensions, 6
front view, 5
initial backup, 25
initial configuration settings, 4
installation tips, 14
IP address range, 15
key split credentials, 18
QuickStart, 13
rear view, 5
Revision: B • 316194902
Security Officer set-up, 19
specifications, 6
system upgrade, 67
time settings, 20
tips, 14
KMS Manager
installation, 21
network connection, 8
L
L1400 library, 57
L180 library, 58
L700 library, 57
LAN connections, 8
LED for encryption, 33
LEDs, 5, 33
LEDs, tape drive status, 33
license, tape drives, 39
lights, 33
local area network connections, 8
L-Series library, 56
M
management network
LAN Connection, 8
manual organization, xiii
manuals, xiv
mass storage, 6
memory, 6
migrate keys, 81
monitor, 10
monitor connector, 5
mounting options, 6
N
null modem cable, 2
O
on/off switch
encryption, 71
on/off switch, power, 5
operators, 22
organization of this manual, xiii
P
part numbers, tools, 2
Partner Agreement, xvi
Partners Web site, xvi
parts, 62
PC Key request form, 36
PCIe, 6
PCI-Express slots, 6
permanently encrypting, 71
planning for encryption, 1
popup blockers, disable, 10
PowderHorn library, 53
power
button, 5
ELOM, 11
LED, 5
supply, 6
power redundancy
SL8500, 46
switch, 50
preparation checklist, 1
processor, 6
programs
embedded Lights Out Manager, 8
QuickStart, 13
wizard, 15
publications, xiv
Q
QuickStart, 13
quorum, 18
R
rack installation, 50
rack space, L-Series libraries, 56
rack specifications, 7
rackmounted tape drives, 59
rear panel, 5
red LED, 33
redirection, ELOM, 12
related publications, documents, xiv
relative humidity, 6
remote control, ELOM, 12
required tools, 2
resellers, xvi
restore
a cluster, 17
from backup, 68
panel views, 5
316194902 • Revision: B
Index
87
S
SATA disk drive, 6
SCA6000, 6
SDP, 60
Security Officer, initial settings, 19
security officers, 22
serial cable, 2
serial port connector, 5
service, 64, 74
Service Delivery Platform, 60
service network
LAN connection, 8
SL3000 library, 51
SL500 library, 52
SL8500 library, 46
cabling example, 47
power redundancy, 46
racks, 48
software upgrade, 67
spares, 62
specifications
KMA, 6
rack, 7
split threshold, 18
steps for partitioning, 76
StorageTek
Customer Resource Center (CRC), xvi
Partners site, xvi
Web site, xvi
subnet mask, SDP, 15
Sun
Customer Resource Center (CRC), xvi
Partners Web site, xvi
Web site, xvi
Sun Crypto Accelerator 6000, 6
Sun Fire X2100 Specifications, 6
support, 64, 74
switch encryption off/on, 71
system assurance, 1
system dump, 69
system upgrade, 67
drive tray, 49
LED status, 33
license, 39
rackmount, 59
work sheet, 77
tasks for partitioning, 76
technical support, 64, 74
temperature, 6
tokens, 72
tools, 2
trace dump, 69
U
upgrade, firmware, 67
USB connectors, 5
use roles work sheet, 76
user IDs, 22
V
VGA connector, 5
Virtual Operator Panel See VOP
VOP
enroll tape drives, 41
license tape drives, 40
switch off encryption, 71
tokens, 72
W
Web browser, supported versions, 9
Web sites, xvi
weight, 6
width, 6
wizard, QuickStart program, 15
work sheets, 73
enrollment, 78
initial configuration, 36, 75
preparation, 1
user roles, 76
works sheets
tape drives, 77
T
T10000 rack kit, 59
tape drives
9741e cabinet, 53
checklist, 34
default IP address, 39
88
KMA: Installation and Service Manual • May 2008
Revision: B • 316194902
Sun Microsystems, Inc. 4150 Network Circle, Santa Clara, CA 95054 USA Phone 1-650-960-1300 or 1-800-555-9SUN Web sun.com
ARGENTINA: 5411-4317-5636 • AUSTRALIA: 1-800-550-786 • AUSTRIA: 43-1-601-26-0 • BALKANS: 301-6188-111 • BELGIUM: 32 2-704 89 83 • BRAZIL: 55-11-51872100 • BRUNEI: 65-216-8333 • CANADA: 1-800-422-8020 (GENERAL); 416-964-2001 (LEARNING MANAGEMENT SYSTEM SALES,TORONTO) • CHILE: 562-372-4500 • COLOMBIA: 571-629-2323
CZECH REPUBLIC: 420 2 33009311 • DENMARK: 45 4556 5040 • EGYPT: 00 202 570 9442 • FINLAND: 358-9-525-561 • FRANCE: 33-1-41-33-17-17 • GERMANY: 49-89-460-08-2788 • GREECE: 30-01-6188101 • HONG KONG: 852-2877-7077 • HUNGARY: 361-202-4415 • INDIA: 91-80-229-8989 • INDONESIA: 65-216-8333 • IRELAND: 353-1-668-4377
ISRAEL: 972-9-9710500 • ITALY: 39-02-9259511 • JAPAN: 81-3-5779-1820 • KOREA: 82-2-3453-6602 • MALAYSIA: 603-2116-1887 • MIDDLE EAST: 00 9714 3366333 • MEXICO: 525-261-0344 • NETHERLANDS: 31-33-4515200 • NEW ZEALAND: 0800-786-338 • NORTH WEST AFRICA: 00 9714 3366333 • NORWAY: FROM NORWAY: 47-22023950, TO NORWAY:
47-23369650 • PAKISTAN: 00-9714-3366333 • PEOPLE'S REPUBLIC OF CHINA: 8610-6803-5588 • PHILIPPINES: 632-885-7867 • POLAND: 48-22-8747848 • PORTUGAL: 351-21-413-4000 • RUSSIA: 7-095-935-8411 • SAUDI ARABIA: 00 9714 3366333 • SINGAPORE: 65-216-8300 • SOUTH AFRICA: 27-11-256-6300 • SPAIN: 34-902-210-412 • SRI LANKA:
65-2168333 • SWEDEN: 46-8-631 22 00 • SWITZERLAND: 41-1-908-90-50 (GERMAN) 41-22-999-0444 (FRENCH) • TAIWAN: 886-2-25185735 • THAILAND: 662-344-6855 • TURKEY: 90 212 335 22 00 • UNITED KINGDOM: 44-1276-416-520 • UNITED STATES: 1-800-422-8020 • VENEZUELA: 582-905-3800 • VIETNAM: 65-216-8333 • WORLDWIDE
HEADQUARTERS: 1-650-960-1300
NETWORK IS THE COMPUTER
SUN™ THE
United States and other countries.
©2006 Sun Microsystems, Inc. All rights reserved. Sun, Sun Microsystems, and the Sun logo are trademarks or registered trademarks of Sun Microsystems, Inc. in the