1
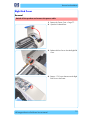
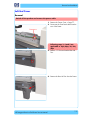
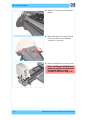
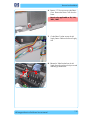
Removal and Installation
Center Cover
Removal
Switch off the product and remove the power cable.
1. Remove the Top Cover ⇒ Page 7-5.
2. Release the Ink Supply Tubes from the
Raceway Holder. Remove the Raceway
Holder from the Printer.
3. Release the Tubes from the retaining clips in
the Center Cover.
4. Remove 4 T-10 screws that secure the
Center Cover to the Printer.
HP Designjet Ultra Low End Printer Service Manual
7-7
Removal and Installation
5. Remove 2 T-10 screws that secure the
Center Cover from the rear.
Step 5 not applicable to 10ps,20ps,
30, 30n, 50ps
6. Open the Printhead Door.
7. Remove the Center Cover from the Printer.
7-8
HP Designjet Ultra Low End Printer Service Manual
Removal and Installation
Right End Cover
Removal
Switch off the product and remove the power cable.
1. Remove the Center Cover ⇒ Page 7-7.
2. Open the Printhead Door.
3. Release the Door Sensor from the Right End
Cover.
4. Remove 1 T-10 screw that secures the Right
End Cover to the Printer.
HP Designjet Ultra Low End Printer Service Manual
7-9
Removal and Installation
5. Remove 1 T-10 screw from the Right Side
Bracket.
Step 5 not applicable to 10ps,20ps,
30,30n,50ps
6. Release the clips that secure the Right End
Cover to the Printer (use a flat-blade
screwdriver if necessary).
7. Remove the Right End Cover from the Printer.
7-10
HP Designjet Ultra Low End Printer Service Manual
Removal and Installation
Left End Cover
Removal
Switch off the product and remove the power cable.
1. Remove the Center Cover ⇒ Page 7-7.
2. Disconnect the Front Panel cable from the
rear of the Printer.
Disconnect
Following steps 3, 4 and 5 not
applicable to 10ps,20ps, 30, 30n,
50ps
3. Remove 1 T-10 screw from the Rear Left
Trim.
4. Remove the Rear Left Trim from the Printer.
HP Designjet Ultra Low End Printer Service Manual
7-11
Removal and Installation
5. Remove 1 T-10 screw from the Left Side
Bracket.
6. Release the clips that secure the Left End
Cover to the Printer (use a flat-blade
screwdriver if necessary).
7. Remove the Left End Cover from the Printer.
Before installing the Left End Cover,
make sure you first check that the
Front Panel Cable is routed
correctly as shown on Page 7-27.
7-12
HP Designjet Ultra Low End Printer Service Manual
Removal and Installation
Ink Supply Station Cover (Applicability: 70, 100, 100plus,
110plus)
Removal
Switch off the product and remove the power cable.
1. Remove the Center Cover ⇒ Page 7-7.
2. Remove the Right End Cover ⇒ Page 7-9.
3. Release the Ink Tubs from the clip on the
ISS Cover.
4. Remove 2 screws that secure the ISS Cover
to the Ink Supply Station.
5. Remove the ISS Cover from the Printer.
HP Designjet Ultra Low End Printer Service Manual
7-13
Removal and Installation
Ink Supply Station
Removal
Switch off the product and remove the power cable.
1. Remove the Center Cover ⇒ Page 7-7.
2. Remove the Right End Cover ⇒ Page 7-9.
Following step only applicable to
Designjet 70, 100, 100+, 110+
3. Remove the ISS Cover ⇒ Page 7-13.
Following step not applicable to
Designjet 10ps, 20ps, 30, 30n,
50ps
4. Release the Plastic Cover protecting the
Electronics Module.
5. Disconnect the Ink Supply Station Cable
from the Main PCA.
7-14
HP Designjet Ultra Low End Printer Service Manual
Removal and Installation
6. Remove 1 T-10 screw securing the Plastic
Cover. Remove the Plastic Cover from the
Printer.
Step 6 only applicable to 70, 100,
100+, 100+
7. Cut the Plastic Tie that secures the Ink
Supply Station Cable to the Power Supply
Unit.
8. Release the Tubes Bracket from the Ink
Supply Station by pushing the clips inwards
and lifting up the Bracket.
1
2
HP Designjet Ultra Low End Printer Service Manual
7-15
Removal and Installation
9. Remove 2 T-10 screws that secure the Ink
Supply Station.
7-16
HP Designjet Ultra Low End Printer Service Manual
Removal and Installation
10. Move the Ink Supply Station to the left to
release it from the securing clips.
2
1
Securing
Clips
11. Remove the Ink Supply Station from the
Printer.
HP Designjet Ultra Low End Printer Service Manual
7-17