1
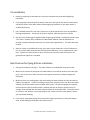
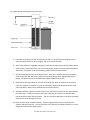
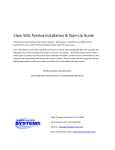
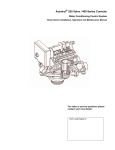
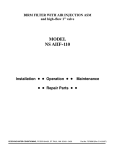
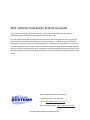
WS1 Softener Installation & Start‐Up Guide Thank you for purchasing a Clean Water System! With proper installation and a little routine maintenance your system will be providing soft water for many years. Your new system comes with a printed Clack Service manual, which along with this start‐up guide will help guide you in the installation and start‐up of your new system. The Clack service manual covers other types of systems as well such as backwashing filters, so there may be information in your manual that does not pertain to your system. You can also find a summary programming card located inside the front cover of the Clack WS1 control valve. Review this card for basic programming steps. Please review this start‐up guide entirely before beginning to install your system and follow the steps outlined for best results. 2806‐C Soquel Ave Santa Cruz CA 95062 For assistance call: 1‐831‐462‐8500 Email us: [email protected] More information online: www.cleanwaterstore.com Clack WS1 Water Softener Installation Guide Pre‐Installation 1. Review your packing list and make sure you have received all the parts before beginning installation. 2. If you are going to be turning off the water to the house and you have an electric water heater, shut off the power to the water heater before beginning installation in case water heater is accidentially drained. 3. Pick a suitable location for your filter system on a dry level spot where it won’t be exposed to freezing temperatures. A minimum of 20 PSI is required. Maximum pressure is 90 PSI. 4. Get all of your plumbing parts together before beginning installation. Installation typically takes 3 to 5 hours. However after installation the WS1 Water Softener must be allowed to run through a complete backwash and rinse cycle (also called ‘regeneration’). This takes about 90 minutes. 5. After the system is installed and running, your water may be discolored, or full of sediment or rust, if you have older piping that has been exposed to sediment, iron or manganese for some time. Typically this clears up over a day or two, but can persist for weeks if the pipe is old galvanized iron pipe that is corroded. Best Practices for Piping & Drain Installation 1. See typical installation (see Fig 1). The water softener is installed after the pressure tank. 2. Make sure to connect the inlet pipe to the WS1 Softener inlet and the outlet to the outlet (see Fig 2). You can see the in and out arrows on the bypass valve which is where the pipes are connected. 3. Make sure there is a working gate or ball valve before the water softener and also one after as shown in the diagram. If you are installing multiple filter systems (such as iron filter then water softener) you do not need a valve in between each system. The pressure gauges are optional and not necessary but a hose bib (which is a faucet that you can attach a garden hose to) is strongly recommended after the water softener before the second ball valve. This makes it easy to rinse your new softener on start‐up and gives you a place to test the water before it enters your household plumbing. 4. If you will be using copper piping, do not sweat the copper pipe directly to the plastic bypass valve. Avoid heating up the bypass valve with the torch. Clack WS1 Water Softener Installation Guide Fig 1 Typical installation for well water systems 5. You do not need unions to install your water softener. If you need to remove it, the Clack WS1 softener has union couplings on the bypass valve that make it easy to put the water softener on by‐pass and remove the filter system from the piping. 6. The drain line tubing (not supplied) is connected to a drain from the drain outlet using flexible ½” ID tubing. Note that the drain can run up above the WS1 softener and into a drain, it does not have to drain down, as the filter backwashes under line pressure from your well pump. Most plumbing codes require an air‐gap connection, so that if your sewer or septic tank backs up, it cannot cross connect with the drain tubing. 7. Usually you do not want to water the garden or irrigate your landscaping with softened water. This will require more salt than usual to be used and in some cases the sodium can build‐up in the soil causing some problems to sensitive plants. It is often not difficult to run hard water (not‐softened lines) to the irrigation thereby bypassing the water softener. Clack WS1 Water Softener Installation Guide 8. If you do want to irrigate with soft water we recommend the use of potassium chloride salt (widely available) instead of regular sodium chloride (water softener rock salt). Any type of salt though can be used in the water softener. Fig 2 Clack WS1 Softener Control Adding Softener Media & Installation Instructions 1. Unscrew by hand the Clack WS1 control valve from top of the tanks if it was shipped screwed on. Place distributor tubes in tank if not already inside tanks. If not already done, make sure blue cap is on top of distributor tube, or wrap the top of distributor tube with electrical or duct tape. The idea is you do not want gravel or resin to go down the distributor tube when you are adding media. 2. Add filter gravel supplied first, using the funnel sent with the water softener. 3. Next add softener resin media. Tank will be approximately 2/3 to the 3/4 full. 4. Remove cap or tape from top of distributor tube. Be careful not to pull up distributor tube when removing cap or tape. Clack WS1 Water Softener Installation Guide Fig 3 Filter diagram showing cut‐away of media 5. If possible at this point, fill tank completely with water. This will allow the softener resin to settle and eliminate the need of “purging” the air out of the tank later. 6. Add a small amount of vegetable cooking oil to the tank threads and screw on the WS1 control valve carefully. Alternatively you can use silicone grease, but do not use pipe‐joint compound, Teflon tape, or Vaseline or other petroleum greases to lubricate tank threads. 7. See how the piping connects to the bypass valve. There are in and out arrows on the bypass valve for the inlet and outlet pipe. Install inlet and outlet piping, drain tubing and brine line tubing. The brine line tube is included and is shipped inside the brine tank. 8. Note that the over‐flow fitting on the side of the brine tank does not need to be connected, unless the softener is installed in a closet or somewhere where overflowing salt water could cause a problem. Water rarely overflows the brine tank however. 9. Add approximately 5 gallons of water to brine tank, then fill brine tank with salt, about 300 lbs, or 6 50‐lb bags. It is OK to use any kind of water softening salt; however we find that extra coarse salt works better than the pellets. You do not have to add water to the brine tank again after this first time during the start‐up. 10. Close the valve after the water softener. Connect a garden hose to the hose bib after the softener and open hose bib. Turn on the water to the softener and allow the water to run out the garden hose until the water is clear. Clack WS1 Water Softener Installation Guide 11. See the Clack WS1 Service Manual for instructions on how to program and set softener. Your softener is already programmed for the size tank you have, but you do need to set the current time of day and program the water softener with your water hardness. When programming add 2 or 3 grains of hardness to your water hardness as a safety measure if you have iron in the water. 12. Start a manual backwash by pressing and holding the REGEN button for 5 seconds. After softener has been regenerating for 20 minutes, look inside the brine tank, and you should see that is has sucked out the brine. At the end of the regeneration (90 minutes) check to make sure that the softener has added water to the bottom of the brine tank to make brine for the next regeneration cycle. Maintaining Your WS1 Softener System WS1 Softeners require little maintenance. The primary task is to add salt to the brine tank a couple of times a year. You can fill the salt tank to the top if wish and then wait until the brine tank is near empty before adding salt again. Or you can add salt whenever you notice that the salt is low enough to add more bags. If you fail to add to salt the water will turn hard again, and you will notice that there is water in the bottom of the brine tank. This is normal, and you can add salt and press the manual regeneration REGEN button for several seconds to regenerate the softener manually and have soft water again. Your softener can use any kind of salt, including extra coarse softening salt, or pellets. It also works with potassium chloride, sometimes sold as K‐Life or Potassium Salt. Clack WS1 Water Softener Installation Guide