1
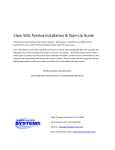
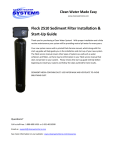
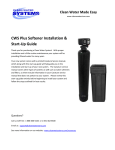
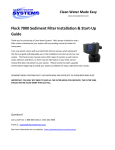
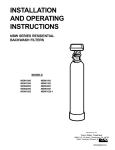
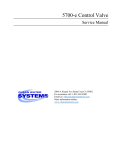
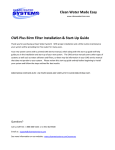
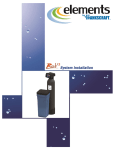
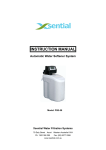
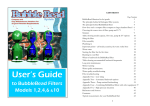
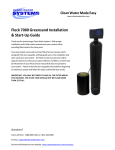
 WS1 Neutralizer Installation & Start‐Up Guide For Neutralizers with Vortech Distributor Screen Thank you for purchasing a Clean Water System! With proper installation and a little routine maintenance your system will be providing treated water for many years. Your new system comes with a printed Clack Service manual, which along with this start‐up guide will help guide you in the installation and start‐up of your new system. The Clack service manual covers other types of systems as well such as water softeners and filters, so there may be information in your Clack service manual that does not pertain to your system. Please review this start‐up guide entirely before beginning to install your system and follow the steps outlined for best results. CALCITE MEDIA CONTAINS DUST. USE PAPER MASK AND VENTILATE TO AVOID BREATHING DUST 2806‐C Soquel Ave Santa Cruz CA 95062 For assistance call: 1‐831‐462‐8500 Email us: [email protected] More information online: www.cleanwaterstore.com Packing List Quantity 1 WS1 Clack Backwash Control Valve + Pipe connector kit (either 1”or ¾”) Quantity 1 Neutralizer filter tank with Vortech distributor tube installed & Media funnel PLUS: Calcite only types – use all the media supplied: 1.0 cubic foot size: Qty 2 50‐lb bags of calcite 1.5 cubic foot size: Qty 3 50‐lb bags of calcite 2.5 cubic foot size: Qty 5 50‐lb bags of calcite Neutralizer Blend 1.0 Cubic Foot: use 90lbs Calcite and 10 lbs Corosex Calcite 100 lbs (2 50‐lb boxes) 1.1 cu ft Corosex 10 lbs (1 10 lb boxes) .13 cu ft Don’t add all the media you receive: You do not want the tank to more than 2/3rds full, so generally we recommend you add 90 lbs of calcite (1.8 bags) and all 10 lbs of Corosex (or FloMag). Neutralizer Blend 1.5 Cubic Foot: use 125 lbs Calcite and 15 lbs Corosex Calcite 150 lbs (3 50‐lb boxes) 1.65 cu ft Corosex 20 lbs (2 10 lb boxes) .26 cu ft Don’t add all the media you receive: You do not want the tank to more than 2/3rds full, so generally we recommend you add 2‐1/2 boxes of Calcite (125 lbs) and 1‐1/2 boxes of Corosex (15 lbs). Neutralizer Blend 2.5 Cubic Foot: use 200 lbs Calcite and 20 lbs Corosex Calcite 200 lbs (4 50‐lb boxes) 2.2 cu ft Corosex 20 lbs (2 10 lb boxes) .26 cu ft Add all the media you receive and you will have: 2.2 cu ft Calcite + 0.26 cu ft Corosex for a total of 2.46 cubic foot. Page 2 Neutralizer WS1 Start‐Up Guide Clean Water Systems Rev 103009 Pre‐Installation 1. Review your packing list and make sure you have received all the parts before beginning installation. 2. If you are going to be turning off the water to the house and you have an electric water heater, shut off the power to the water heater before beginning installation in case water heater is accidentially drained. 3. Pick a suitable location for your filter system on a dry level spot where it won’t be exposed to freezing temperatures. A minimum of 20 PSI is required. Maximum pressure is 90 PSI. 4. Get all of your plumbing parts together before beginning installation. Installation typically takes 3 to 5 hours. However after installation the Calcite Neutralizer Filter must be allowed to run through two complete backwash and rinse cycles. 5. After the system is installed and running, your water may be discolored, or full of sediment or rust, particularly if the piping is older or corroded. Typically this clears up over a day or two. Best Practices for Piping & Drain Installation 1. See typical installation (see Fig 2). The neutralizer is installed after pressure tank. 2. Make sure to follow to connect the in pipe to the Clack WS1 inlet and the outlet to the outlet (see Fig 2). As you face the Clack WS1 control from the front, the water enters on the right and exits on the left. The inlet and outlet fittings are marked with arrows as well. 3. Make sure there is a working gate or ball valve before the Clack WS1 Neutralizer filter and also one after as shown in the diagram Fig 2. The pressure gauges are optional and perhaps not necessary but a hose bib (which is a faucet that you can attach a garden hose to) is strongly recommended after the neutralizer filter before the second ball valve. This makes it easy to rinse your new neutralizer filter on start‐up and gives you a place to test the water before it enters your household plumbing. It also makes it much easier to perform the maintenance which involves adding more calcite media in the future, which must be done once a year . 4. If you will be using copper piping, do not sweat the copper pipe directly on to the Clack WS1 control valve. Avoid heating the Clack WS1 control valve plastic. 5. If have copper pipe before the calcite neutralizer and it is too difficult to change it, you may still experience some copper staining of fixtures and have a copper residual in the water, We recommend PEX or PVC pipe up to the neutralizer and then copper after it, if you have copper plumbing. Page 3 Neutralizer WS1 Start‐Up Guide Clean Water Systems Rev 103009 6. You do not need unions to install your Clack WS1 control. If you need to remove it, the Clack WS1 has quick‐release couplings that make it easy to put the calcite neutralizer filter on by‐pass and remove the filter system from the piping. 7. The drain line tubing (not supplied) is connected to a drain from the drain outlet using flexible ½” ID tubing. Note that the drain can run up above the Clack WS1 control and into a drain, it does not have to drain down, as the filter backwashes under line pressure from your well pump. Follow local plumbing codes. How Your Neutralizer Works See Fig 1. In your neutralizer the water enters the top of the tank and flows down through the media from the top of the media to the bottom distributor screen and up the distributor tube and out to the house. The neutralizer removes sediment and can be backwashed, which cleans and re‐classifies the calcite, preventing channeling. During backwash, the water flow is reversed and water flows down the distributor tube and up through the media, lifting and expanding the calcite media. During the backwash the calcite is cleaned by the action of the water flowing through it. Figure 1 ‐ Calcite neutralizer tank diagram Page 4 Neutralizer WS1 Start‐Up Guide Clean Water Systems Rev 103009 Figure 2 ‐ Typical Neutralizer Clack WS1 piping installation with ball valve and hose bib after the filter Page 5 Neutralizer WS1 Start‐Up Guide Clean Water Systems Rev 103009 Assembly and Installation Instructions 1. With control valve not attached to the top of the tank, make sure blue cap is on top of distributor tube, or wrap the top of distributor tube with electrical or duct tape. You do not want calcite or corosex (if you are using a blend of media) to go down the distributor tube. 2. Next add calcite or calcite‐blend media. If you are using a blend of Calcite and Corosex (“Flo‐
Mag” is same material) make sure to read page 12 for more information on using blends. 3. Remove cap or tape from top of distributor tube. 4. If possible at this point, fill tank completely with water. This will allow the neutralizer media to settle and eliminate the need of “purging” the air out of the tank later. 5. Add a small amount of silicone grease or vegetable cooking oil to the tank threads and screw on control valve carefully. Do not use pipe‐joint compound, Teflon tape, Vaseline or other petroleum grease to lubricate threads. Figure 3 Neutralizer WS1 Control Valve Page 6 Neutralizer WS1 Start‐Up Guide Clean Water Systems Rev 103009 6. Lubricate the by‐pass valve o‐rings with some vegetable oil or silicone grease and connect the bypass assembly to the Clack WS1 control by sliding the bypass valve firmly into the body of the Clack WS1. Figure 4 ‐ Installation Fittings ¾” is slip for gluing PVC fittings; 1” is threaded NPT 7. See Figure 4. If the O‐ring (3) and Split Ring (2) are not inserted correctly, the Nut (1) will not tighten. If the Nut doesn’t tighten up and is still loose when you go to connect the installation fitting assembly, then you know the O‐ring and Split Ring are not inserted correctly. 8. See Figure 5 on next page. If red valve handles are in‐line with pipe they are in service, not bypass. Move both valves to the BYPASS OPERATION position if not already in bypass. 9. Now install your water pipes to the Clack WS1 bypass end connectors. Make sure inlet is installed to the 'In" pipe connector on the bypass valve and outlet is on the “Out” connector. 10. Connect some flexible tubing from the drain connection on the Clack WS1 control valve to a suitable drain such as a septic tank or drain to a sewer. It is OK to run the drain line up and over the Clack WS1 Neutralizer filter up to 4 feet above the top of the tank. If the drain line will be more than 20 feet, use larger diameter tubing such as ¾” or 1”. Note that it is desirable to be able to run the drain line into a bucket in order to test the backwash flow rate in the future. Page 7 Neutralizer WS1 Start‐Up Guide Clean Water Systems Rev 103009 Make sure to use Teflon tap or Teflon pipe joint compound on the threads to attach the barbed fitting to the drain fitting on the control valve. The drain tubing is then firmly clamped to the barbed fitting with a hose clamp (not included with shipment) to prevent leaks. Figure 5 Page 8 Neutralizer WS1 Start‐Up Guide Clean Water Systems Rev 103009 11. Plug in your Clack WS1 control valve to an outlet. 12. Set current time of day: Press NEXT button until of time of day is displayed. Press and hold the Up or Down button until the SET indicator is displayed and the hour flashes. Press the Up or Down button until the correct hour is displayed. Then press the NEXT button. The minutes will flash. Press the Up or Down button until the correct minute is displayed. Press the NEXT button to return to the Display Screens. SIMPLE PROGRAMMING STEPS (Also see Page 10 of the WS1_EE Manual for same instructions with illustrations). Note if your display shows numbers for Draw or Fill, set those to OFF and press NEXT per the directions below, as these are for water softener applications. Step 1: Press NEXT and the Down button simultaneously for 5 seconds and release. Step 2: Select FILTERING if not already selected; Press NEXT Step 3: Adjust the length of backwash to 10 (for 10 minutes); Press NEXT Step 4: The regenerant draw should be set to OFF; if not, use down arrow to adjust down until it is OFF. Press NEXT. Step 5: The 2nd backwash is typically set to OFF. if not, use down arrow to adjust down until it is OFF. Press NEXT. Step 6: Adjust the length of rinse to 6 (for 6 minutes); Press NEXT Step 7: The Fill cycle should be set to OFF. Press NEXT. Now the display will go back to the time of the day. Step 8: Now press Next and Up button for five seconds and release. Step 9: Adjust days to 7 by using Up or Down buttons. If your water has a lot of iron or sediment in it, set to 3 or 4 days. Press NEXT. Step 7: Use Up or Down button to change regeneration backwash time. Default is 2:00 am. If any water is used during the time the system is backwashing, the untreated water will flow into the house and the water will not be interrupted. Press NEXT to exit programming. That is it! You are done programming. 13. Now you are ready to turn on the water. Turn on the water and leave the neutralizer on bypass and check for leaks. Leave the ball valve after the Neutralizer filter closed, so water is still off to the house, but connect a garden hose and open up the hose bib after the Neutralizer filter and allow the water to run for several minutes. This important step clears out any foreign material that may be in the pipes from the piping installation. If you do not have a valve installed after the Neutralizer filter and you do not have a hose bib, you will need to turn the water on inside Page 9 Neutralizer WS1 Start‐Up Guide Clean Water Systems Rev 103009 the house to let the water run. Use a bathtub or laundry sink or other fixture that does not have an aerator screen. 14. Press the REGEN button for several seconds which will allow the WS1 control to go into the backwash position, ready for backwashing. 15. Now you can slowly turn the bypass valve to the service position. First open the Inlet Side of the bypass valve. Second slowly open the Outlet Side of the bypass until it is in the full service position. 16. There should be no calcite media coming out of the drain line, but the water will be milky or dirty looking. At this point the Neutralizer will be in a backwash mode, which is the first of two cycles it goes through during backwash (also called regeneration”). The backwash takes 10 minutes. The next cycle is the rinse which takes 6 minutes. 17. After the backwash and rinse cycles are complete, repeat the process by pressing the REGEN button again. 18. Note it is normal for some small amount of calcite dust and fines to come out during the backwash, although you do not want to see a large amount of media coming out, which would mean you have very high water pressure, or the drain flow for the Clack WS1 is missing. 19. If possible verify that the backwash flow is between 5 and 6 gallons per minute, which is the recommended backwash flow rate for 1.0 and 1.5 cubic foot models. If you have a 2.5 cubic foot neutralizer it should be backwashing at 10 gallons per minute. You can easily run the drain hose to a bucket and using a watch verify the flow rate in gallons per minute. An adequate backwash is critical to properly clean the calcite media and prevent it from cementing together. 20. Refer to your Clack WS1 service manual for more information about how your control valve is programmed if desired. Maintaining Your WS1 Neutralizer Filter System 1. Check the pH before after the neutralizer. You want to have a pH of at least 7.0 after the neutralizer filter. 2. When the pH drops below 7 check the depth of the calcite media by shining a bright light through the tank. Your media should be about 2/3rds full. When the media level drops to ½ full, it is time to add more calcite or calcite blend media if you are using a blend. 3. For most residential applications add calcite media once or twice a year. Do not fill more than 3/4ths full, about 2/3rds full is best. Page 10 Neutralizer WS1 Start‐Up Guide Clean Water Systems Rev 103009 How to Add Calcite Media to the Neutralizer Filter CALCITE MEDIA CONTAINS DUST. USE PAPER MASK OR VENTILATE TO AVOID BREATHING DUST. 1. Begin by putting neutralizer filter on bypass, or turning the water pressure off before the neutralizer. 2. Initiate a manual backwash cycle. Since it is on bypass, this will relieve the pressure inside the control valve so you safely unscrew the Media Fill Plug located on top of the neutralizer tank. 3. Unplug the control valve cord from the wall outlet. 4. Unscrew the media fill plug with a channel locks or pliers and using a tube or hose, siphon 2 to 3 gallons of water out of the filter tank. 5. If you don't siphon water out, when you add filter media, water will flow out the fill plug hole and flow onto the floor. If water on the floor is OK then you do not have to siphon water out first before pouring calcite media into top fill plug hole. 6. Add neutralizer filter media until the tank is 2/3rds full. Do not over‐fill; be sure to leave at least 12" of free space above media to allow room for the media to expand during a backwash. 7. Put the top fill plug back in. You can lubricate the threads with some vegetable oil or silicone grease, but do not use Teflon tape or plumbing grease. 8. Plug back in the control valve and press the REGEN button so the Clack WS1 control is in a backwash cycle. 9. Slowly turn on the bypass valve slowly at first back to the service position (if it is in "service" this means it is in the proper position for filtering and neutralizing. 10. Allow the system to go through a complete backwash and rinse cycle. Repeat backwash cycle by starting another manual cycle, so the neutralizer is thoroughly backwashed and rinsed before putting it back into service. Page 11 Neutralizer WS1 Start‐Up Guide Clean Water Systems Rev 103009 When to Use Calcite Blends If the water pH is less than 6.0, calcite alone may not be enough to bring the pH up to the desired pH range of 7.0 to 7.8. In this case a blend of Calcite and Corosex should be used. Calcite is a calcium media consisting of calcium carbonate and raises the pH slowly. Calcite will not raise the pH much over 7.2. Corosex is a natural mineral media consisting of magnesium oxide. It reacts much faster and raises the pH must higher than Calcite alone. Corosex is almost never used alone as it will raise the pH too high and in some cases will over‐correct and create a highly basic (high pH) condition. It can also cement together like concrete in the neutralizer tank if you add too much and there is not sufficient backwash. So for most residential well applications a 90% calcite and 10% Corosex is best. However, in some cases a 80%/20% mix or even a 70%/30% is used. It is always better to start with a 90%/10% mix at first as this solves the majority of low pH problems in the range of 4.5 to 5.9. For a pH of 6.0 to 6.9 use calcite alone. For pH of 4.5 to 5.9 use a blend of Calcite and Corosex usually 90% calcite and 10% Corosex. How to Mix and Use Calcite Blends The Calcite and Corosex media is sold and shipped in separate boxes. It does not have to be completed blended together to use as it will mix during the backwash and rinse cycles. However, when you are adding the Calcite and Corosex it is better to blend it lightly in a 5 gallon bucket and then add it. Or you can add some calcite and then add some Corosex as you are filling the tank. Calcite is shipped in 50 lb boxes and one box of Calcite is equal to 0.55 cu ft. Corosex (or “FloMag”) is shipped in 10 lb boxes and 1 box is equal to 0.13 cu ft. 50 lbs of Calcite = 0.55 cubic foot of media 50 lbs of Corosex = 0.66 cubic foot of media Page 12 Neutralizer WS1 Start‐Up Guide Clean Water Systems Rev 103009 Neutralizer Blend 1.0 Cubic Foot: use 90lbs Calcite and 10 lbs Corosex Your new 1.0 Cubic Foot Neutralizer Blend filter includes: Calcite 100 lbs (2 50‐lb boxes) 1.1 cu ft Corosex 10 lbs (1 10 lb boxes) .13 cu ft Don’t add all the media you receive: You do not want the tank to more than 2/3rds full, so generally we recommend you add 90 lbs of calcite (1.8 bags) and all 10 lbs of Corosex (or FloMag). Neutralizer Blend 1.5 Cubic Foot: use 125 lbs Calcite and 10 to 15 lbs Corosex Your new 1.5 Cubic Foot Neutralizer Blend filter includes: Calcite 150 lbs (3 50‐lb boxes) 1.65 cu ft Corosex 20 lbs (2 10 lb boxes) .26 cu ft Don’t add all the media you receive: You do not want the tank to more than 2/3rds full, so generally we recommend you add 2‐1/2 boxes of Calcite (125 lbs) and 1 to 1‐1/2 boxes of Corosex (10 to 15 lbs). For very low pH of less than 5.0 or to have an 80/20 blend you can use 125 lbs of calcite and all 20 lbs of the Corosex. Neutralizer Blend 2.5 Cubic Foot: use 225 lbs Calcite and 20 lbs Corosex Your new 2.5 Cubic Foot Neutralizer Blend filter includes: Calcite 200 lbs (4 50‐lb boxes) 2.2 cu ft Corosex 20 lbs (2 10 lb boxes) .26 cu ft Add all the media you receive and you will have: 2.2 cu ft Calcite + 0.26 cu ft Corosex for a total of 2.46 cubic foot. Page 13 Neutralizer WS1 Start‐Up Guide Clean Water Systems Rev 103009 Troubleshooting the Clack WS1 Neutralizer Filter One problem that may occur is if you do not have enough backwash flow rate to properly clean the Neutralizer filter. You can verify the backwash flow rate by running the drain line into a bucket and timing it when the Clack WS1 is in Cycle 1 or backwash. A 1.0 or 1.5 cubic foot system should have 5 gallons per minute and a 2.5 cubic foot system should have 10 gallons per minute of backwash. If your pH is not as high as you desire then you can always add more Corosex later usually in increments of 10 lbs each at a time. If the pH After the Neutralizer is Not High Enough or Is Too High Note that even though the pH will change in the water after the neutralizer almost instantly when the neutralizer is put into use, please allow one week after the neutralizer has been installed for the most accurate pH test results. This allows the media to settle in and the water in the household pipes to be neutralized. A pH of 7 to 8 range is desired for most applications. The pH kit usually supplied with the neutralizer uses a green reagent, which should turn yellow or orange if the pH is acidic (less than 7.0) and green if the pH is neutral (7 – 7.5) or blue if the pH is 7.5 to 8.5. Note that pH strips may not be accurate. The pH is Too Low For most water that has a pH of 6.0 – 6.9 a calcite media works great, but if the pH is not high enough some Corosex (also sold as Flomag by the same manufacturer) can be added to the tank. To start with, add 5 to 10 lbs on top of the calcite to achieve a higher pH. The pH is Too High If the pH test kit reagent turns blue, this is desirable and not a problem. If you are using a calcite‐
corosex blend media, you might first see the pH at a higher level of 8.0 to 8.5 (and the reagent will turn blue when added to the test tube), and then after a few weeks to a few months it might go down to the 7.0 to 7.5 pH range (reagent will turn green). If your pH test kit reagent turns purple, the pH is over 8.5 and is too high. This can occur if the water is very low in pH (less than 5.5) and/or the water is very soft (low in calcium carbonate). This can be easily corrected by adjusting the neutralizer to backwash every 2 or 3 days for two weeks (see page 9). To lower the pH immediately first backwash the filter two or three times in a row and re‐test the water. If the condition persists, open each of the bypass valves slightly so that untreated water enters and mixes with the household water. Next time you add the media, cut the amount of Corosex used by 50%. Page 14 Neutralizer WS1 Start‐Up Guide Clean Water Systems Rev 103009